Loading...
Loading...
Loading...
Loading...
Loading...
Loading...
Loading...
Loading...
Loading...
Loading...
Loading...
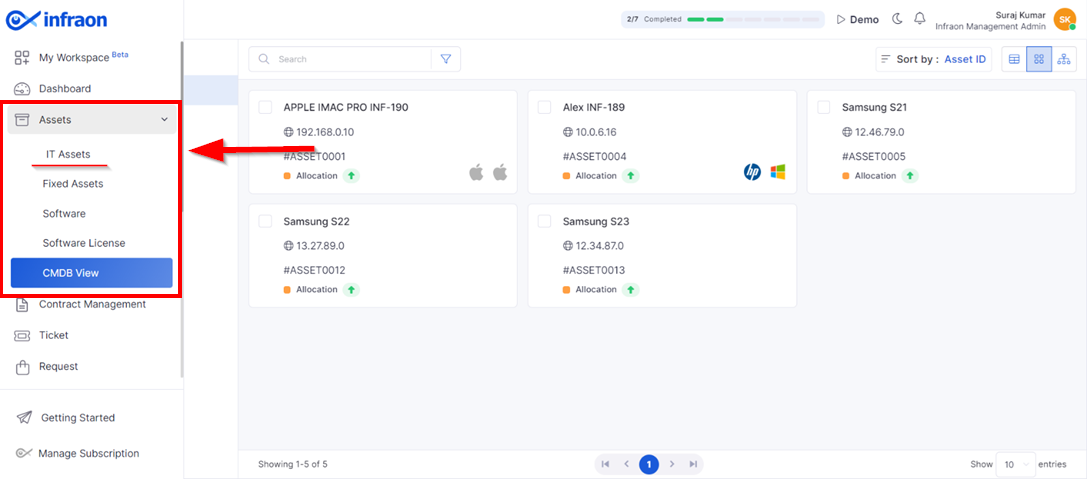
This guide explores the sub-modules of the Infraon Infinity platform's Assets.
IT assets, or IT nodes, are devices with an IP address. These encompass servers, routers, storage devices, transport devices, wireless controllers, and access points.
On the other hand, Fixed assets are tangible devices used in an organization's operations. Examples include scanners, fax machines, printers, modems, hubs, and air conditioners.
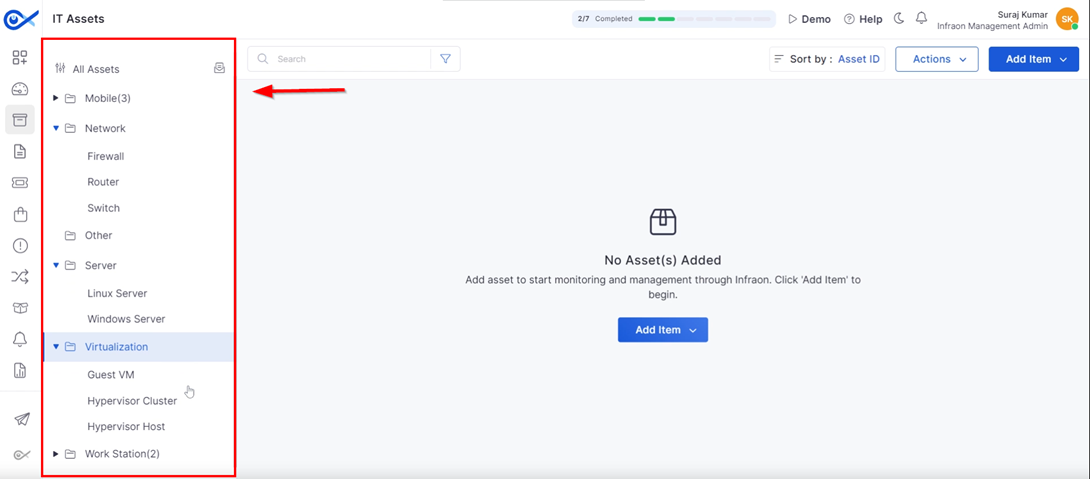
Clicking on the IT asset will display categories on the left panel, sorted by device type. Infraon maintains a comprehensive inventory of each asset. These categories help differentiate and filter assets based on their type.
The system employs a hierarchical structure to categorize IT assets.
Primary categories include:
Network
Other
Server
Virtualization
Workstation
Certain categories contain subcategories for more detailed classification.
Network: firewalls, routers, switches
Server: Linux servers, Windows servers
Virtualization: guest VM, hypervisor cluster, hypervisor host
Workstation: desktops, laptops, Macs
Subcategories inherit properties from their parent categories.
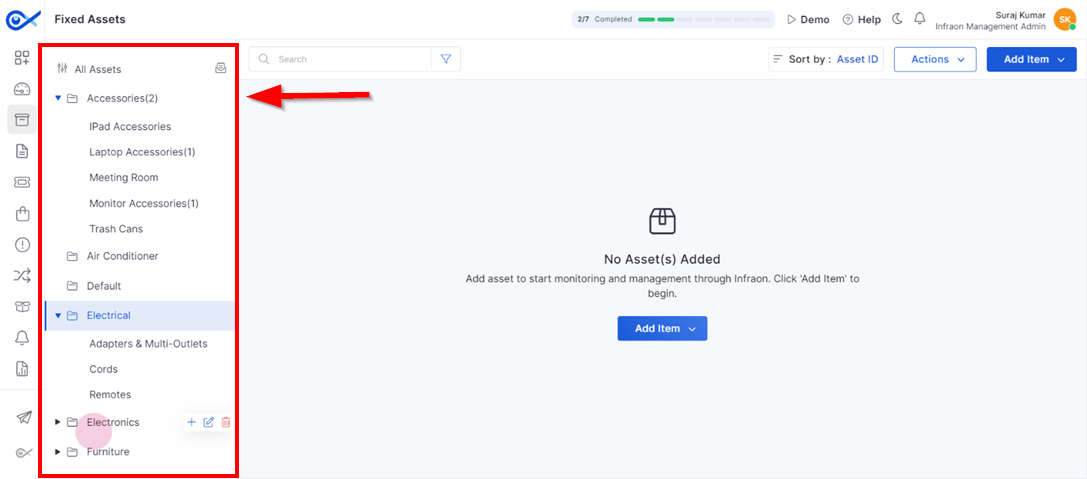
The Fixed Assets section on the left panel features pre-defined categories for organizing and filtering your assets by type. These categories include:
Accessories: iPad accessories, laptop accessories, meeting room equipment, monitor accessories, trash cans
Air Conditioners
Electrical: adapters, multi-outlets, cords, remotes
Electronics: iPads, laptops, phones, projectors, screens
Users can further refine their asset search by exploring the subcategories within each category.
The next guide will demonstrate how to add categories.
Furniture: chairs
Category
Add a Asset
Miscellaneous


Explore a comprehensive guide to the Asset module featuring visual aids and step-by-step instructions. This guide provides detailed directions for specific asset submodules, including IT Assets, Fixed Assets, Software, Software License, CMDB view, and Asset Lifecycle. With clear What you see on the screen and How-to guides with pictorial representations, you can easily navigate the user interface and thoroughly understand the module.
Adding an Asset Manually
Adding an Asset using CSV
Adding an Asset using Inventory Agent


IT & Fixed Asset
Software Inventory
Software License
CMDB View
Asset Lifecycle


This guide explains how to add an asset using the Infraon Inventory Agent. The Infraon Inventory Agent is a software tool that automates inventory management for businesses. It functions like a digital inspector, scanning systems and compiling a comprehensive report of both hardware and software components. The Infraon agent is available for Windows, Mac, and Linux users.
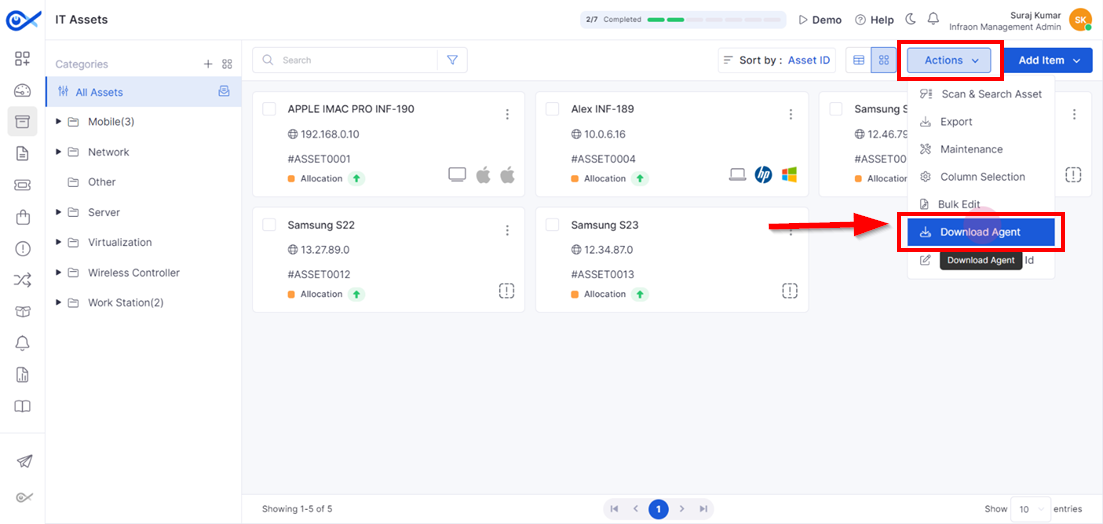
Step 1: To begin adding the asset using the agent, download the inventory agent itself. In the IT Asset tab, click 'Actions' on the top panel, and then select 'Download Agent'."
OR
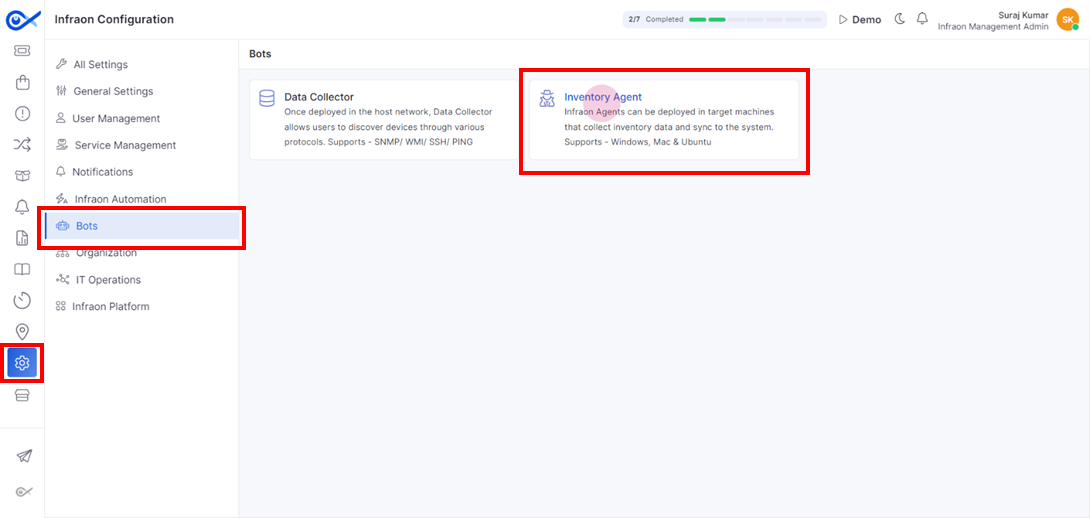
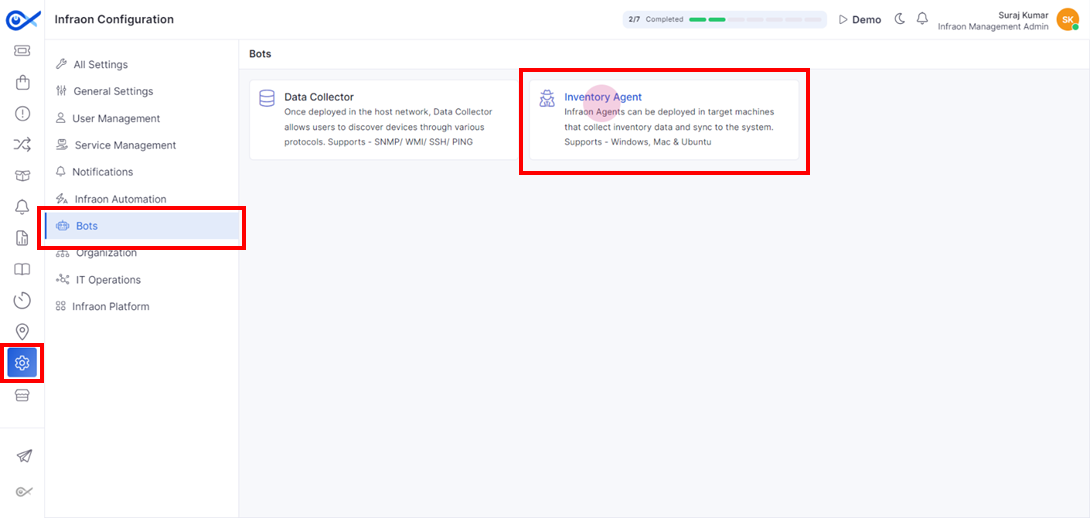
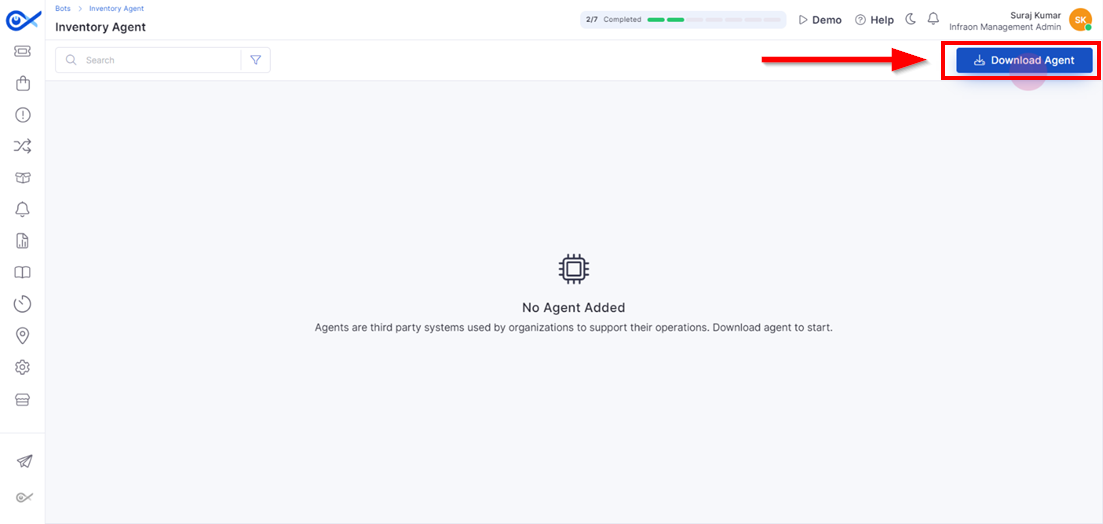
Alternatively, you can download the Inventory Agent from Infraon Configuration. Go to Bots and navigate to the Inventory Agent module.
Click on the download agent located at the top right corner of the page.
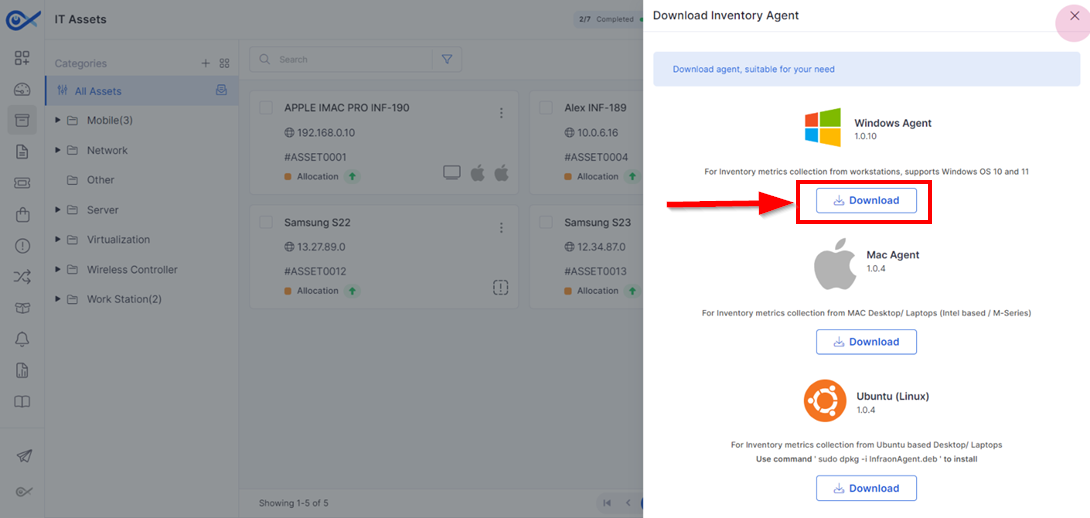
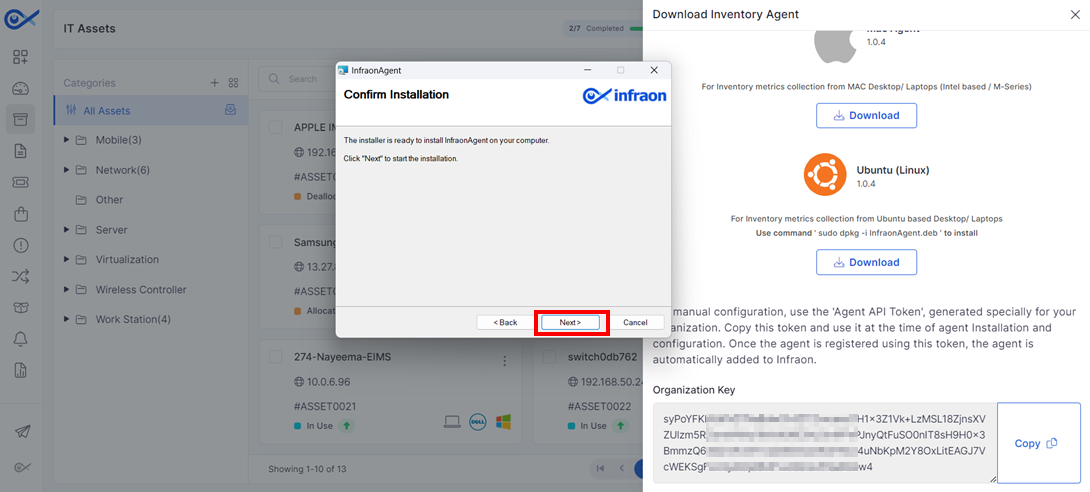
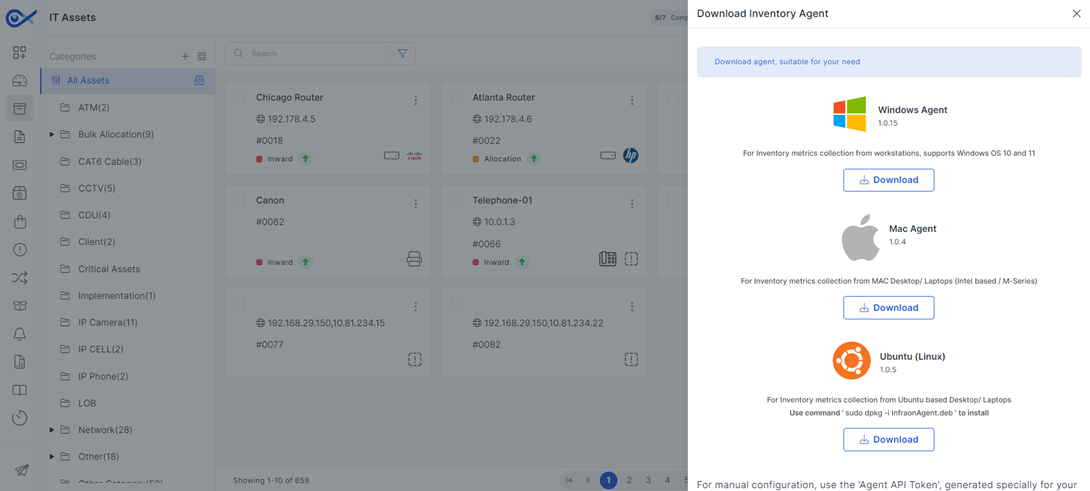
Step 2: The Inventory Agent is compatible with Windows, Mac, and Ubuntu (Linux) devices. Clicking the download button next to your chosen operating system will download the installation package for the Inventory Agent.
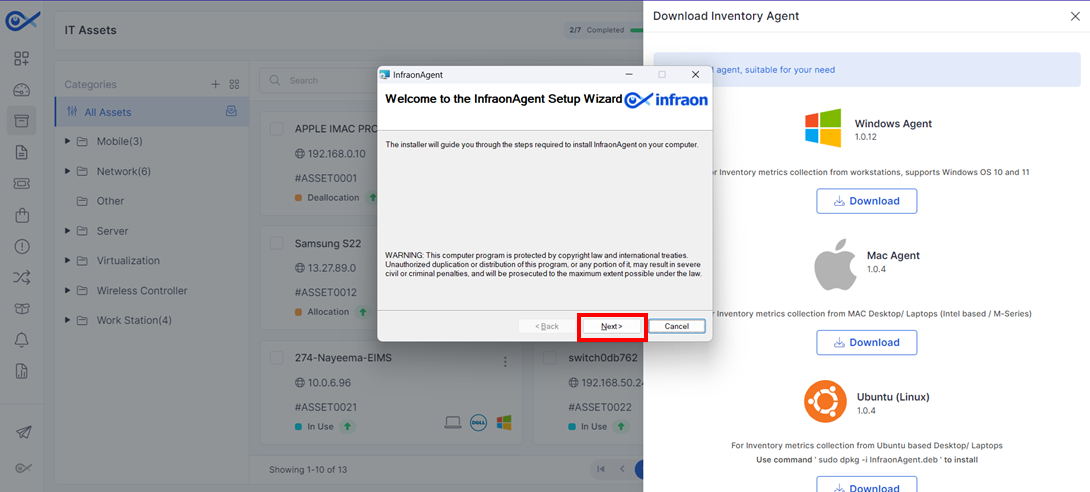
Step 3: Open the downloaded file to begin the installation. In the Infraon agent installer, click Next to proceed.
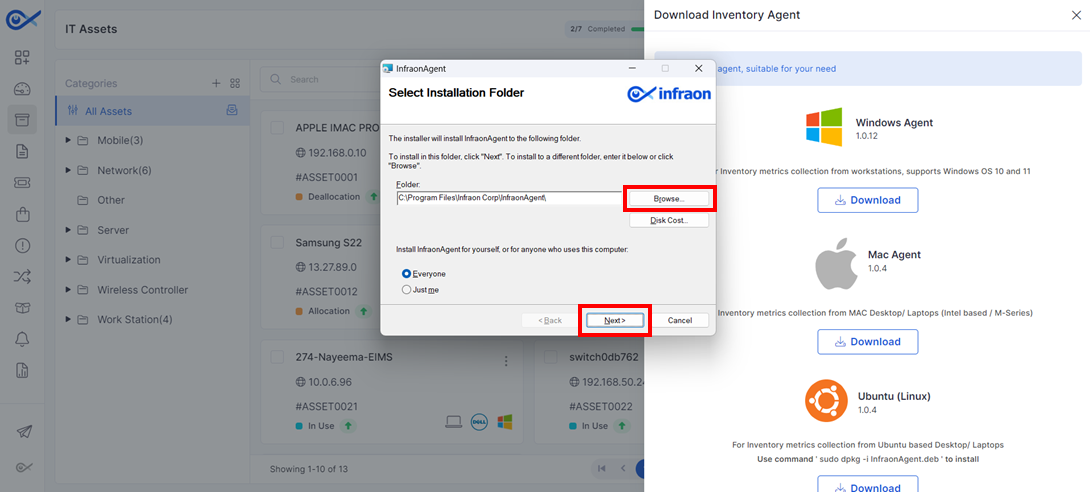
Step 4: Select the desired file path where the Infraon agent should be installed, then click Next.
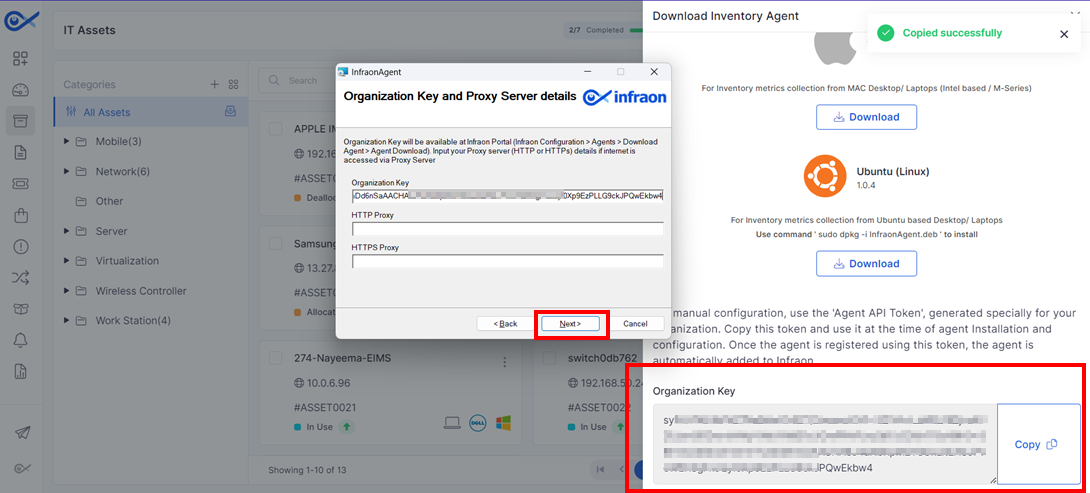
Step 5: Enter the organization key available in the download inventory agent module, then click Next.
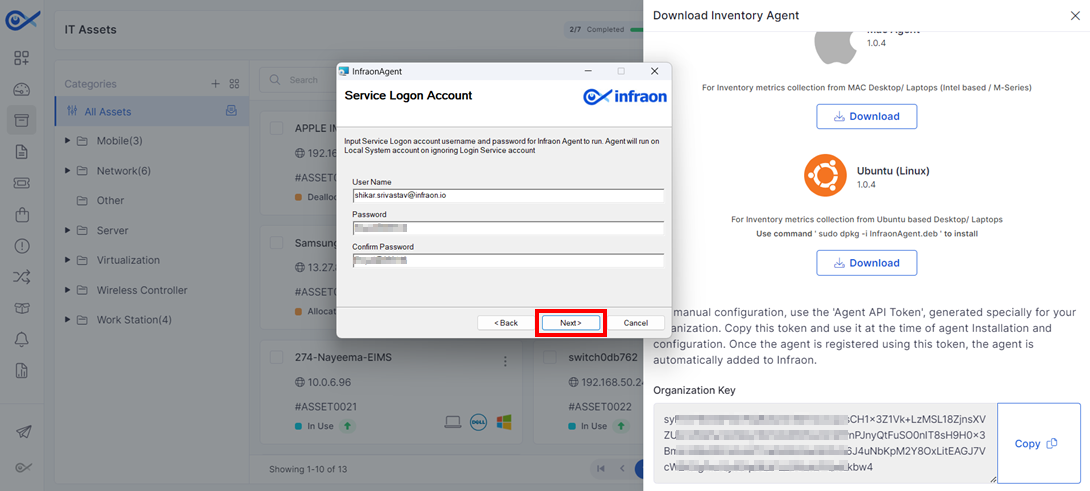
Step 6: Enter the username and password for the Infraon agent. Click Next to proceed.
Step 7: Once the configurations are added, proceed to install it by clicking Next.
The inventory agent is now successfully installed.
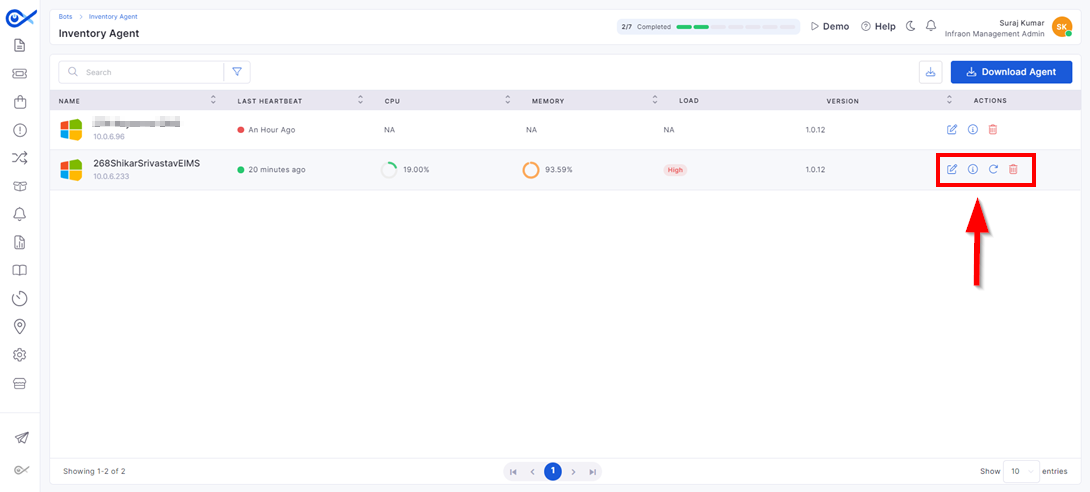
Step 1: Navigate to Infraon Configuration -> Bots -> Inventory Agent to view the list of installed agents.
Check the inventory agent list for the Infraon agent after installation.
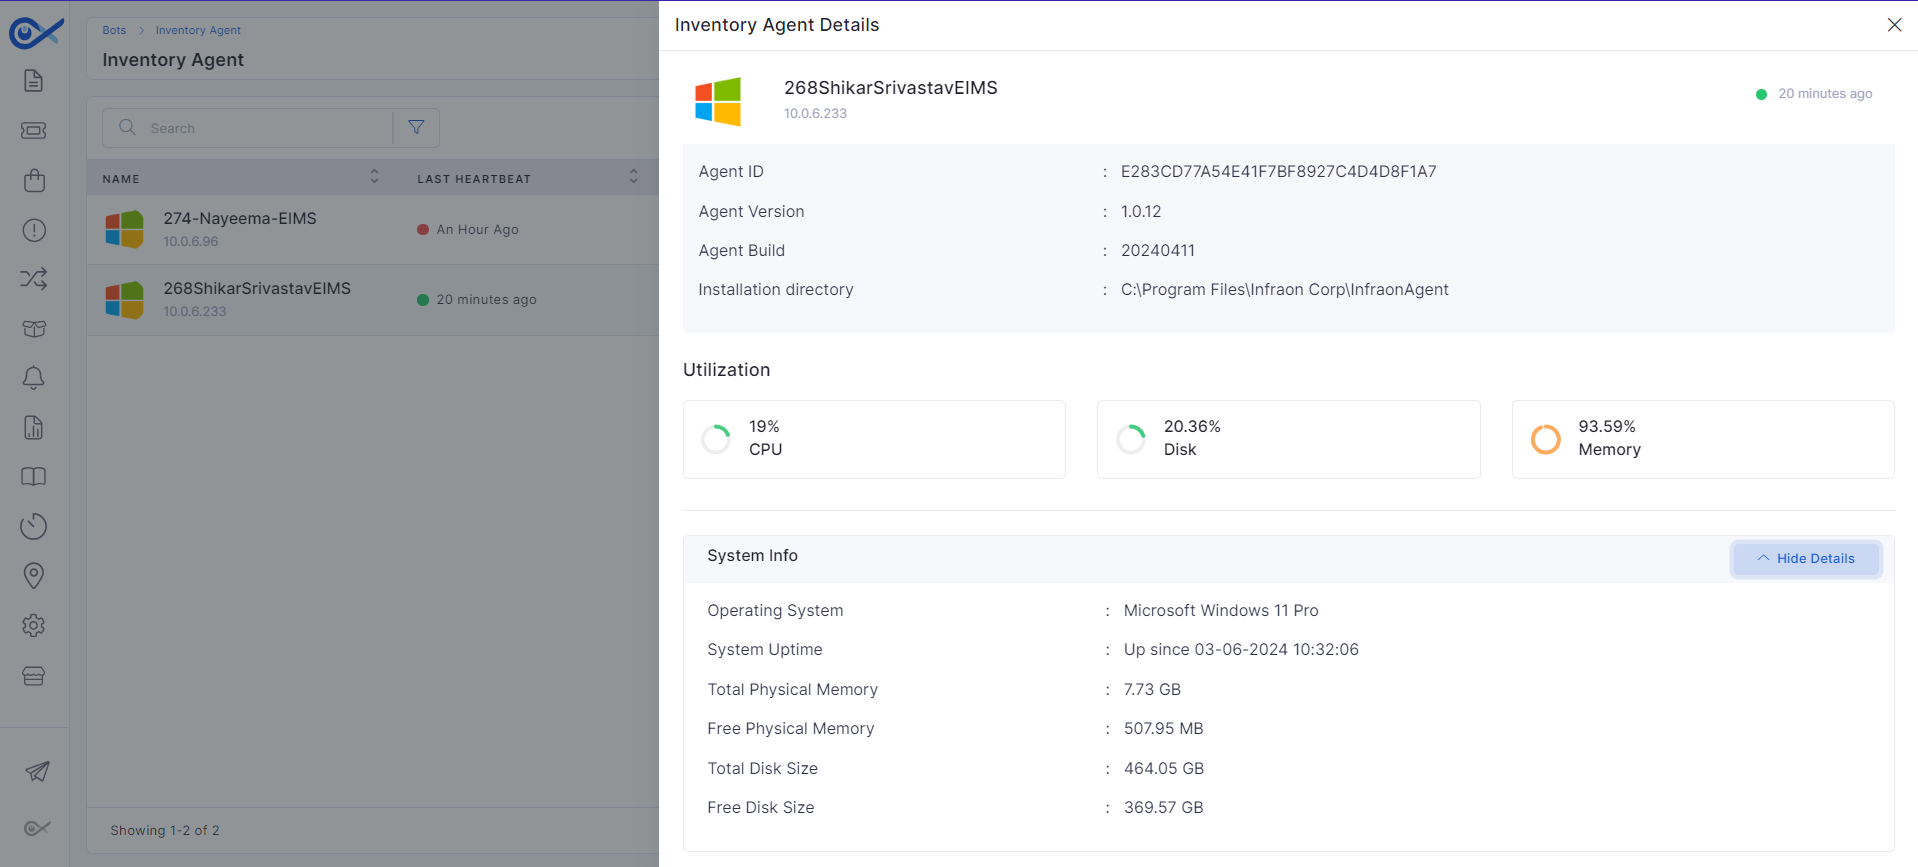
Step 2: Clicking on the (i) icon will open a pop-up page reflecting all the agent's name, last heartbeat, CPU usage, memory load, and version of the Infraon agent.
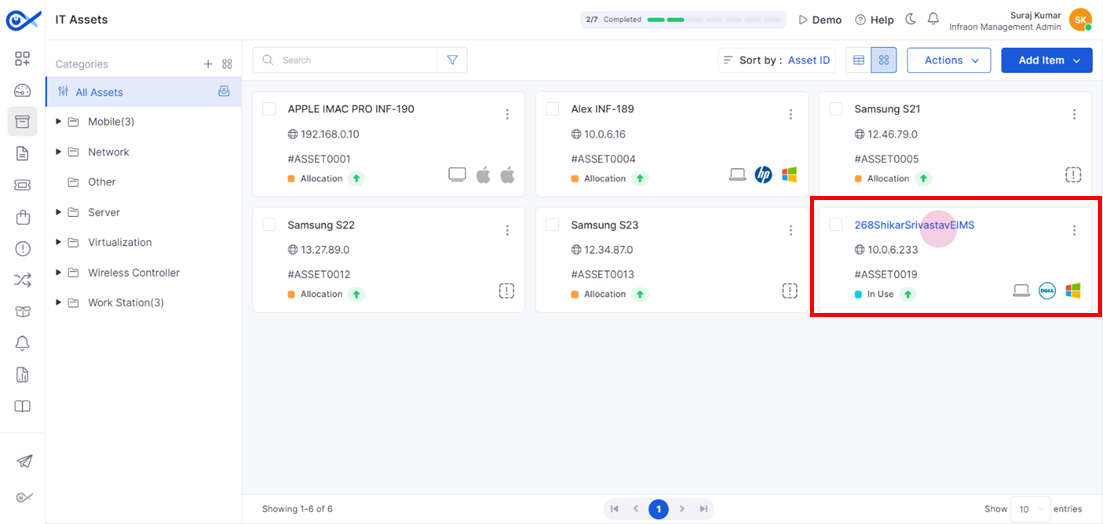
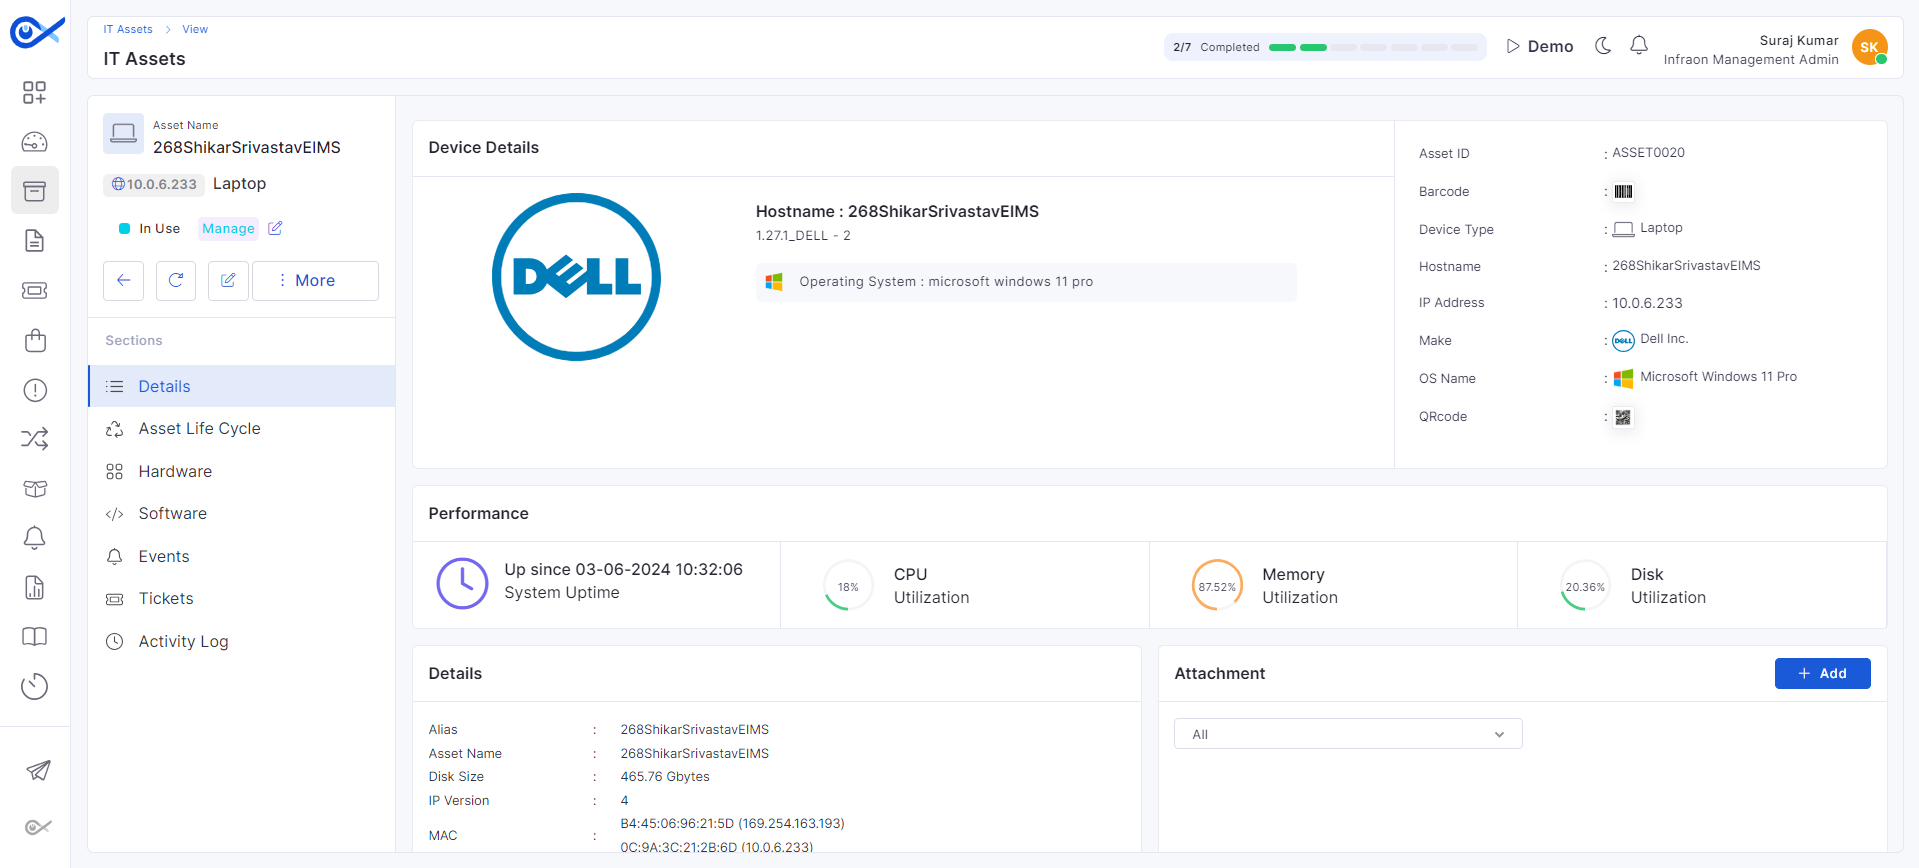
Step 3: The IT asset tab will reflect the asset discovered by the agent. Click on the discovered asset for more information.
Step 4: Review the detailed information captured by the Infraon agent, including hardware and software details, asset lifecycle, and any associated events.
This tutorial outlines the steps to add multiple assets using the CSV file method.
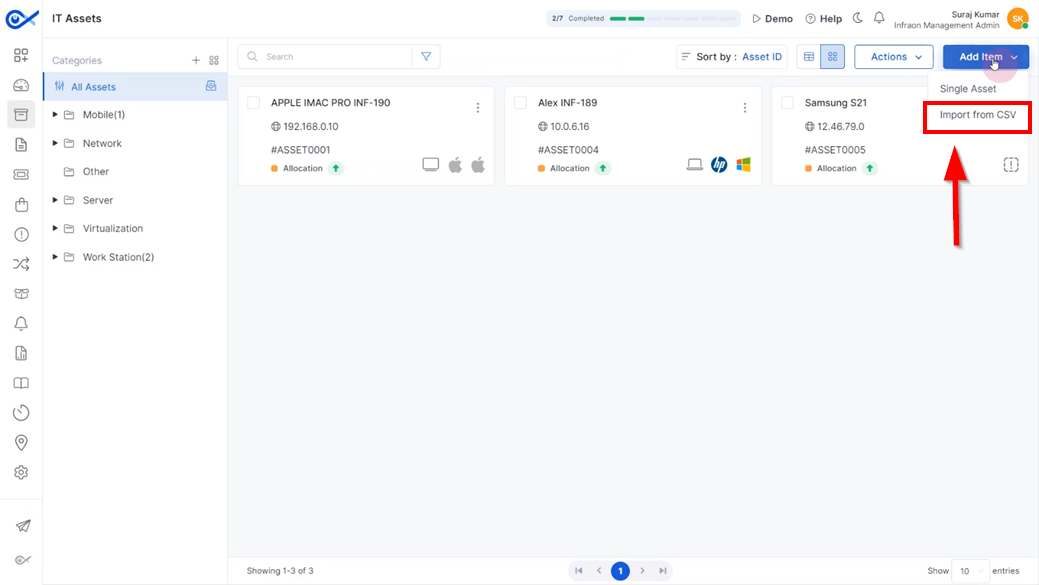
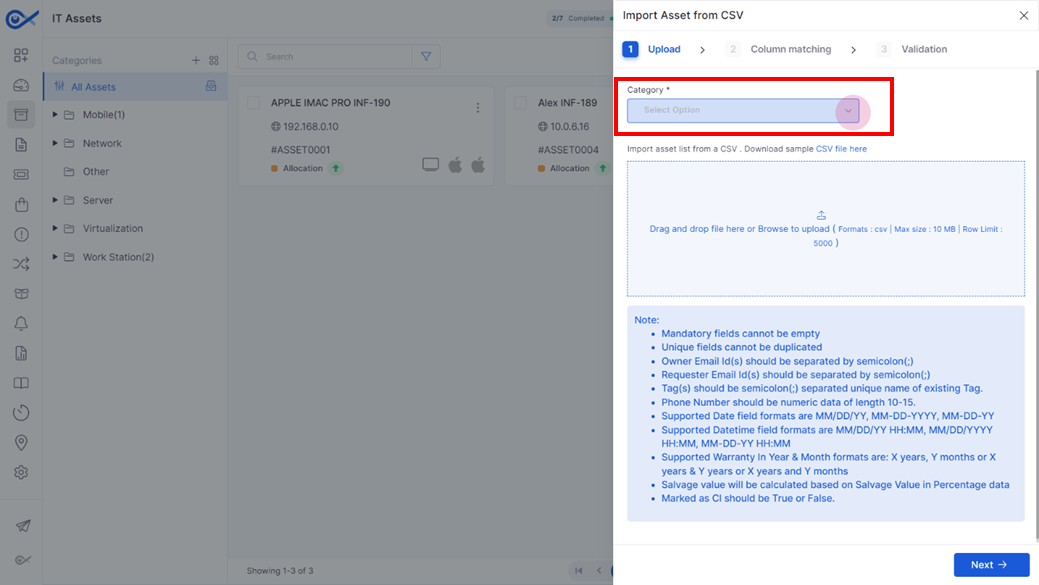
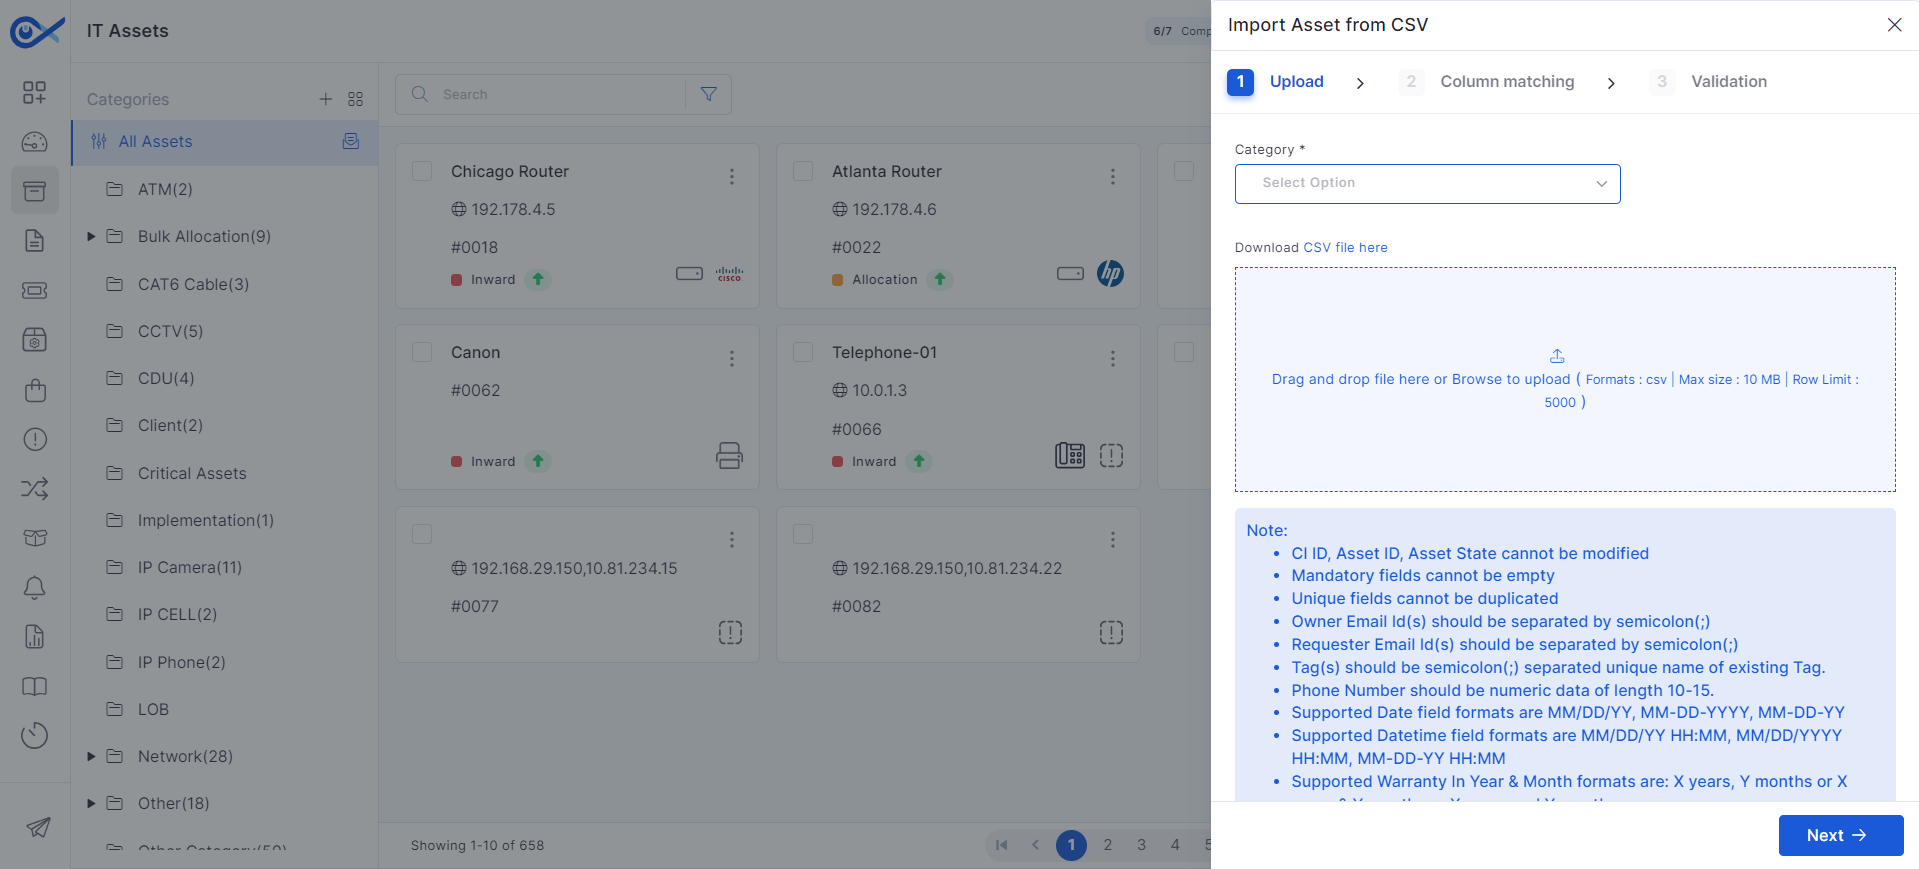
Step 1: Click on Add Item at the top right corner of the page and choose the ‘Import from CSV’ option.
Step 2: In the pop-up tab, use the dropdown menu to map the assets to a parent or child category. Select the category in which the assets will be added.
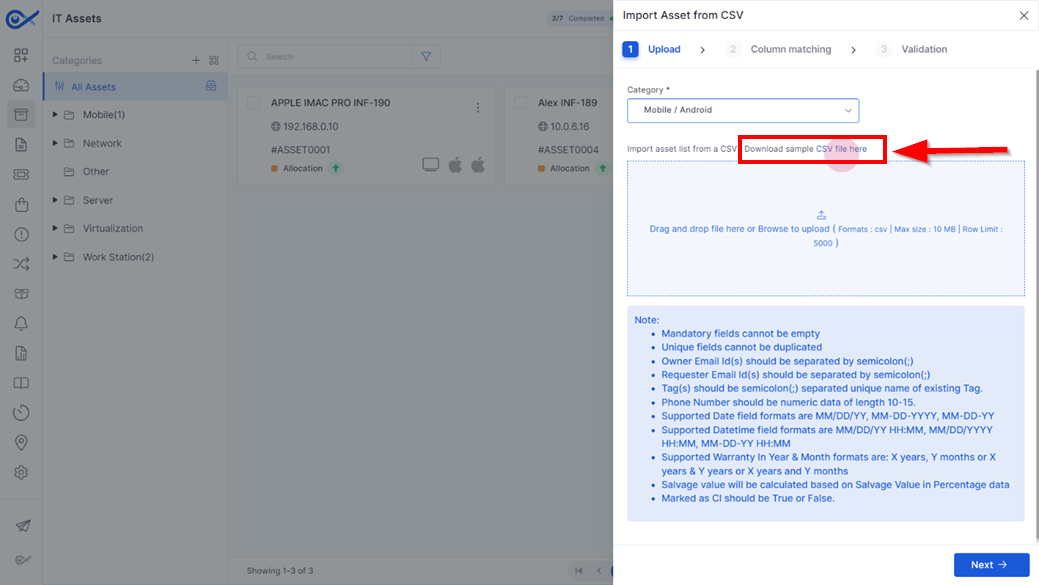
Step 3: Download the sample CSV file by clicking on the ‘CSV file here’.
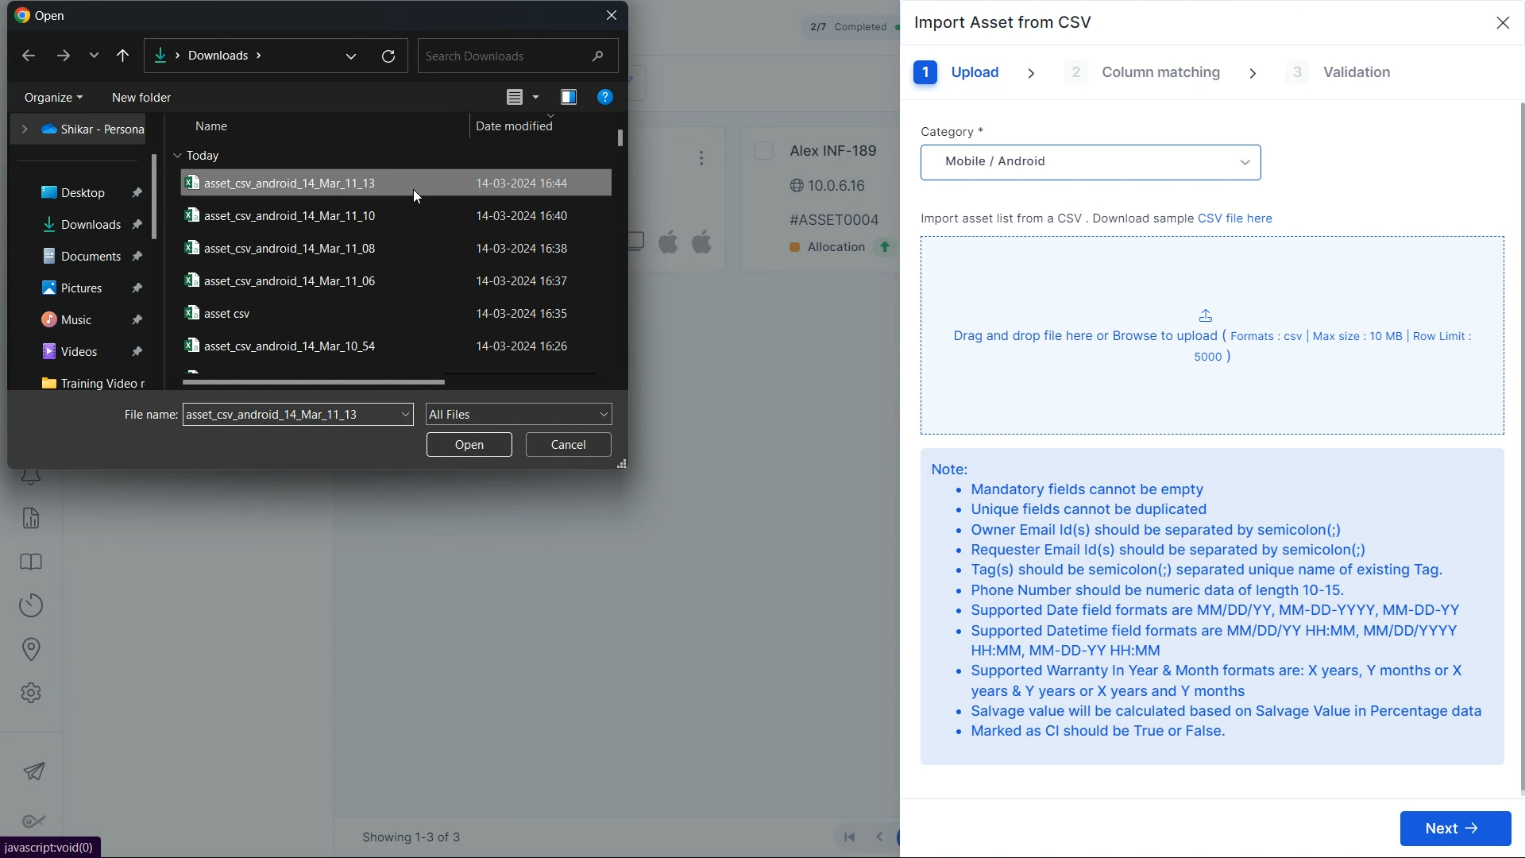
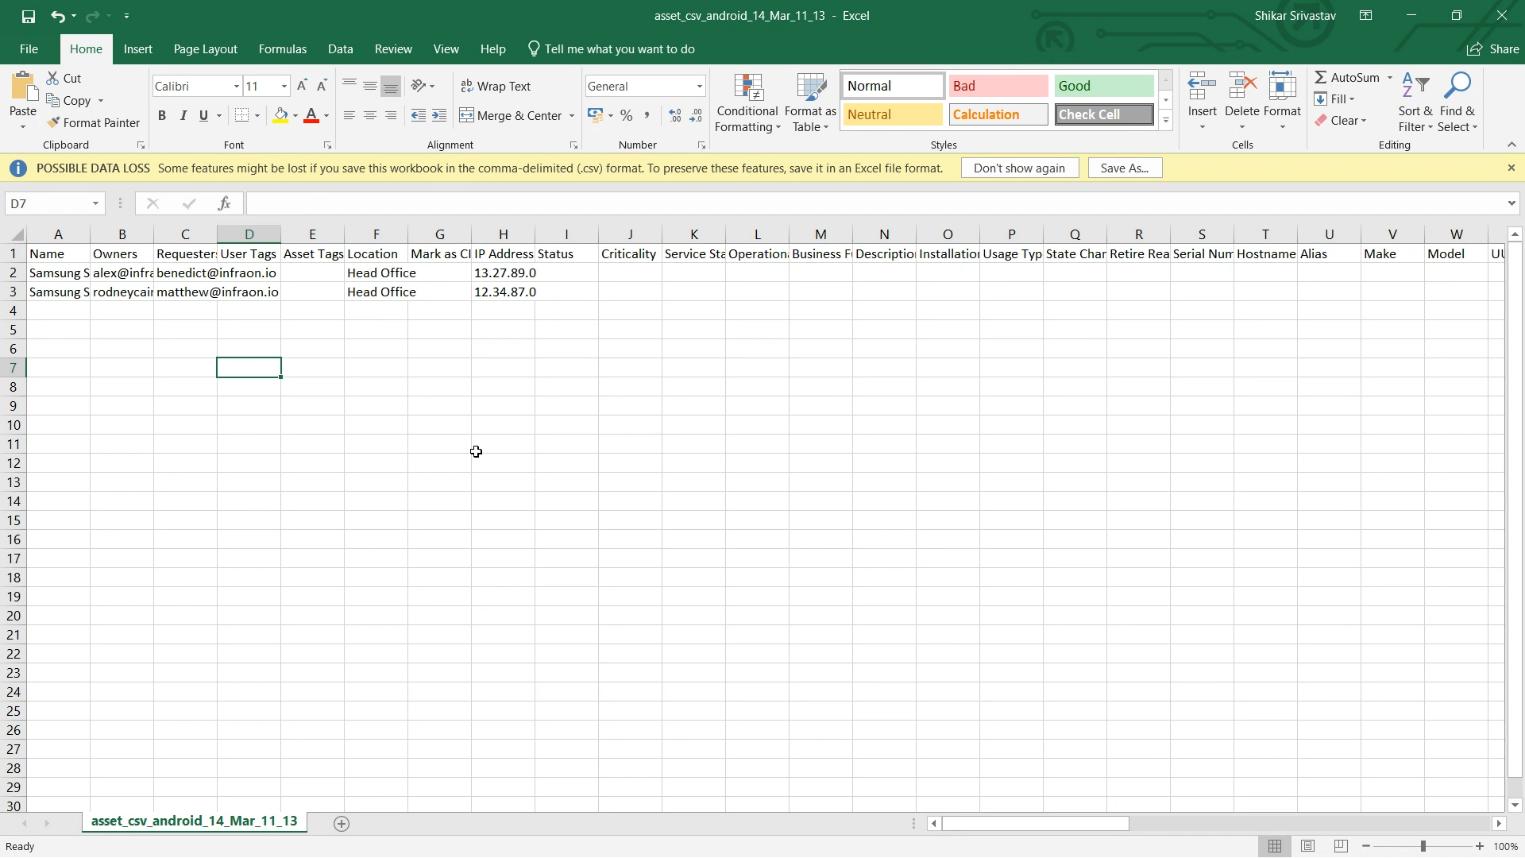
Step 4: Open the downloaded CSV file and fill in the required details for the assets in the appropriate columns.
STEP 5: After filling in the details, save the CSV file and upload it.
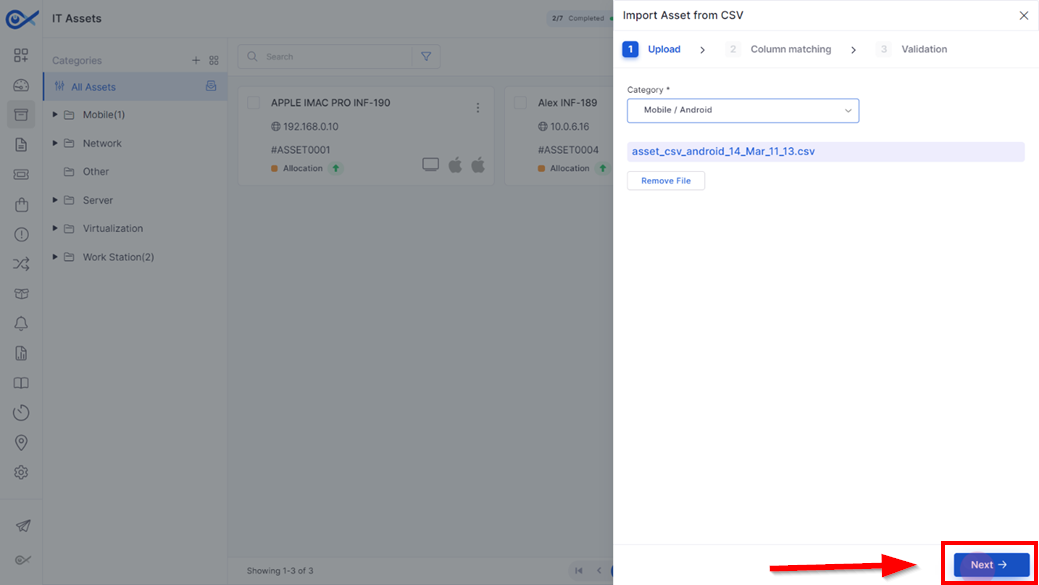
Step 6: After a successful upload, click Next.
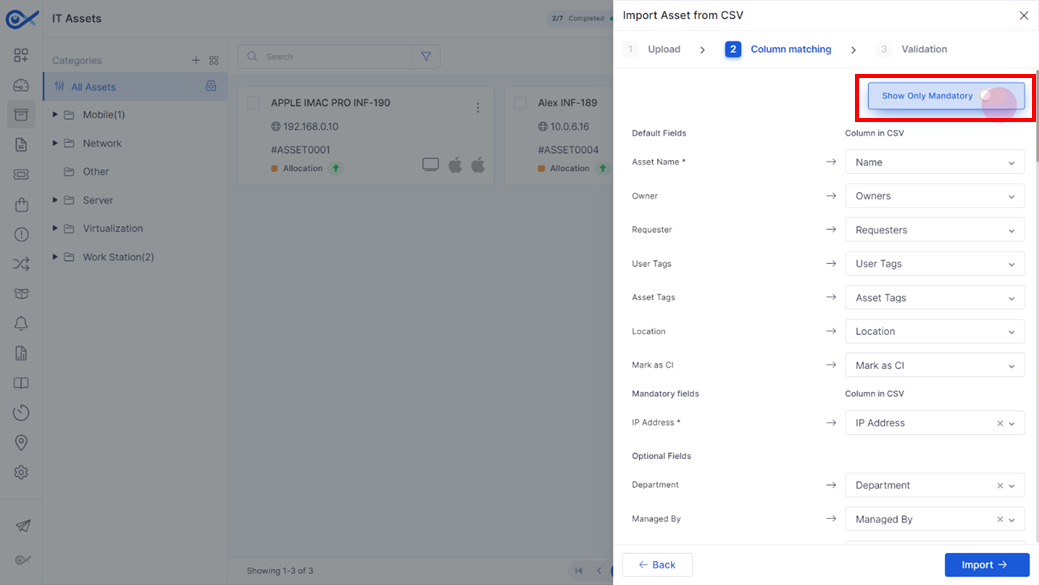
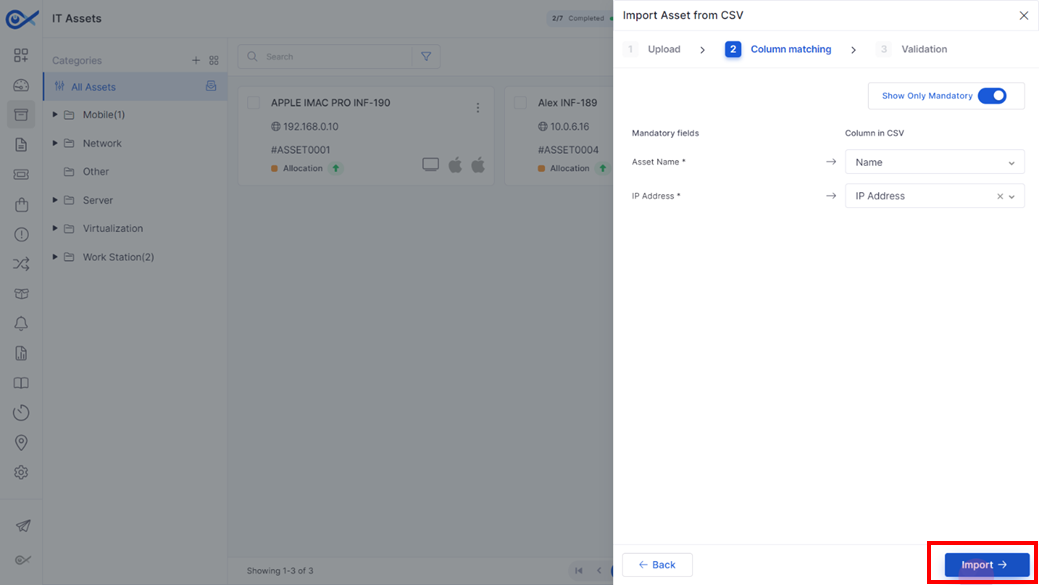
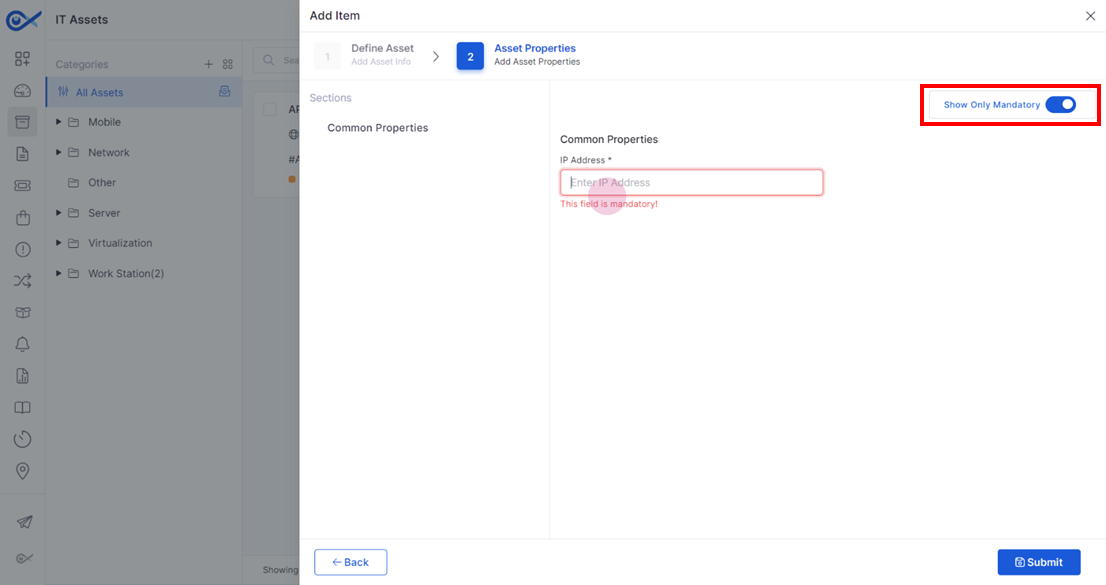
Step 7: On the column matching page, make sure the columns match the data in the CSV file. Use the ‘Show Only Mandatory’ toggle to view only mandatory fields.
Step 8: Click Import to start importing the CSV file.
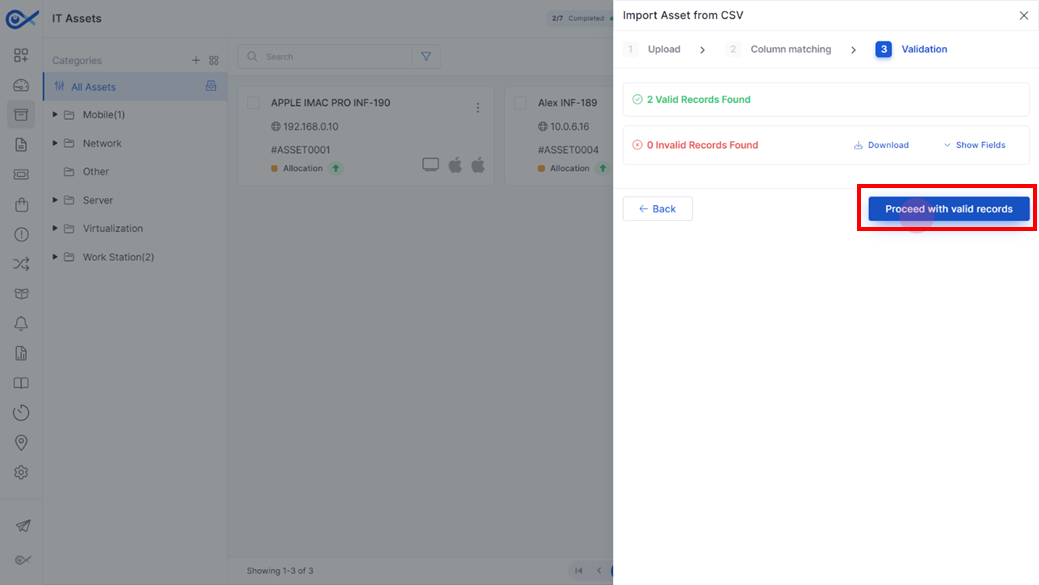
Step 9: Once the import is successful, select Proceed with Valid Records to add the assets.
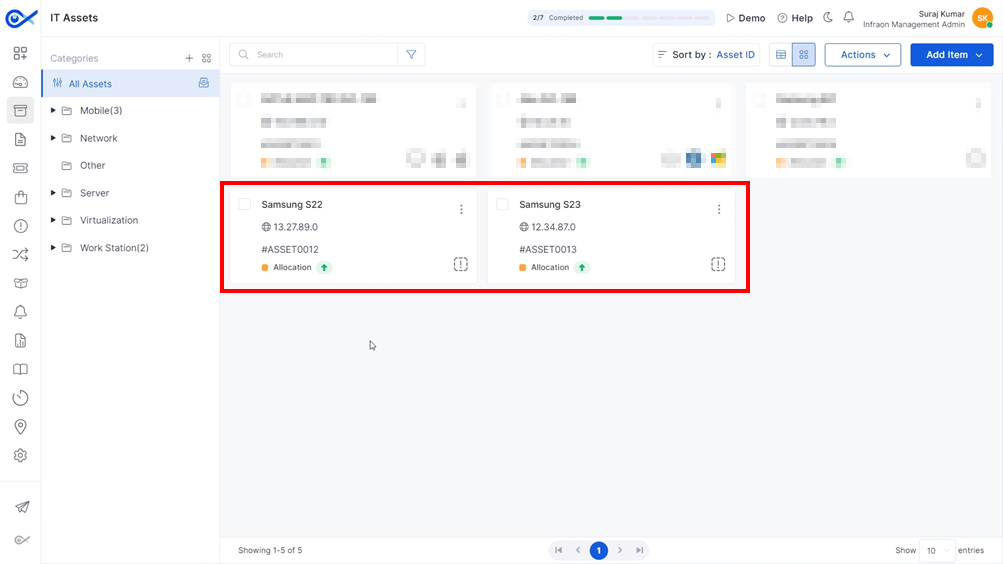
Step 10: A popup will appear confirming the successful upload of the CSV file and the addition of the assets to the selected category.
This guide explains how to add an asset to a created asset category. There are three methods: manually, using a CSV file, or through Discovery (only applicable to IT assets).
This tutorial will focus on manually adding an asset.
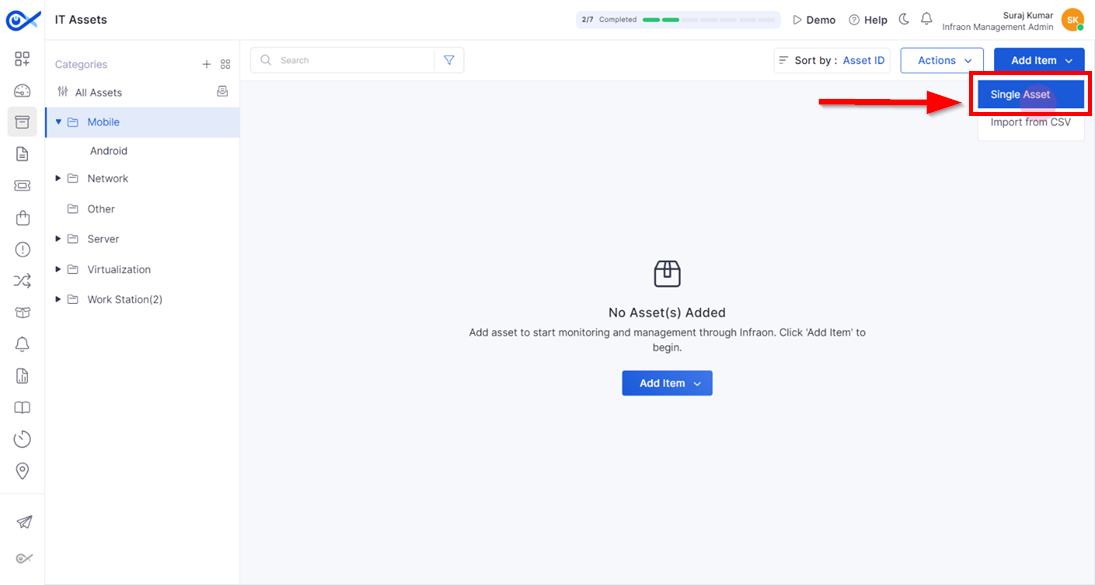
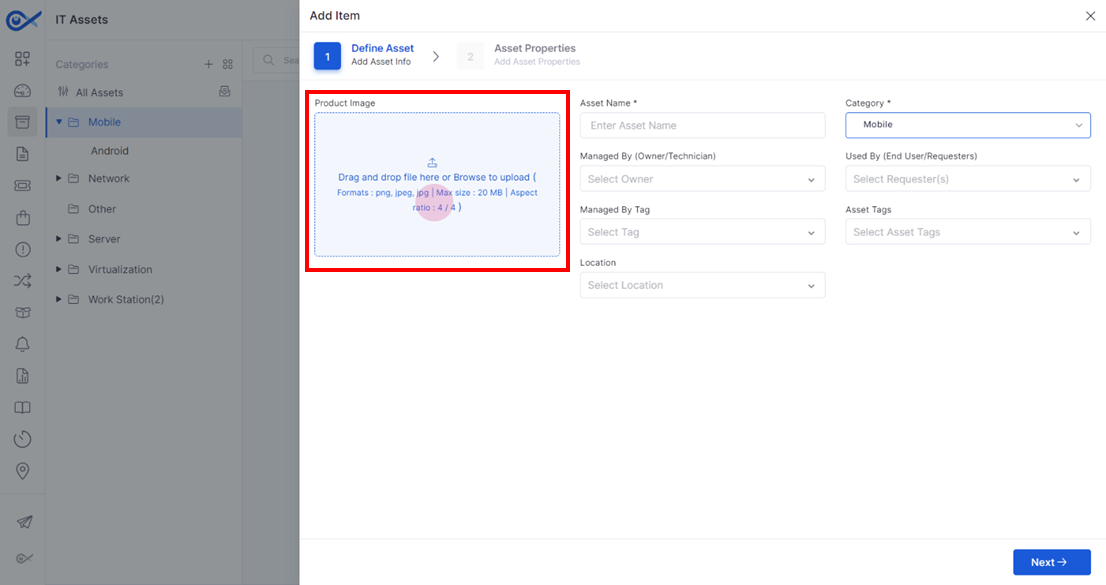
Step 1: Click on the add item at the top right corner of the page and select the single asset option.
Step 2: On the Define Asset page, fill out the details in the respective call-out boxes, starting with the product image for the asset. (Formats: png, jpeg, jpg | Max size: 20 MB | Aspect ratio: 4 / 4)
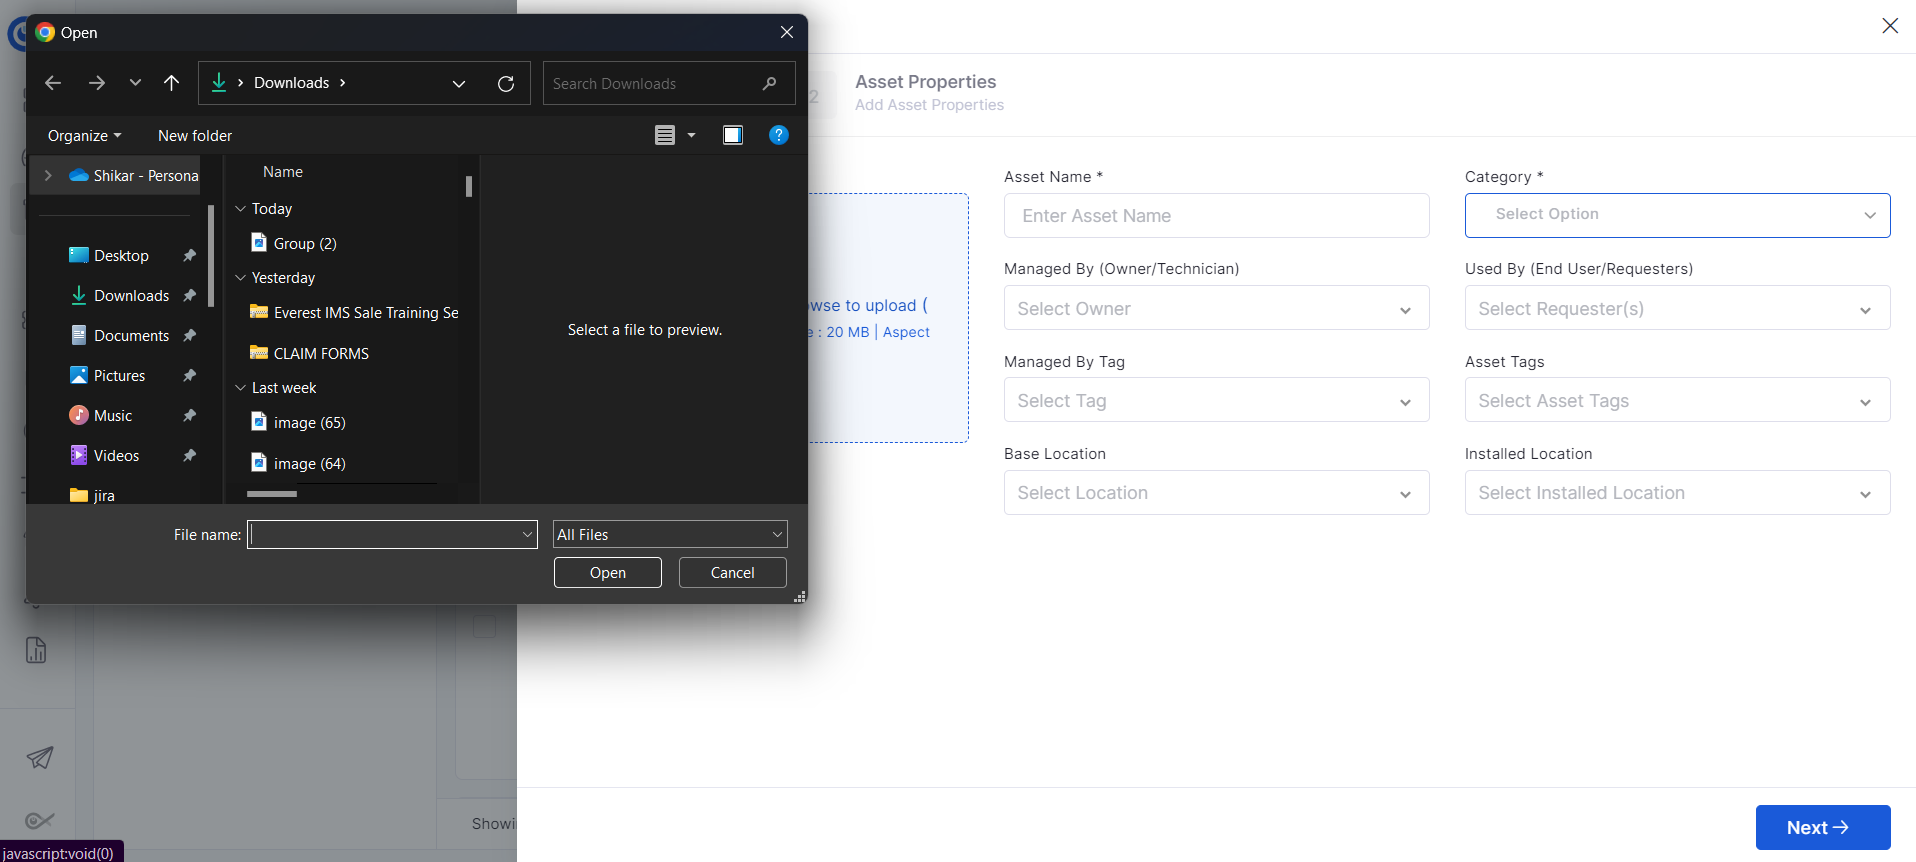
Step 3: Drag and drop the asset image or select the file to upload.
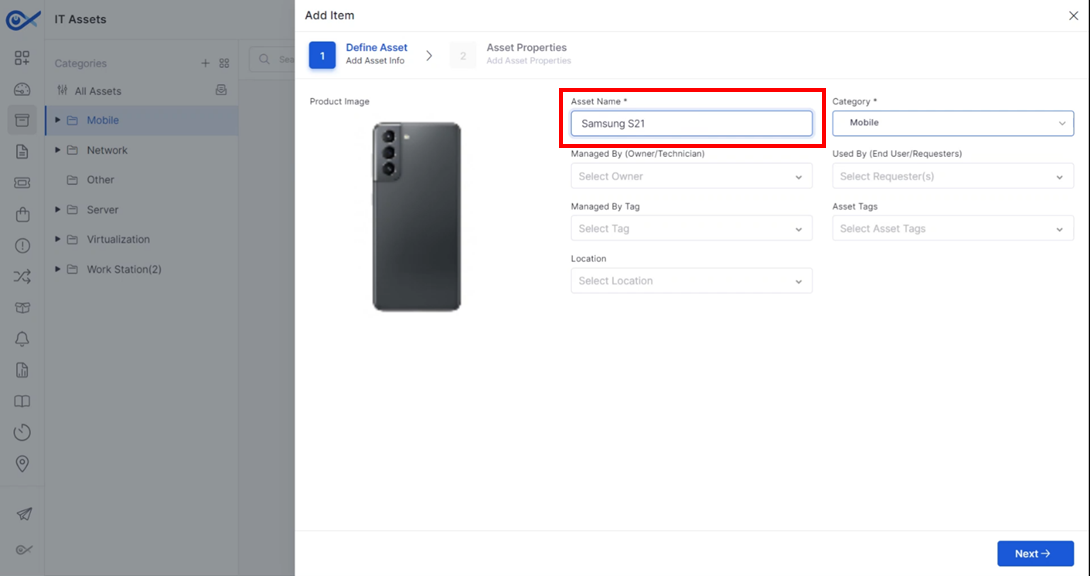
Step 4: After uploading the product image, click on the asset name input field and enter the name, for example, "Samsung S21."
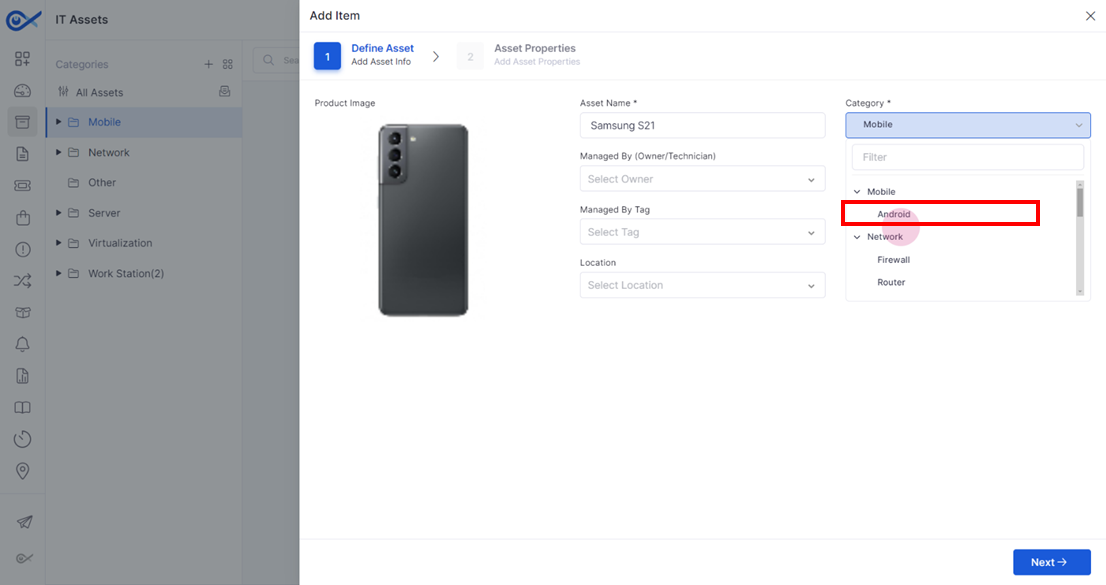
Step 5: The dropdown menu maps the asset to a parent or child category. For this example, select "Android" as the sub-category.
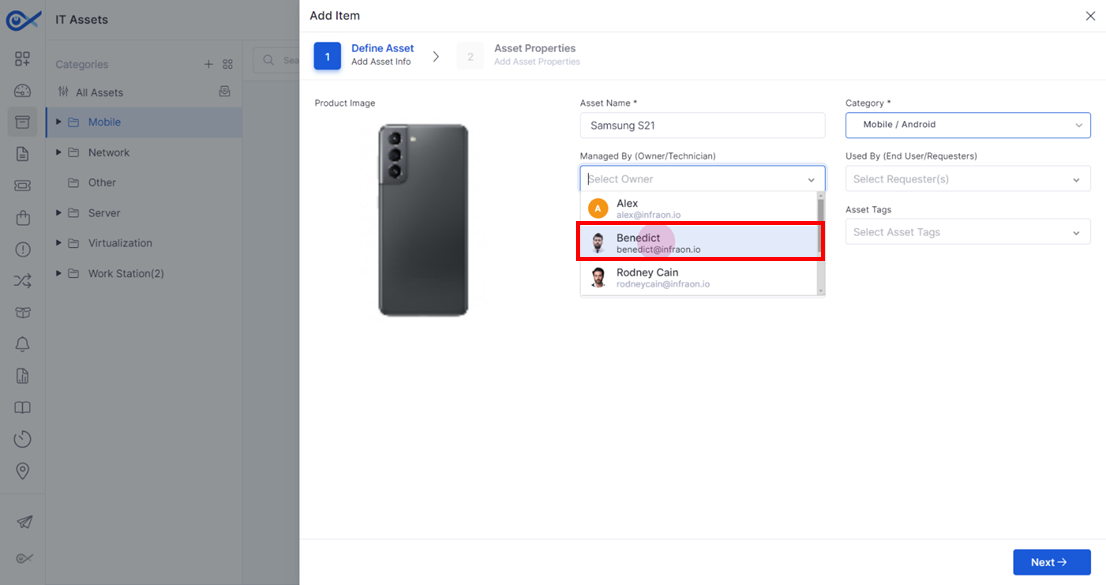
Step 6: In the "Managed by" field, designate the owner or the person managing the asset, potentially a technician. Users can make multiple selections based on the usage of the assets.
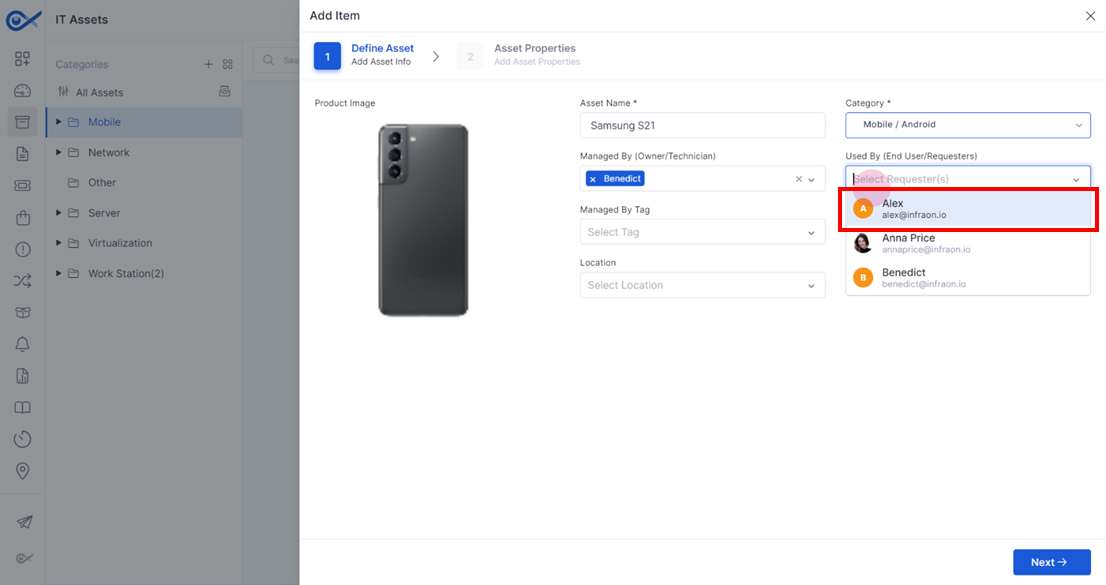
Step 7: The "Used by" field indicates the person using the asset, also known as the requester. Based on the usage of the assets, users can make multiple selections.
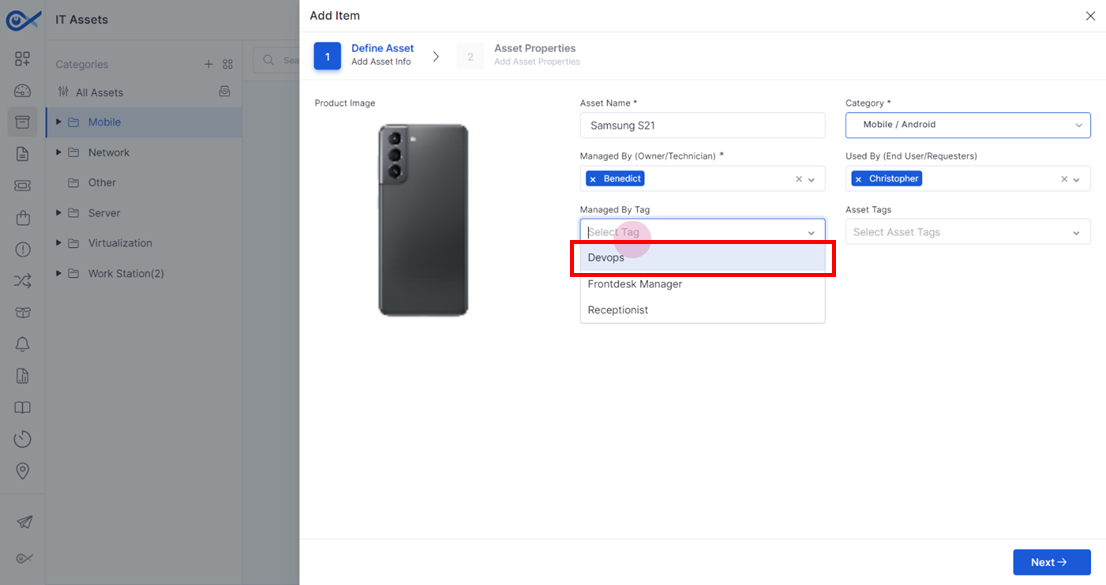
Step 8: In the 'Managed By' call-out box, select a tag from the drop-down list to specify the team that will manage the asset.
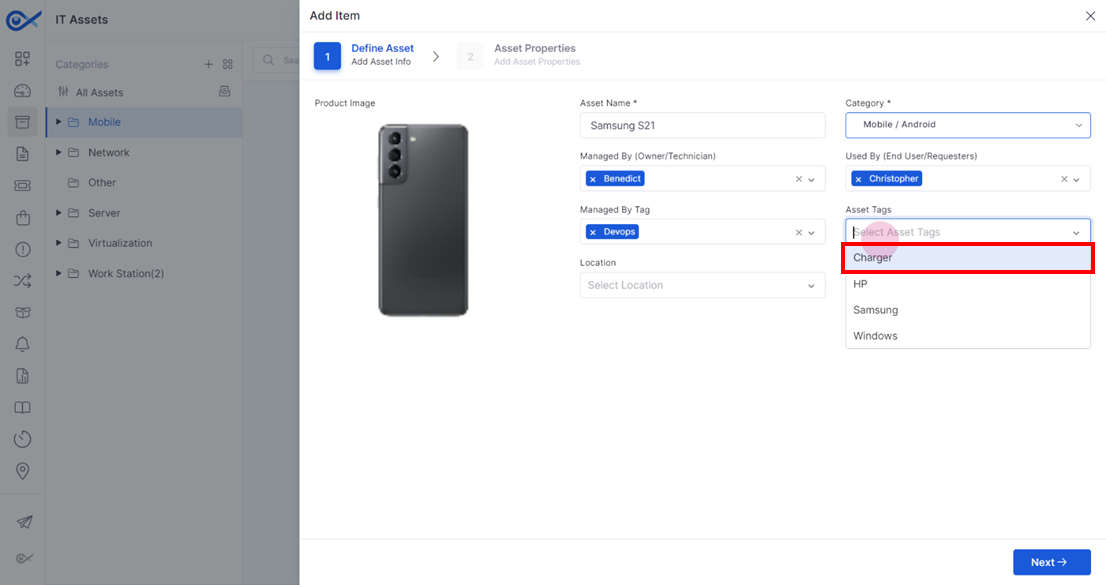
Step 9: Assign an asset tag to the specific type of asset by selecting it from the dropdown.
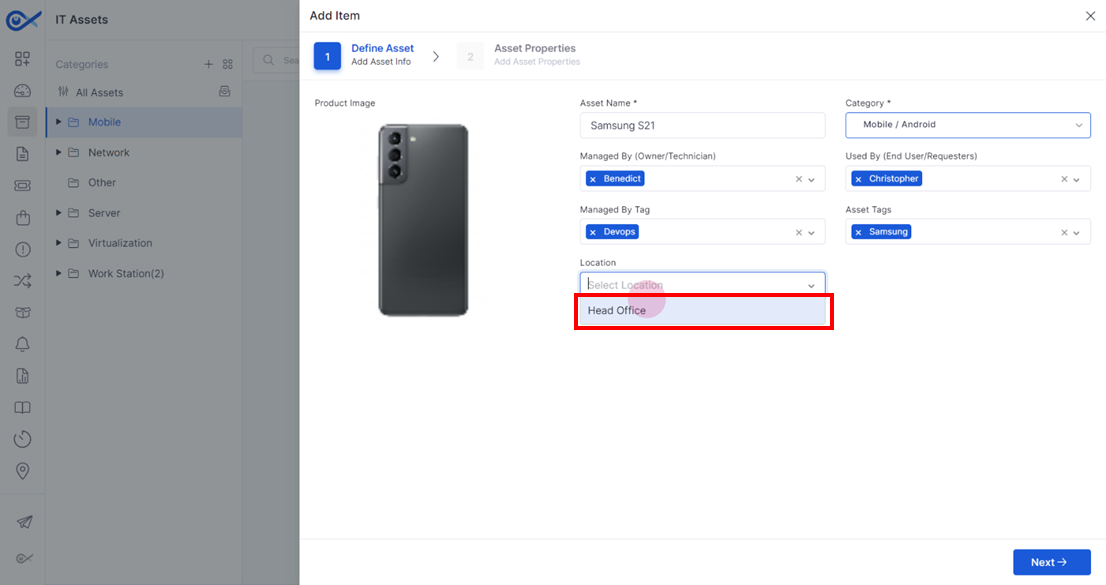
Step 10: Specify the location where the asset is situated.
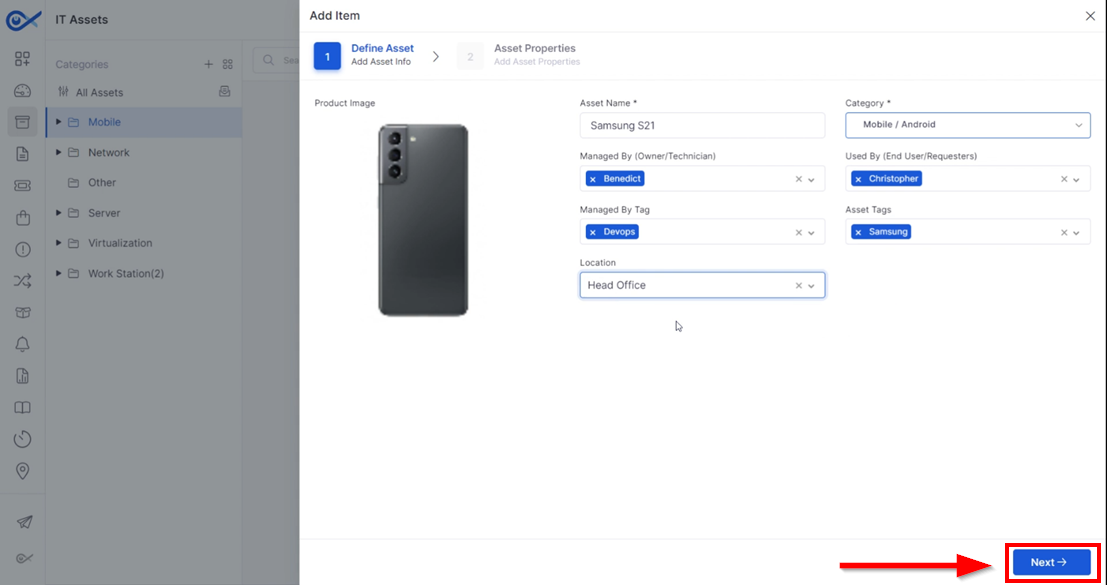
STEP 11: After filling in the data, proceed to the next step to view the asset properties.
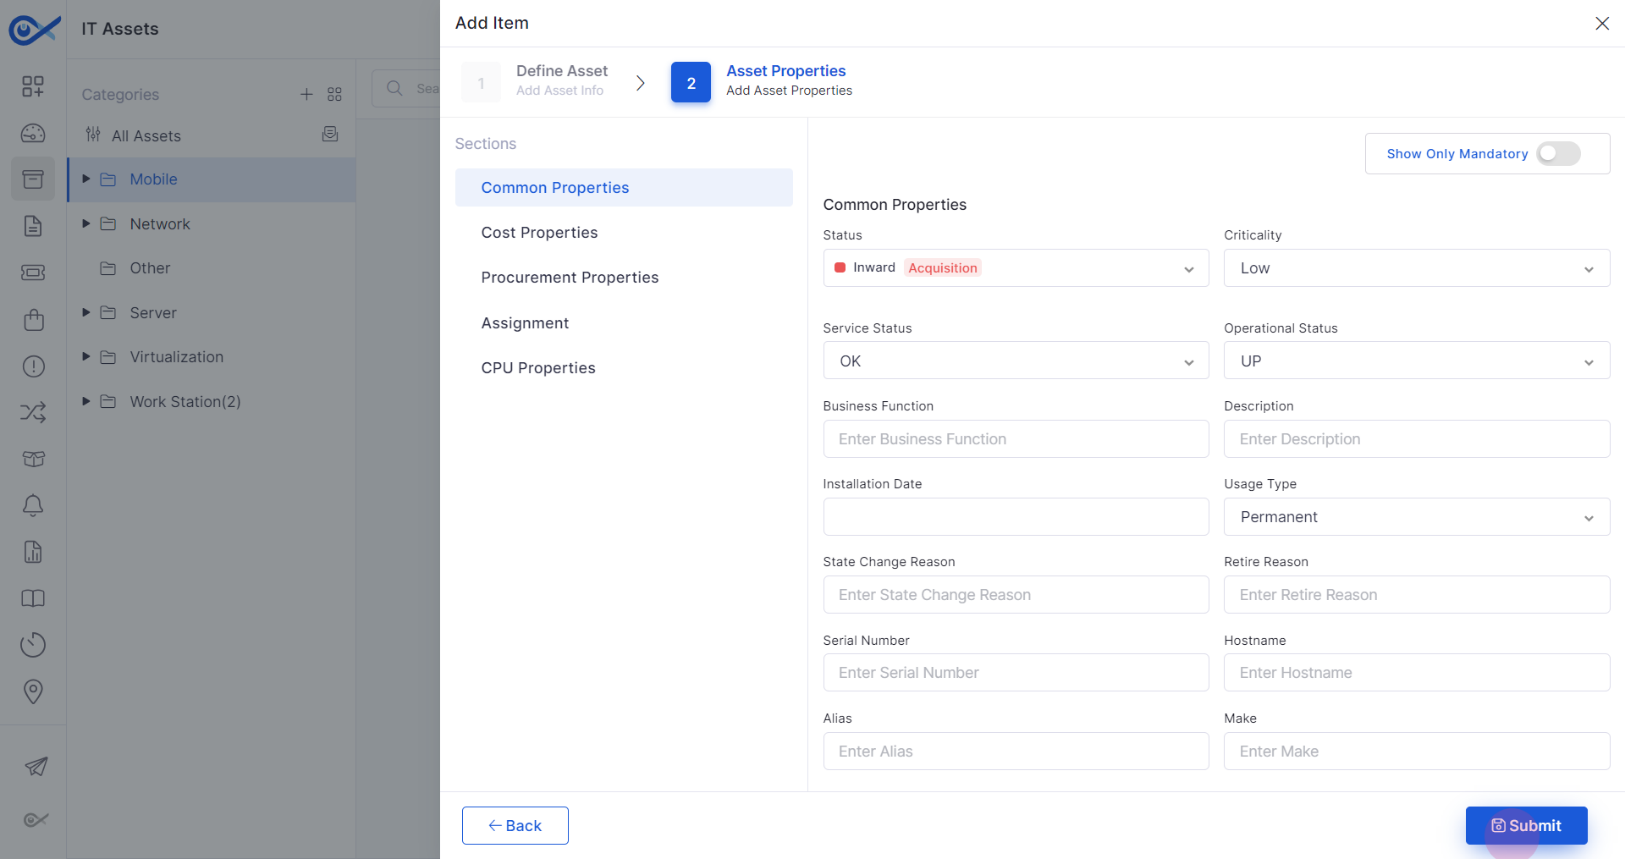
STEP 1: The Asset Properties section contains categories such as common properties, cost properties, procurement properties, assignment properties, and CPU properties. Each property has input fields where data can be entered.
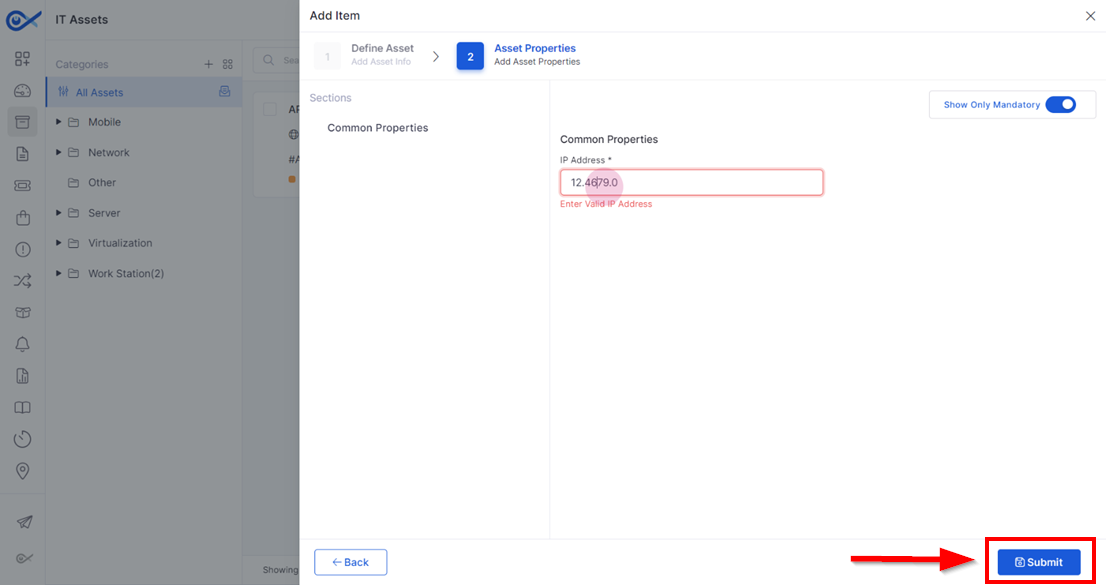
Step 2: After adding the mandatory data, submit the form to finalize the creation of the asset.
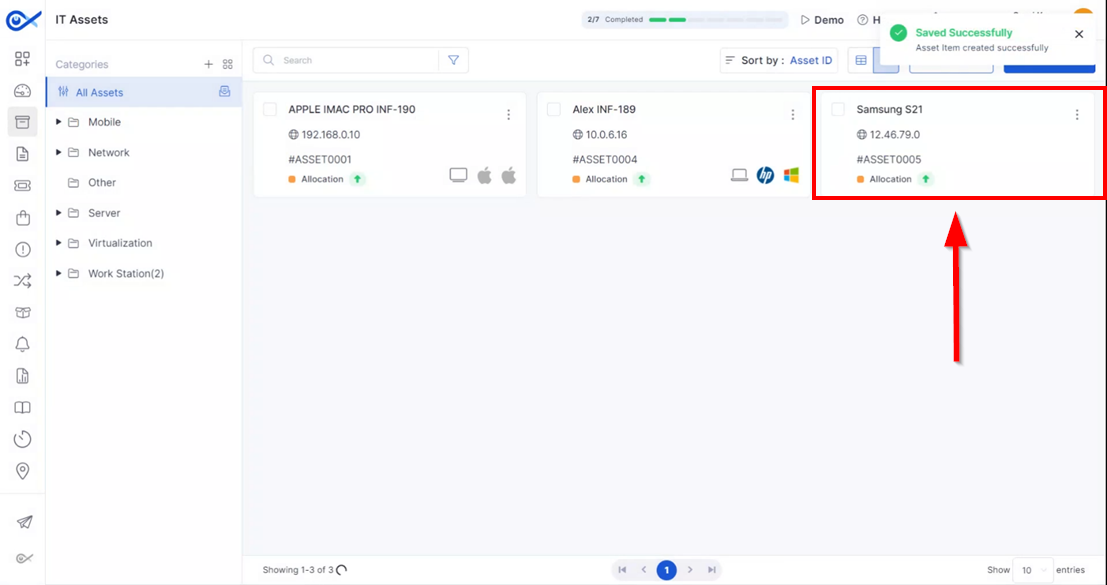
Step 3: After submission, the respective asset will be generated with a unique ID, facilitating its identification.
This guide explores the Configuration Management Database (CMDB) view in this guide. This interface provides a structured visualization of configuration items (CIs) and their relationships.
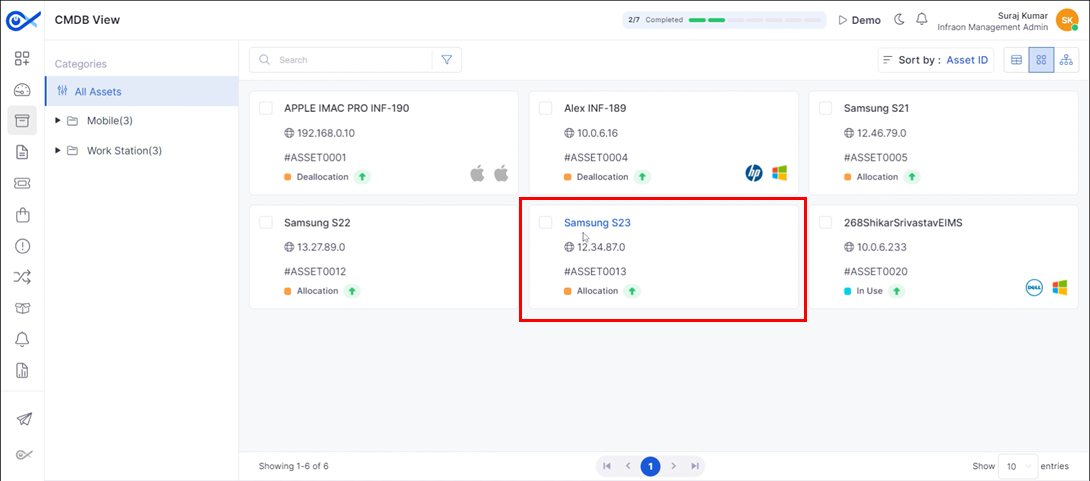
Locate the "CMDB View" option in the left menu of the asset catalogue. This view's left panel displays categorized configuration items.
Step 1: Click on an asset to add or view a relationship.
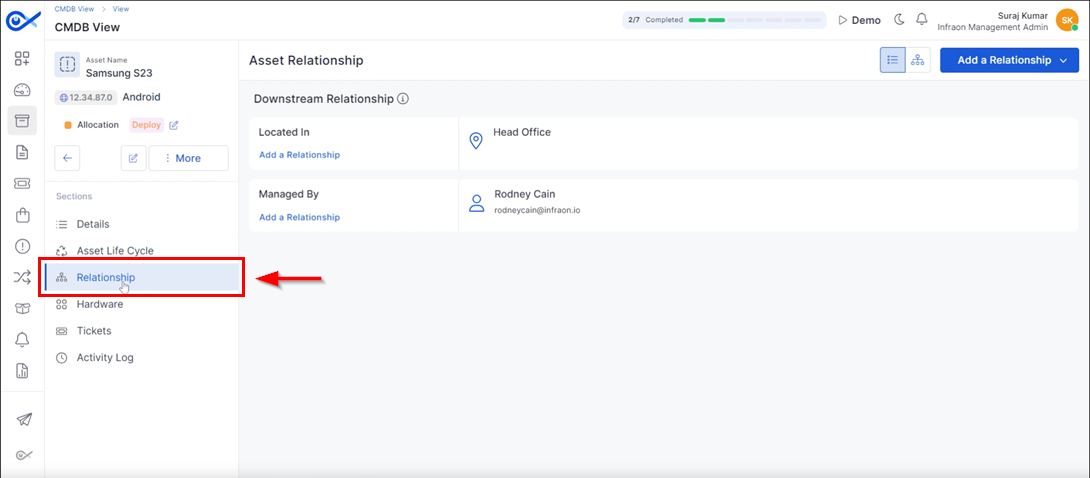
Step 2: Navigate to the asset information page and select the “Relationship” tab. This displays the asset's configured upstream and downstream connections.
Step 3: To add a relationship, click on Add a relationship at the top right corner of the page.
Step 4: In the property tab, fields are presented with properties such as 'Part Of,' which defines if it is part of the selected Configuration Item (CI), backed up by selected CI, etc.
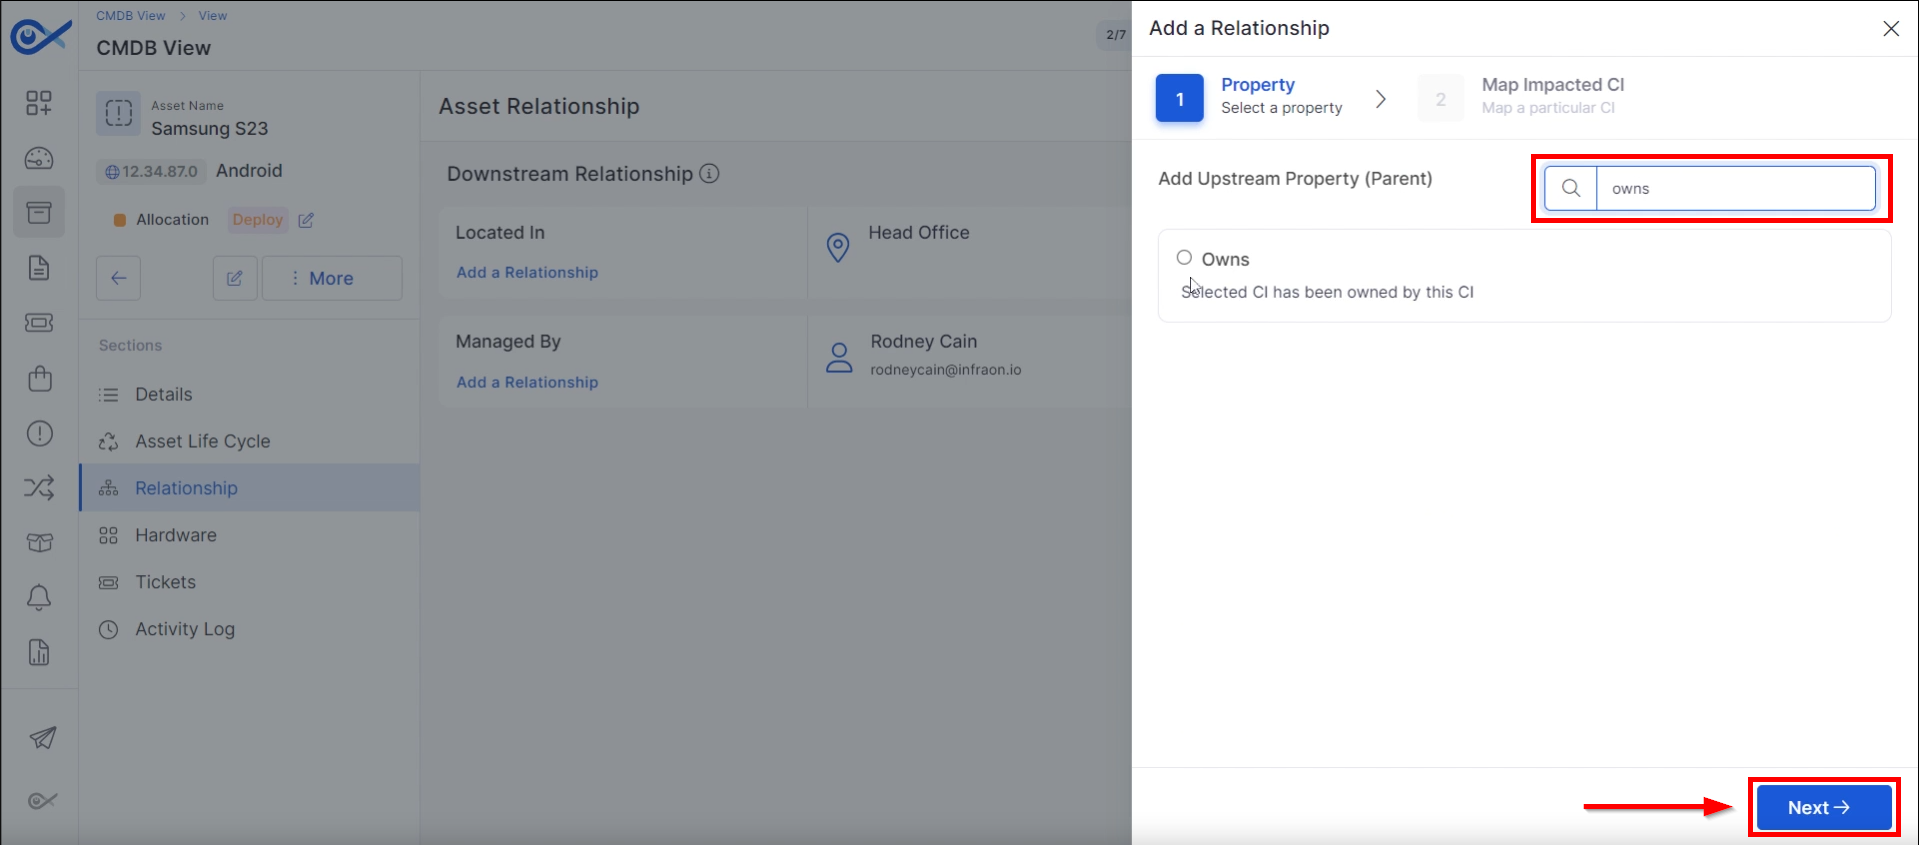
Step 5: Search for the required property in a CMDVB view. Once the property has been selected, Click on Next.
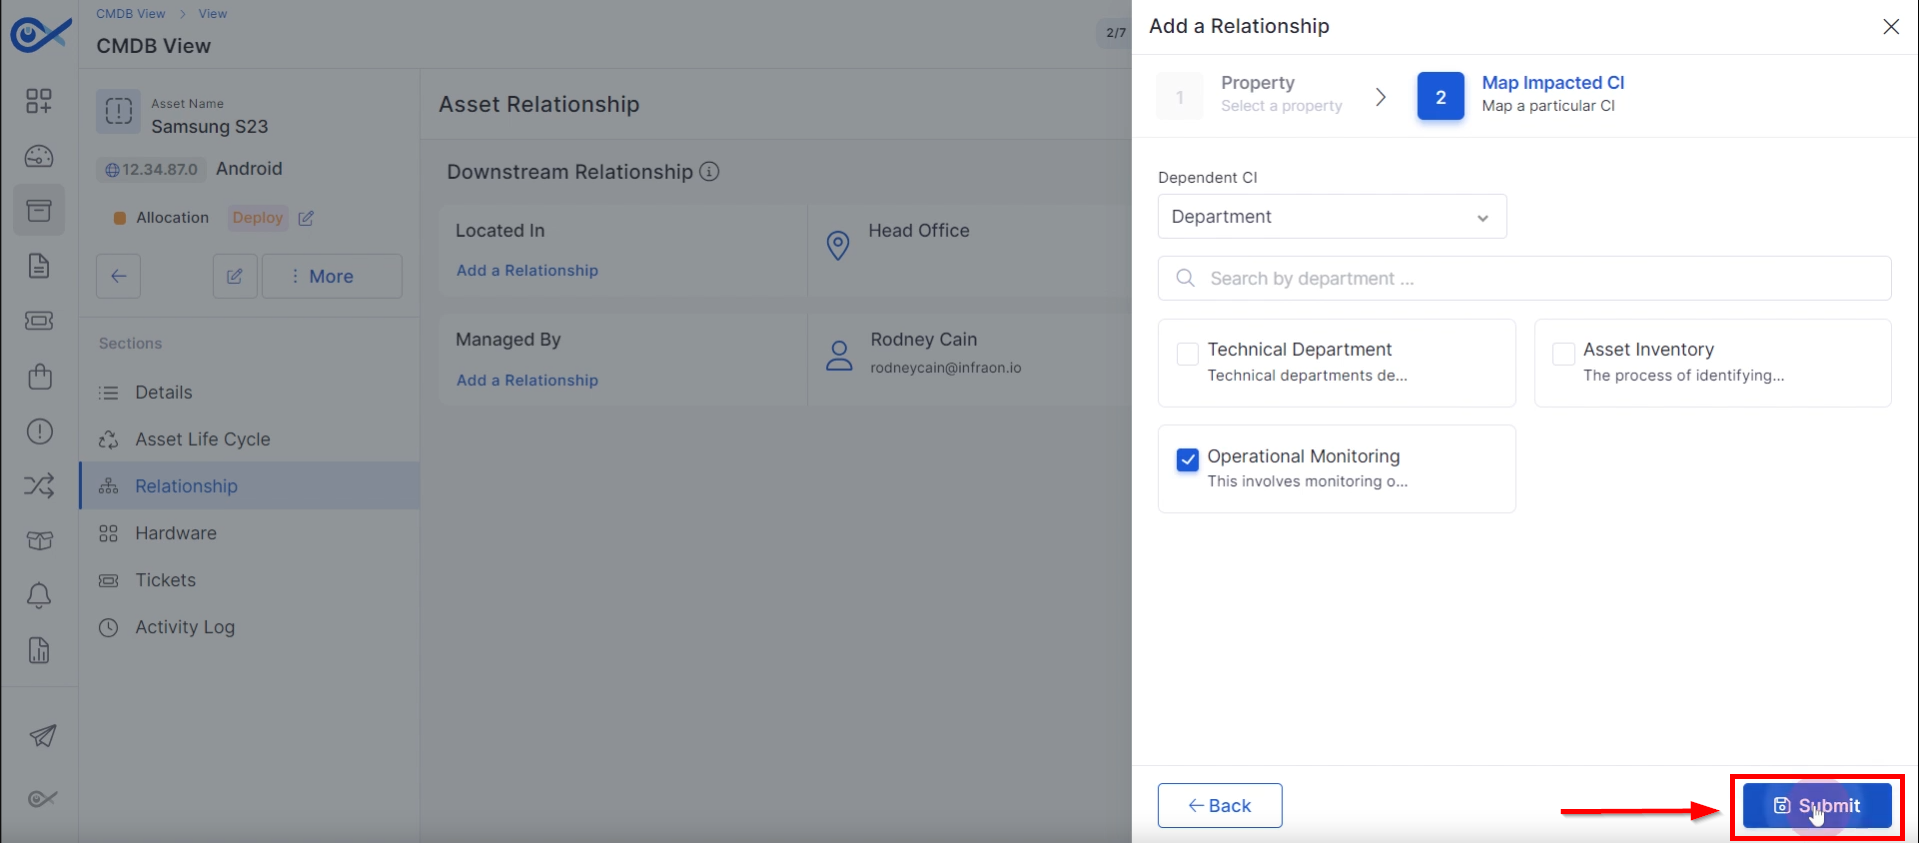
Step 6: Select the Dependent CI from the drop-down list in the Map impacted CI. Tick the appropriate selection to add the relationship. Once you've done this, Click on Submit.
Step 7: The changes will be reflected on the asset relationship page after submission.
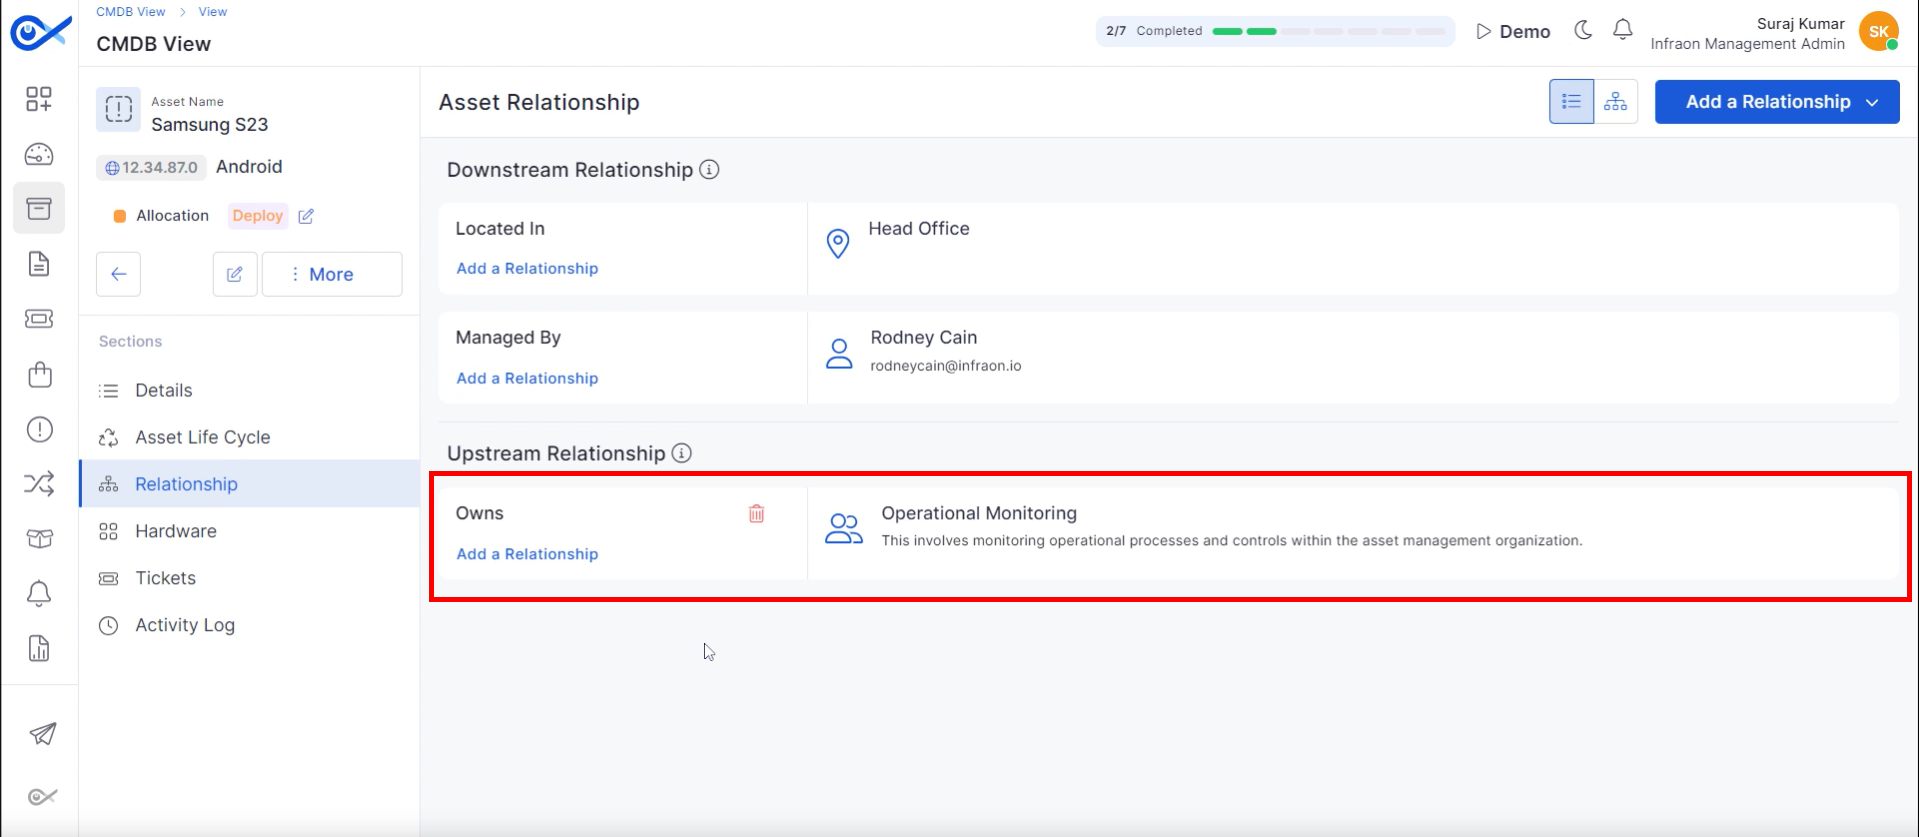
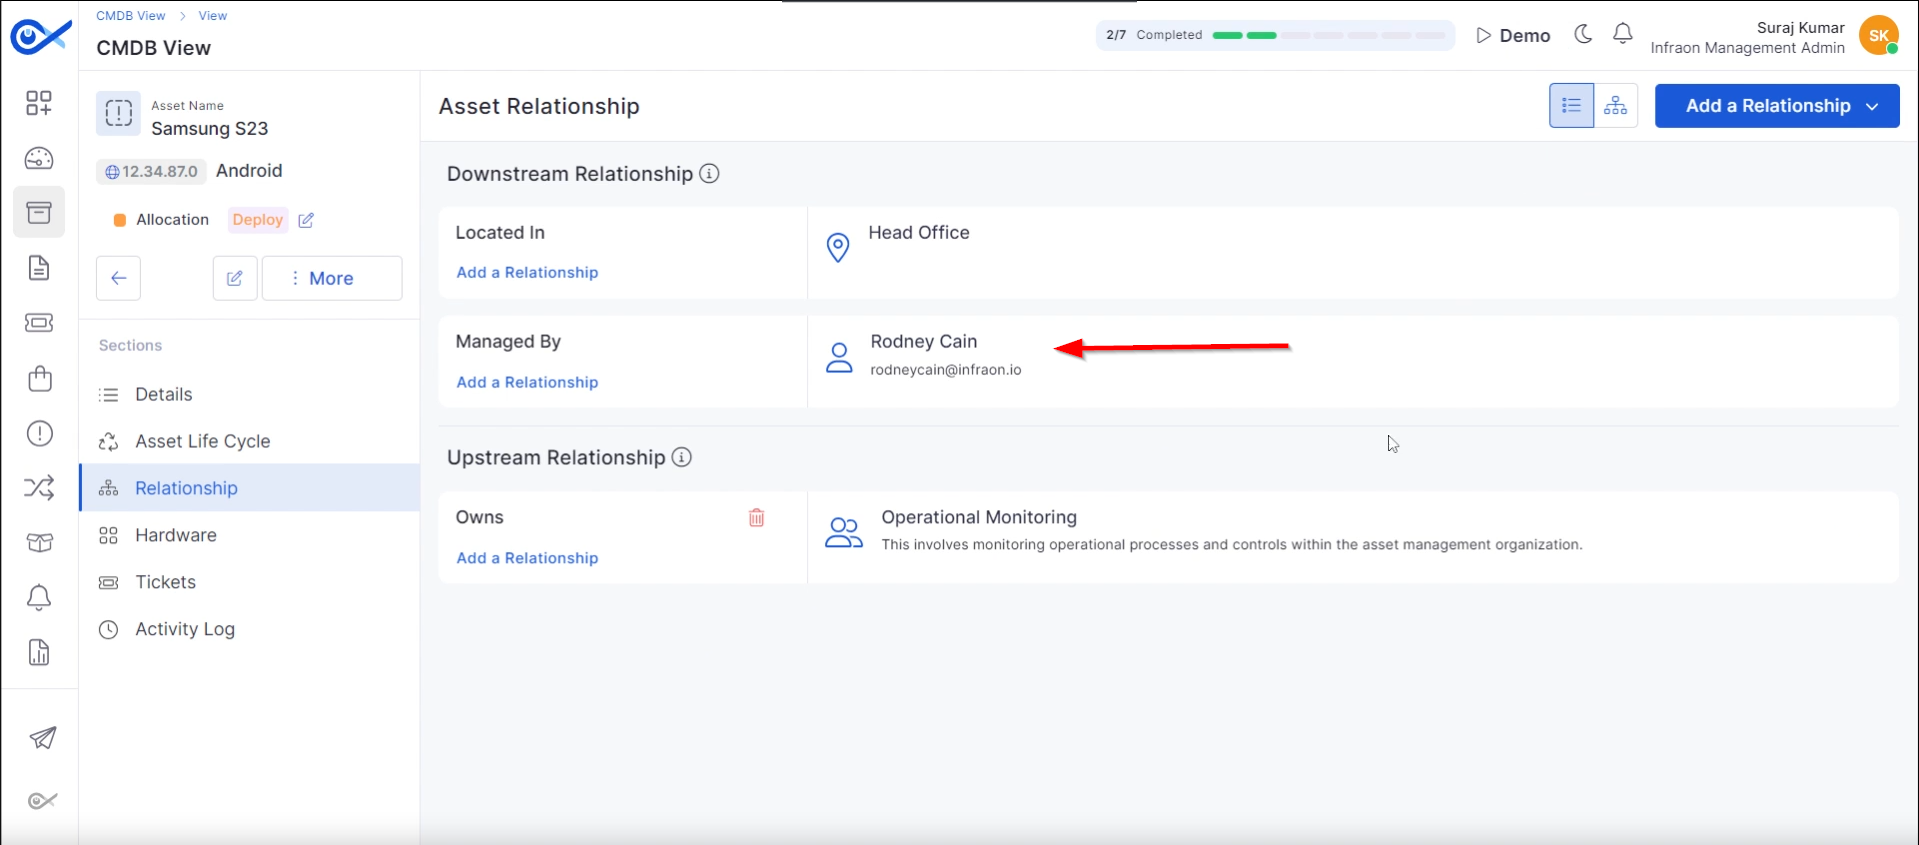
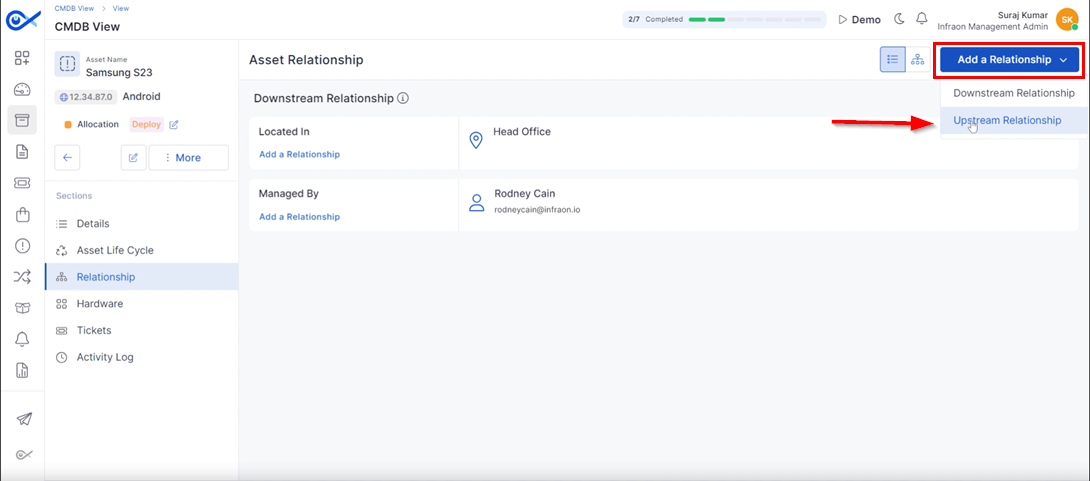
The configured relationship means that the asset is located in the head office and managed by Rodney Cain in the downstream relationship. The upstream relationship shows the asset is "Owned by" the Operational Monitoring Department.
Infraon offers two views to view the relationship page: List View and Map View.
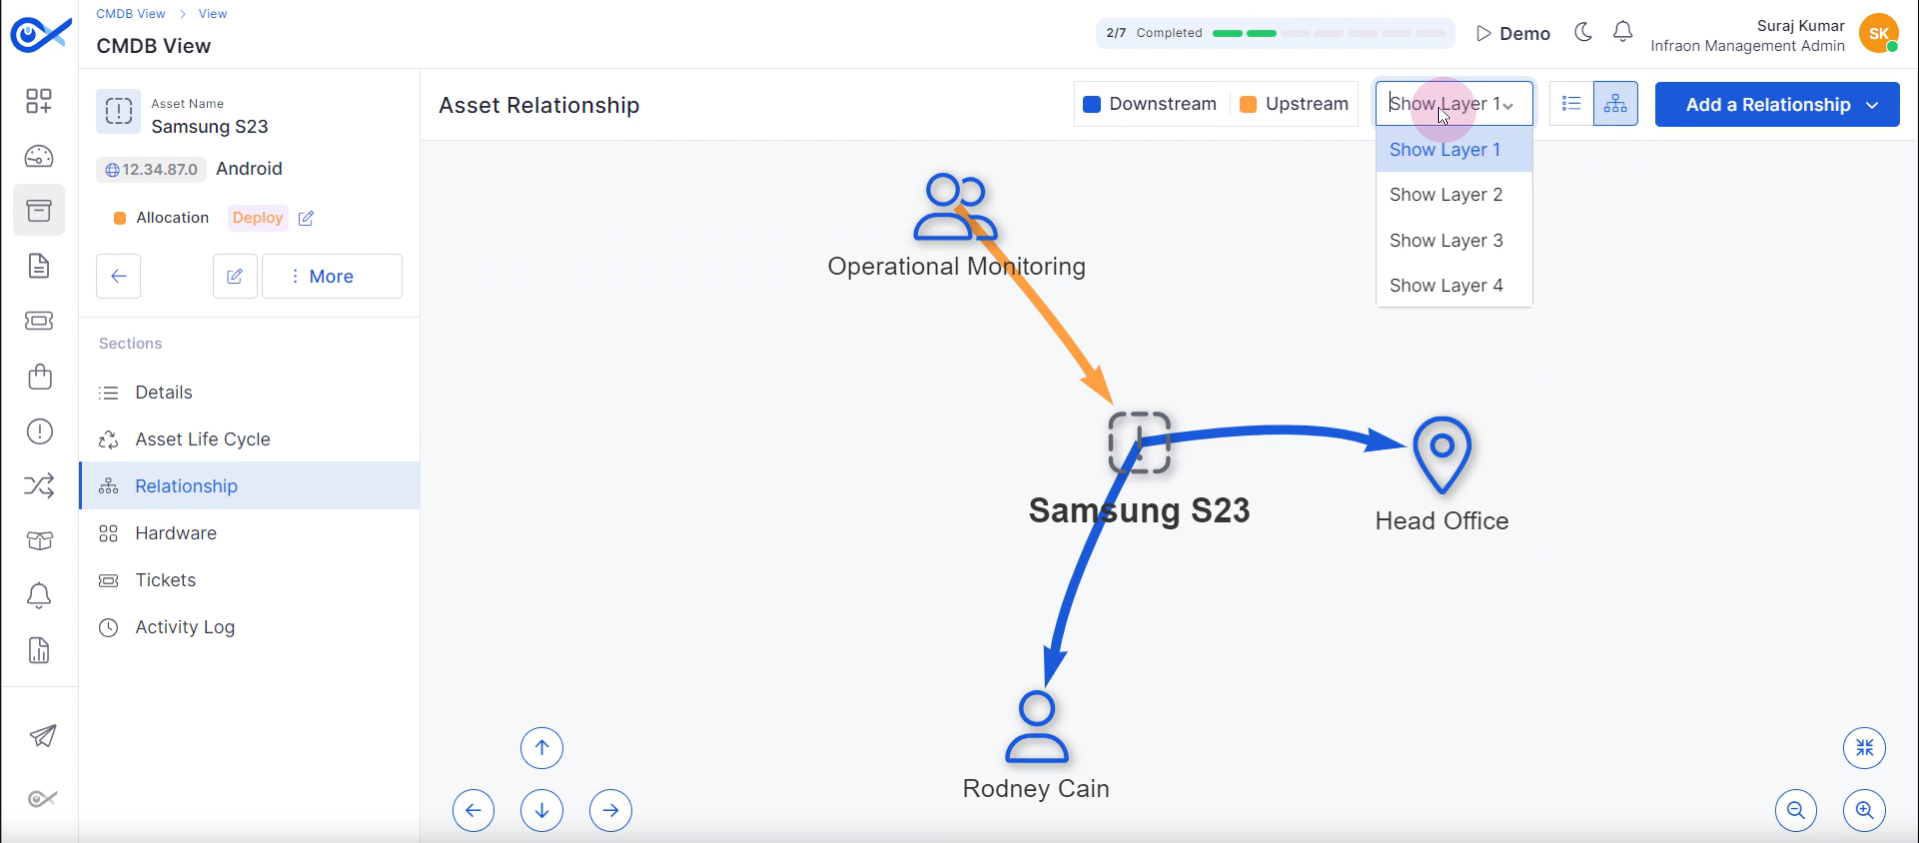
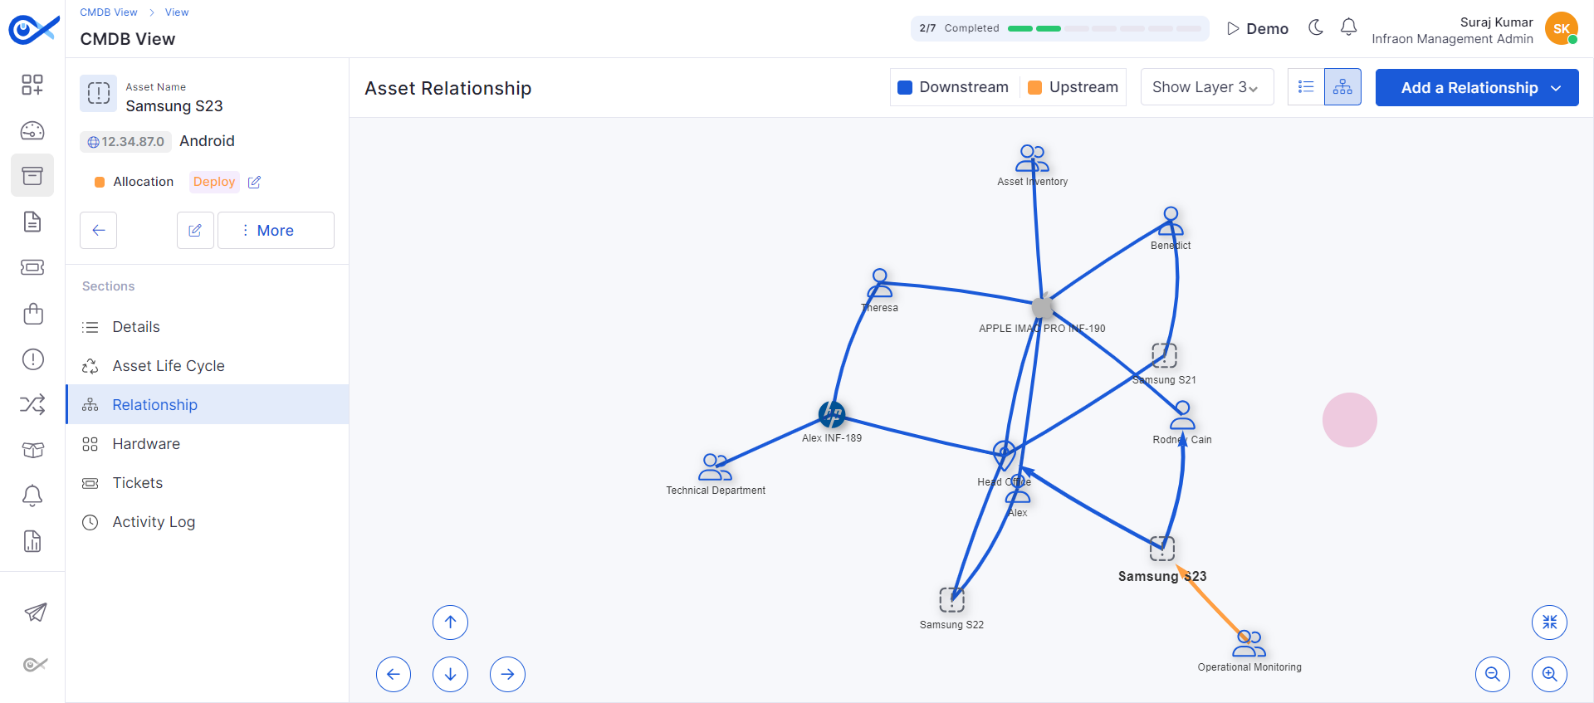
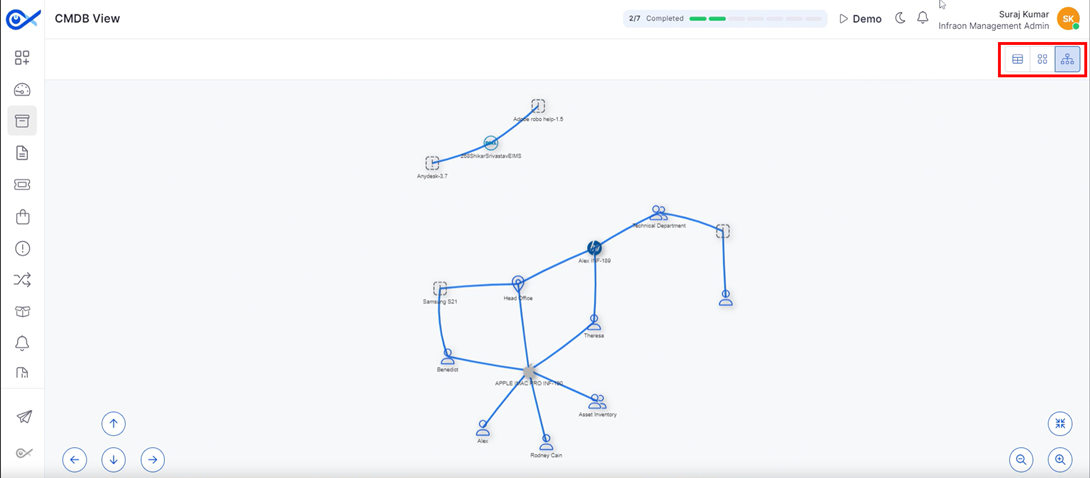
The Map view visually represents asset connections, showing upstream and downstream relationships. Technicians can view the topology based on different layers, with Layer 3 CI relationships as the default.
The map view offers multiple layers (1-5) for visualizing asset relationships. The default view shows Layer 3 connections. Selecting a different layer will adjust the map to display the corresponding level of relationships.
The screen navigation controls are located at the bottom. Technicians can zoom in, out, and pan using the provided buttons or arrow keys.
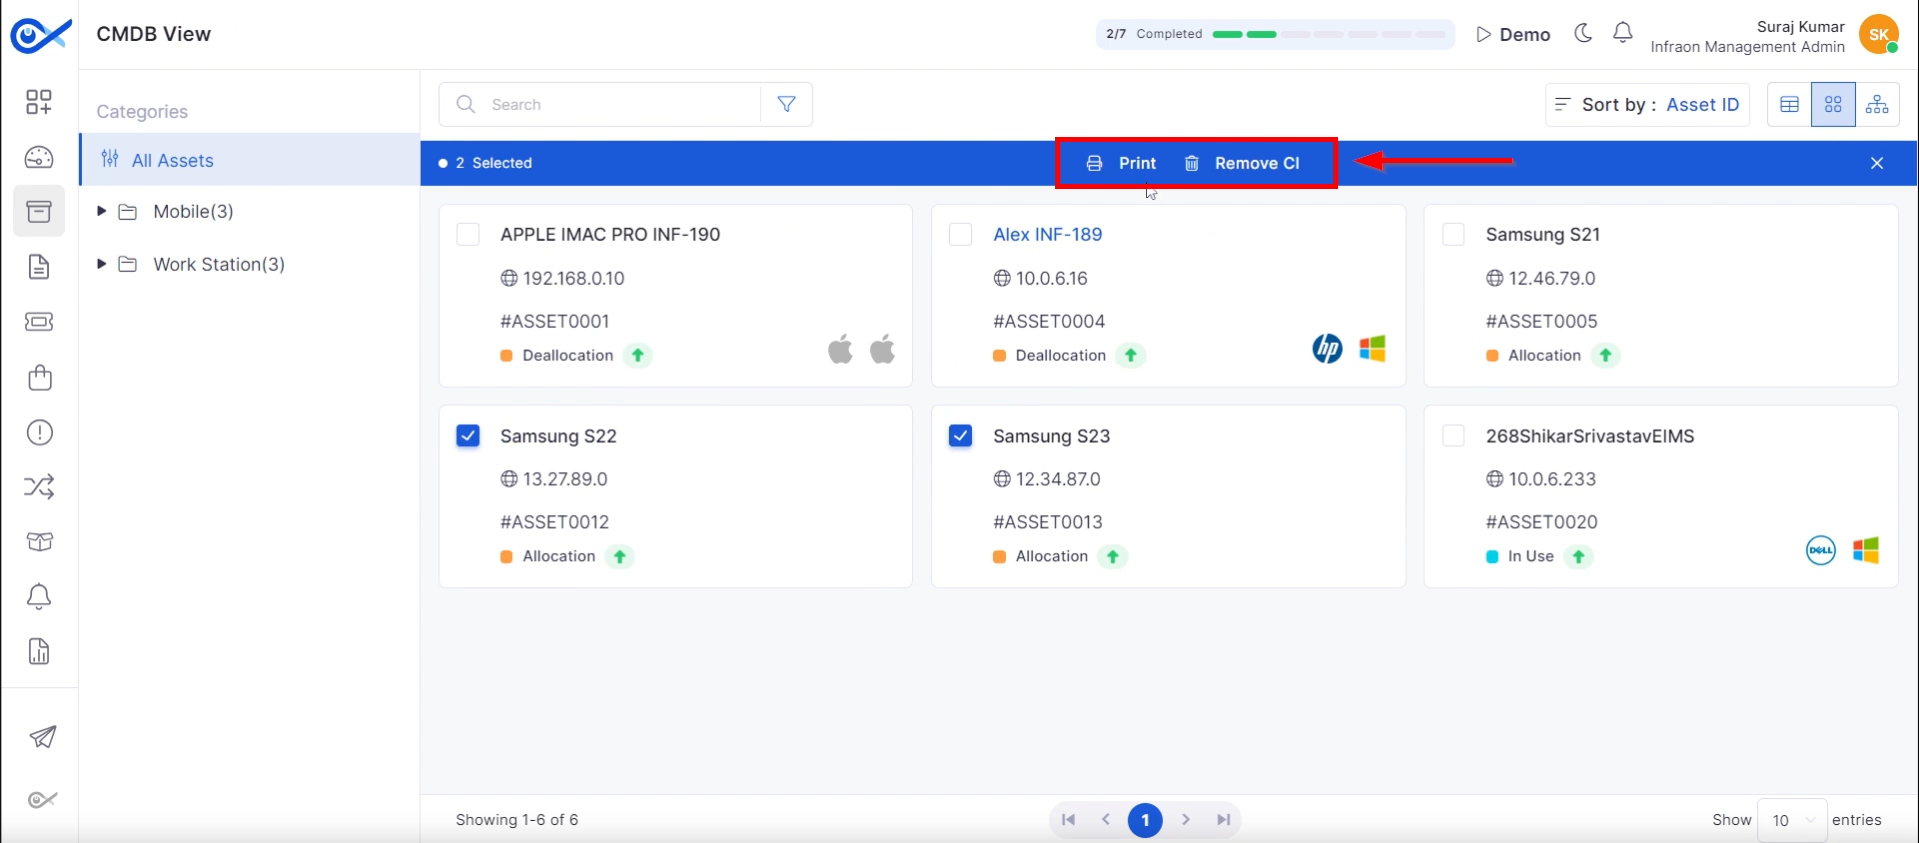
Select multiple assets on the CMDB view page. A top panel with options to Print or Remove CI will appear.
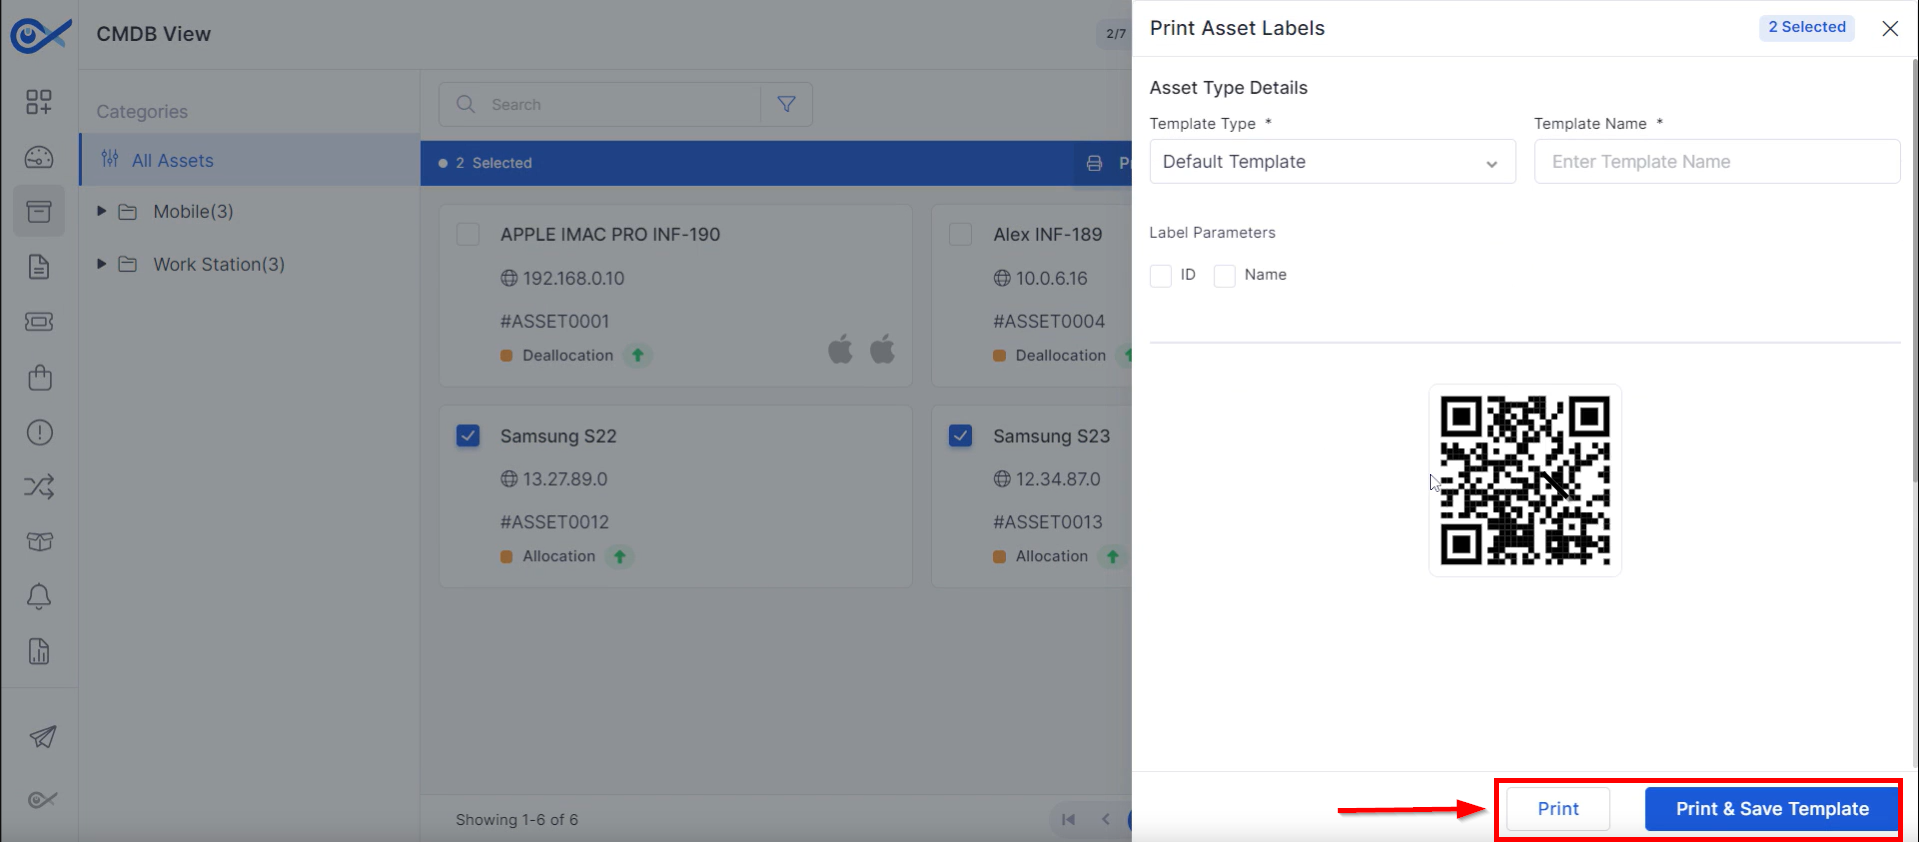
Step 1: Click the print option to print QR or barcode labels for selected assets. Customize labels by including the asset ID, name, or other relevant information.
Step 2: To print and store the template later, click 'Print and Save a Template.'
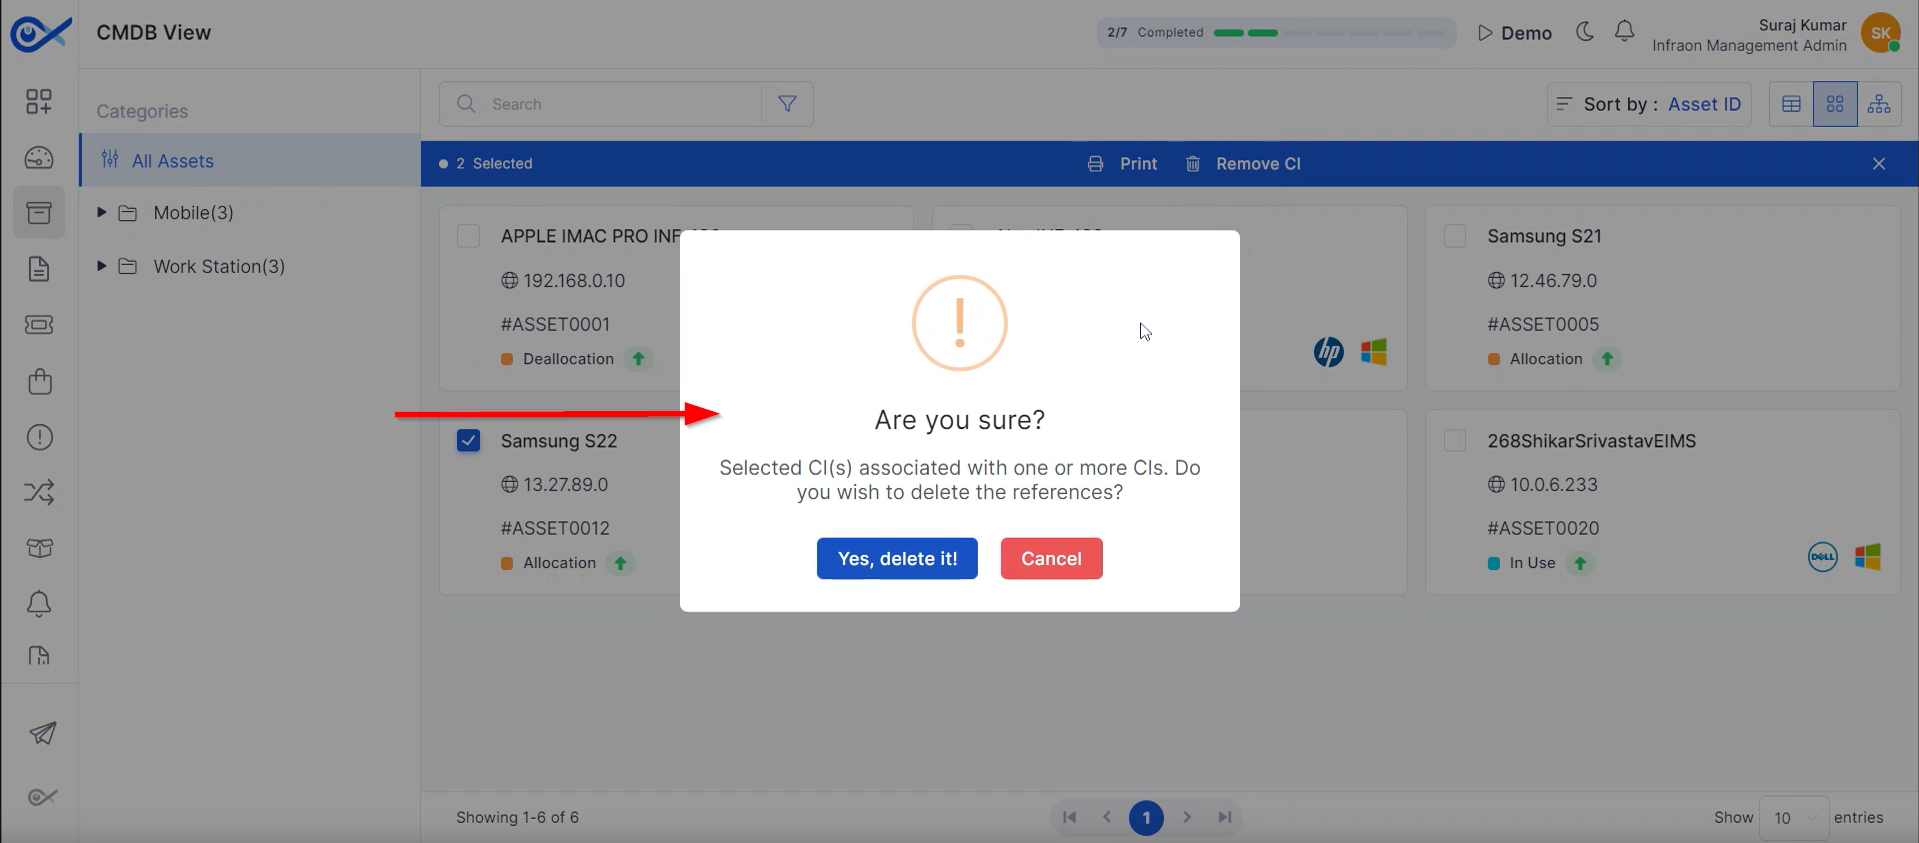
To remove a configuration item (CI) from an asset, select the asset and click “Remove CI.” Confirm the action to delete the CI from the CMDB view permanently.
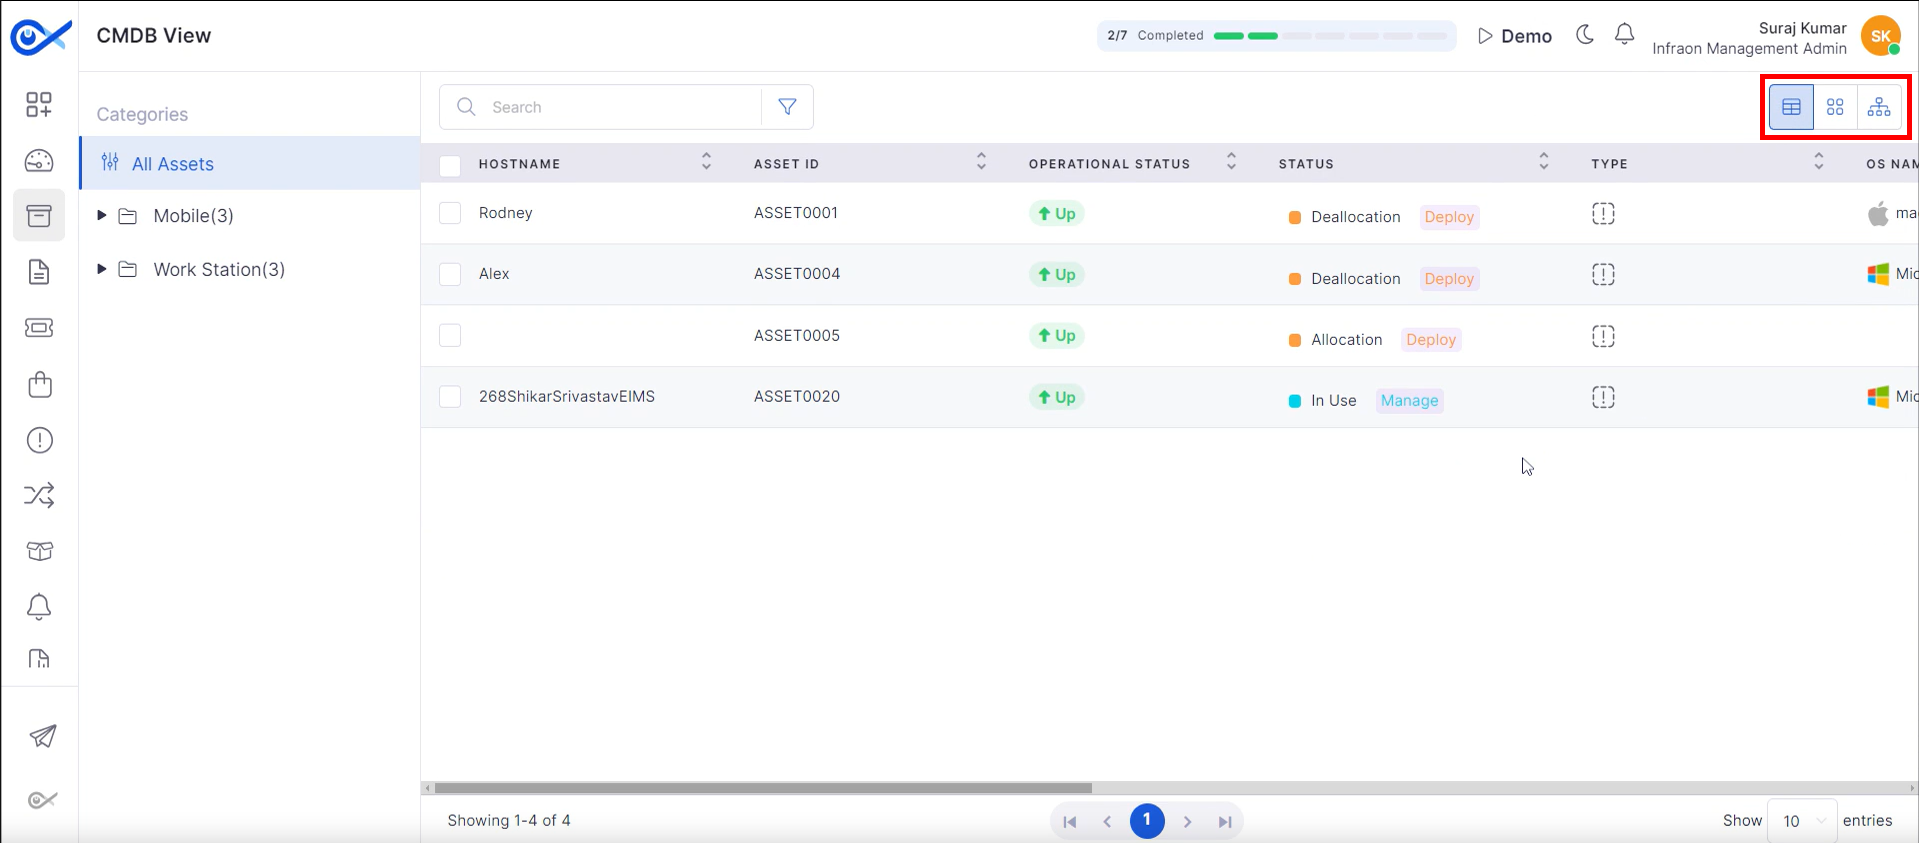
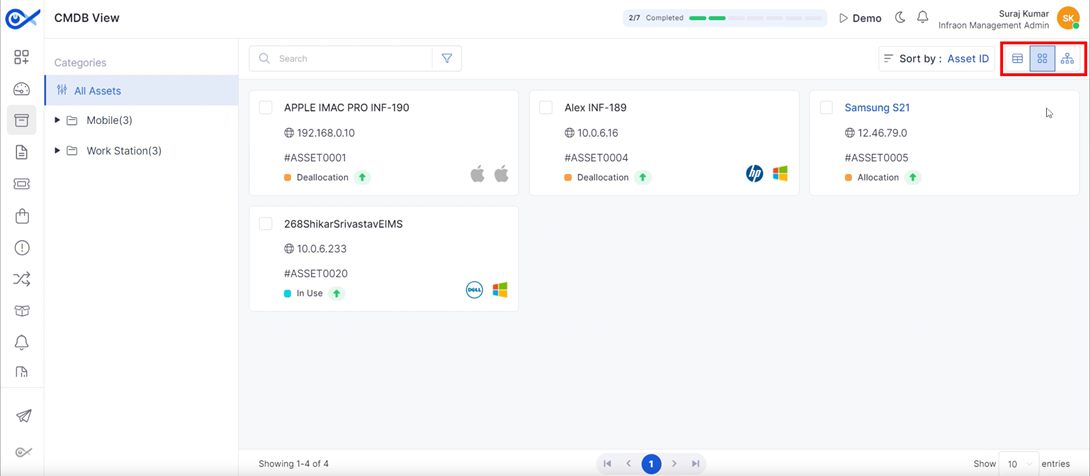
Infraon provides three CMDB view options.
The Grid view presents data in a tabular format, offering a quick overview of configuration items.
The Card view, the default format, offers a more detailed asset overview in a card-like layout.
The Map view presents asset information in a visual, geographical format.
This concludes the CMDB view of the Infraon Infinity platform.
This guide will explore the asset categories in the Infraon Infinity platform.
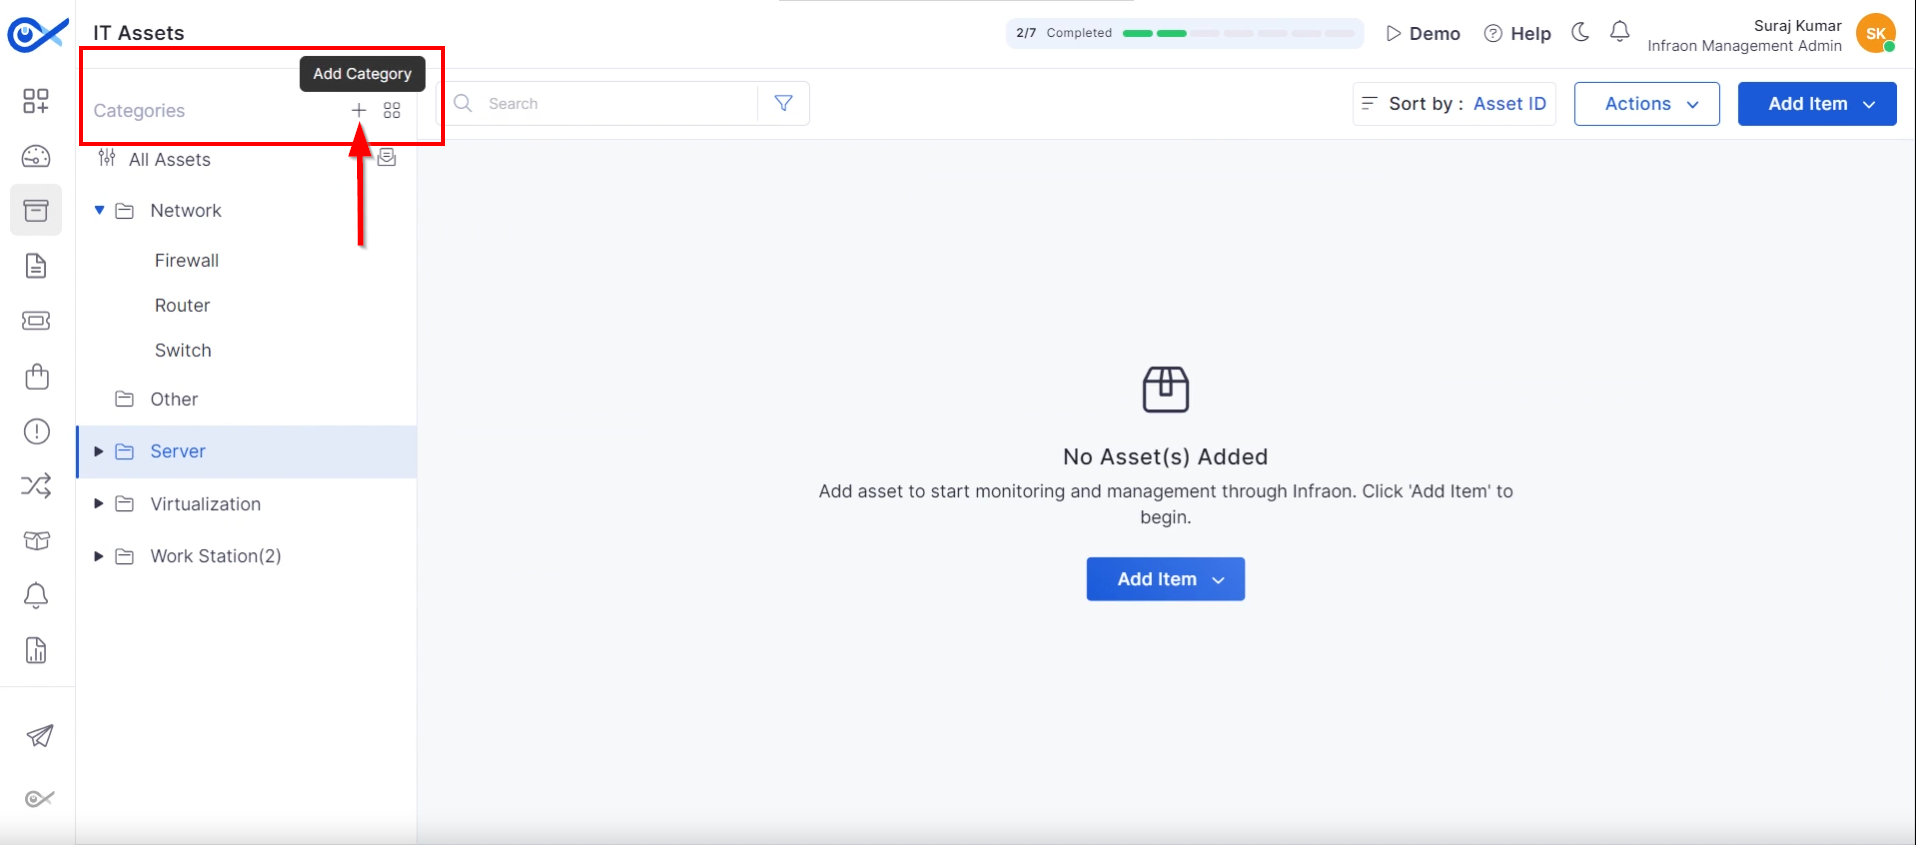
Step 1: Create a new category by clicking the "plus" icon. Clicking the indicated icon will open the asset category creation form.
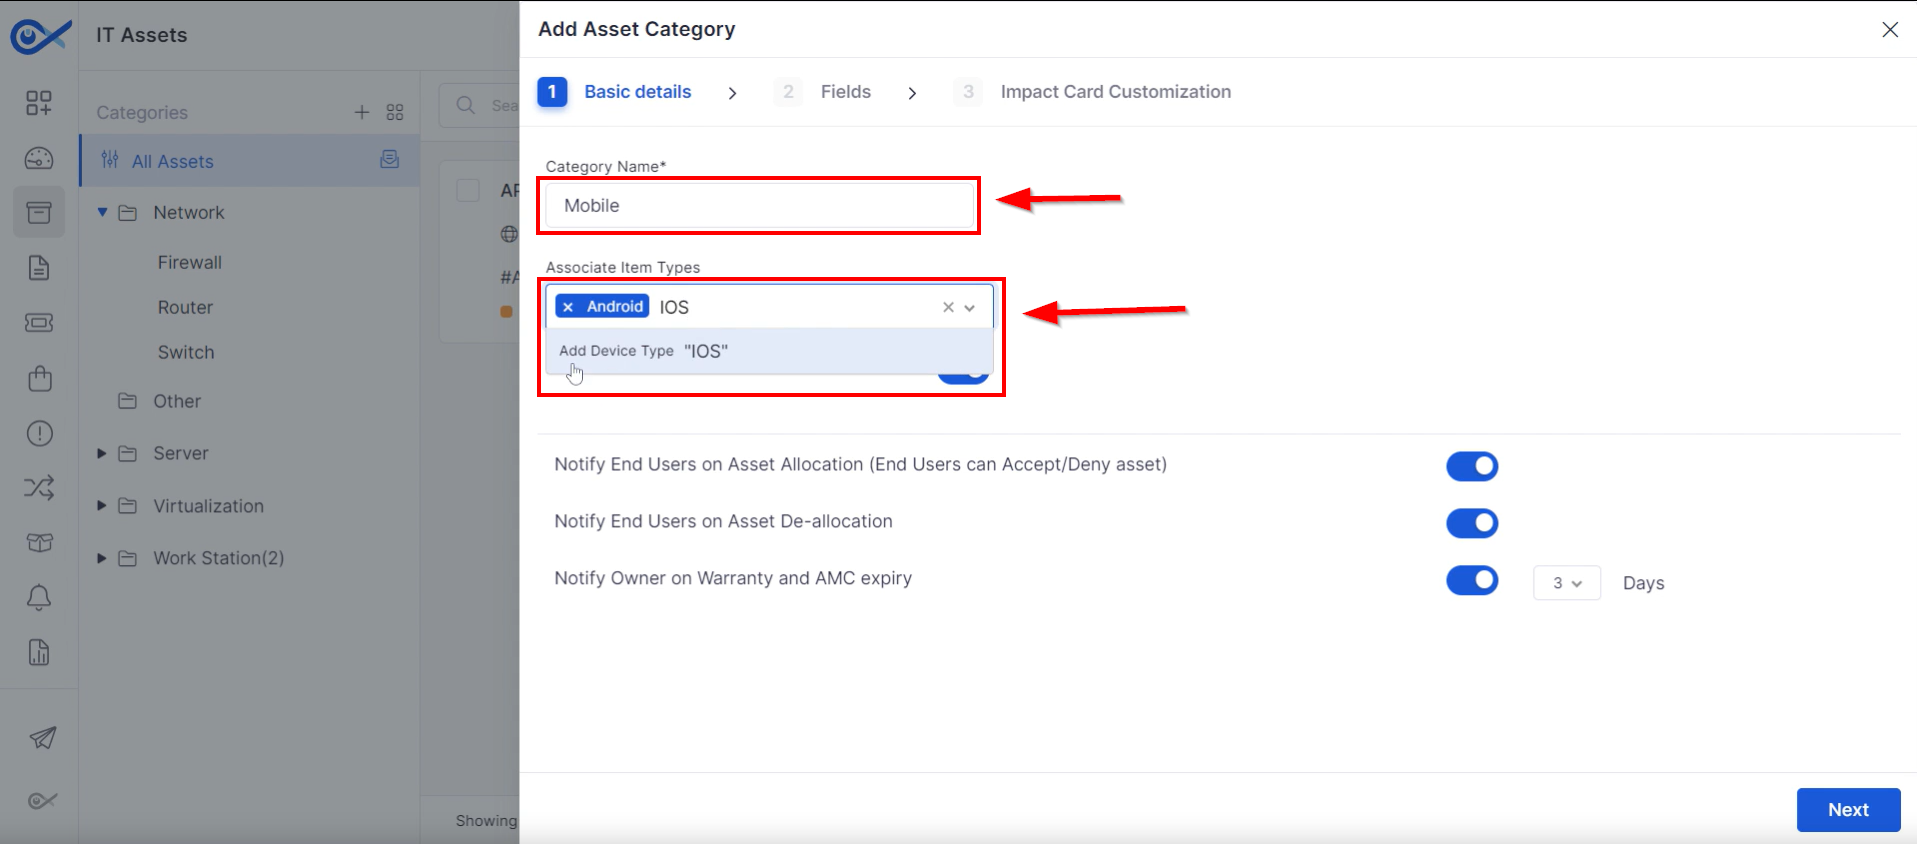
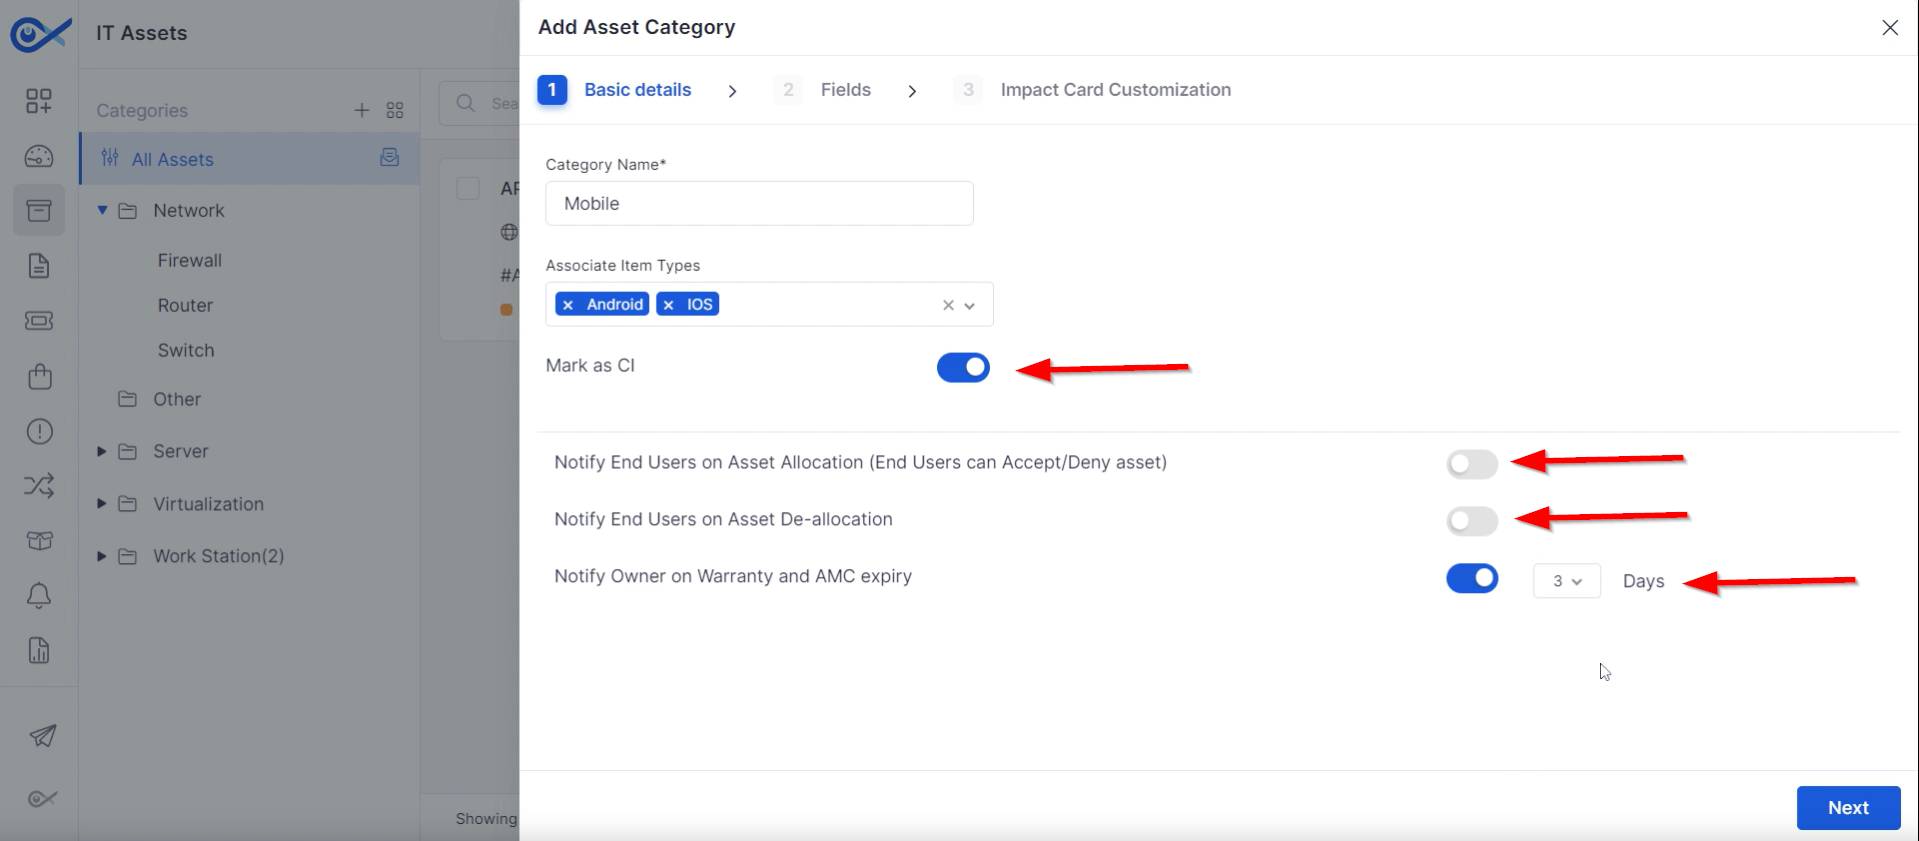
Step 2: Enter a name for the category and specify associated item types (e.g., Android). Clicking "Add a device" will include specified item types in the category.
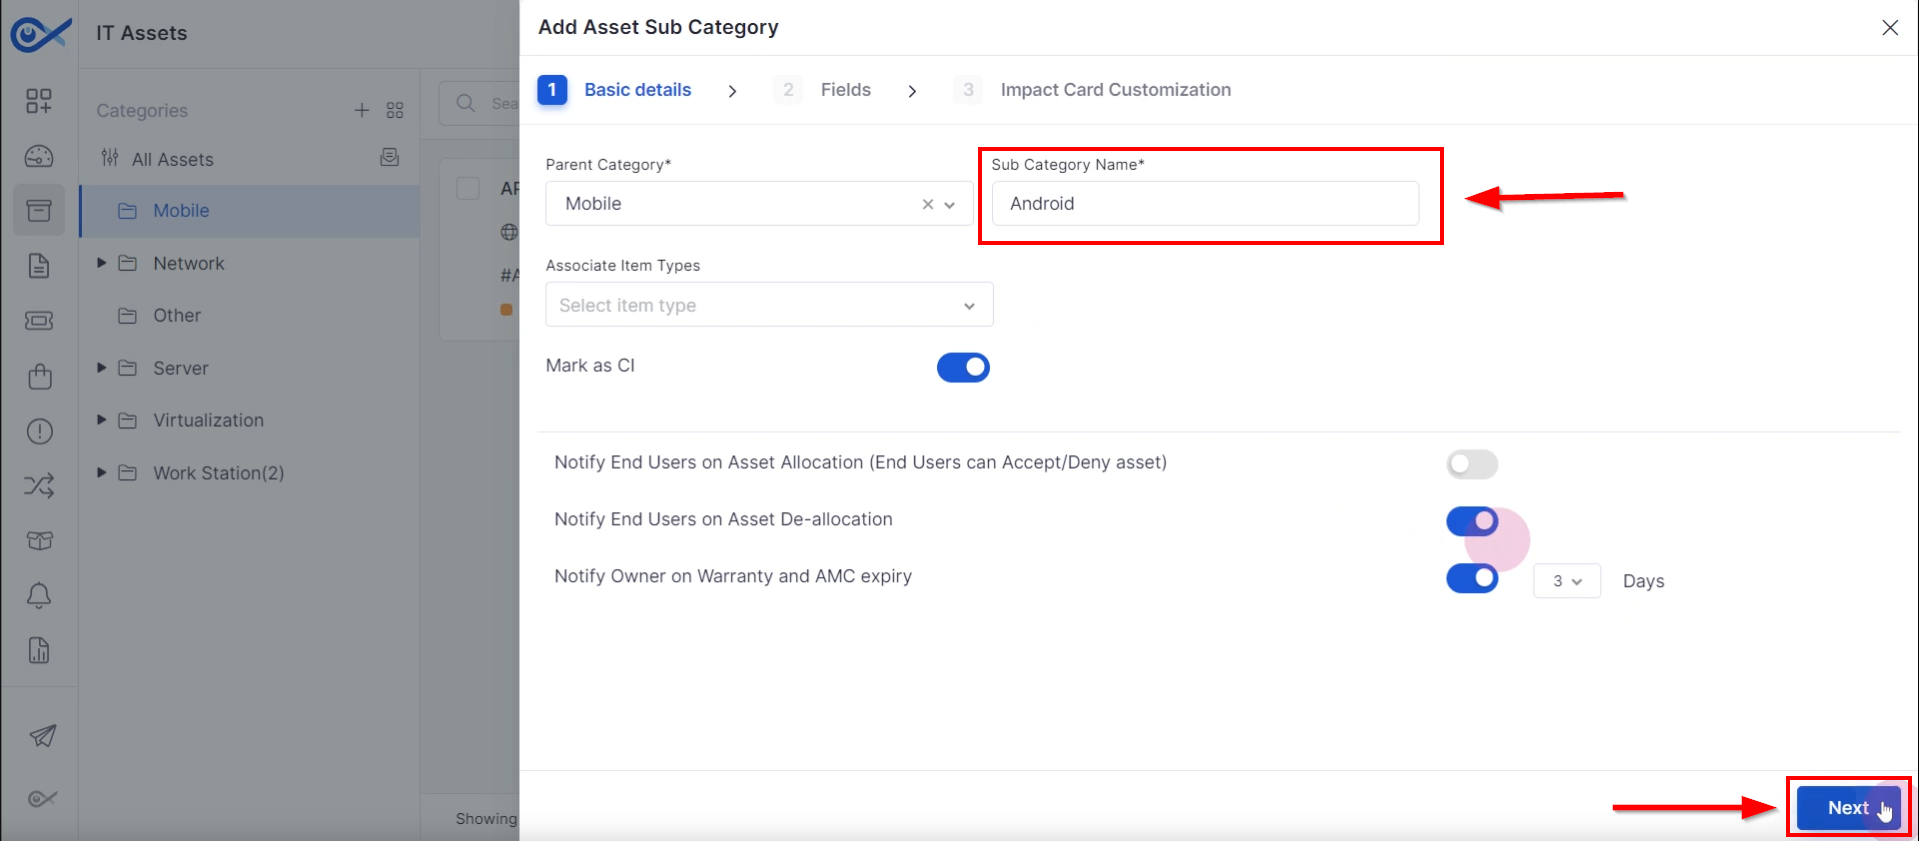
Step 3: Configure basic details:
Enable the “Mark as CI” option to include the asset in the CMDB configuration page.
This guide will explore the software inventory tab in the Infraon Infinity platform. This tutorial guides technicians through managing software inventory, establishing CI relationships, and importing software via CSV file.
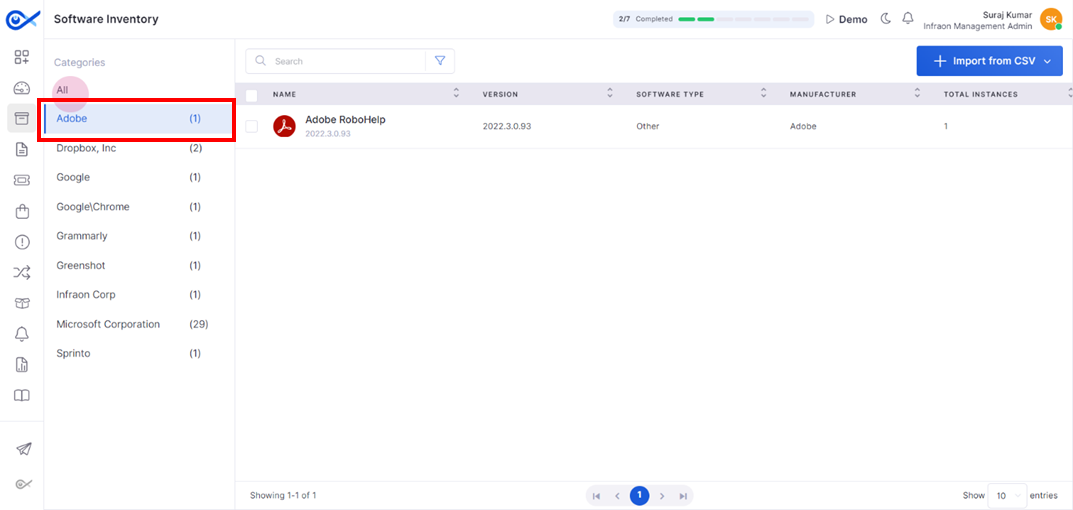
In the Software inventory tab, view the software installed on systems where the agent has been deployed.
Select the desired manufacturer from the left panel to view software for a specific manufacturer.
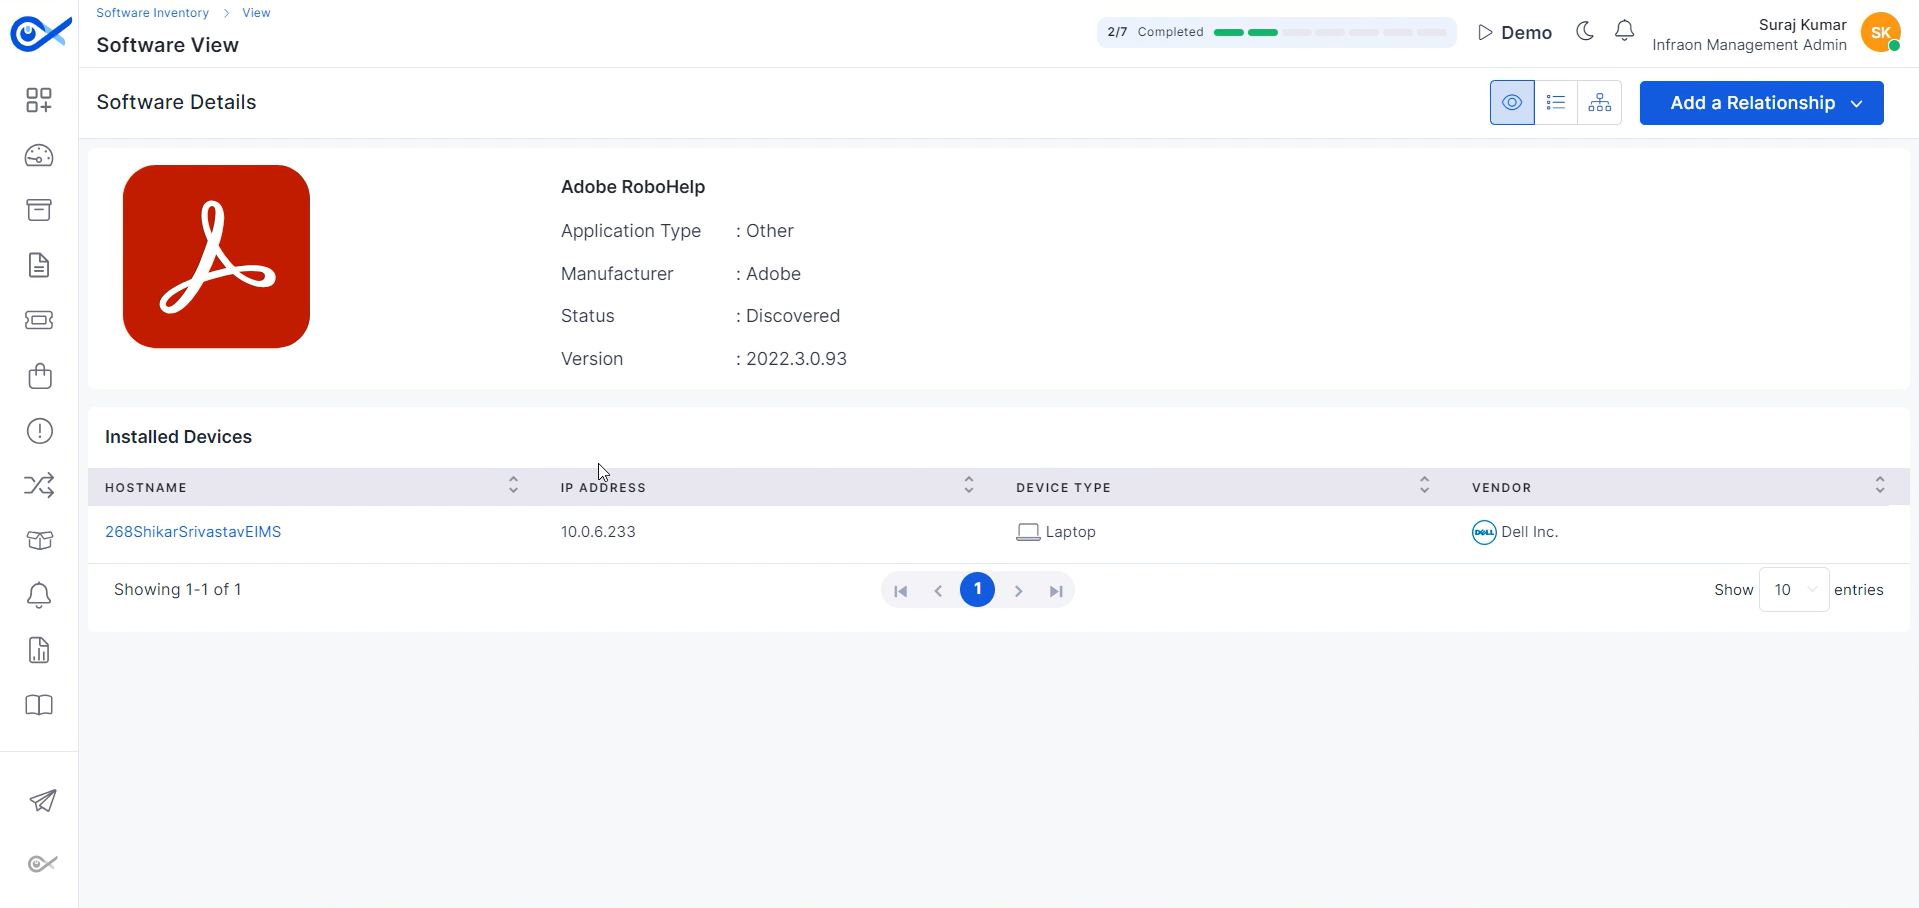
Identify the software name, version, type, manufacturer, and total instance count on the software page.
Click on the software listing to access in-depth software details. Information includes hostname, installation path, type, manufacturer, status, and version.
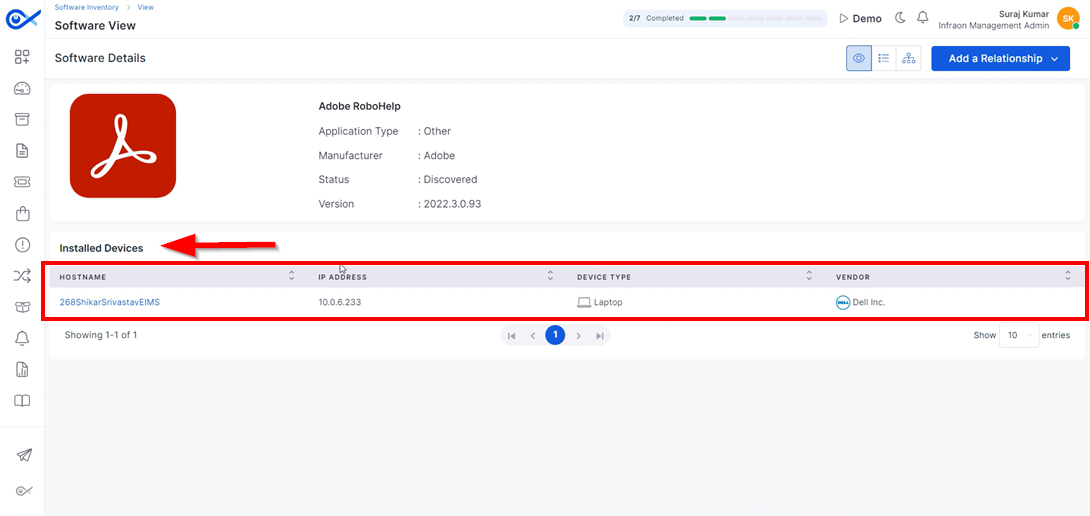
The “Installed Devices” section displays the hostname, IP address, device type, vendor, and installed assets.








Select whether to send email notifications to asset requesters by notifying end-users of asset allocation.
Determine if an acknowledgment email should be sent upon asset deallocation.
Choose whether to send notifications for upcoming warranty or AMC expiration.
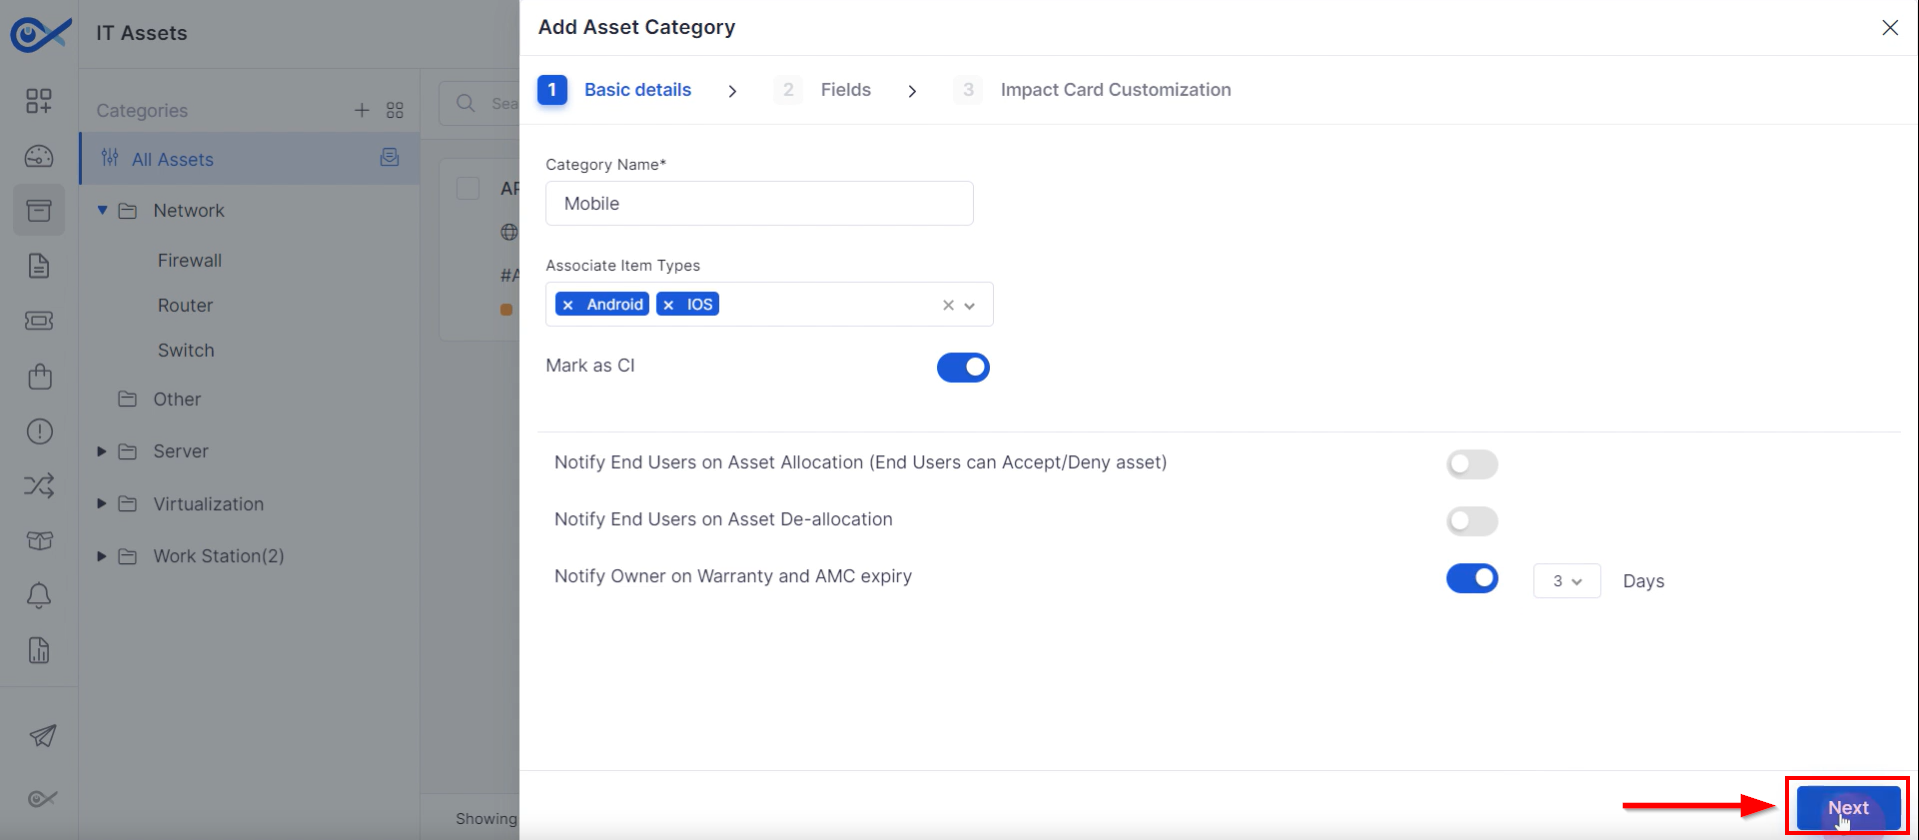
Step 4: Click "Next" to access the field configuration stage.
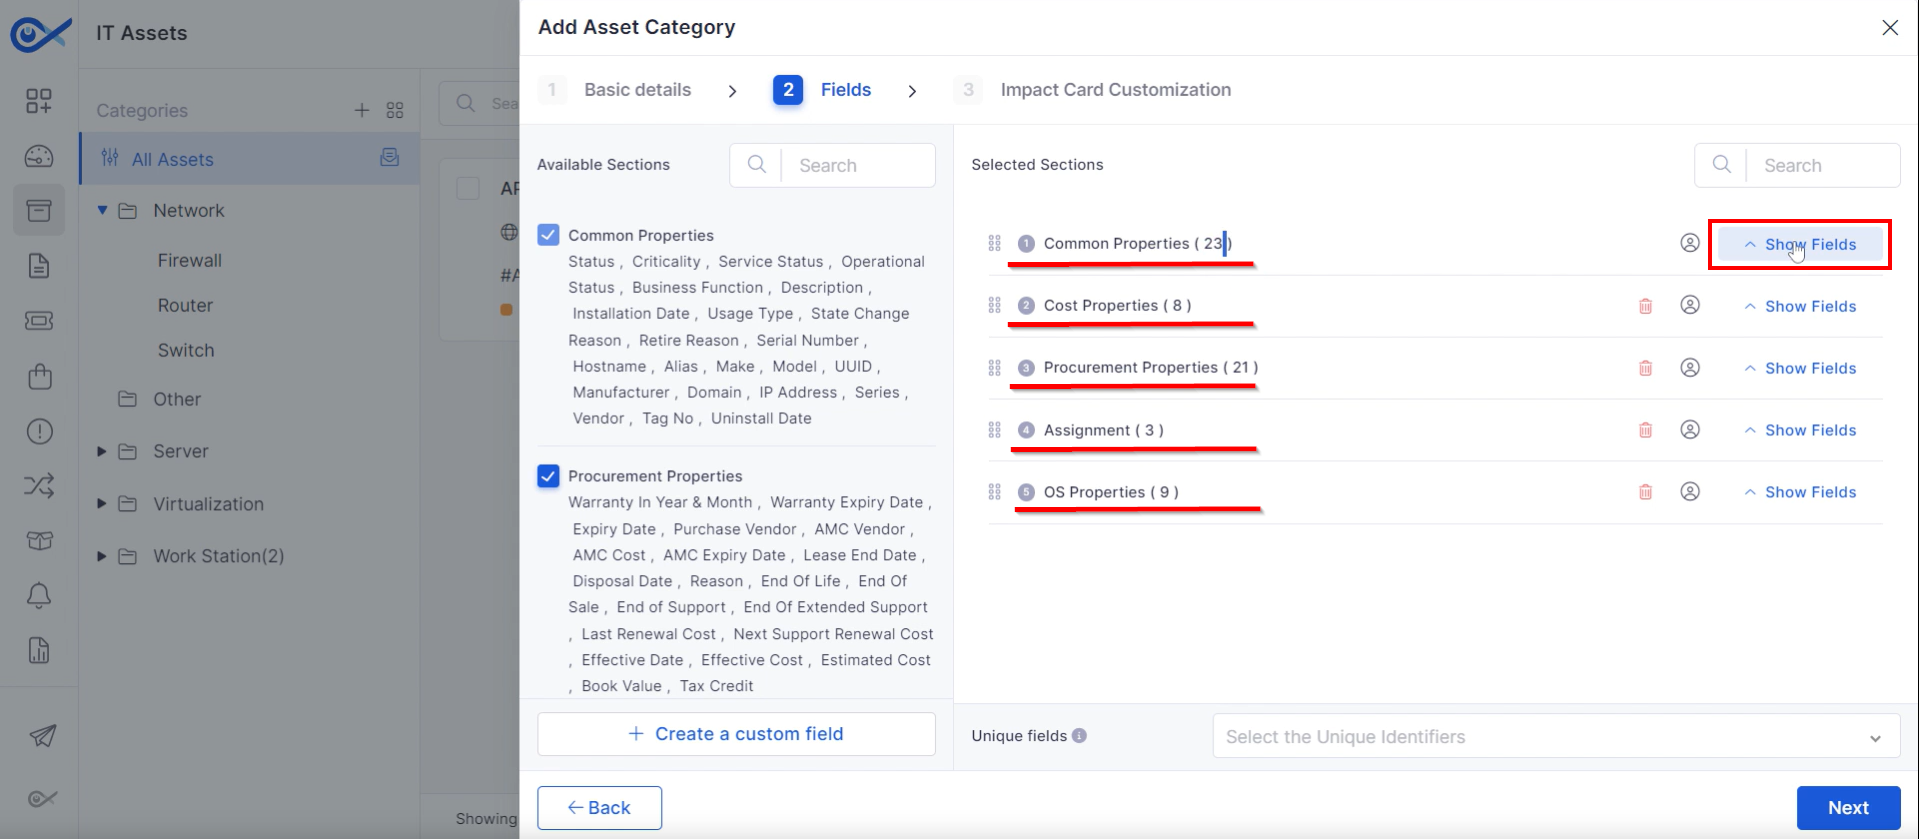
Step 1: Choose from Common, Cost, Procurement, Assignment, and OS properties. Clicking "Show Fields" at the extreme right panel will display the available input fields (status, criticality, model, serial number, etc.).
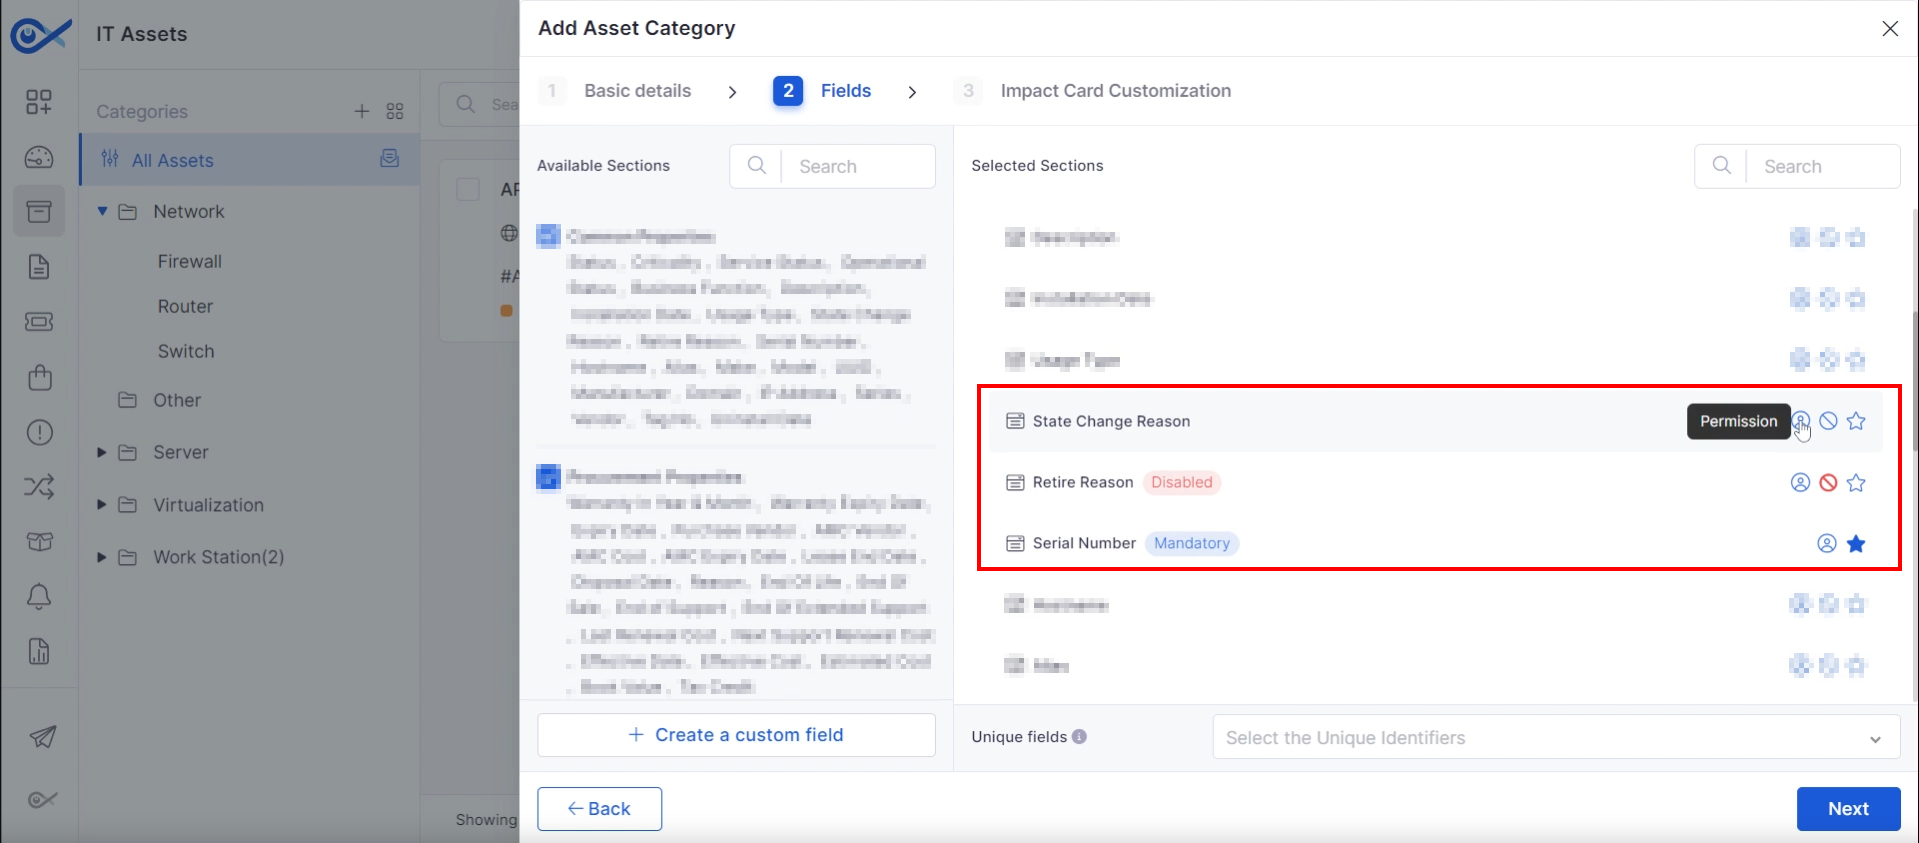
Step 2: Configure field properties:
Mark fields as mandatory using the "Mandatory" icon.
Prevent field modification by clicking the disable icon.
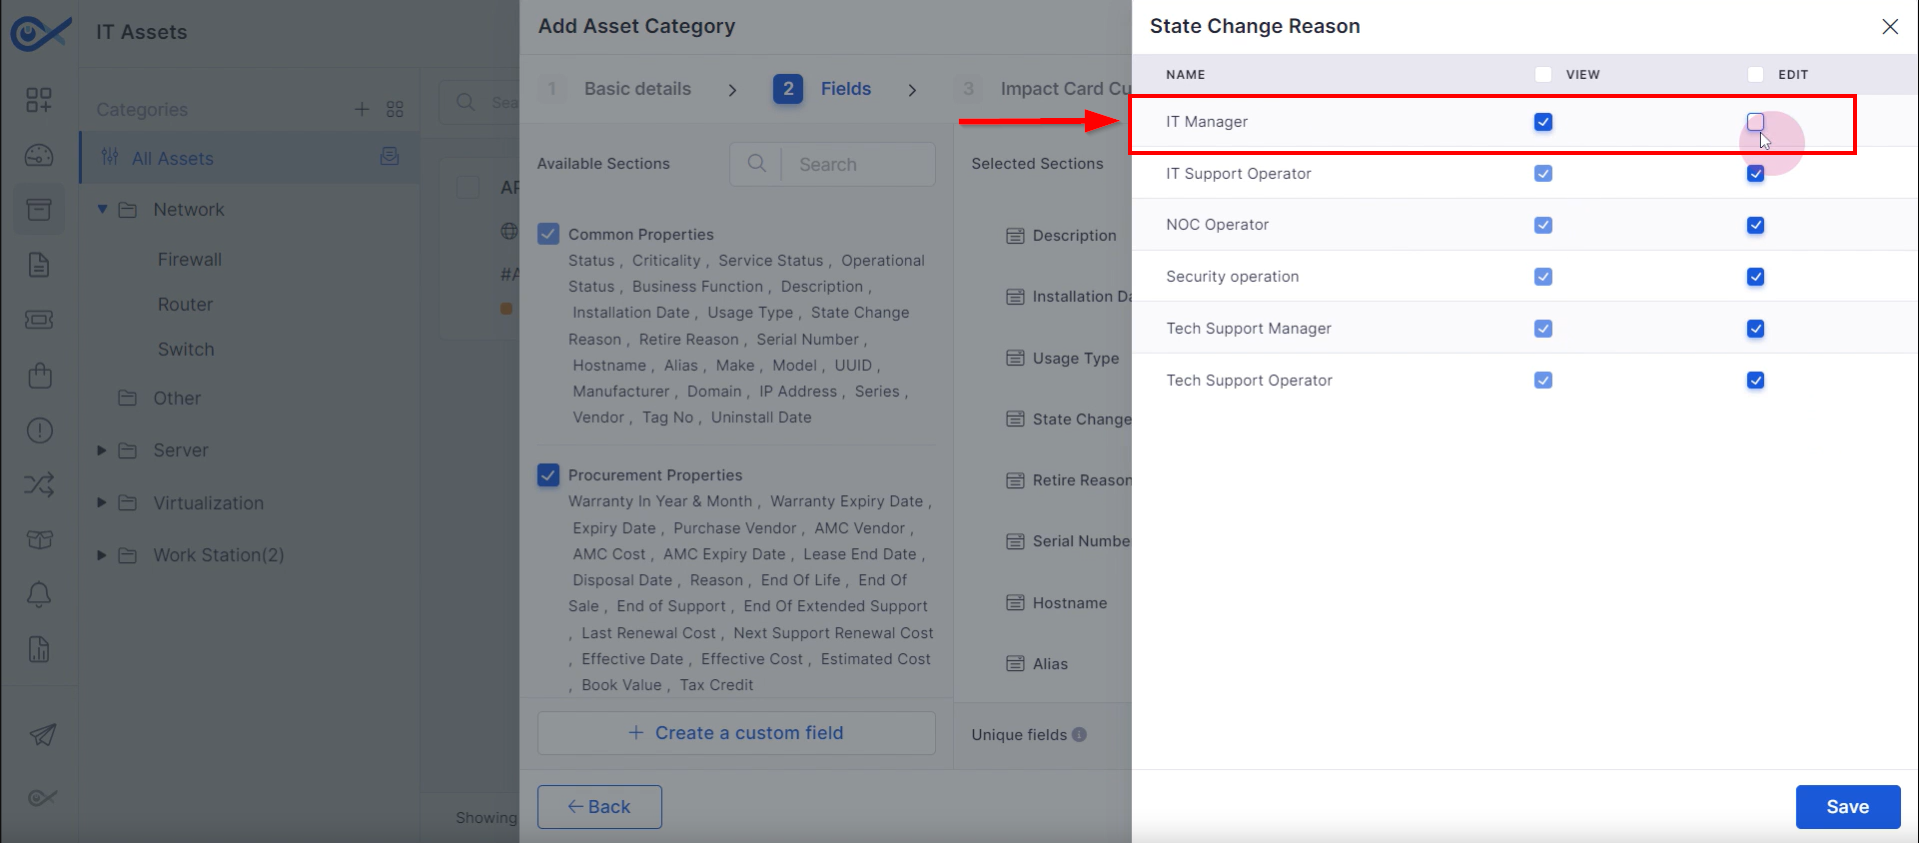
Control field visibility and editing rights using the "Permission" option.
Selecting the “Permission” option opens a popup displaying user roles and their associated permissions. Technicians can adjust these permissions by checking or unchecking the corresponding boxes.
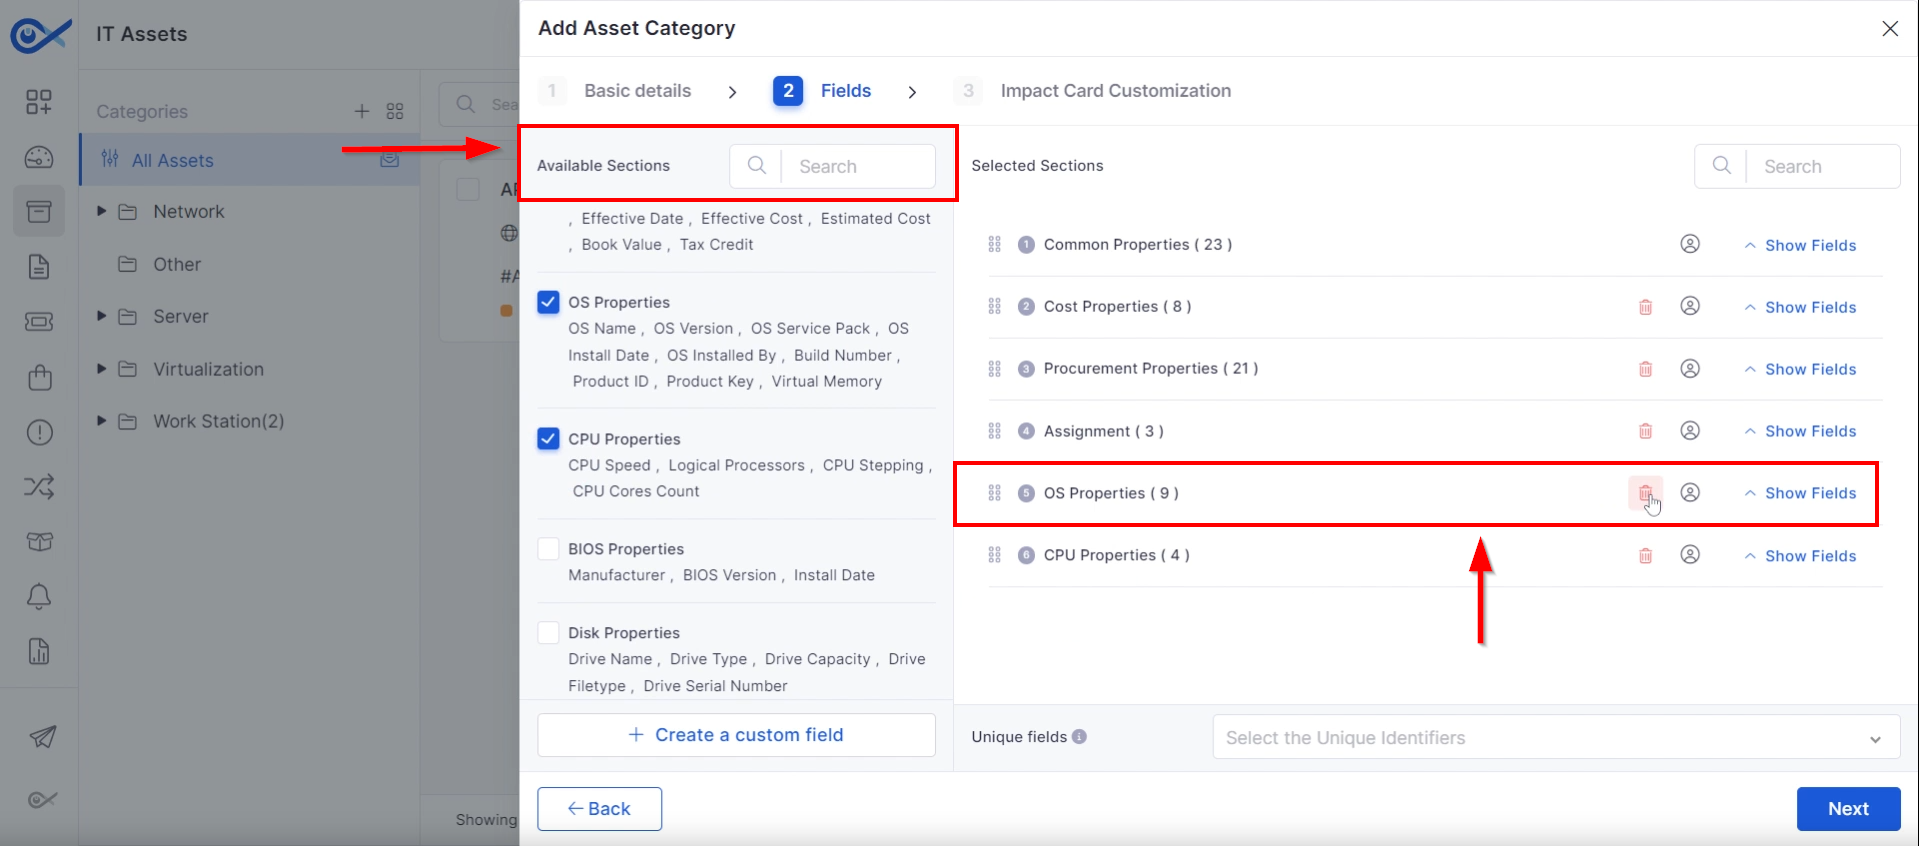
Step 3: Editing custom fields:
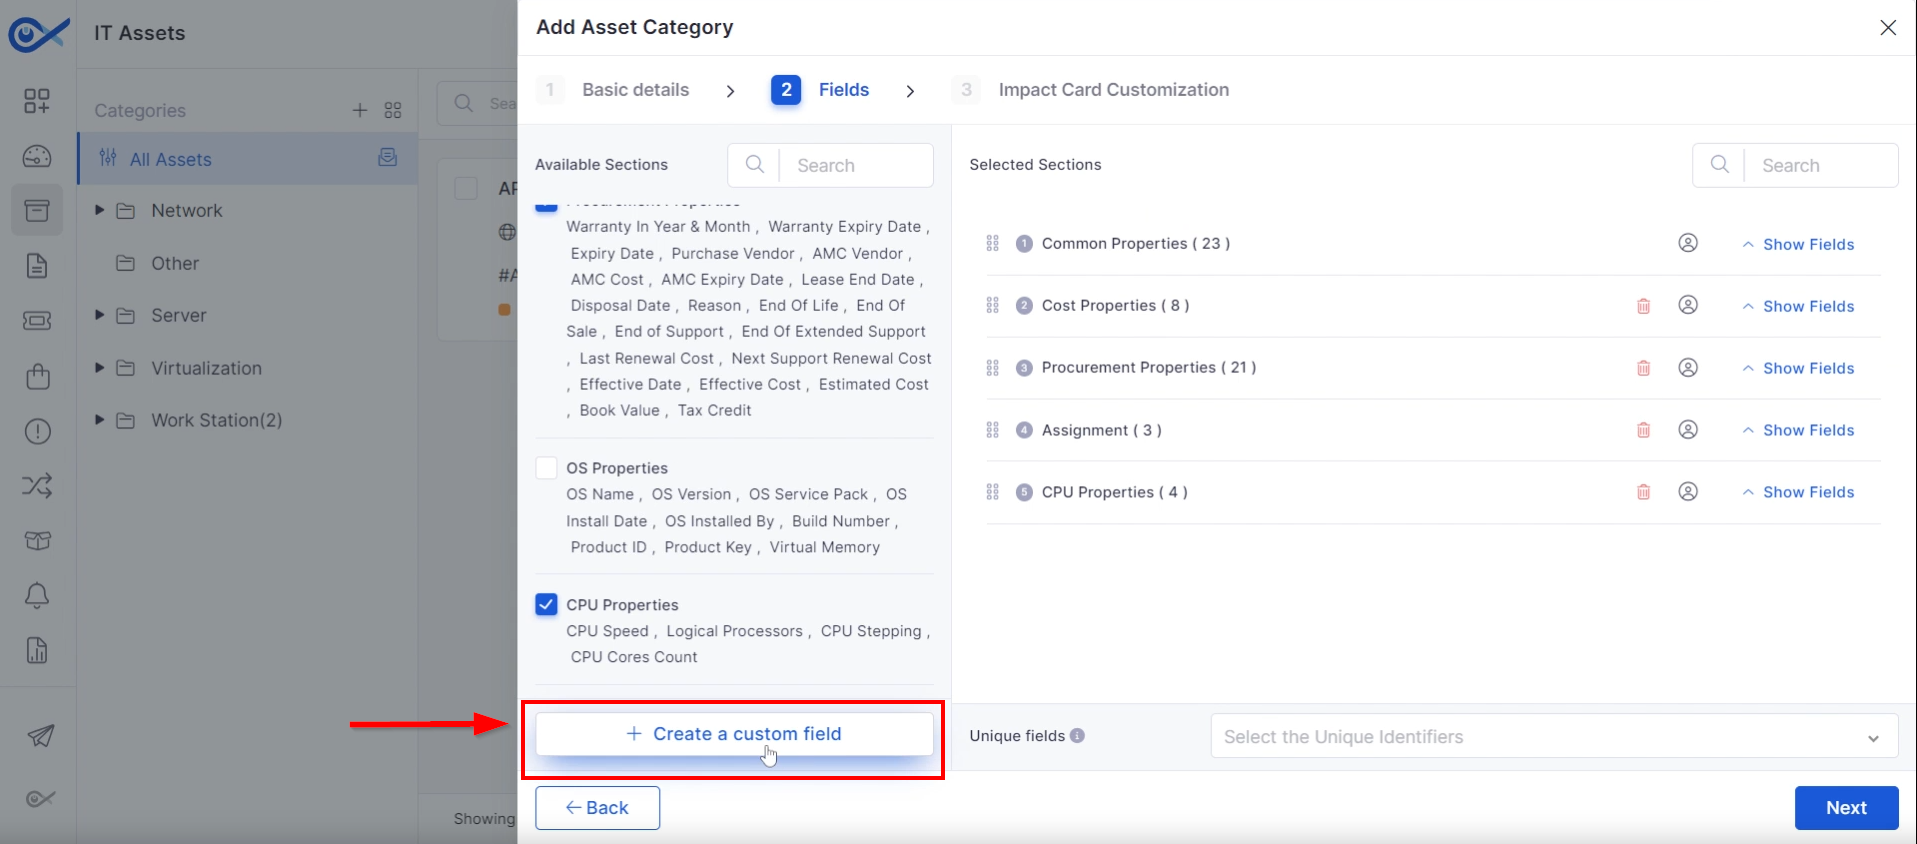
The left side of the interface features “Available sections,” which lists both default and custom field categories provided by Infraon. These categories can contain various property sections that technicians can add as needed. To include or exclude specific sections, check or uncheck the corresponding boxes.
Step 4: Create custom fields:
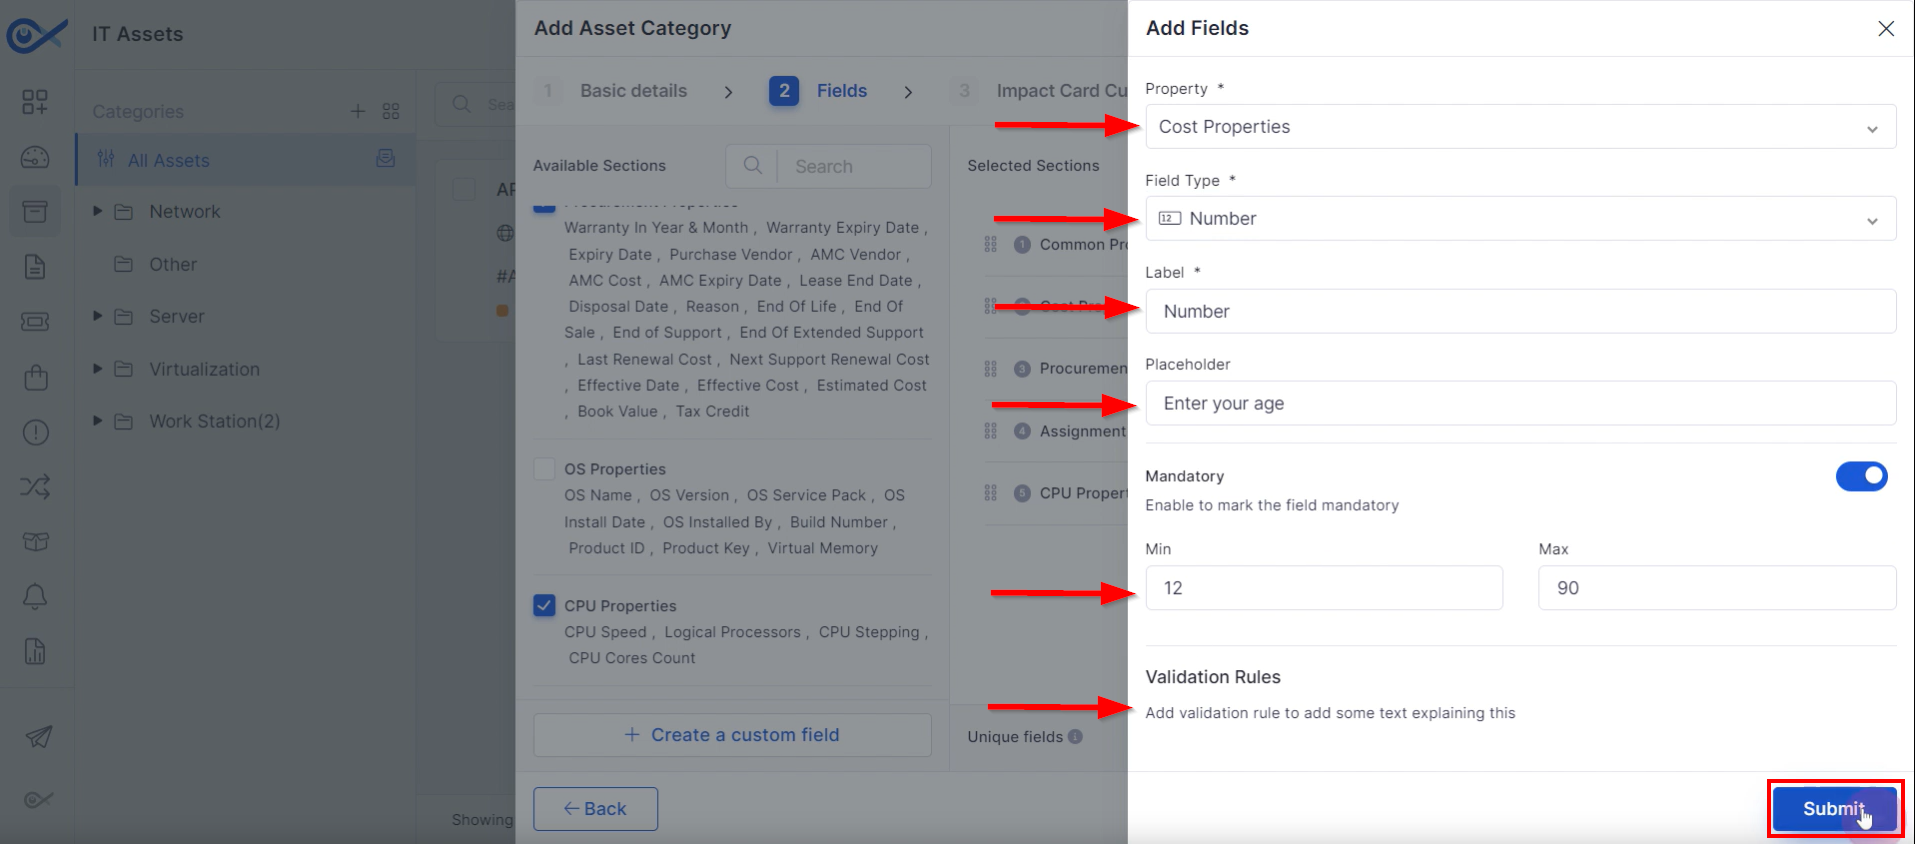
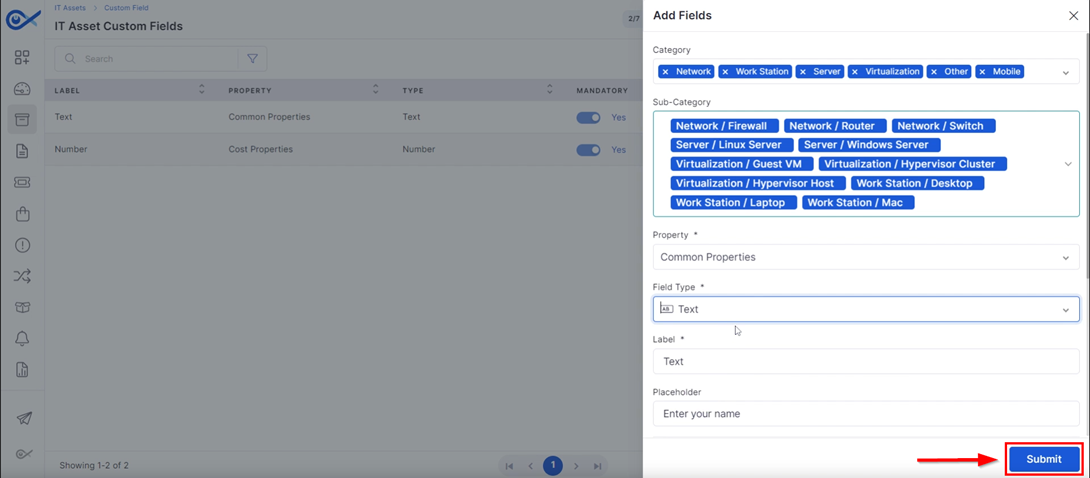
Click "Create a Custom Field" to define new fields.
Select the property type (cost, procurement, assignment, CPU).
Choose a field type (email, text, dropdown, etc.).
Configure field label, placeholder, and mandatory status.
Set validation rules as needed.
Associate the custom field with selected categories or subcategories.
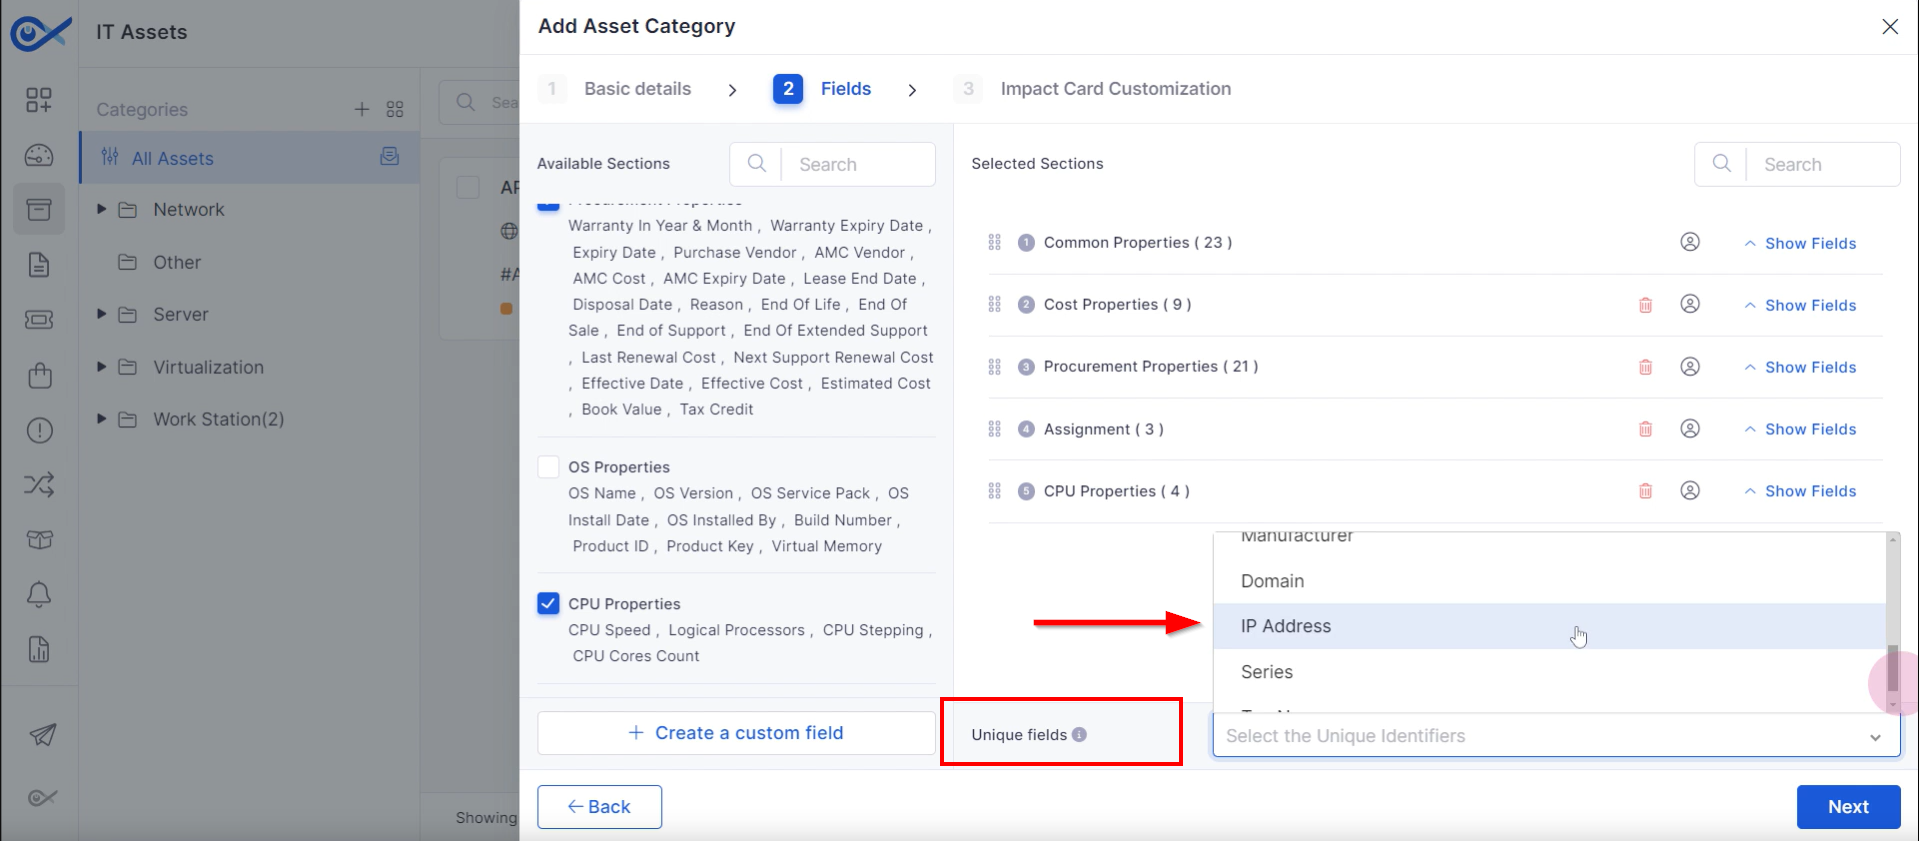
Step 1: To prevent duplicate entries within a category, technicians can choose a unique identifier from the dropdown menu. Available options include serial number, hostname, alias, make, model, UUID, manufacturer, domain, IP address, series, or tag number.
Selecting one of these identifiers guarantees data uniqueness within the category.
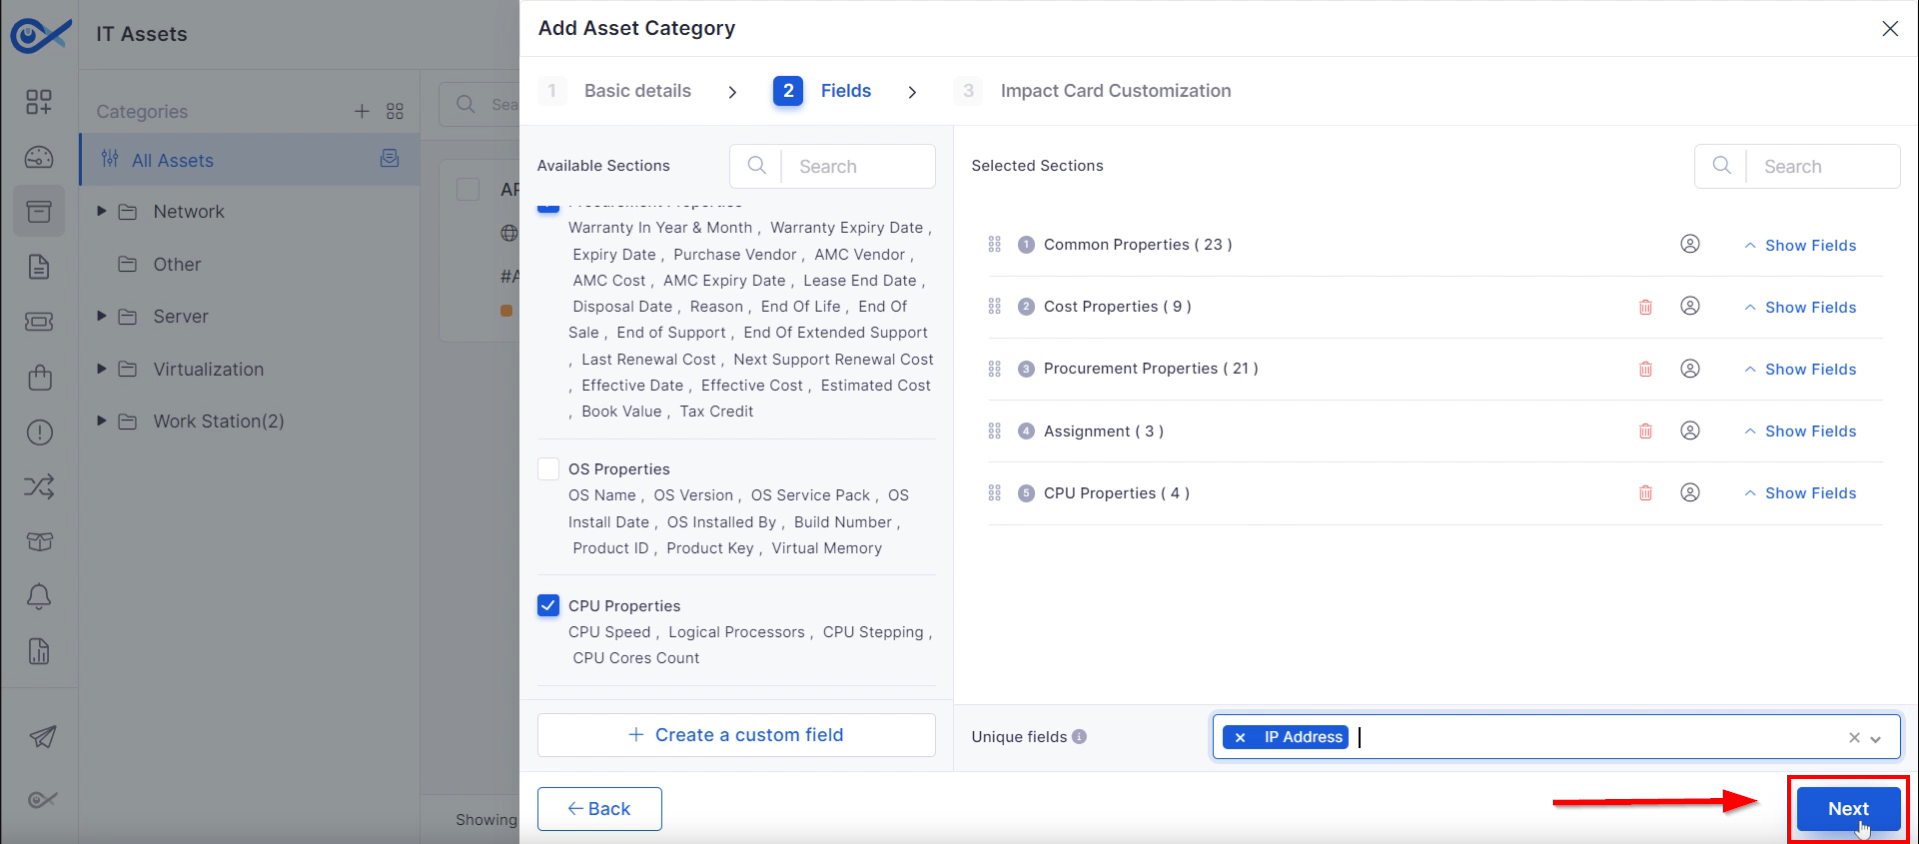
Step 2: Once the selection is made, click “Next” to continue.
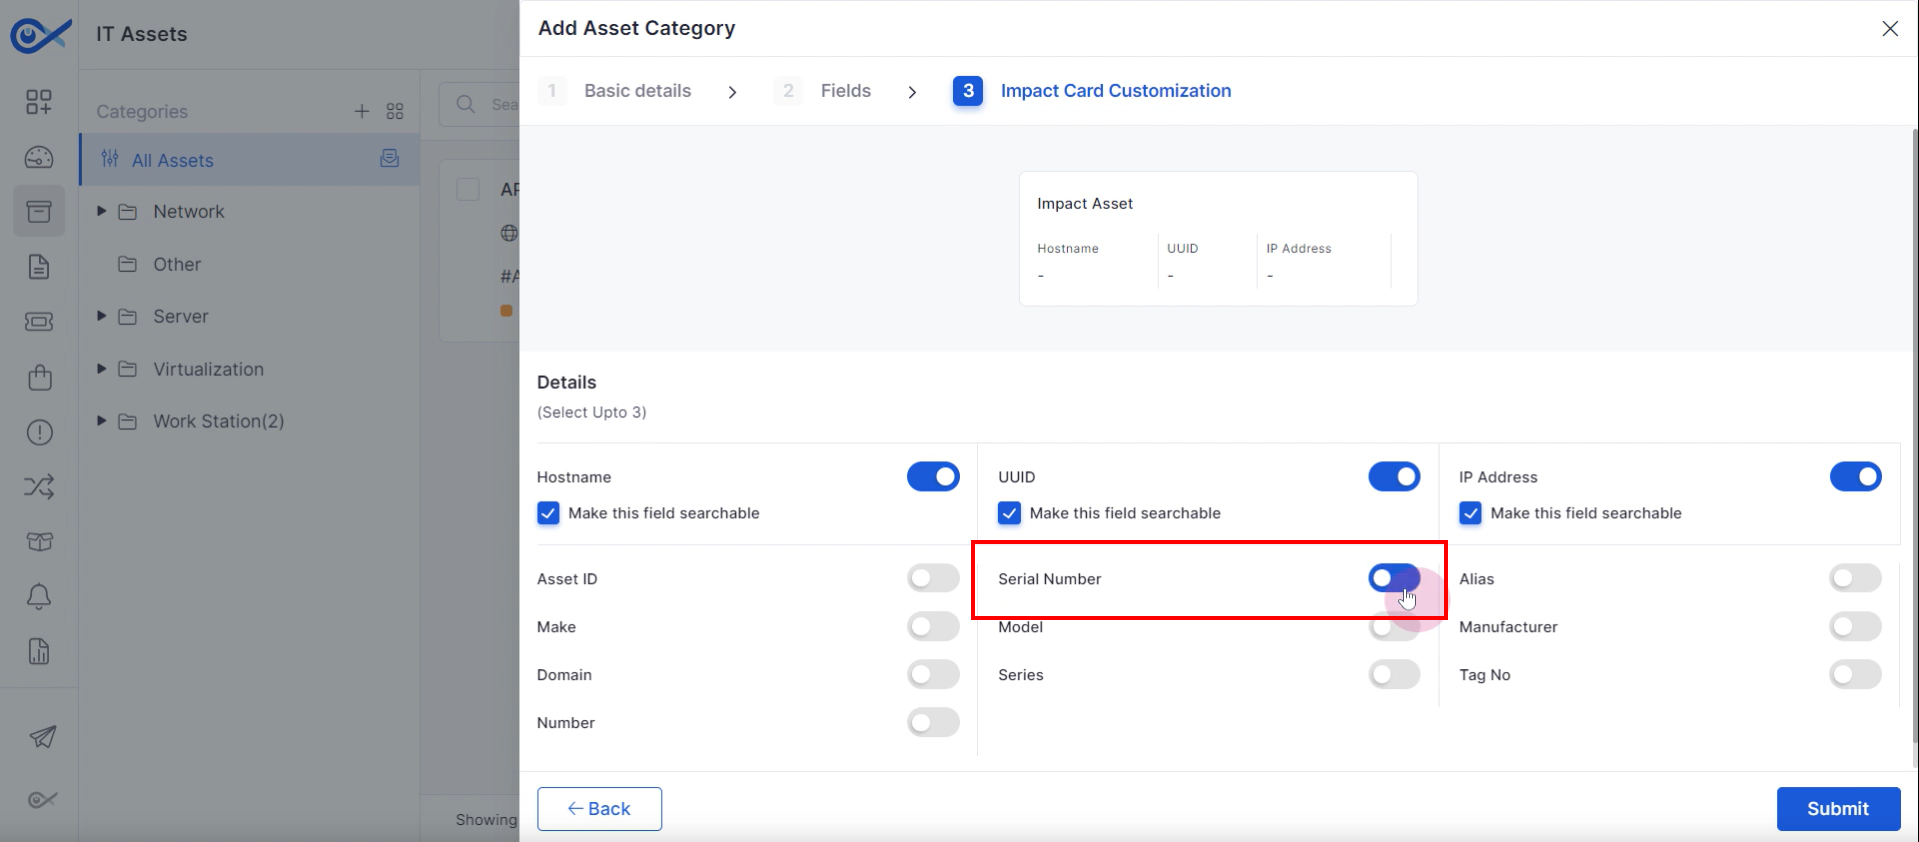
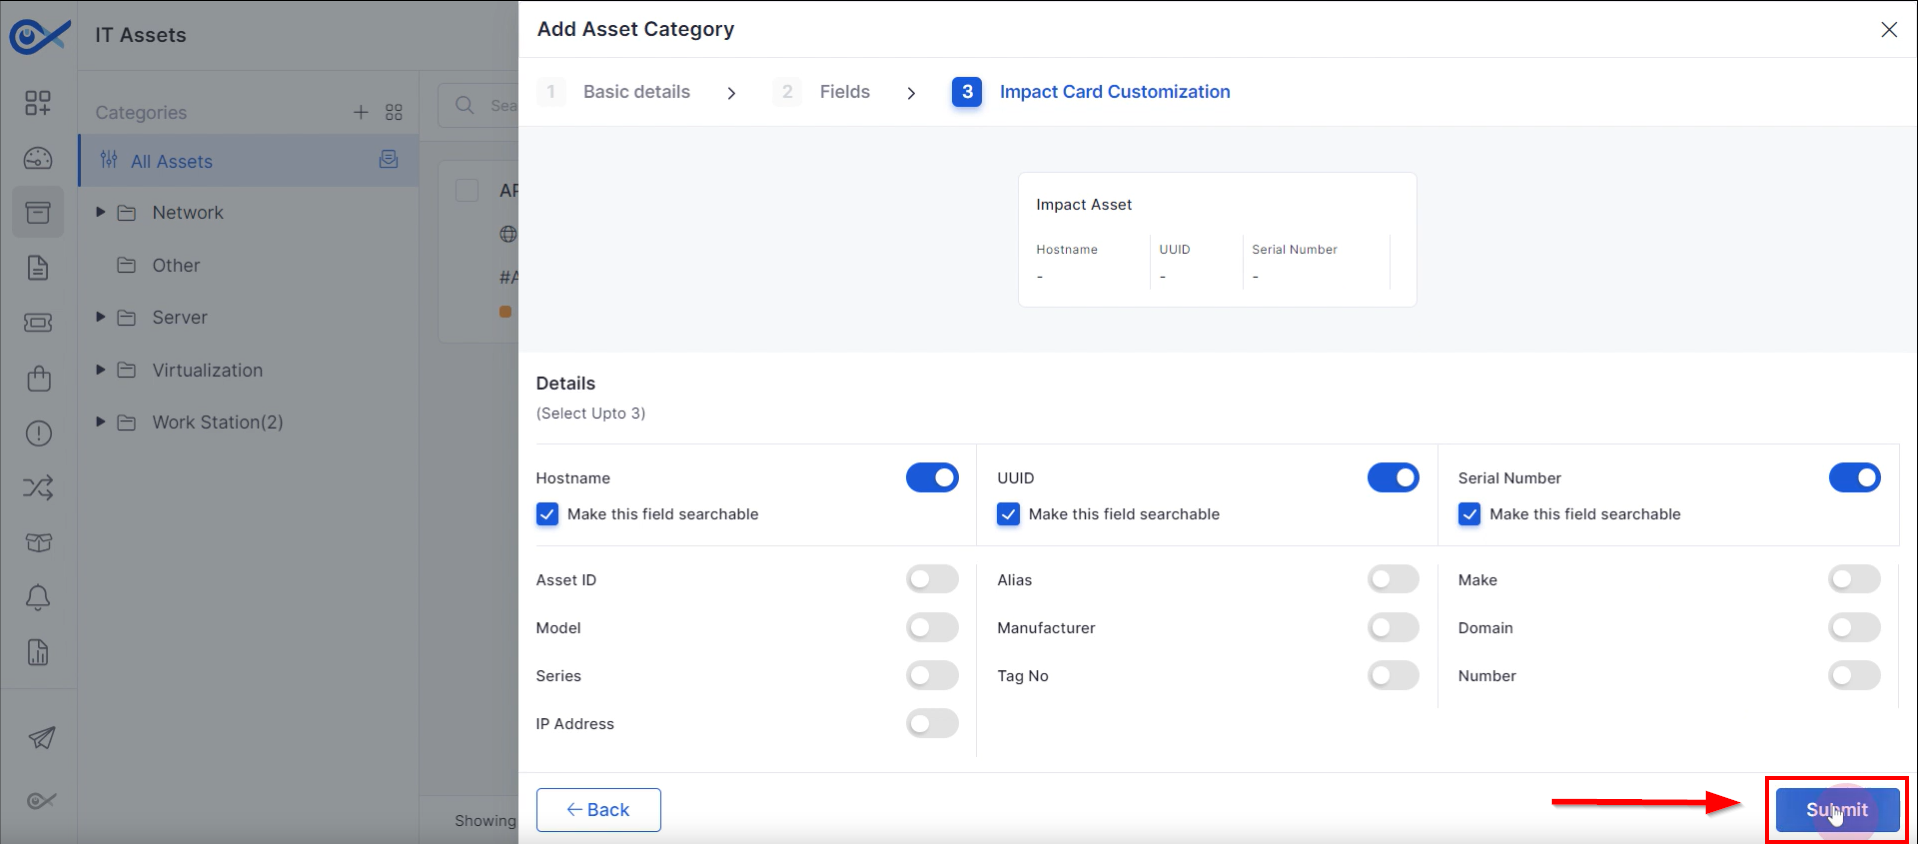
Step 1: Choose up to three fields (hostname, UUID, IP address) to display on the impact card.
Step 2: Click "Submit" to save the impact card configuration.
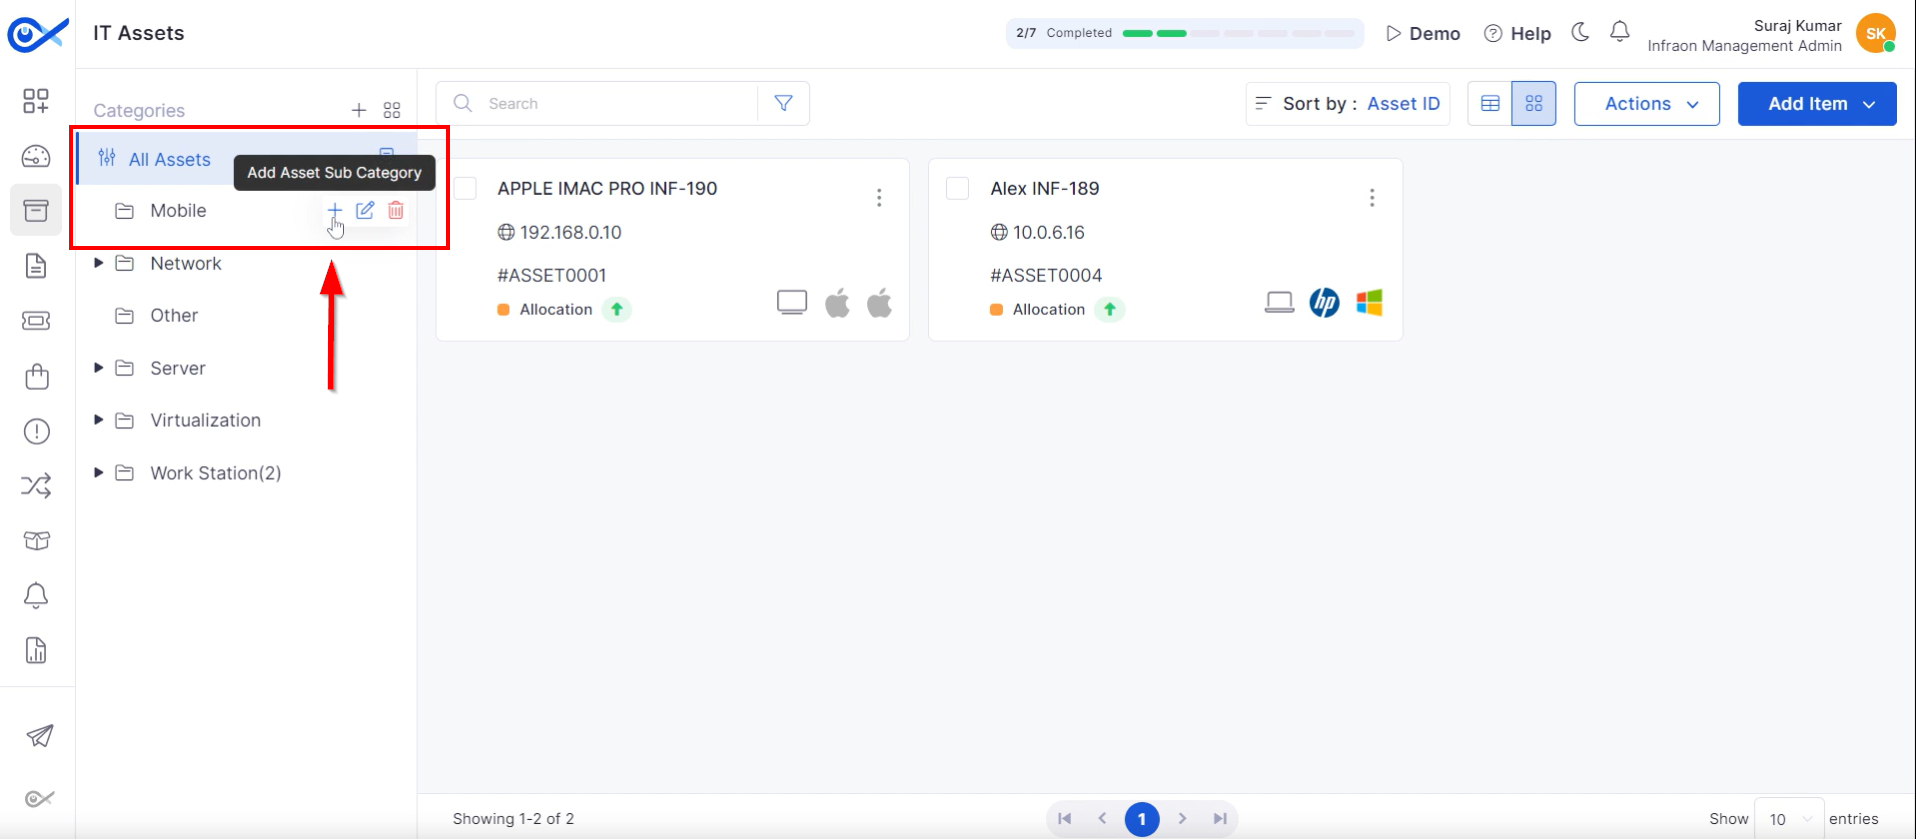
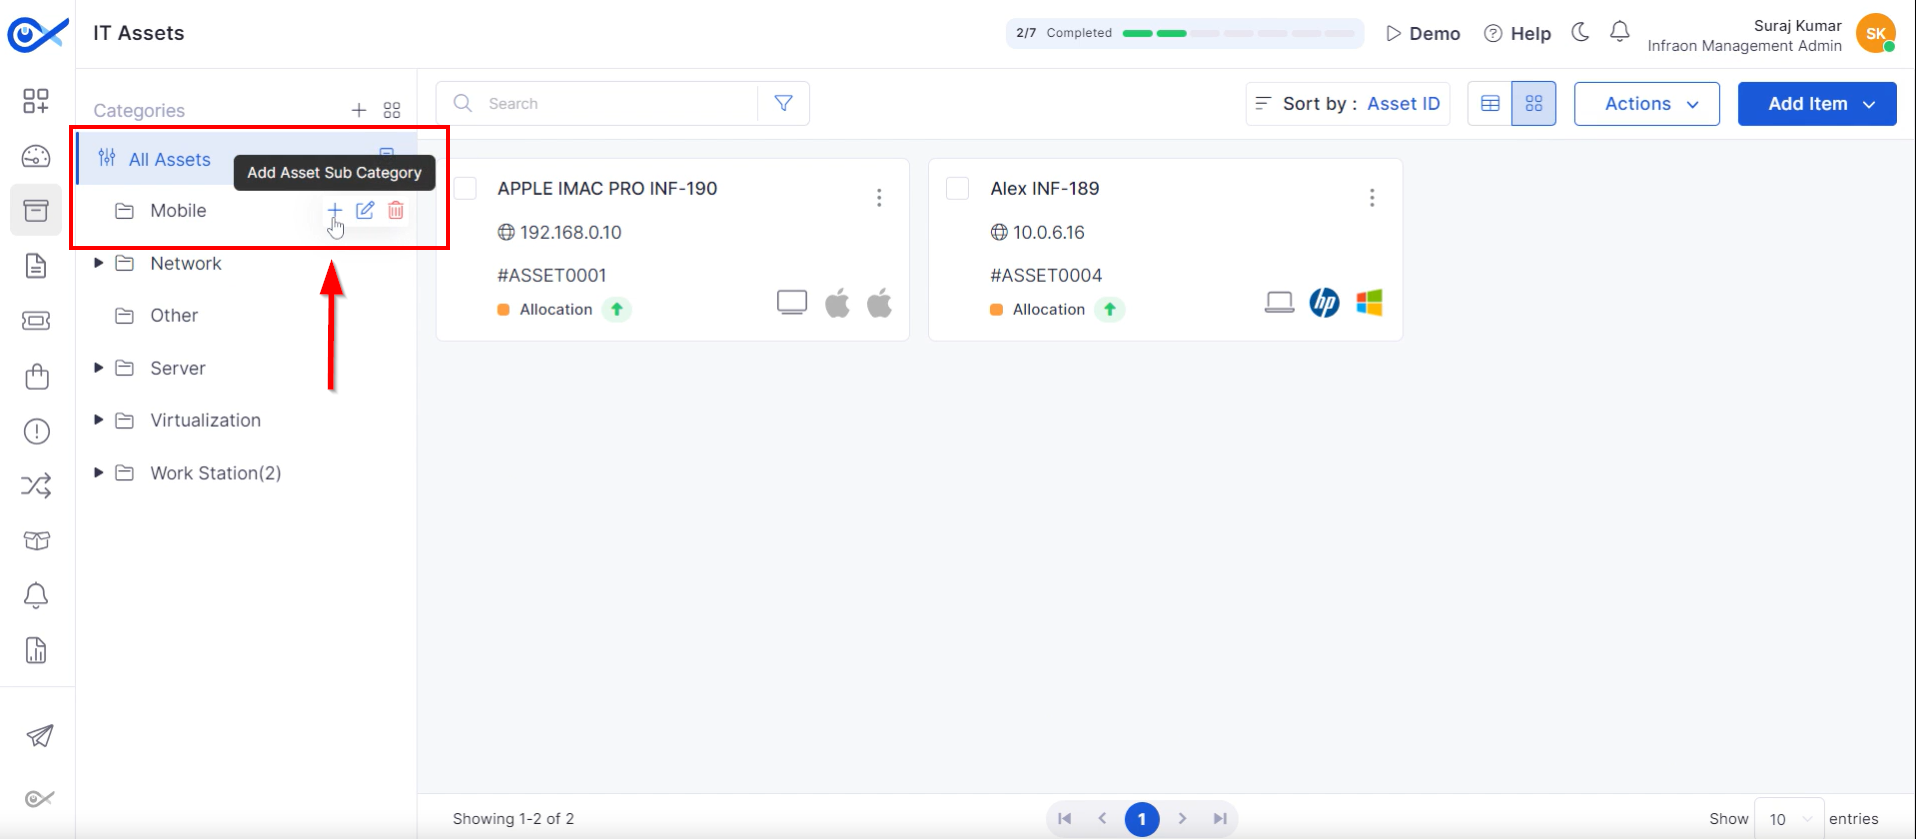
Step 1: Click the "plus" icon within the parent category to Add a subcategory.
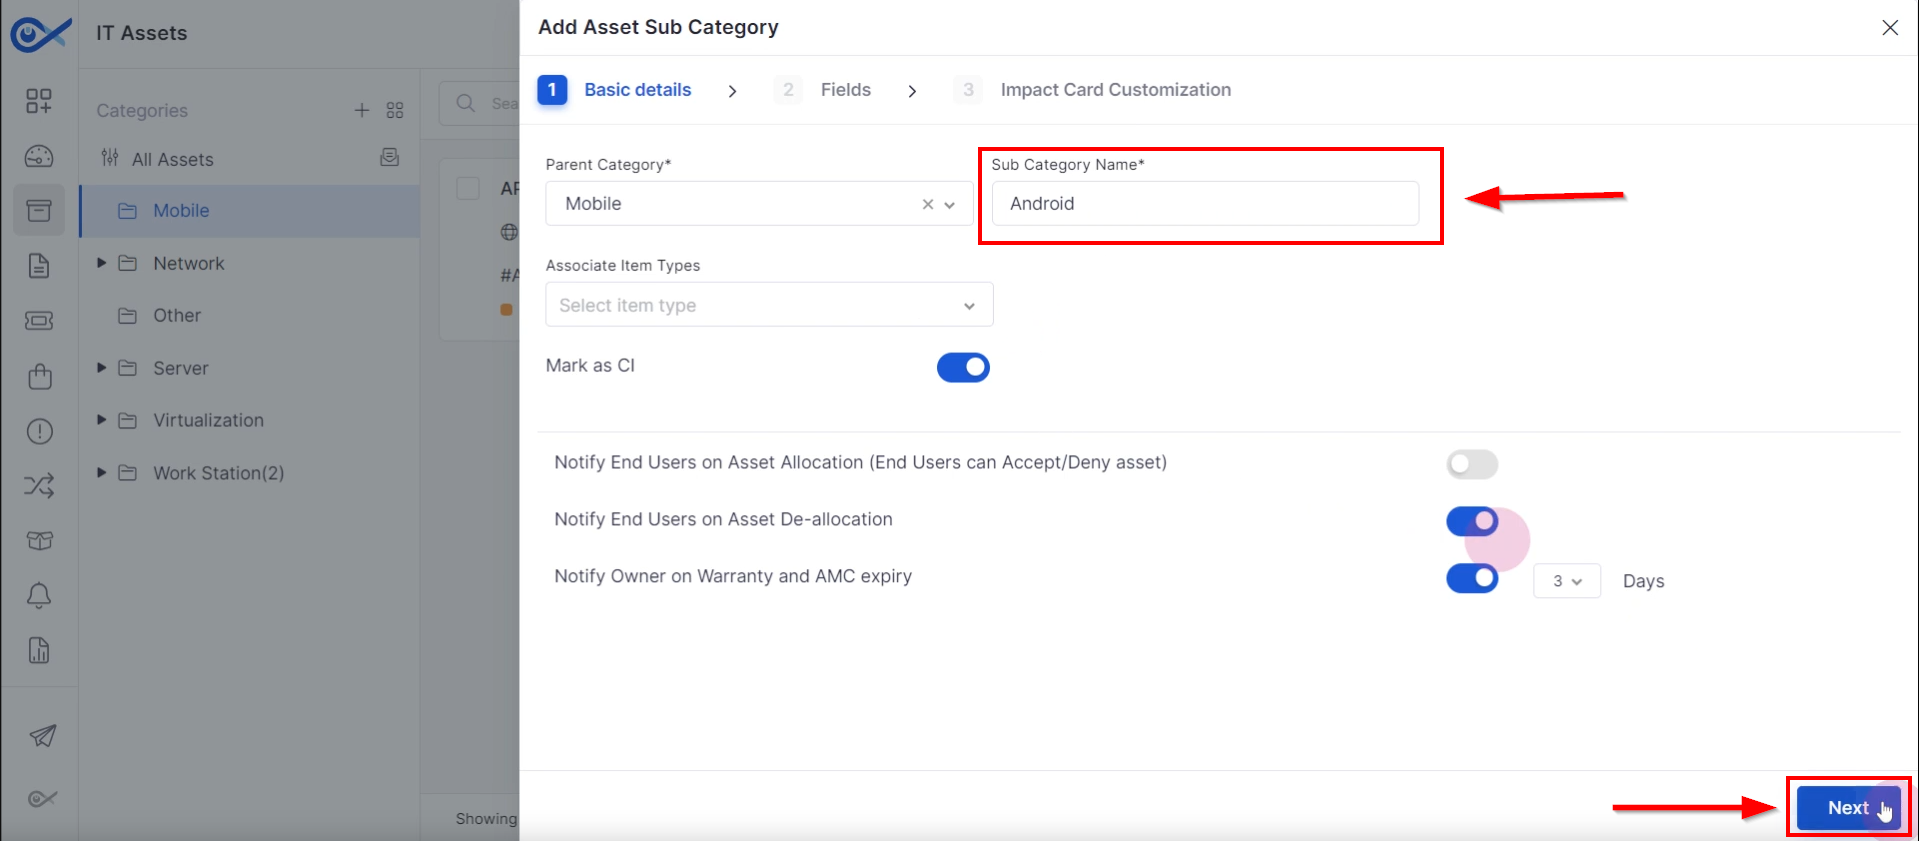
Step 2: Enter an ID and name for the subcategory (e.g., Android).
Step 3: Inherit properties from the parent category or make specific modifications.
Step 1: Click “Add” to add a subcategory.
Step 2: Click the "Edit" option to modify category details.
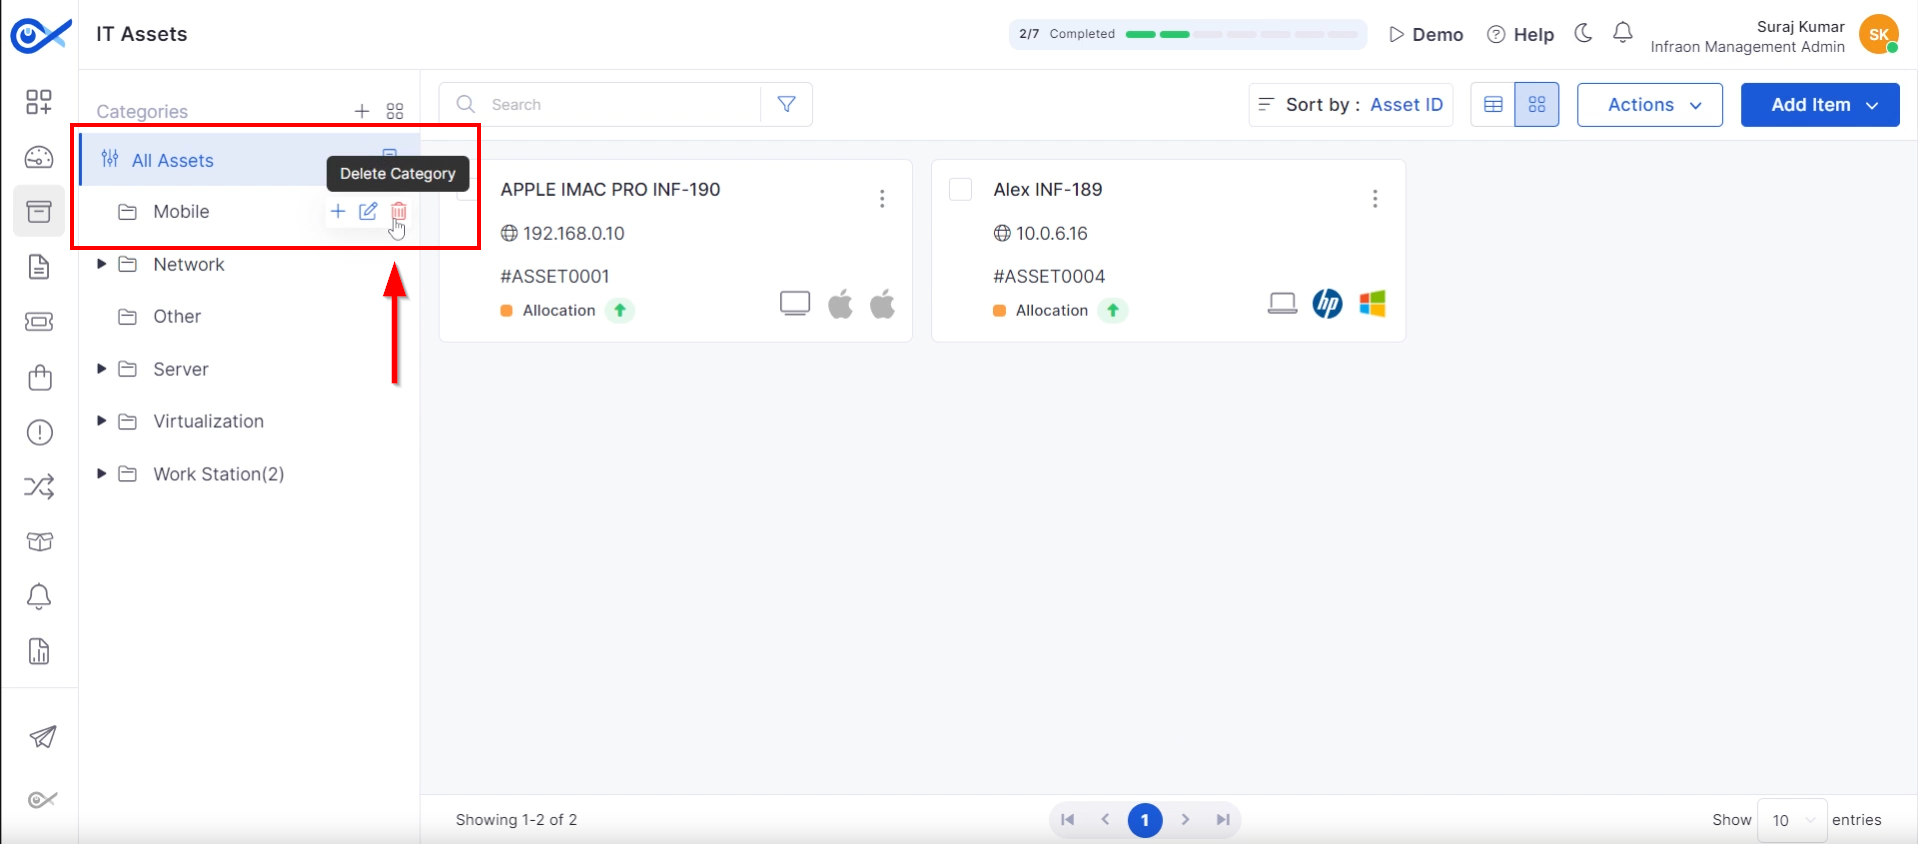
Step 3: Click the "Delete" option to remove a category (confirmation required for subcategories).
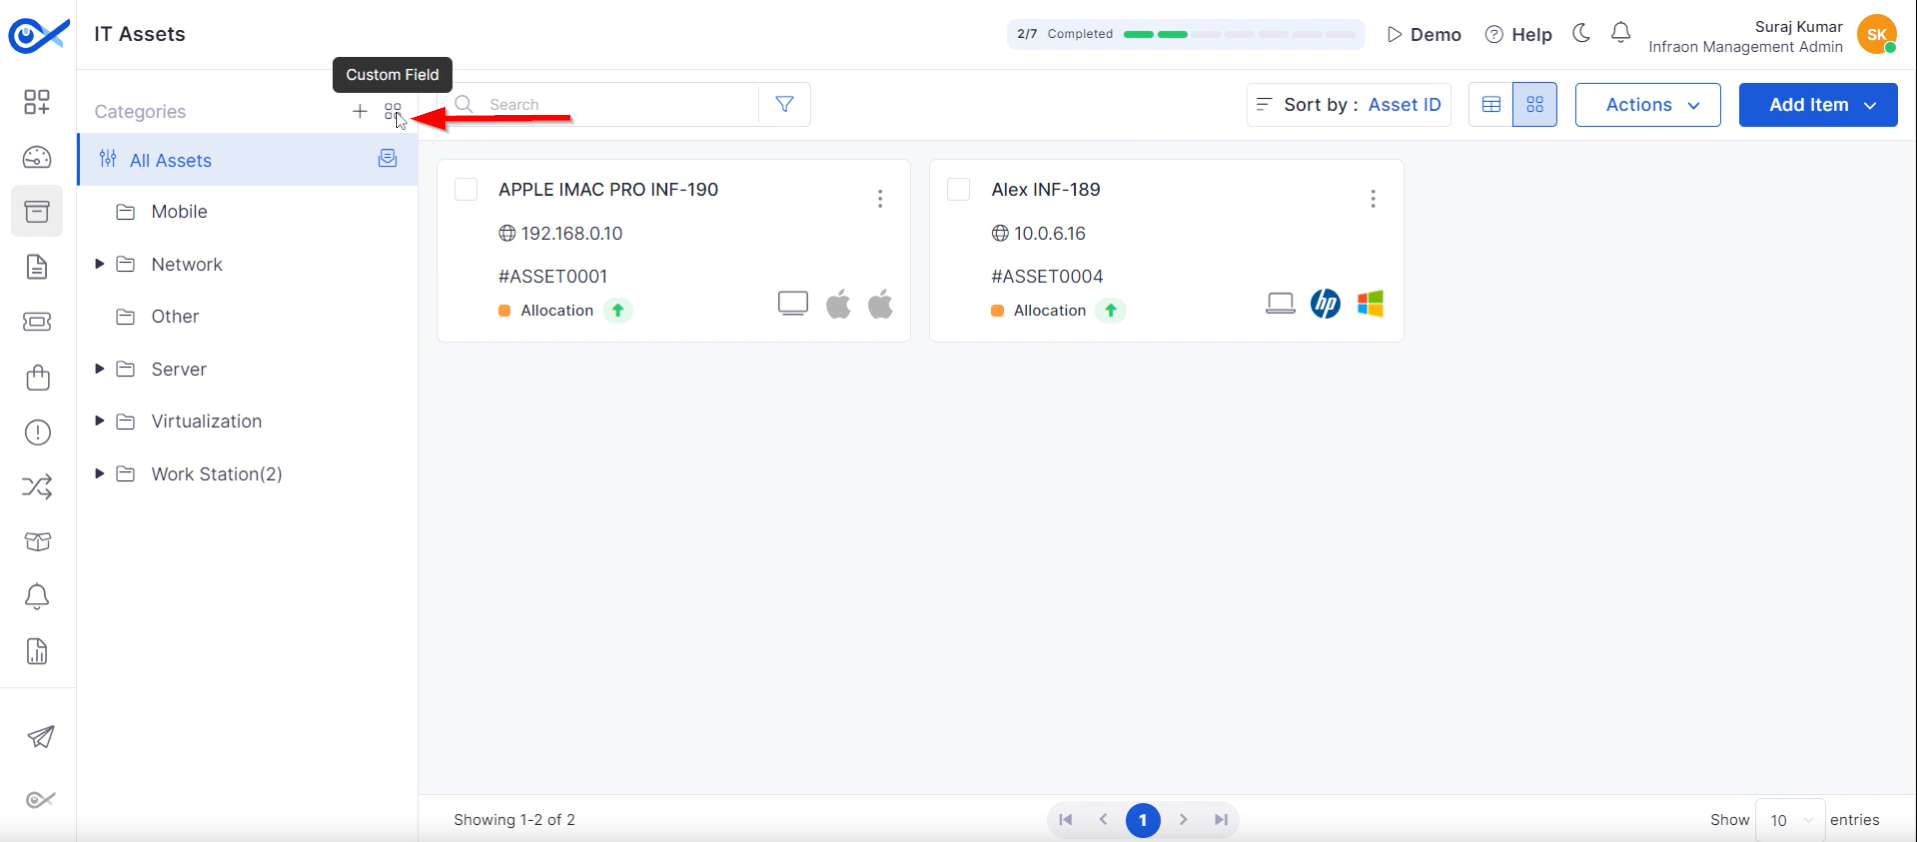
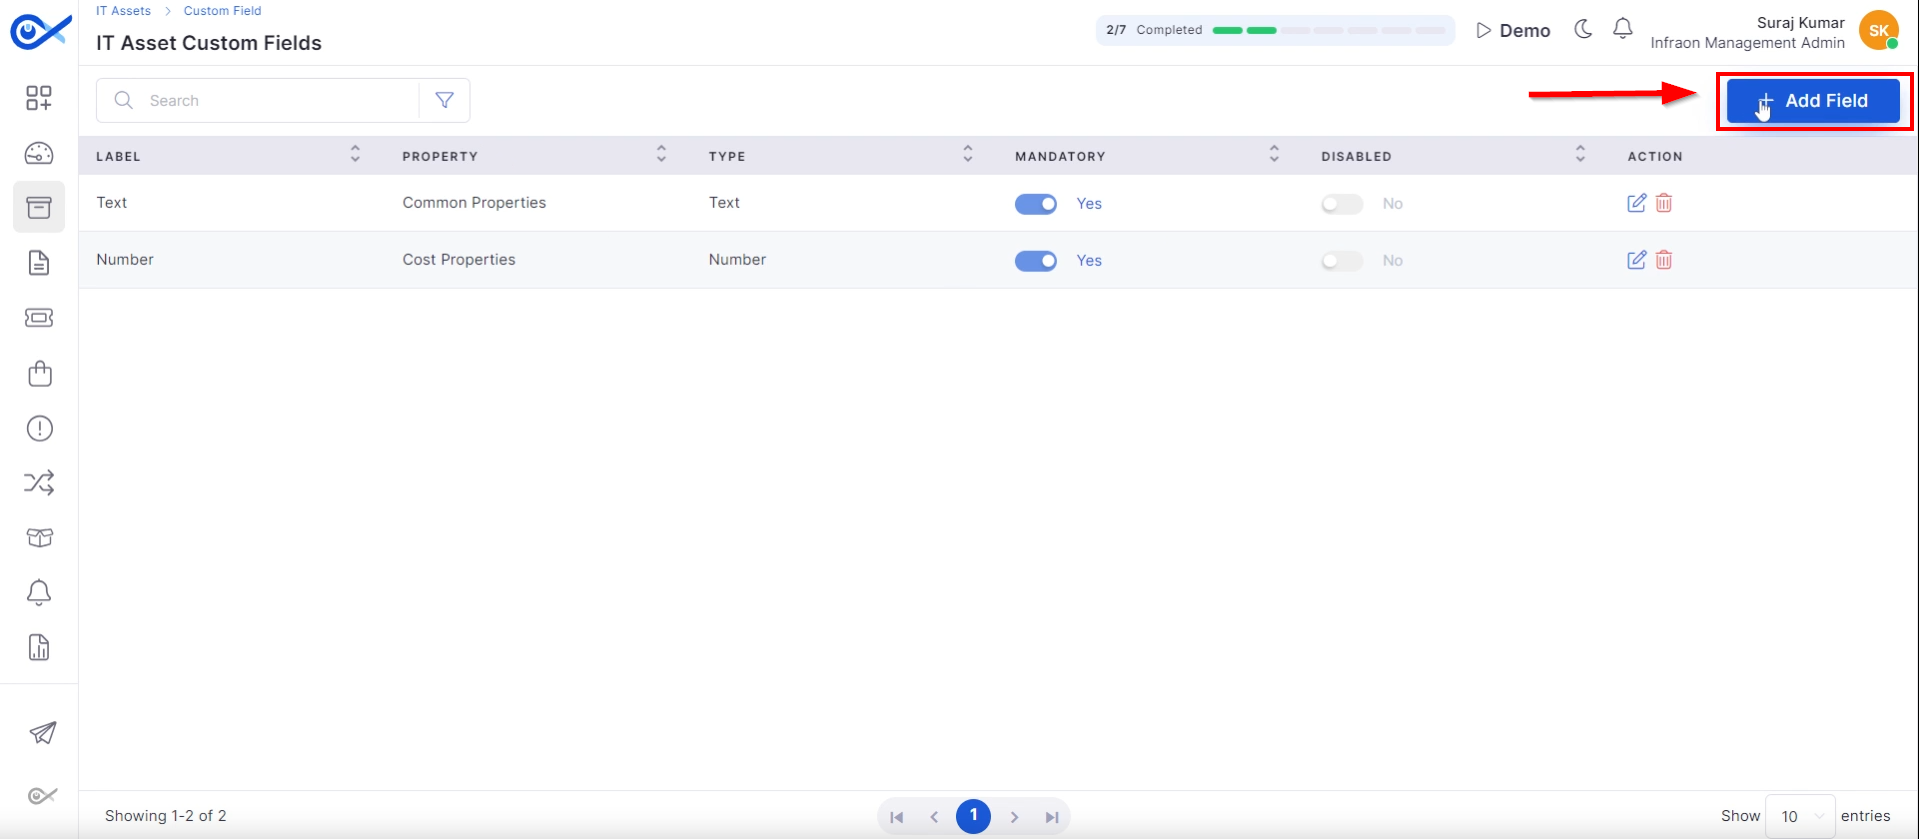
Step 4: To create custom fields applicable to multiple categories, Click "Custom Field."
Step 5: Now, click “New Filed” at the top right corner of the page.
Step 6: Configure a default category template for efficient category creation.
Click "Submit" to save all modifications made to categories or subcategories.
These steps allow technicians to create, manage, and customize asset categories within the Infraon Infinity platform.
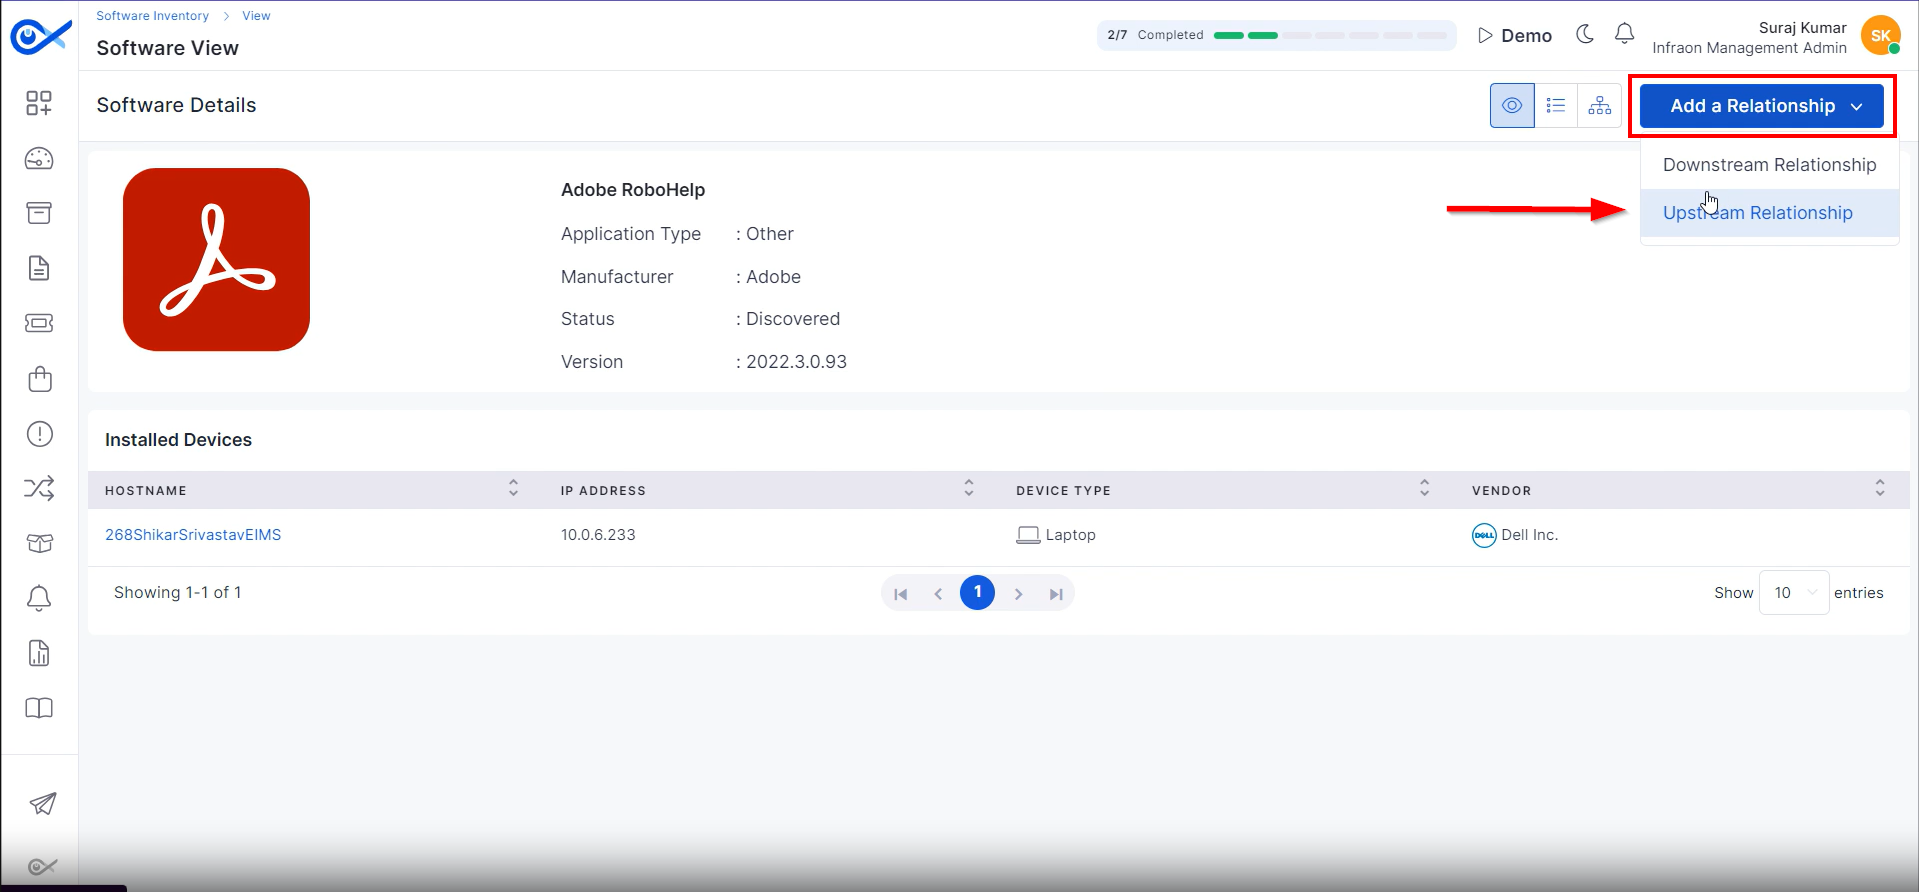
Step 2: Manage both downstream and upstream relationships.
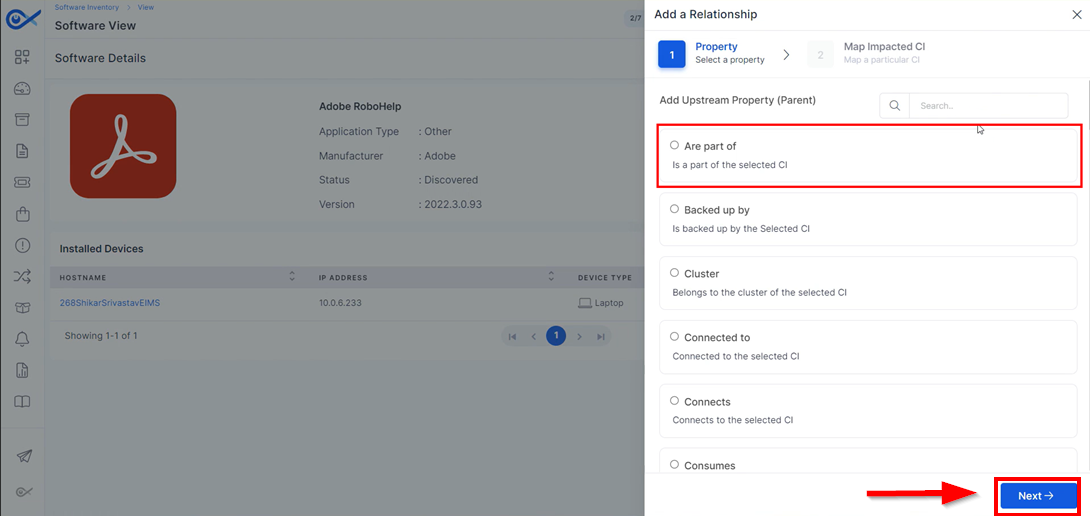
Step 3: Select the part of the selected Configuration Item (CI) among the available properties. After selecting the property, click on “Next.”
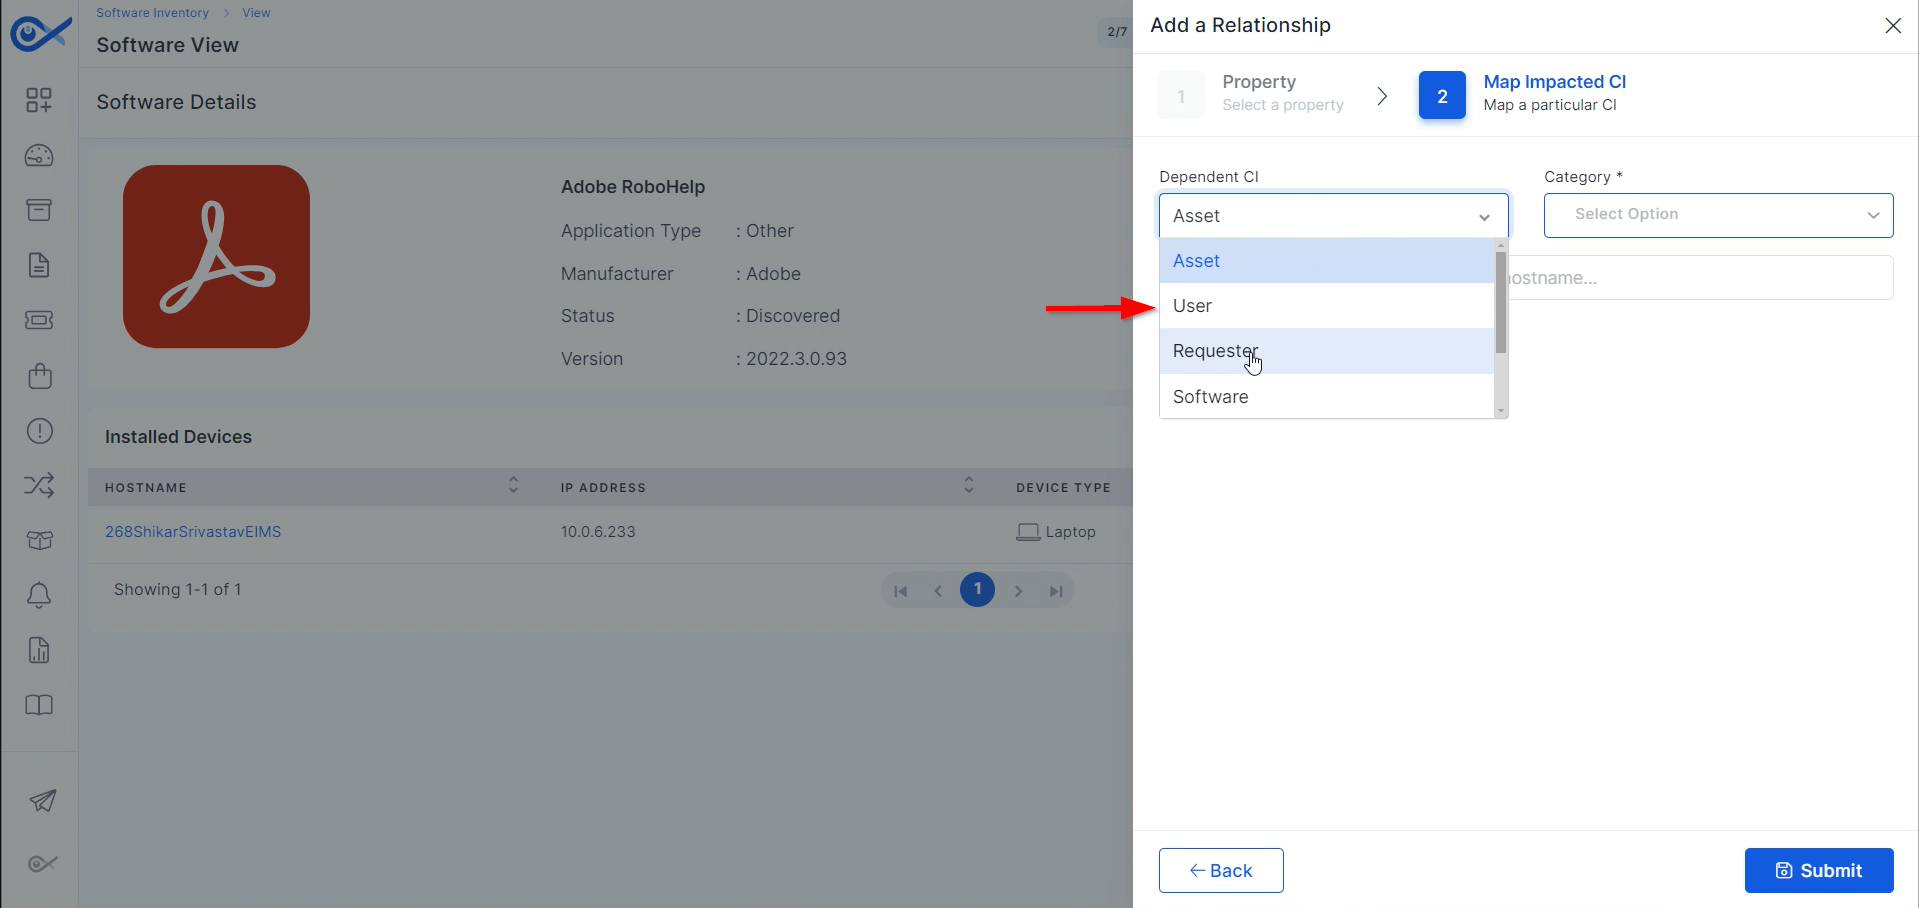
Step 4: Add the dependent CI from the drop-down column in the map-impacted CI tab.
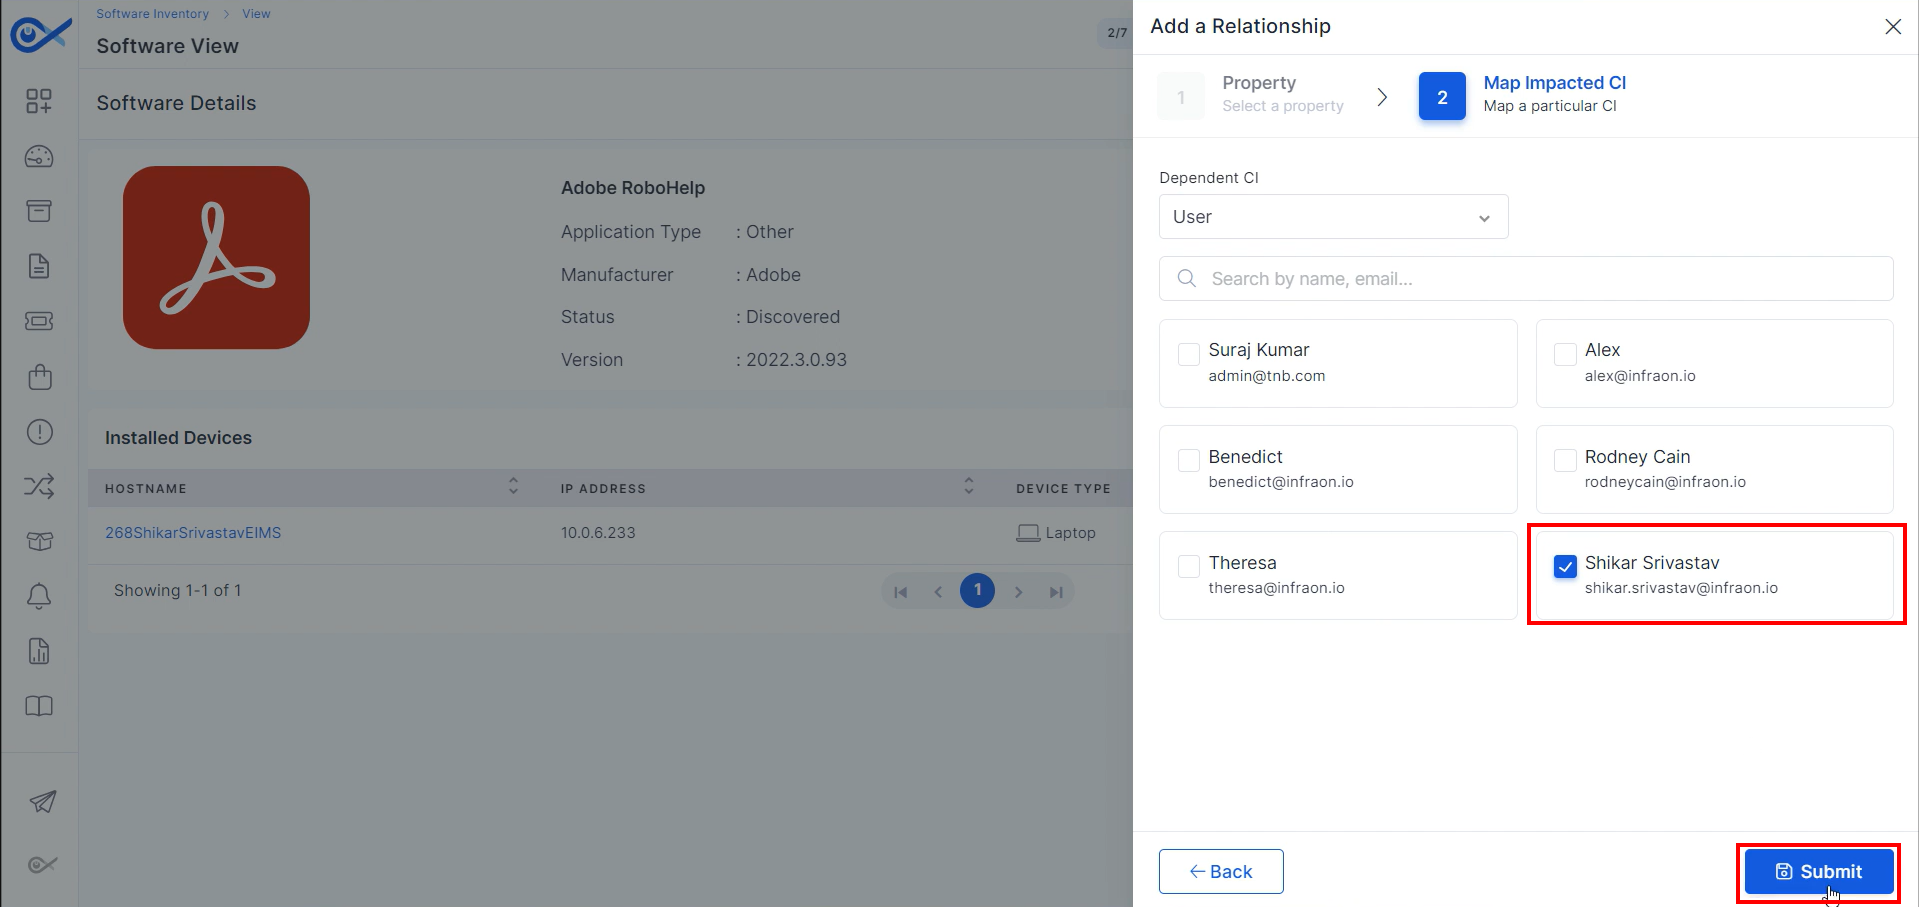
Step 5: Choose “User.” This will filter the list of users who have been added to the tool. Click “Submit” to create the relationship.
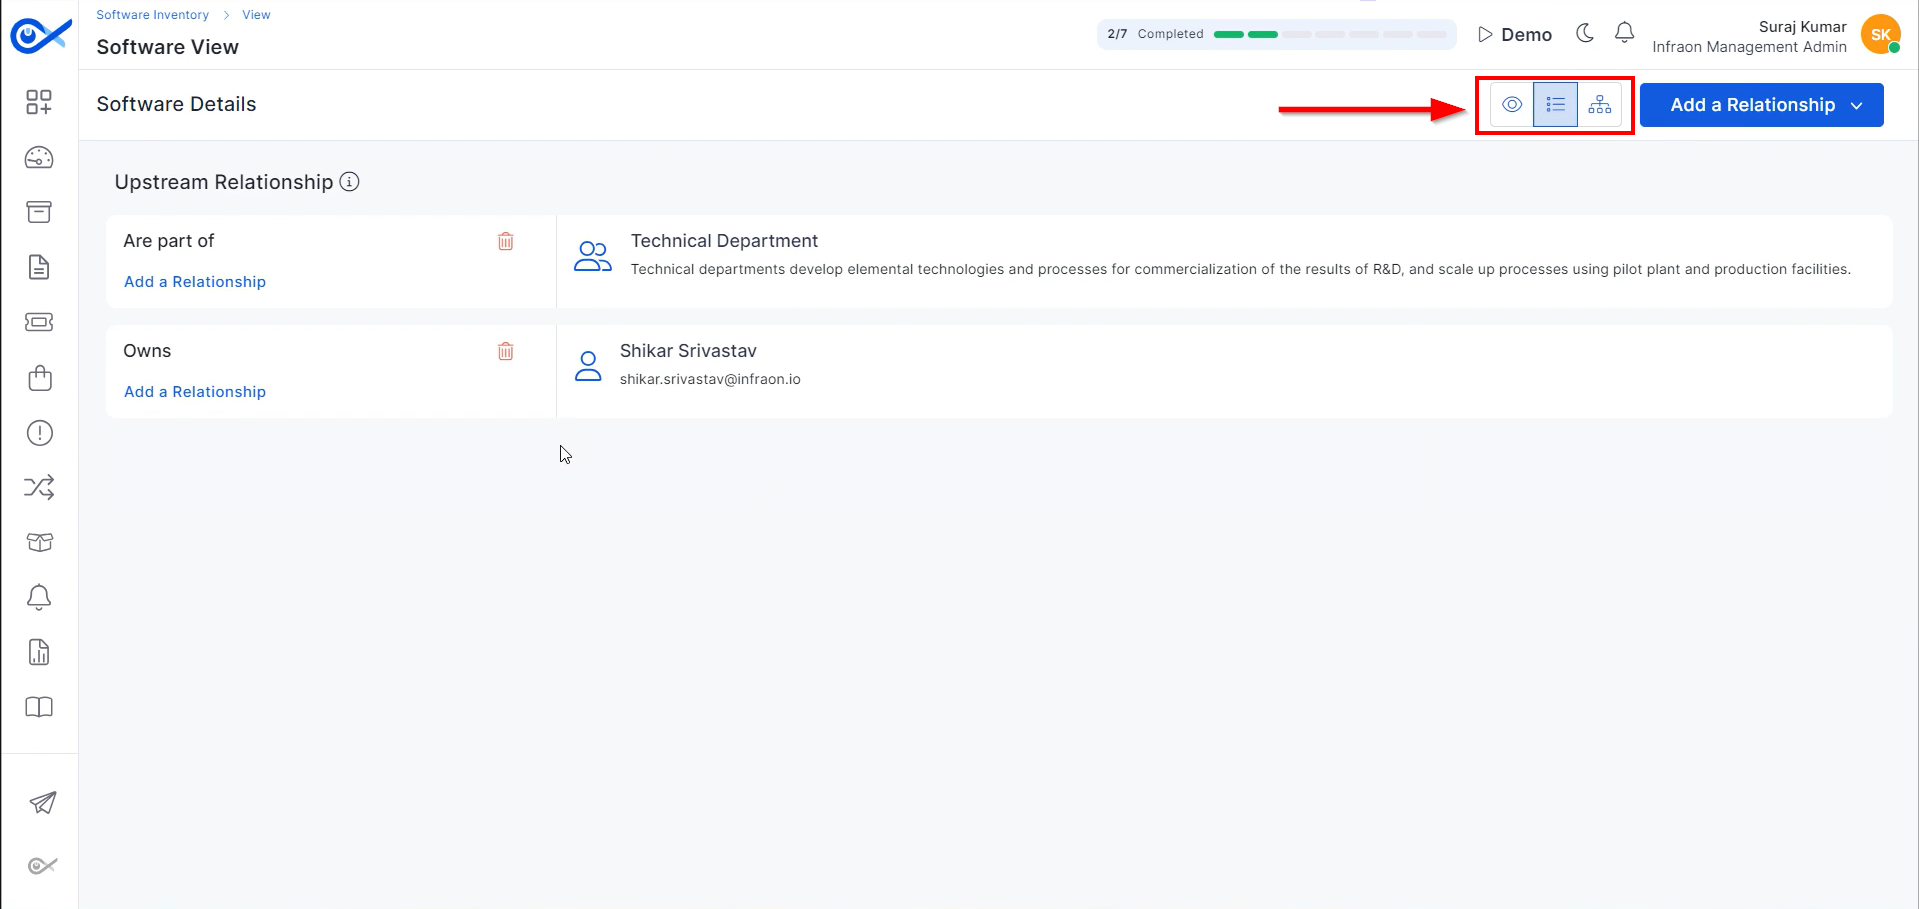
Infraon provides three different types of views: software view, list view, and map view.
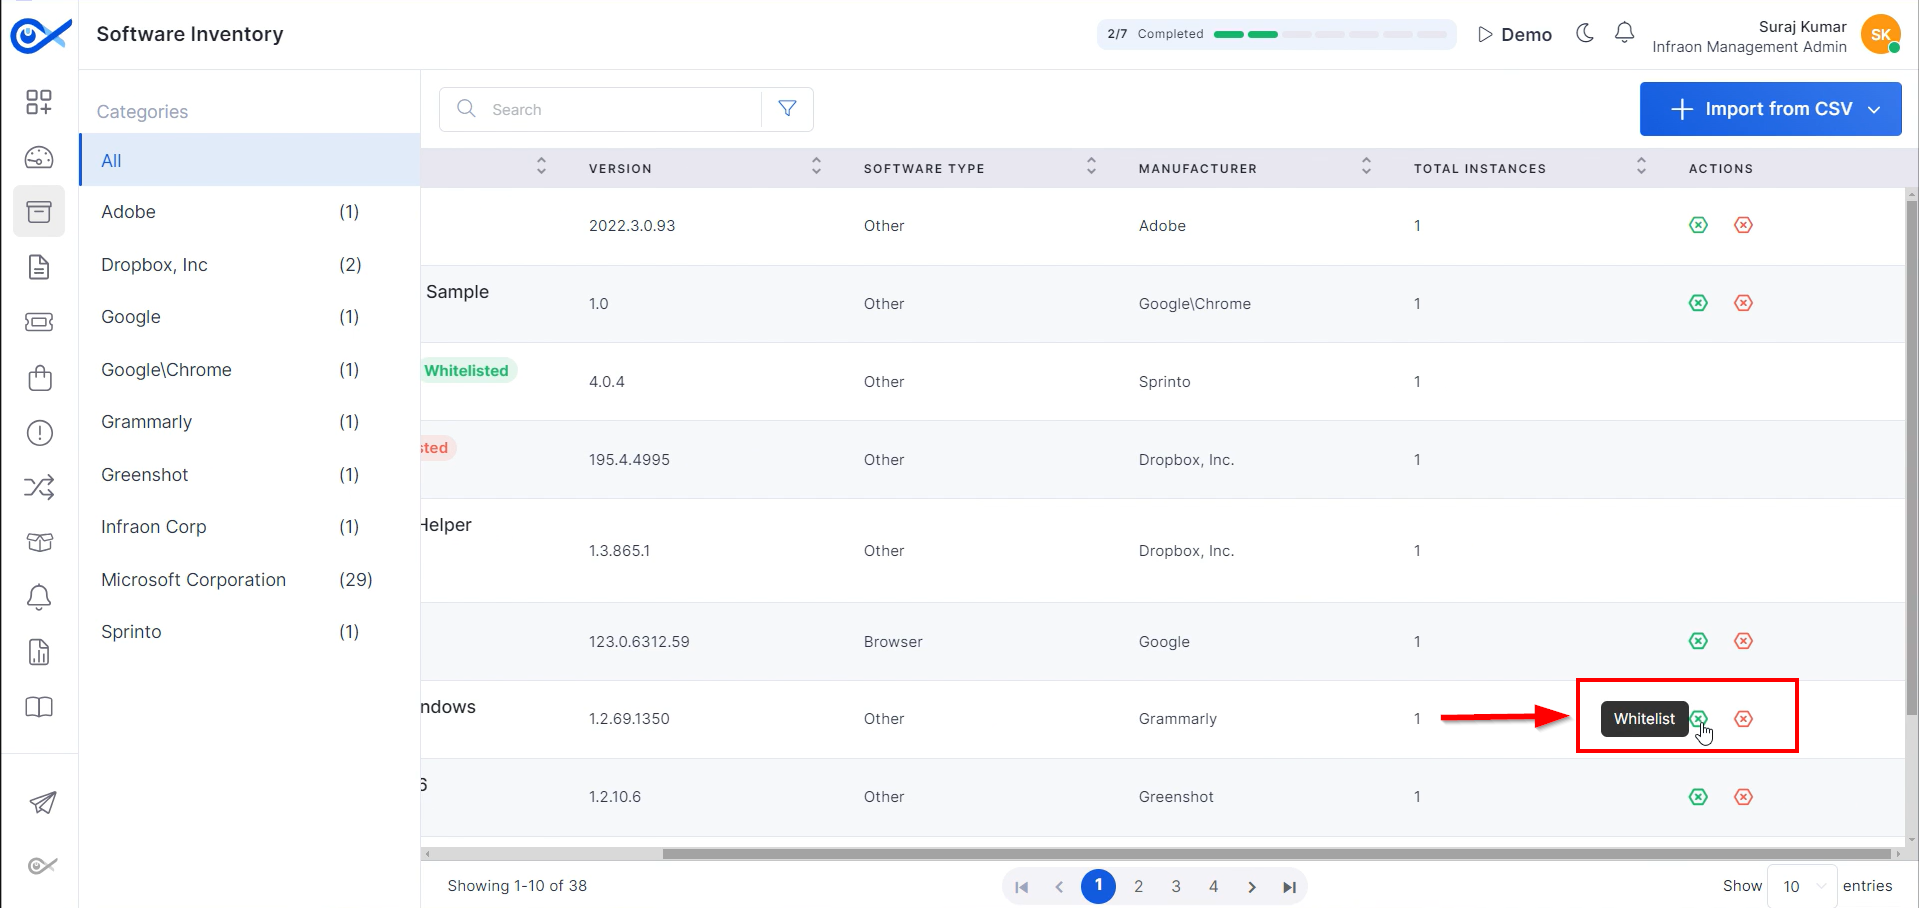
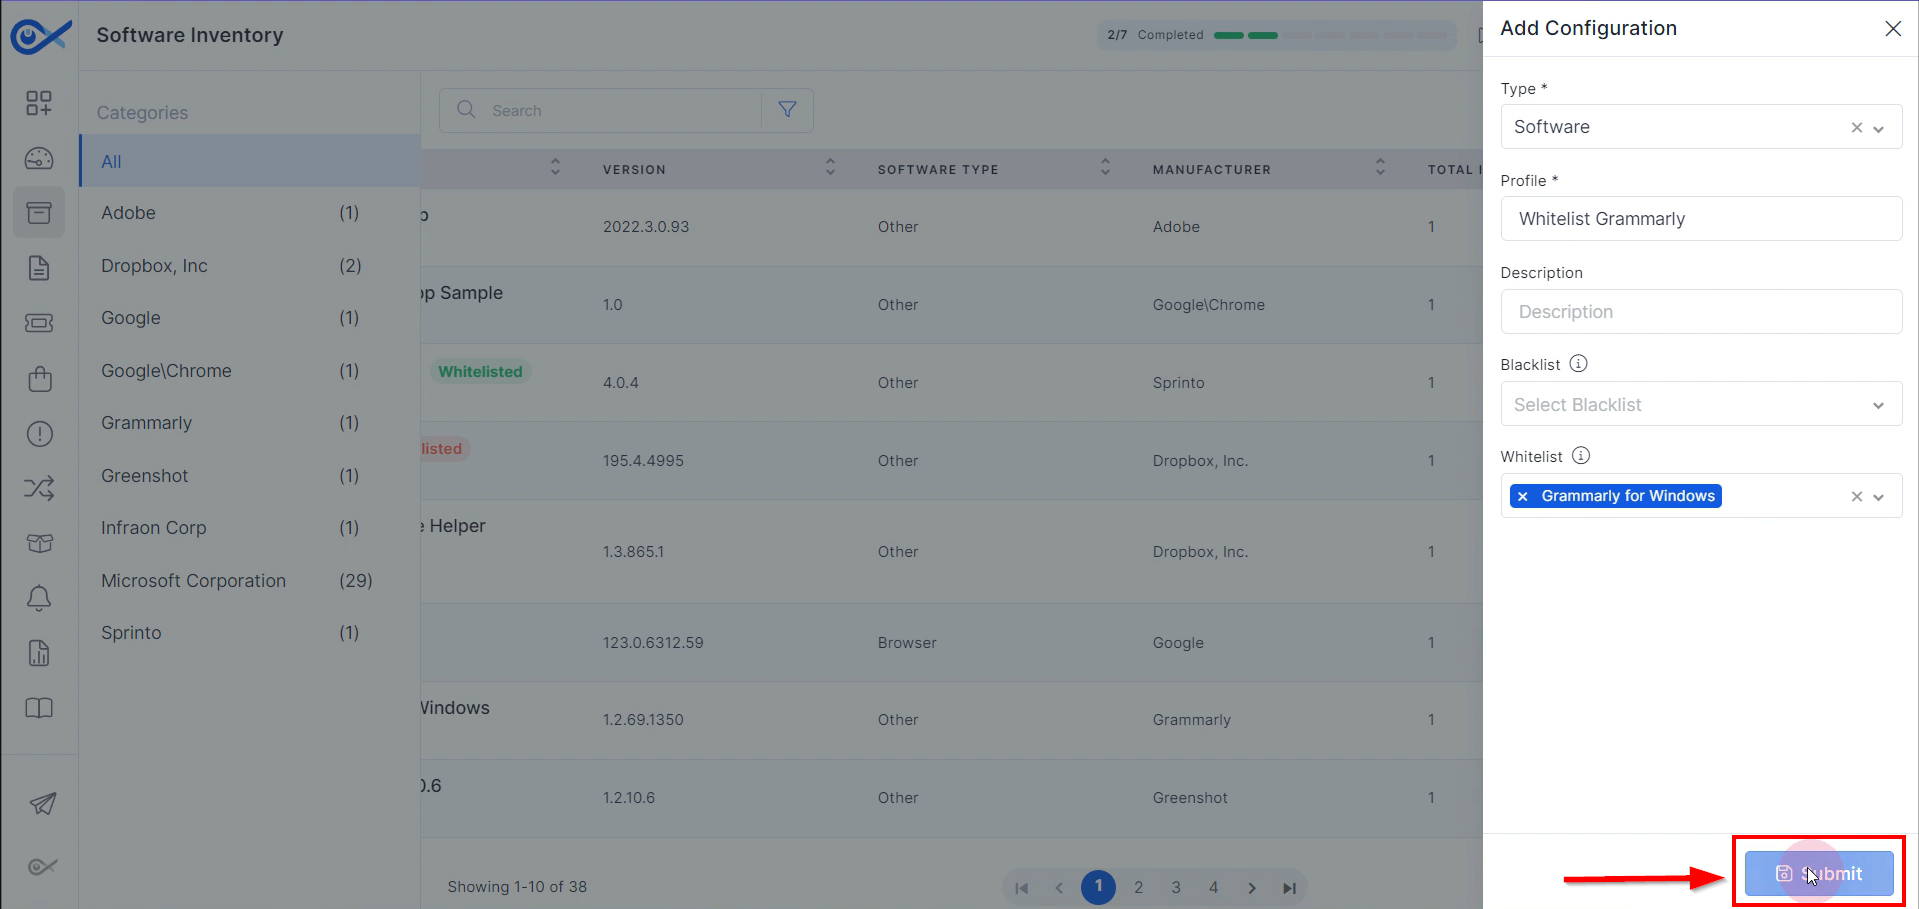
Step 1: To label software items as whitelisted or blacklisted, navigate to the software inventory page. Use the green icon to whitelist and the red icon to blacklist specific software.
Step 2: After clicking on the whitelisting option, a configuration page will appear. Provide a profile for the specific software, including a description.
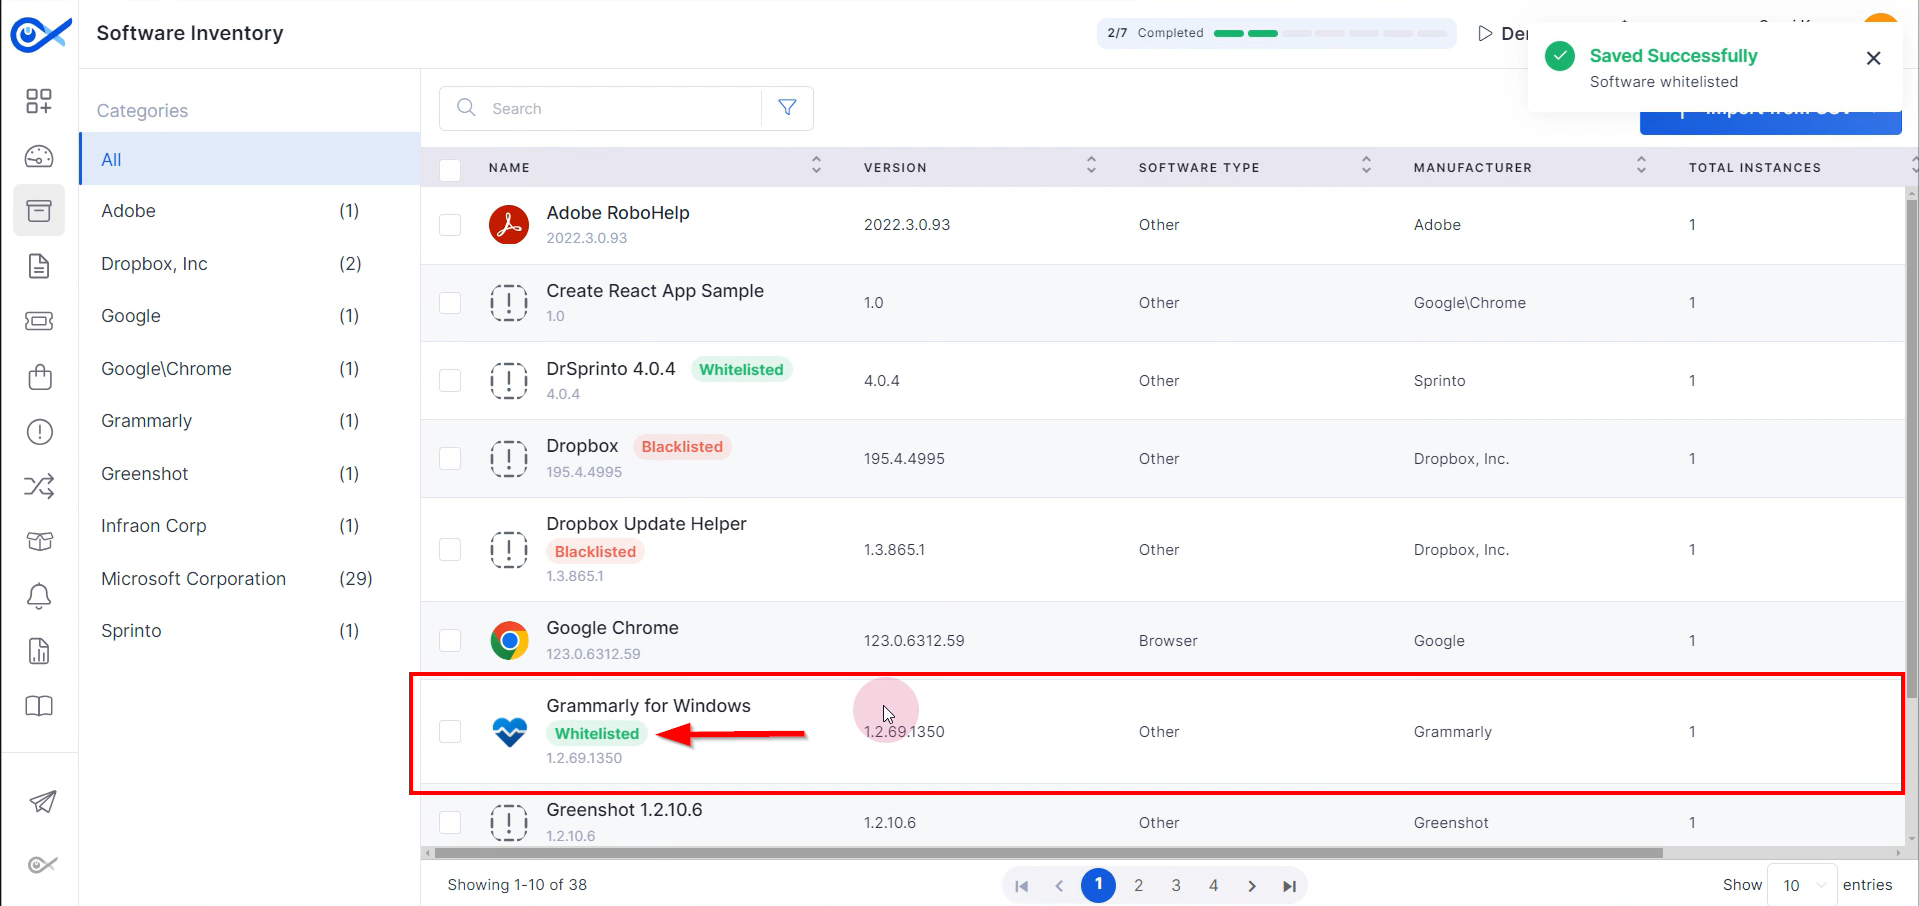
Step 3: After submitting, the software is labelled as whitelisted.
The process for adding software to the blacklist is identical to the process for whitelisting.
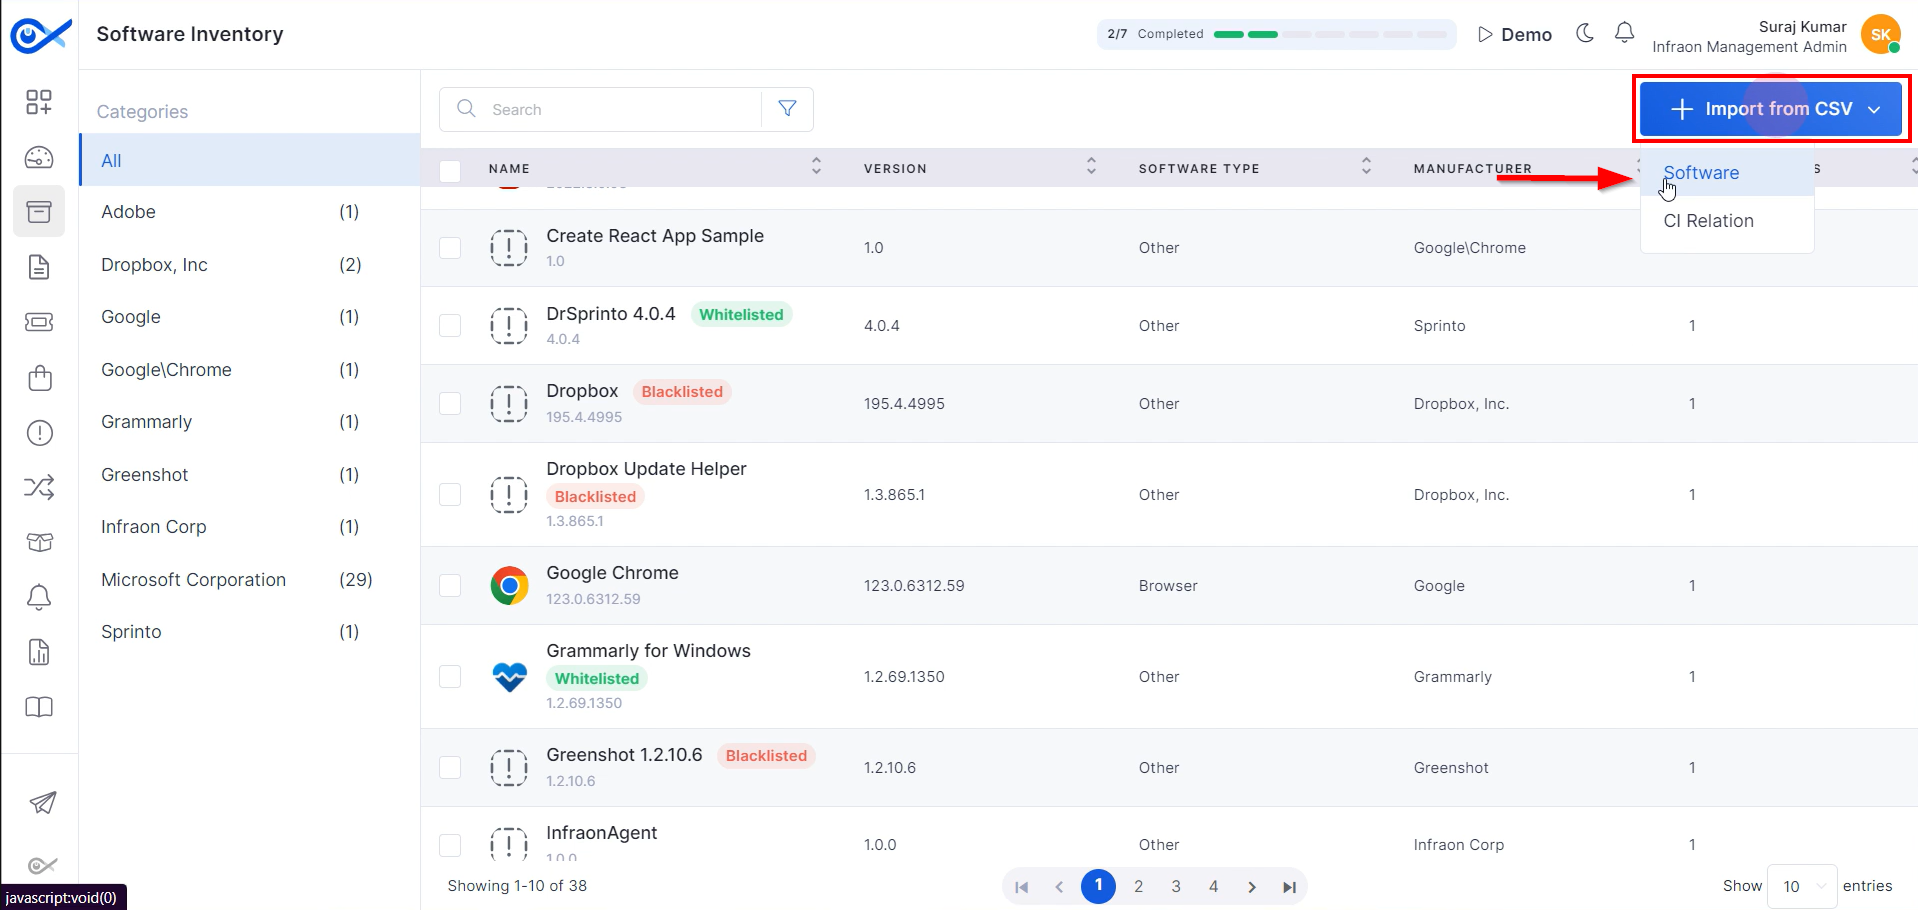
Step 1: Click on 'Import from CSV' at the screen's top right corner, and select "Software."
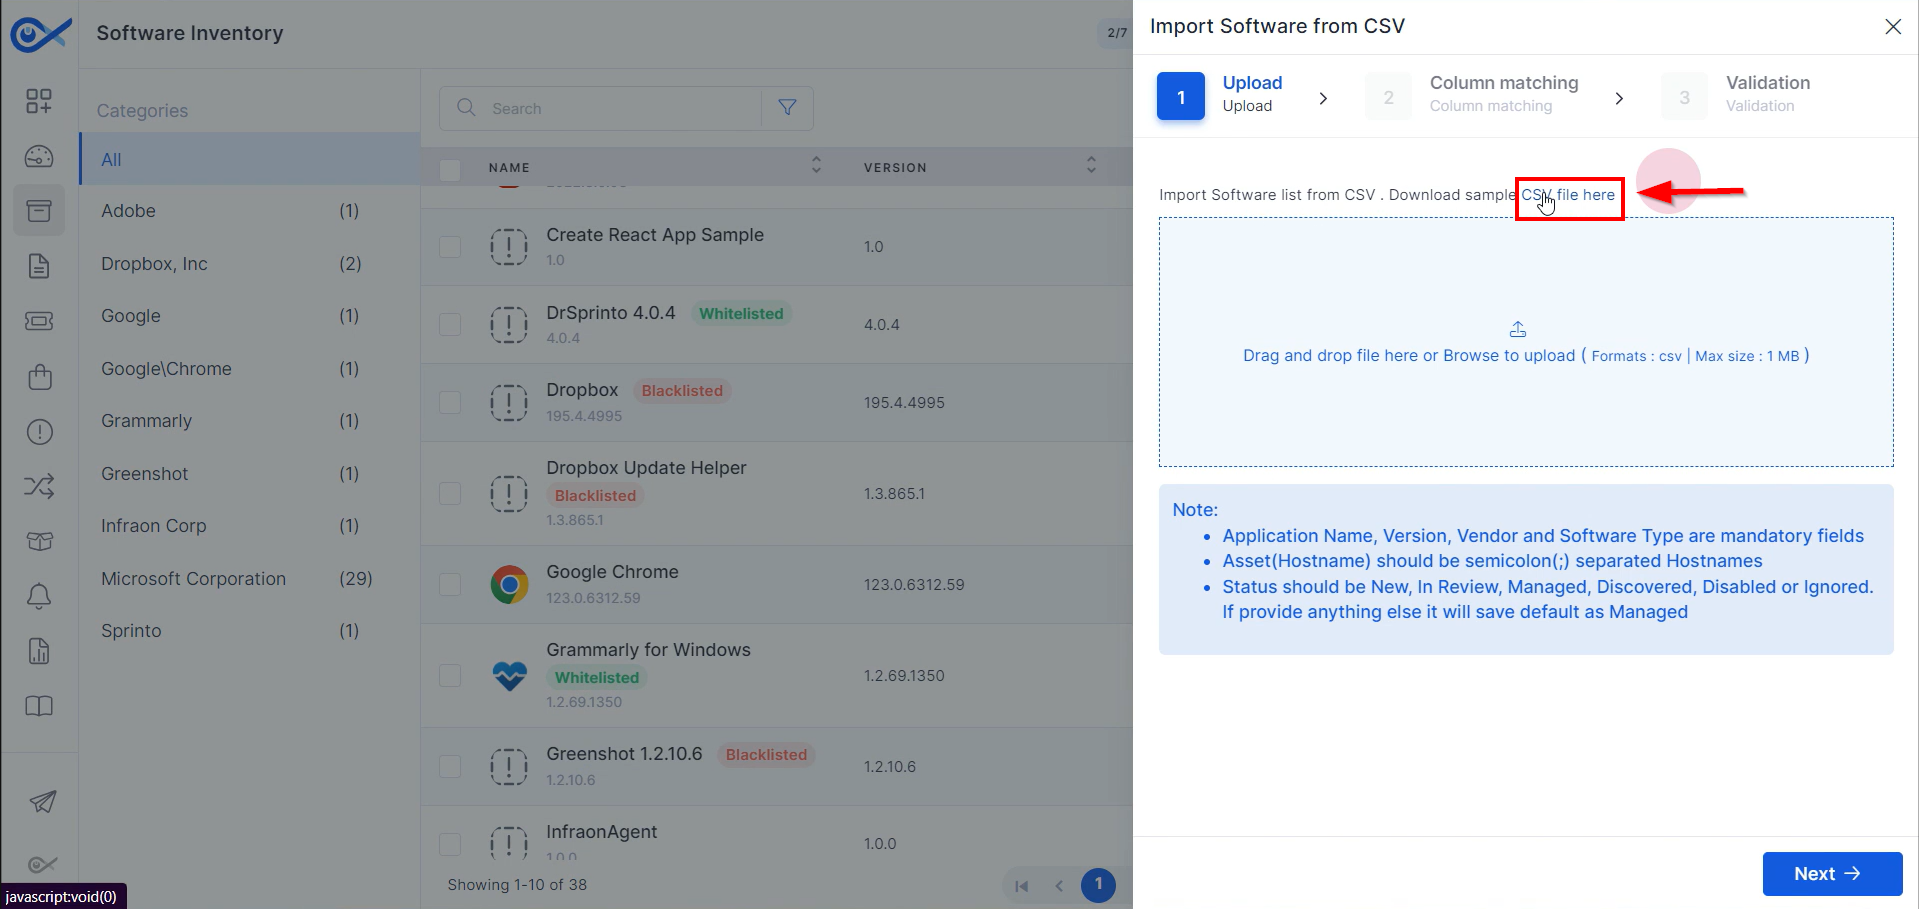
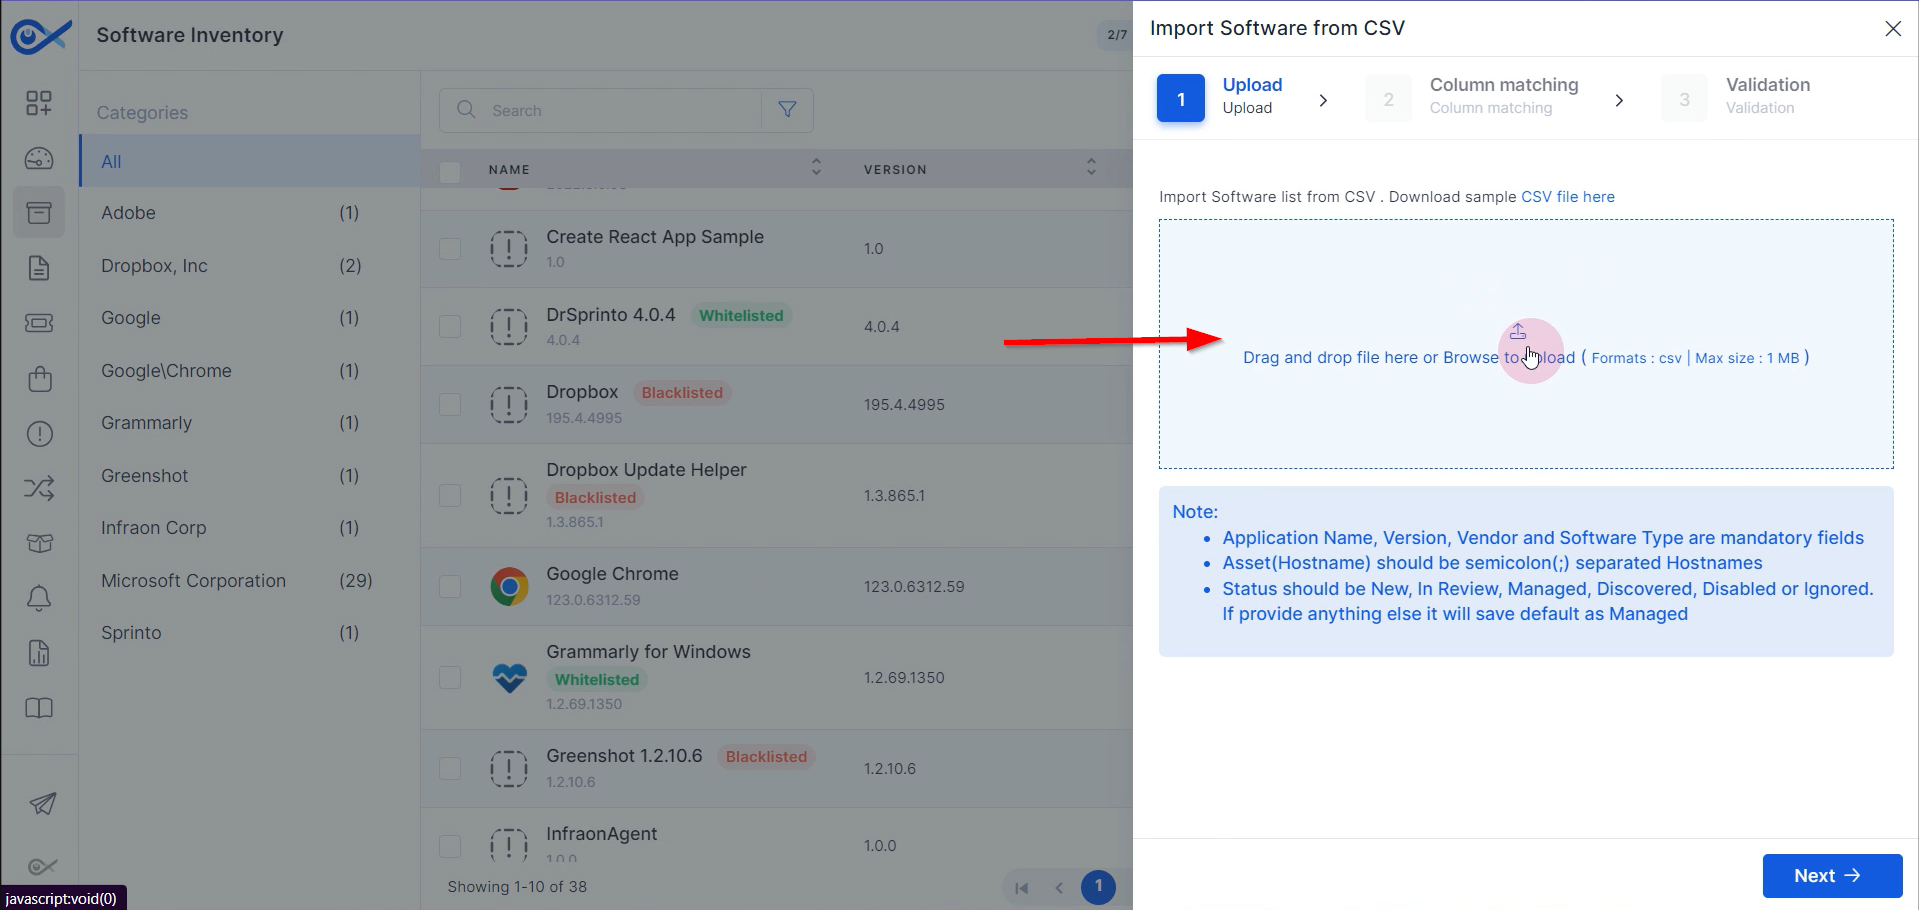
Step 2: Download the CSV template by clicking on "CSV file."
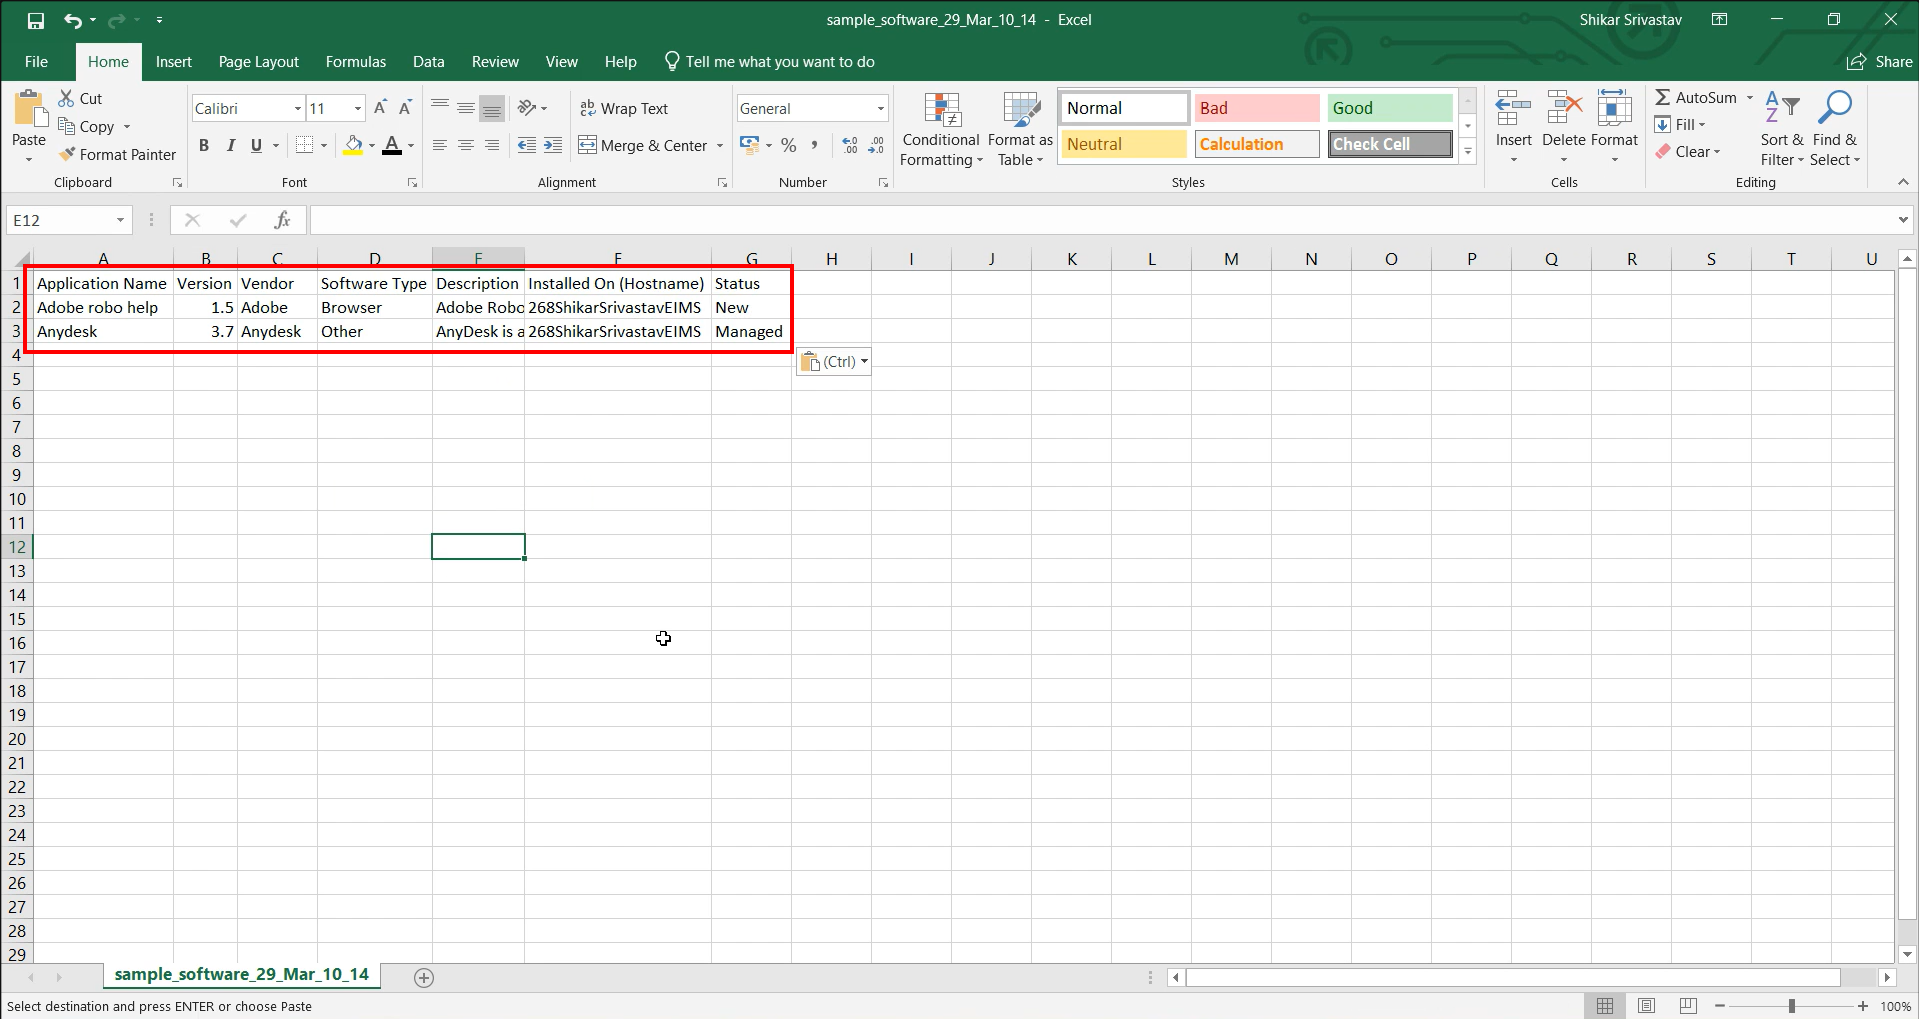
Step 3: Open the downloaded file and add the necessary details.
Step 4: Click "Upload" to upload the edited file.
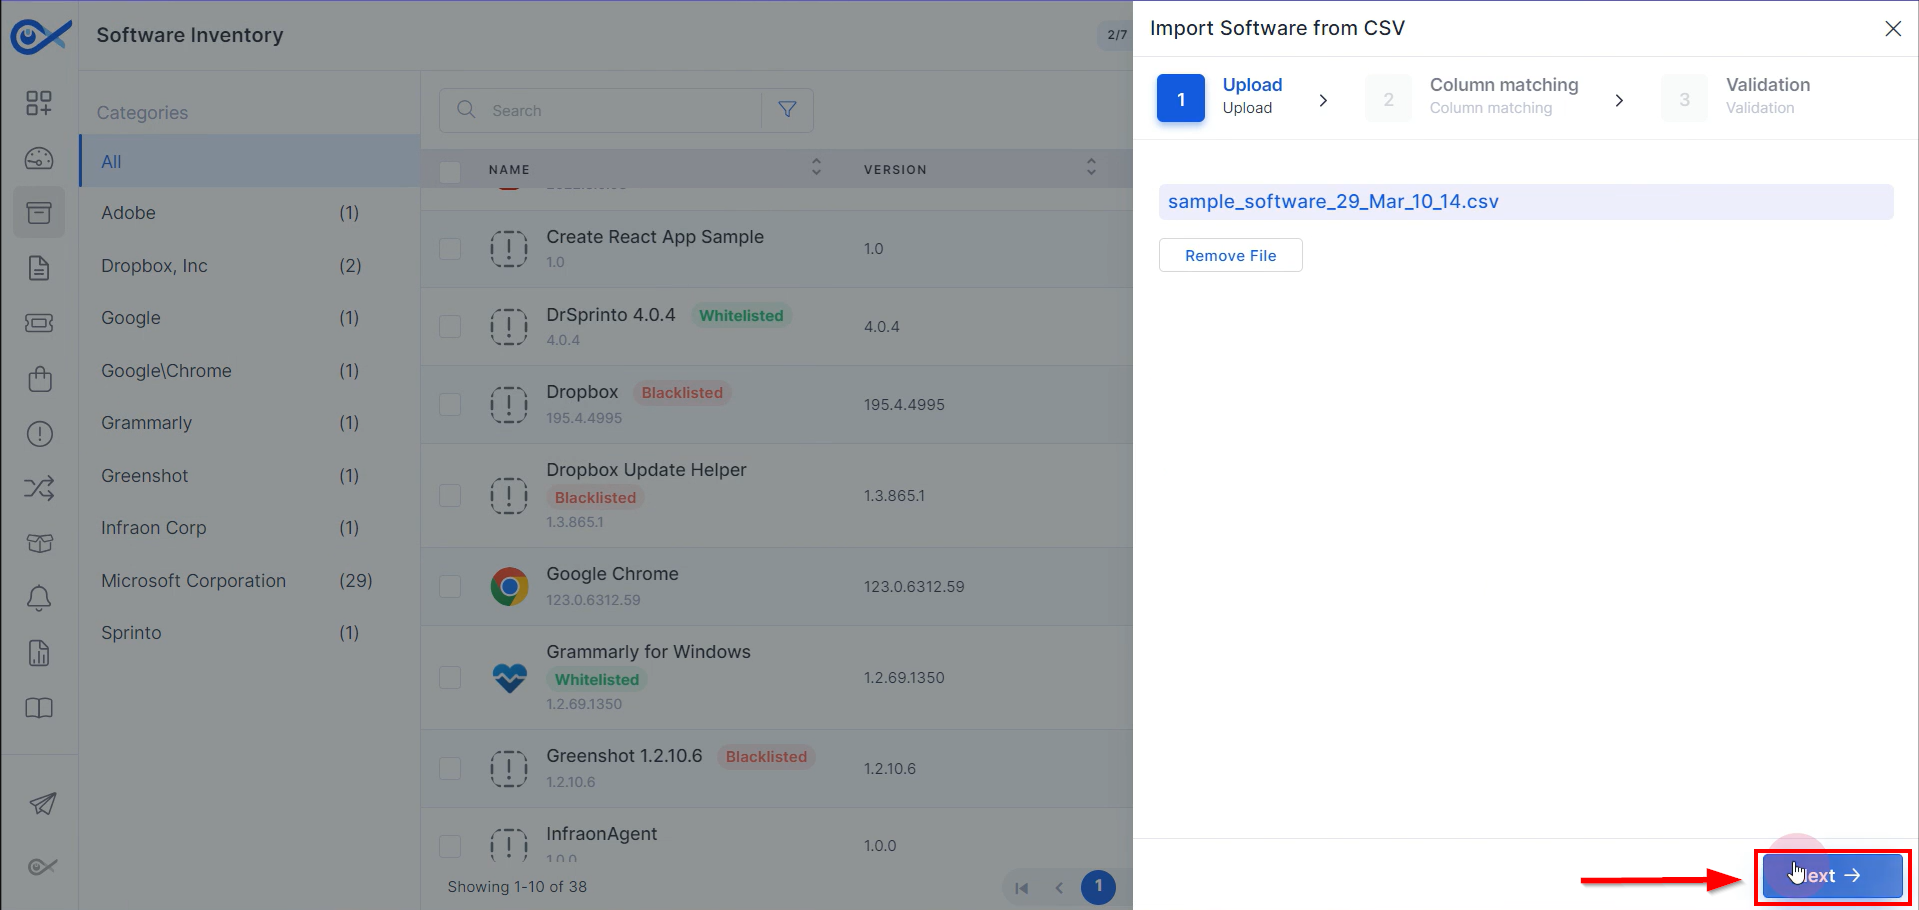
Step 5: Click “Next” to move forward.
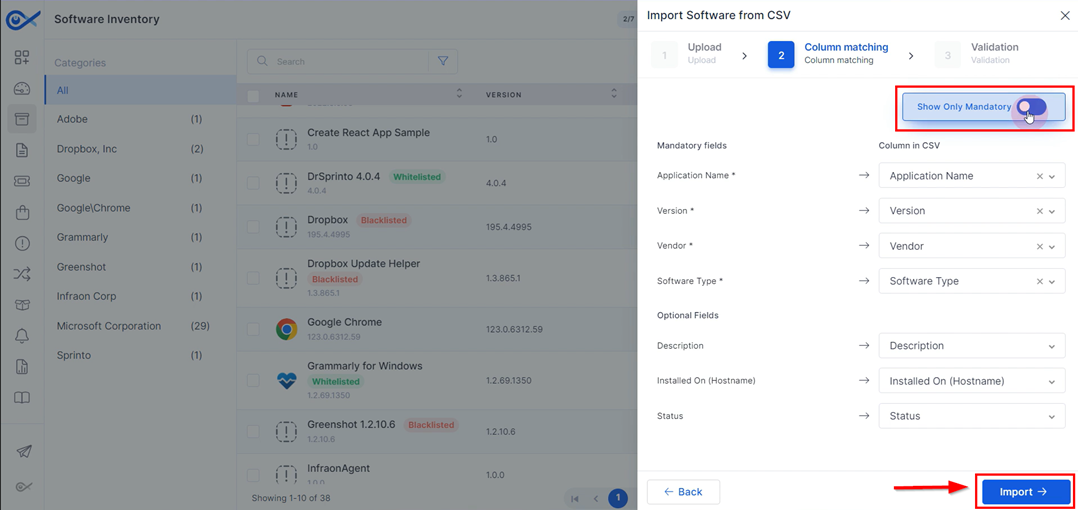
Step 6: Match the mandatory fields to CSV columns as needed on the column matching page. Once done, click “Import” to complete the process.
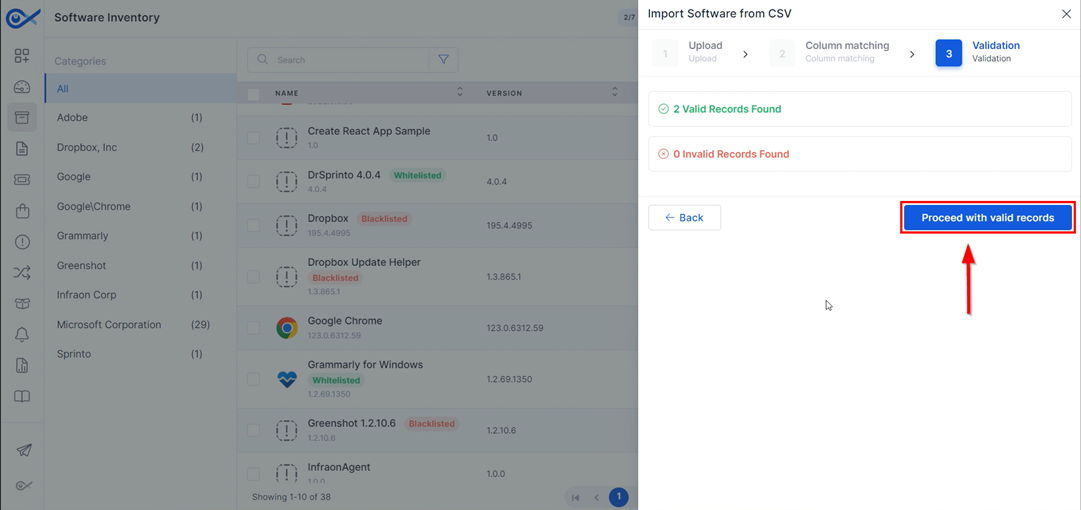
Step 7: Proceed with the valid records to add the software details on the software details page.
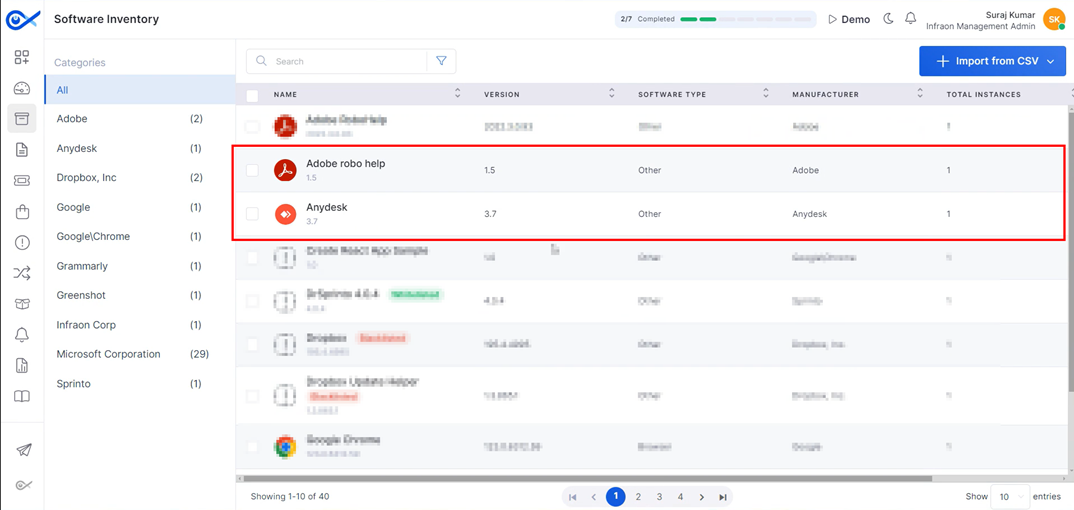
Step 8: Once the software has been added, it will be reflected on the software inventory page.
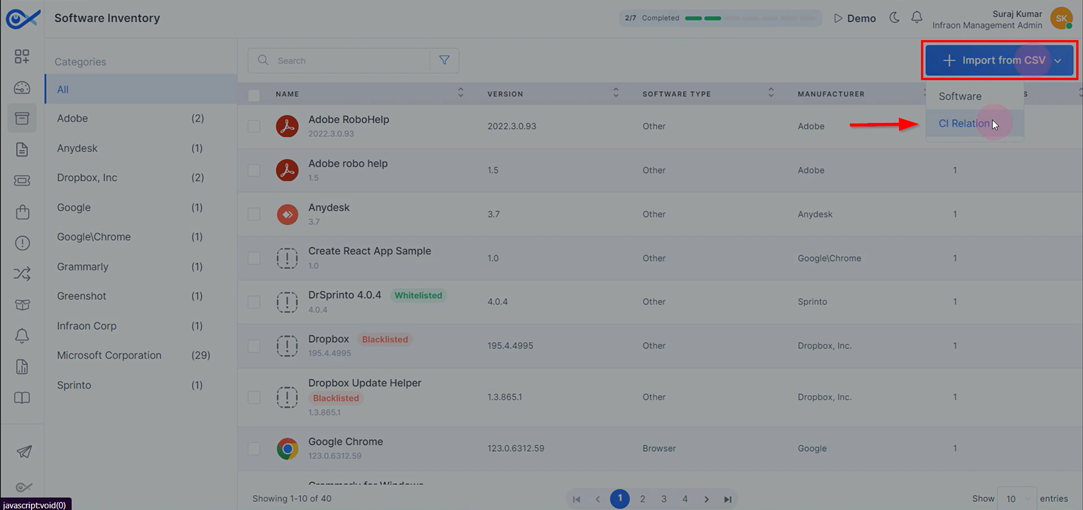
Step 1: Click on the “Import from CSV” option and select “CI Relation” to add the CI relation for the software listed on the software inventory page.
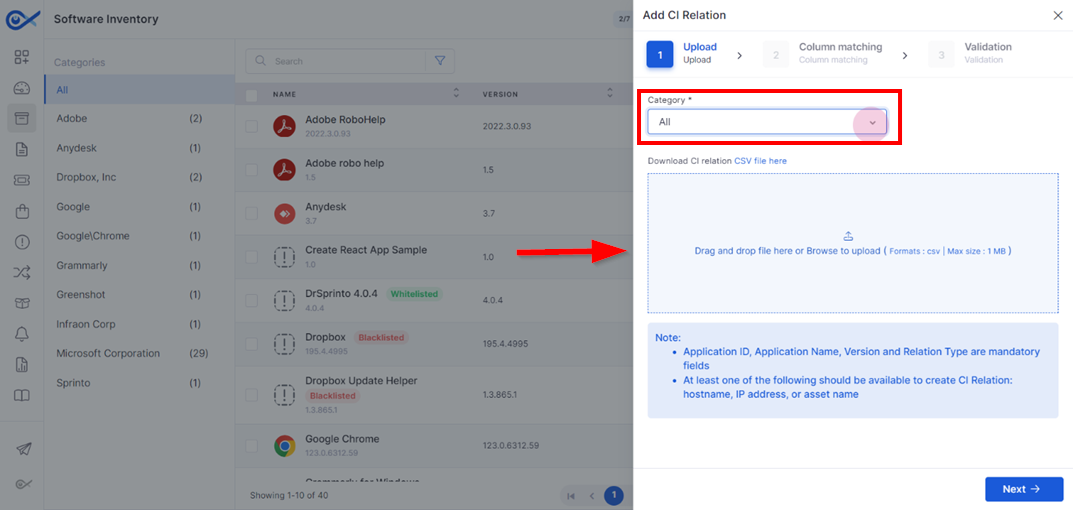
Step 2: Select the software category that best meets the technician's needs. Download the corresponding CSV file, fill in the details, and upload it after adding the CI relations.
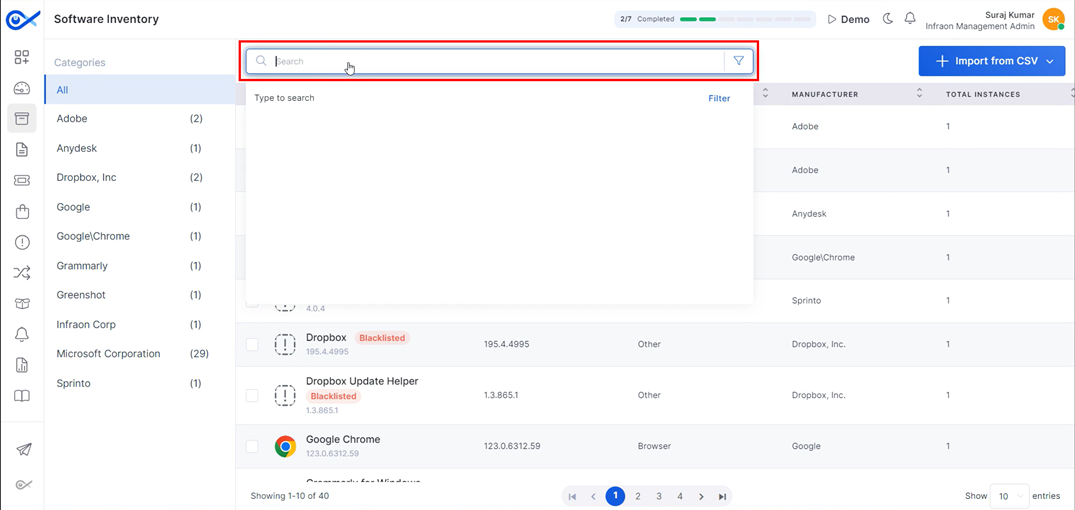
Locate the search bar at the top of the software inventory page. Use it to find software by name, hostname, or version number.
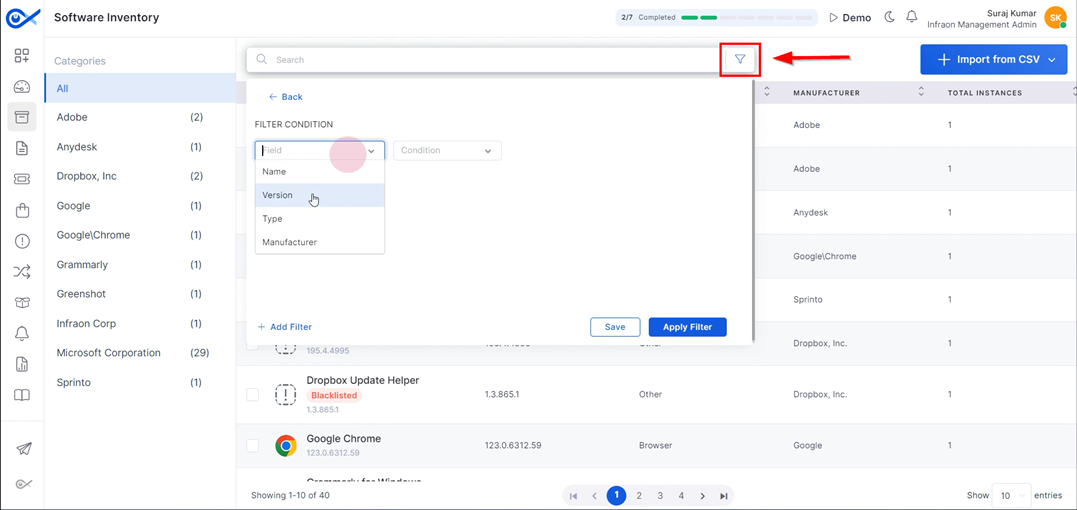
Filter software by name, version, type, or manufacturer. Customize filter conditions as needed. Save filter settings for future use.




This guide will explore the features and options available on the fixed asset and IT assets pages. These pages offer various tools for managing and organizing assets effectively.
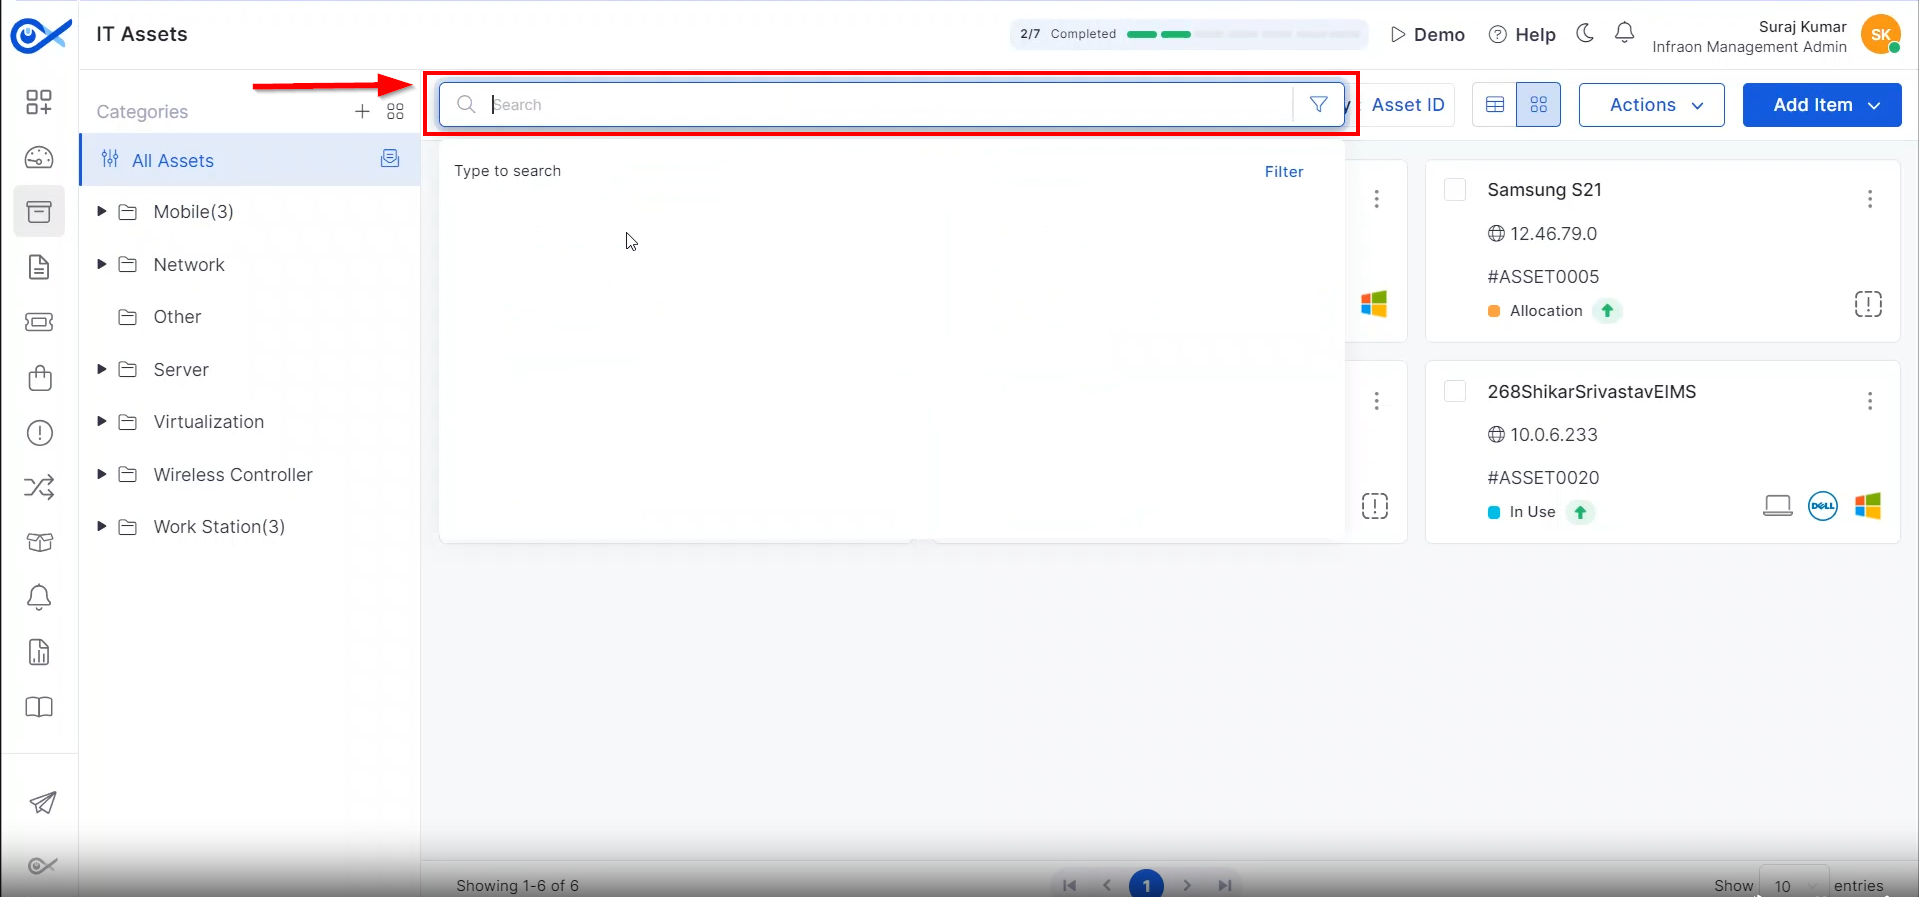
Locating the search option on the top panel of both pages will assist technicians in finding a specific asset based on its name, ID, and more.
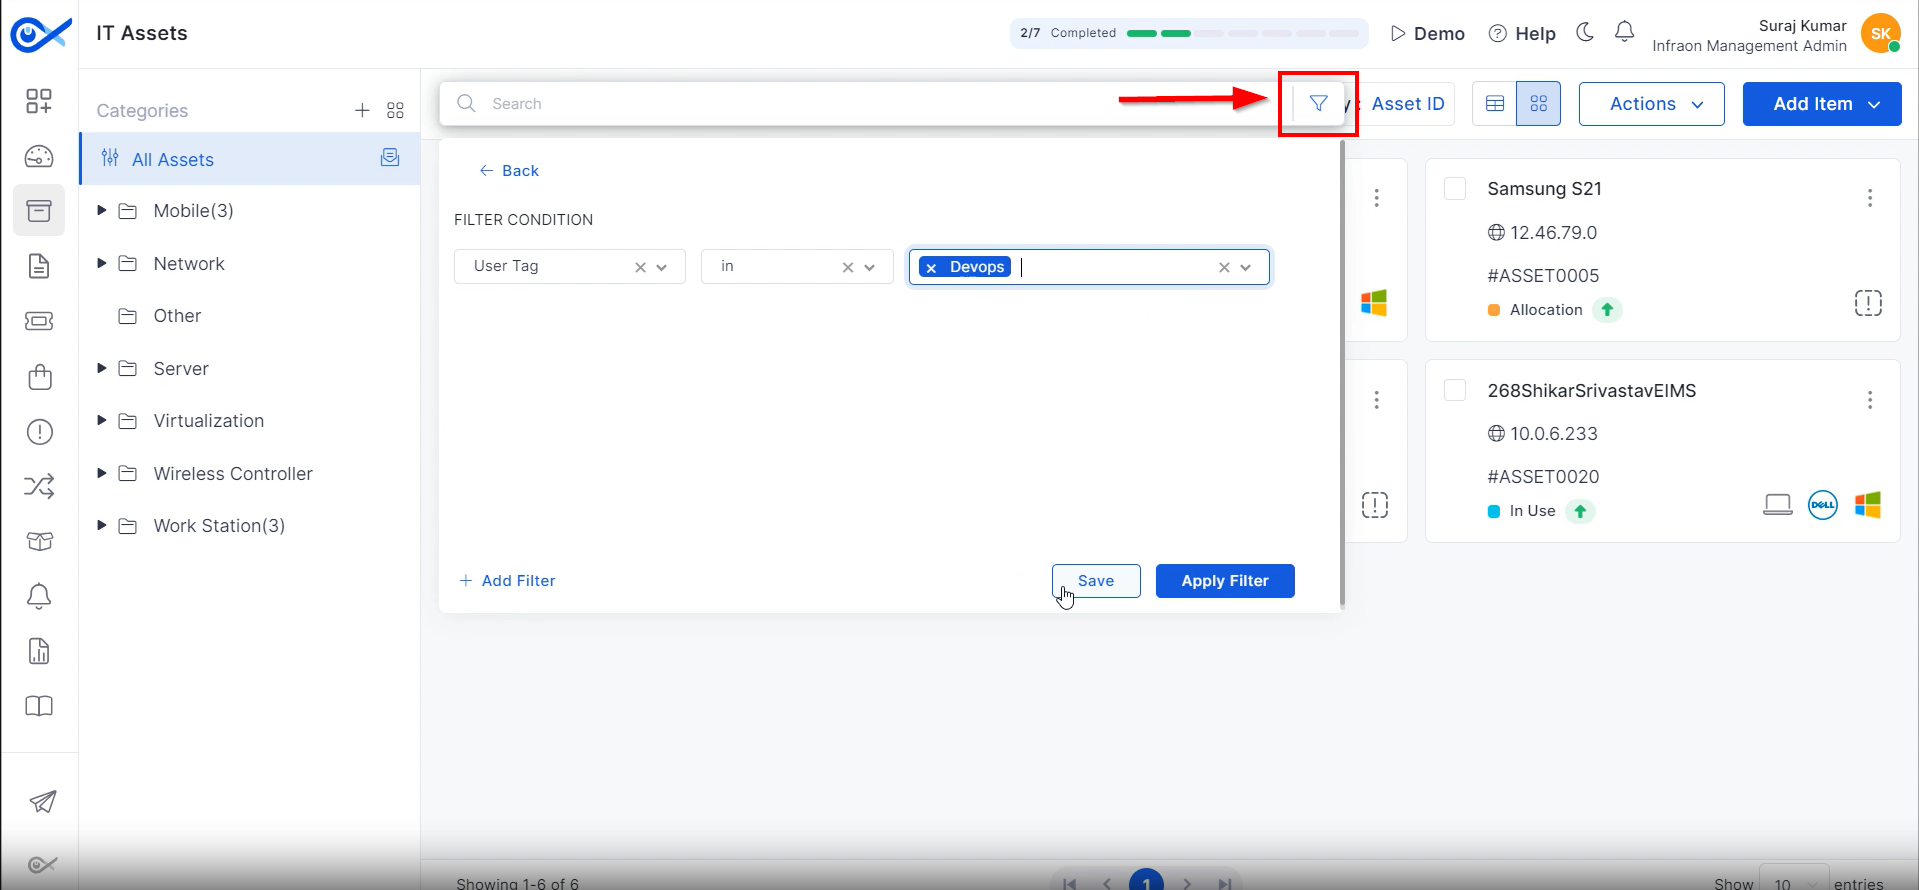
Use the filter option adjacent to the search bar to refine your asset search. Apply filters based on criteria like asset name, ID, status, owner, location, requester, etc. Save your custom filter settings for future use.
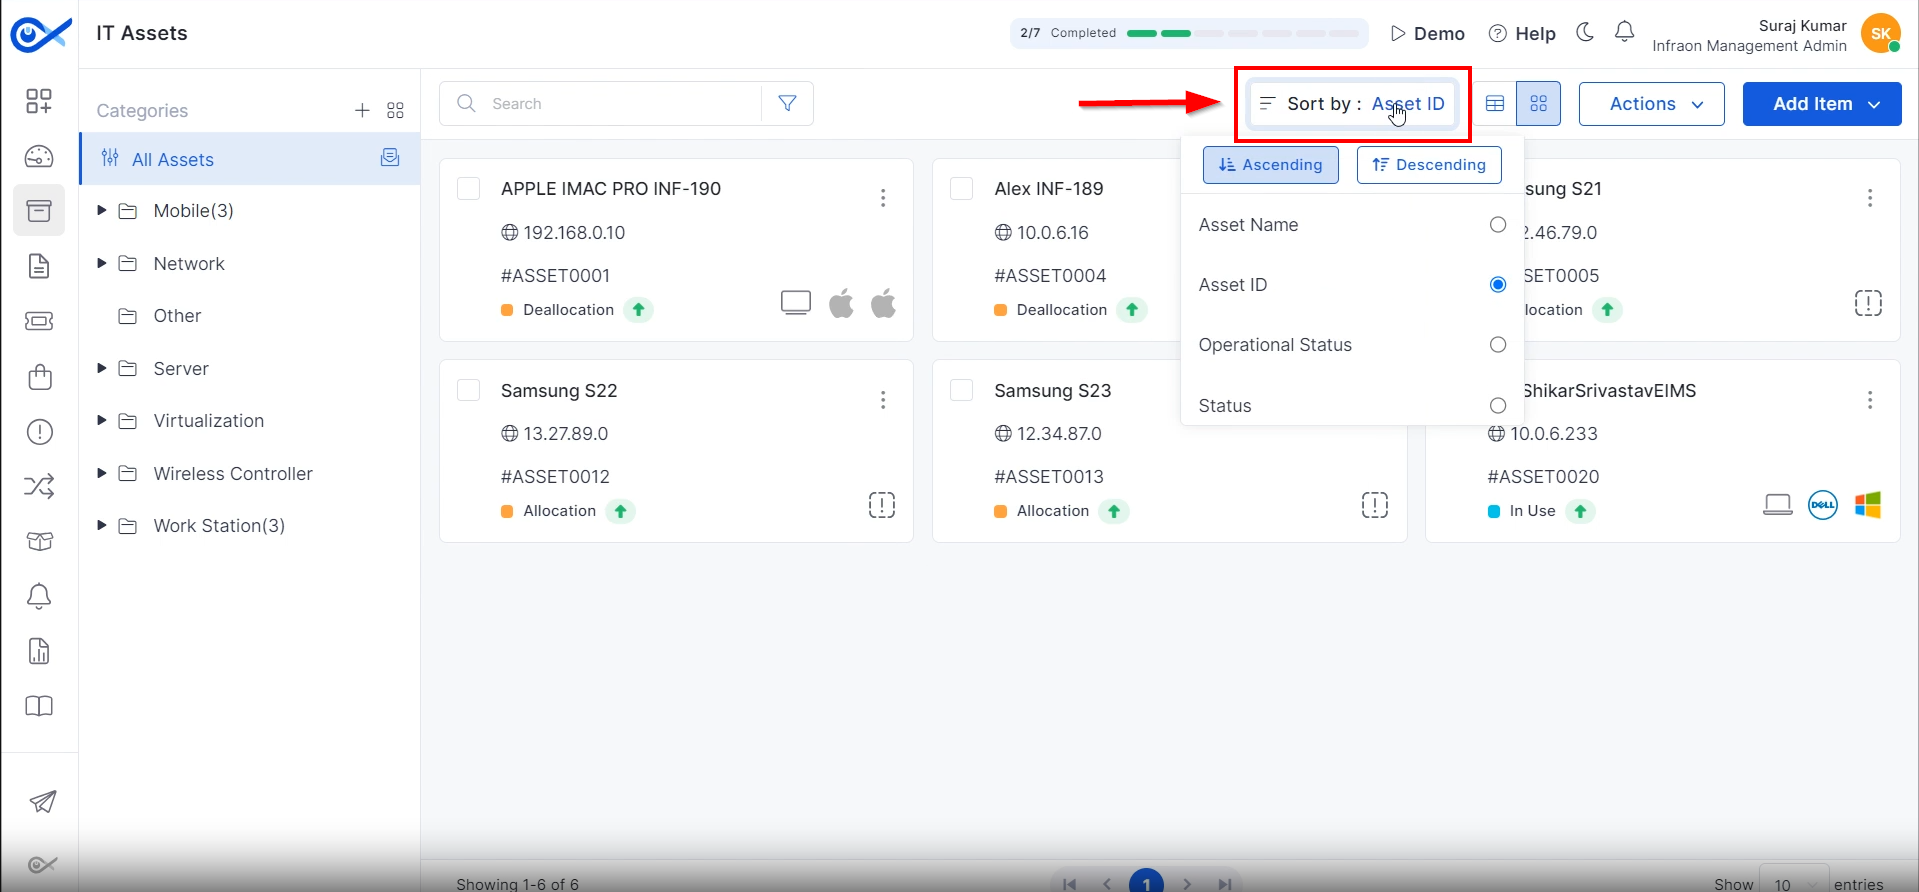
Next to the filter option, find the sort-by-arrangement option. Sort assets by name, asset ID, operational status, type, OS name, make, serial number, base location, whether they are active or installed, and their locations. Choose to organize the assets in ascending or descending order.
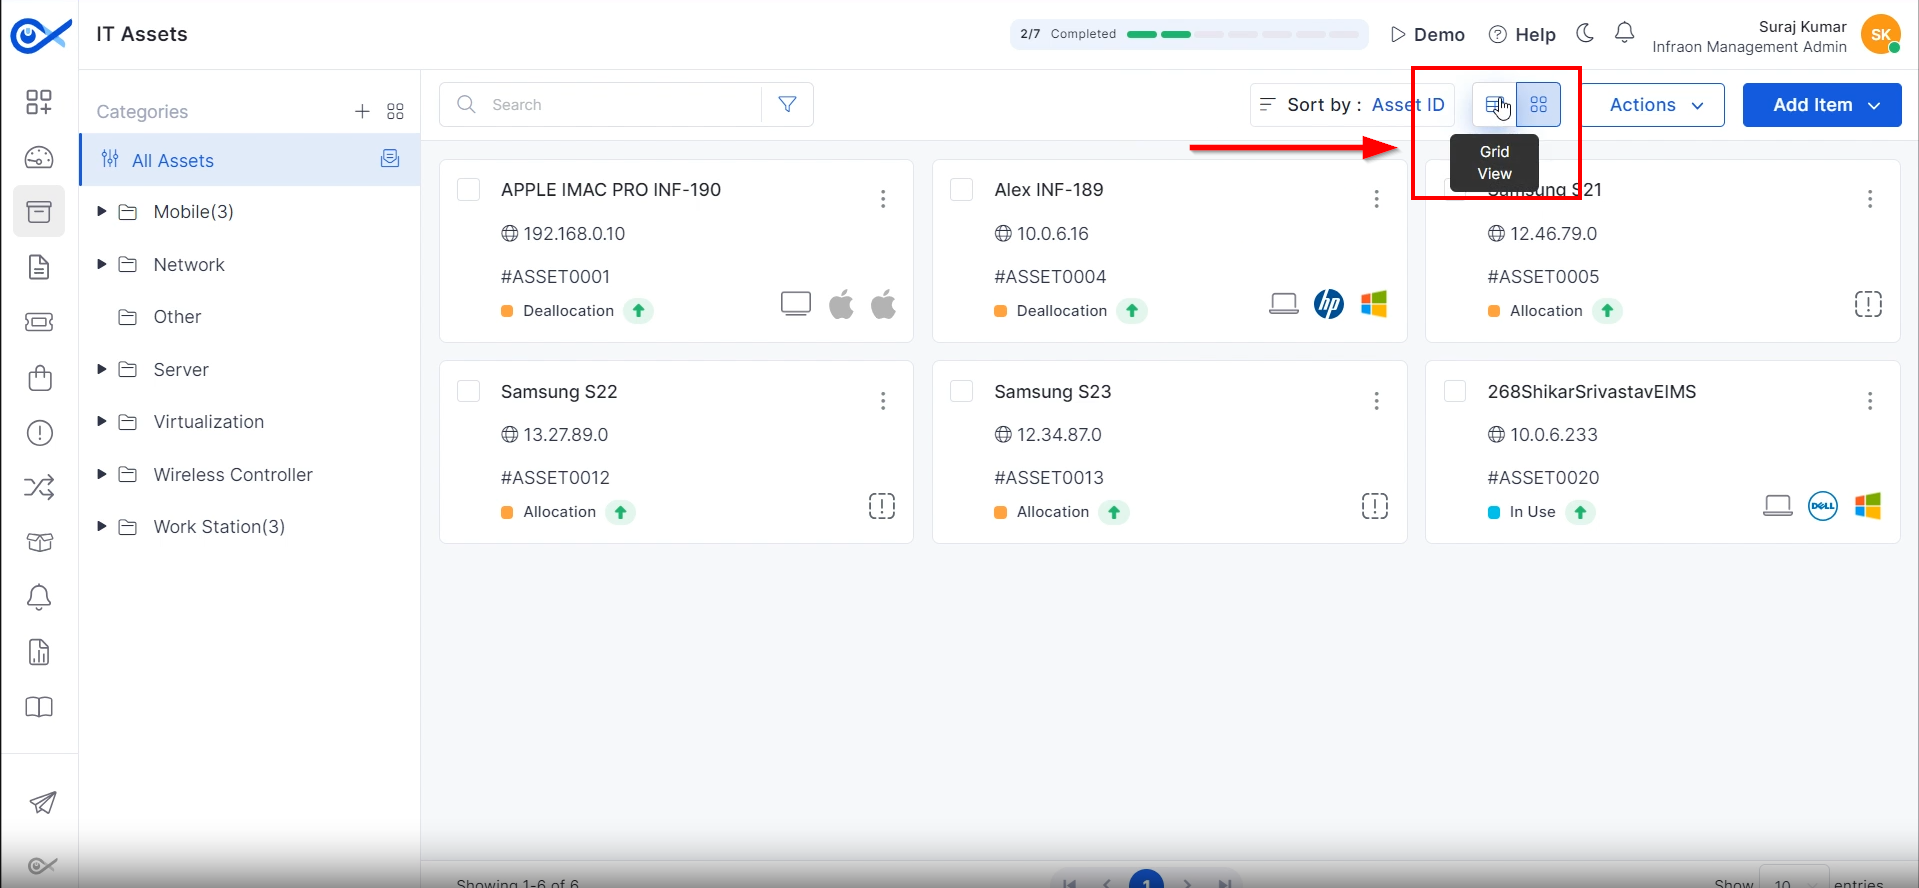
Infraon Infinity provides two viewing options: grid view and panel view.
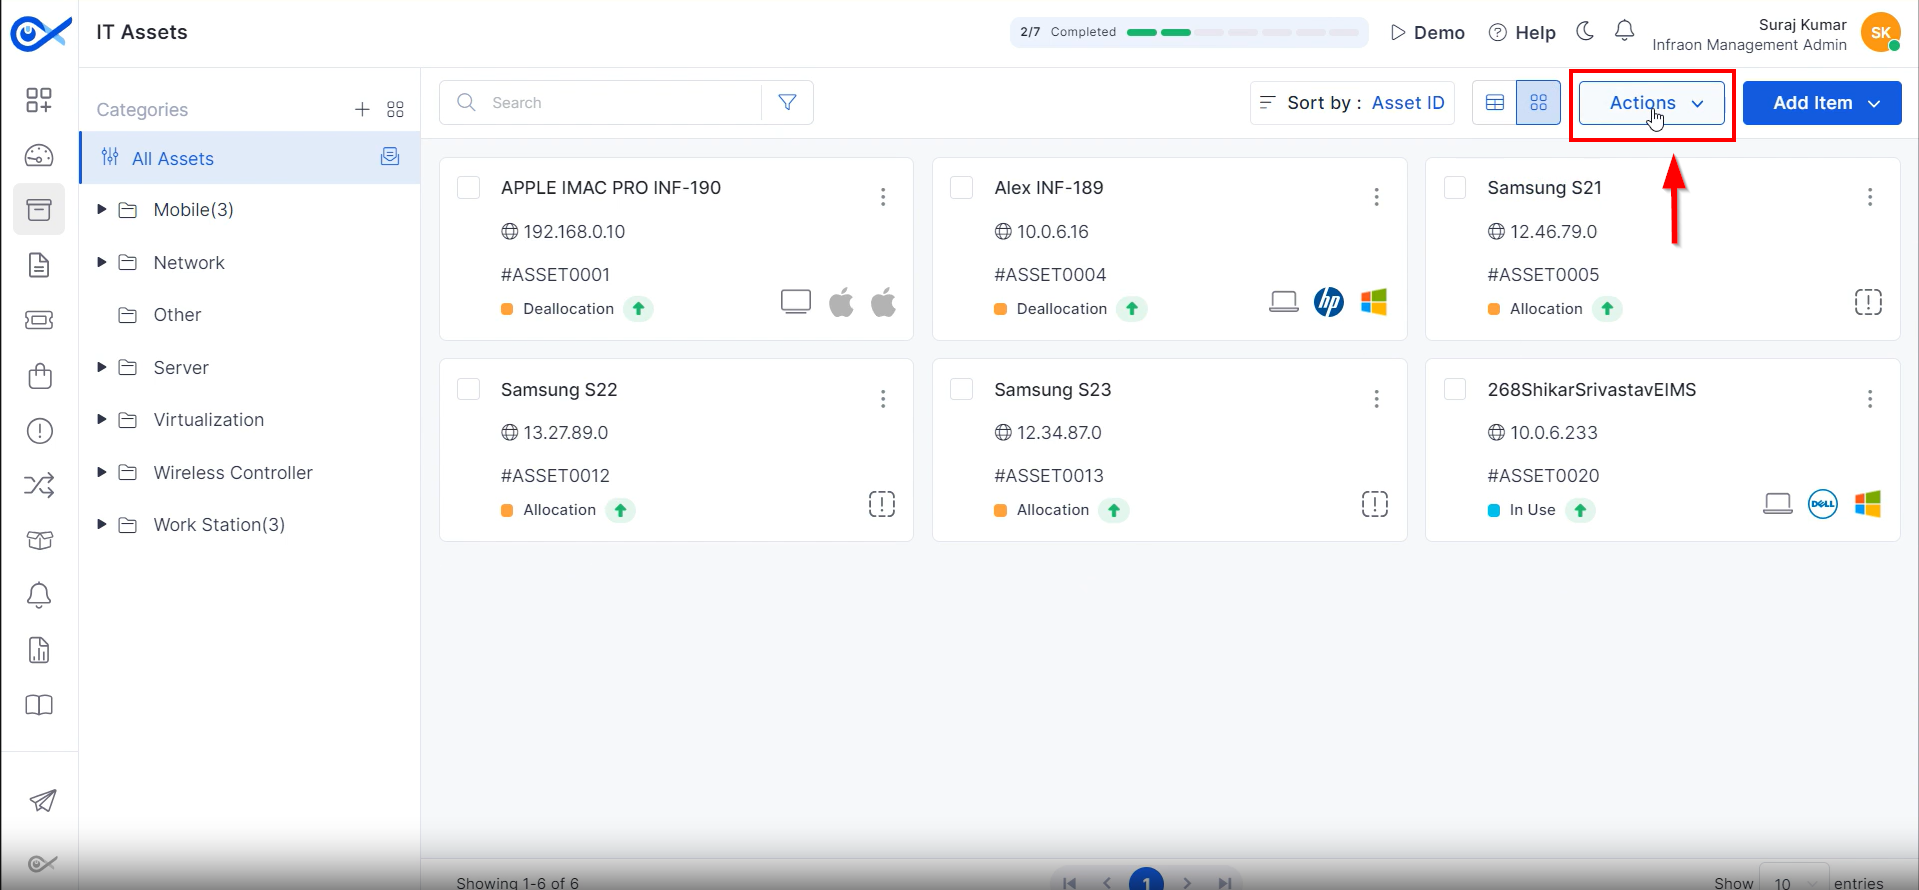
Find the actions tab adjacent to the view options.
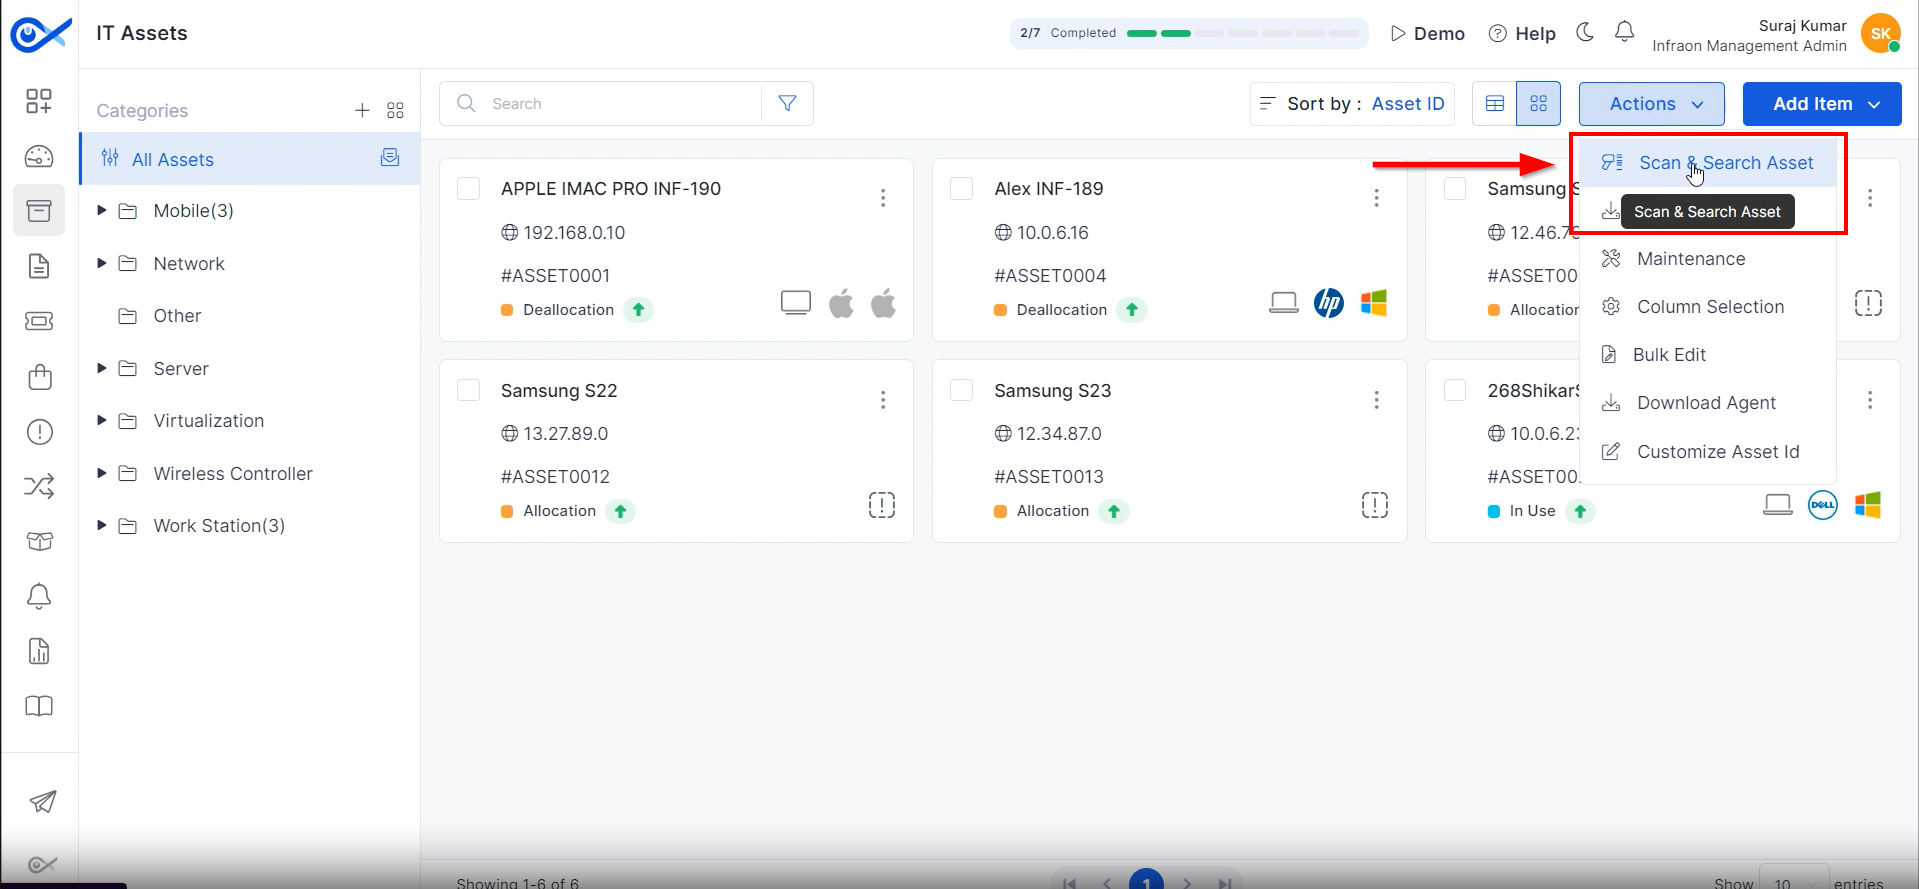
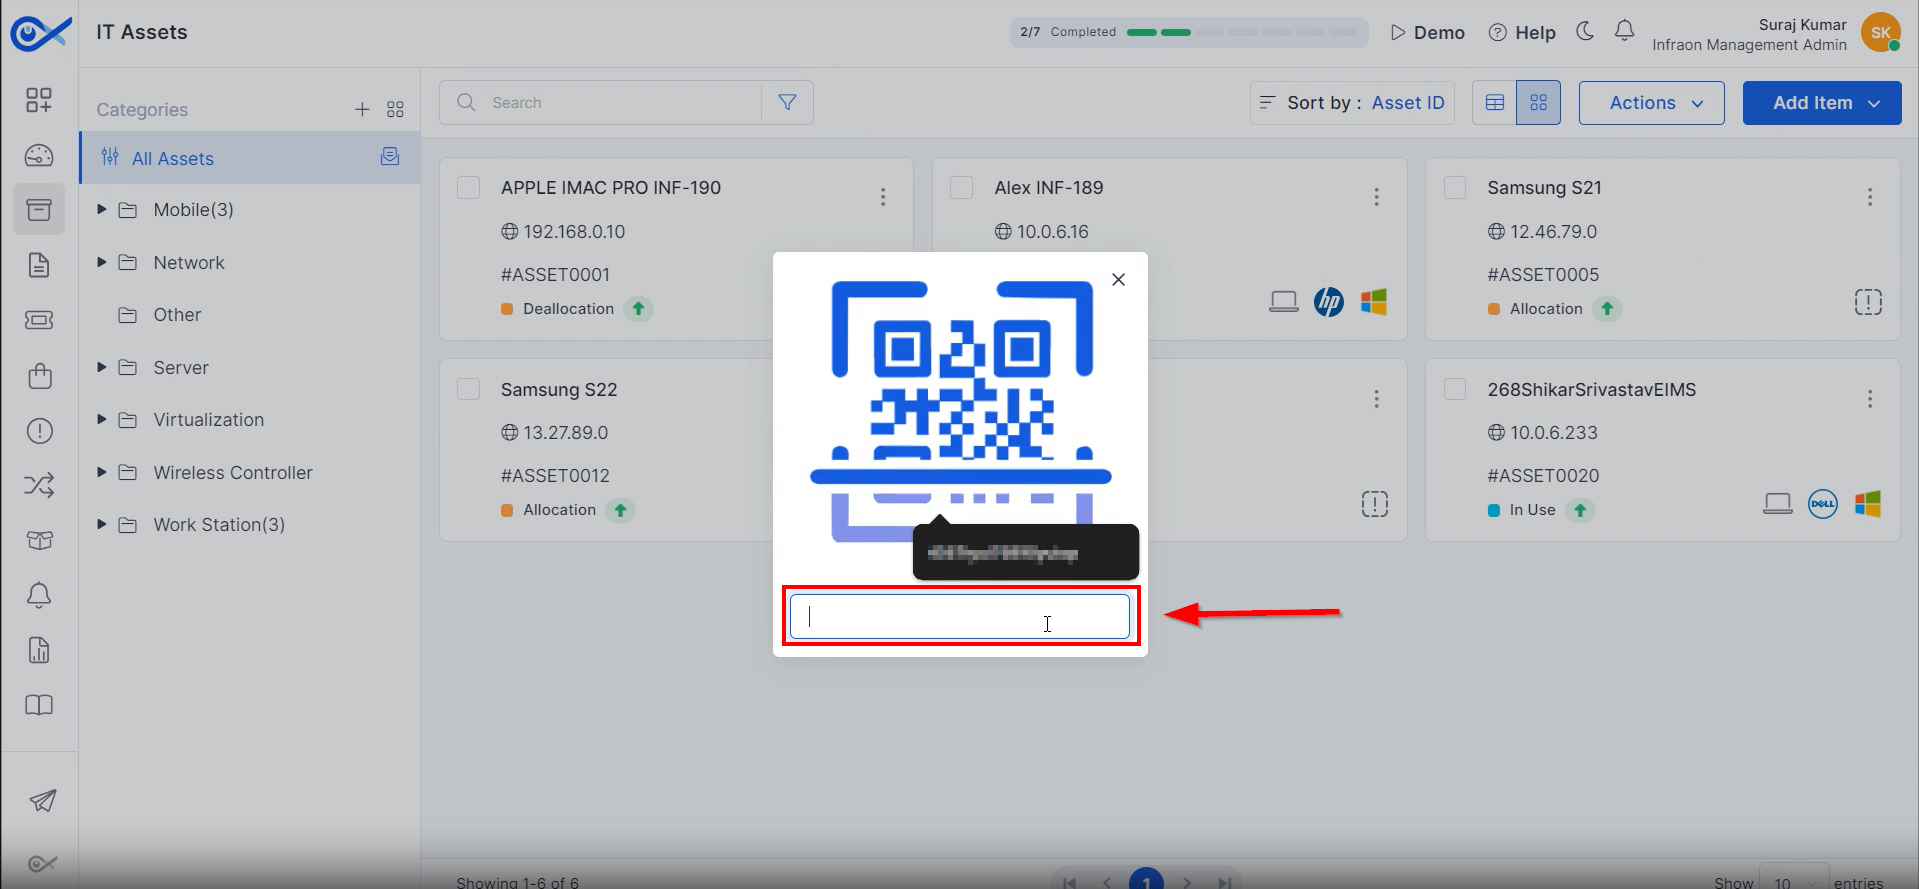
The first option in the actions tab is the scan and search asset feature. Technicians can add an asset directly using its barcode number.
Enter the barcode and the asset is added to the platform.
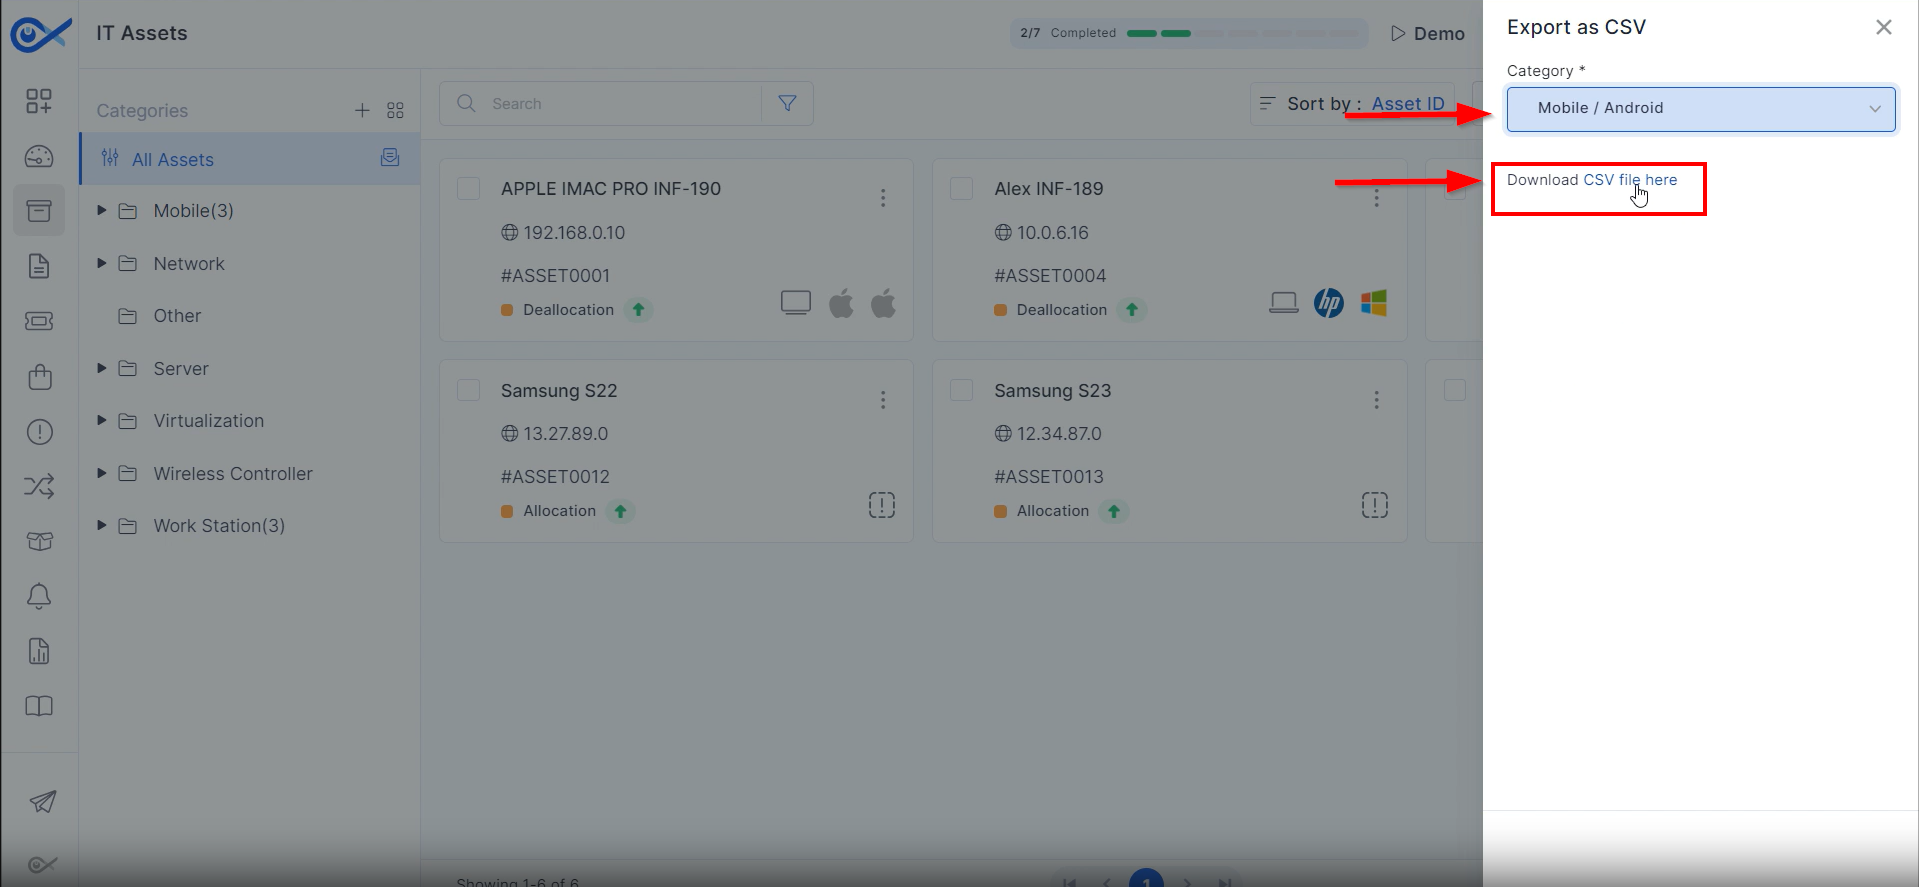
Further along, find the export option. Use this function to create a CSV file of the assets listed on the IT and Fixed assets page. Select the asset category for which the data is needed, then click on the download CSV file option. The downloaded CSV file contains all the information about the asset, including asset ID, name, owner, requester, tag, asset tags, location, and other details.
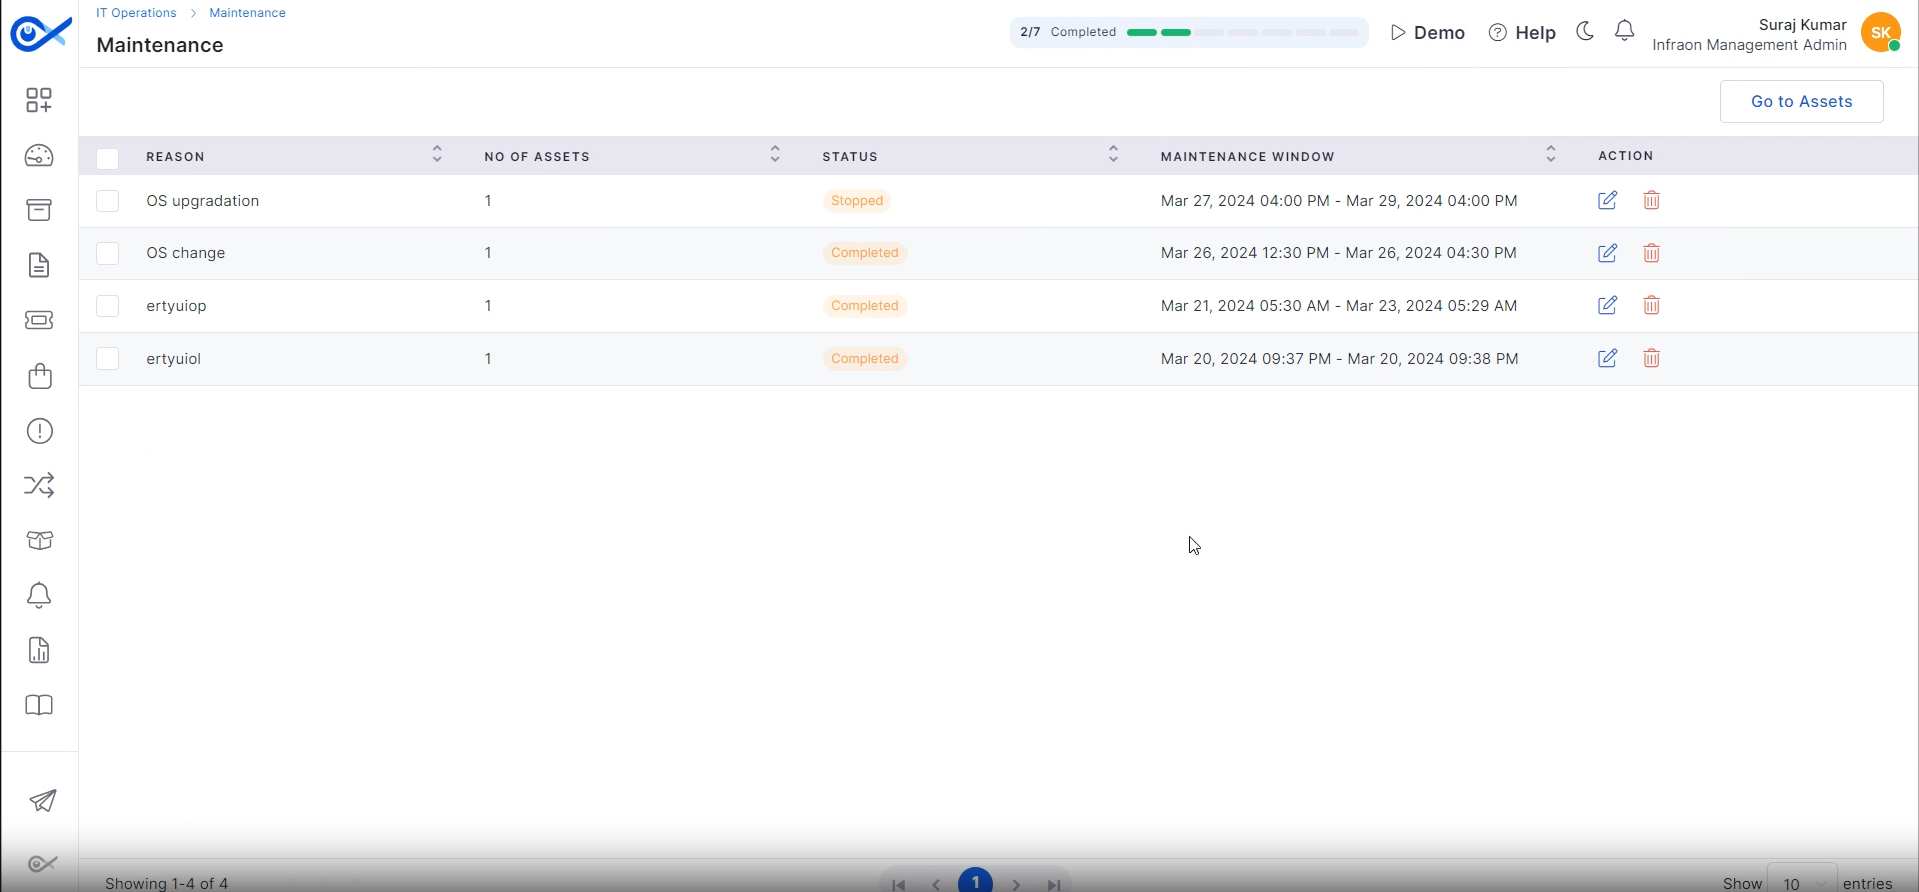
Also, in the action tab, find the maintenance option. Clicking on it will redirect you to the maintenance module, which will reflect all past and future maintenance assignments.
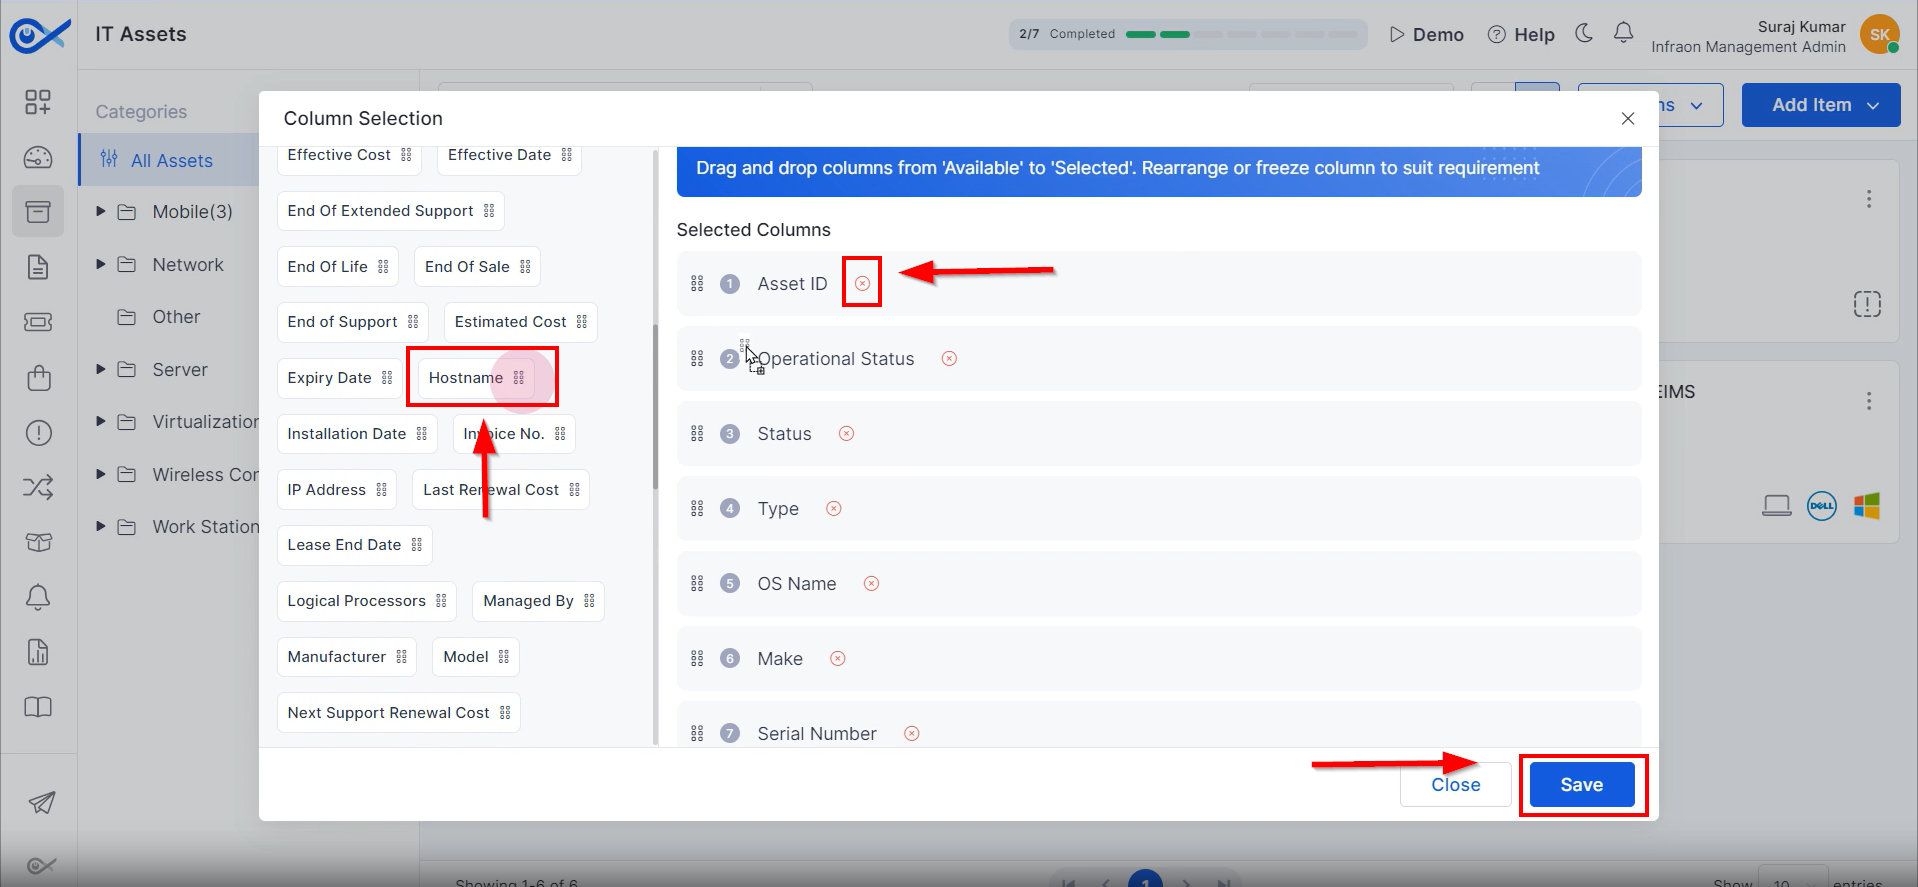
In the column selection, choose the information displayed on the asset page. To add or remove columns, click on the cross option to remove a column. To add a selection, drag and drop it from the column selection. Once done, click on save to apply the changes. The grid view now reflects the selections just made.
Click on bulk edit to make changes to a specific category of assets using a CSV file. This option is similar to adding an asset using a CSV file.
You can download the inventory agent. This option is also available in the inventory agent located in the IT operations module.
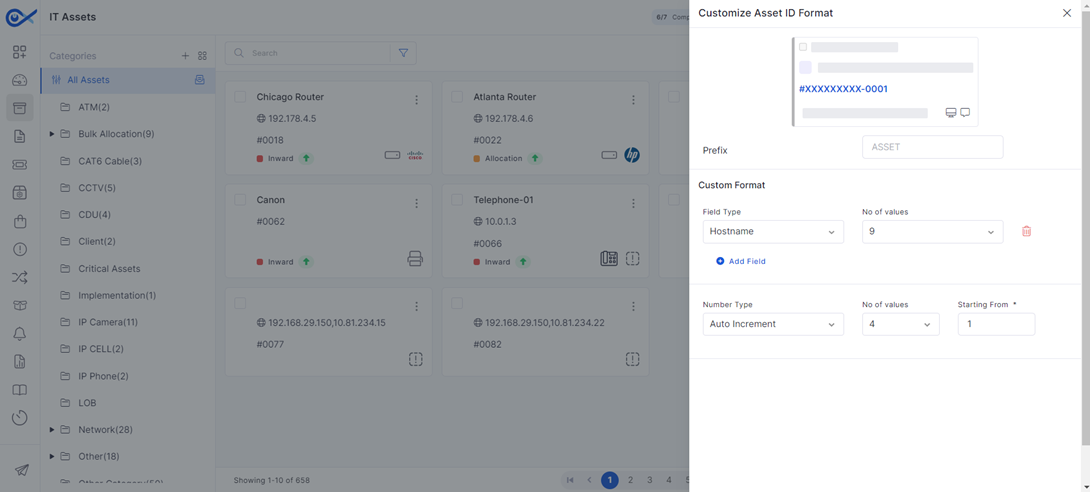
Lastly, find the customized asset ID feature. Customize the ID format of the assets created. Change the prefix and choose alphanumeric or random ID format. Define the number of values and set the conditions for them.
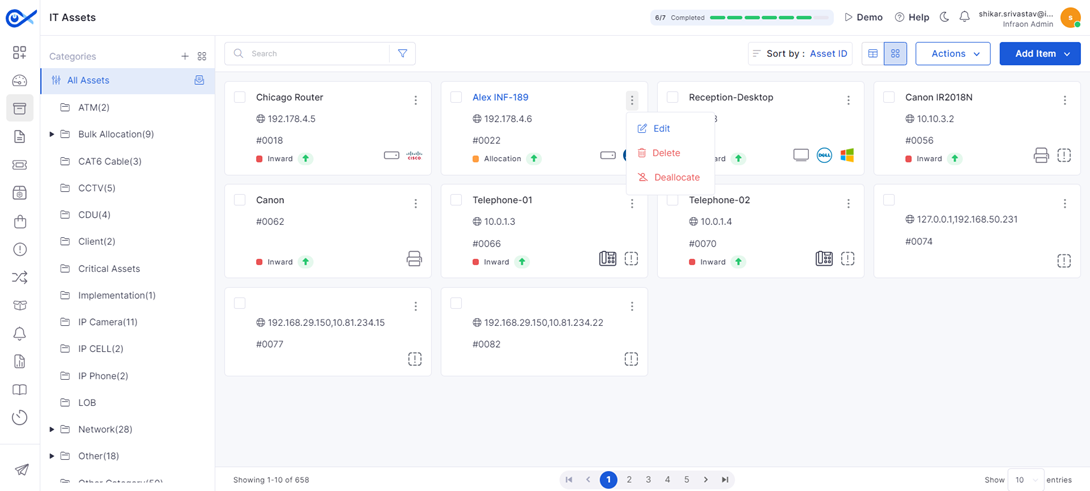
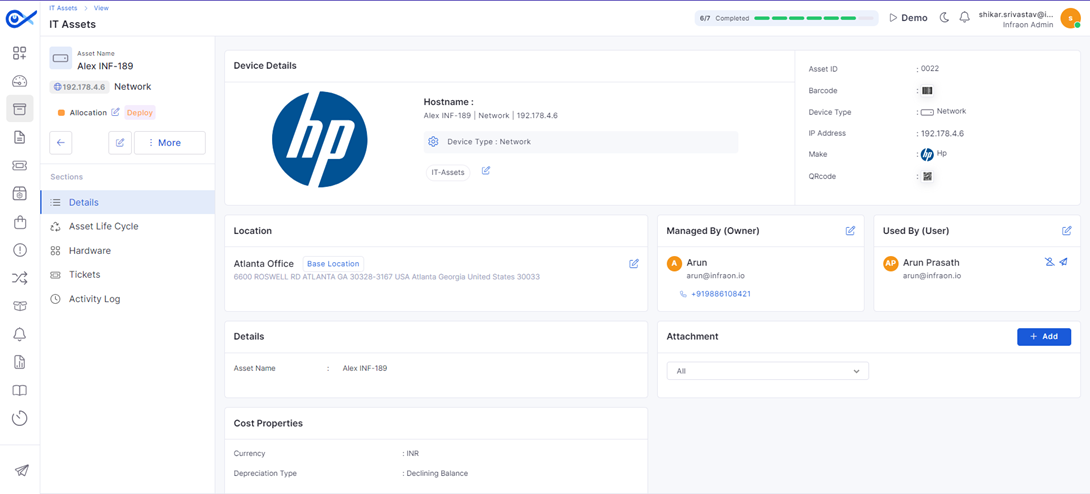
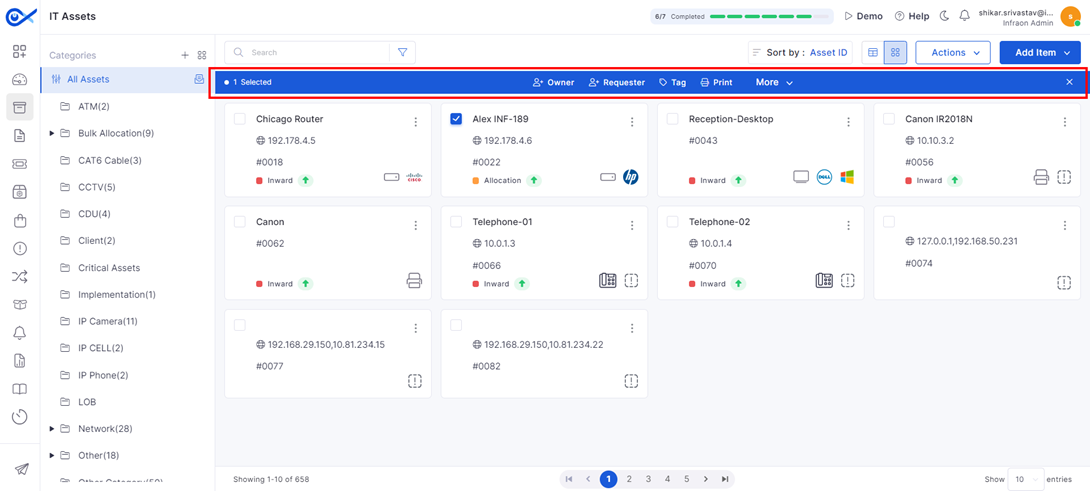
Examine an example with the asset ID "Alex INF-189" on the asset grid page. The asset name, IP, asset ID, and its status—whether it is deallocated or not—are reflected. The asset's status is also shown, indicating whether it is up or down. Next to it, the type of device, its manufacturer, and the OS version are displayed. Additionally, find a "more options" key, which allows users to edit or make changes to the asset. To delete the asset, click "delete." To allocate a user to this specific asset, click "allocate."
For a detailed view of the asset, click on the asset name.
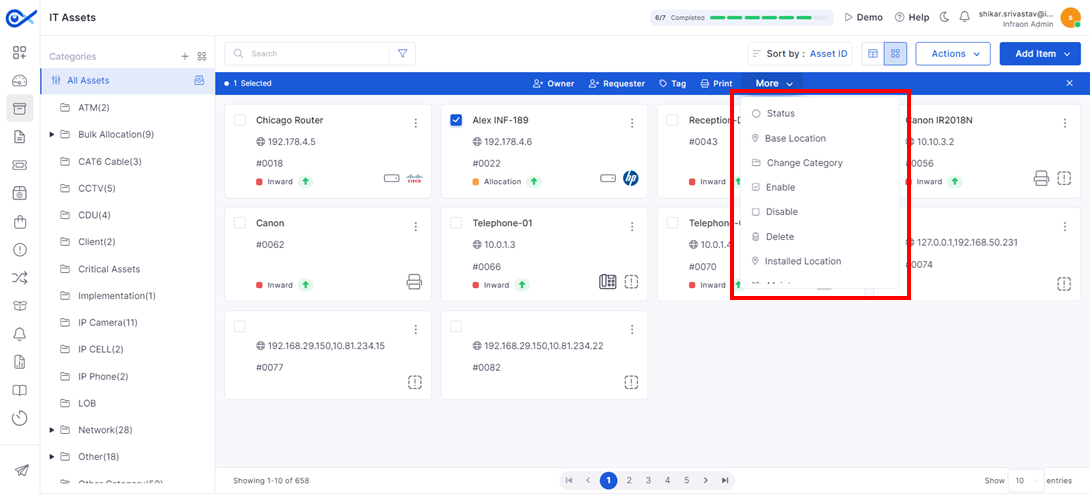
This page offers efficient bulk actions. By selecting multiple assets, a toolbar appears at the top of the page. From here, you can perform actions on selected assets, such as assigning owners, choosing requesters, applying group tags, printing, and accessing additional options.
The 'More actions' option provides bulk management capabilities. By selecting multiple assets, technicians can activate, relocate, recategorize, enable/disable, delete, reinstall, schedule maintenance, or mark assets as CI.
The left panel displays categories and subcategories for both fixed and IT assets. You can also perform actions such as editing, deleting, adding new categories, creating category templates, and adding custom fields.
This concludes the overview of the Infraon Infinity IT asset and the fixed asset management tab.










This guide covers the software license module in the Asset module.
A software license outlines the permissions granted by software developers to users and details how the software should be used and paid for. The software license management page displays all software licenses captured by the Infraon agent.
There are two main methods for adding a software license: manually or importing from a CSV file. When an Infraon agent is installed on an asset, it automatically captures the operating system license of that asset.
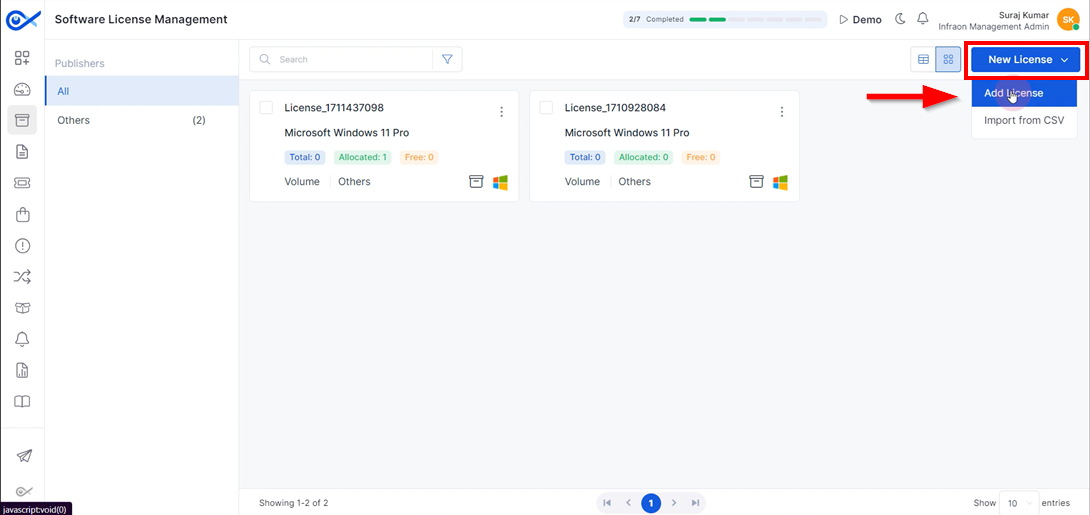
Step 1: Click “New License” at the top right corner of the page and select “Add License.”
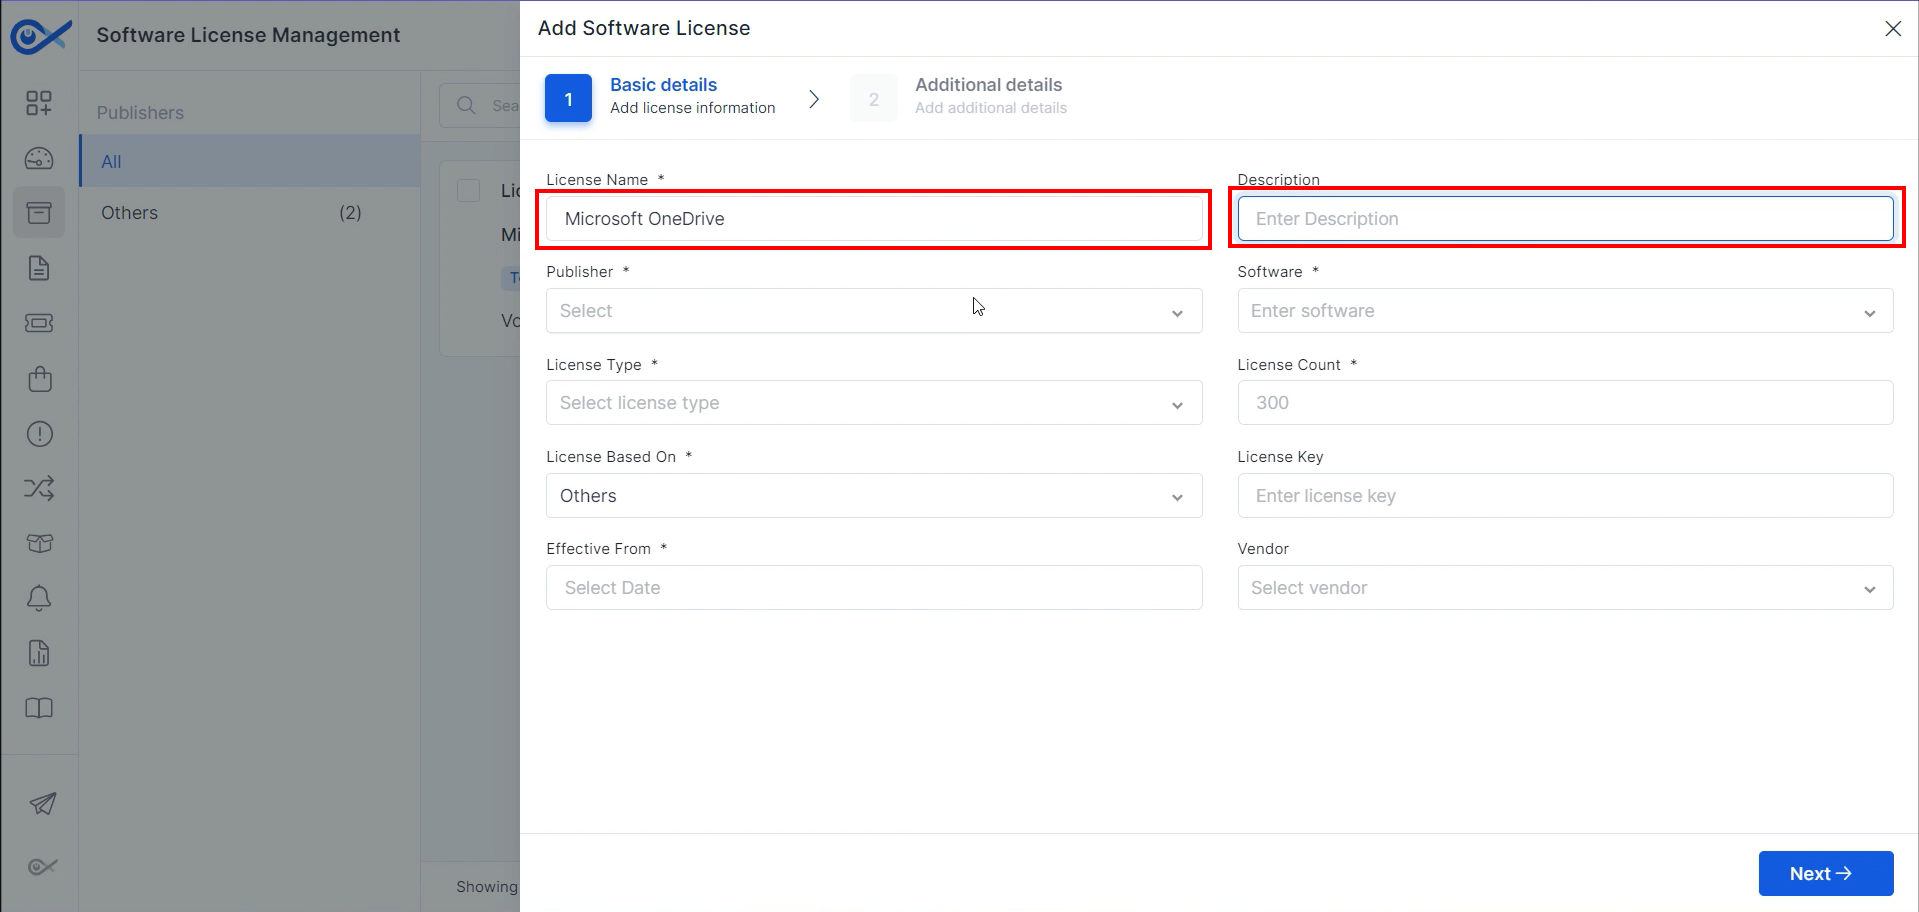
Step 2: Add the license information in the Basic Details tab. Begin with the license name and provide a description.
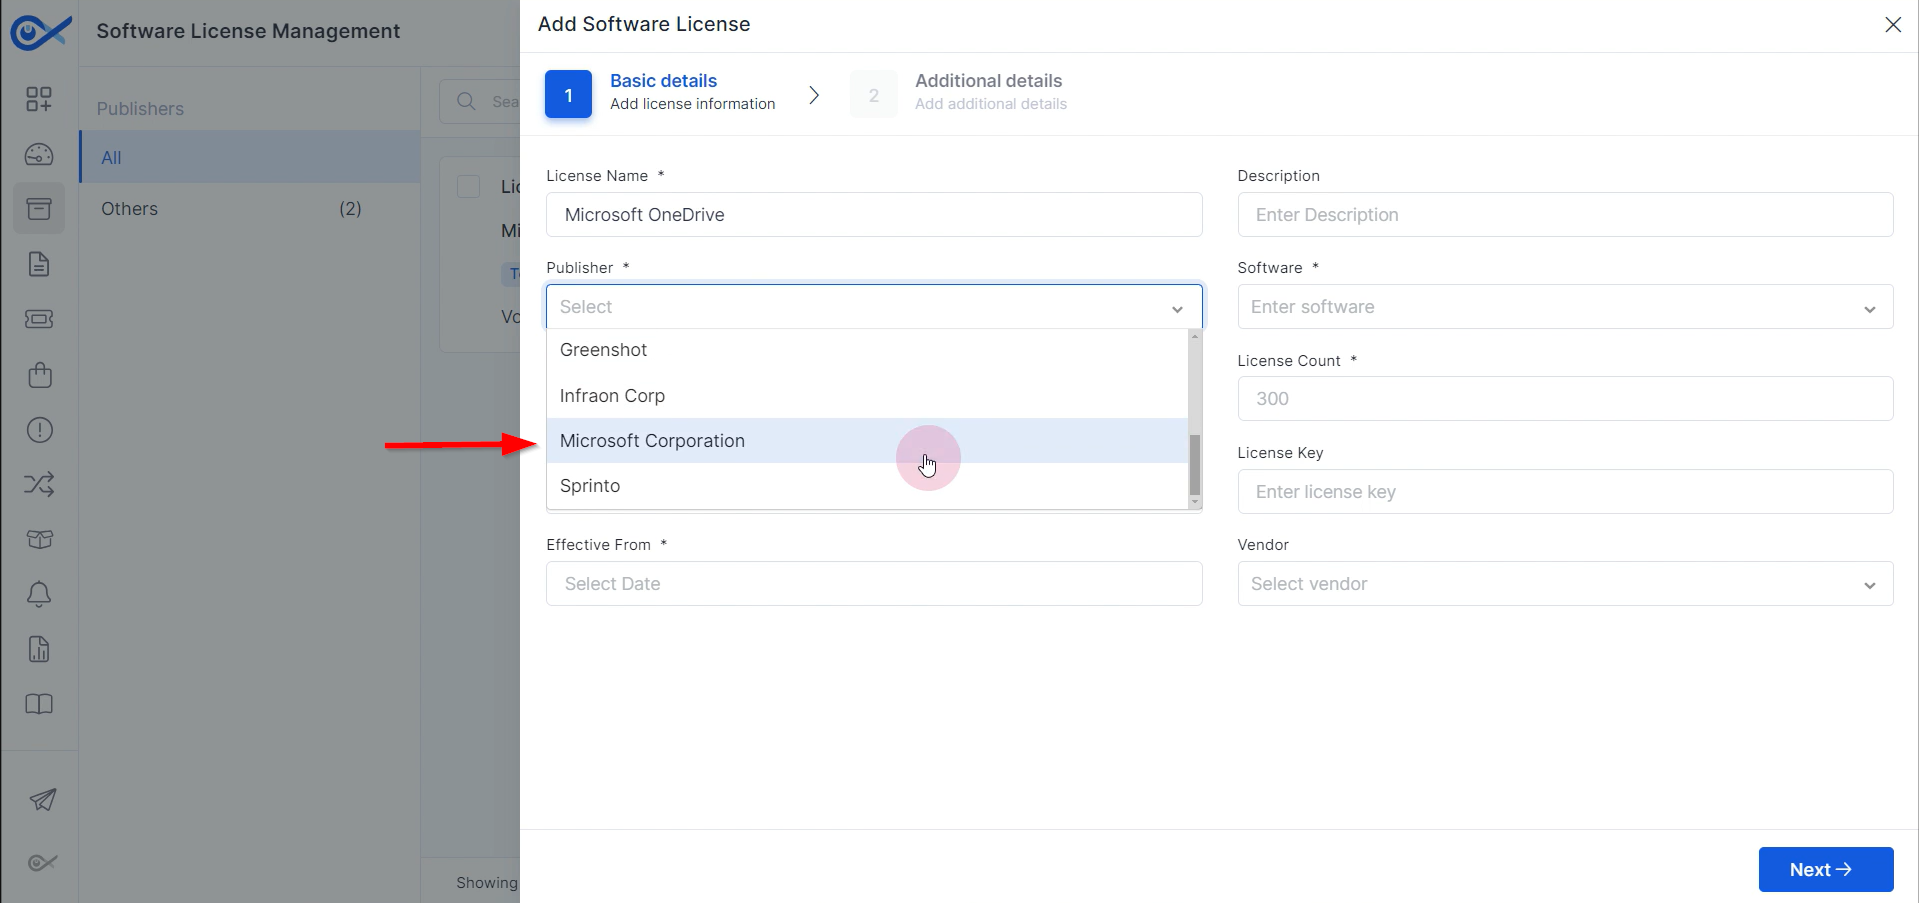
Step 3: Add the publisher from the dropdown list, which displays all the software added.
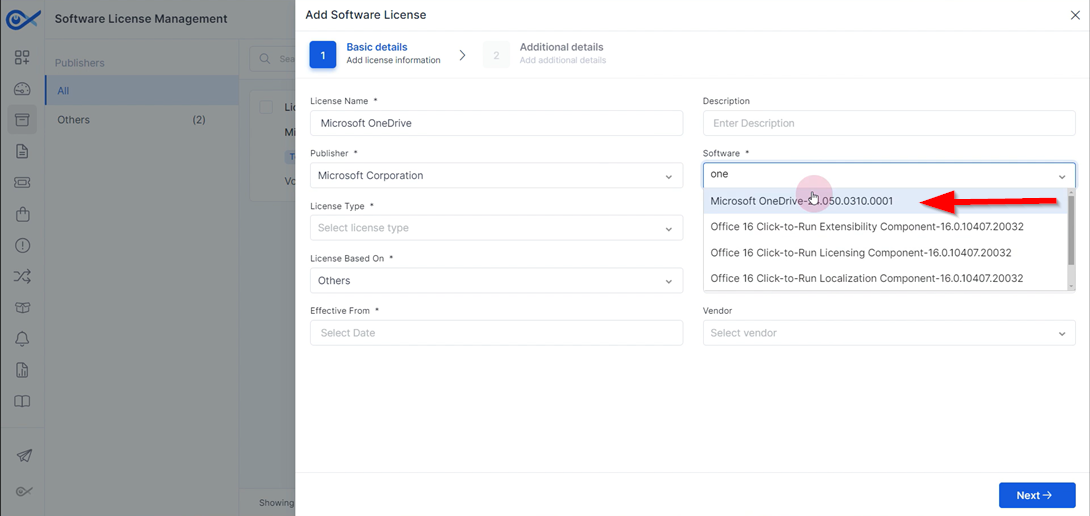
Step 4: After selecting the publisher, choose the software for which the license has been generated.
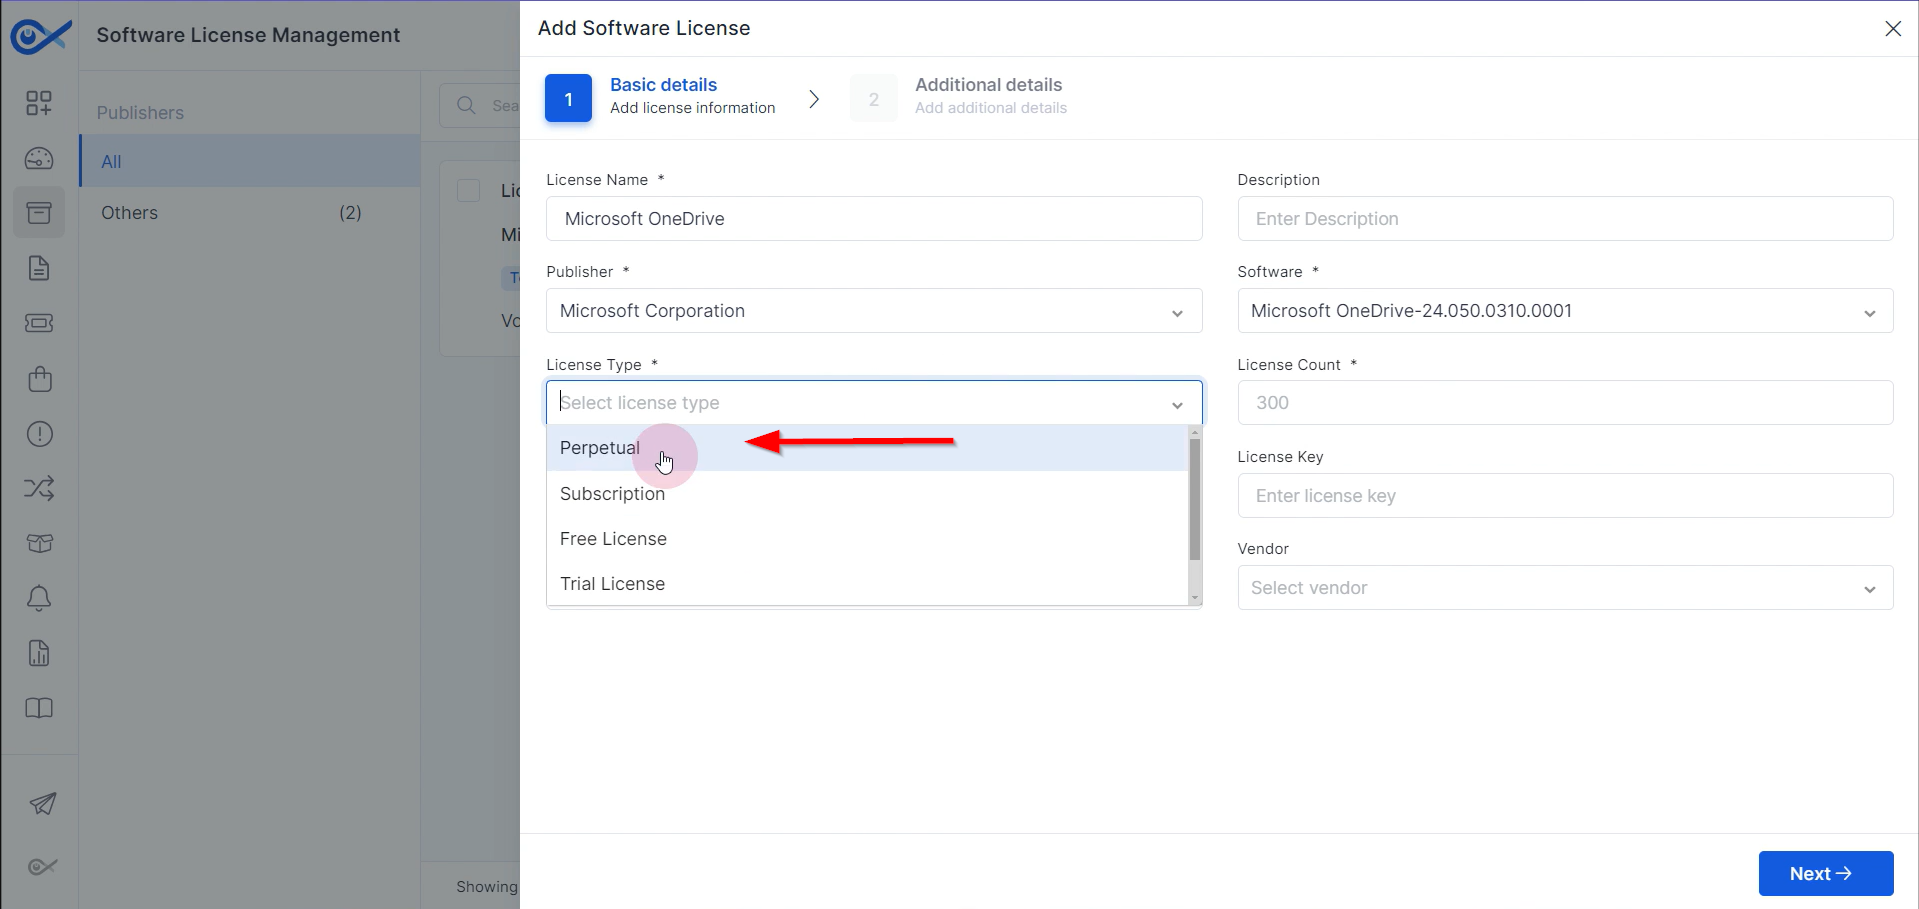
Step 5: Select the license type. Infraon offers a perpetual subscription-free trial license and volume license. Choose according to requirements.
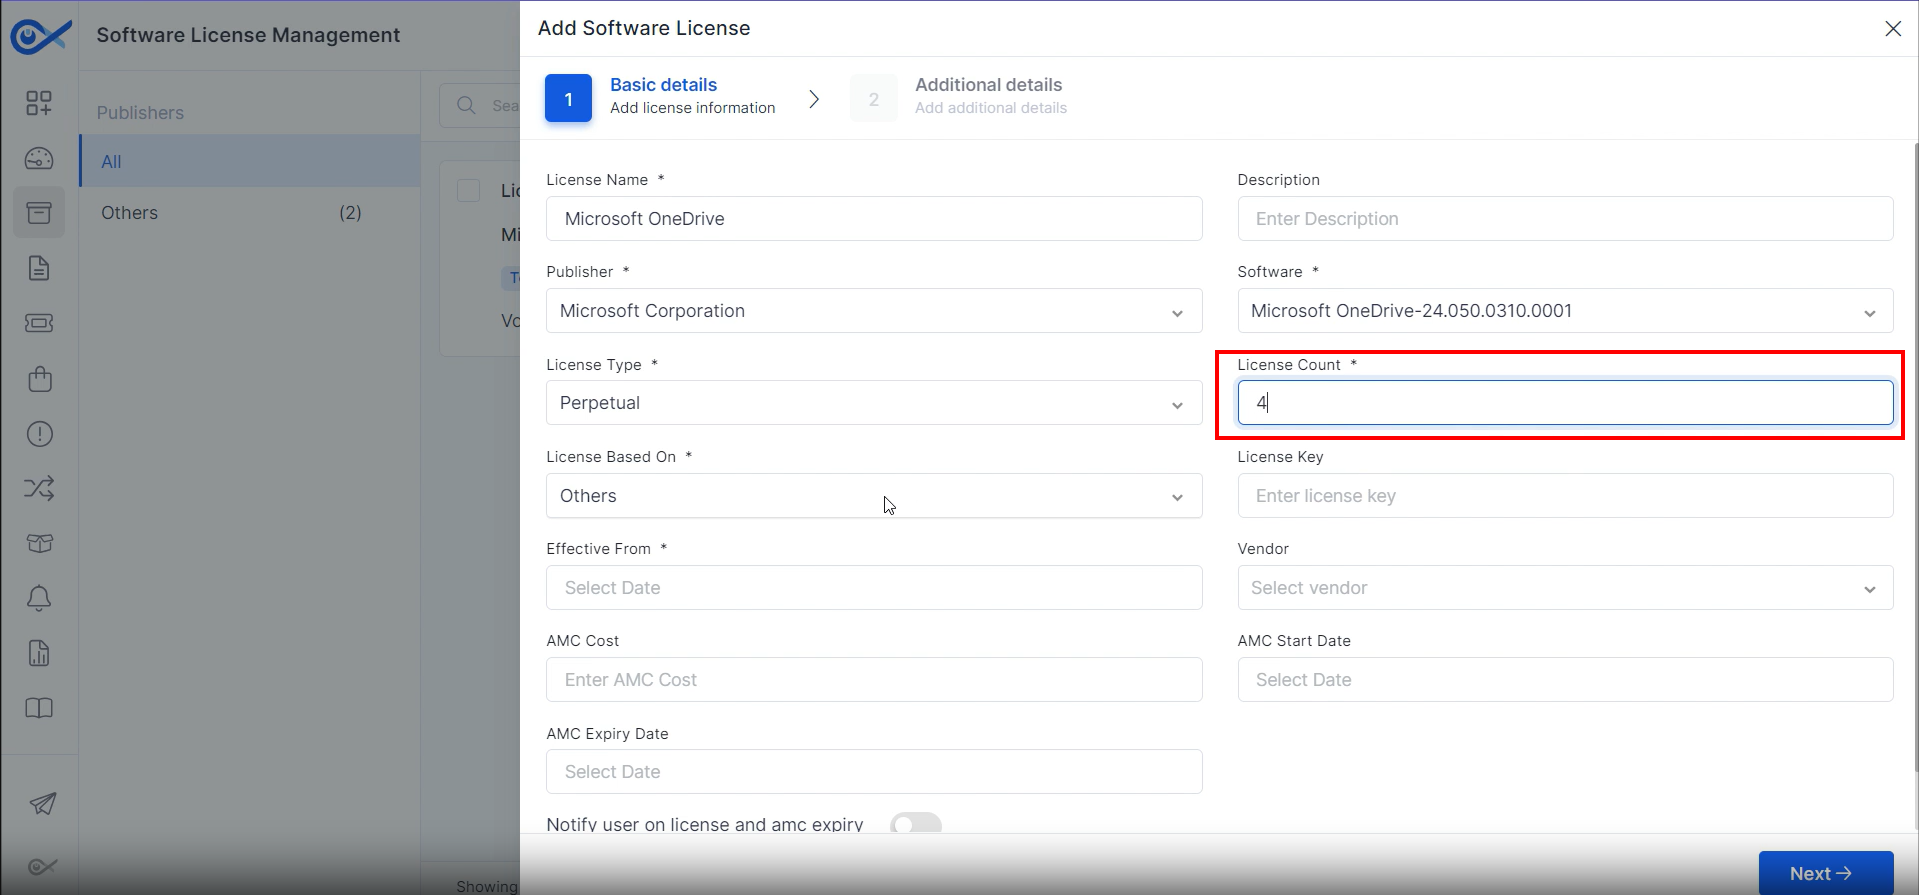
Step 6: Choose the desired license count. License count refers to the total number of software licenses owned or allocated by an organization for the authorized use of specific software products or services.
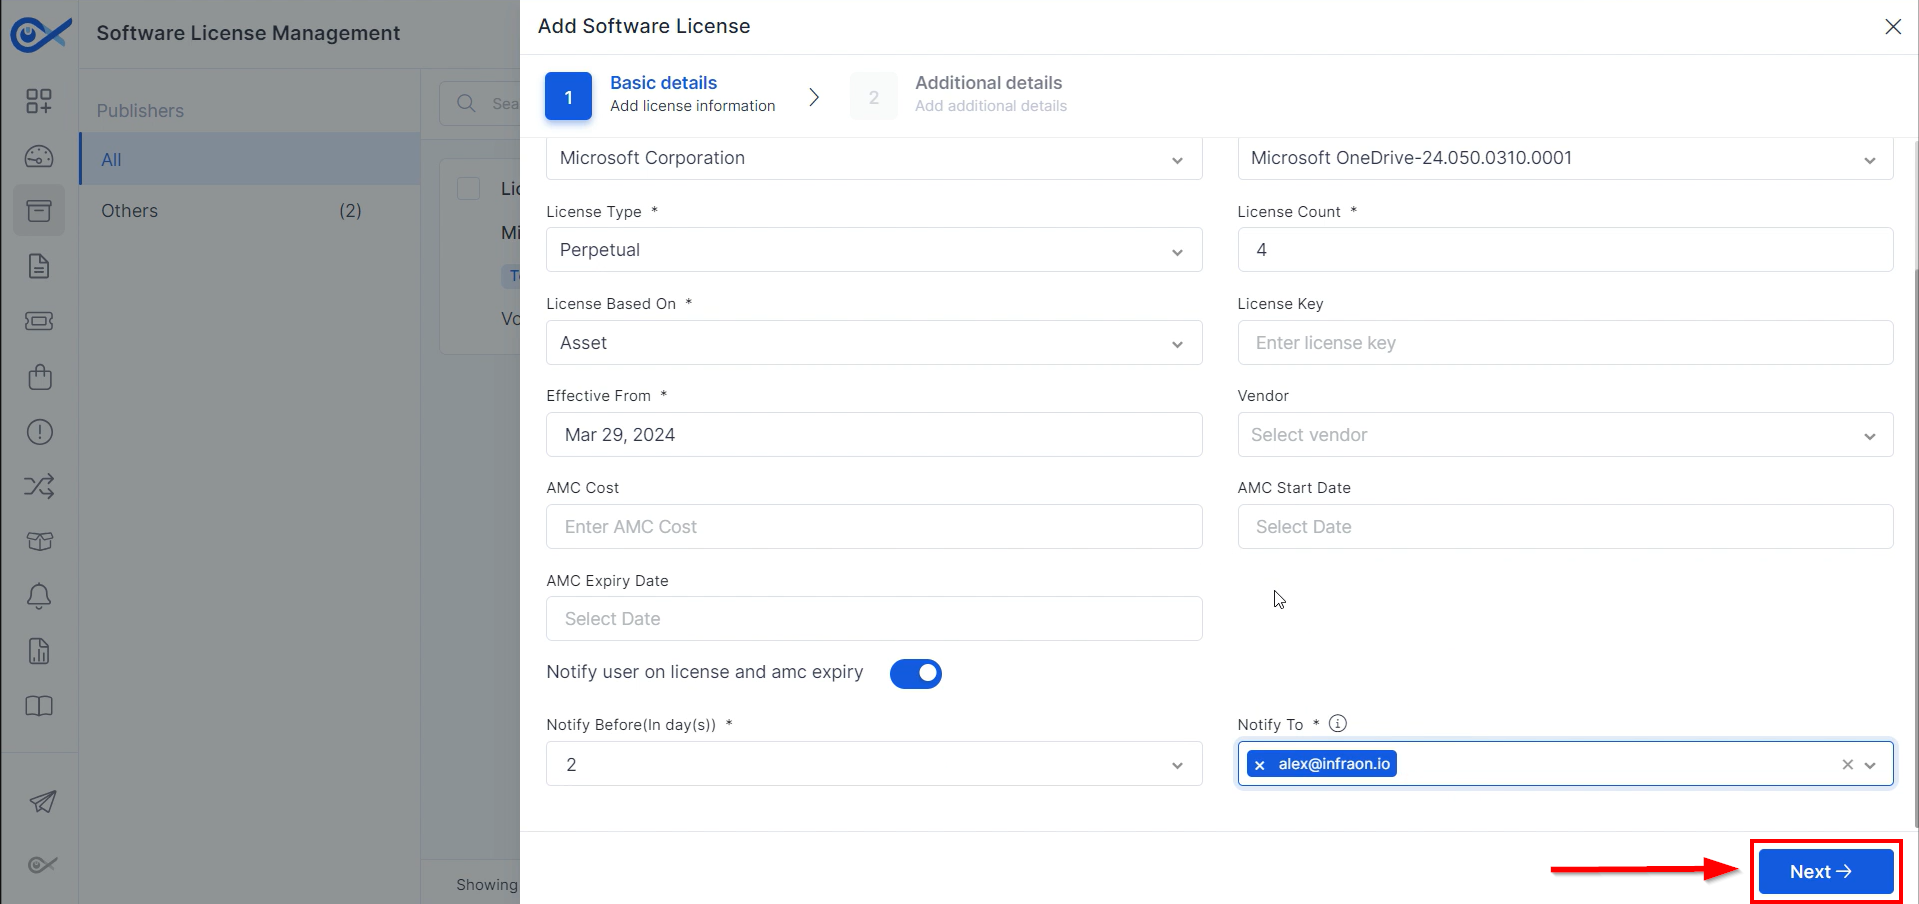
Step 7: If standard license options are insufficient, create a custom license based on asset, user, or other criteria. Provide a license key if available. Specify the license start date. Include vendor details, AMC cost, and start and end dates if applicable. Set up license and AMC expiration notifications, choosing recipients and notification timing. Once complete, click “Next.”
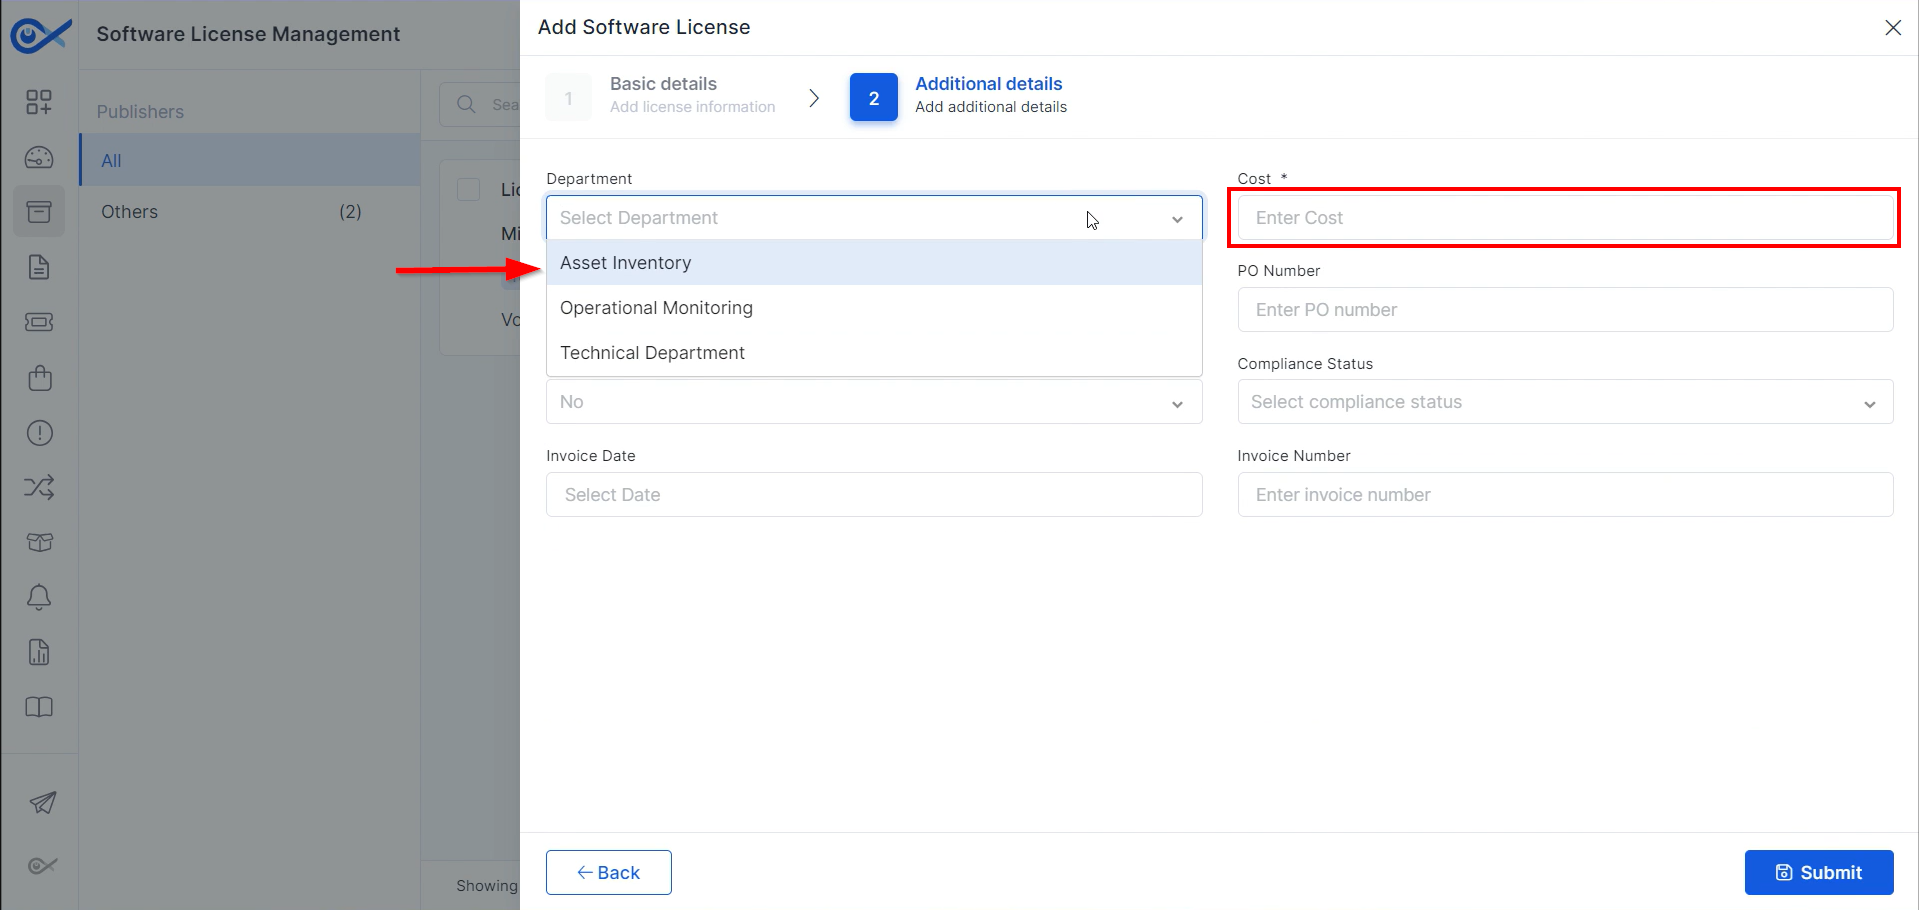
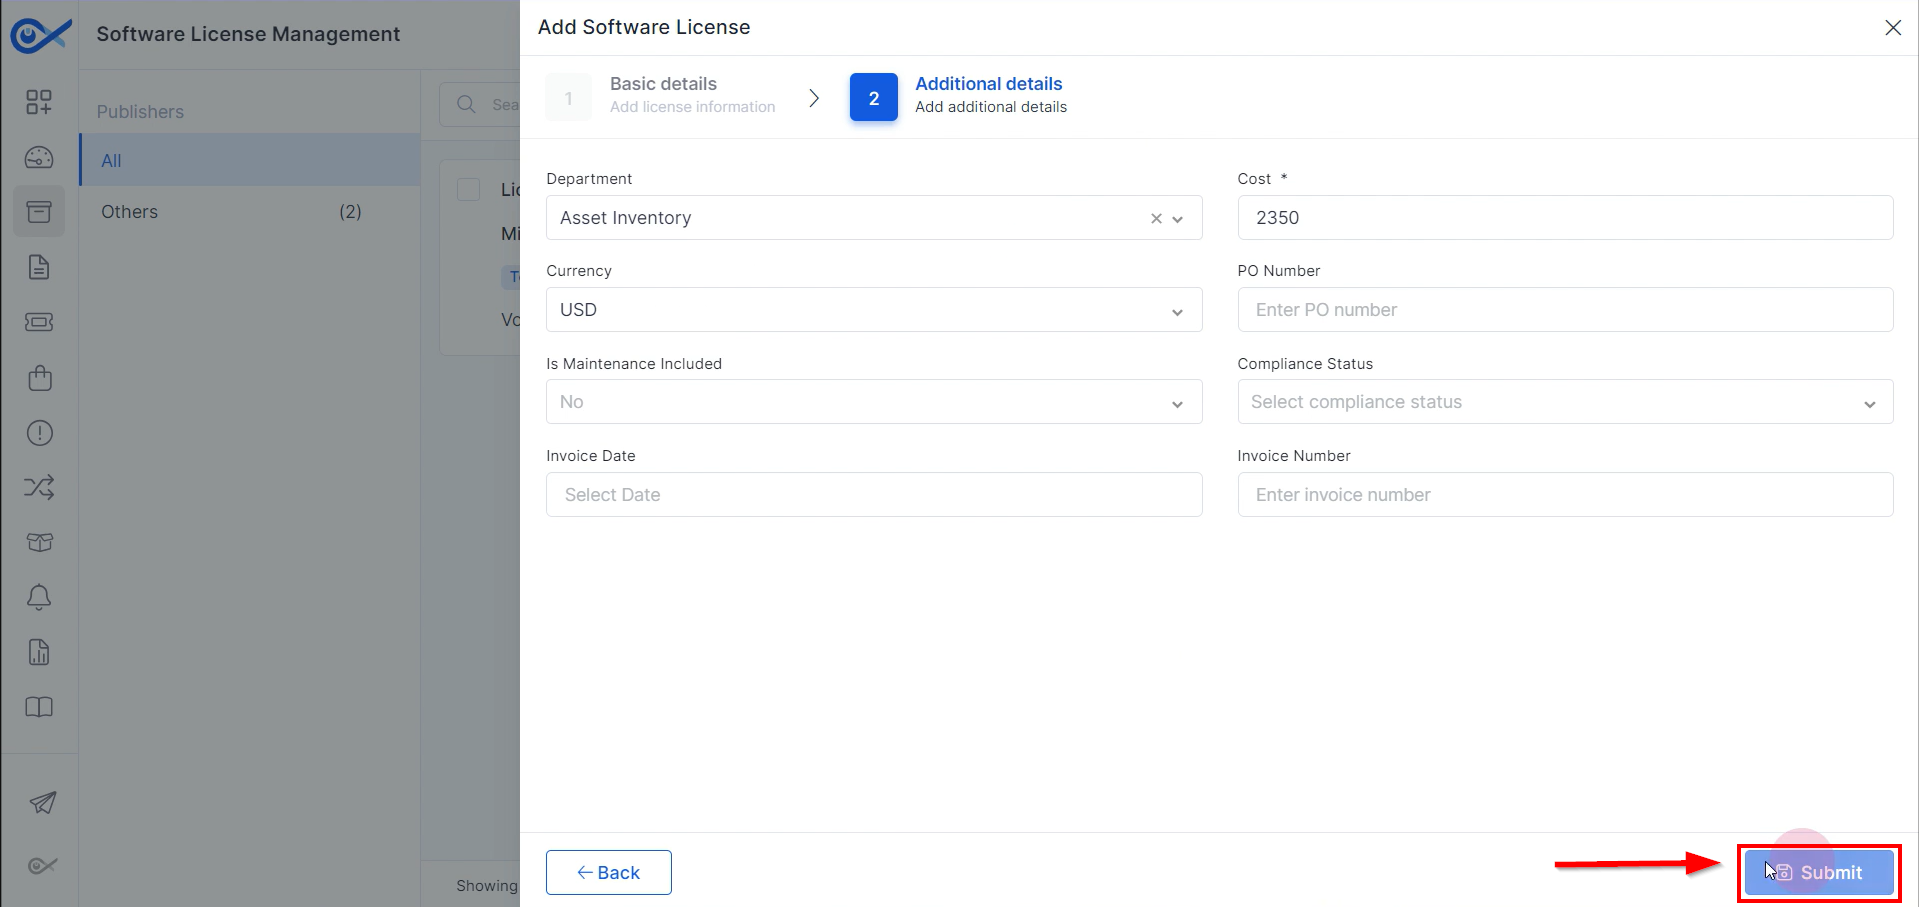
Step 8: Add the department name and cost of the license to map the license to a particular department in the additional details tab.
Step 9: Select the currency, include the PO number, and note the compliance status, invoice date, and invoice number if applicable.
After inputting all details, click “Submit.”
The license will then be added to the software license management tab, where it can be viewed.
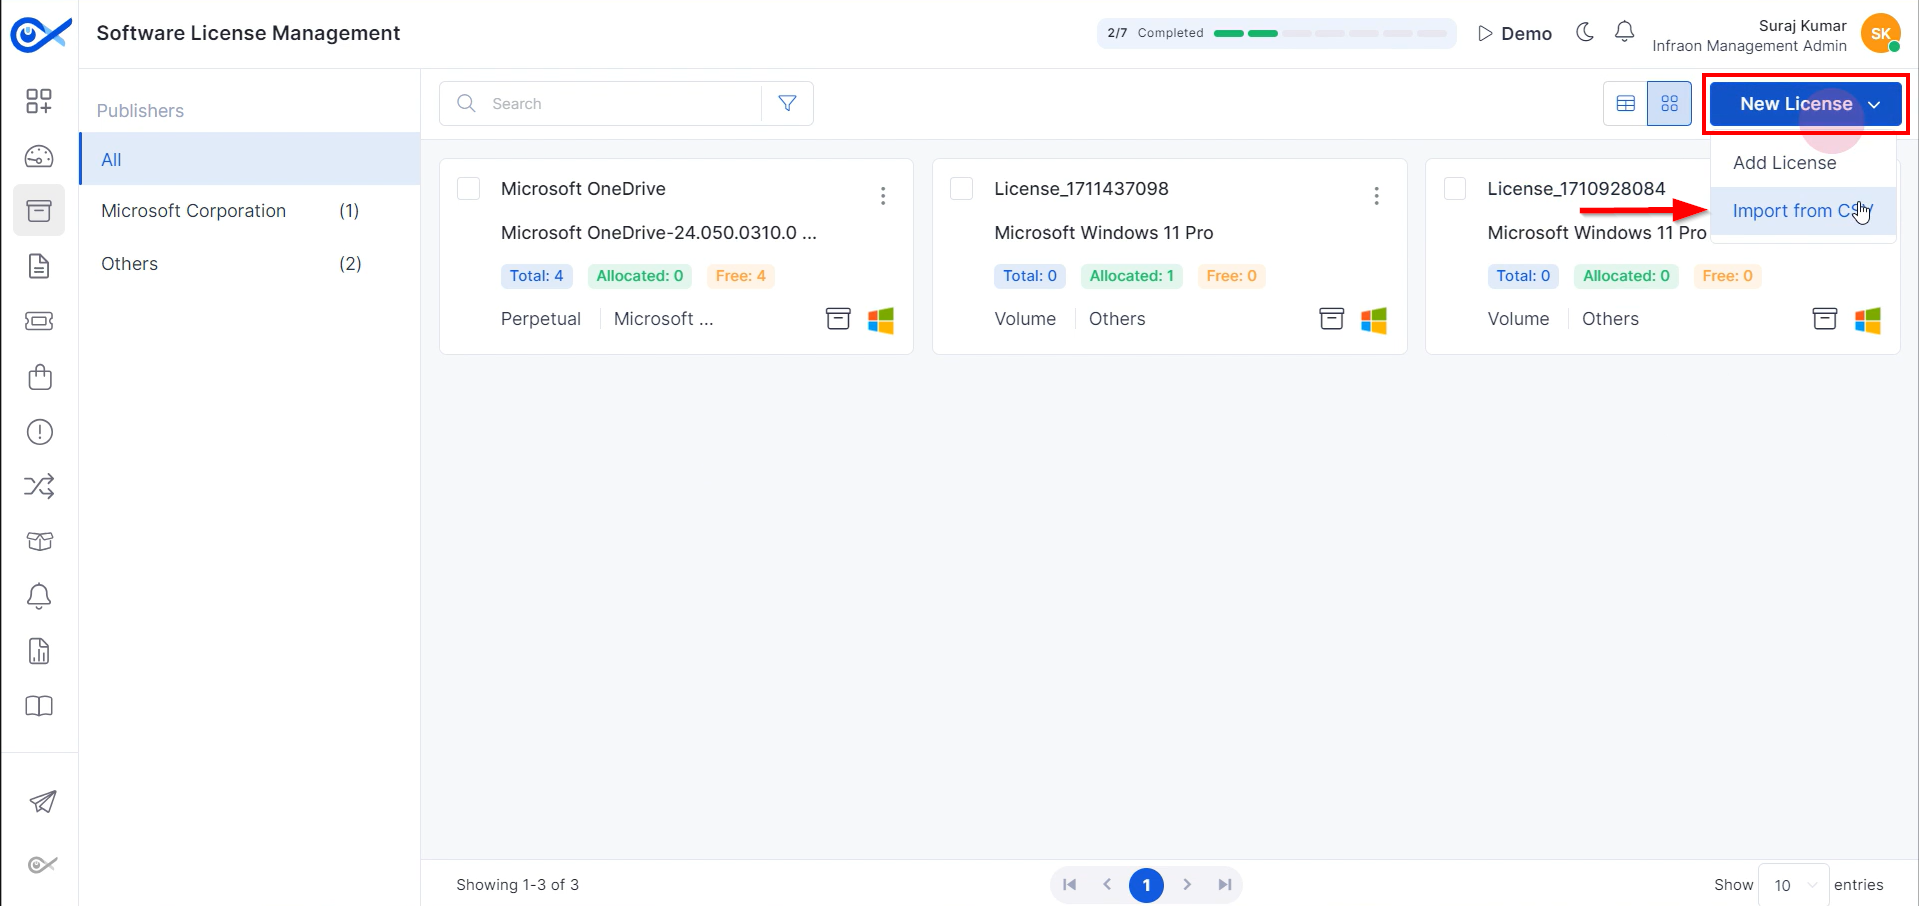
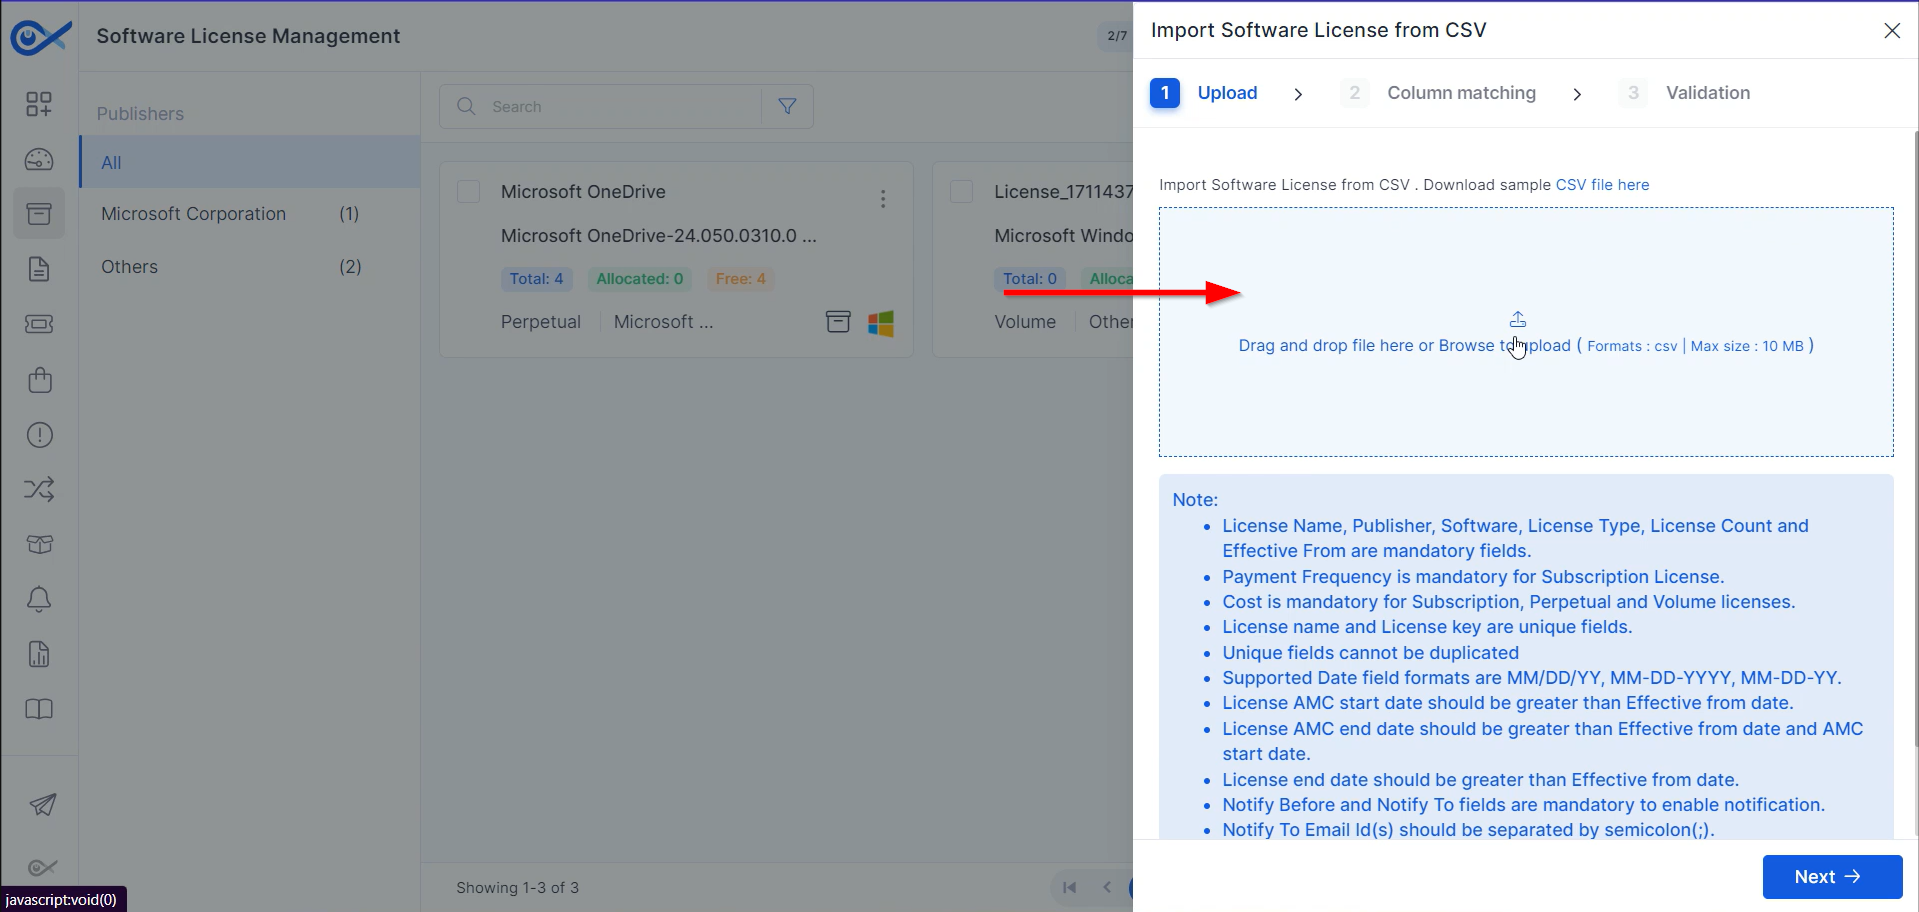
Step 1: Click “New License” at the top right corner of the page and select “Import from CSV.”
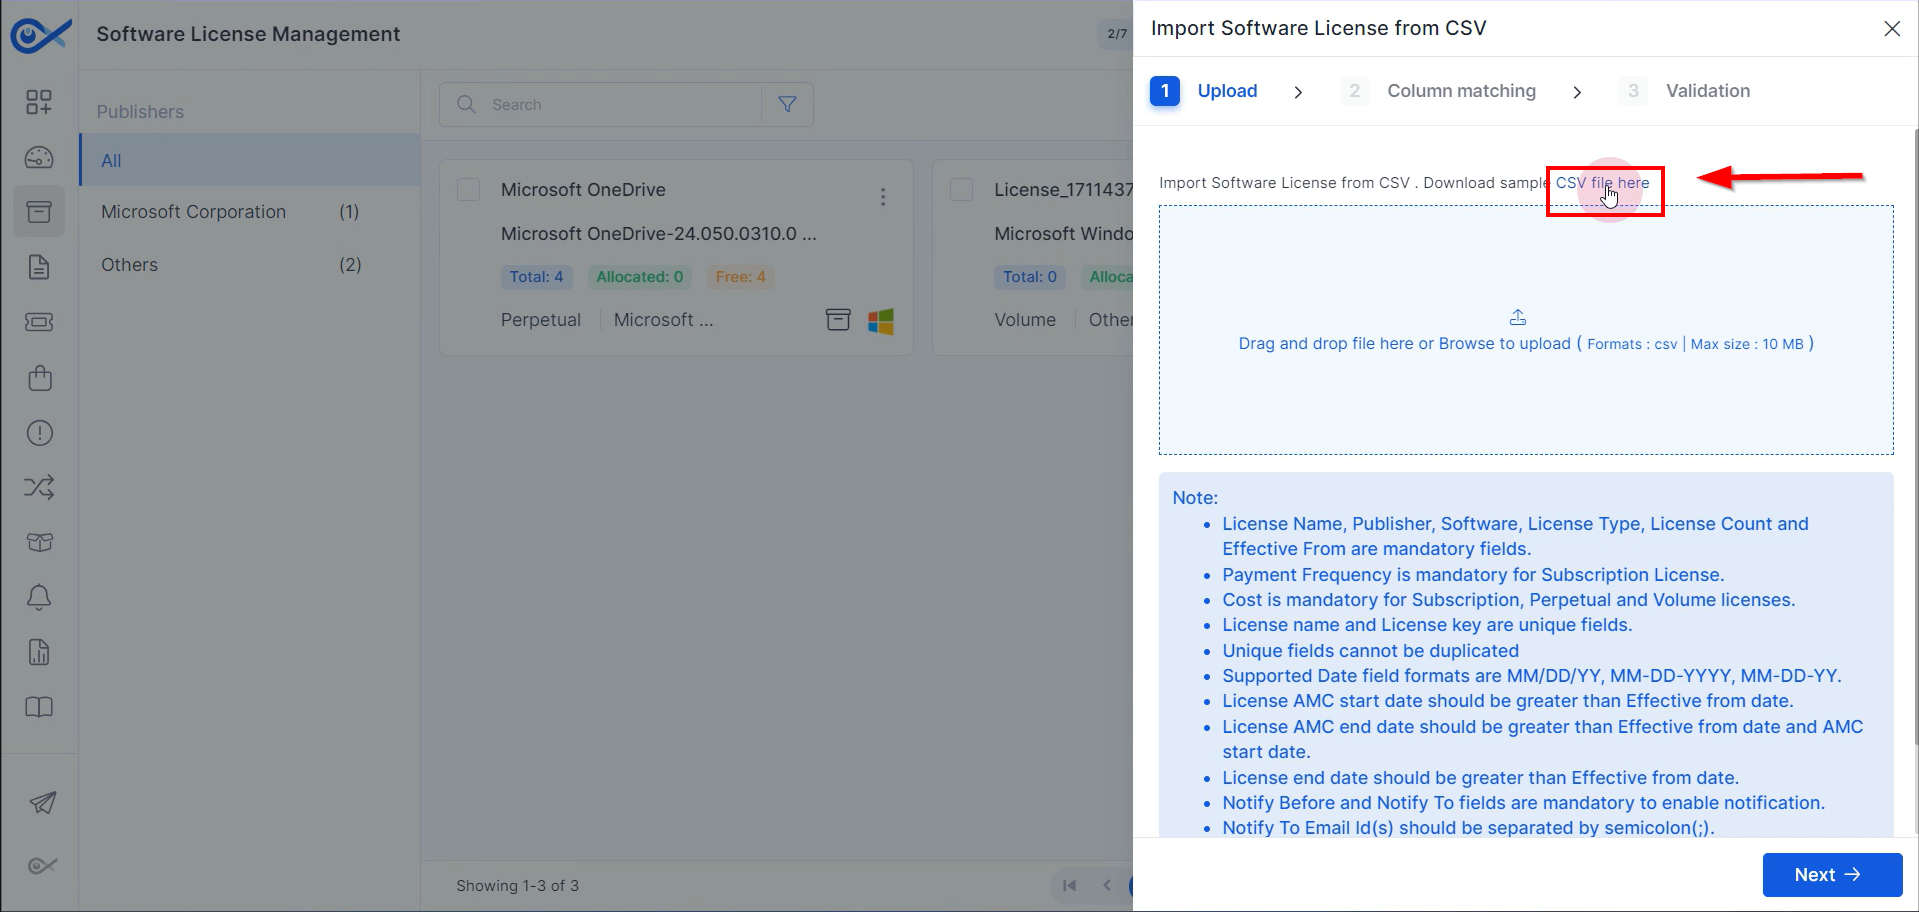
Step 2: Download the sample CSV file by clicking on the appropriate option.
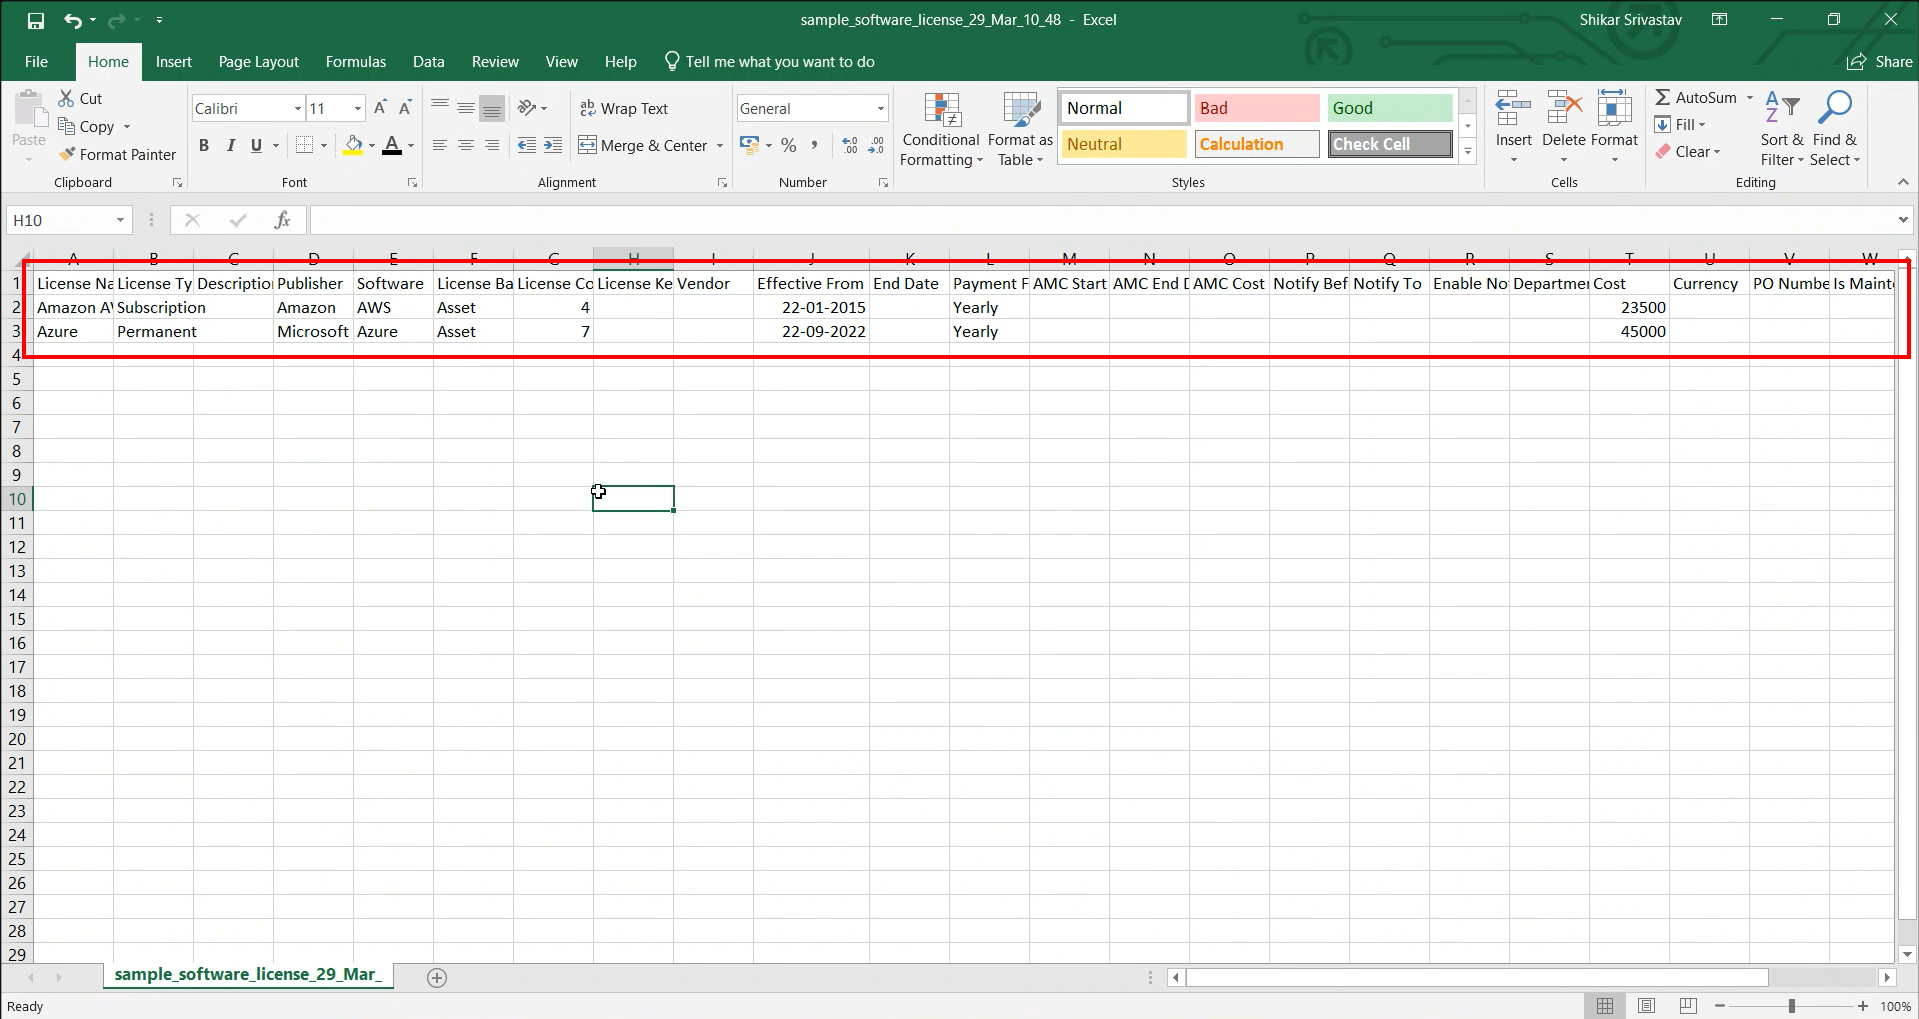
Step 3: Open the CSV file and enter the required details to add software license information. After filling it out, save the file.
Step 4: Upload the prepared CSV file and click Next.
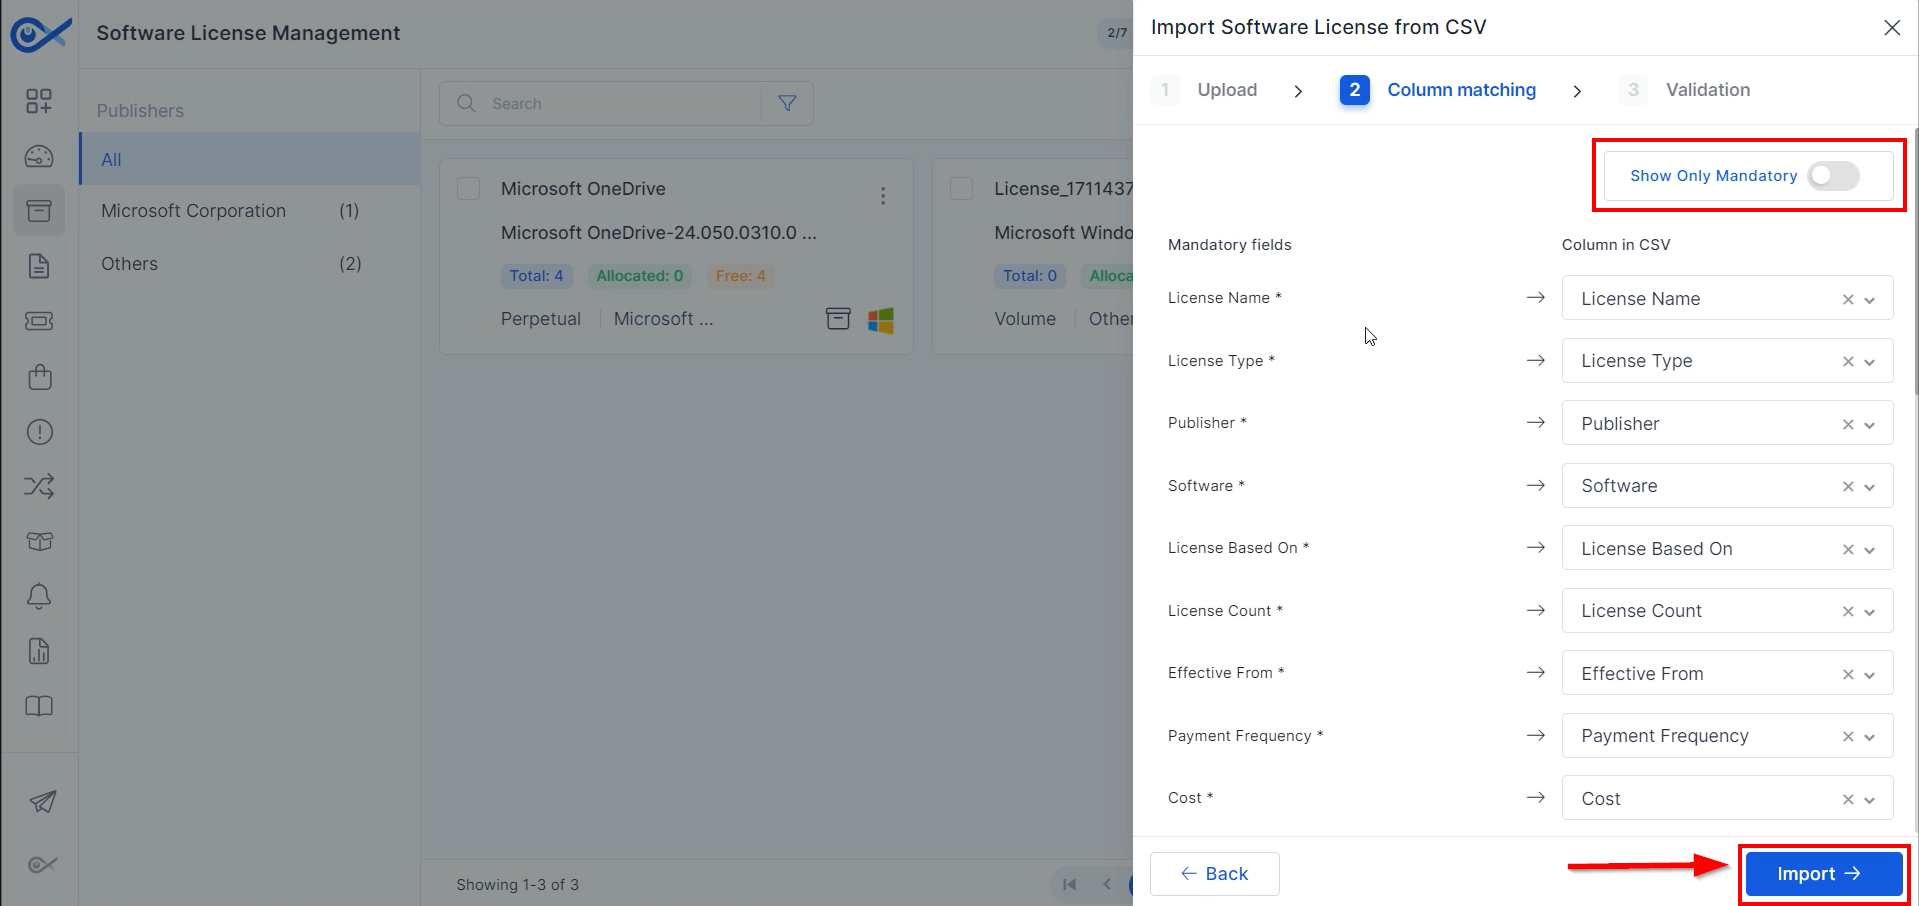
Step 5: Perform any necessary column matching on the column matching page. Click on the Show Only mandatory icon to view the mandatory fields. Once done, Click Import.
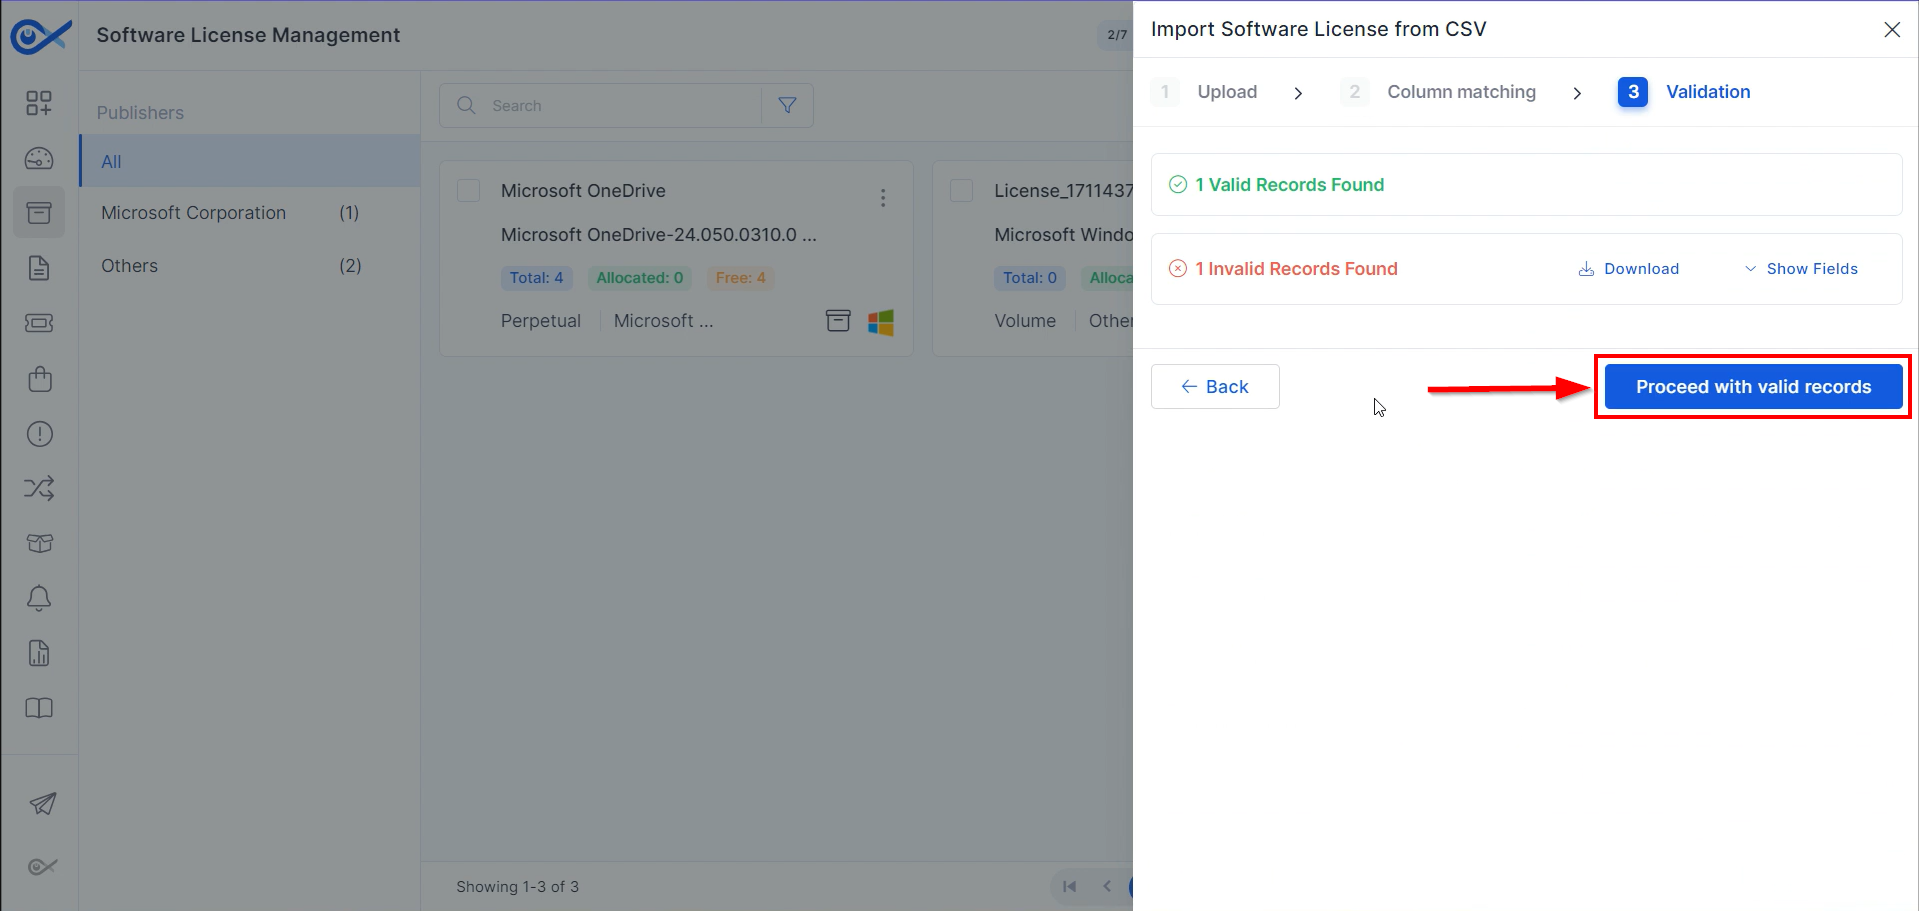
Step 6: The valid records will be processed after importing the CSV file. Click on Proceed with valid records to add the software licenses.
The licenses will then be added to the Infraon Infinity platform.
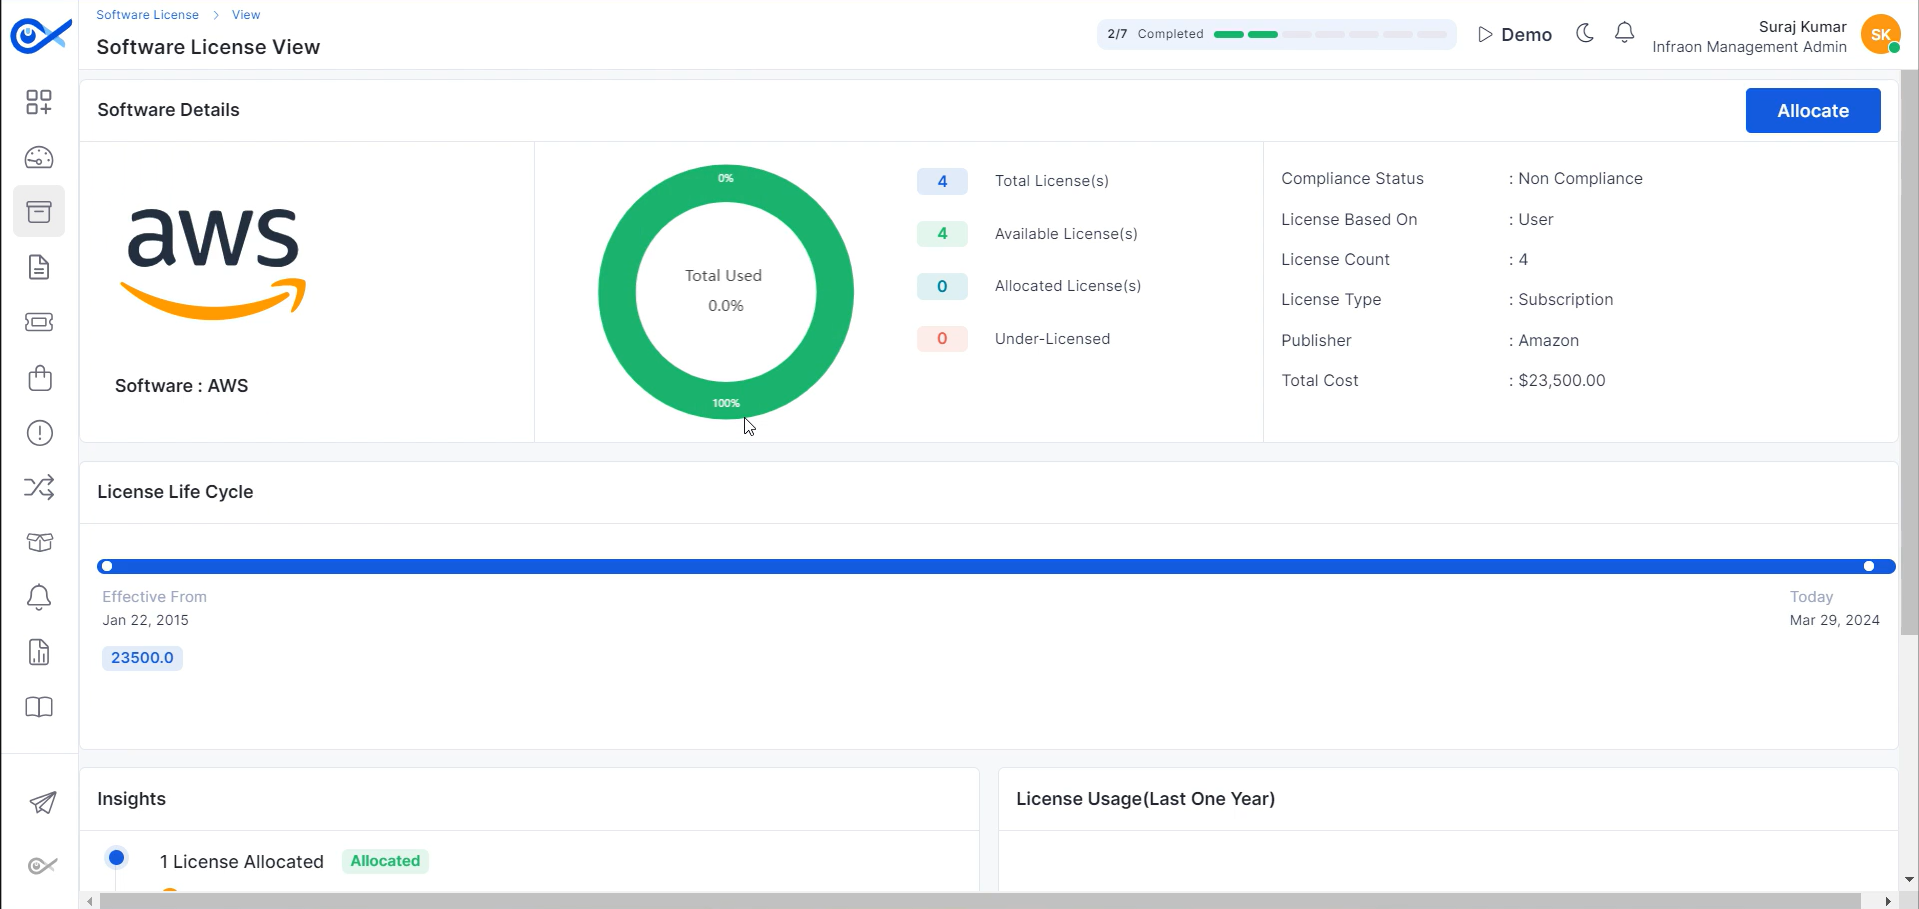
Click on the name of the added software licenses to view software details, including the license's software image and version.
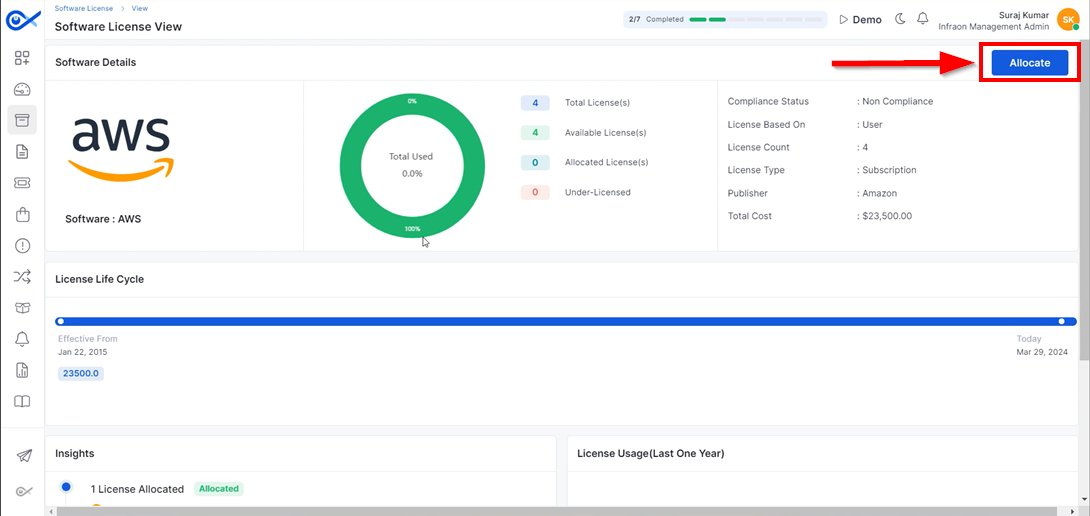
The pie chart showing the total licenses, available licenses, allocated licenses, under-licensed status, and compliance status based on the license type can also be found here.
In the software license lifecycle section, the start date is noted as "Effective from," and the end date of the license can be viewed.
Step 1: Click on the Allocate option.
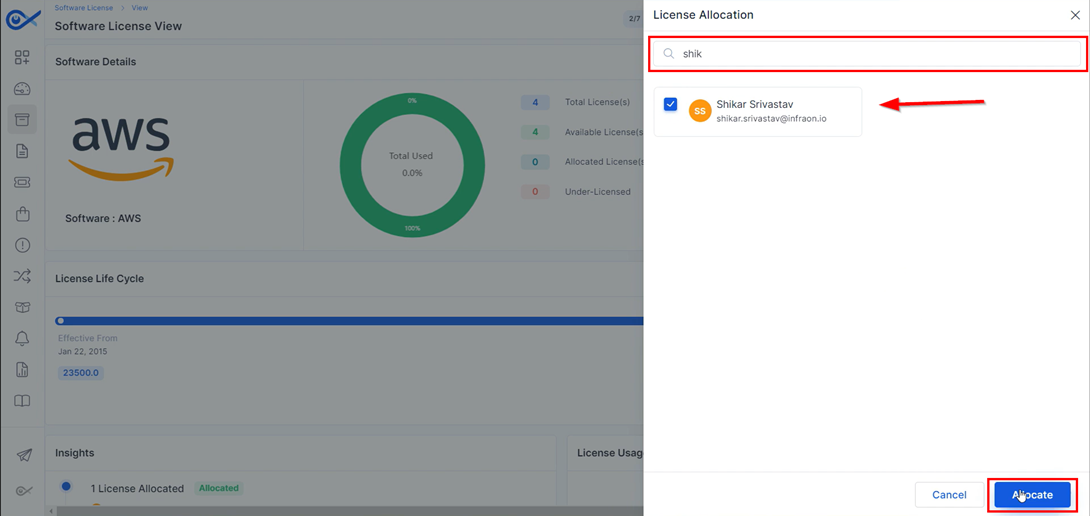
Step 2: Search for the requester and click Allocate.
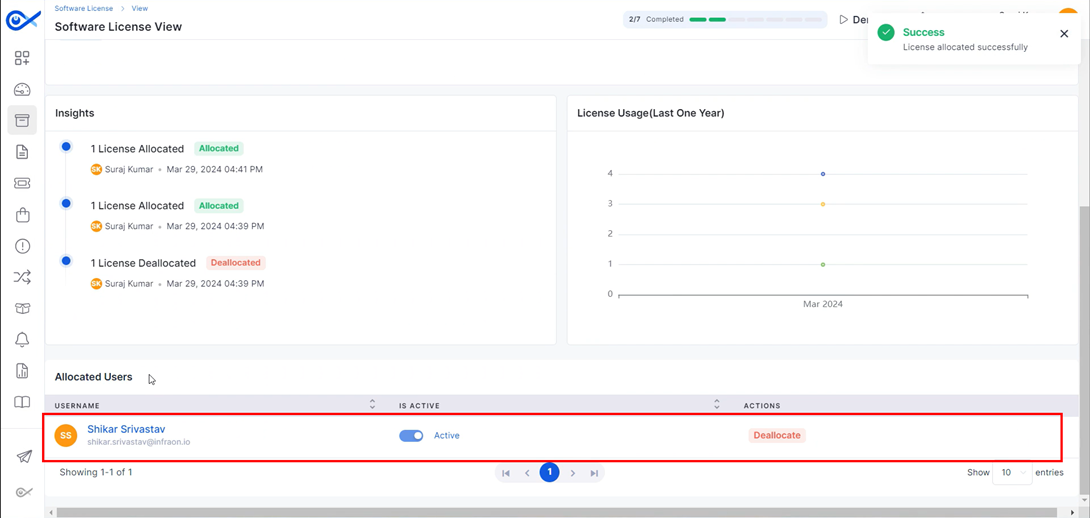
The allocated user will then appear in the Allocated User tab below.
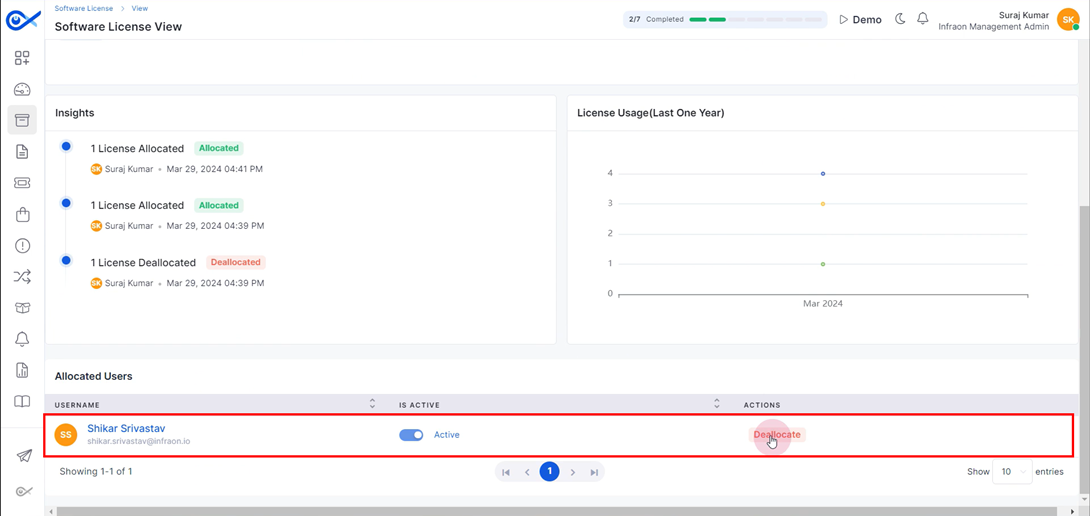
Click on the Deallocate button and proceed with the valid option.
The software licenses will then be deallocated from the selected requester.
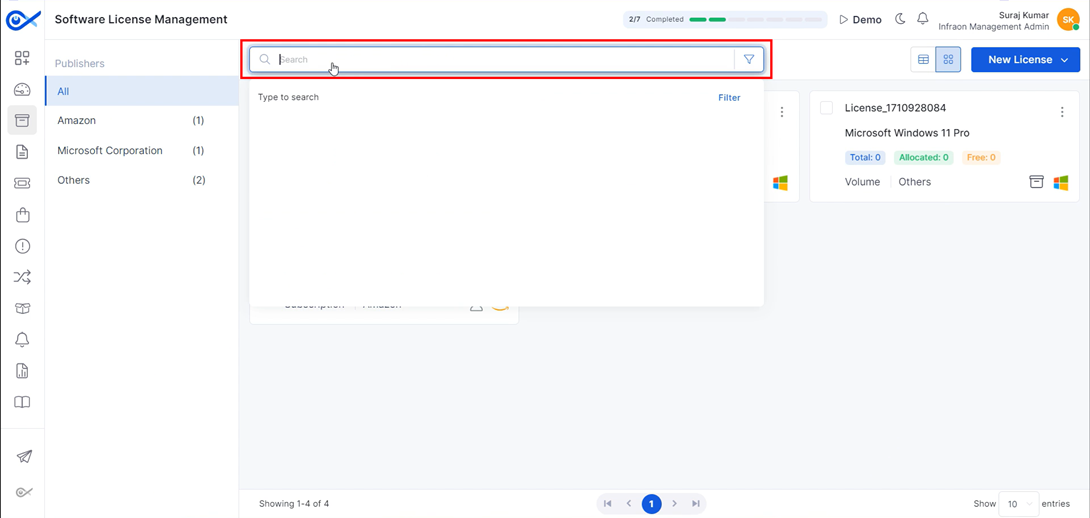
The software license management page features a search bar at the top for finding licenses by name or number.
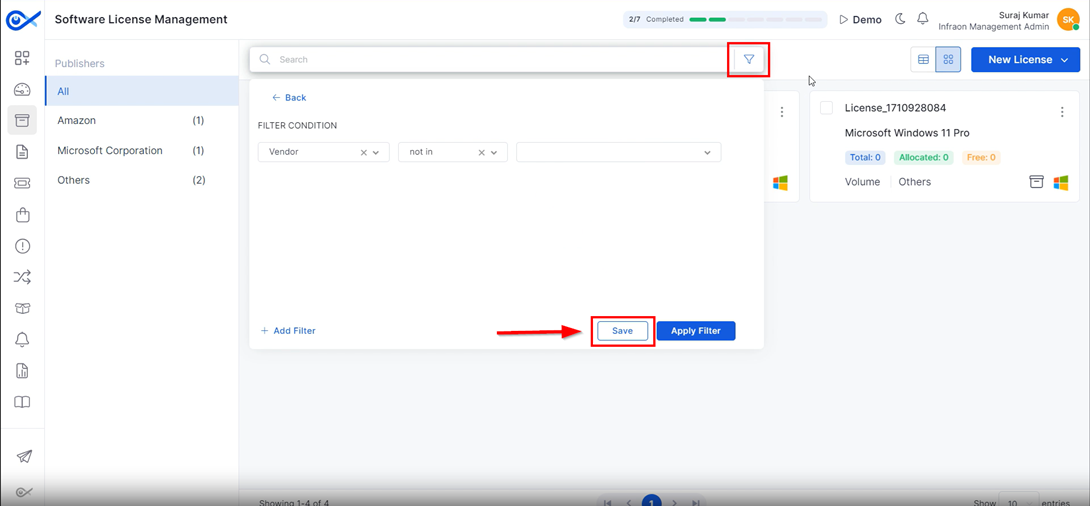
Filter software licenses by name, software, publisher, type, vendor, or other criteria. Save custom filter settings for later use.
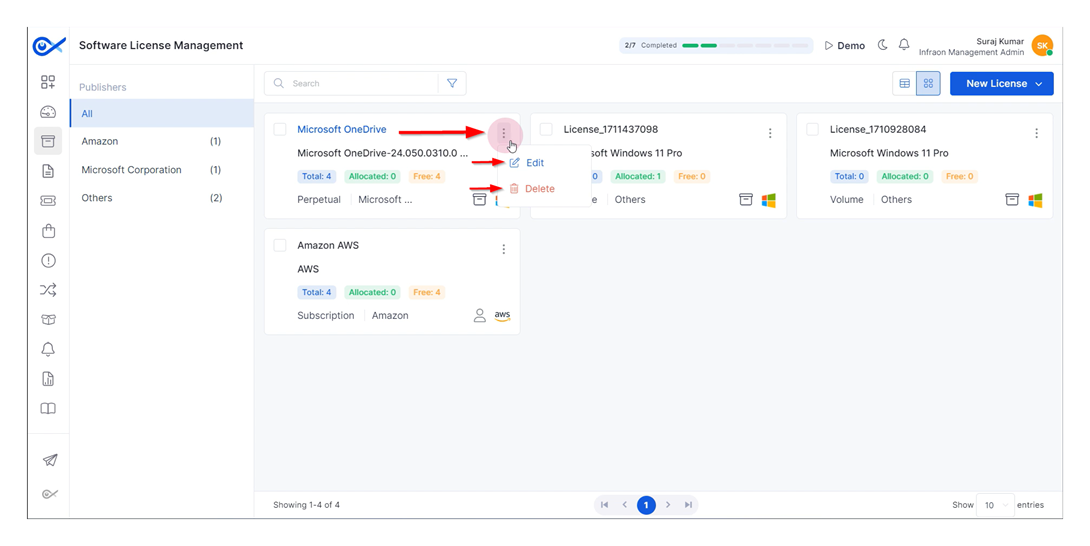
Infraon's license management tab offers Grid and Card View formats. Each license displays details, including name, associated software, total licenses, user allocations, available licenses, category, company, assigned assets, and the software's logo.
To modify or remove a software license, click the "More" option. This will display additional actions, including the ability to edit license details.
Select the "delete" button to remove a license and follow the on-screen prompts permanently.
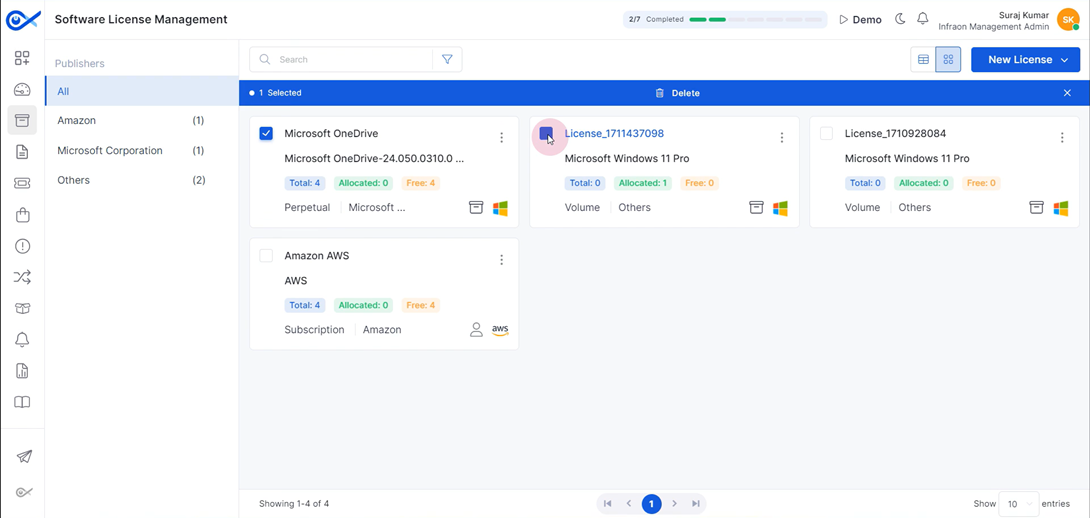
Select the Take Multiple Options feature to delete multiple software licenses simultaneously. This concludes the overview of the software license management functionalities within the Infraon Infinity platform.