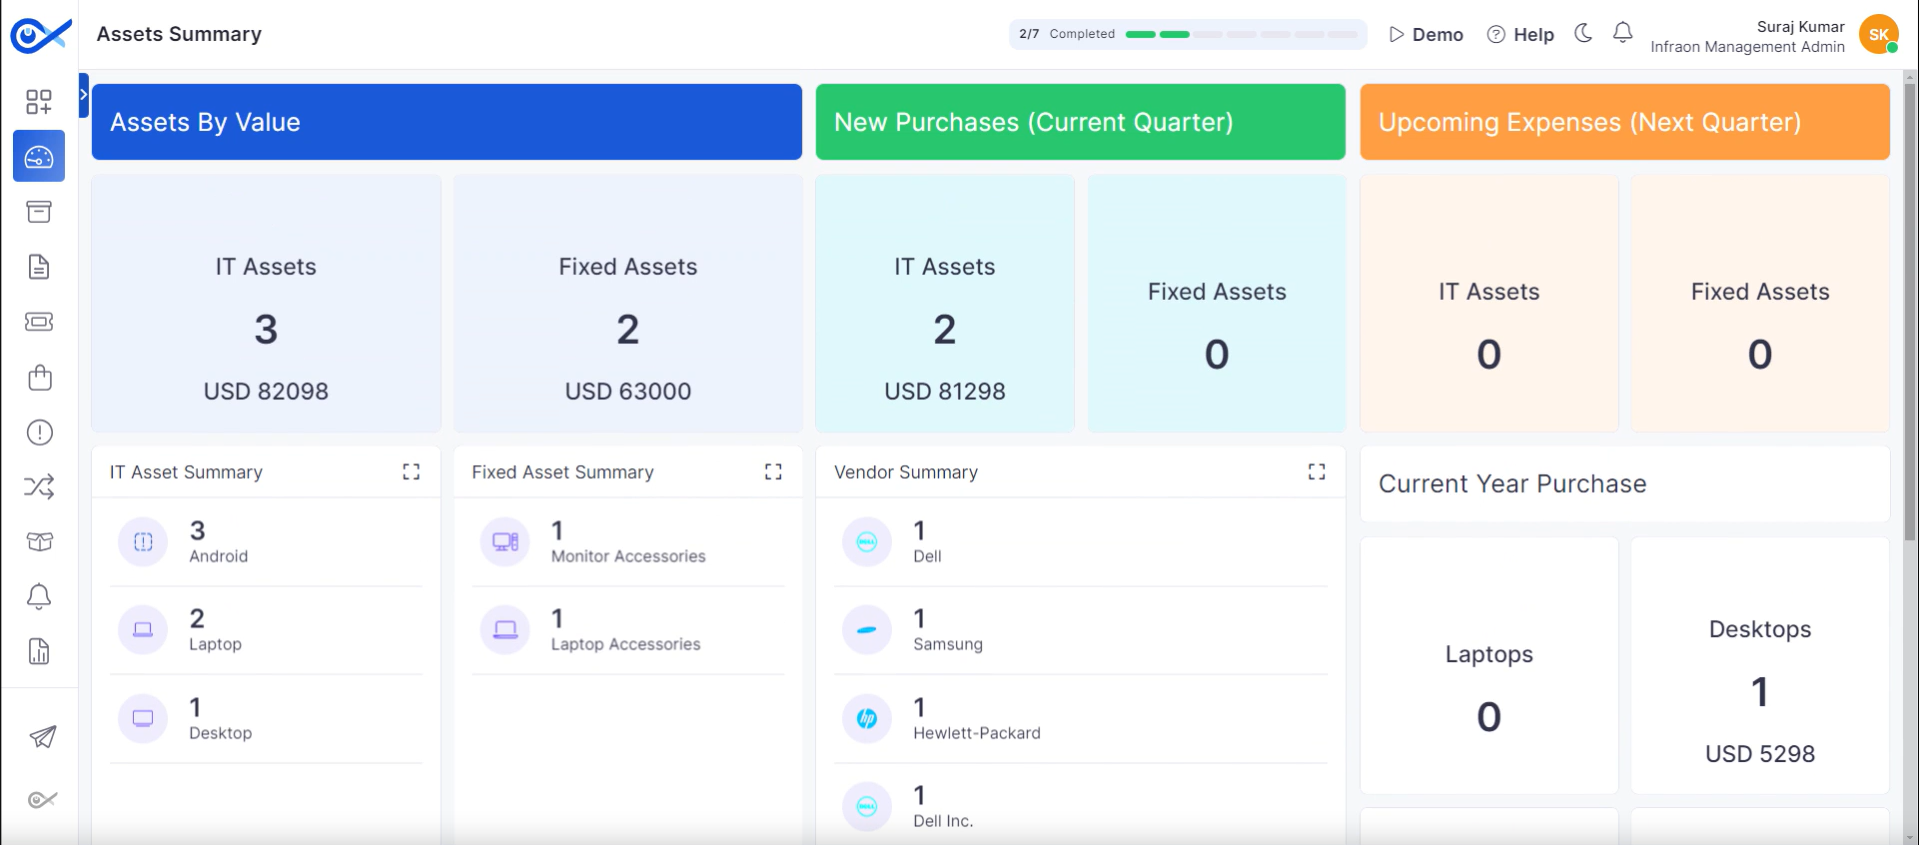
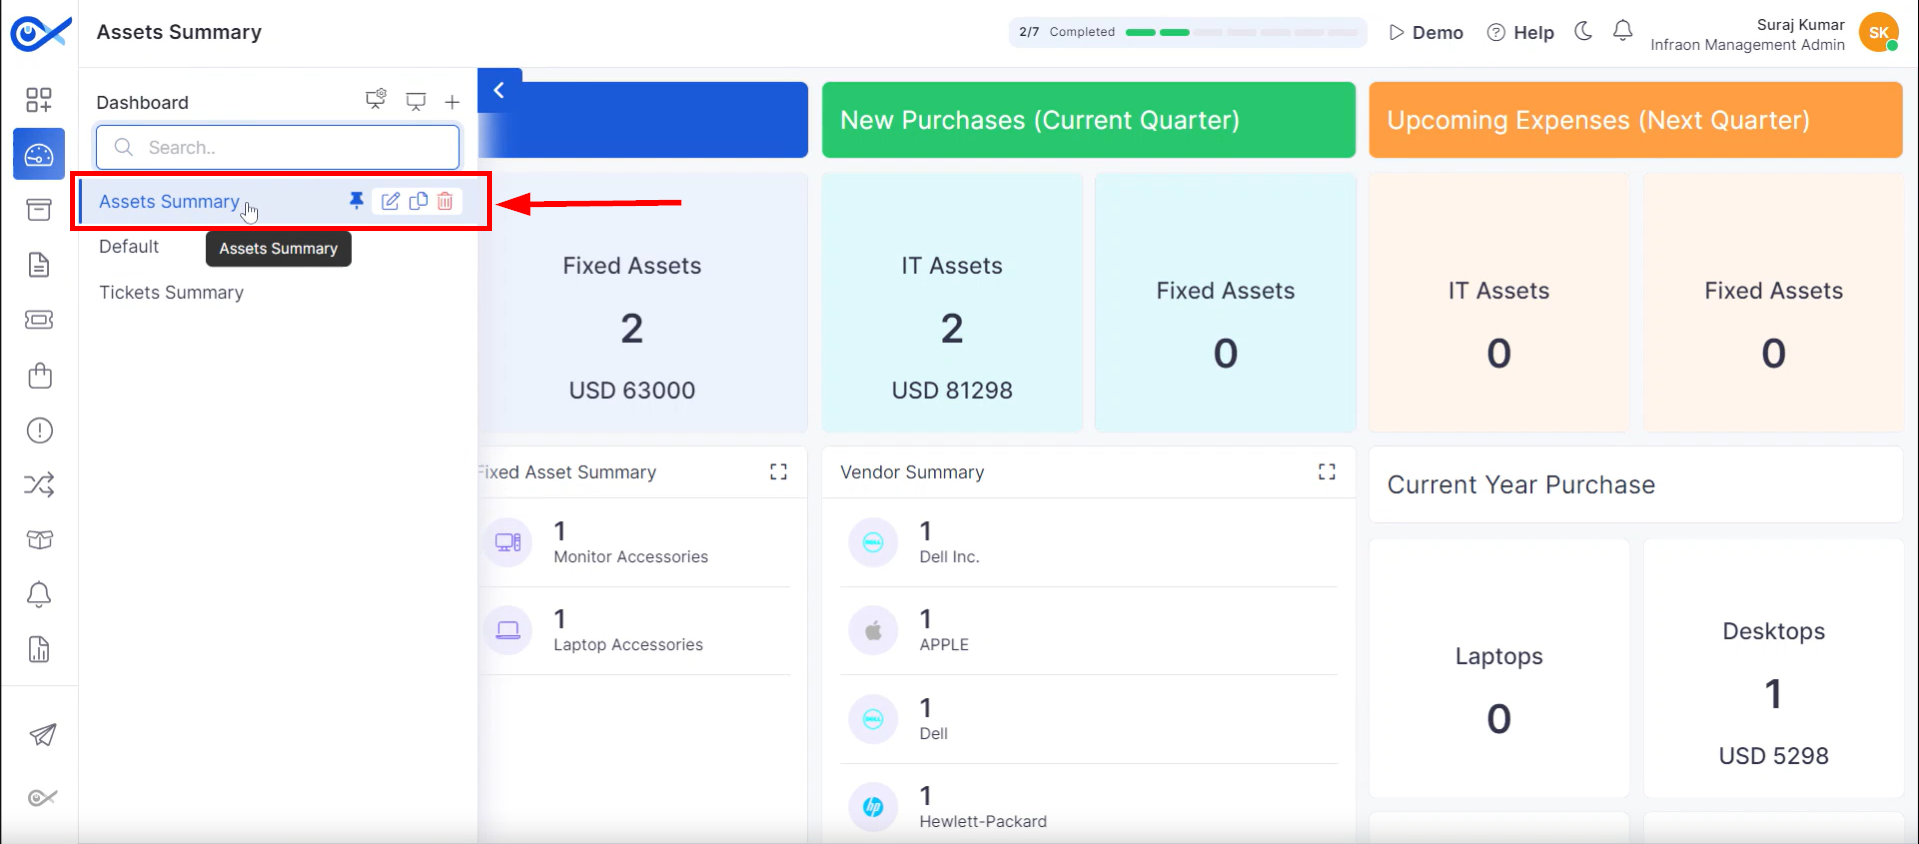
This guide explores the default dashboards provided by the Infraon Infinity platform in this guide. Infraon offers three dashboards: Asset Summary Dashboard,Default Dashboard, and Tickets Summary Dashboard. Dive into the details of each one below.
Asset Summary Dashboard
Overview
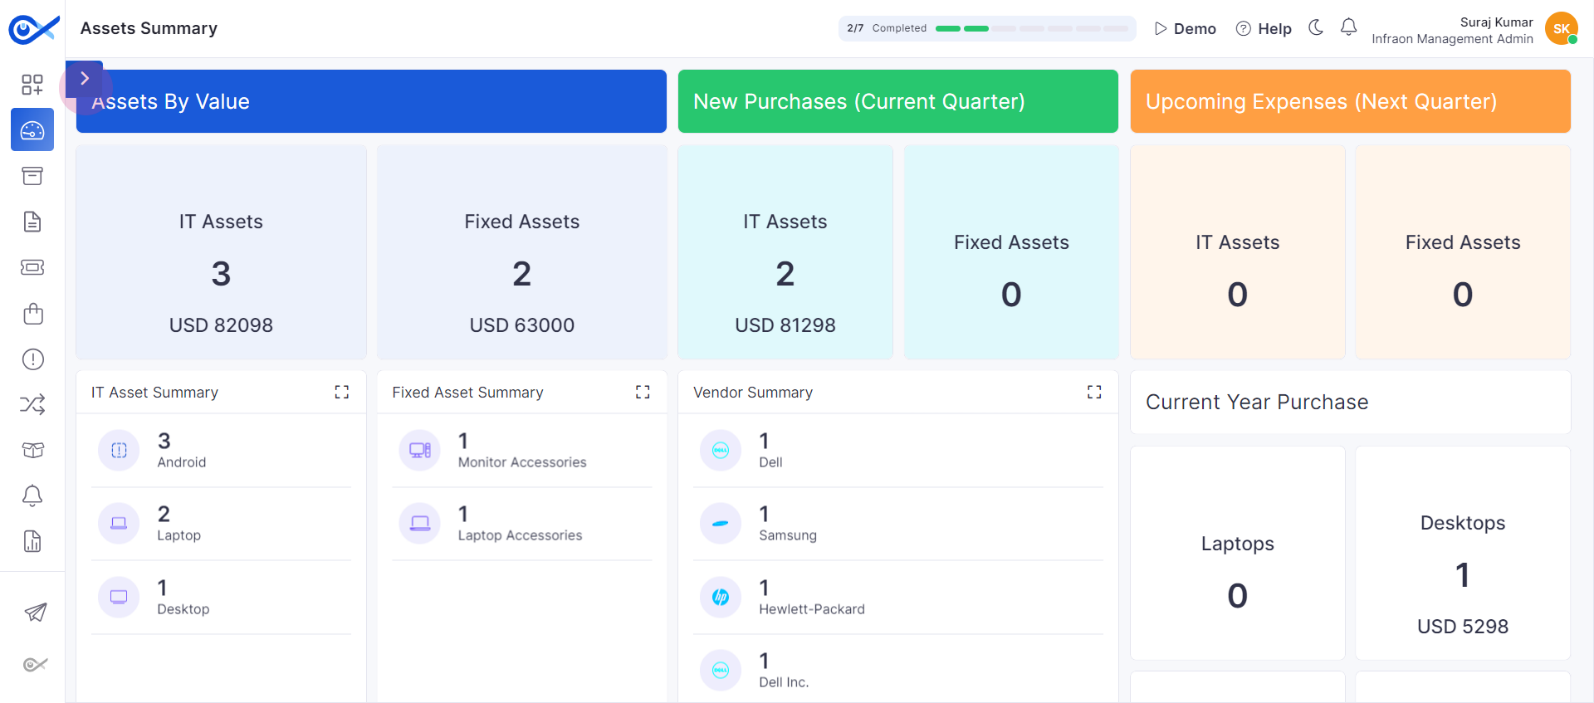
Includes pre-built widgets for asset value, new purchases, expenses, IT asset summary, fixed assets, vendor details, and current-year purchases.
Provides a visual representation of asset data through various widget types.
Data Exploration
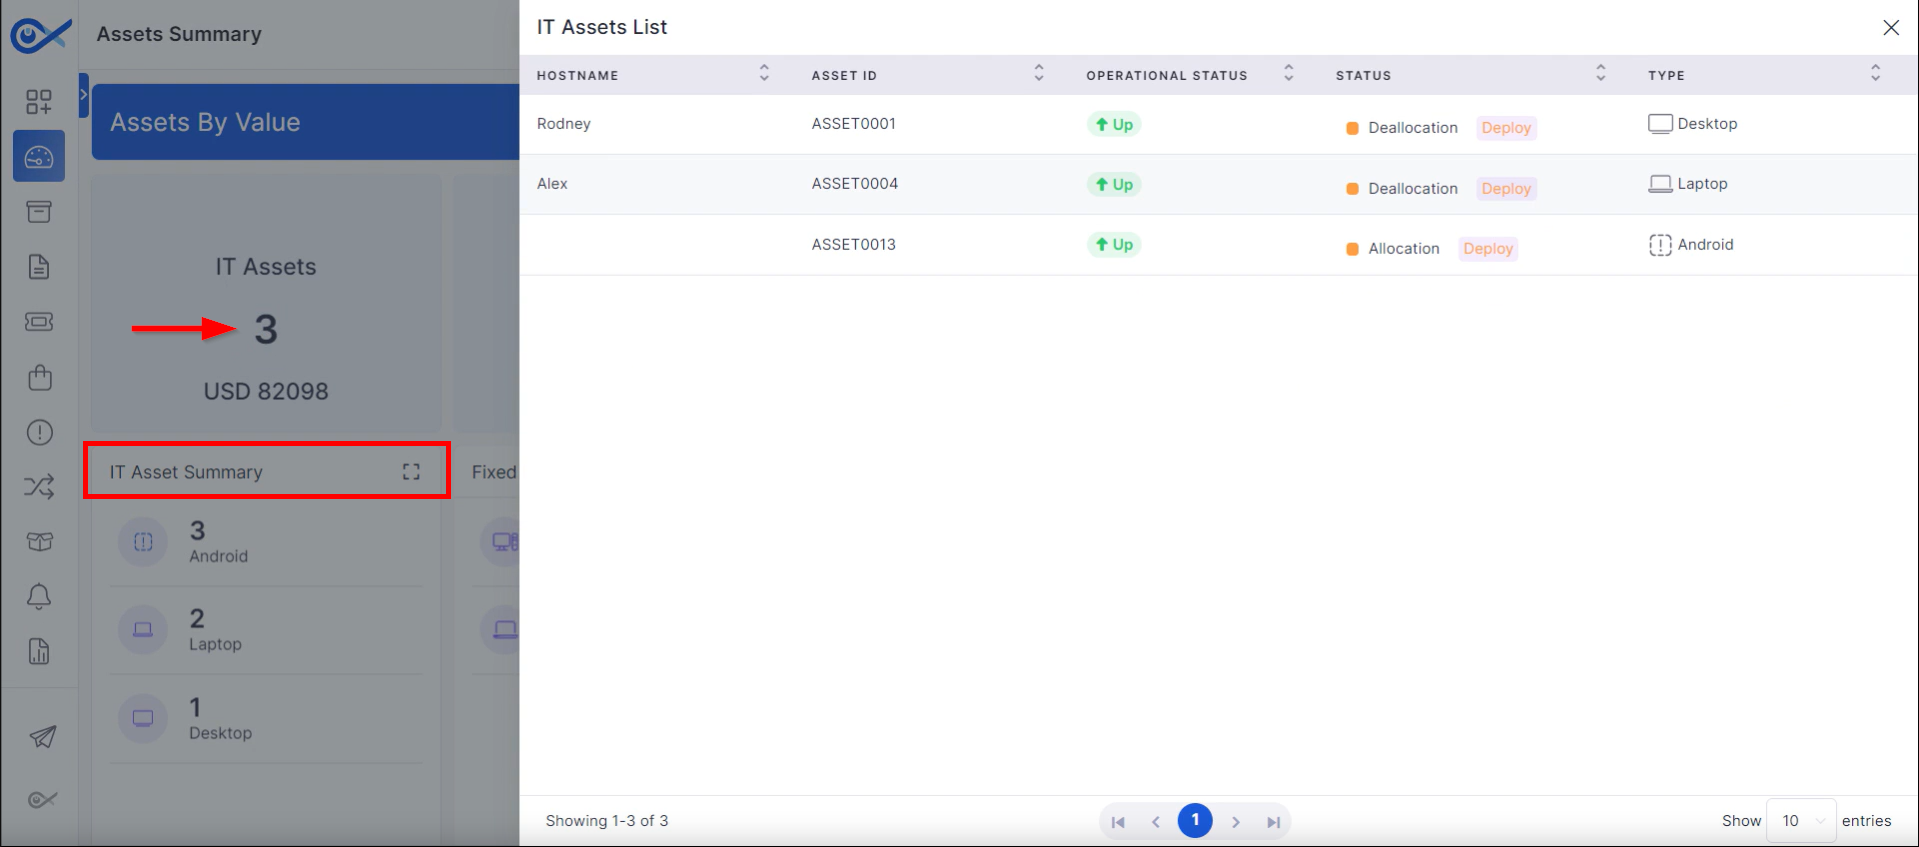
Click on widgets to view detailed device information, including hostname, asset ID, status, type, OS, manufacturer, and location.
Utilize filter options within widgets to refine data display.
Maximize widgets for a closer look at specific data points.
Asset Category Analysis
Explore device categories like laptops, desktops, servers, and network equipment within purchase-related widgets.
Click on specific categories for detailed breakdowns.
Analyze asset trends and patterns across different widgets.
Default Dashboard
Components
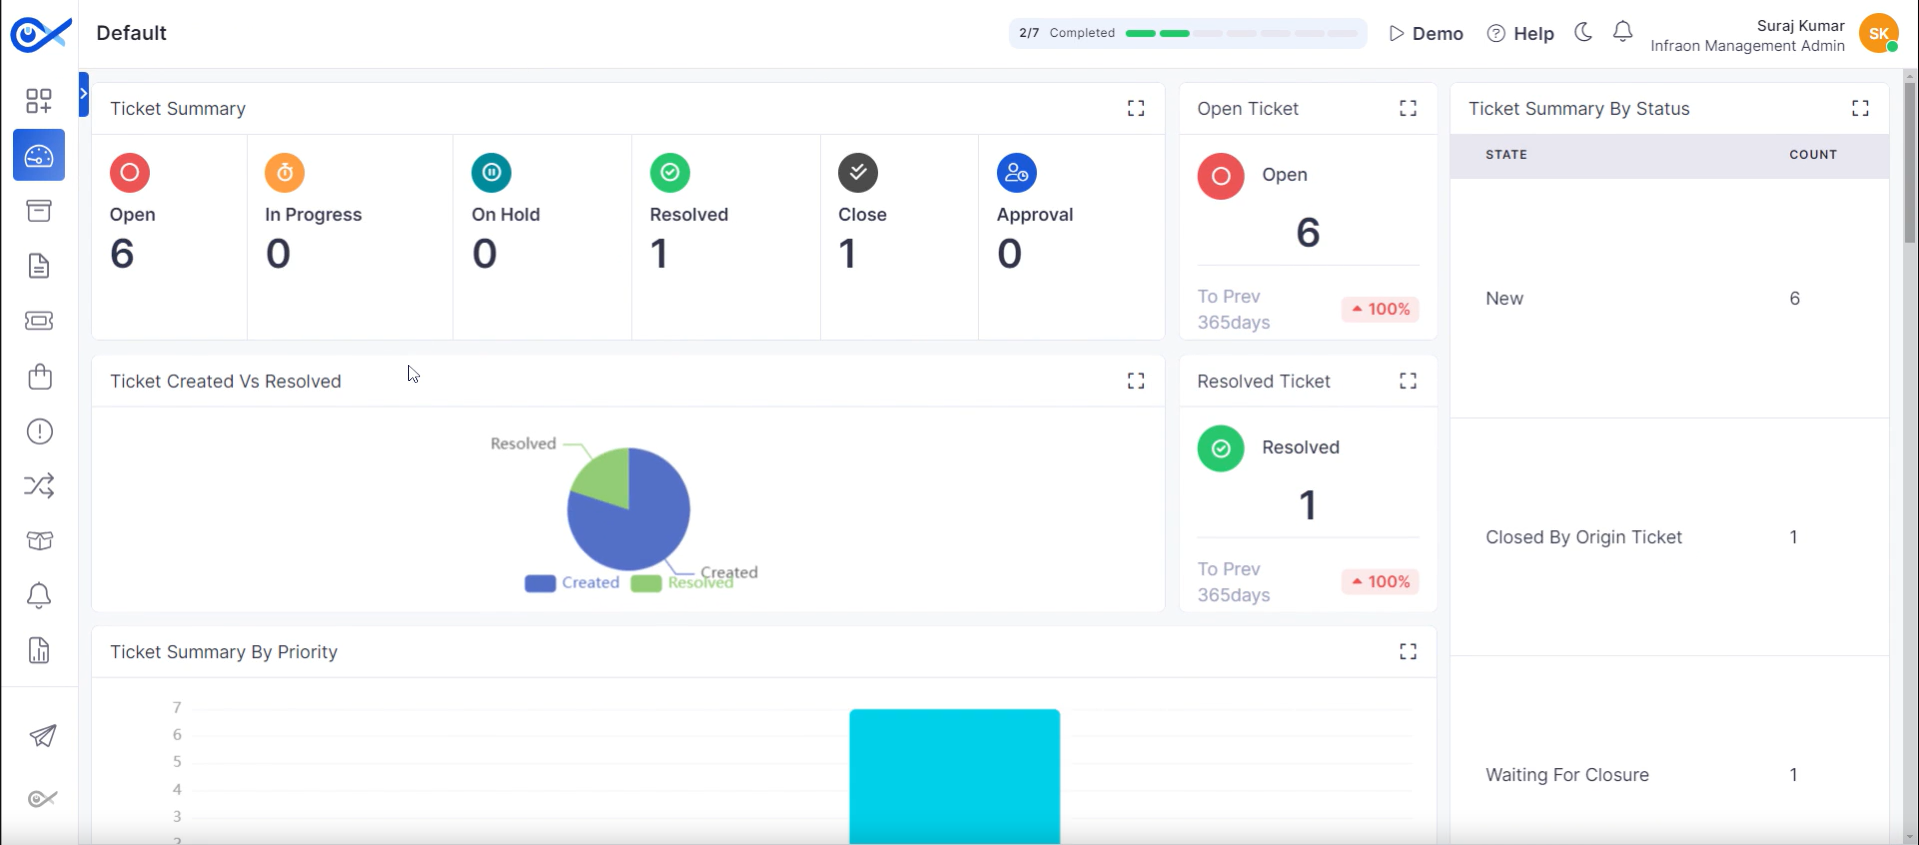
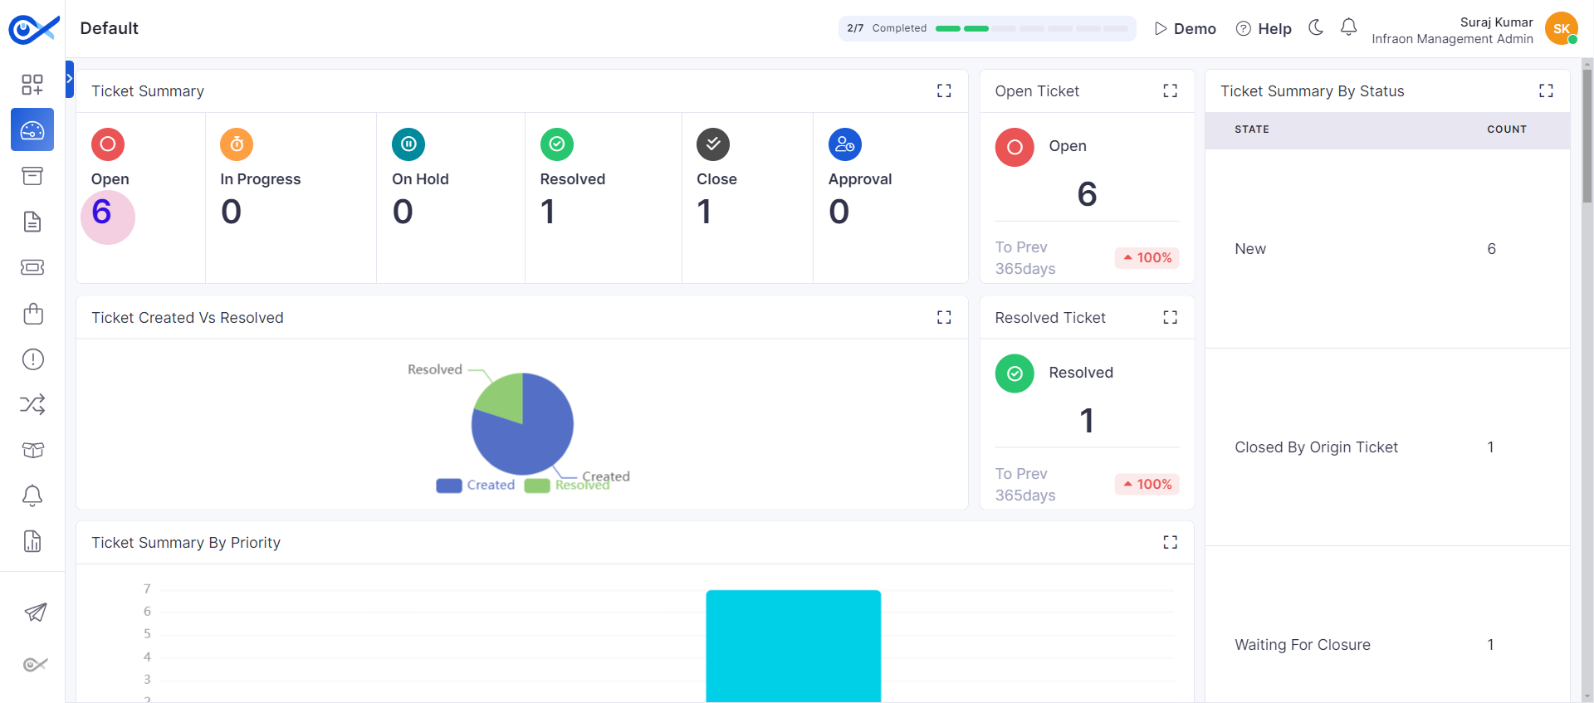
Features pre-built widgets for tickets, requests, problems, and changes.
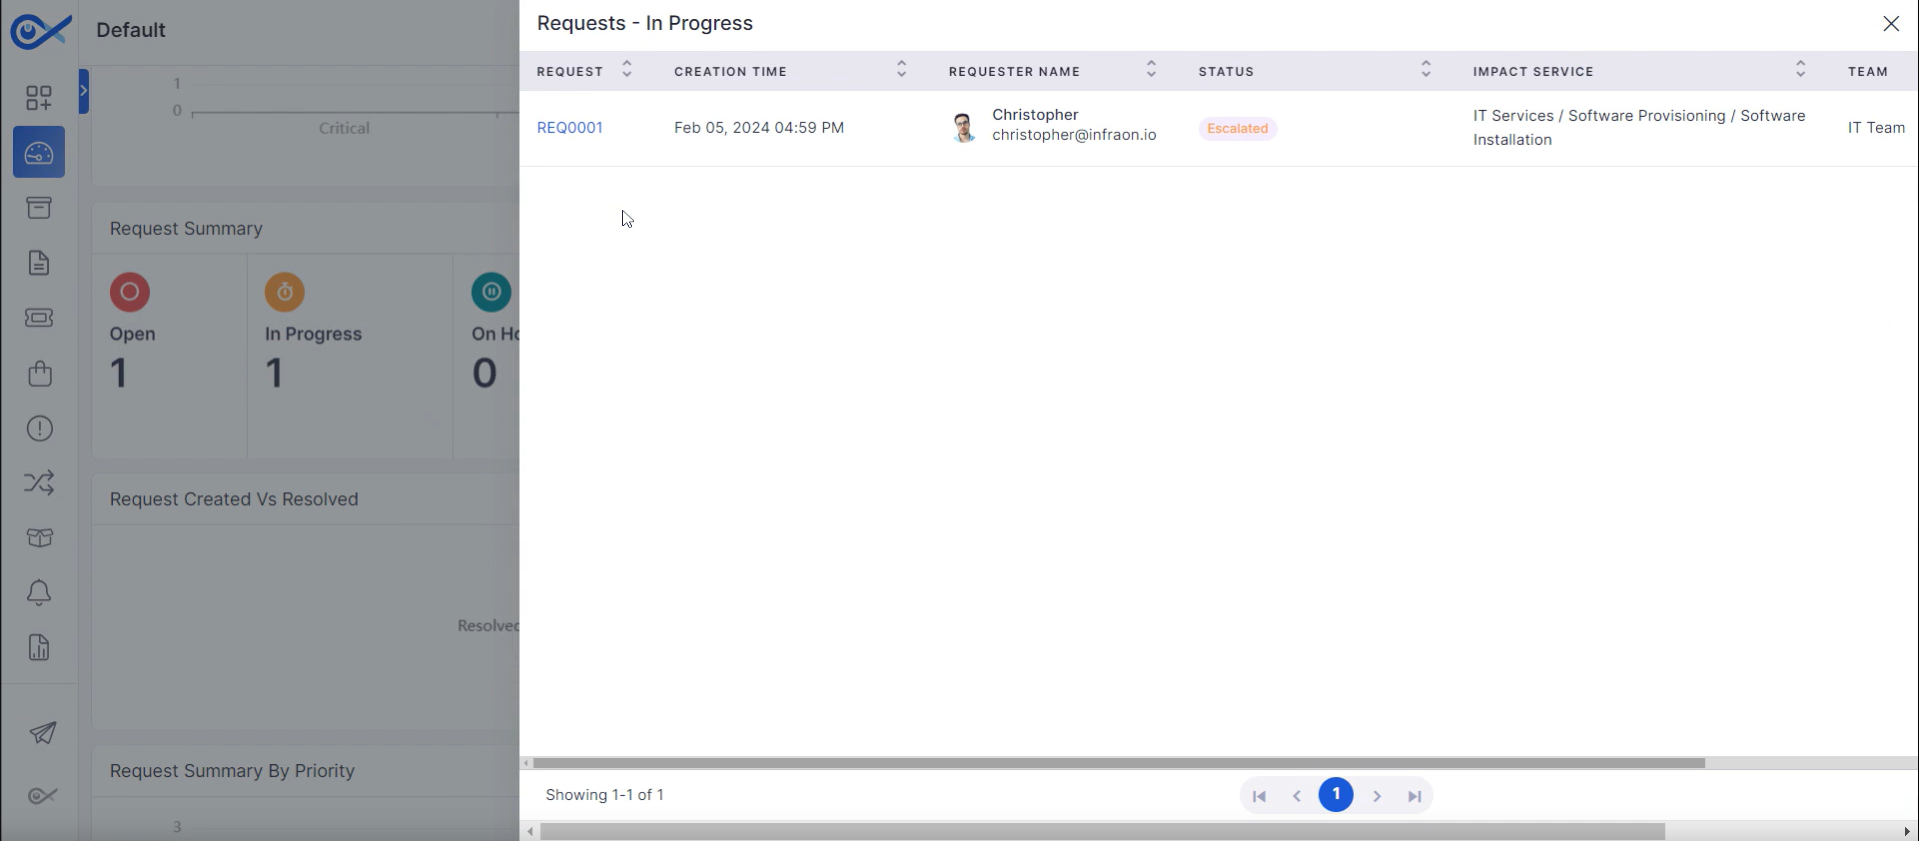
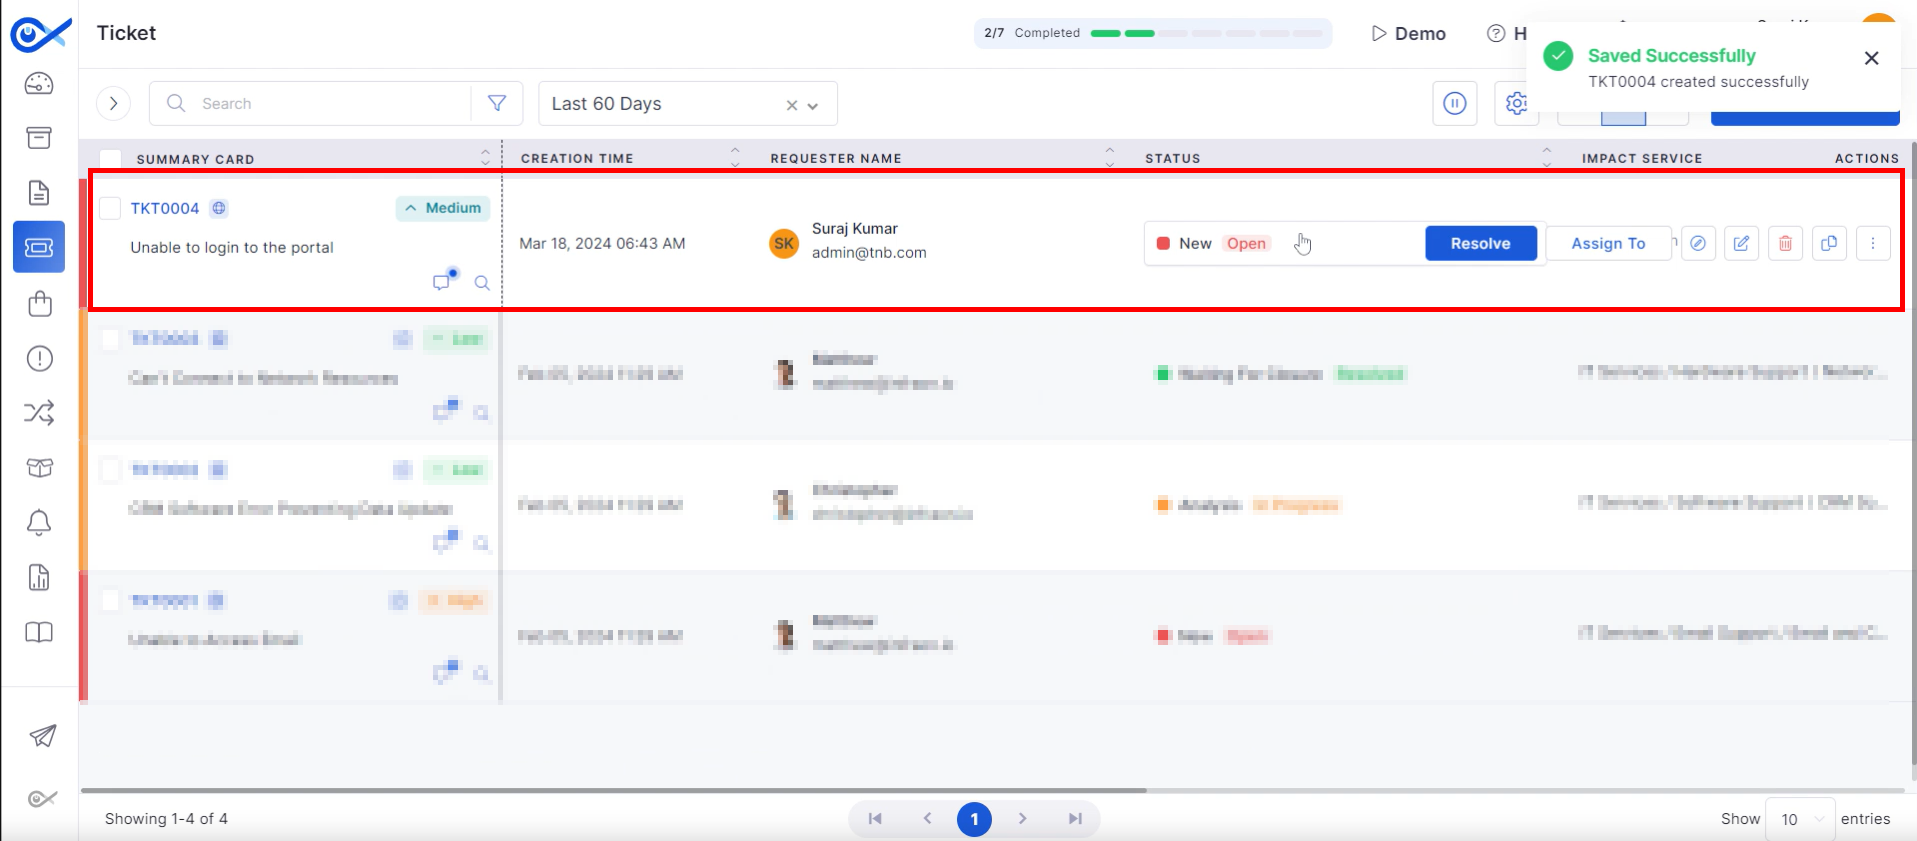
A decal section displays the ticket status (open, in progress, on hold, resolved, closed, approval).
Data Interaction
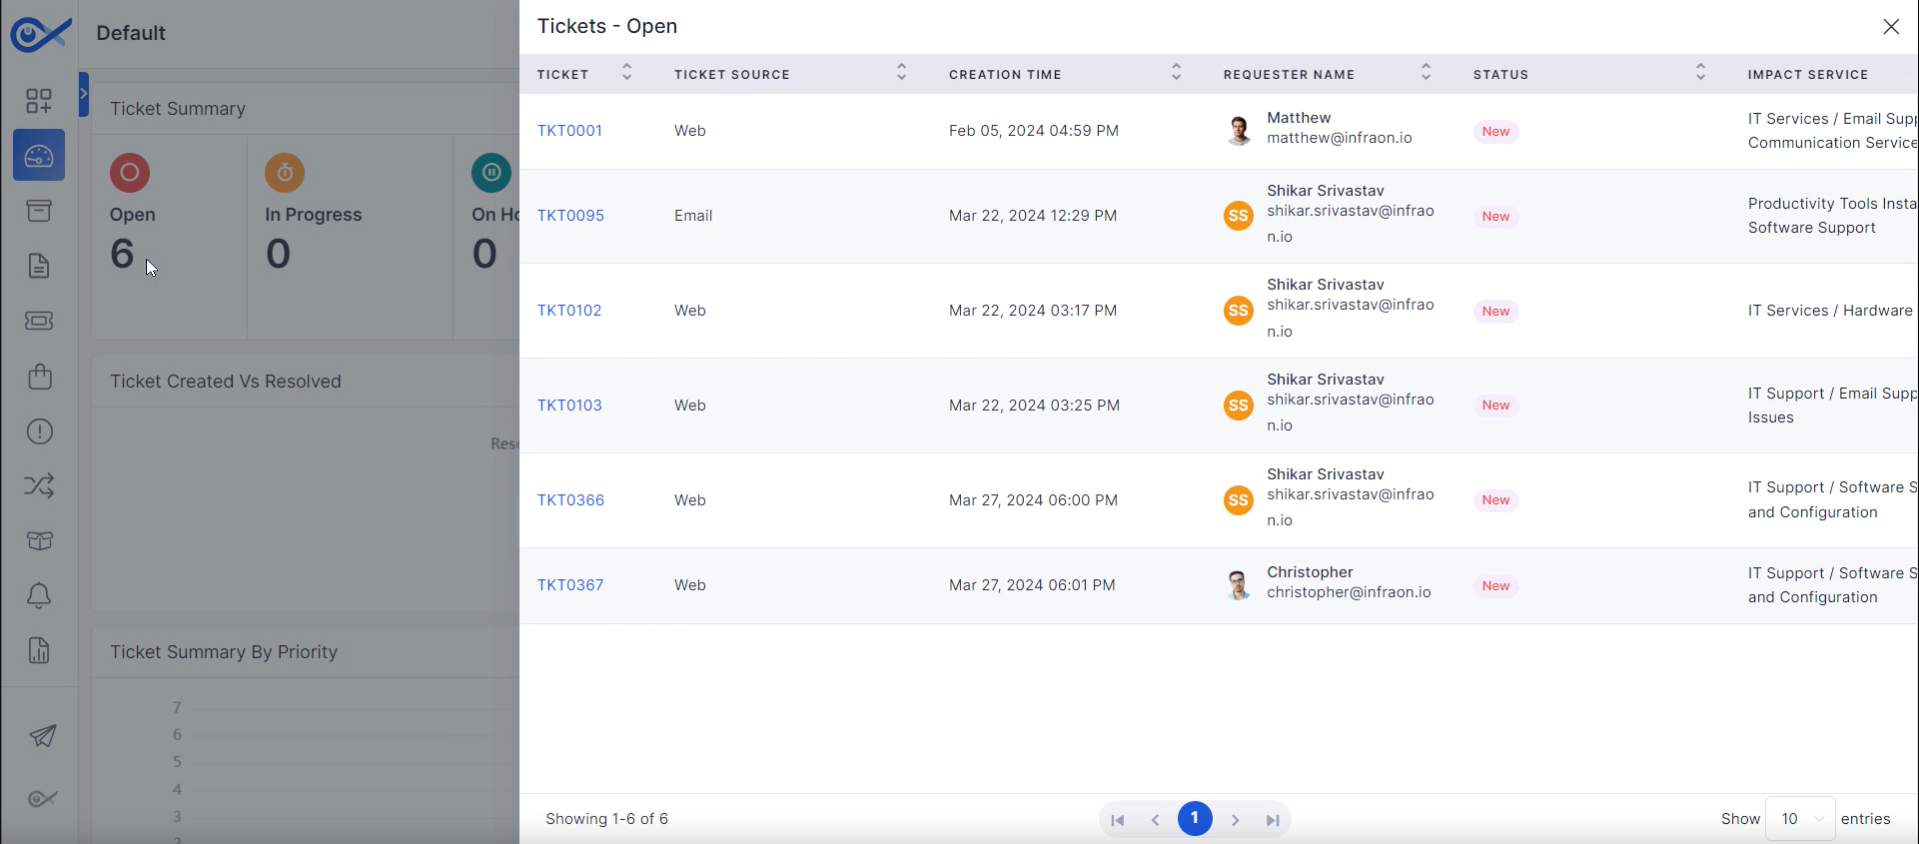
Click on decal widgets to filter tickets and view details.
Explore pie charts for ticket creation to resolution overview.
Analyze ticket priority trends using bar charts.
Interact with requests and problems and change widgets similarly to ticket widgets.
Data Insights
Gain insights into ticket and request volumes and statuses.
Identify trends and patterns in problem and change management.
Utilize dashboard visualizations for quick data analysis.
Tickets Summary Dashboard
Dashboard Focus
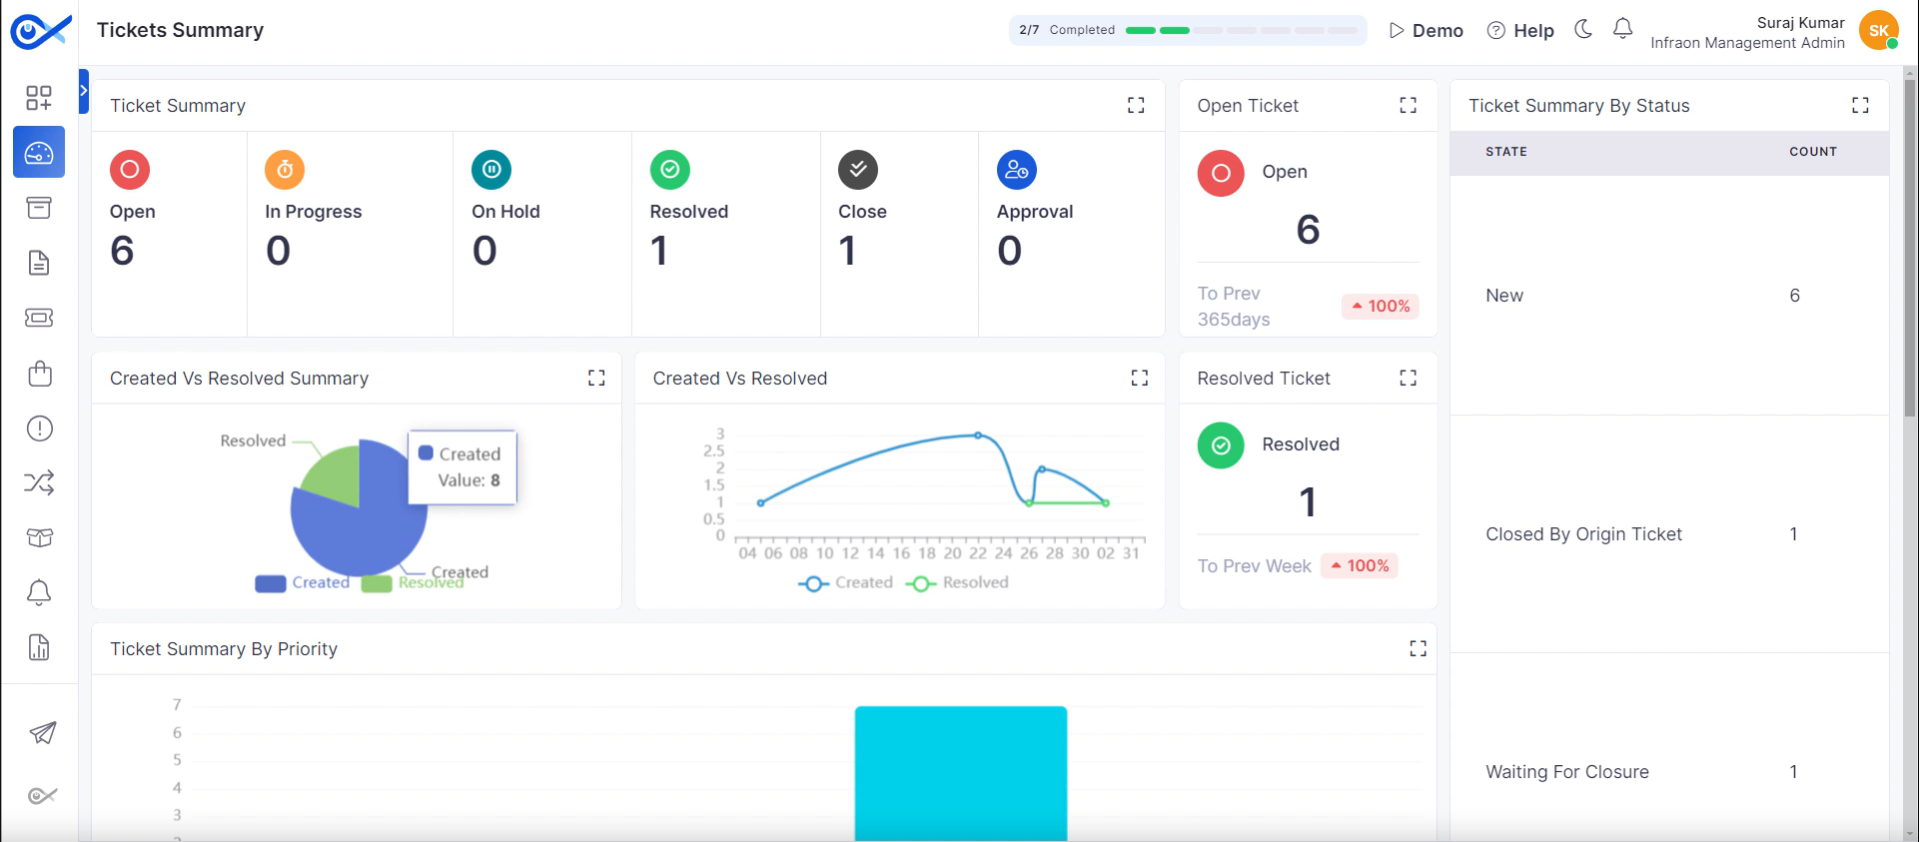
Dedicated dashboard for ticket-related metrics.
Visualizes ticket creation and resolution trends.
Provide ticket status and priority overviews.
Key Metrics
Displays ticket creation and resolution comparison.
Presents ticket status summary (open, in progress, resolved, etc.).
Shows ticket distribution by priority.
Data Visualization
Utilizes graphs and charts for data representation.
Offers interactive elements for deeper data exploration.
These are the default dashboards available in the Infraon Infinity platform.
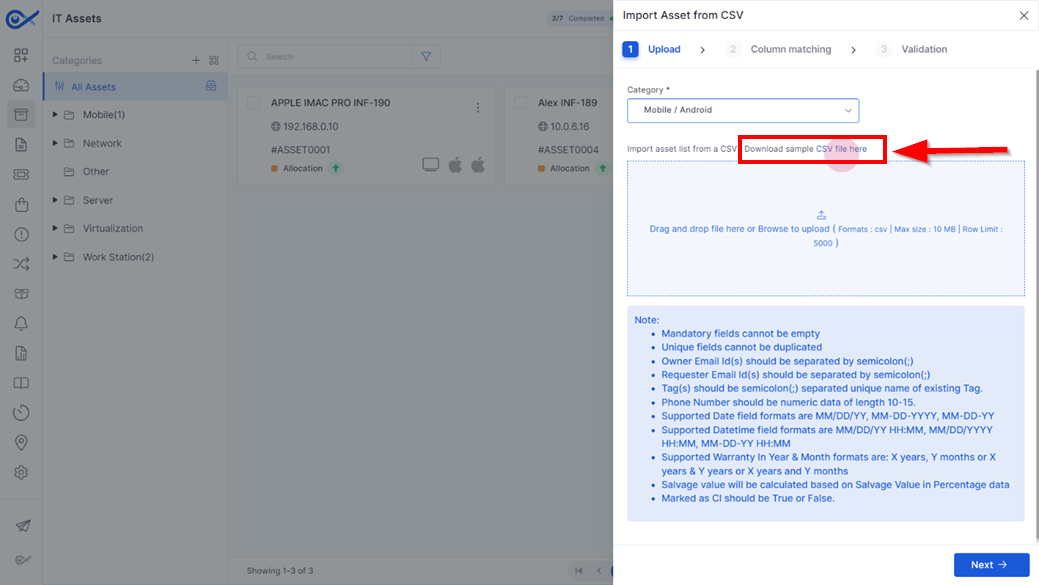
This tutorial outlines the steps to add multiple assets using the CSV file method.
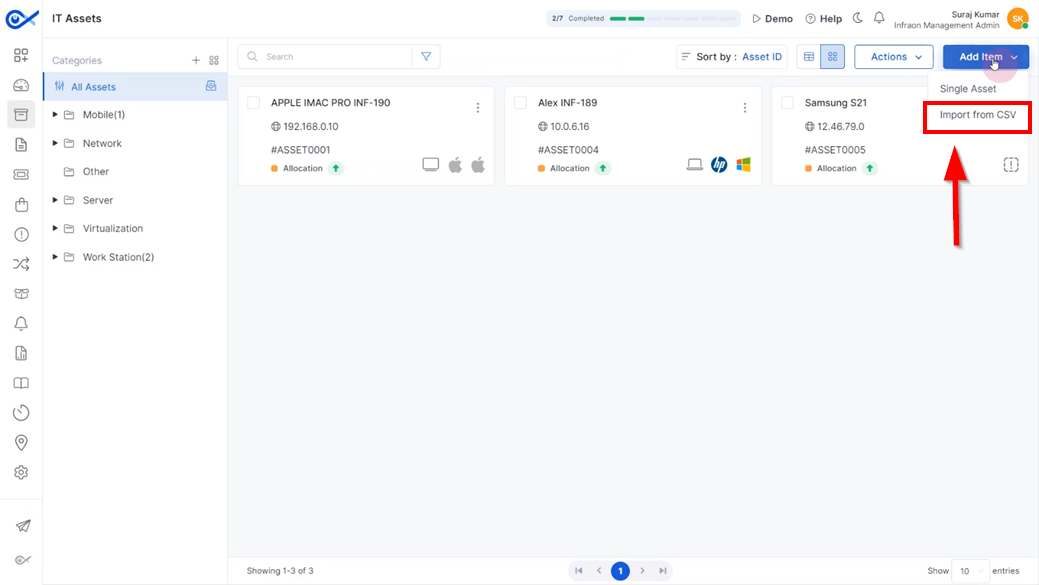
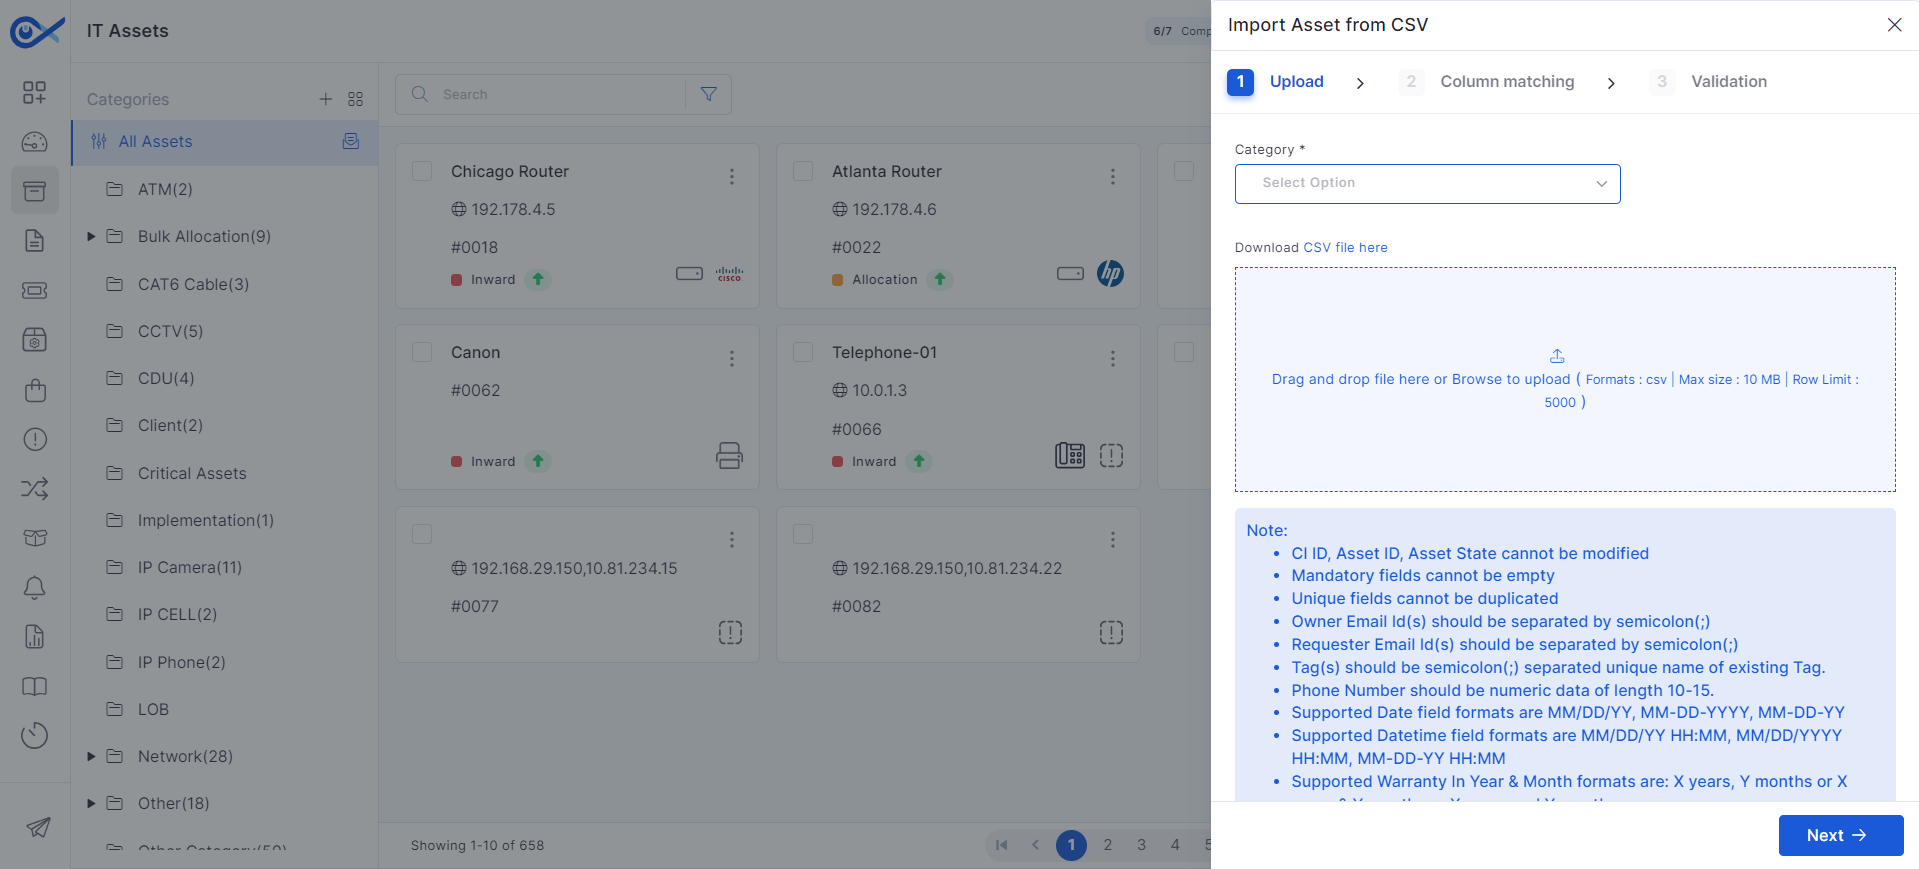
Step 1: Click on Add Item at the top right corner of the page and choose the ‘Import from CSV’ option.
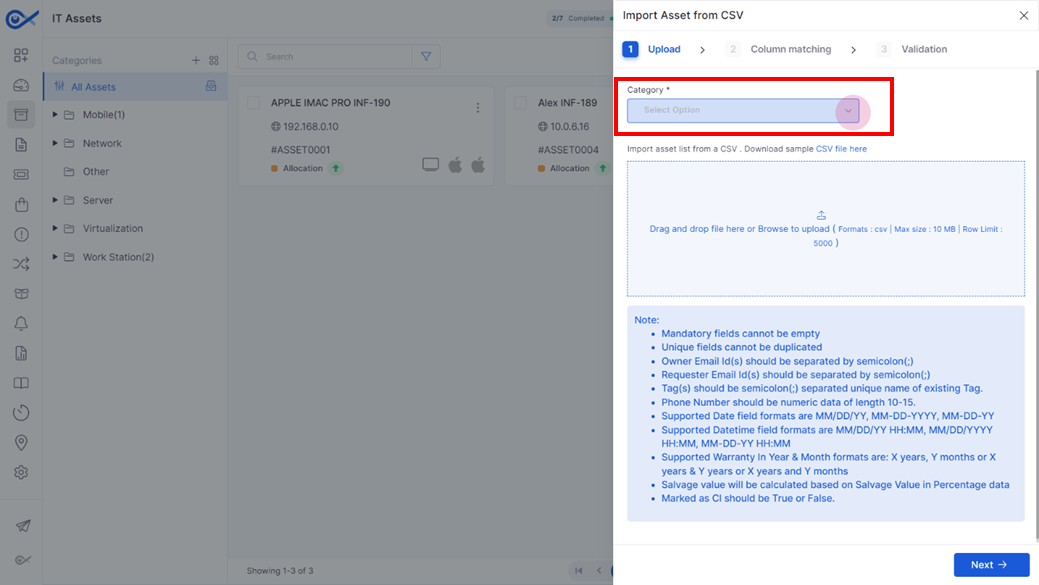
Step 2: In the pop-up tab, use the dropdown menu to map the assets to a parent or child category. Select the category in which the assets will be added.
Step 3: Download the sample CSV file by clicking on the ‘CSV file here’.
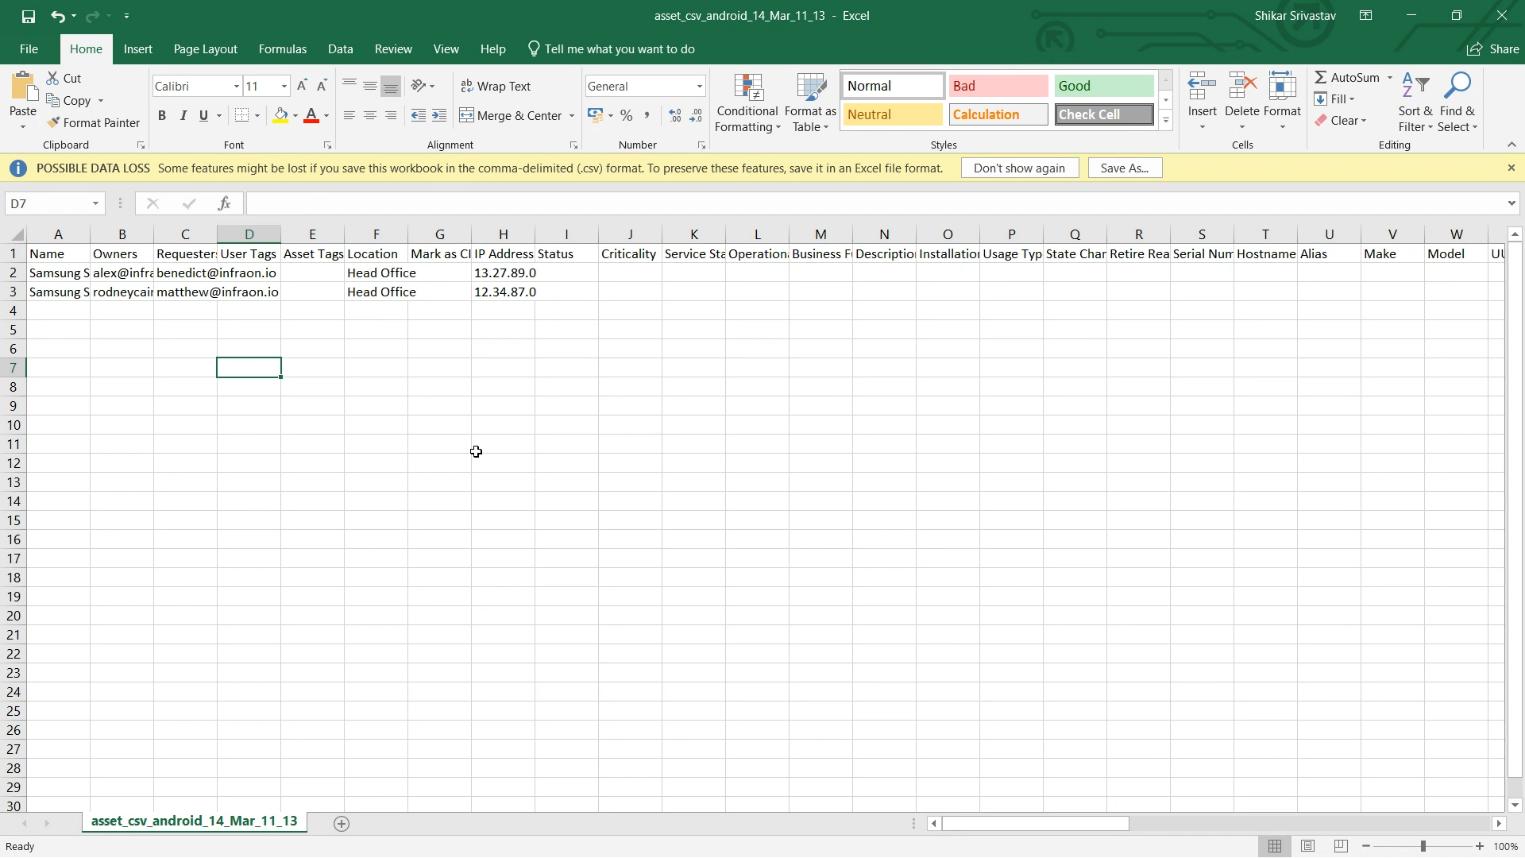
Step 4: Open the downloaded CSV file and fill in the required details for the assets in the appropriate columns.
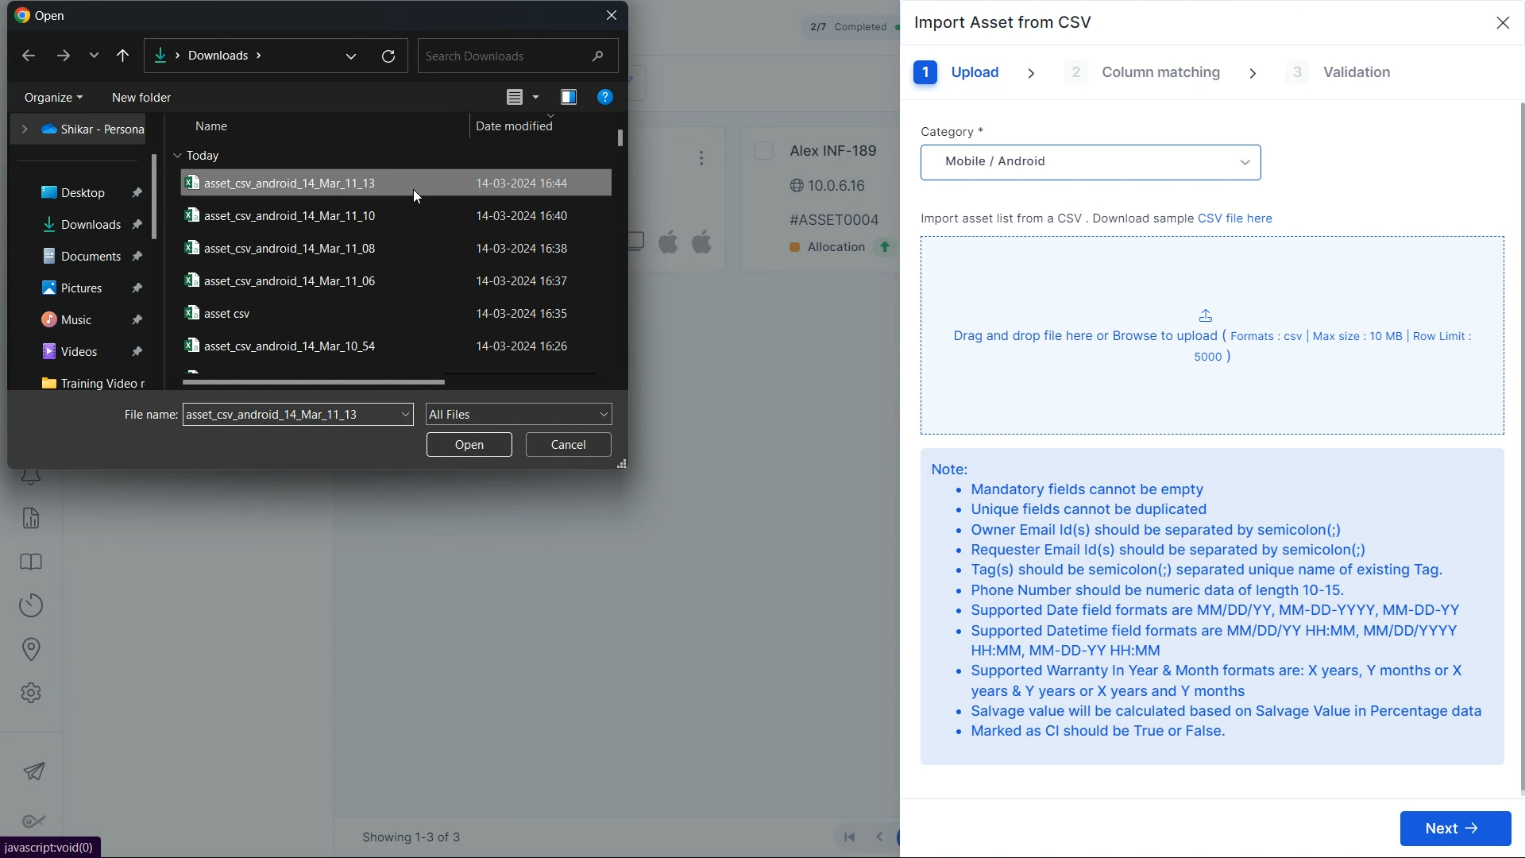
STEP 5: After filling in the details, save the CSV file and upload it.
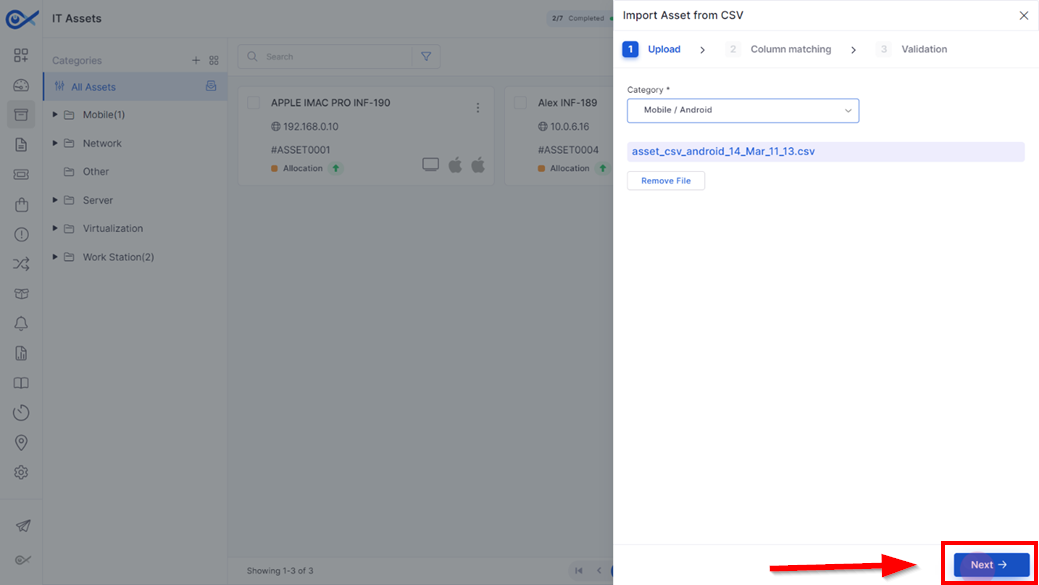
Step 6: After a successful upload, click Next.
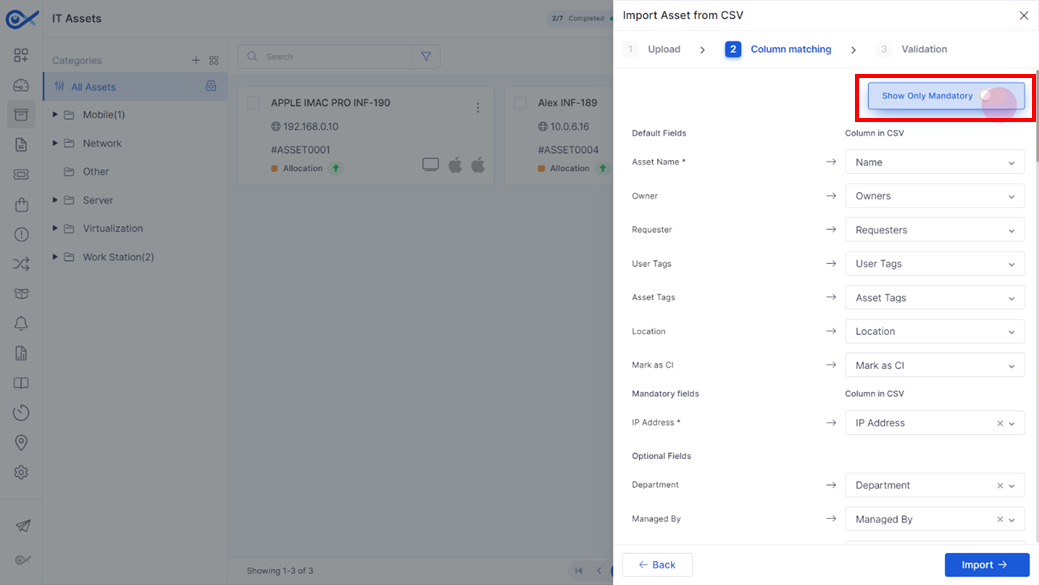
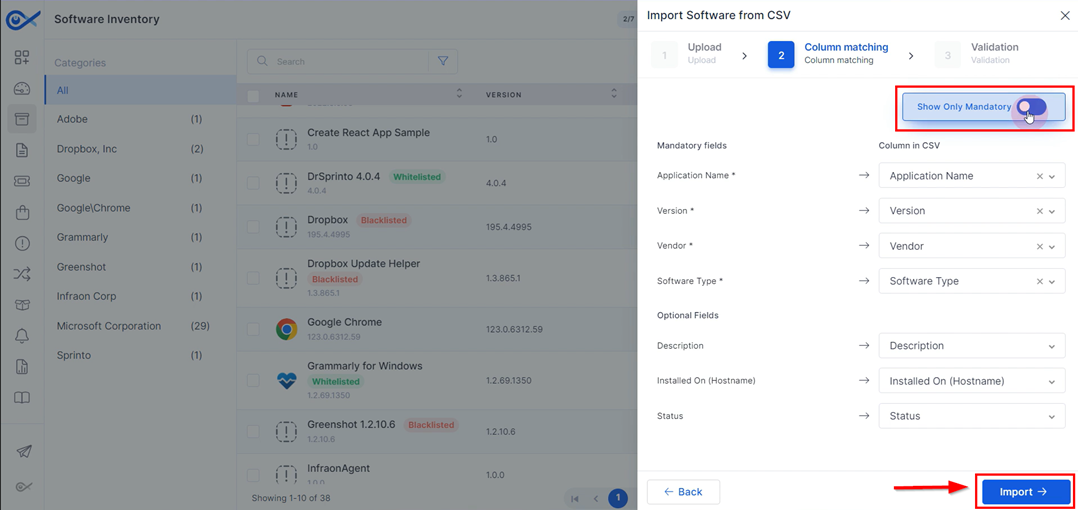
Step 7: On the column matching page, make sure the columns match the data in the CSV file. Use the ‘Show Only Mandatory’ toggle to view only mandatory fields.
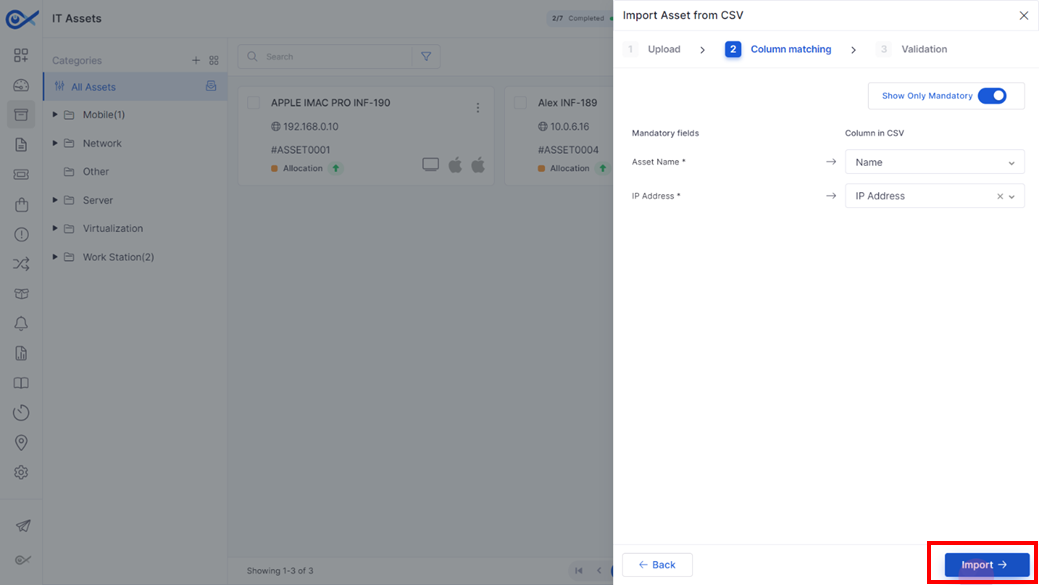
Step 8: Click Import to start importing the CSV file.
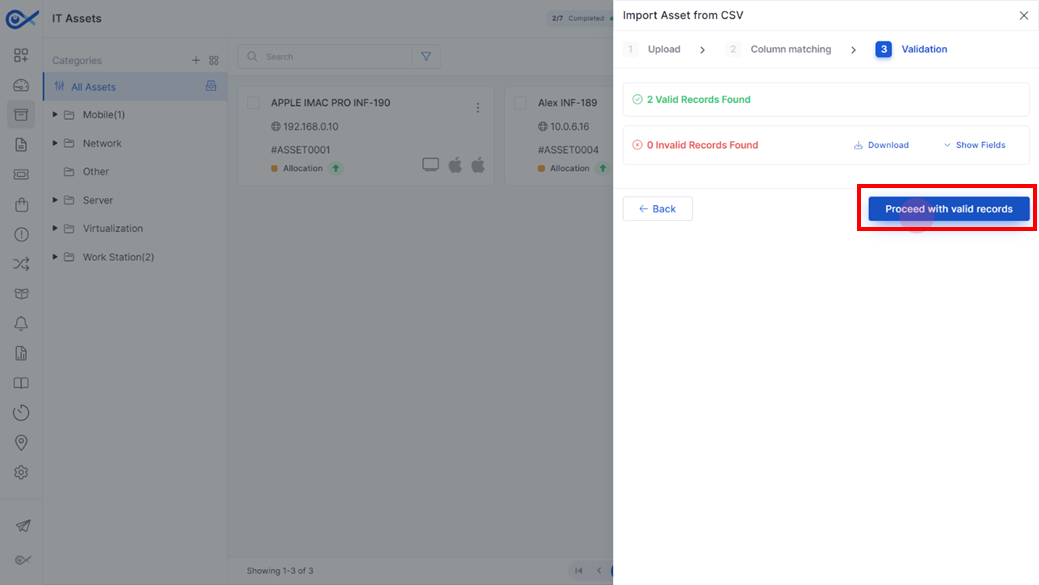
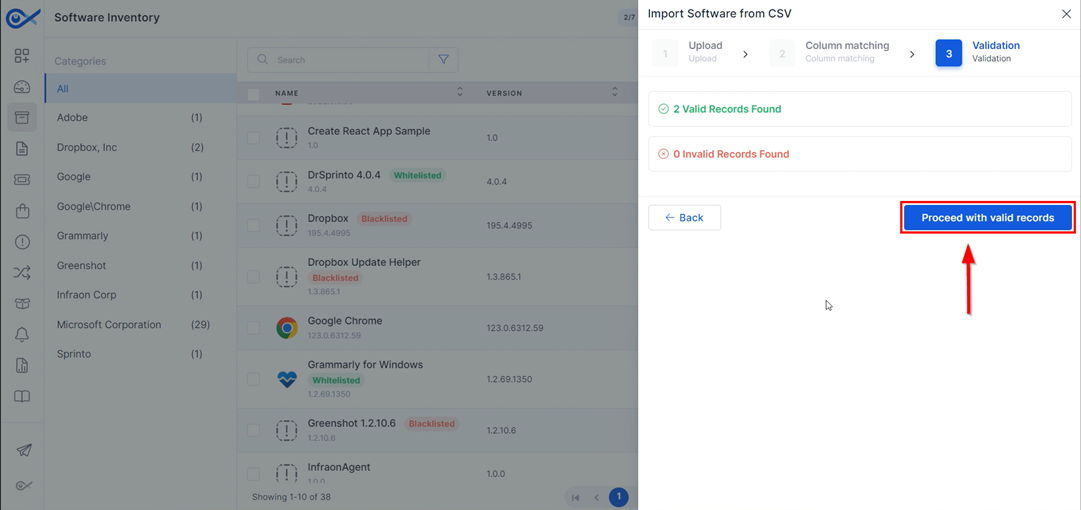
Step 9: Once the import is successful, select Proceed with Valid Records to add the assets.
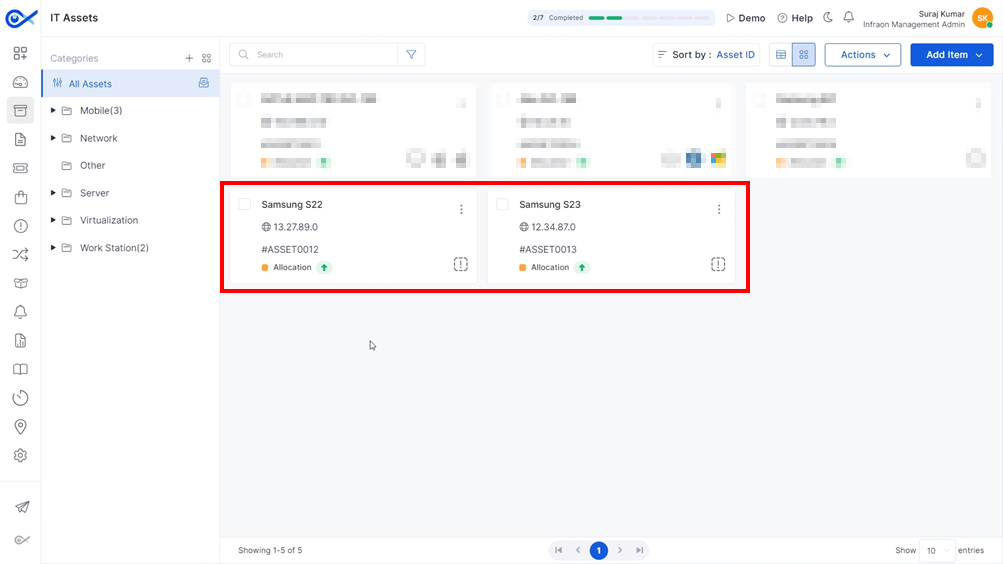
Step 10: A popup will appear confirming the successful upload of the CSV file and the addition of the assets to the selected category.
Adding an asset using Inventory Agent
This guide explains how to add an asset using the Infraon Inventory Agent. The Infraon Inventory Agent is a software tool that automates inventory management for businesses. It functions like a digital inspector, scanning systems and compiling a comprehensive report of both hardware and software components. The Infraon agent is available for Windows, Mac, and Linux users.
Downloading and Installing the Infraon Inventory Agent
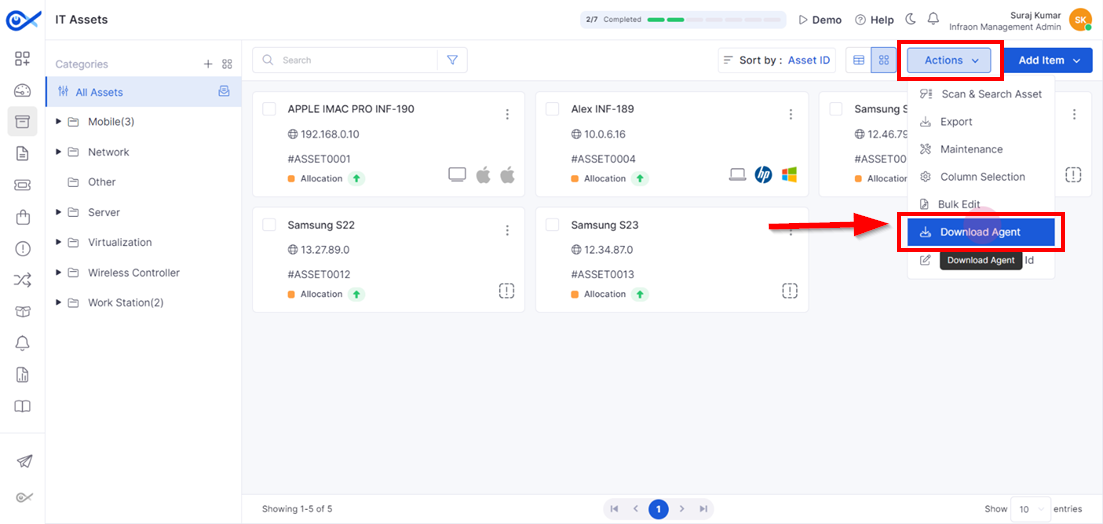
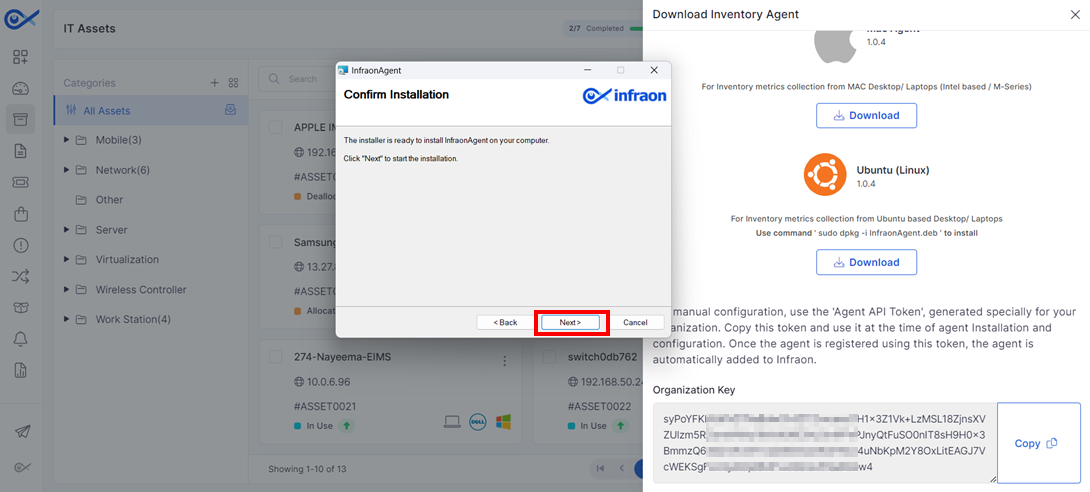
Step 1: To begin adding the asset using the agent, download the inventory agent itself. In the IT Asset tab, click 'Actions' on the top panel, and then select 'Download Agent'."
OR
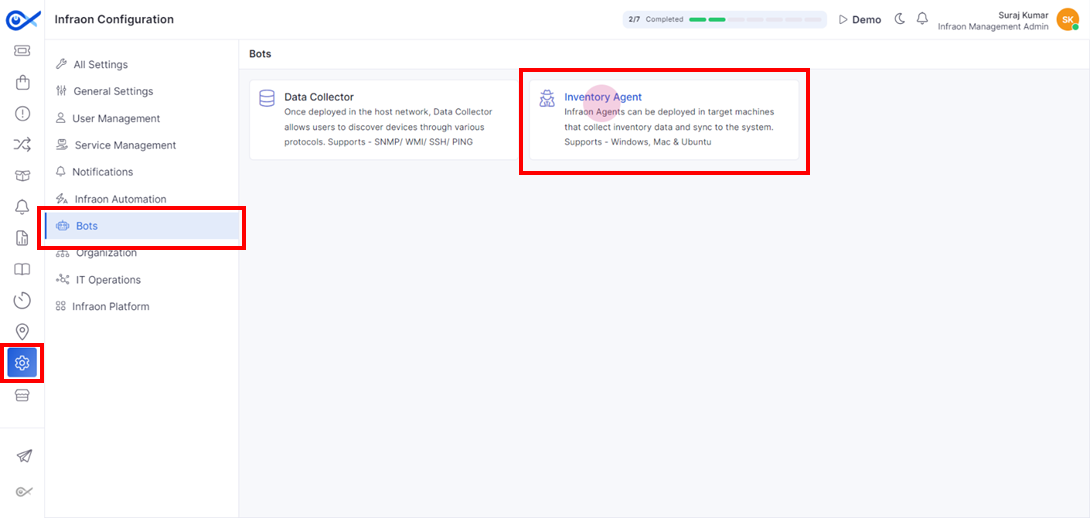
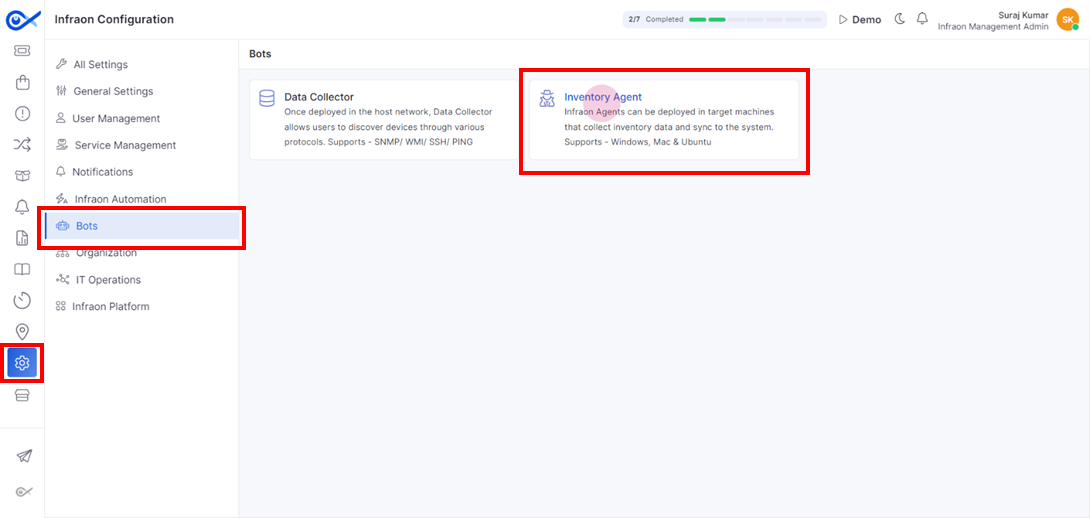
Alternatively, you can download the Inventory Agent from Infraon Configuration. Go to Bots and navigate to the Inventory Agent module.
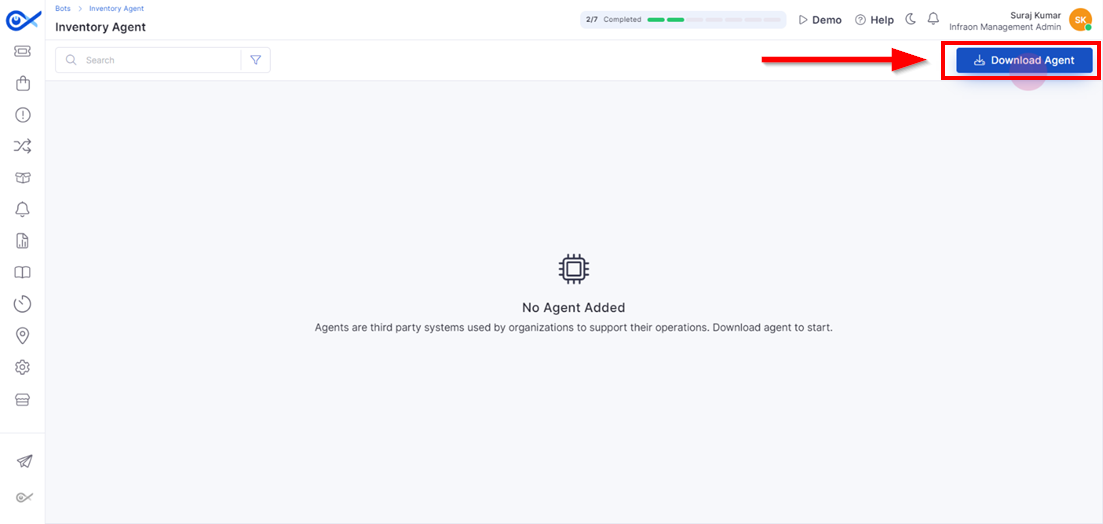
Click on the download agent located at the top right corner of the page.
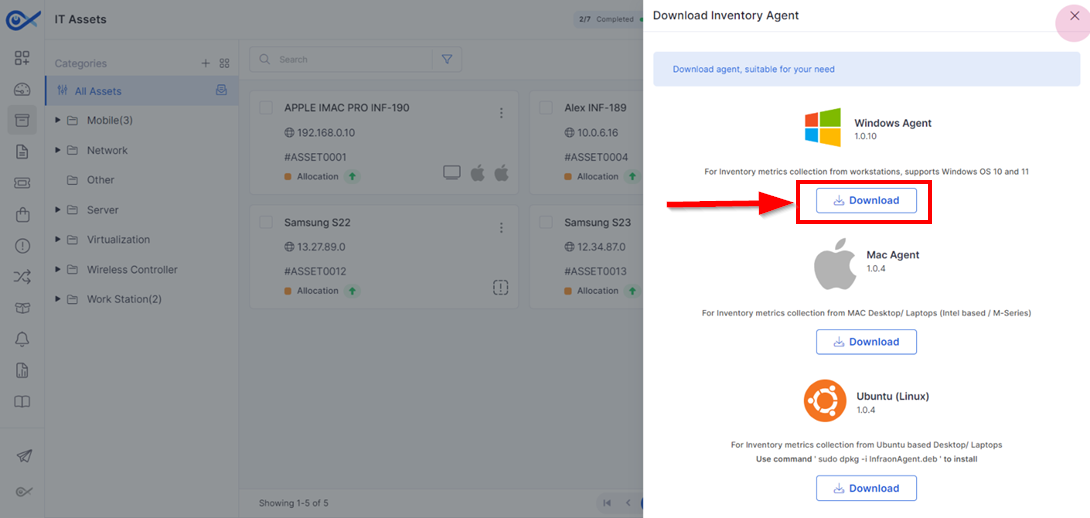
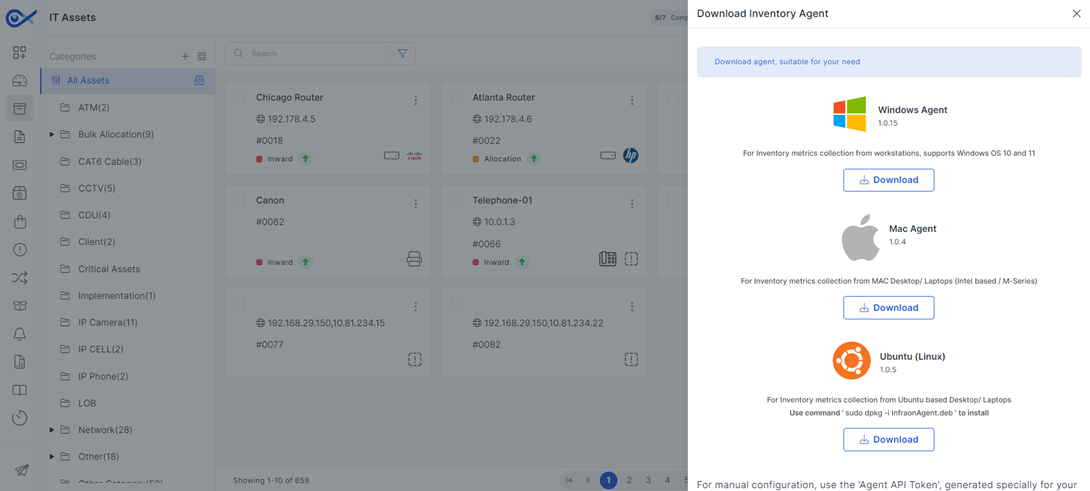
Step 2: The Inventory Agent is compatible with Windows, Mac, and Ubuntu (Linux) devices. Clicking the download button next to your chosen operating system will download the installation package for the Inventory Agent.
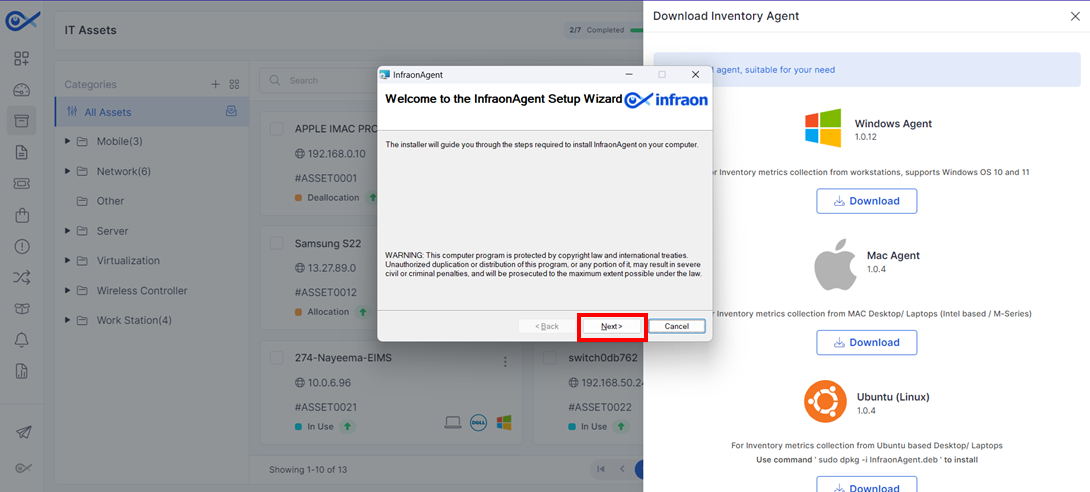
Step 3: Open the downloaded file to begin the installation. In the Infraon agent installer, click Next to proceed.
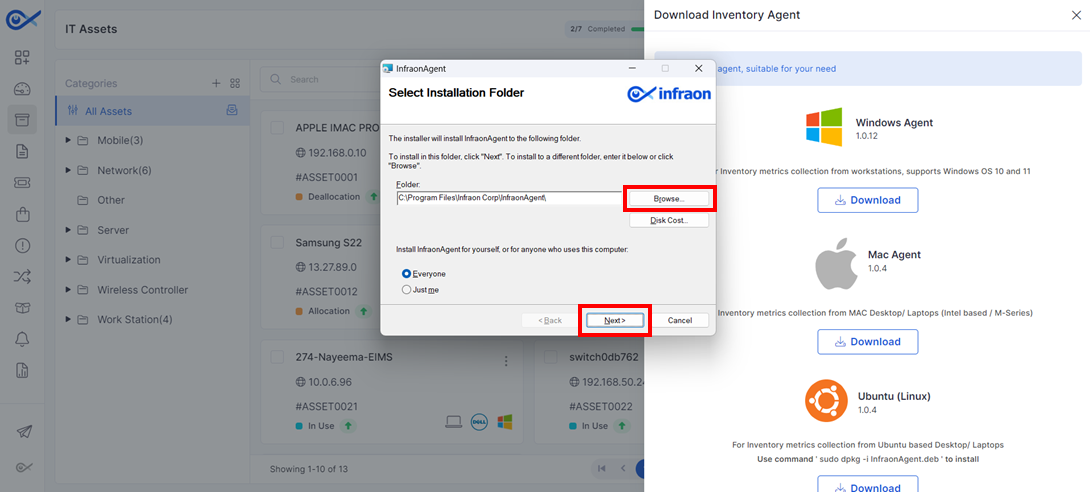
Step 4: Select the desired file path where the Infraon agent should be installed, then click Next.
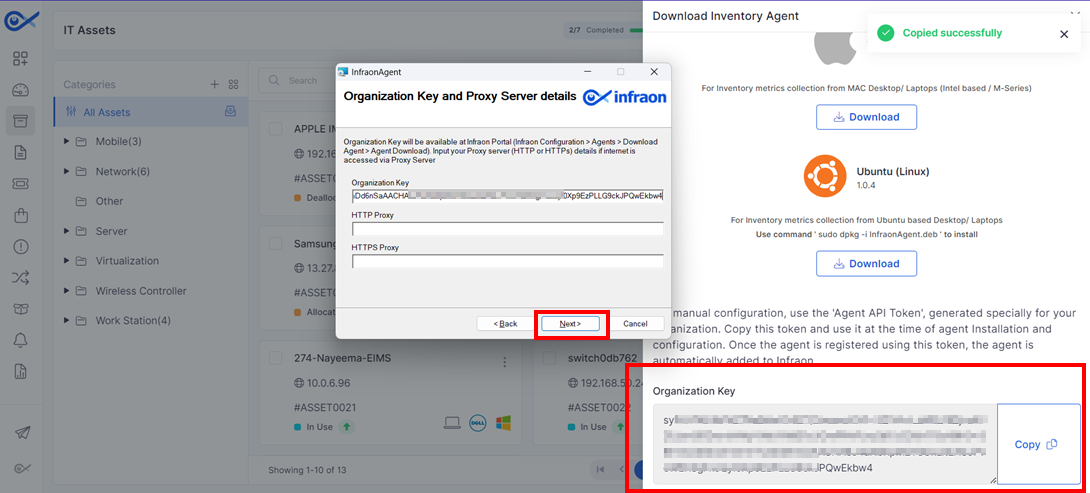
Step 5: Enter the organization key available in the download inventory agent module, then click Next.
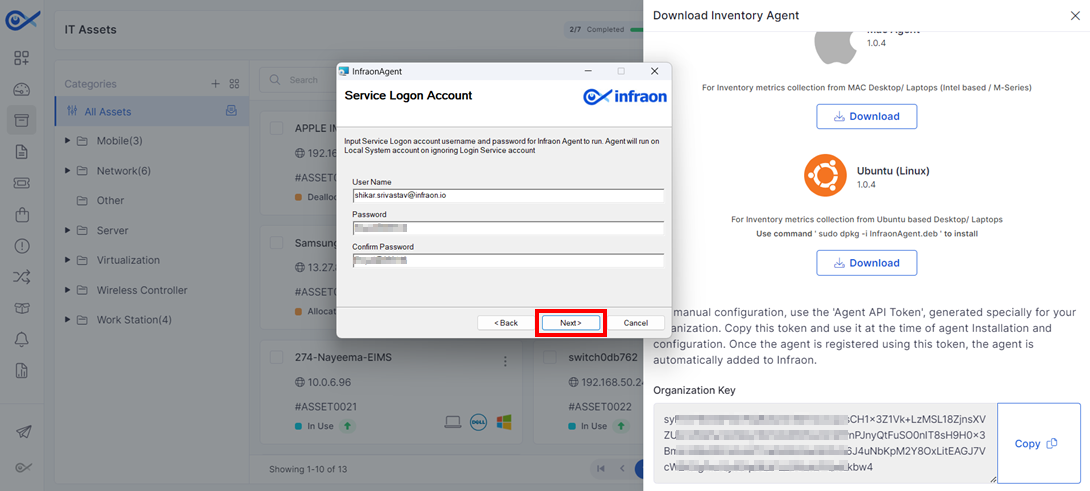
Step 6: Enter the username and password for the Infraon agent. Click Next to proceed.
Step 7: Once the configurations are added, proceed to install it by clicking Next.
The inventory agent is now successfully installed.
Infraon Inventory Agent
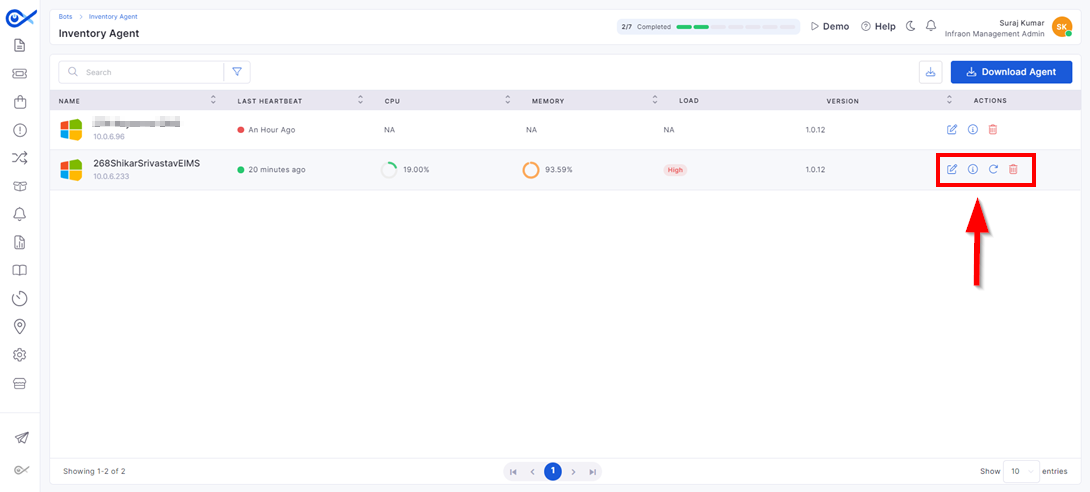
Step 1: Navigate to Infraon Configuration -> Bots -> Inventory Agent to view the list of installed agents.
Check the inventory agent list for the Infraon agent after installation.
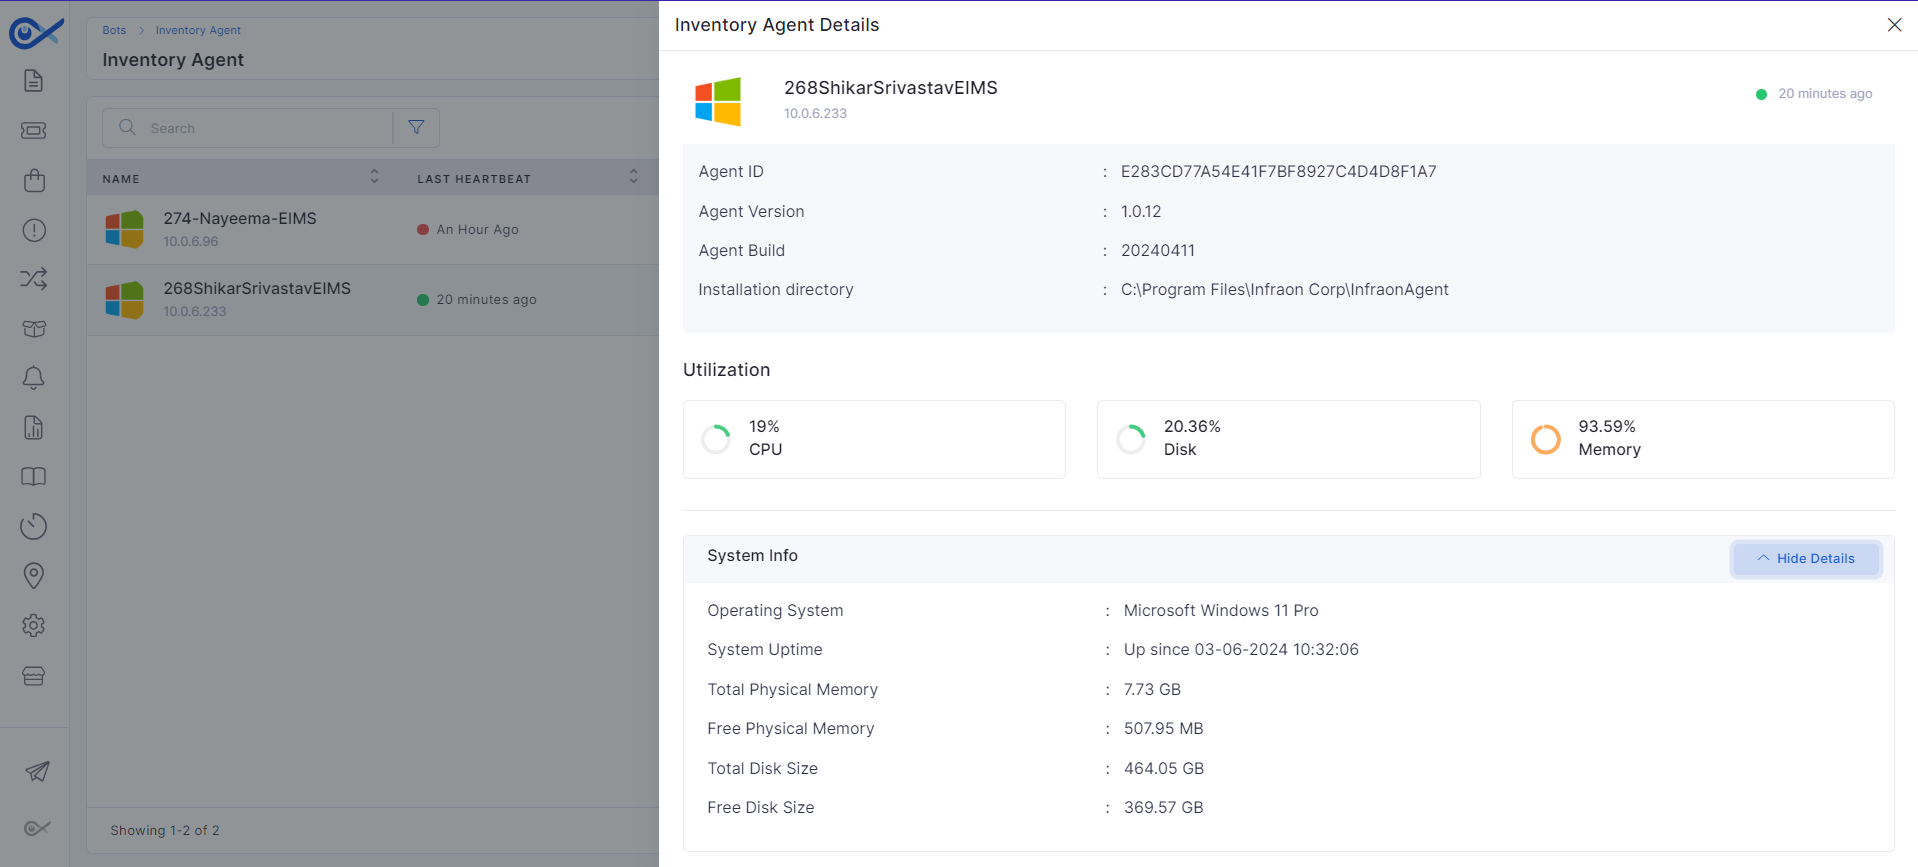
Step 2: Clicking on the (i) icon will open a pop-up page reflecting all the agent's name, last heartbeat, CPU usage, memory load, and version of the Infraon agent.
Step 3: The IT asset tab will reflect the asset discovered by the agent. Click on the discovered asset for more information.
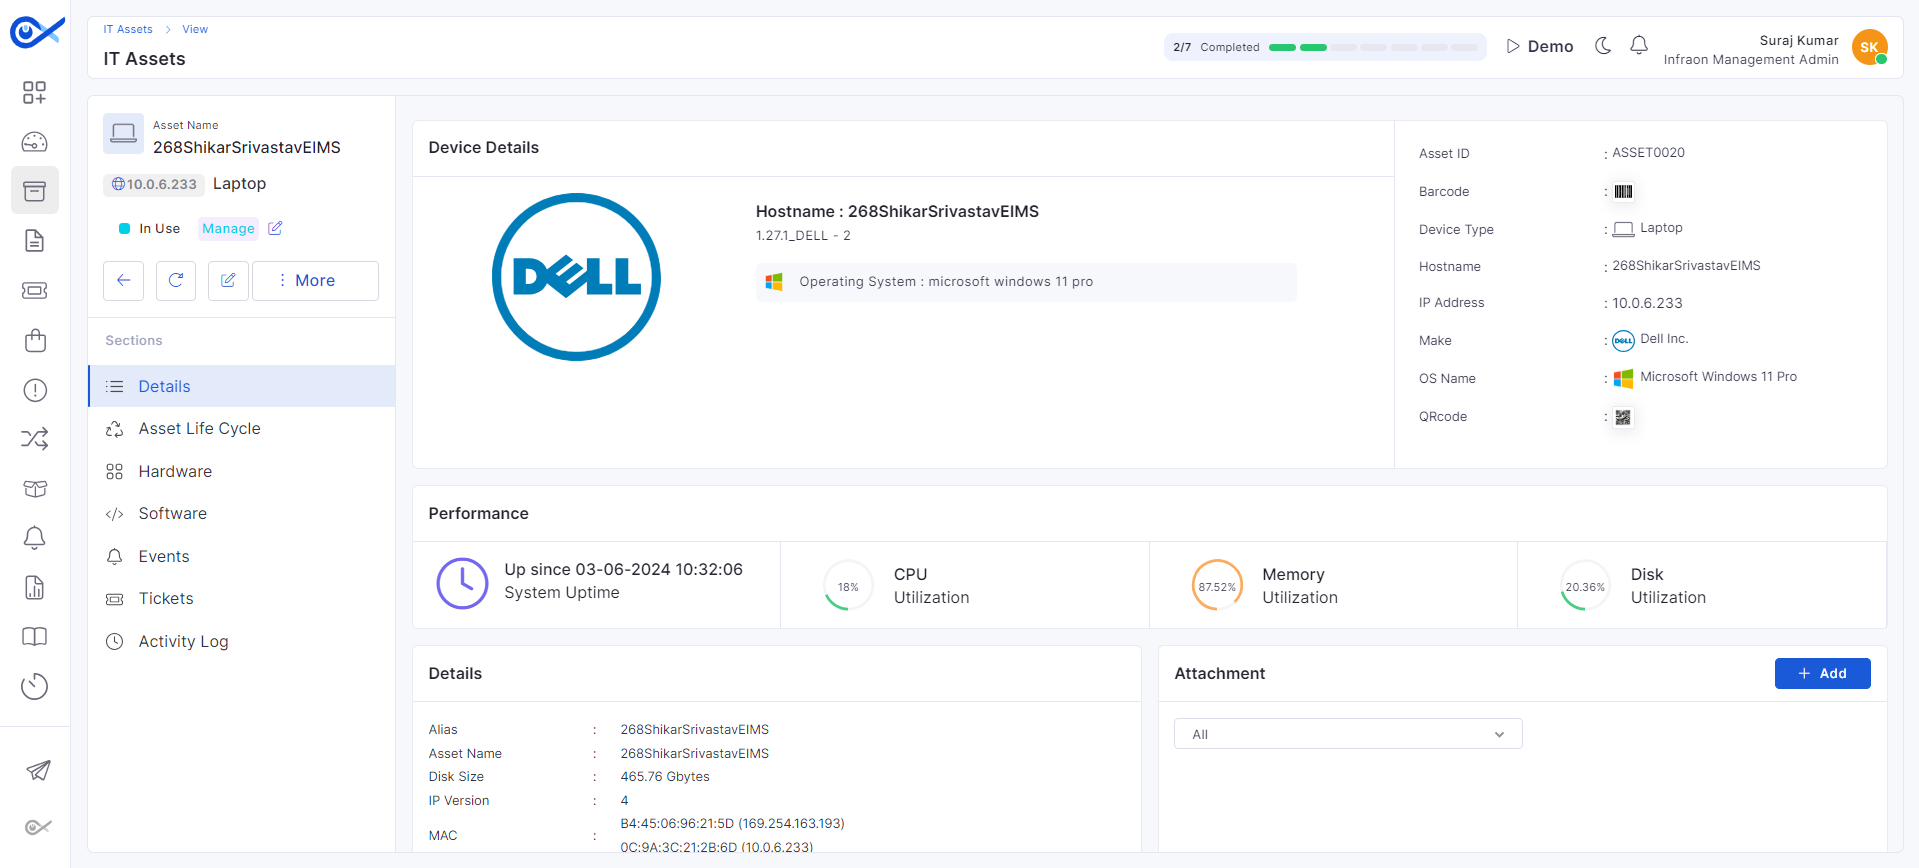
Step 4: Review the detailed information captured by the Infraon agent, including hardware and software details, asset lifecycle, and any associated events.
Ticket Creation
Creating Tickets in Infraon Infinity
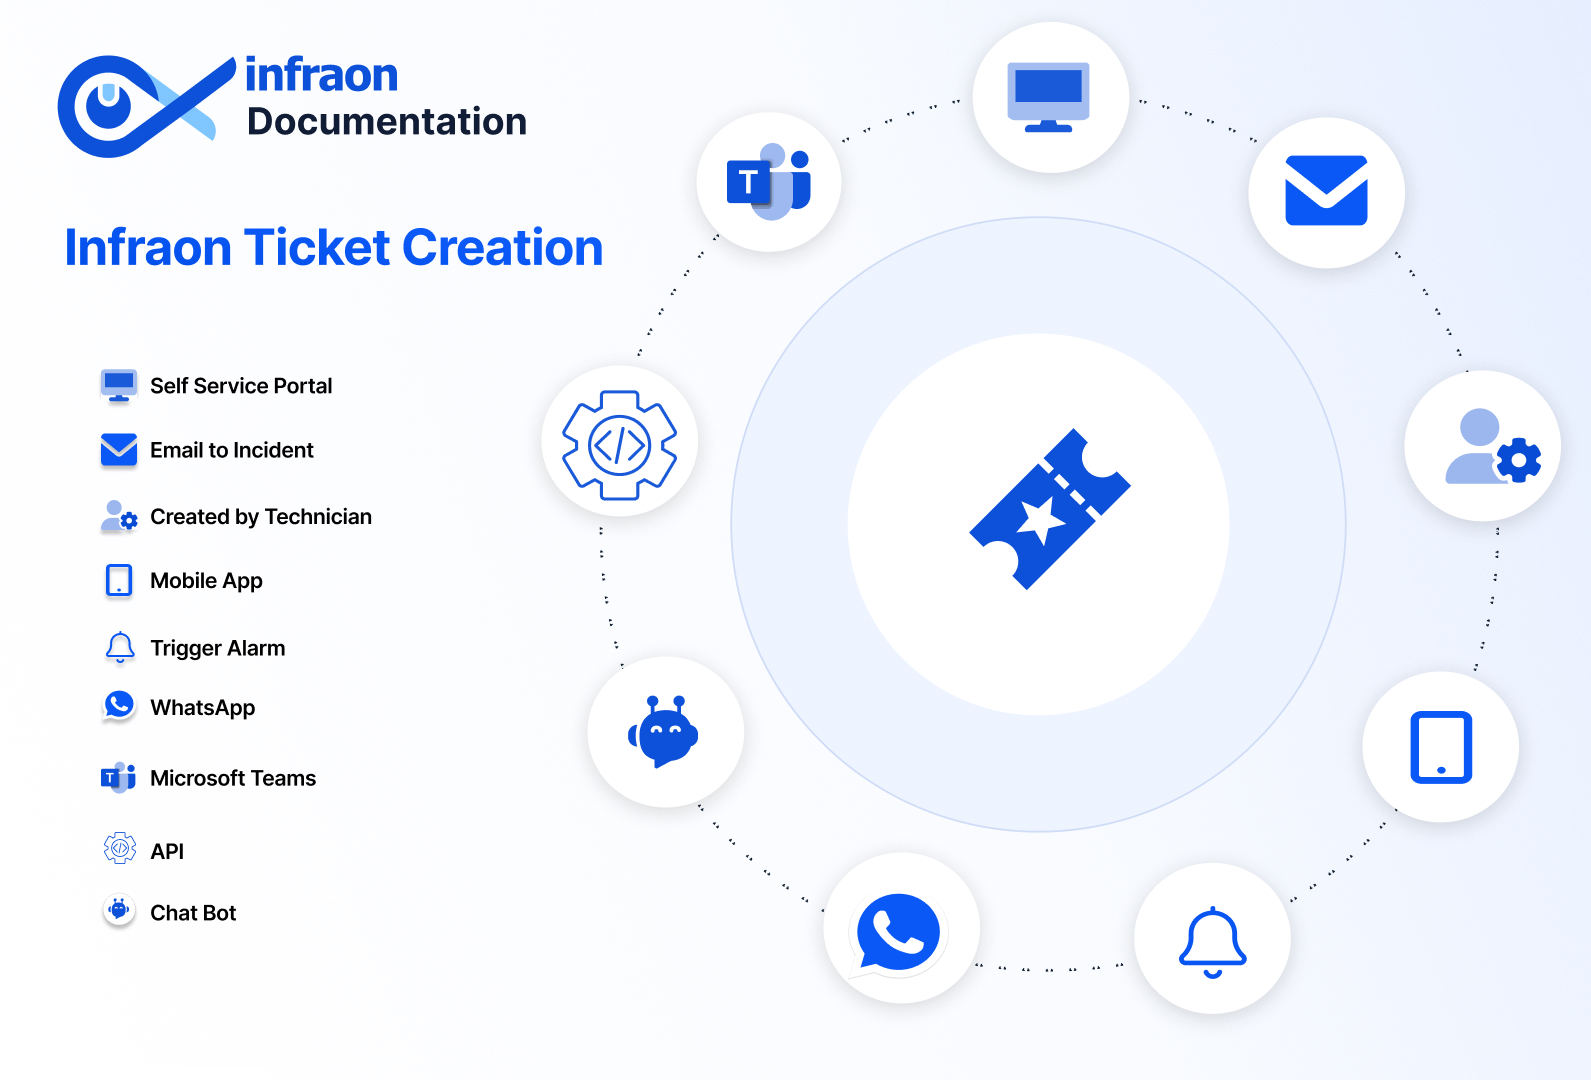
Infraon Infinity offers three primary methods for creating tickets.
The first method is through the Self-service portal, where end users can log in and raise their tickets.
The second method involves an email-to-incident feature. By configuring the support email, any emails sent by an end user automatically generate a ticket in the Infraon Infinity platform.
The third method is via the technician portal. If an end user cannot use email or the self-service portal, they can directly contact a technician. The technician can create a ticket for the end user within the admin portal.
The following sections provide a detailed look at these different methods of ticket creation.
This guide explains how to create a ticket using the email-to-incident feature in the Infraon Infinity tool. This feature allows a requester or end user to send a ticket directly to a technician or the front-end administrator via a designated email ID. Before using this feature, it's necessary to configure the support mail ID in the Infraon Infinity tool.
Configuring the Support Mail ID
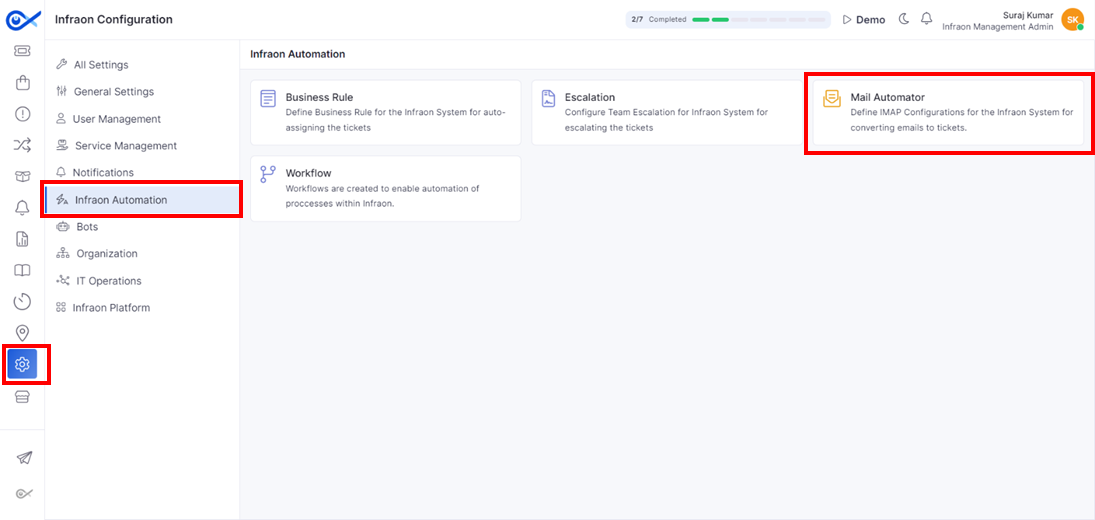
Step 1: Navigate to Infraon configuration and locate Mail Automator, also known as IMAP configuration, which resides in the Infraon Automation module. This allows you to set up automatic ticket creation from emails.
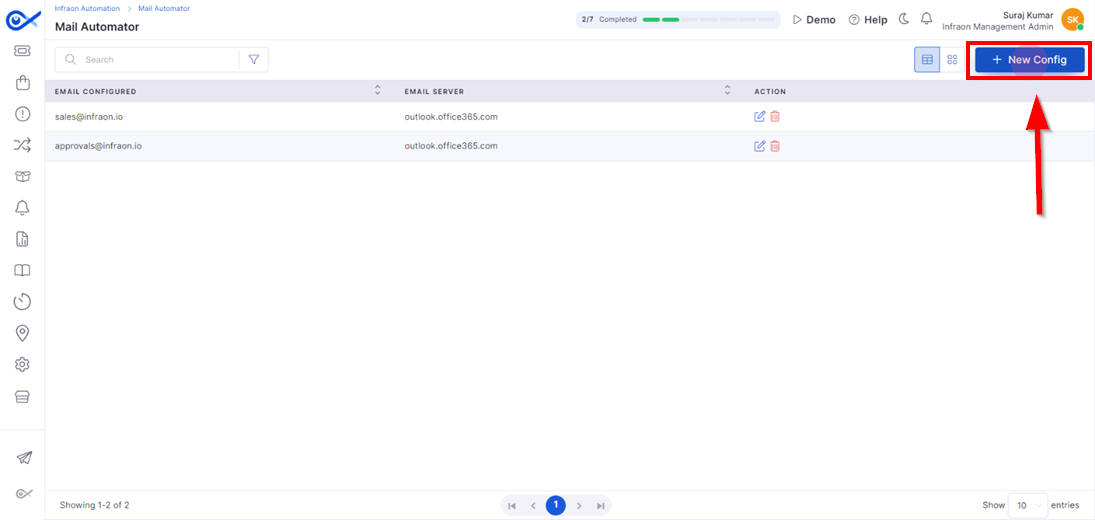
Step 2: Click on the New Configuration located at the top right corner of the page to create a new IMAP configuration.
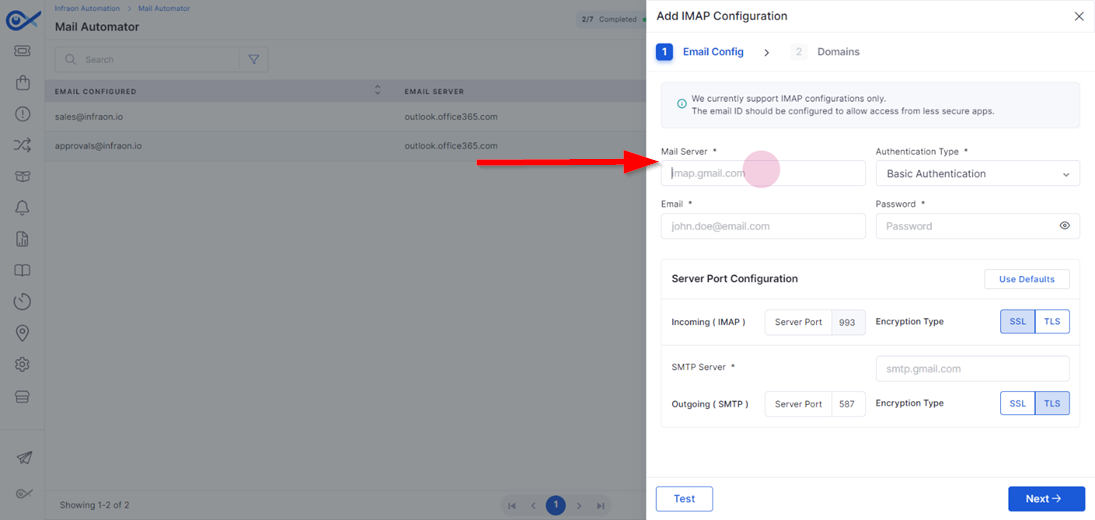
Step 3: Enter the necessary details for the mail configuration. Start by entering the mail server.
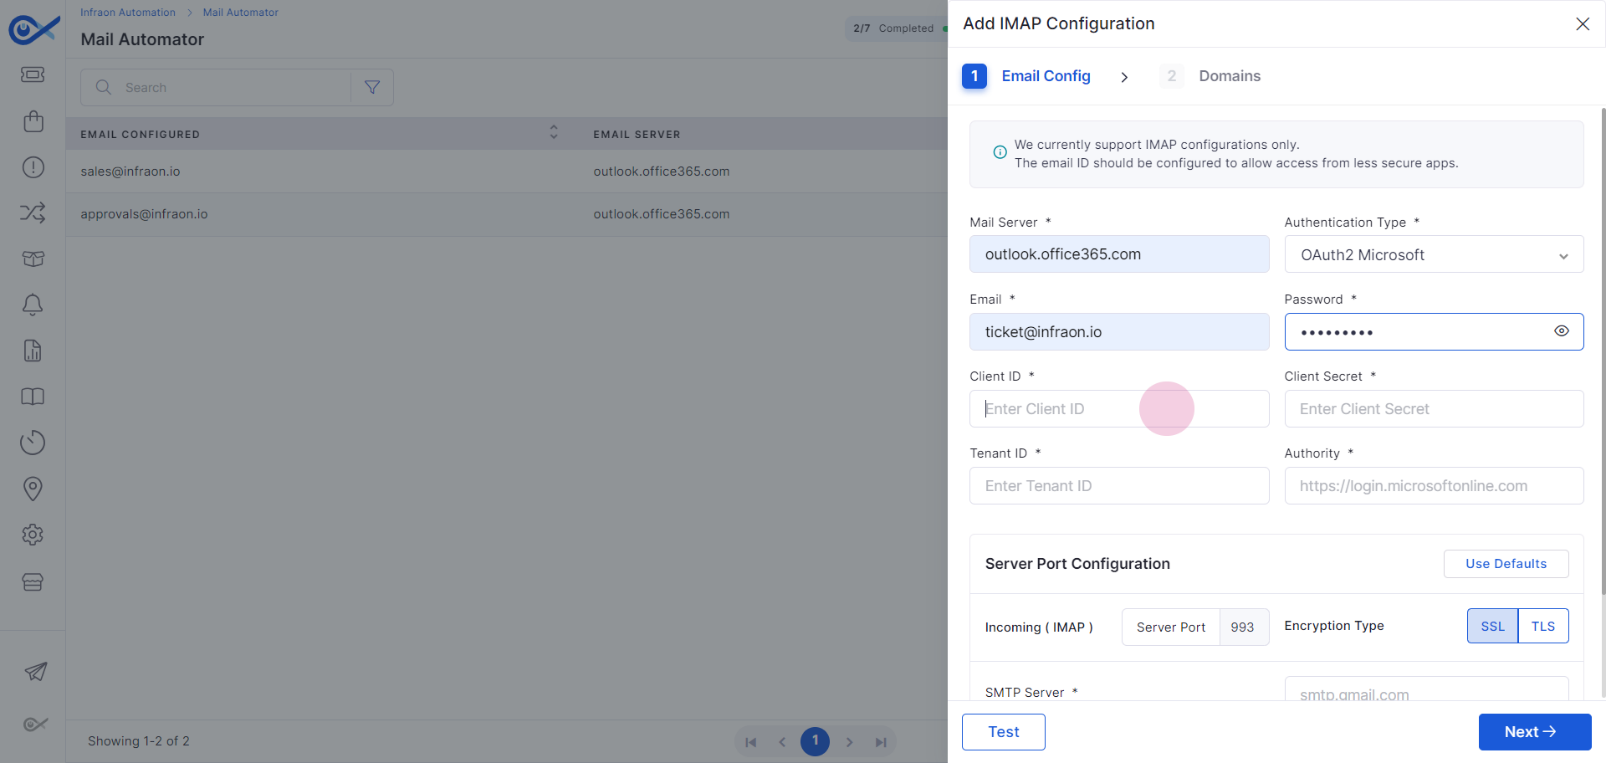
Step 4: Choose the authentication method and enter the email address and password in the designated fields. Requesters will use this email address to submit tickets via email.
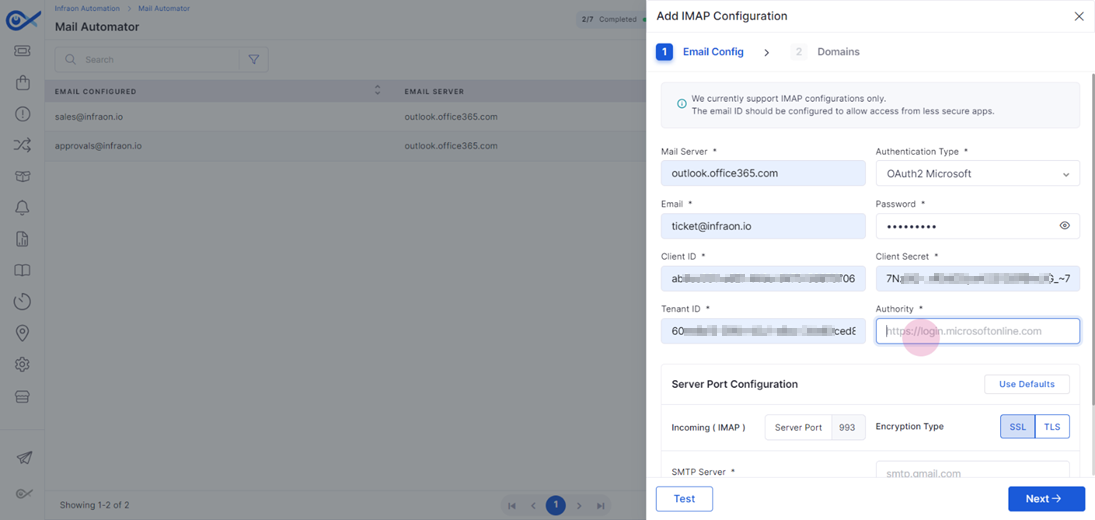
Step 5: Now, specify the Client ID, Client Secret, Tenant ID, and Authority in the respective call-out boxes.
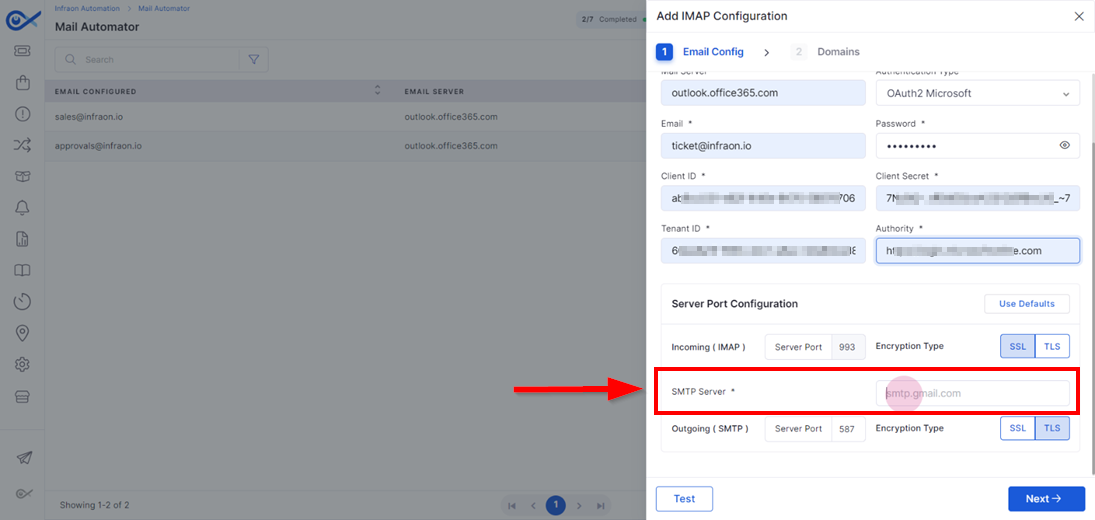
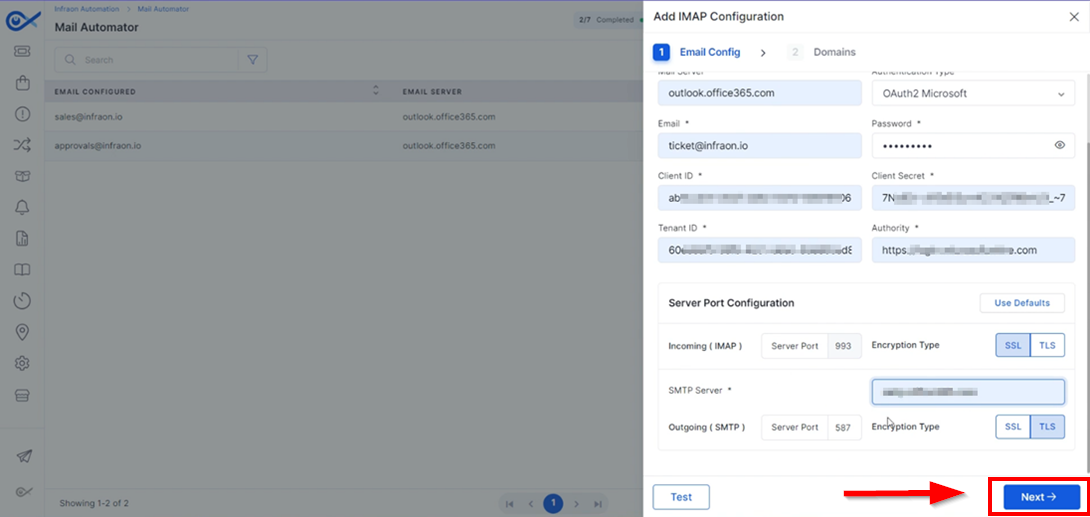
Step 6: Enter the SMTP server details in the Server Port Configuration section.
Step 7: After entering all required information, click Next.
Setting Up Domains and Submitting Configuration
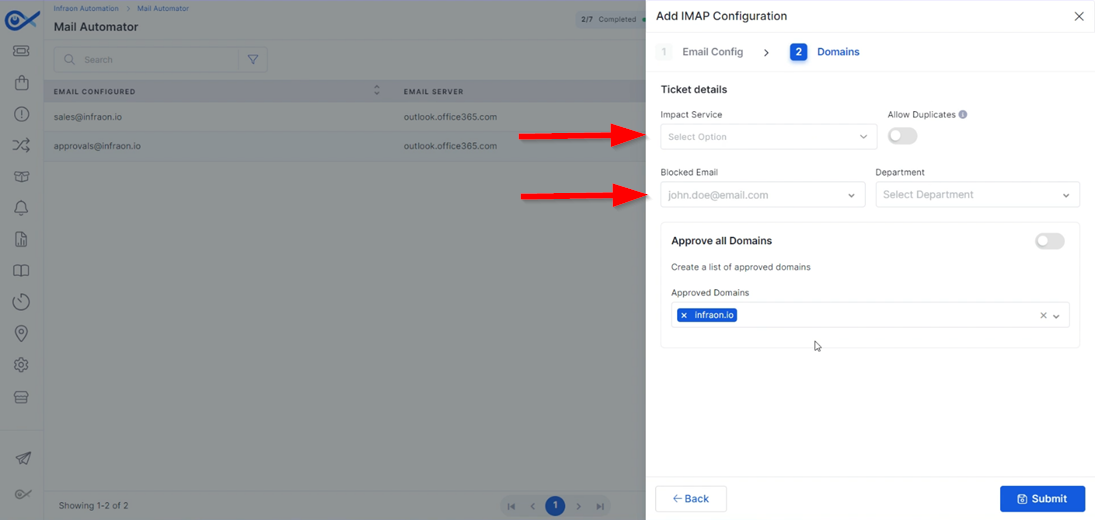
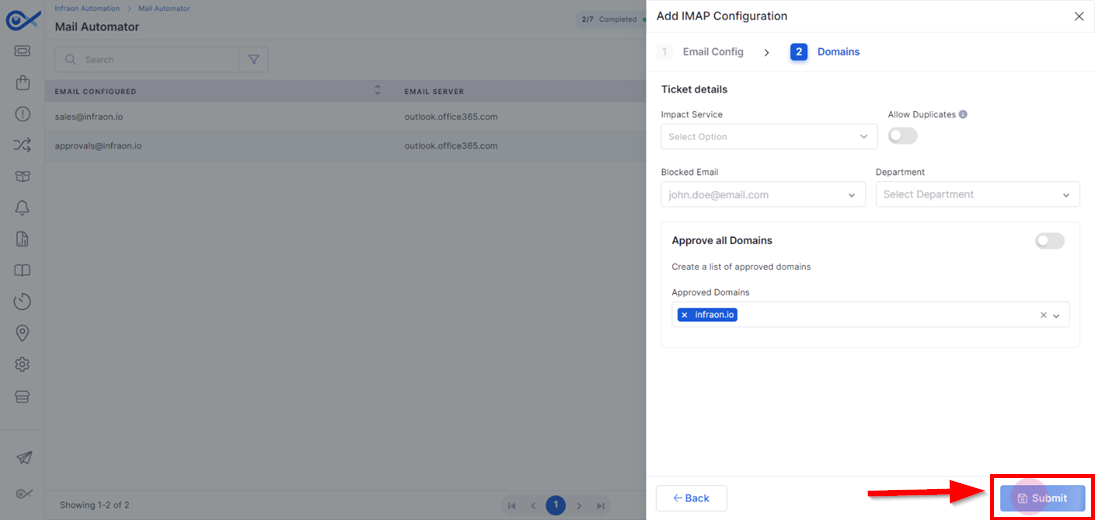
Step 8: On the domains page, add the impact services. Use the Allow Duplicate toggle button as needed. To block any email accounts, select the Blocked Email option.
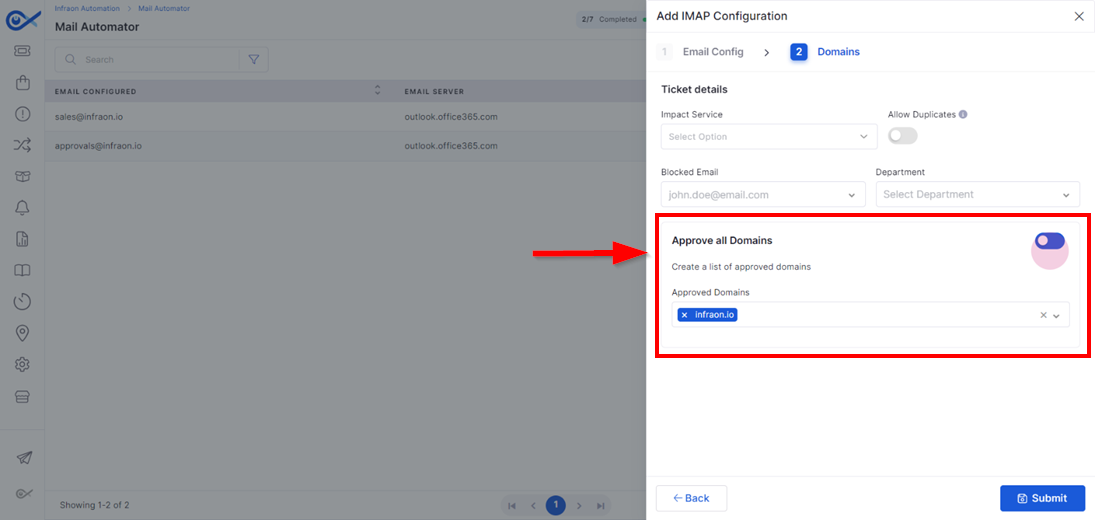
Step 9: For the "Approve all Domains" option, choose the domain ID from which tickets are to be created, or click on Approve All Domains to allow tickets from all domain IDs to be created in the administrator's portal.
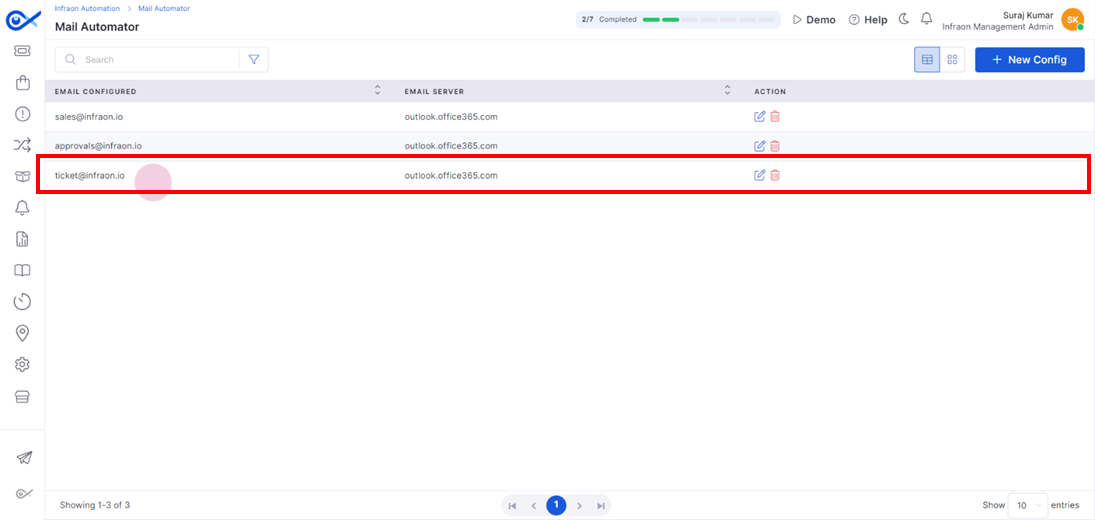
Step 10: Once the necessary configurations are made, click ‘Submit’ to add the IMAP Configuration.
Step 11: Now, admins or users can share this configured email ID with the requesters or end users to create tickets using the email-to-incident feature.
Creating Tickets as an End User
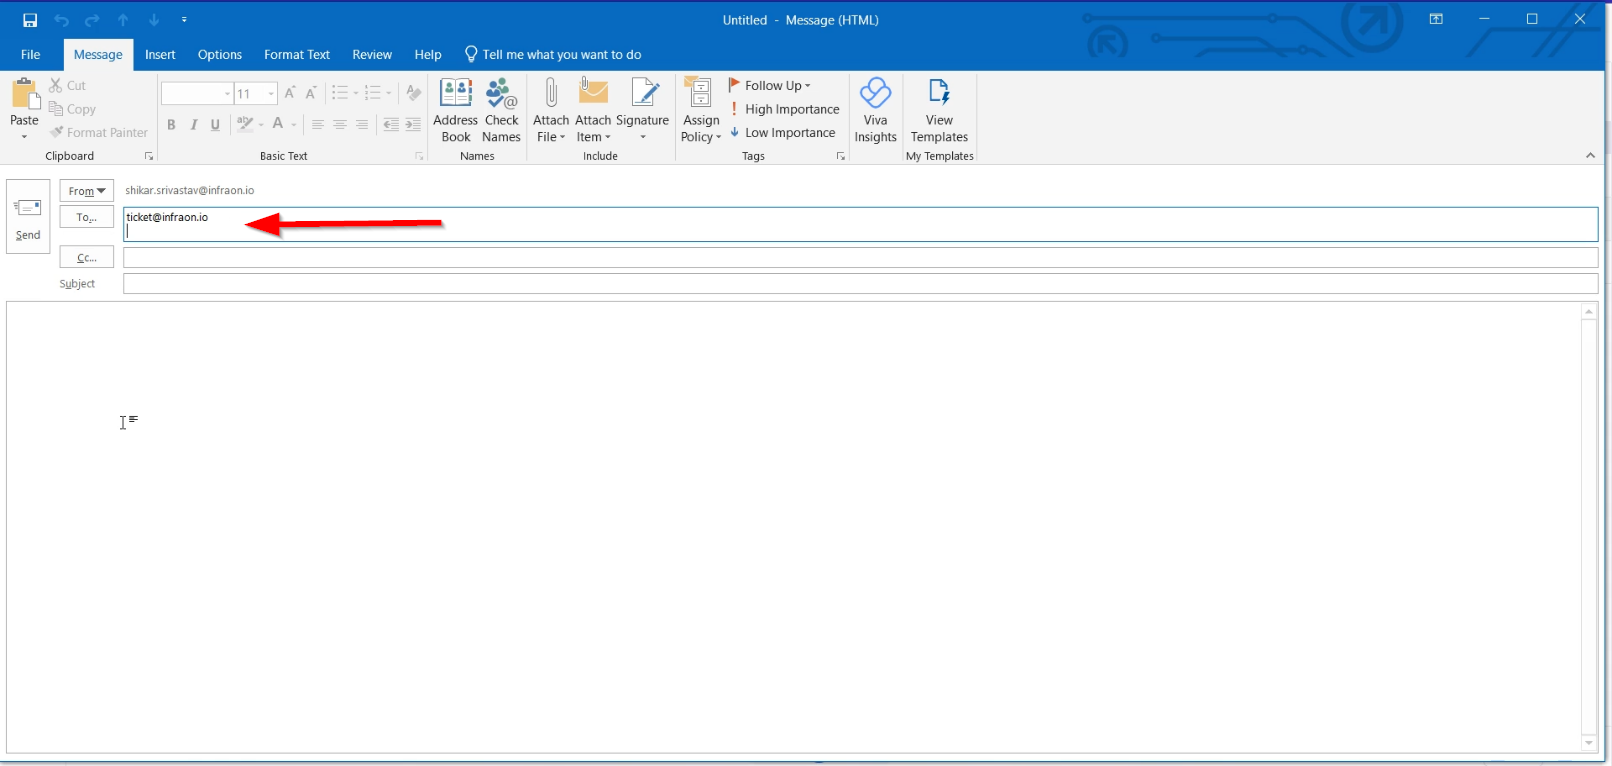
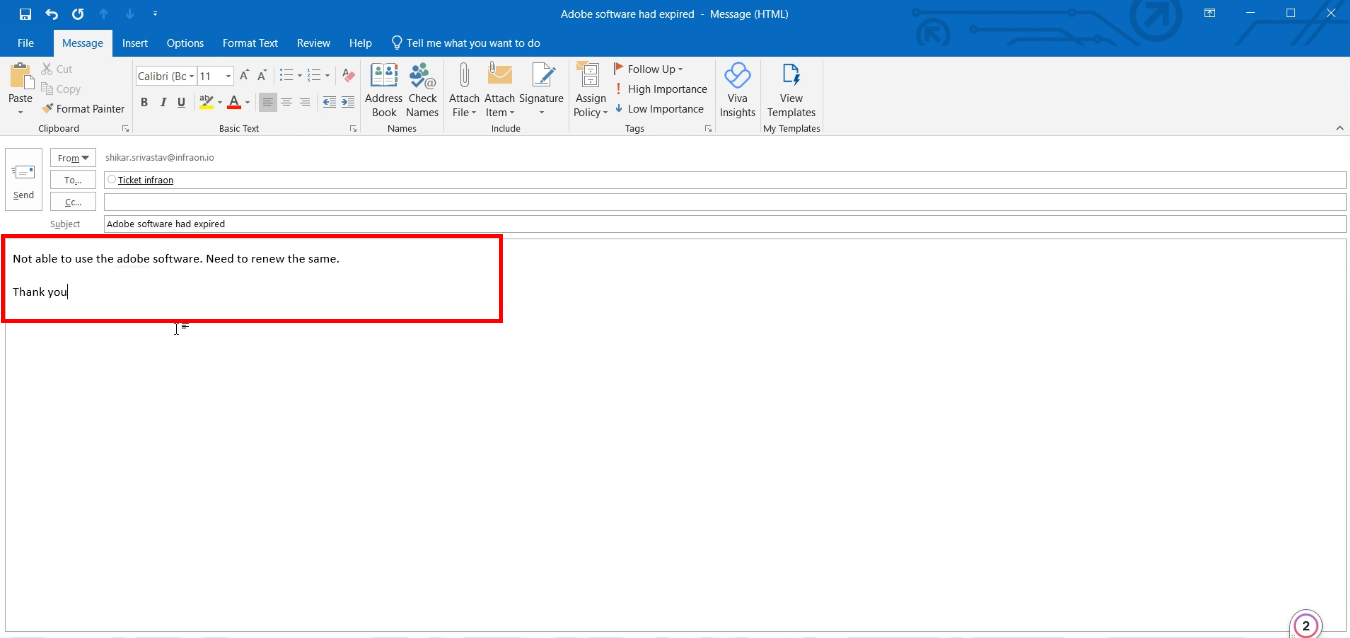
Step 1: To submit a ticket via email, compose a new email and address it to the configured email address.
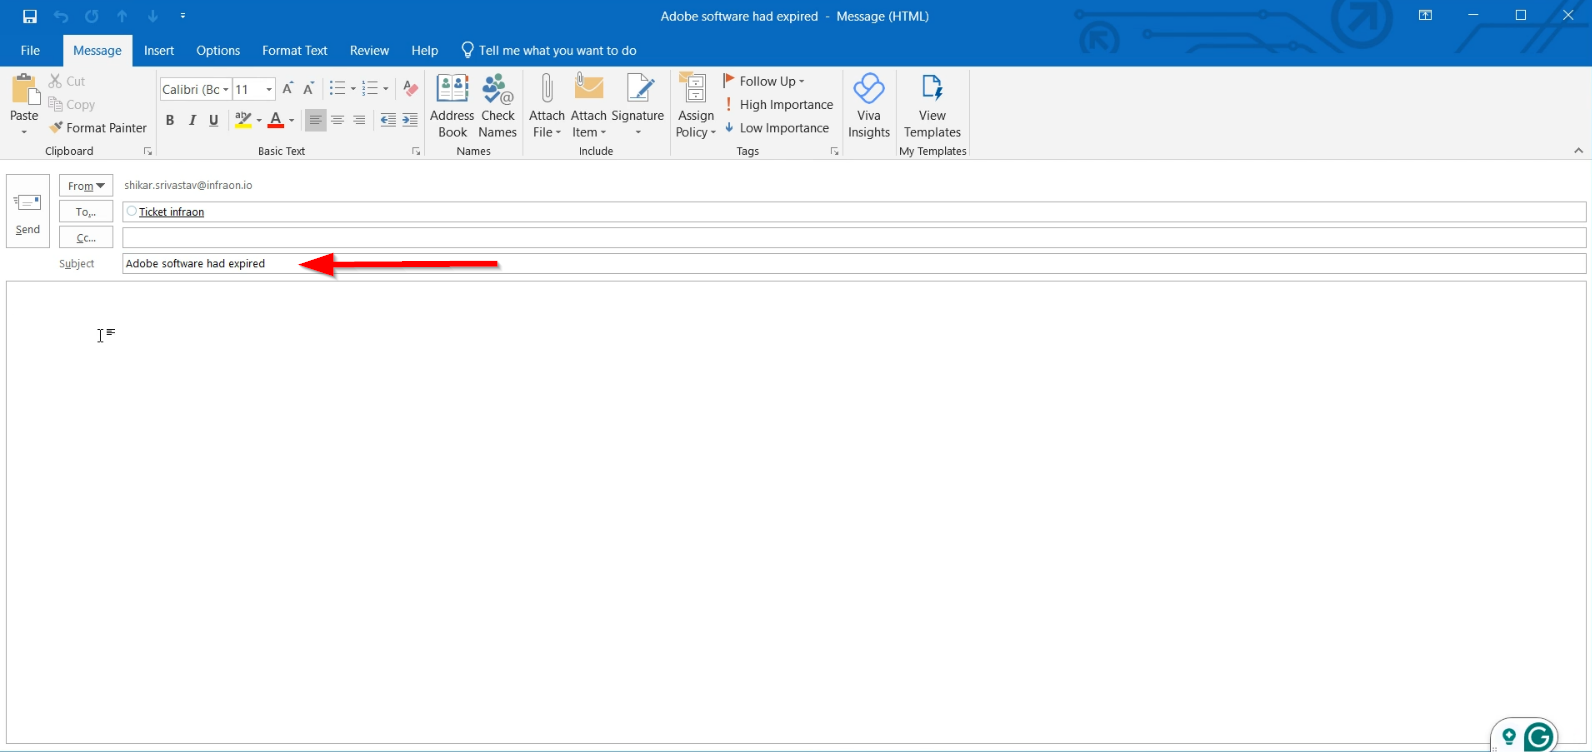
Step 2: Include a subject line for the ticket. Without a subject, the ticket won't be created in the admin portal.
Step 3: Summarize the issue for the technician. This helps the technician resolve the issue more quickly.
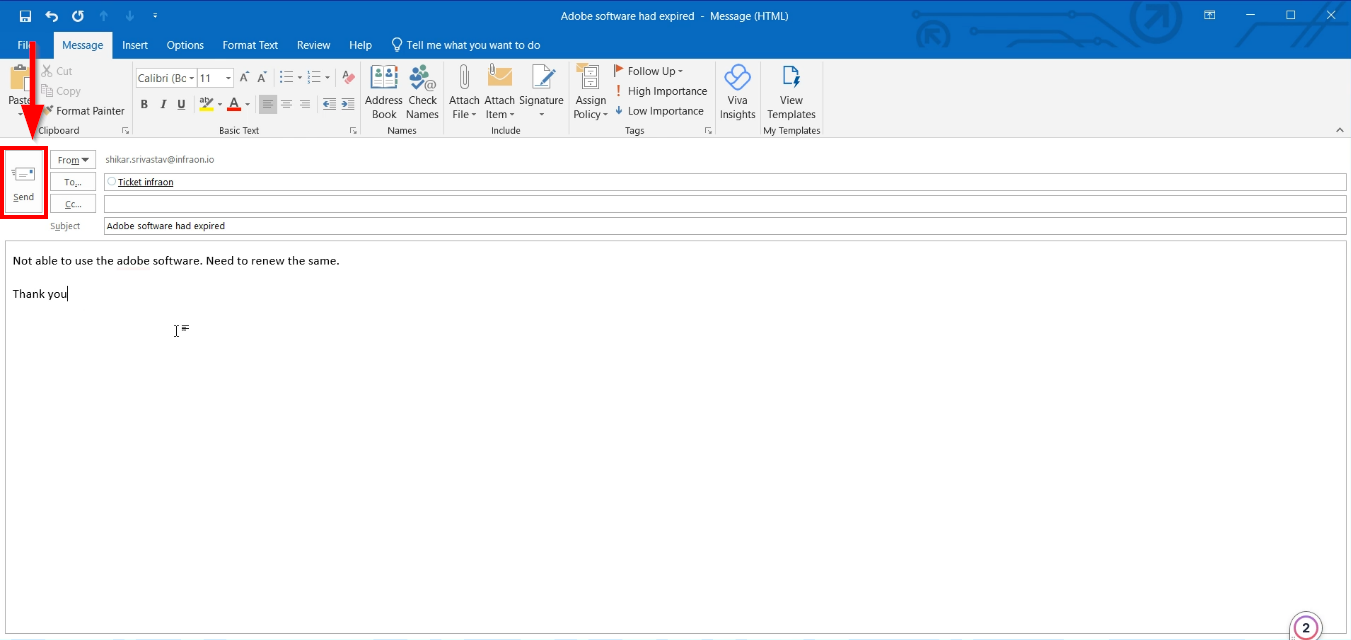
Step 4: After filling in the details, click Send.
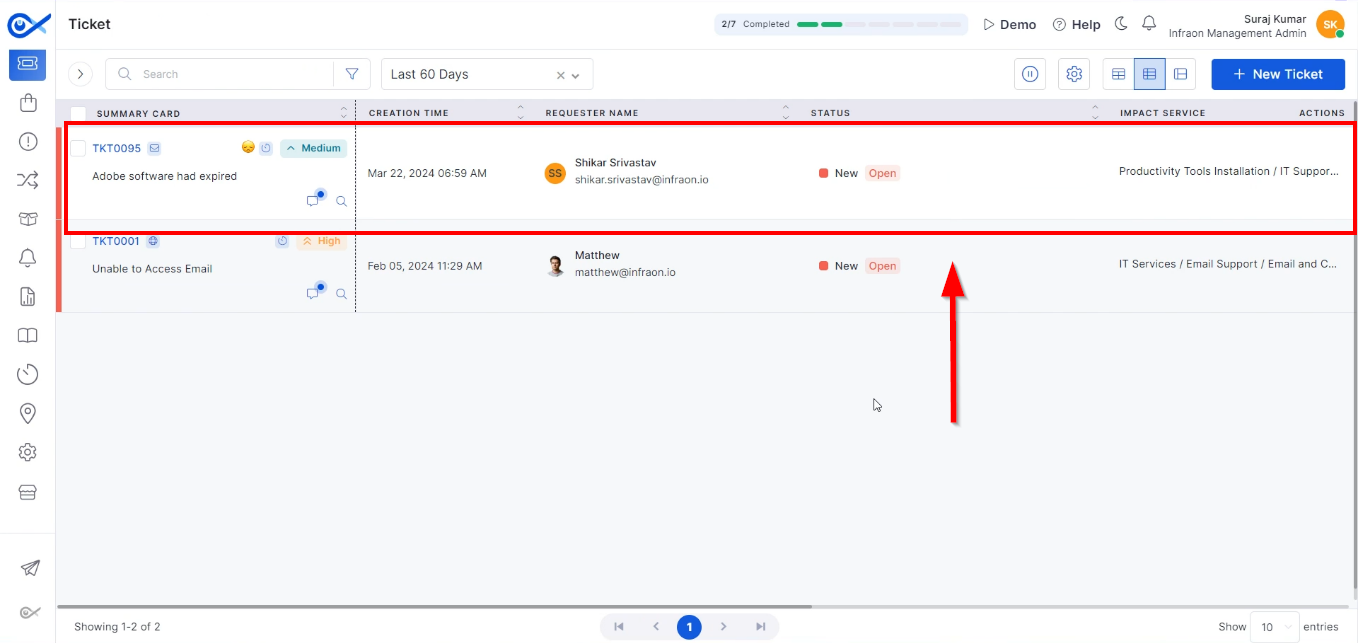
Once the email is sent, a ticket is generated in the admin portal. Technicians can see the created ticket, source (email), subject line, summary, and the requester's name.
The technician can then start working on the ticket and provide a resolution to the end user.
This process, known as "email to incident," allows the end user to send an email that is converted into a ticket in the Infraon Infinity tool.
Ticket Management
This guide provides a detailed walkthrough of ticket management within the Infraon Infinity platform. The ticketing module on the left panel is crucial for managing incidents.
In Infraon Infinity, tickets are synonymous with incidents, a term used to simplify the concept for end-users.
Understanding Incident Management
Incident management in the Infraon Infinity platform is designed to restore normal service operation as quickly as possible following an unexpected disruption or incident. An incident usually refers to an unplanned interruption or degradation of service that affects the regular operation of an IT service or system, disrupting users or stakeholders. These incidents can occur due to various factors, including hardware failures, software bugs, network issues, human errors, security breaches, or environmental events.
Discover practical applications of our modules with step-by-step guides. This section features cards for different modules, providing detailed walkthroughs to help you effectively utilize each component of our platform.
Dashboard
Assets Management
Ticket Management
IMACD
IT & Fixed Asset
This guide explores the sub-modules of the Infraon Infinity platform's Assets.
IT assets, or IT nodes, are devices with an IP address. These encompass servers, routers, storage devices, transport devices, wireless controllers, and access points.
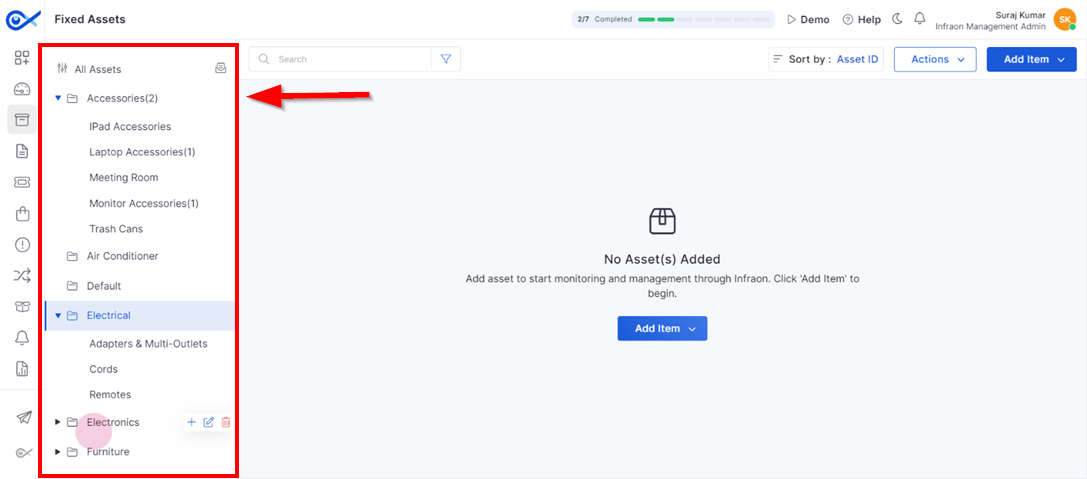
On the other hand, Fixed assets are tangible devices used in an organization's operations. Examples include scanners, fax machines, printers, modems, hubs, and air conditioners.
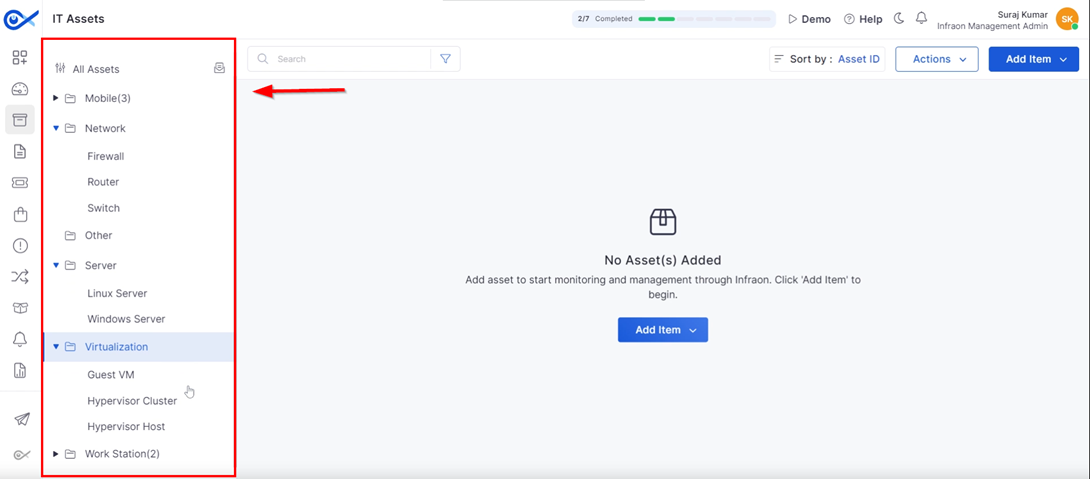
IT Assets
Clicking on the IT asset will display categories on the left panel, sorted by device type. Infraon maintains a comprehensive inventory of each asset. These categories help differentiate and filter assets based on their type.
The system employs a hierarchical structure to categorize IT assets.
Primary categories include:
Network
Other
Server
Virtualization
Workstation
Certain categories contain subcategories for more detailed classification.
Users can further refine their asset search by exploring the subcategories within each category.
The next guide will demonstrate how to add categories.
Category
Add a Asset
Miscellaneous
Asset Categories
This guide will explore the asset categories in the Infraon Infinity platform.
Creating a New Category
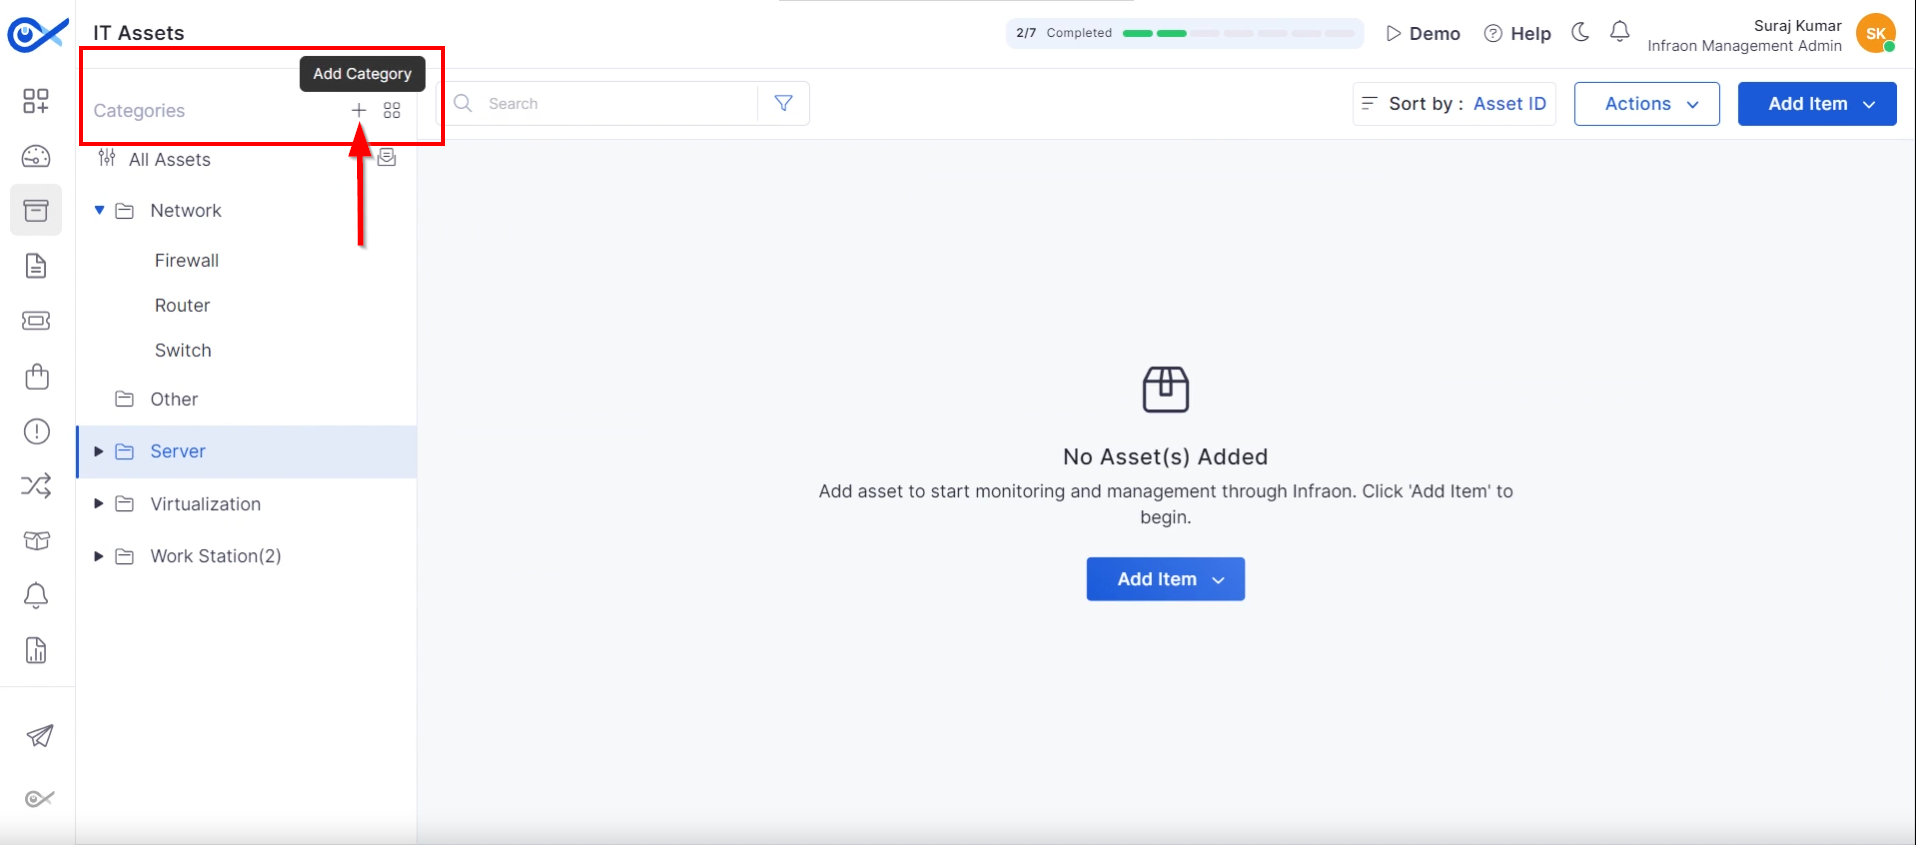
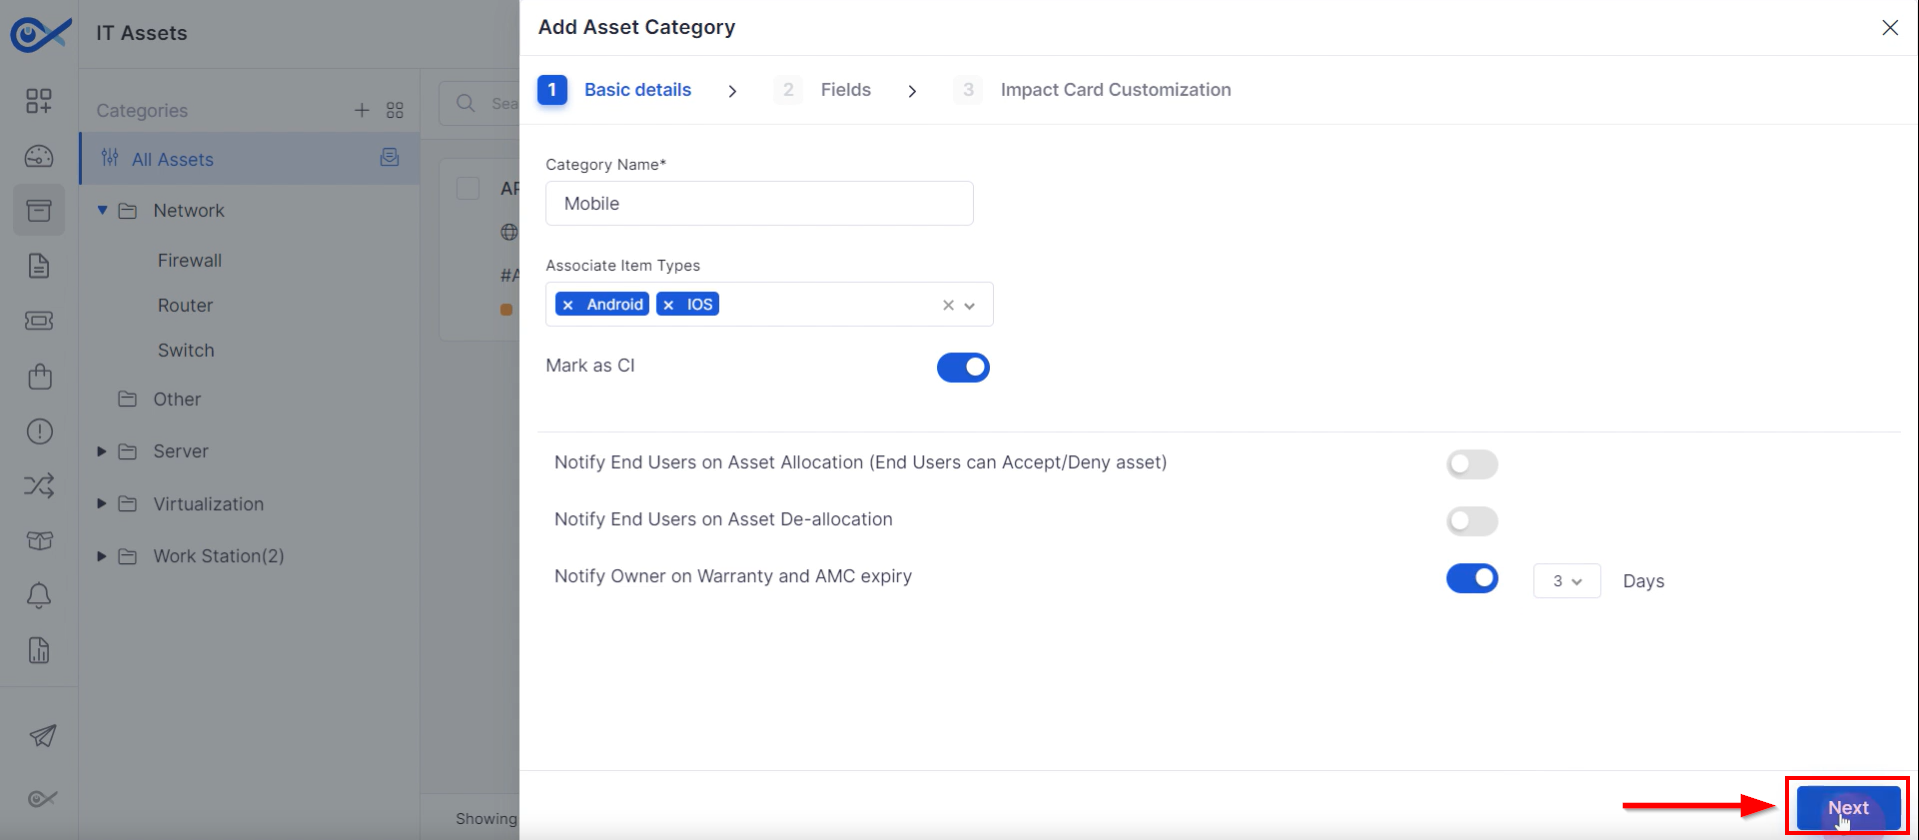
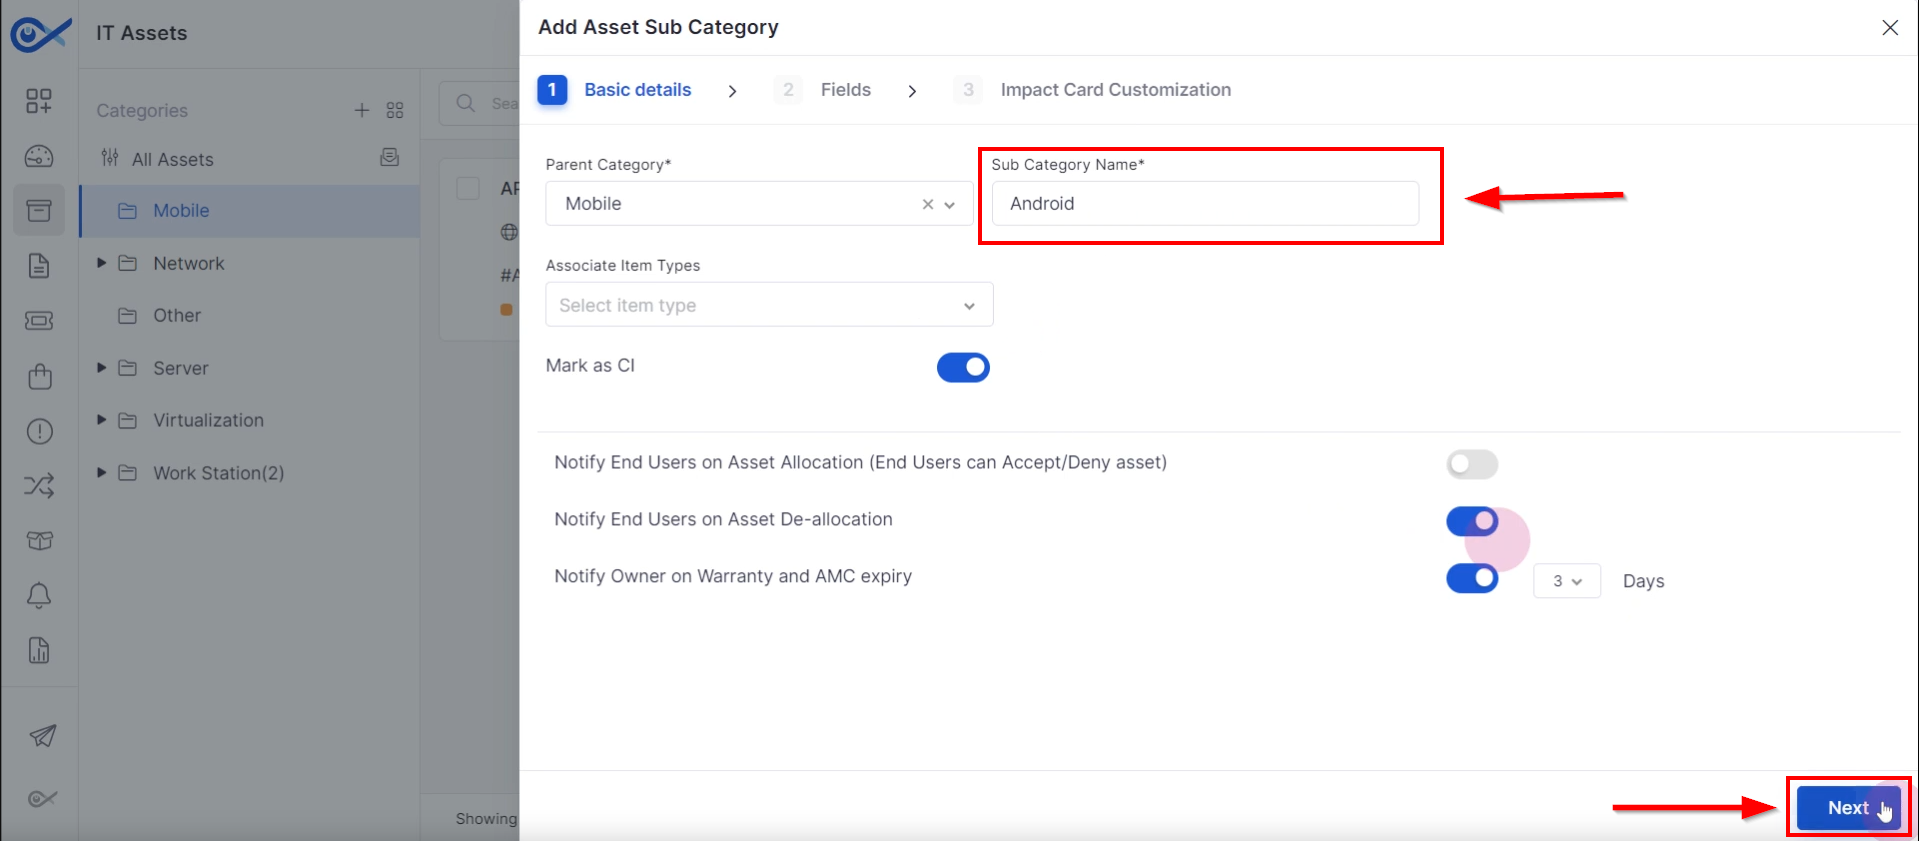
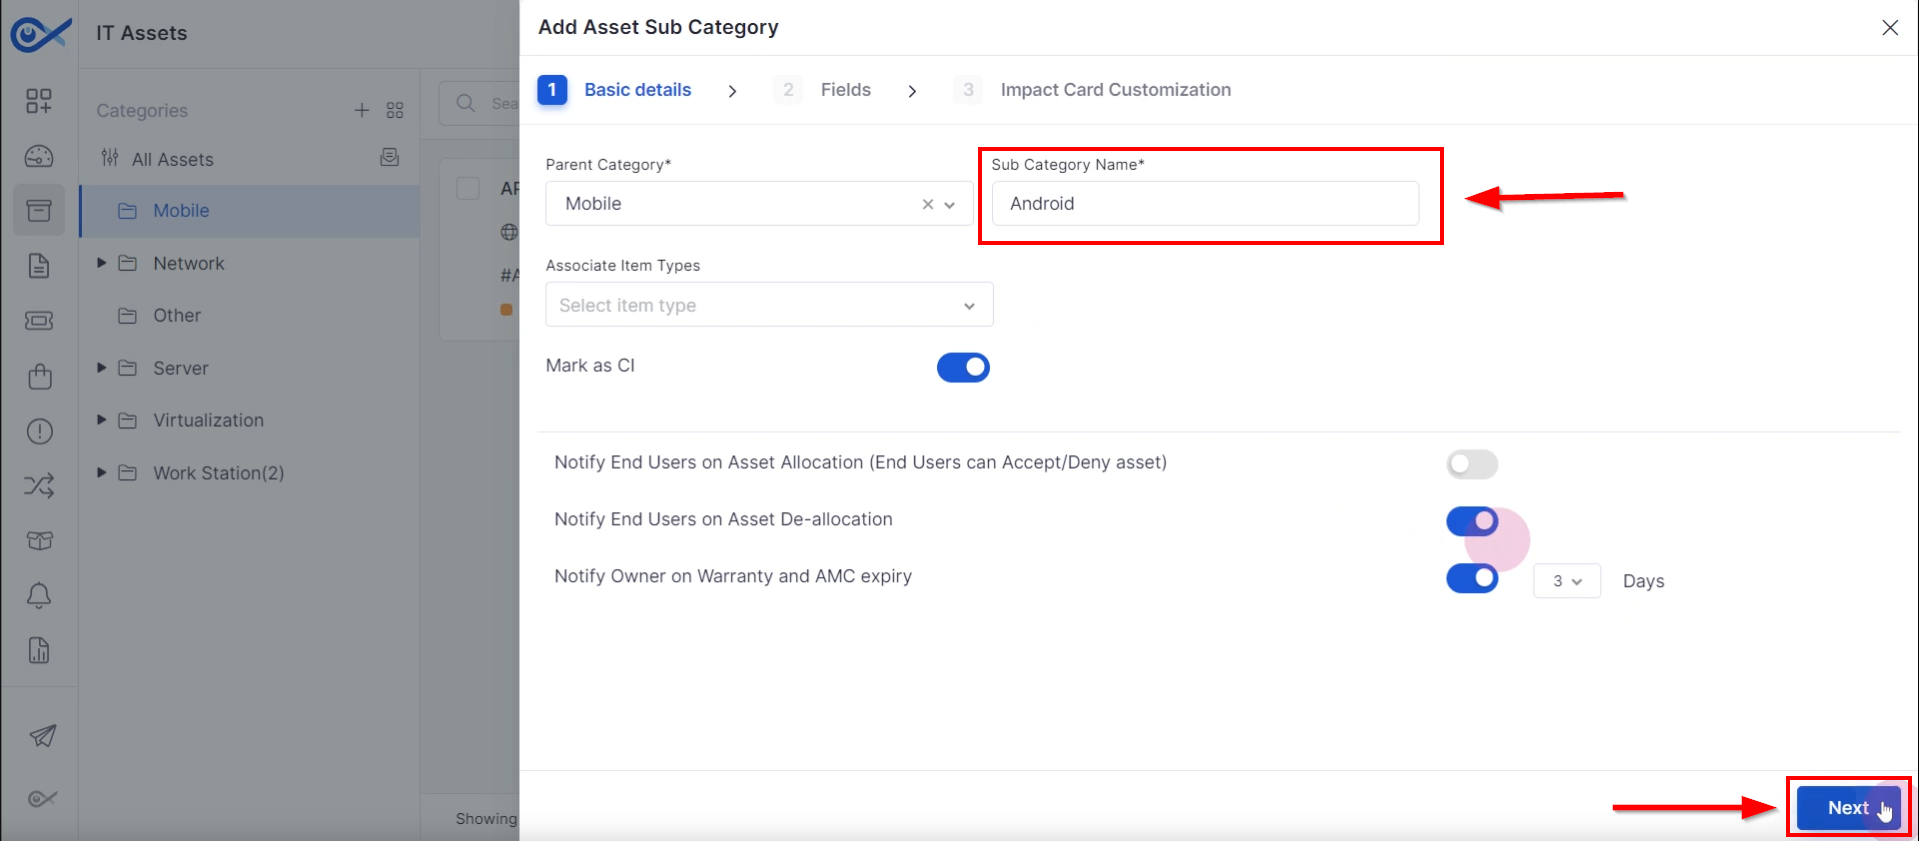
Step 1: Create a new category by clicking the "plus" icon. Clicking the indicated icon will open the asset category creation form.
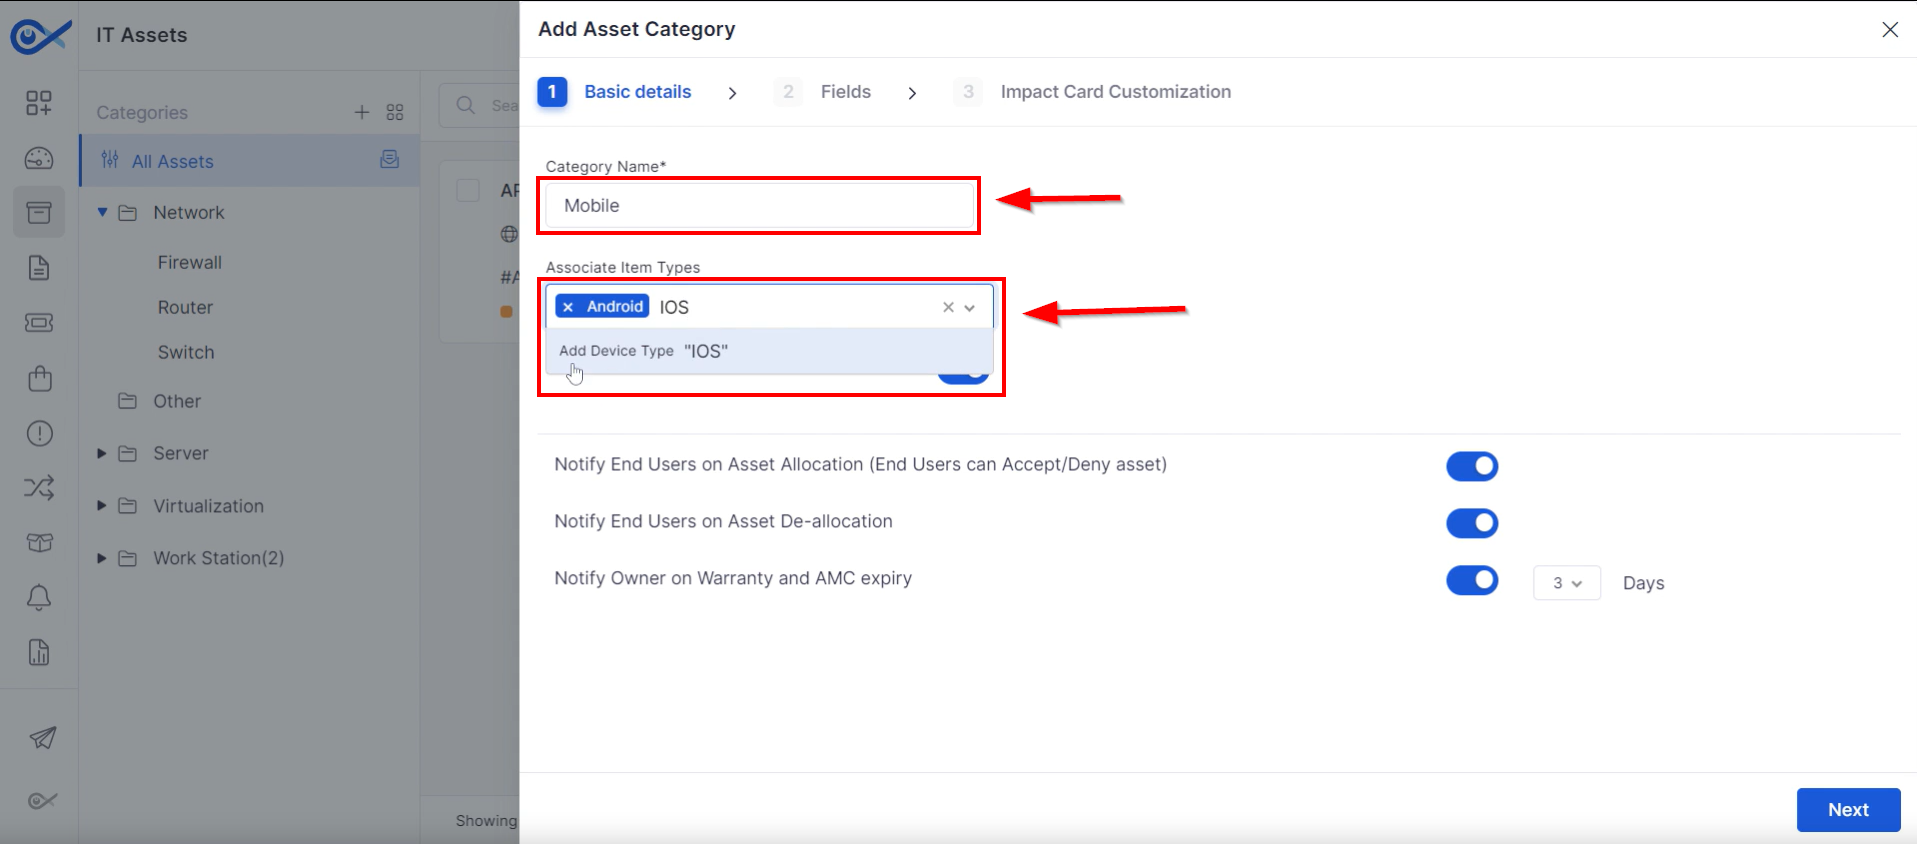
Step 2: Enter a name for the category and specify associated item types (e.g., Android). Clicking "Add a device" will include specified item types in the category.
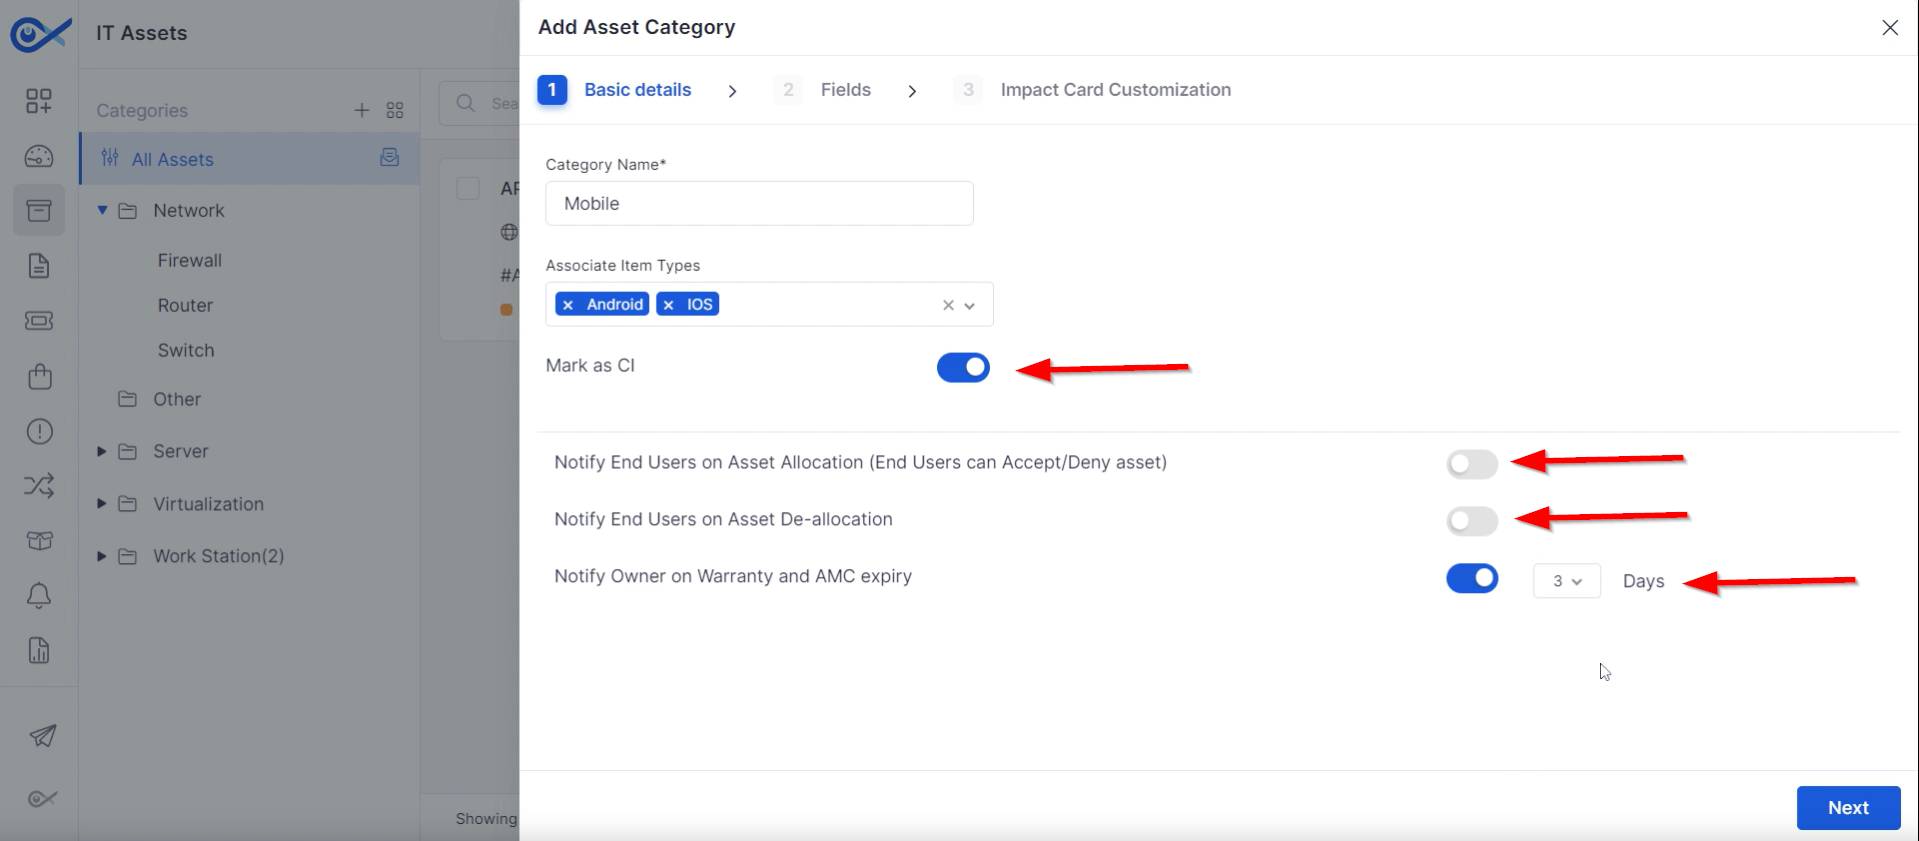
Step 3:Configure basic details:
Enable the “Mark as CI” option to include the asset in the CMDB configuration page.
Select whether to send email notifications to asset requesters by notifying end-users of asset allocation.
Determine if an acknowledgment email should be sent upon asset deallocation.
Choose whether to send notifications for upcoming warranty or AMC expiration.
Step 4: Click "Next" to access the field configuration stage.
Configuring Category Fields
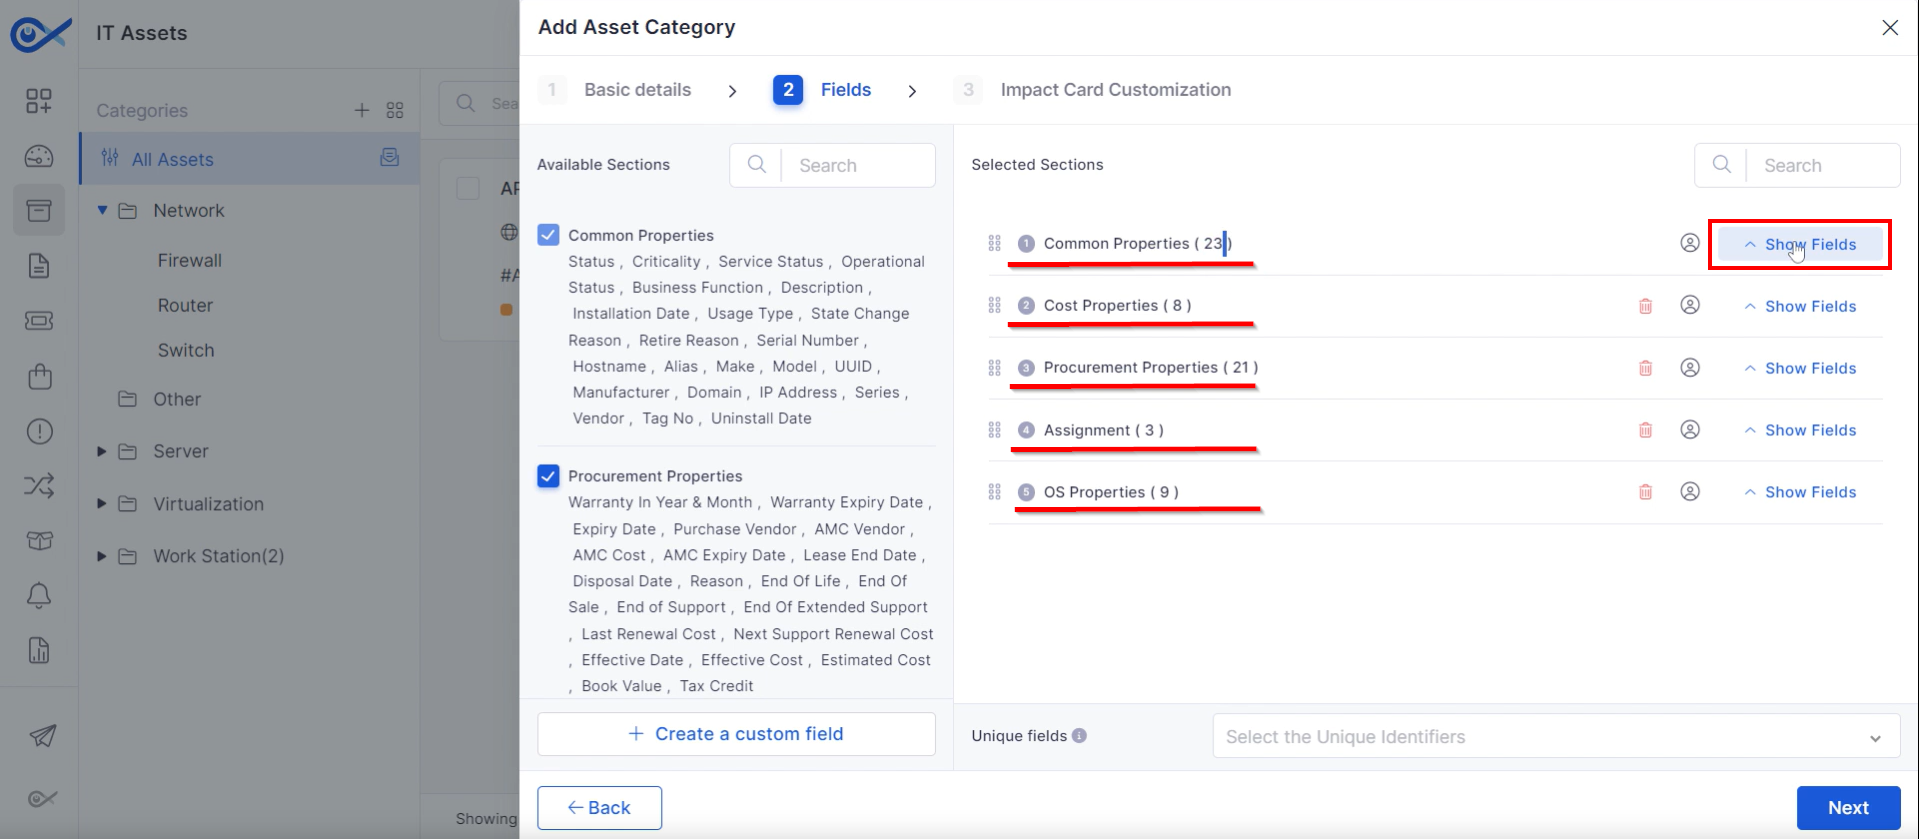
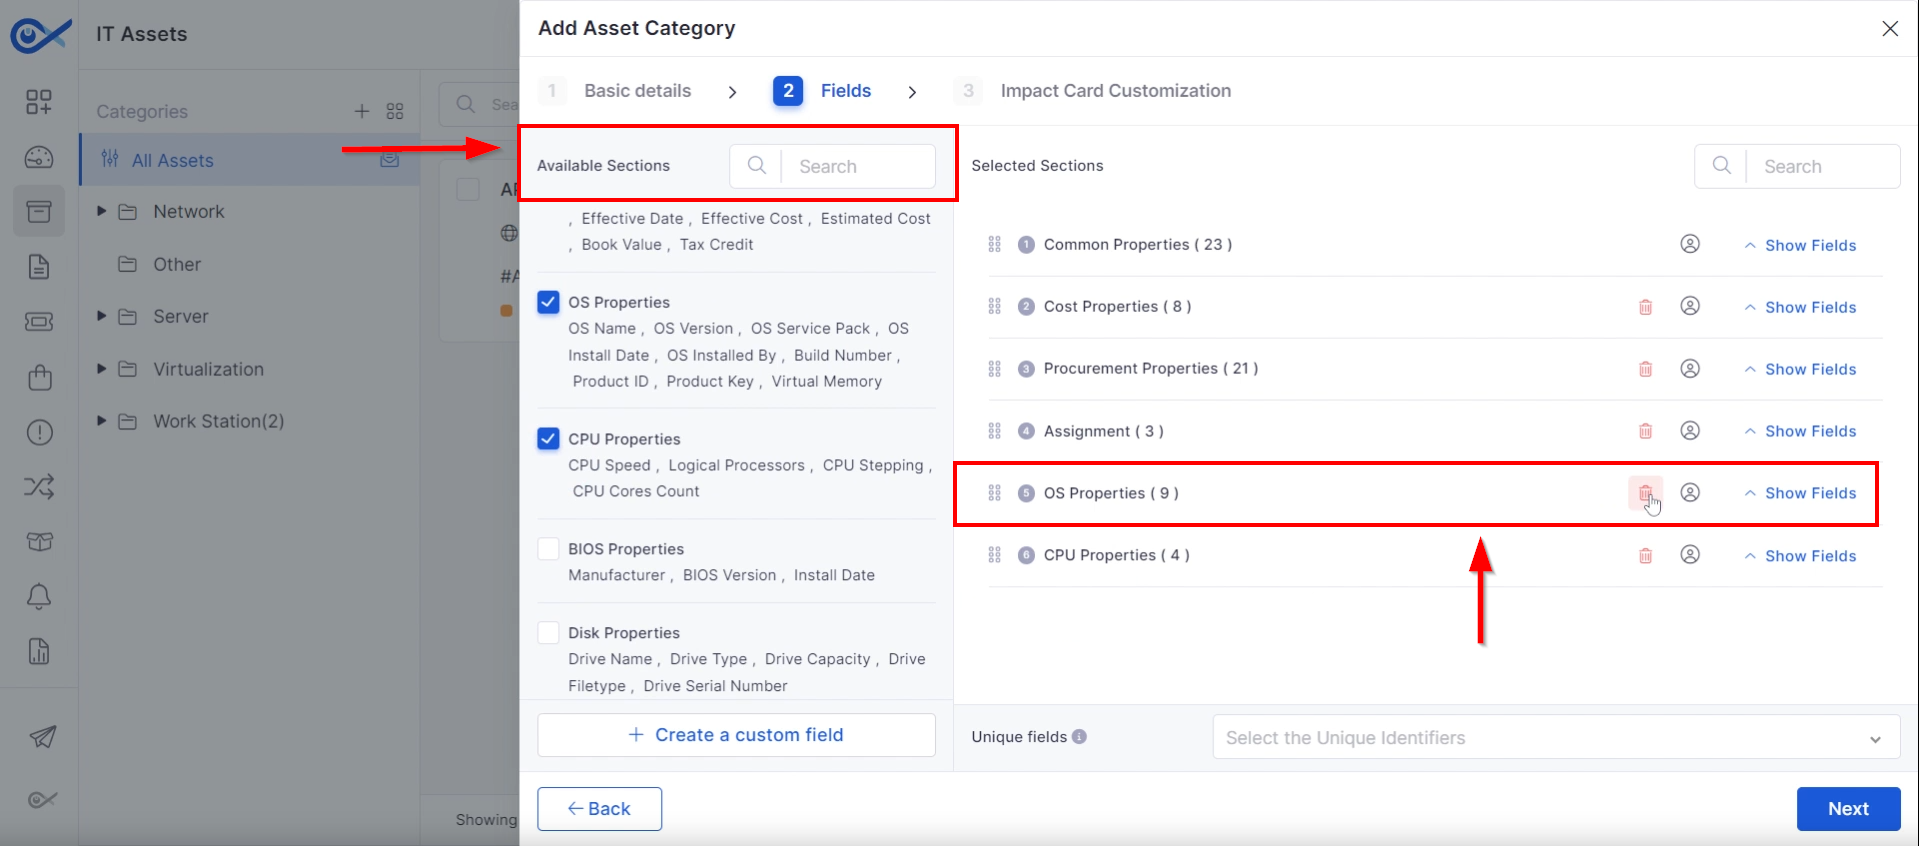
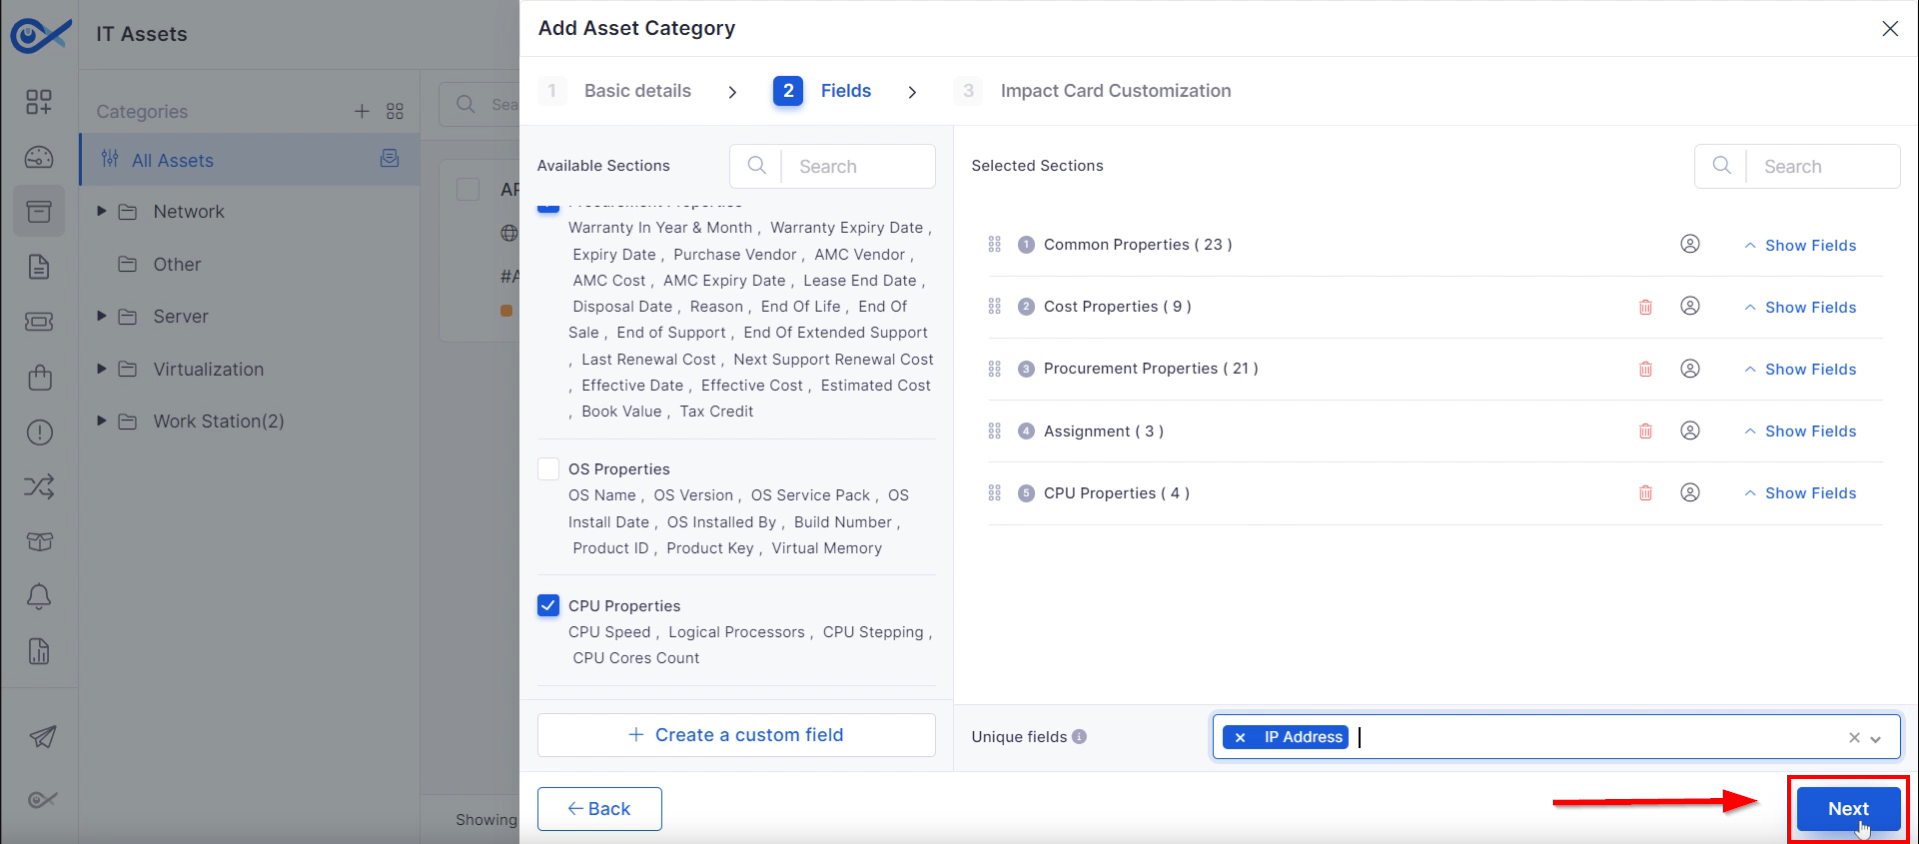
Step 1: Choose from Common, Cost, Procurement, Assignment, and OS properties. Clicking "Show Fields" at the extreme right panel will display the available input fields (status, criticality, model, serial number, etc.).
Step 2:Configure field properties:
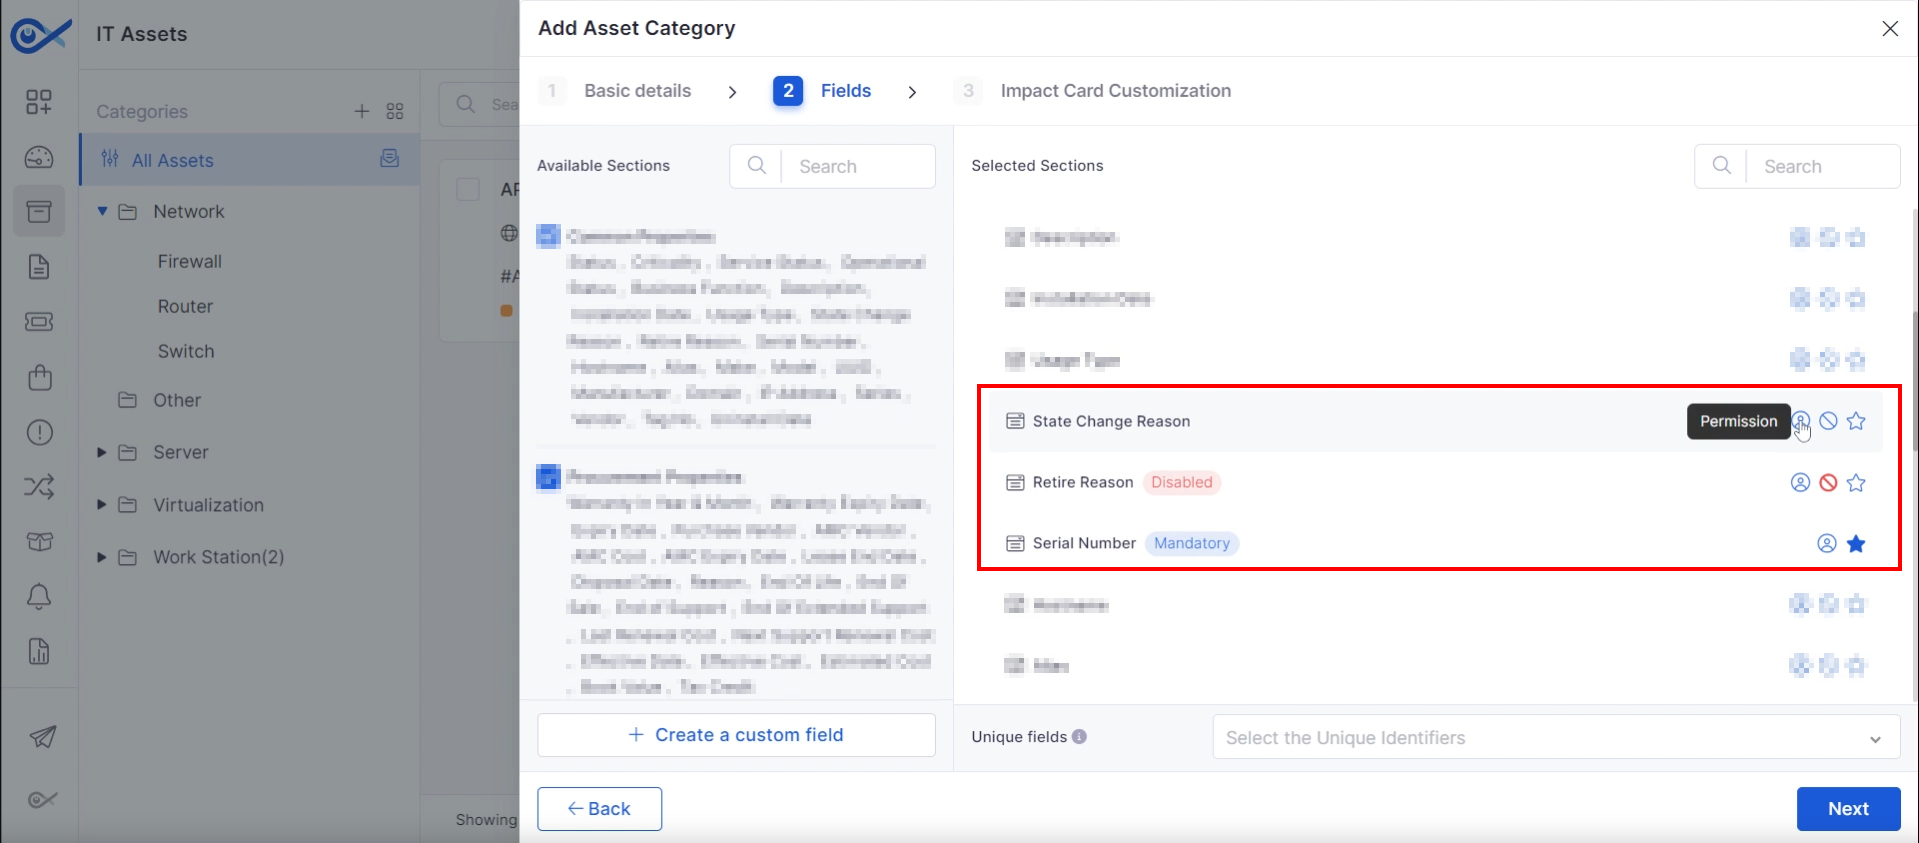
Mark fields as mandatory using the "Mandatory" icon.
Prevent field modification by clicking the disable icon.
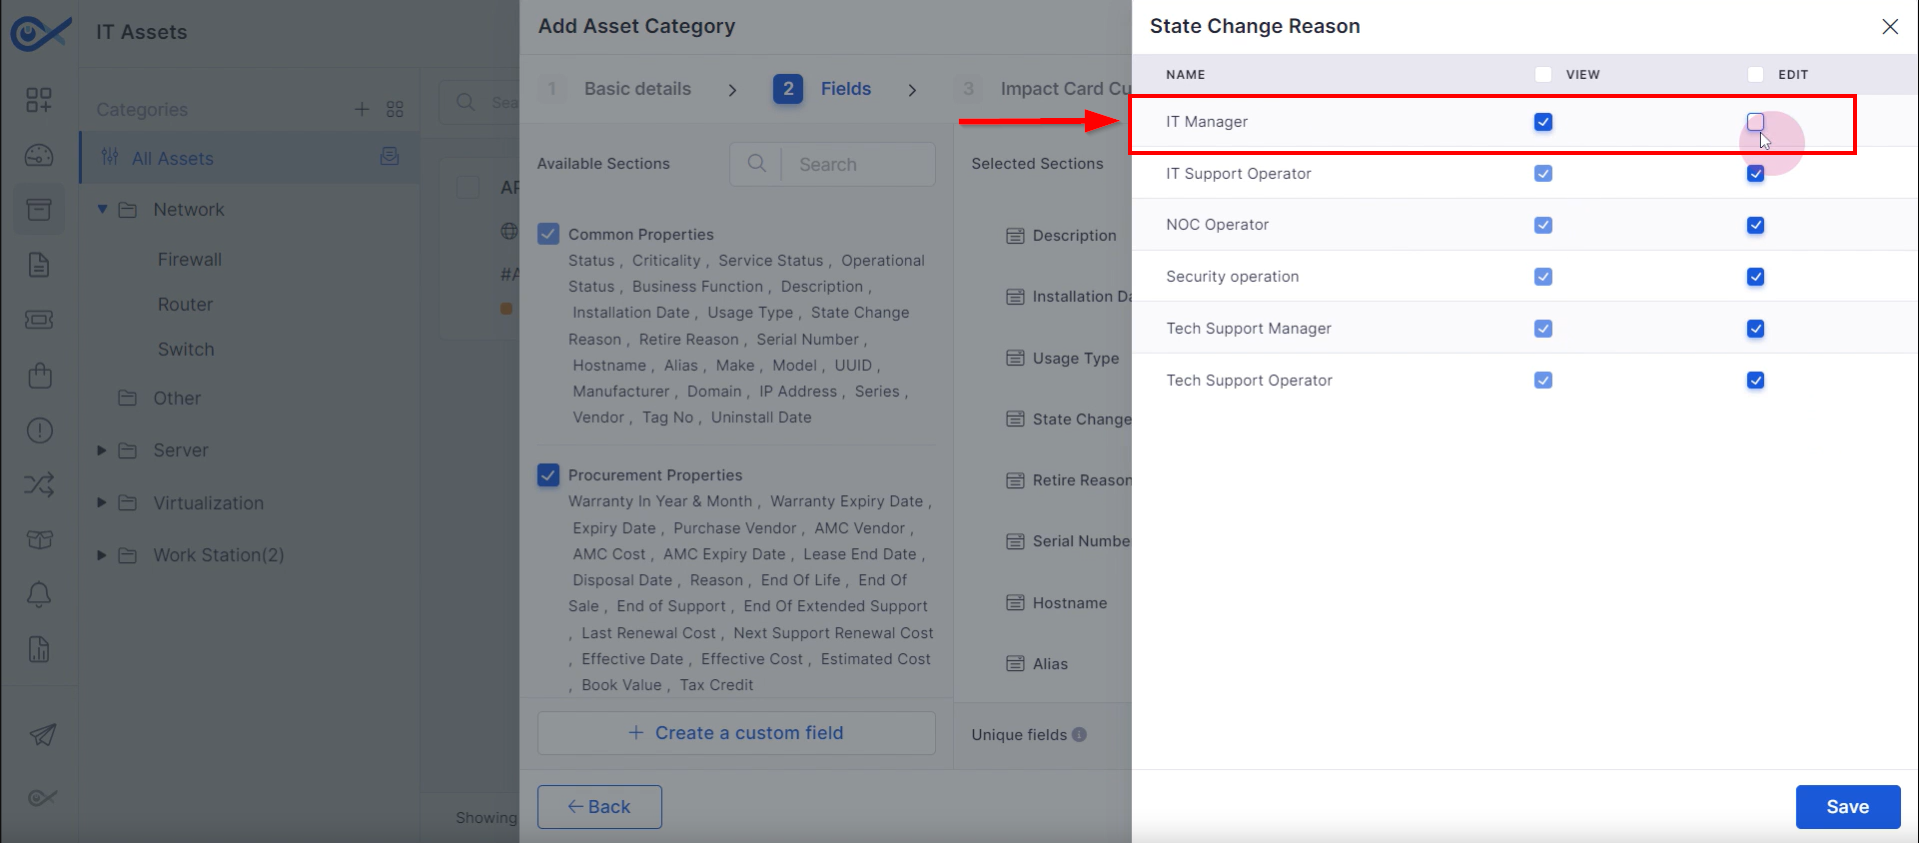
Control field visibility and editing rights using the "Permission" option.
Selecting the “Permission” option opens a popup displaying user roles and their associated permissions. Technicians can adjust these permissions by checking or unchecking the corresponding boxes.
Step 3:Editing custom fields:
The left side of the interface features “Available sections,” which lists both default and custom field categories provided by Infraon. These categories can contain various property sections that technicians can add as needed. To include or exclude specific sections, check or uncheck the corresponding boxes.
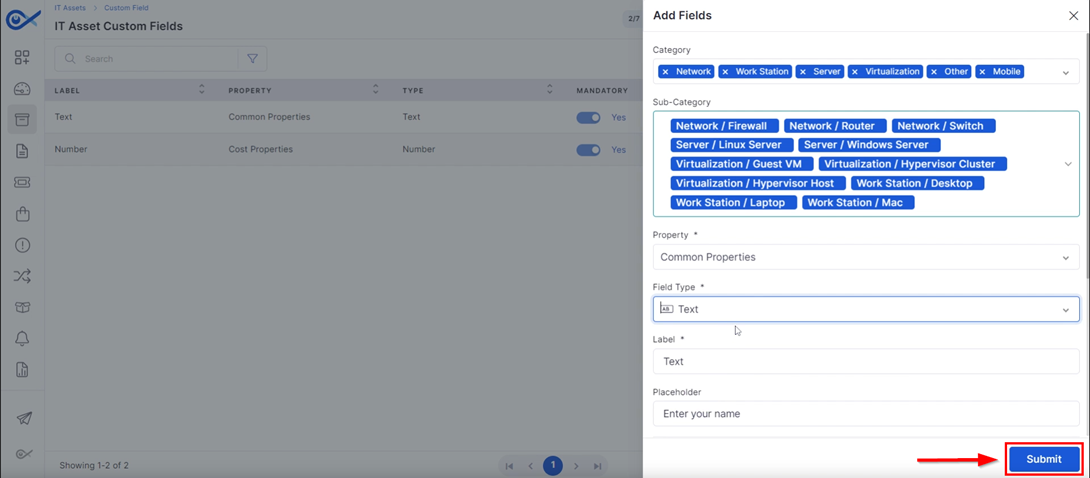
Step 4:Create custom fields:
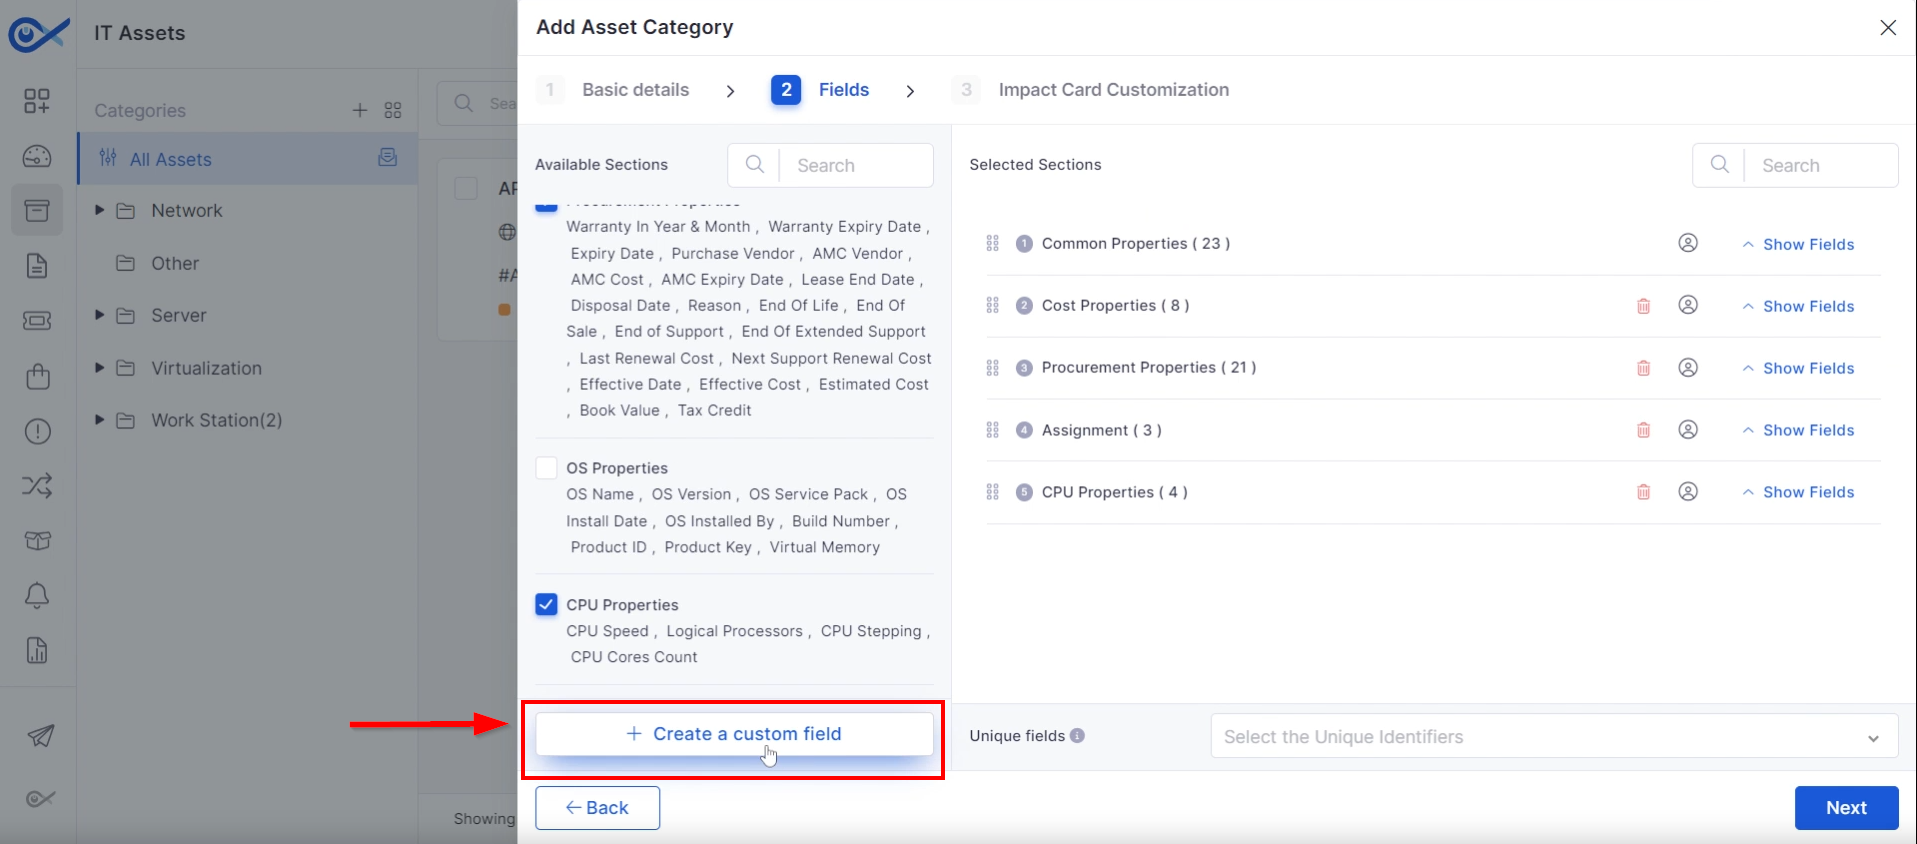
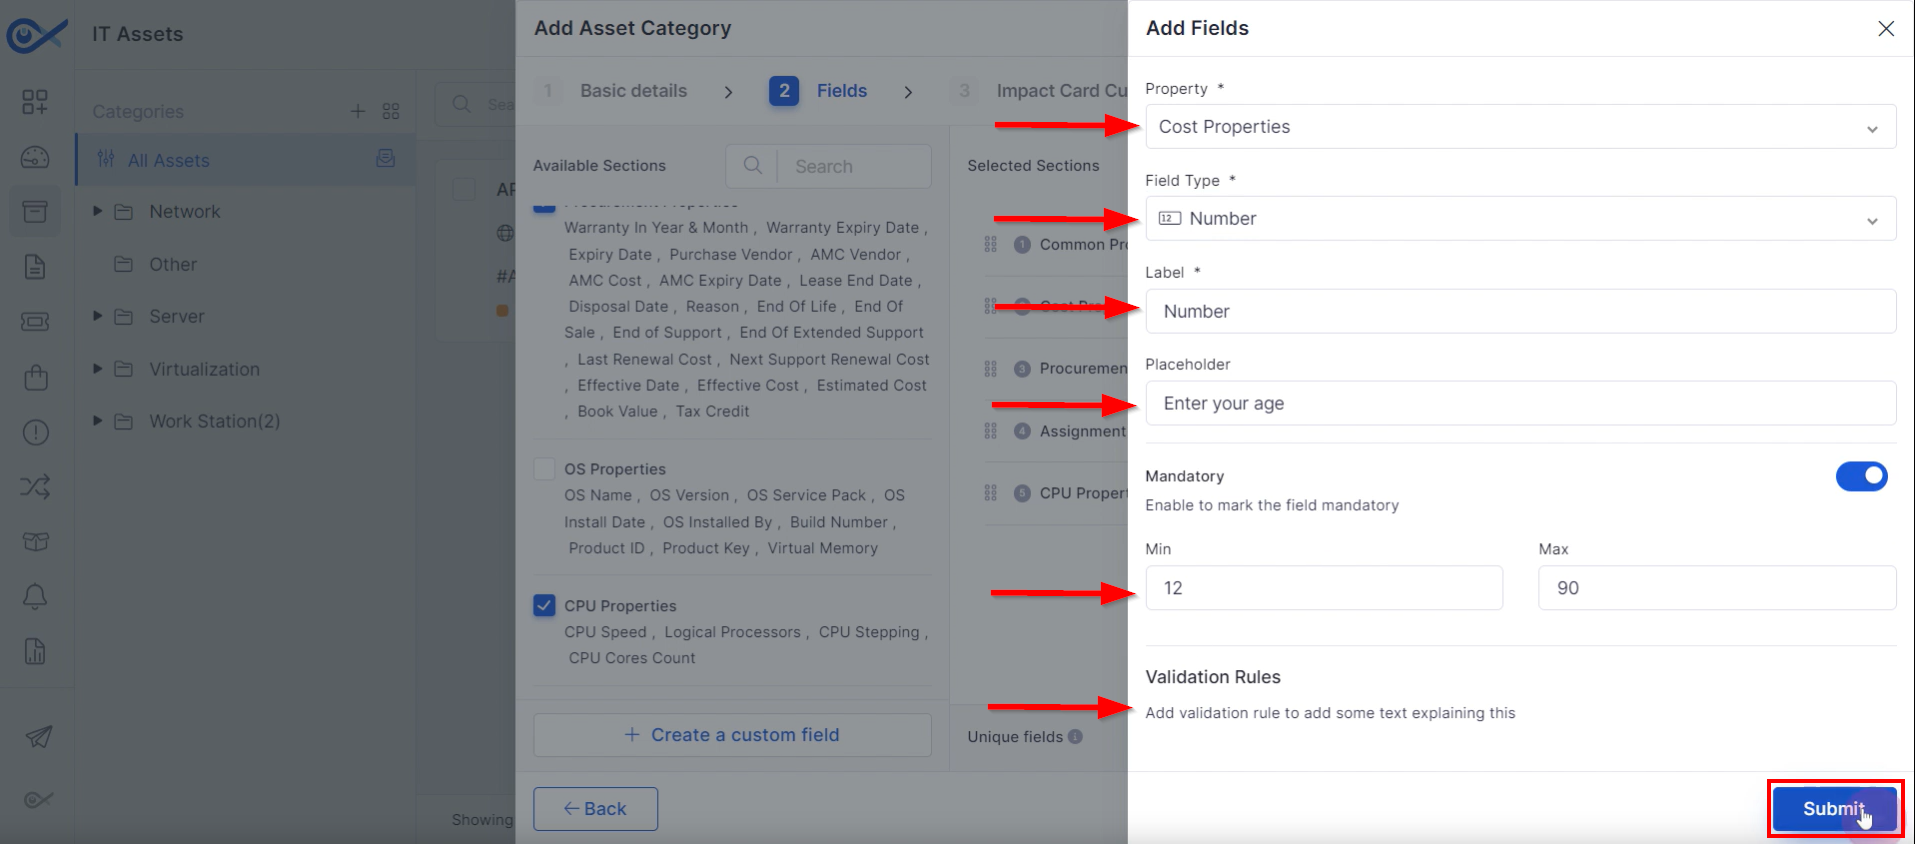
Click "Create a Custom Field" to define new fields.
Select the property type (cost, procurement, assignment, CPU).
Choose a field type (email, text, dropdown, etc.).
Configure field label, placeholder, and mandatory status.
Set validation rules as needed.
Associate the custom field with selected categories or subcategories.
Unique Fields
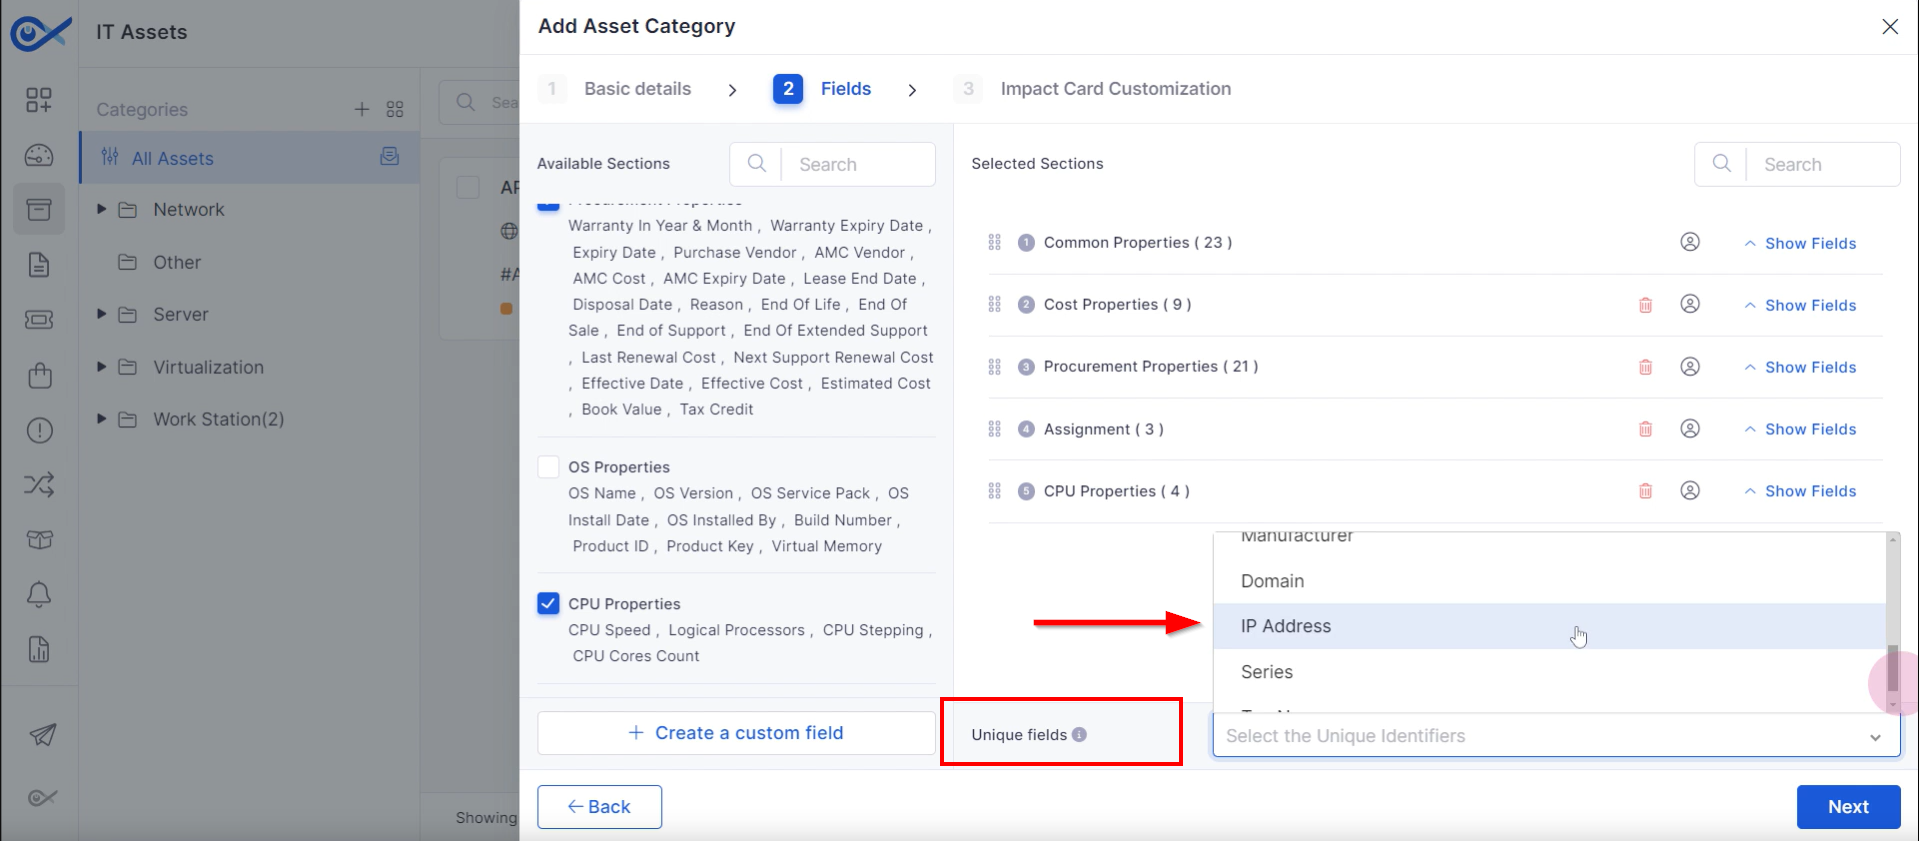
Step 1: To prevent duplicate entries within a category, technicians can choose a unique identifier from the dropdown menu. Available options include serial number, hostname, alias, make, model, UUID, manufacturer, domain, IP address, series, or tag number.
Selecting one of these identifiers guarantees data uniqueness within the category.
Step 2: Once the selection is made, click “Next” to continue.
Impact Card Customization
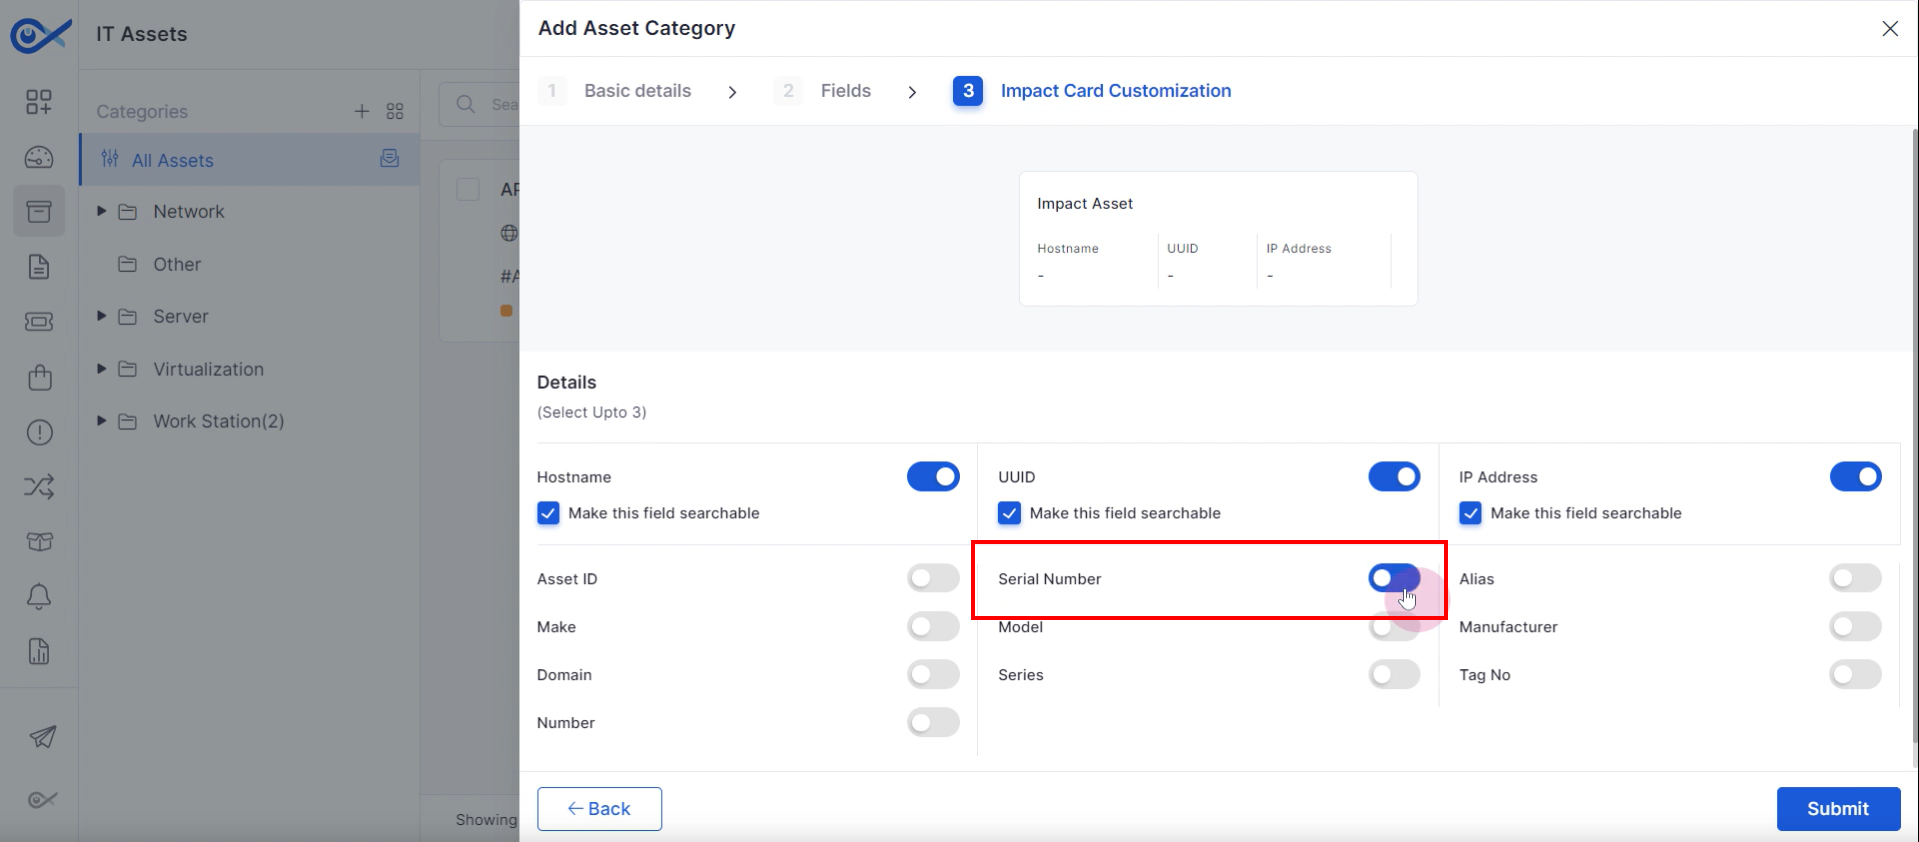
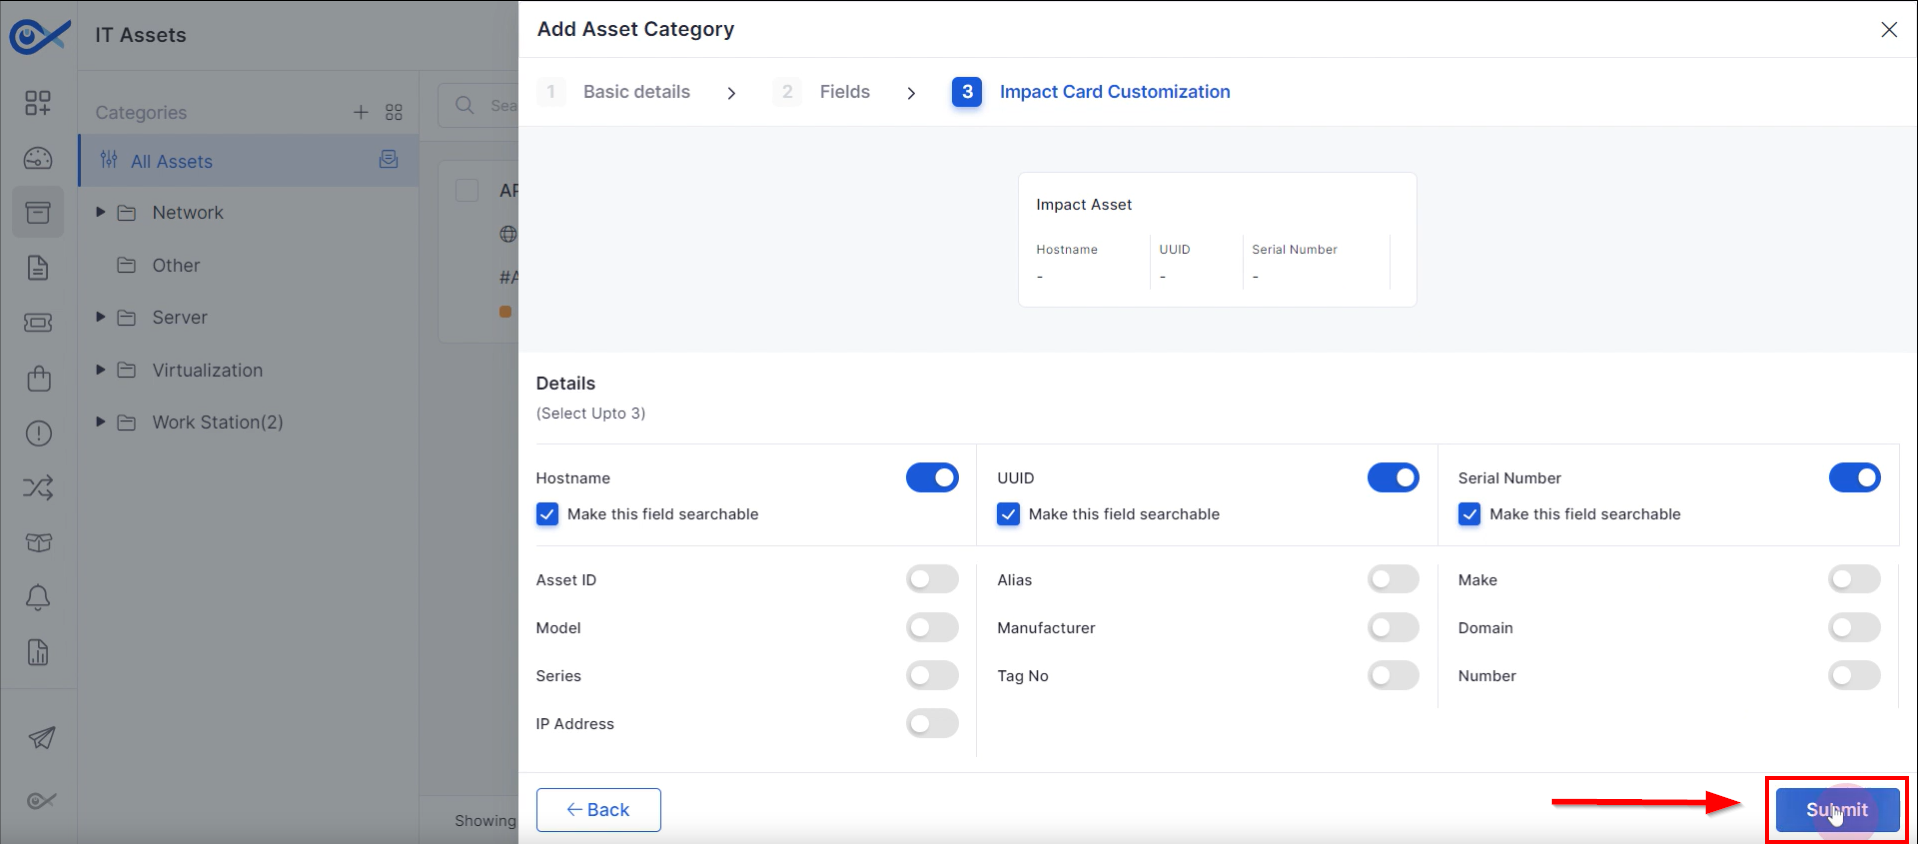
Step 1: Choose up to three fields (hostname, UUID, IP address) to display on the impact card.
Step 2: Click "Submit" to save the impact card configuration.
Creating Subcategories
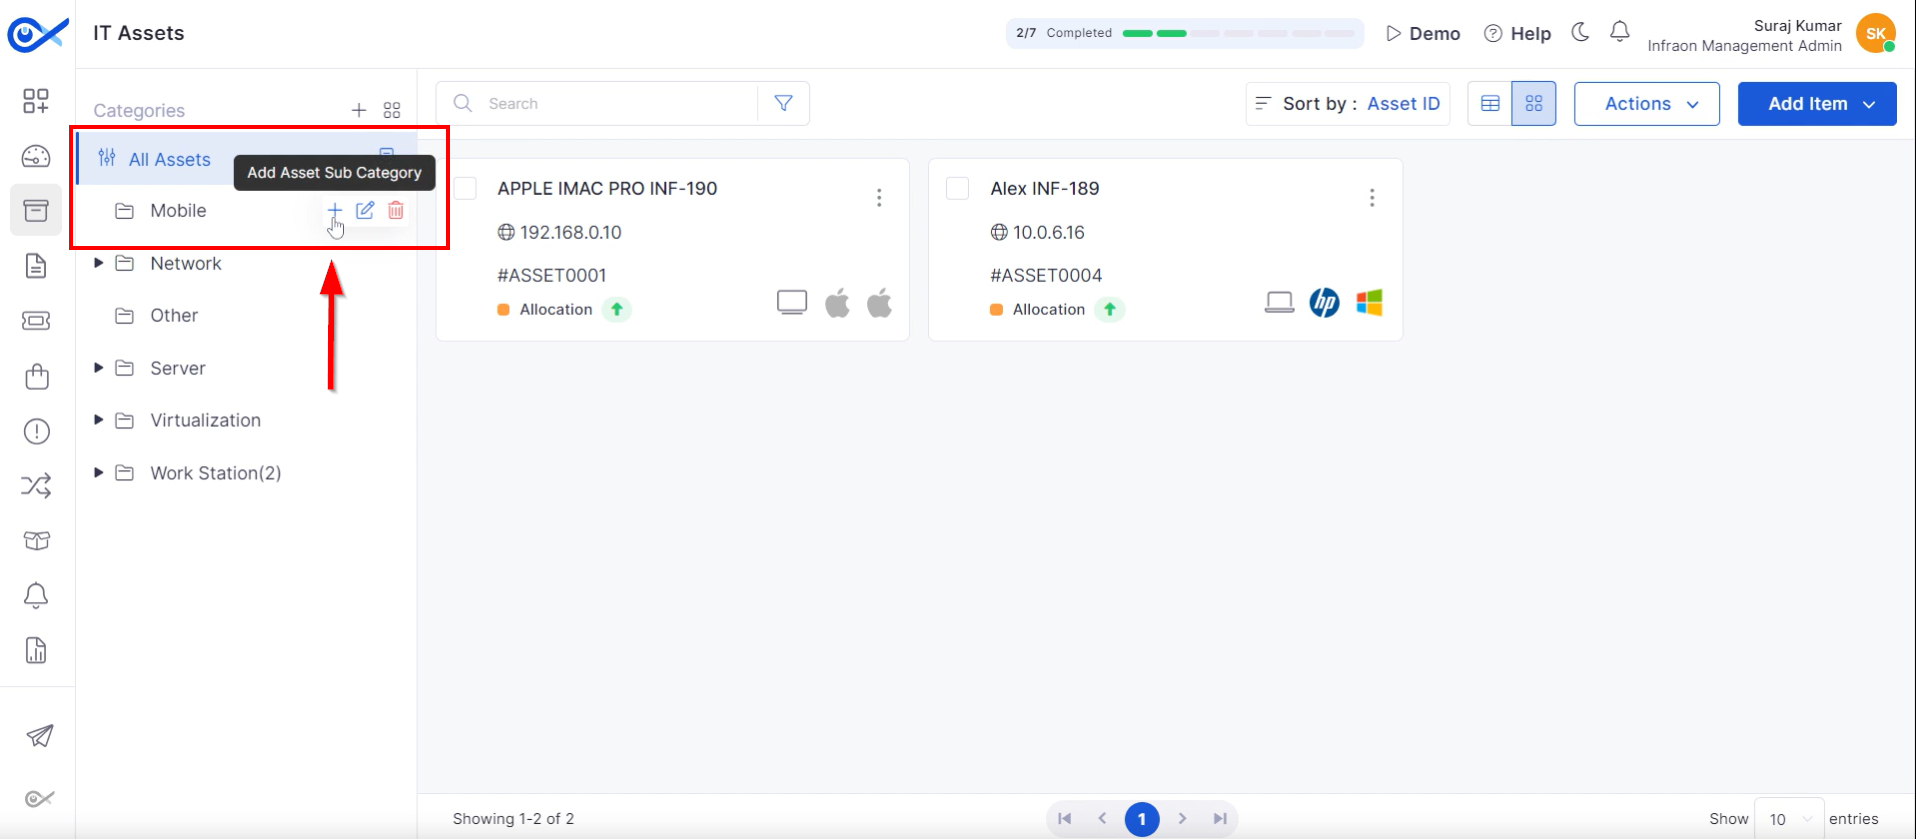
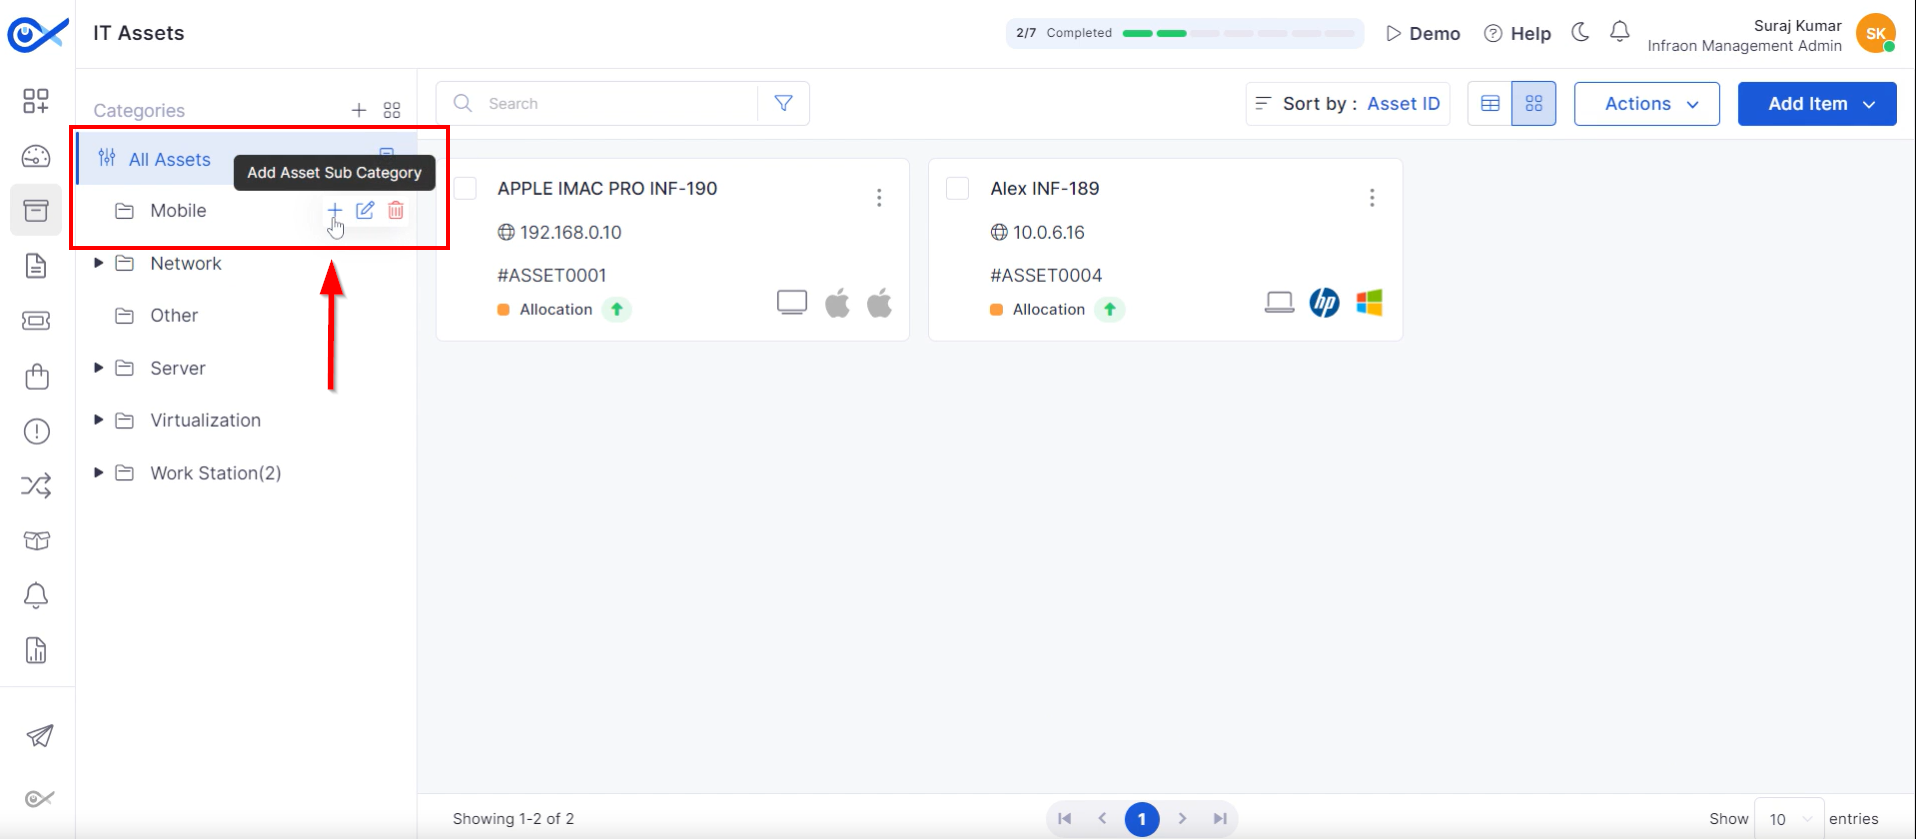
Step 1: Click the "plus" icon within the parent category to Add a subcategory.
Step 2: Enter an ID and name for the subcategory (e.g., Android).
Step 3: Inherit properties from the parent category or make specific modifications.
Managing Categories
Step 1: Click “Add” to add a subcategory.
Step 2: Click the "Edit" option to modify category details.
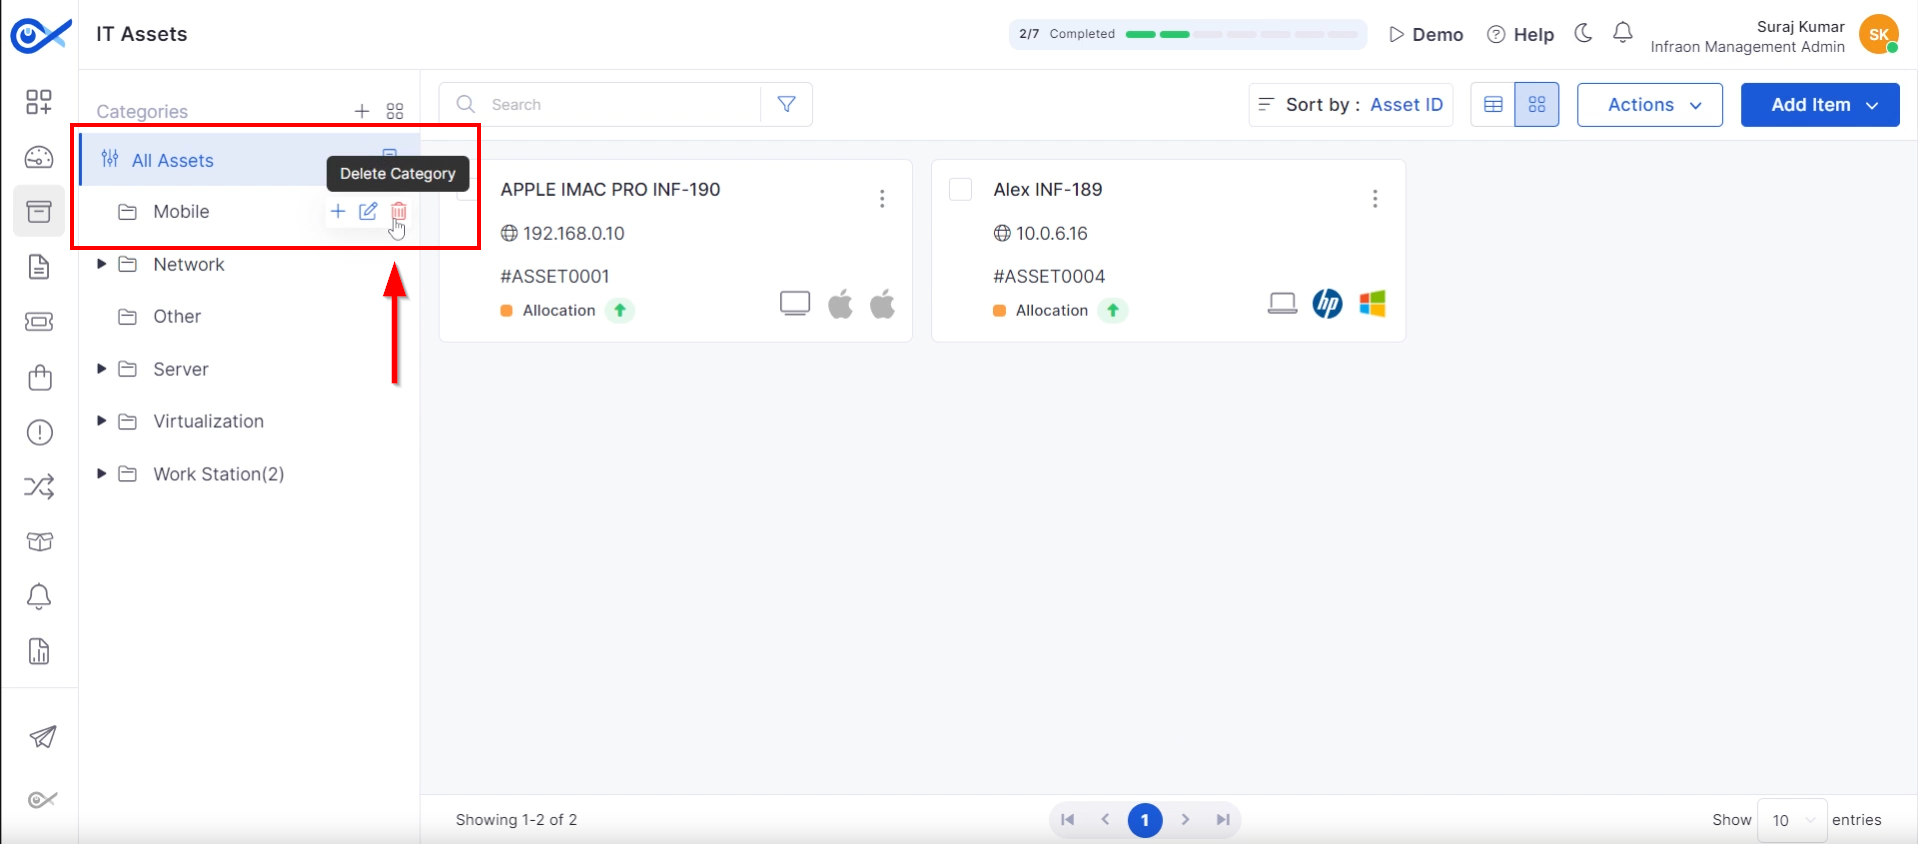
Step 3: Click the "Delete" option to remove a category (confirmation required for subcategories).
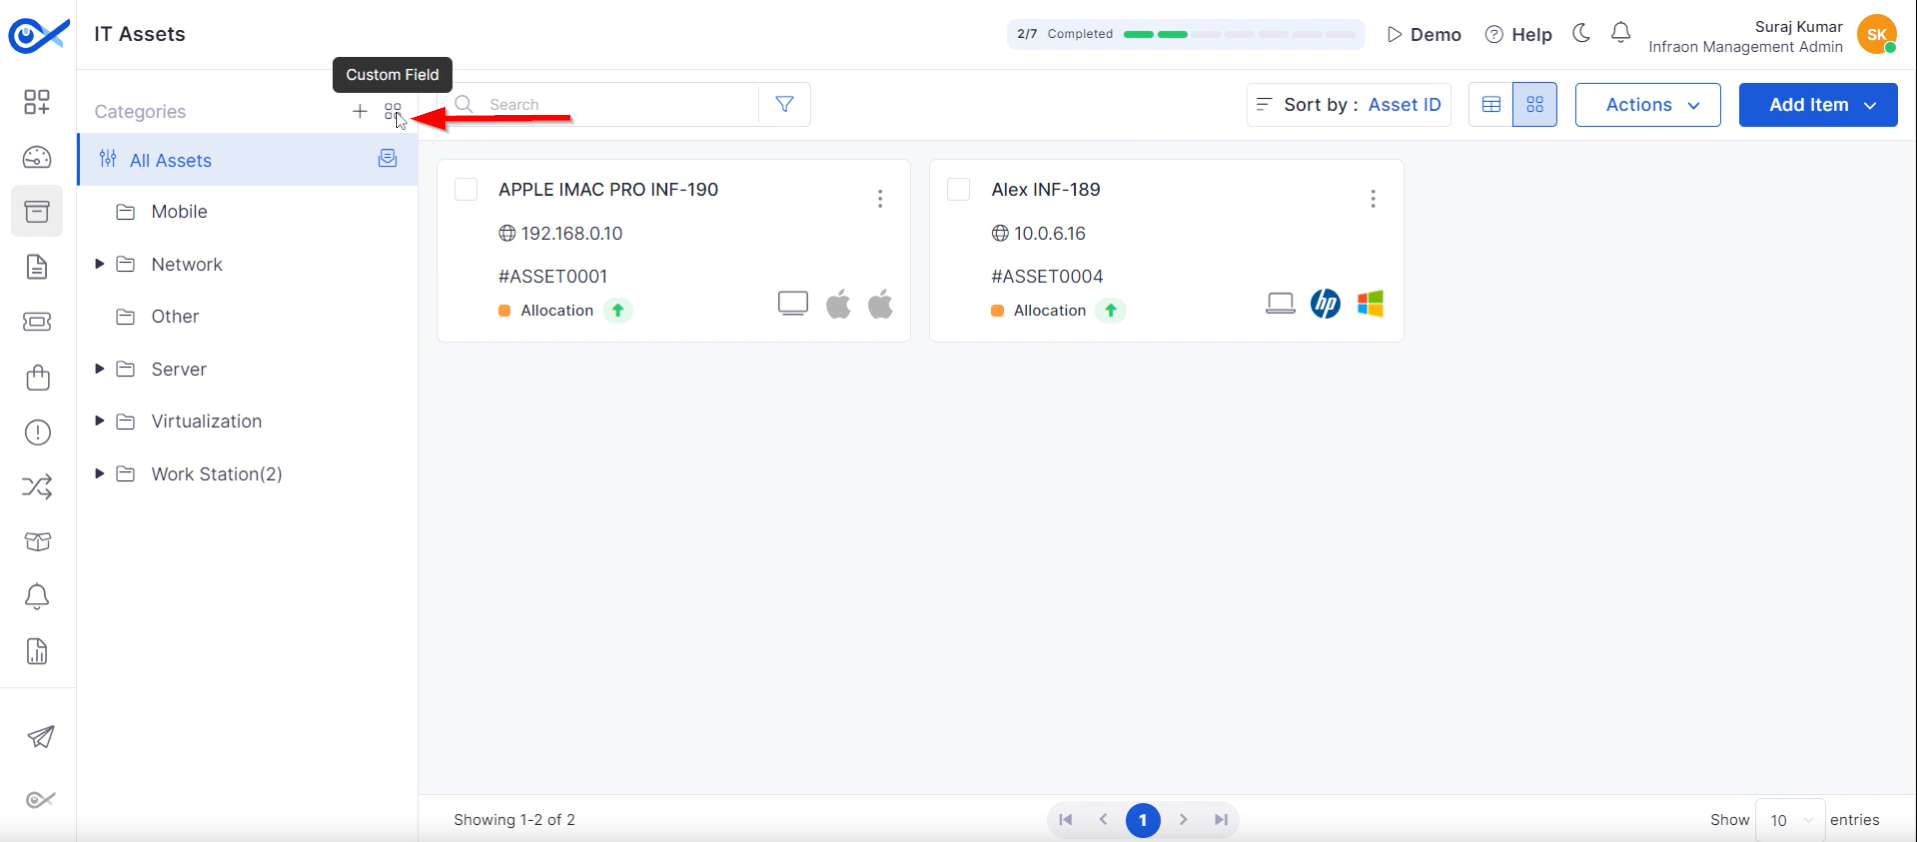
Step 4: To create custom fields applicable to multiple categories, Click "Custom Field."
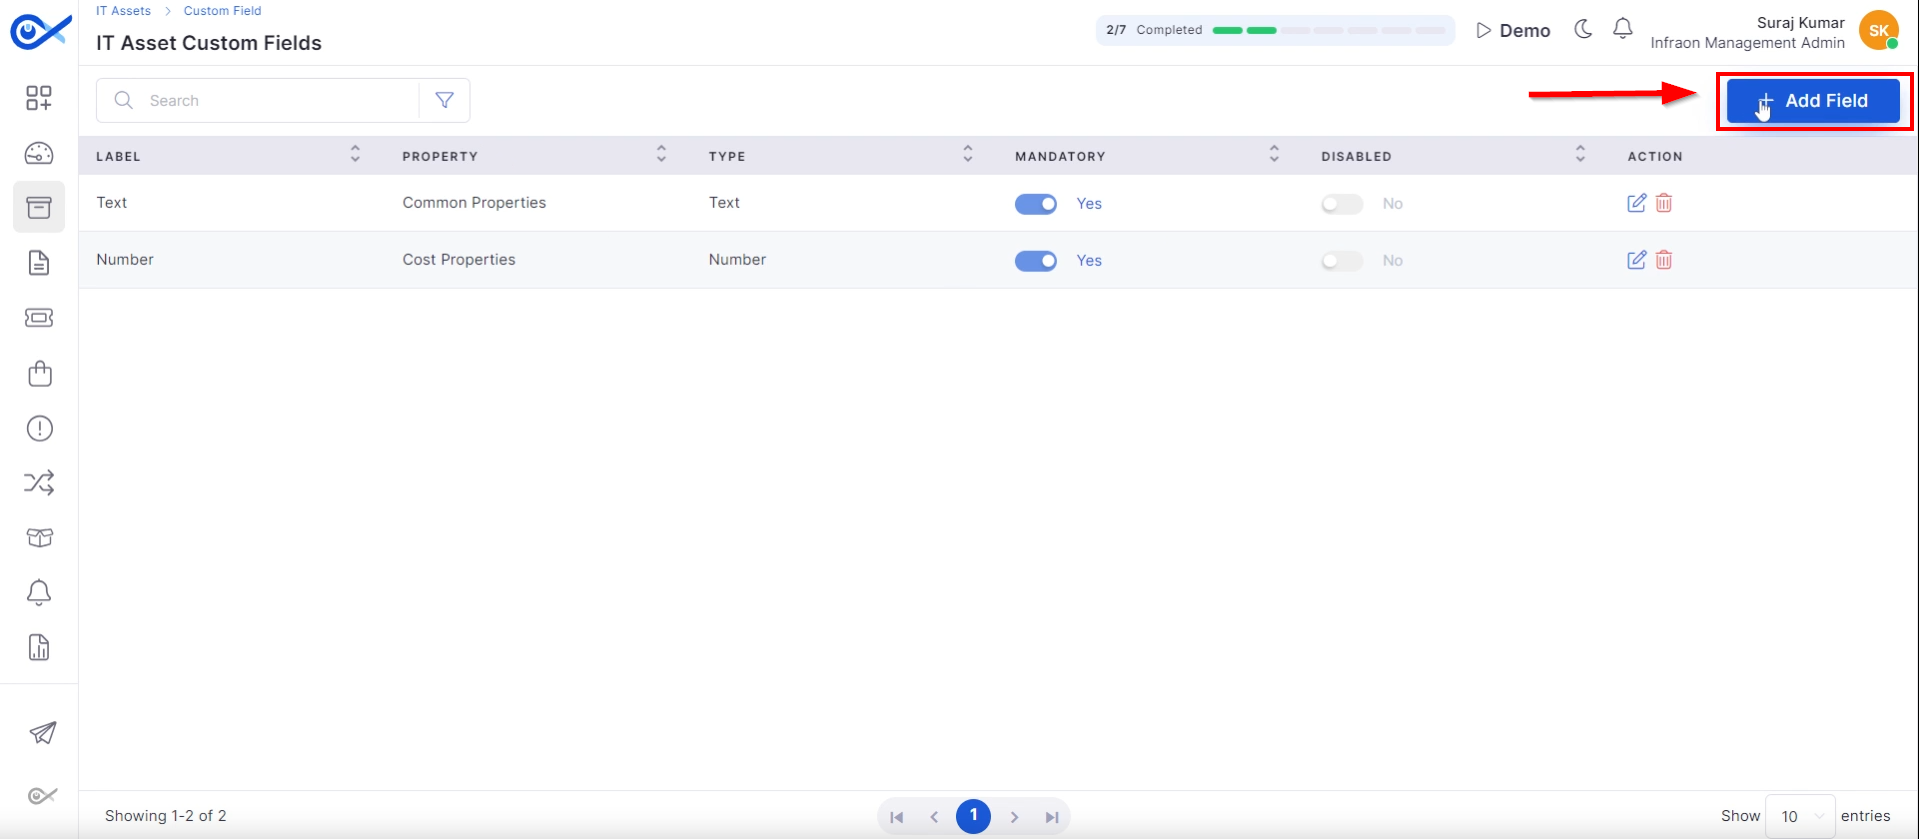
Step 5: Now, click “New Filed” at the top right corner of the page.
Step 6: Configure a default category template for efficient category creation.
Saving Changes
Click "Submit" to save all modifications made to categories or subcategories.
These steps allow technicians to create, manage, and customize asset categories within the Infraon Infinity platform.
Adding an Asset Manually
This guide explains how to add an asset to a created asset category. There are three methods: manually, using a CSV file, or through Discovery (only applicable to IT assets).
This tutorial will focus on manually adding an asset.
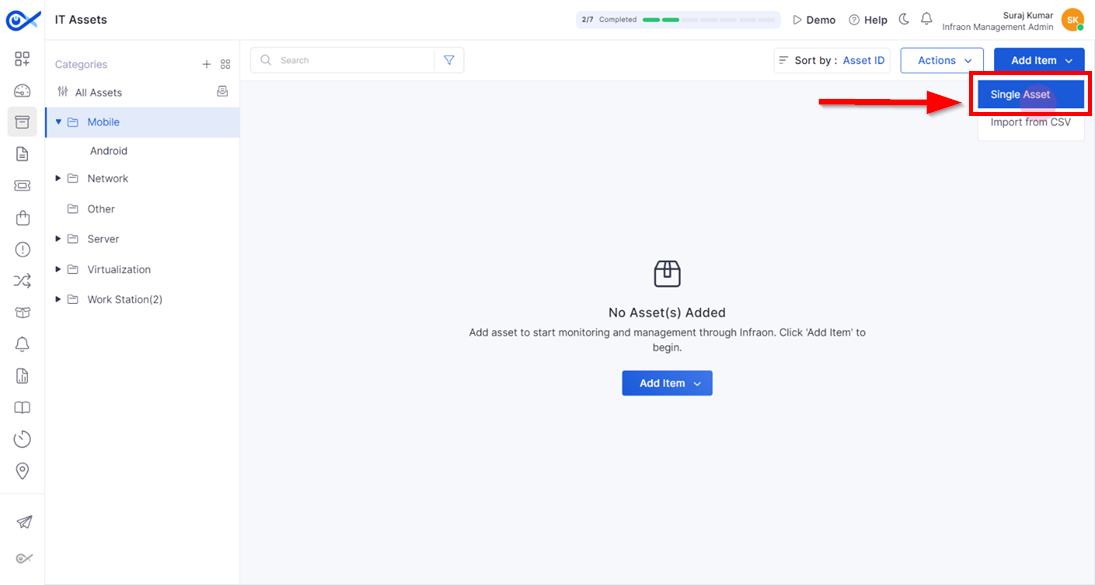
Step 1: Click on the add item at the top right corner of the page and select the single asset option.
Filling Out Asset Information
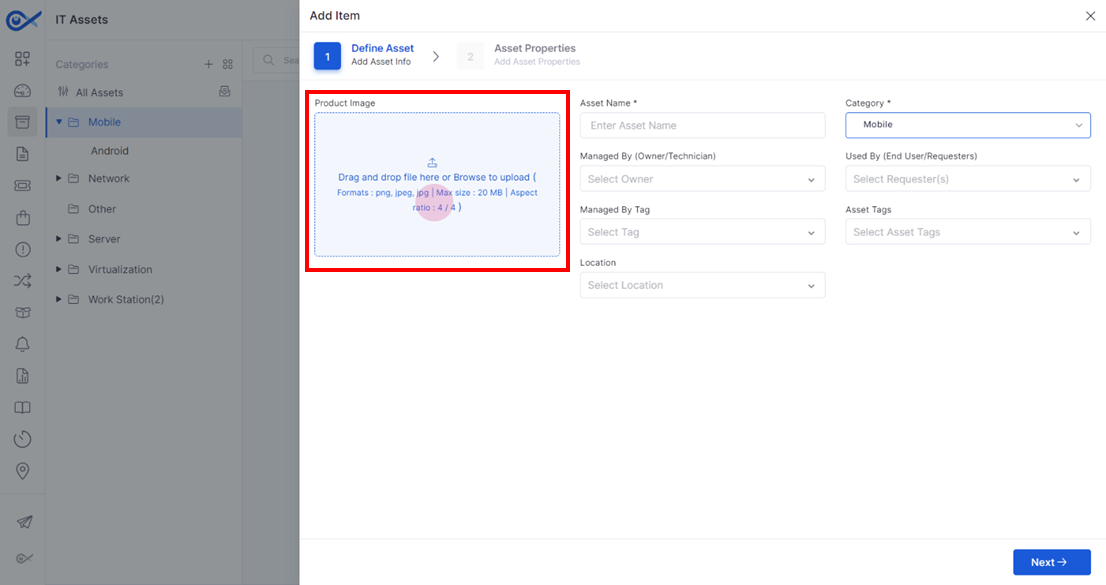
Step 2: On the Define Asset page, fill out the details in the respective call-out boxes, starting with the product image for the asset. (Formats: png, jpeg, jpg | Max size: 20 MB | Aspect ratio: 4 / 4)
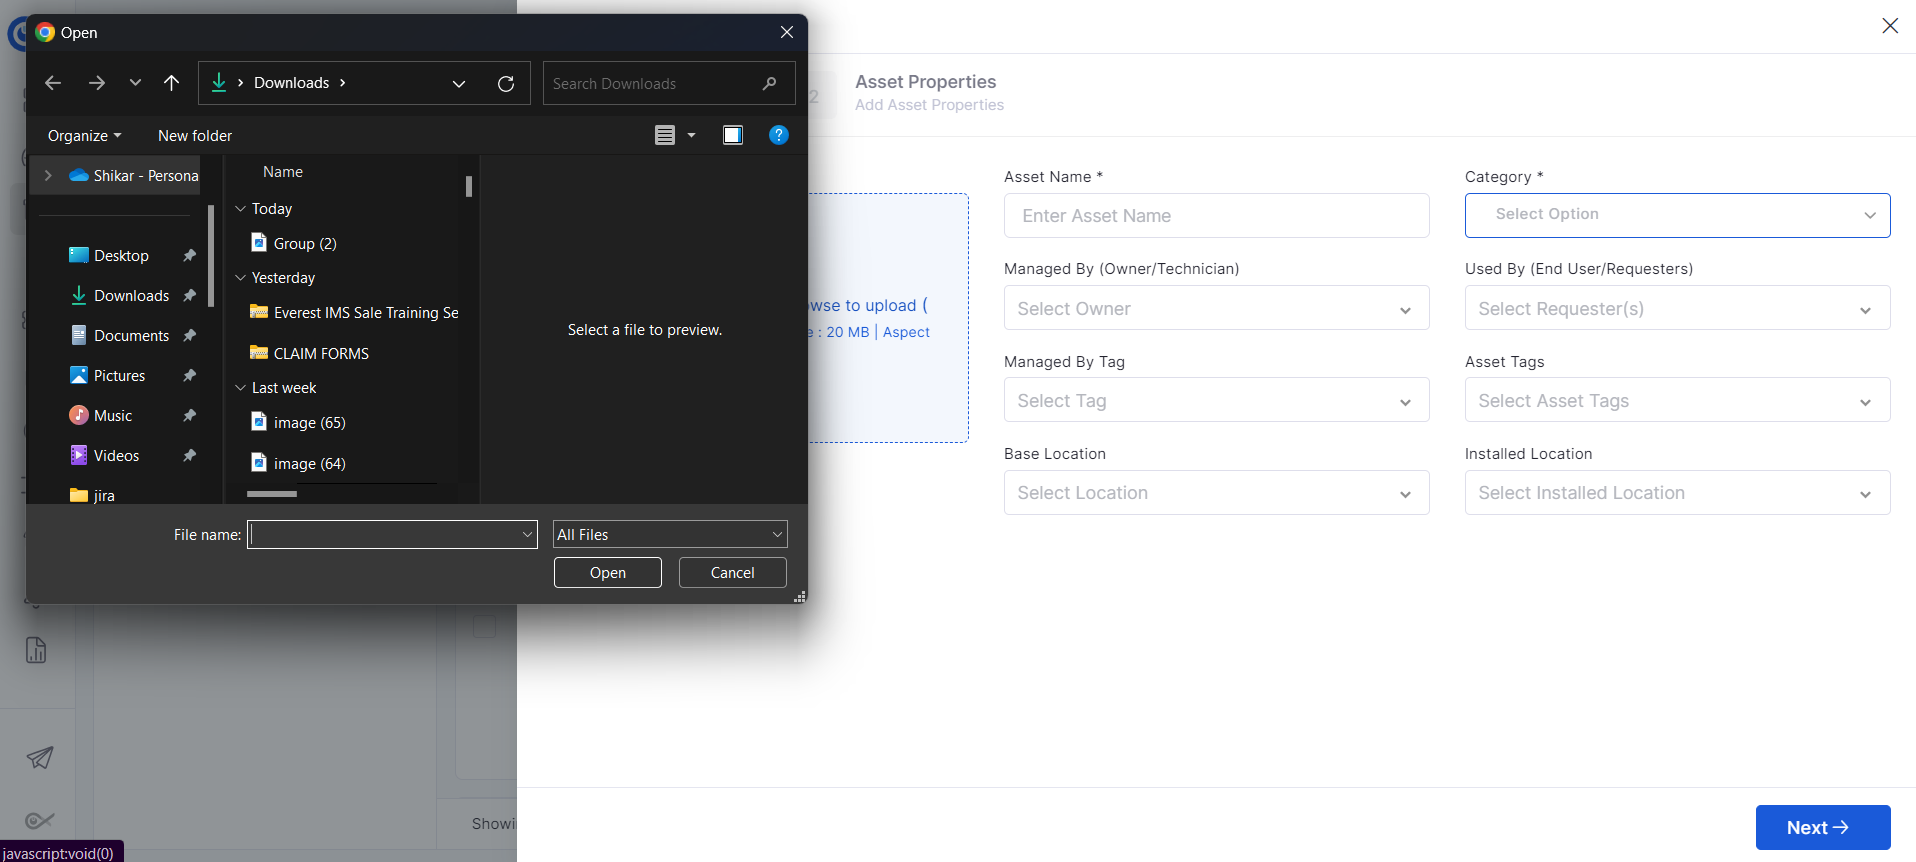
Step 3: Drag and drop the asset image or select the file to upload.
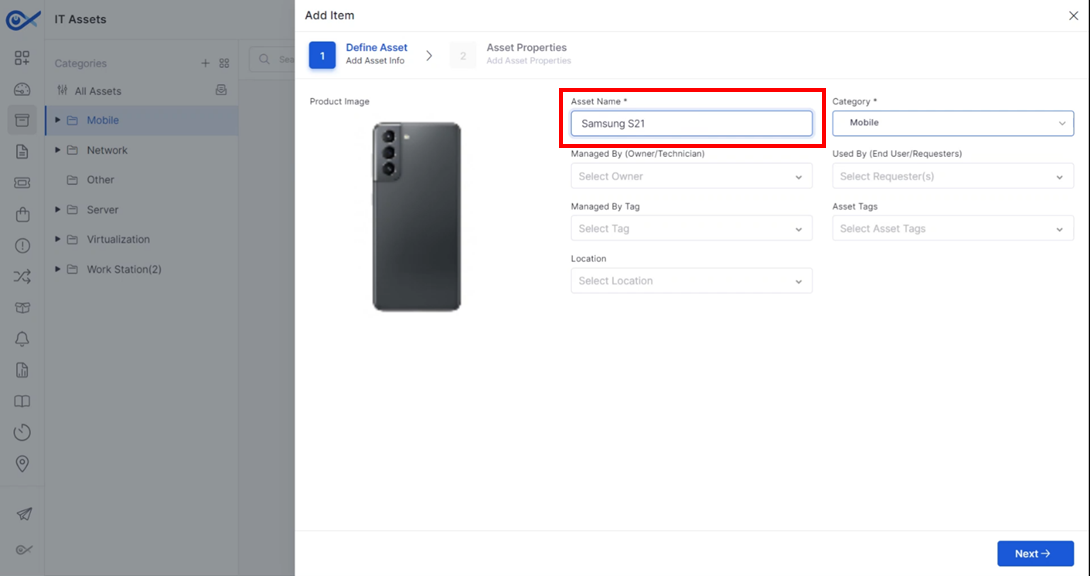
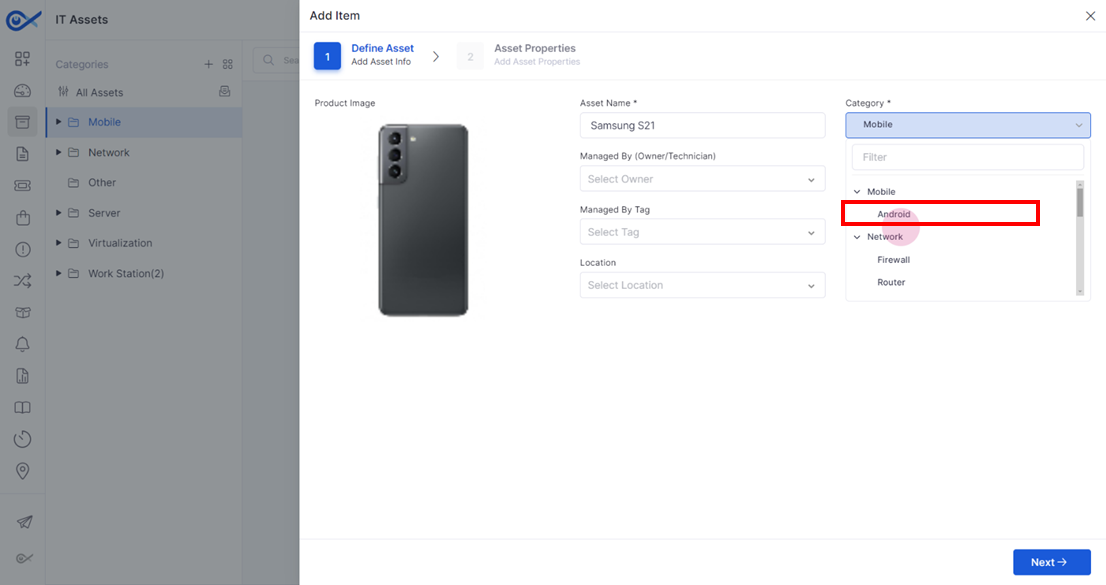
Step 4: After uploading the product image, click on the asset name input field and enter the name, for example, "Samsung S21."
Step 5: The dropdown menu maps the asset to a parent or child category. For this example, select "Android" as the sub-category.
Assigning Asset Management and Usage
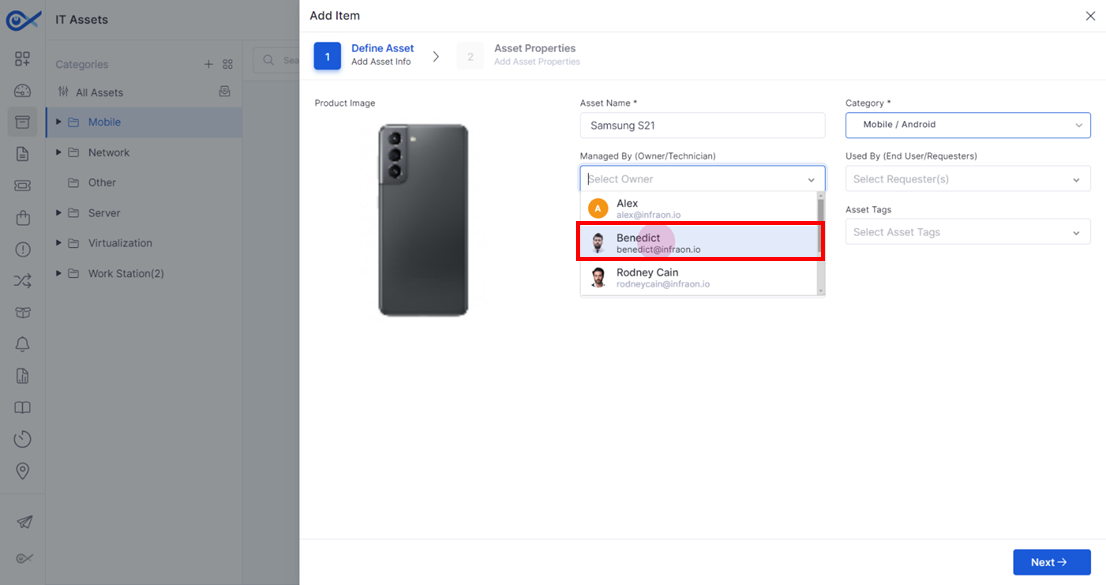
Step 6: In the "Managed by" field, designate the owner or the person managing the asset, potentially a technician. Users can make multiple selections based on the usage of the assets.
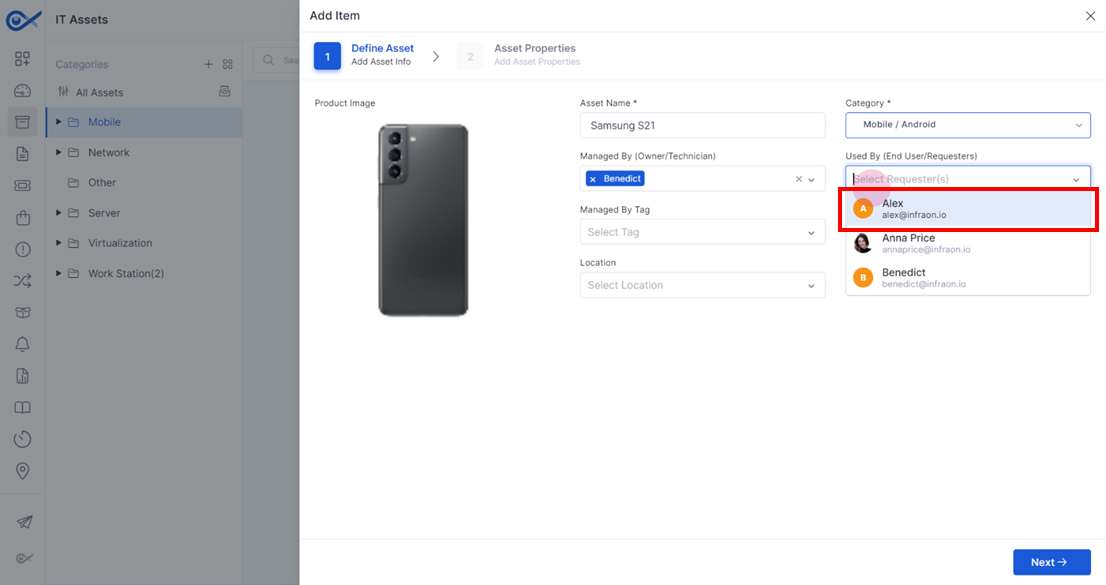
Step 7: The "Used by" field indicates the person using the asset, also known as the requester. Based on the usage of the assets, users can make multiple selections.
Assigning Asset Tag and Location
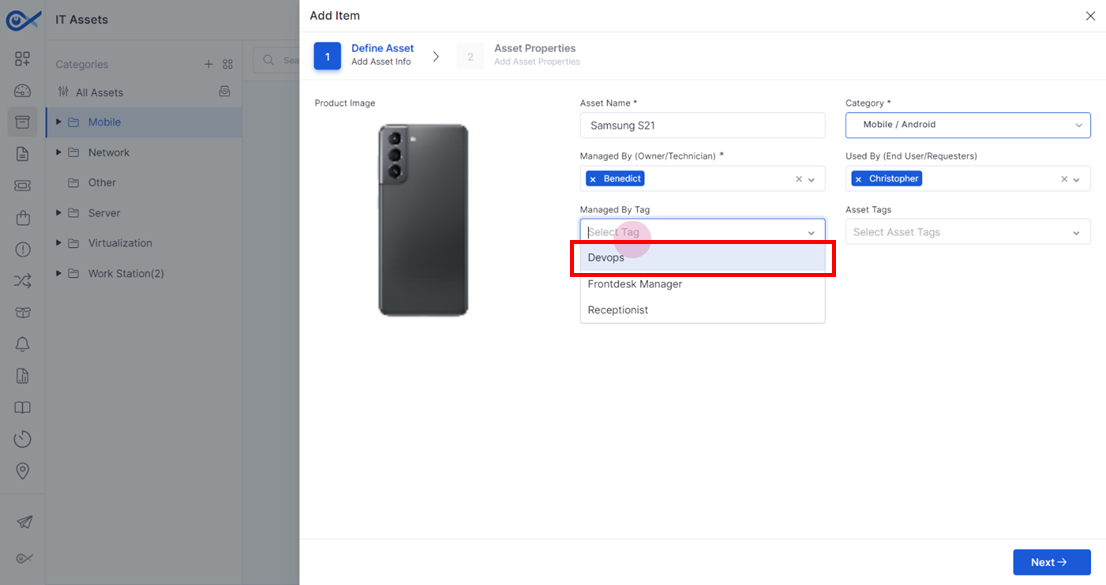
Step 8: In the 'Managed By' call-out box, select a tag from the drop-down list to specify the team that will manage the asset.
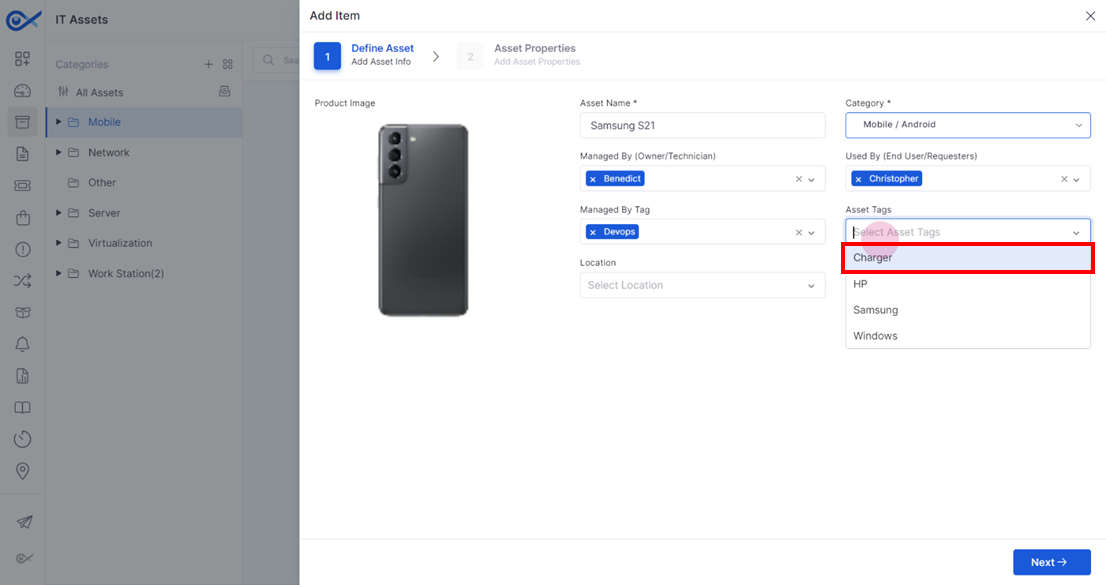
Step 9: Assign an asset tag to the specific type of asset by selecting it from the dropdown.
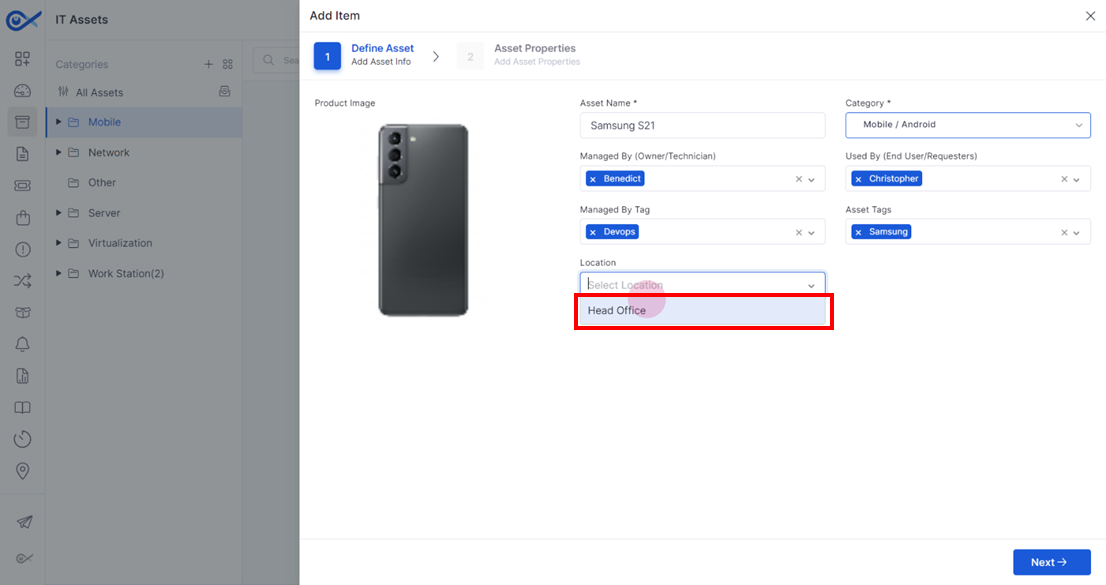
Step 10: Specify the location where the asset is situated.
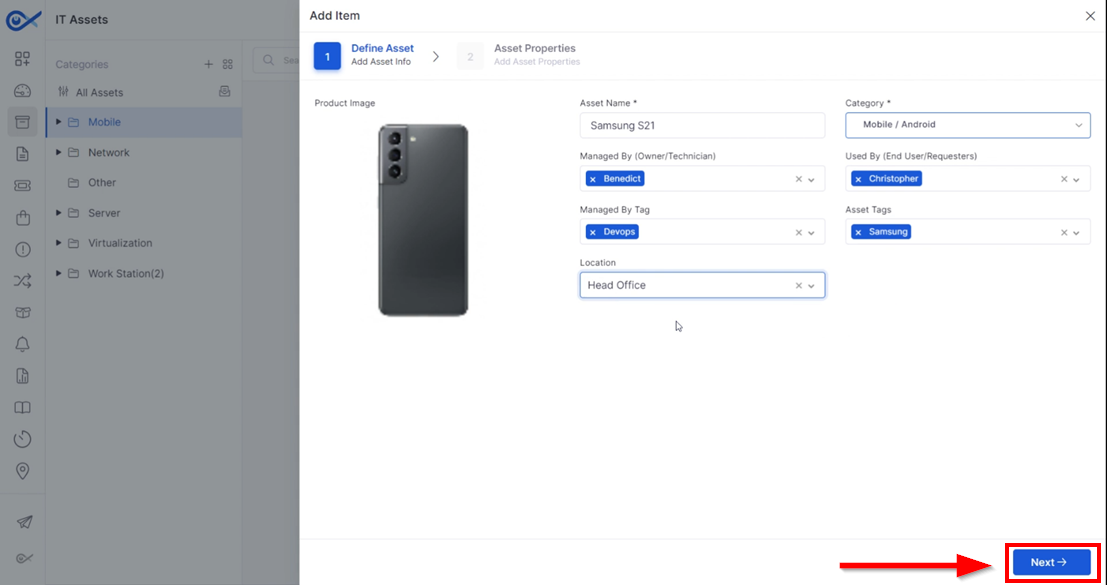
NOTE: Fields denoted by an asterisk (*) are mandatory for completion. All other fields are optional.
STEP 11: After filling in the data, proceed to the next step to view the asset properties.
Filling Out Asset Properties
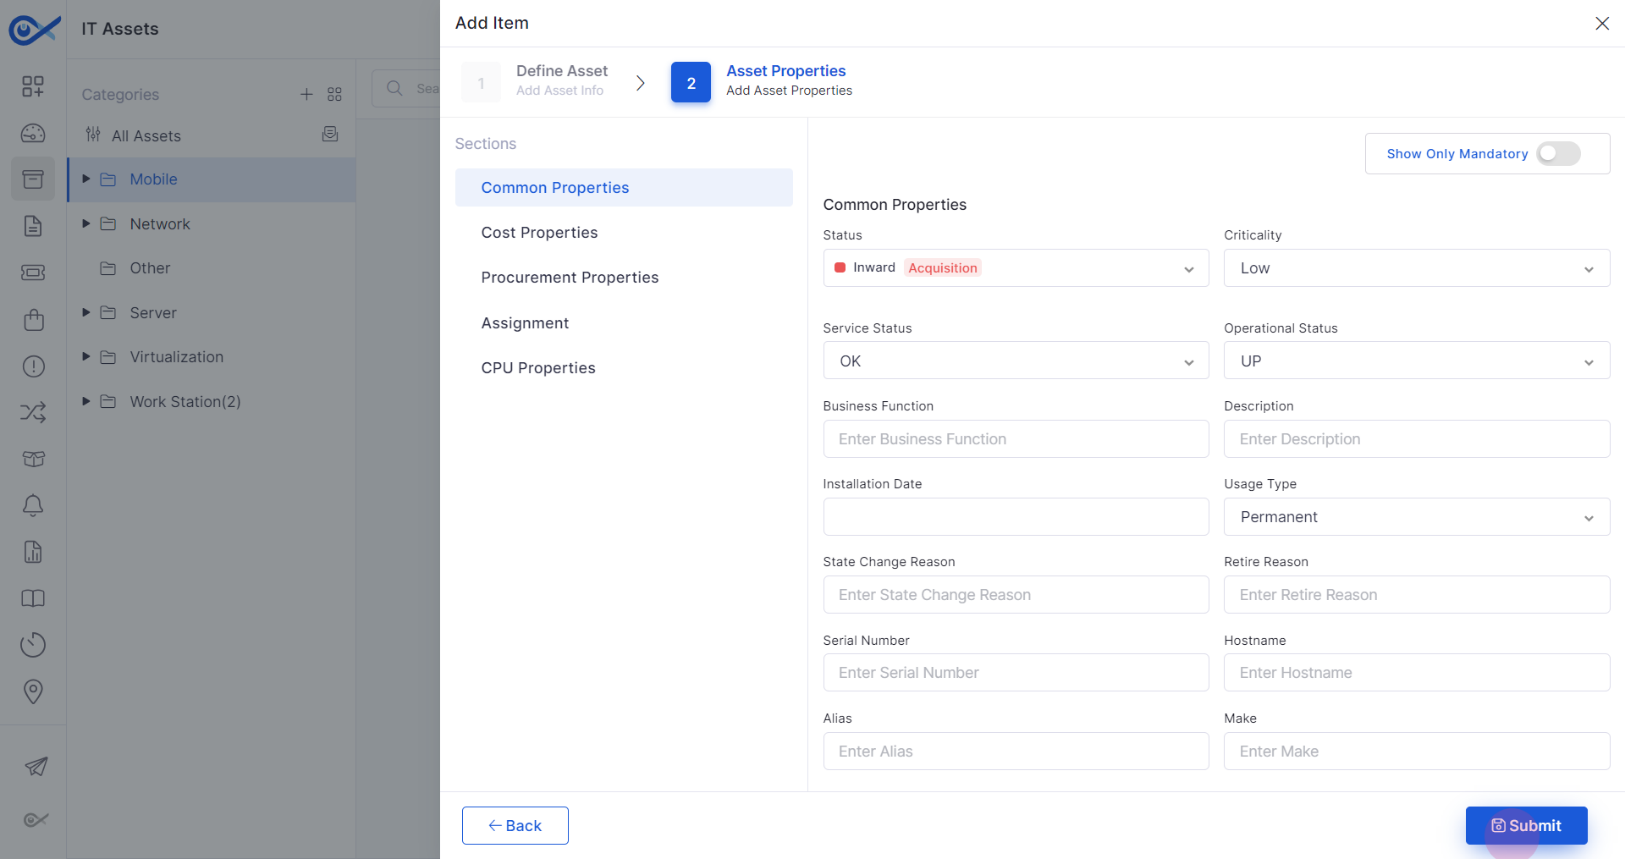
STEP 1: The Asset Properties section contains categories such as common properties, cost properties, procurement properties, assignment properties, and CPU properties. Each property has input fields where data can be entered.
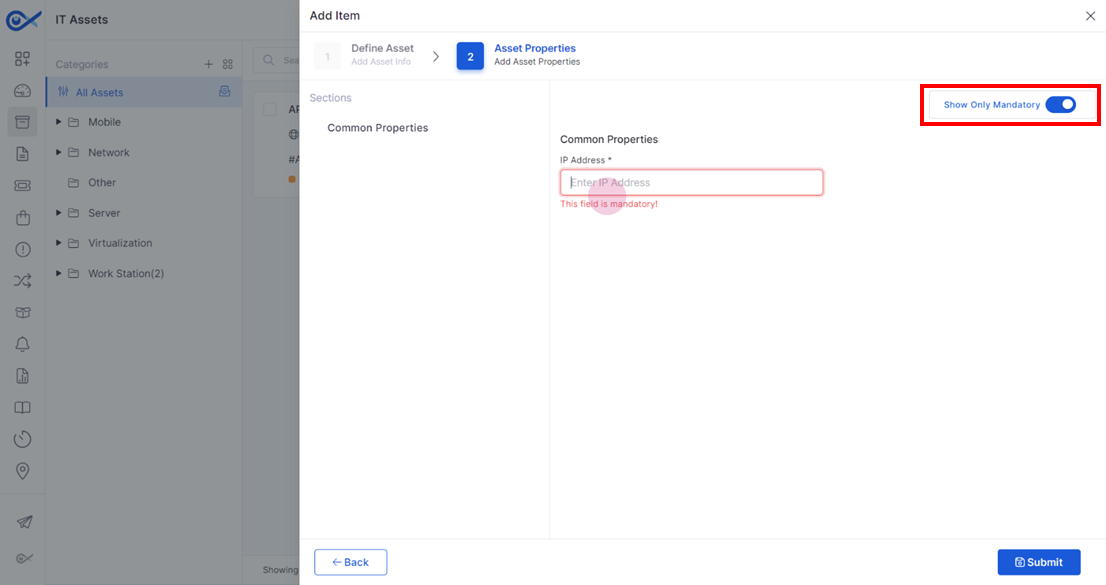
NOTE: To view only mandatory fields, click on the show-only mandatory toggle.
Finalizing Asset Creation
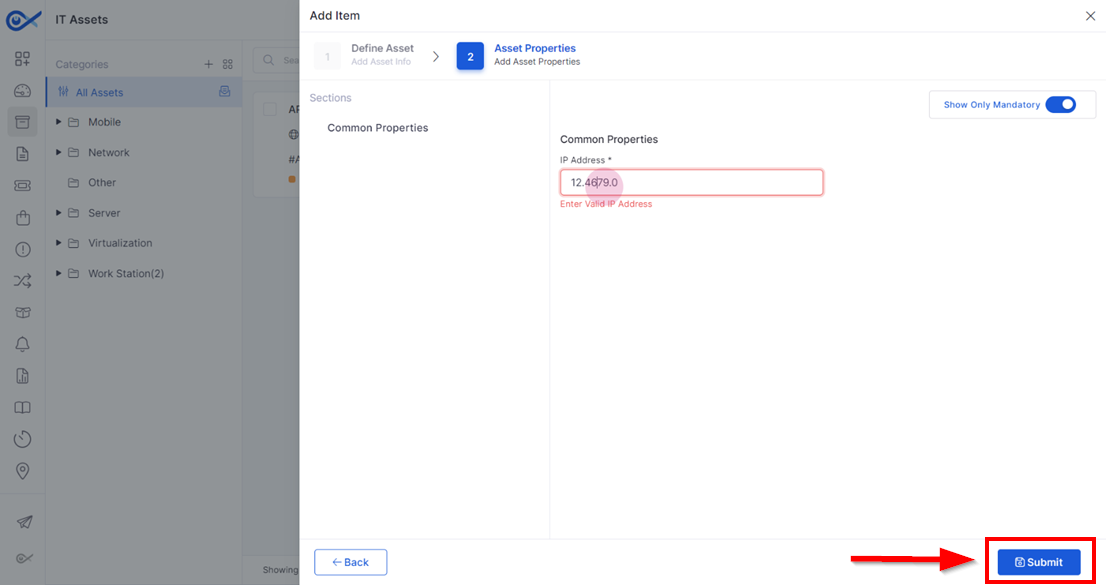
Step 2: After adding the mandatory data, submit the form to finalize the creation of the asset.
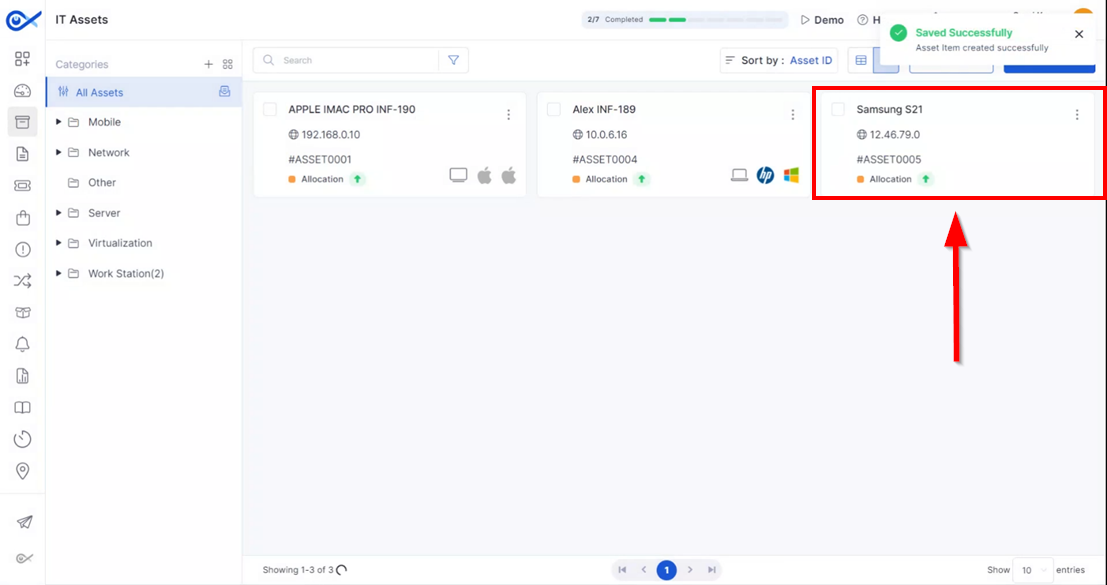
Step 3: After submission, the respective asset will be generated with a unique ID, facilitating its identification.
Miscellaneous
This guide will explore the features and options available on the fixed asset and IT assets pages. These pages offer various tools for managing and organizing assets effectively.
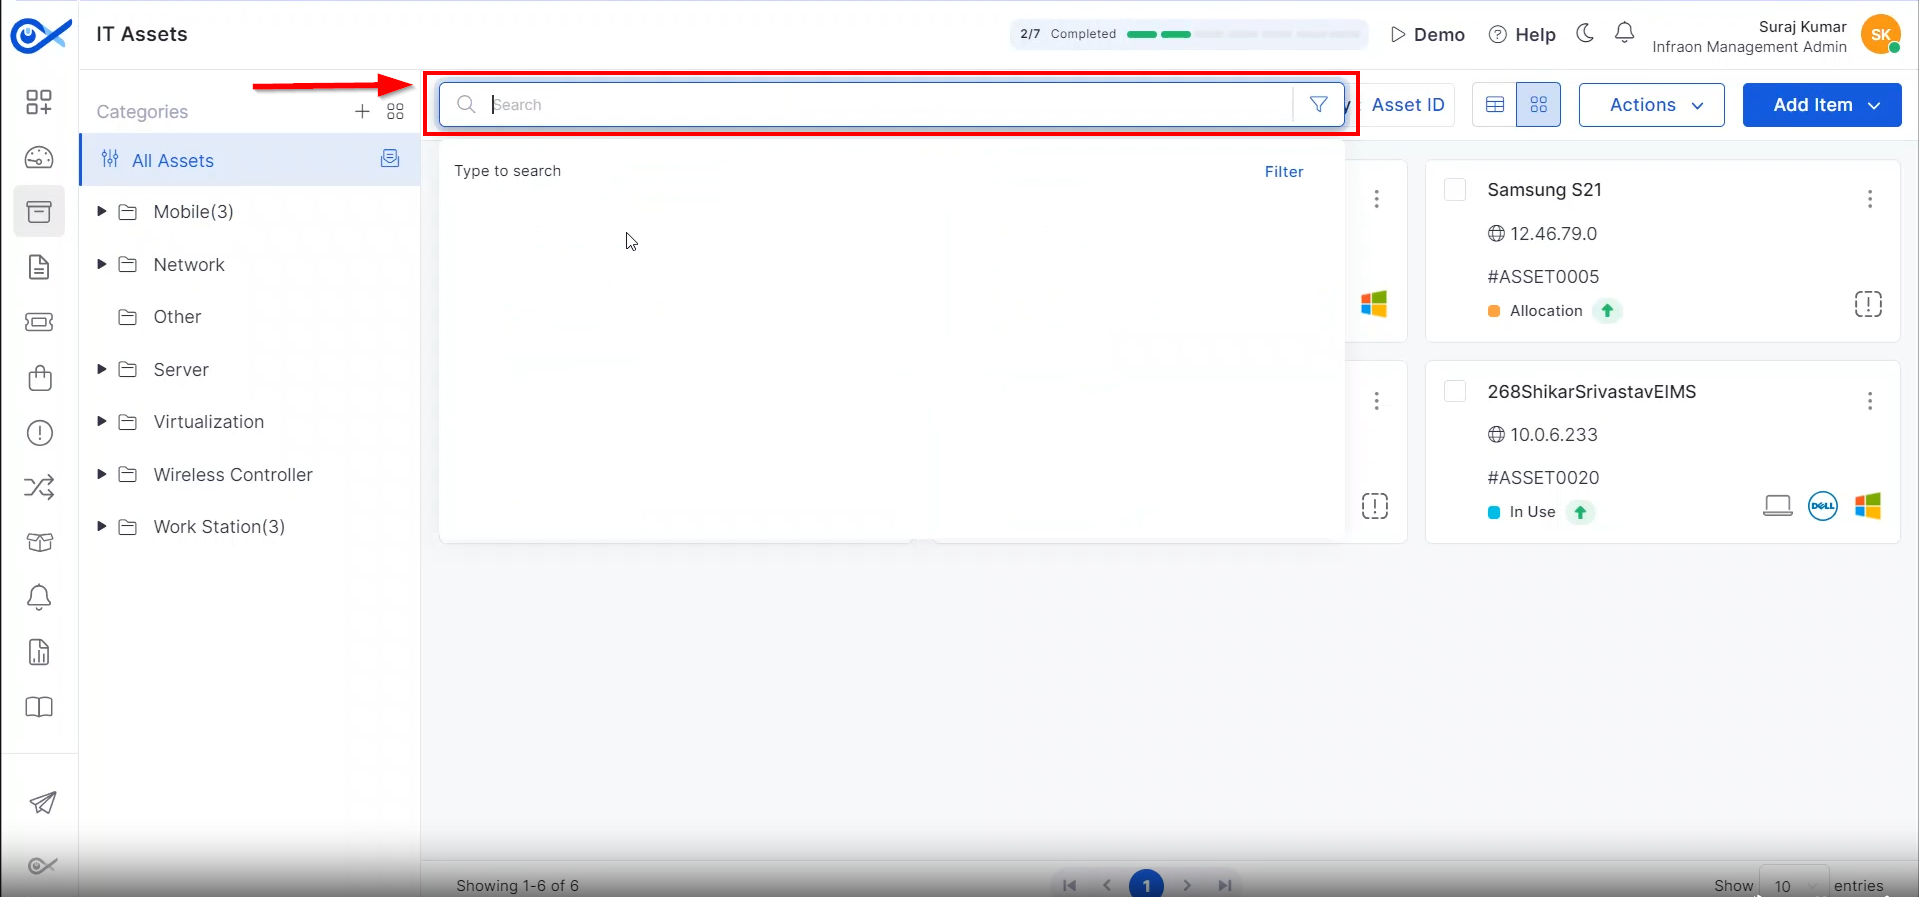
Locating the search option on the top panel of both pages will assist technicians in finding a specific asset based on its name, ID, and more.
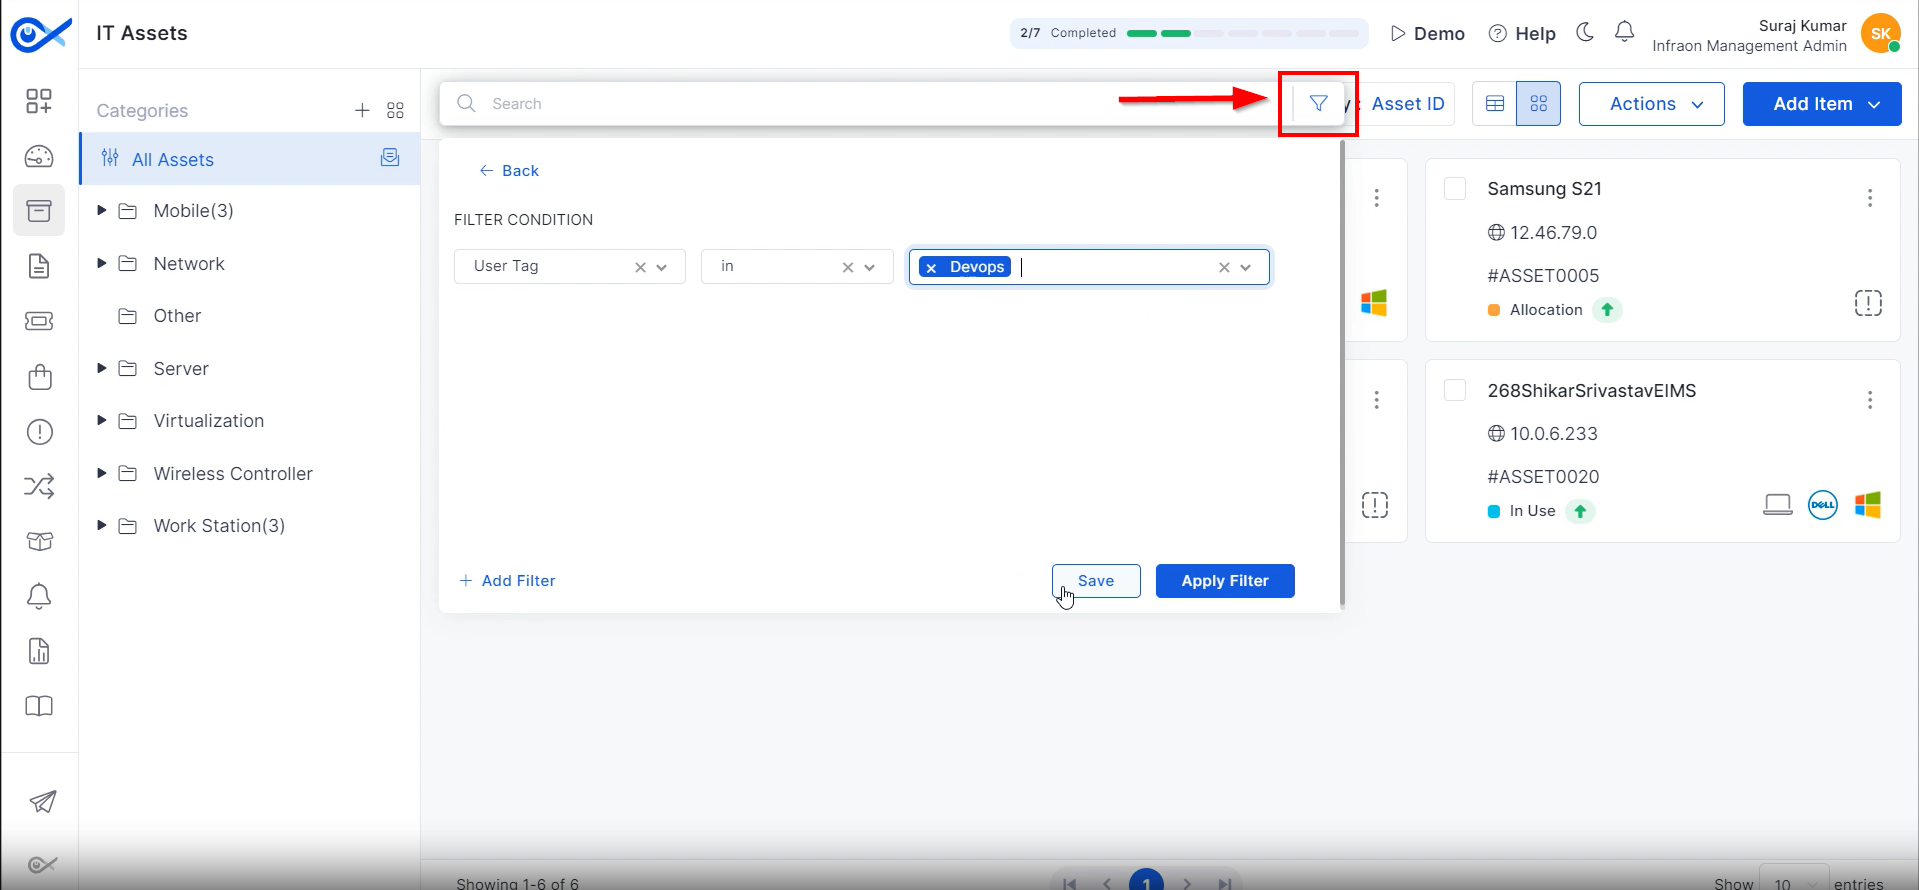
Use the filter option adjacent to the search bar to refine your asset search. Apply filters based on criteria like asset name, ID, status, owner, location, requester, etc. Save your custom filter settings for future use.
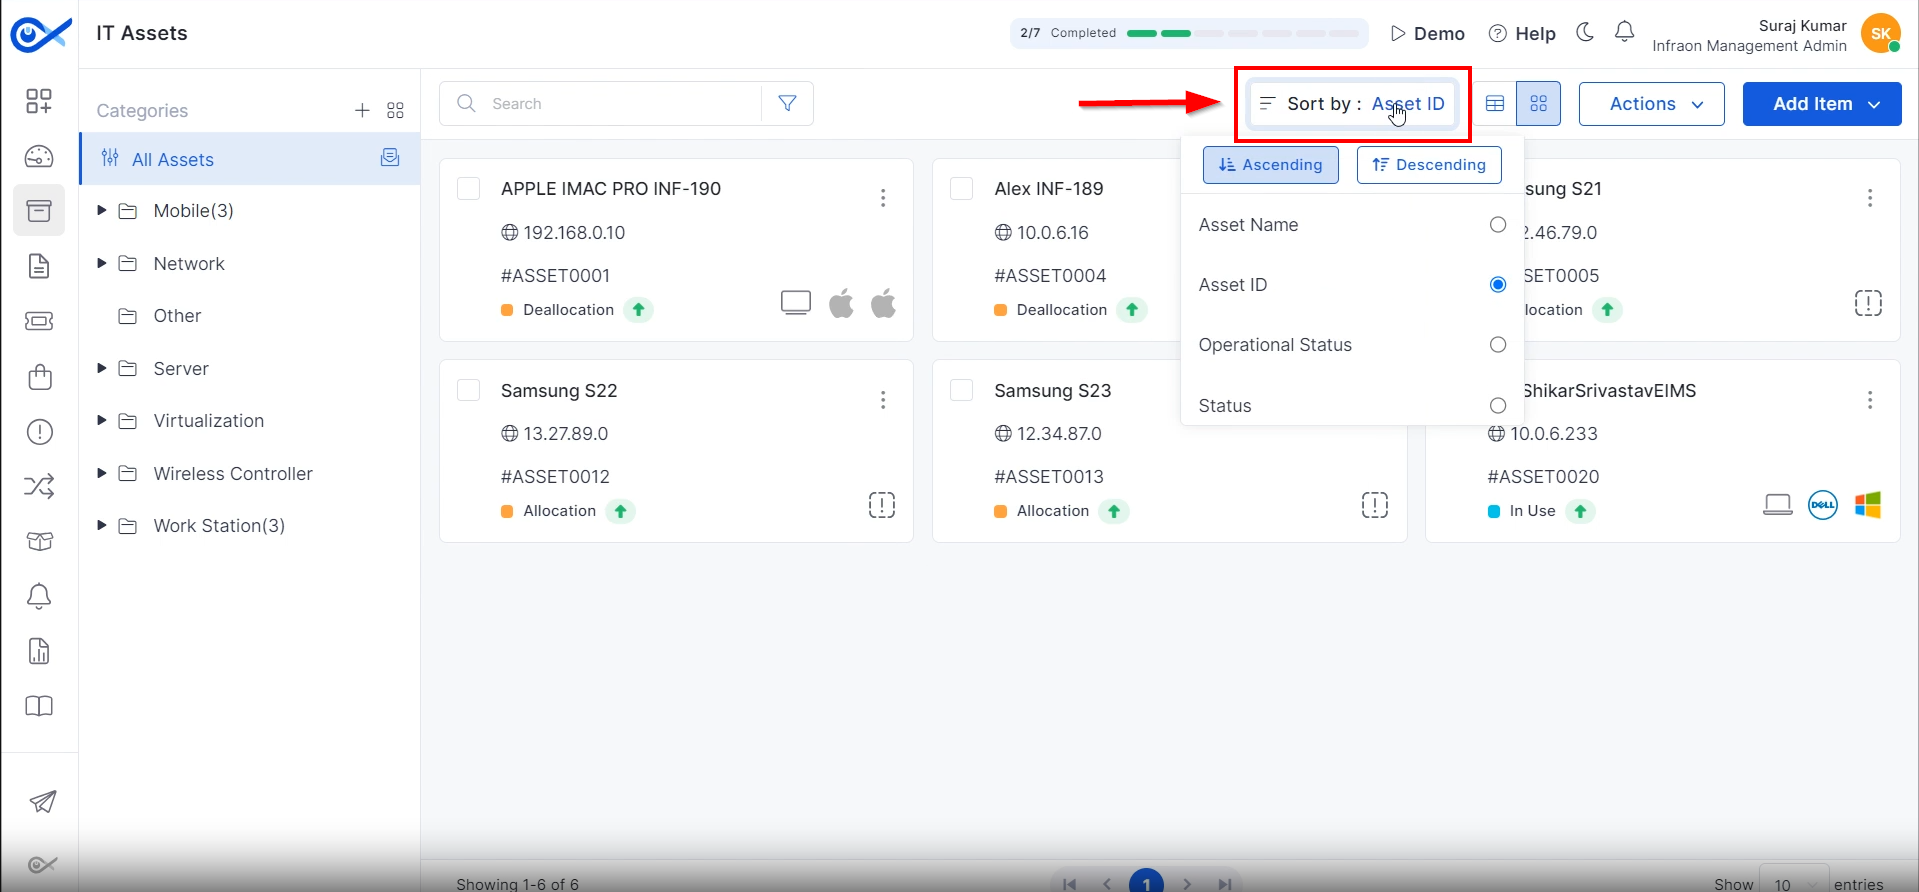
Next to the filter option, find the sort-by-arrangement option. Sort assets by name, asset ID, operational status, type, OS name, make, serial number, base location, whether they are active or installed, and their locations. Choose to organize the assets in ascending or descending order.
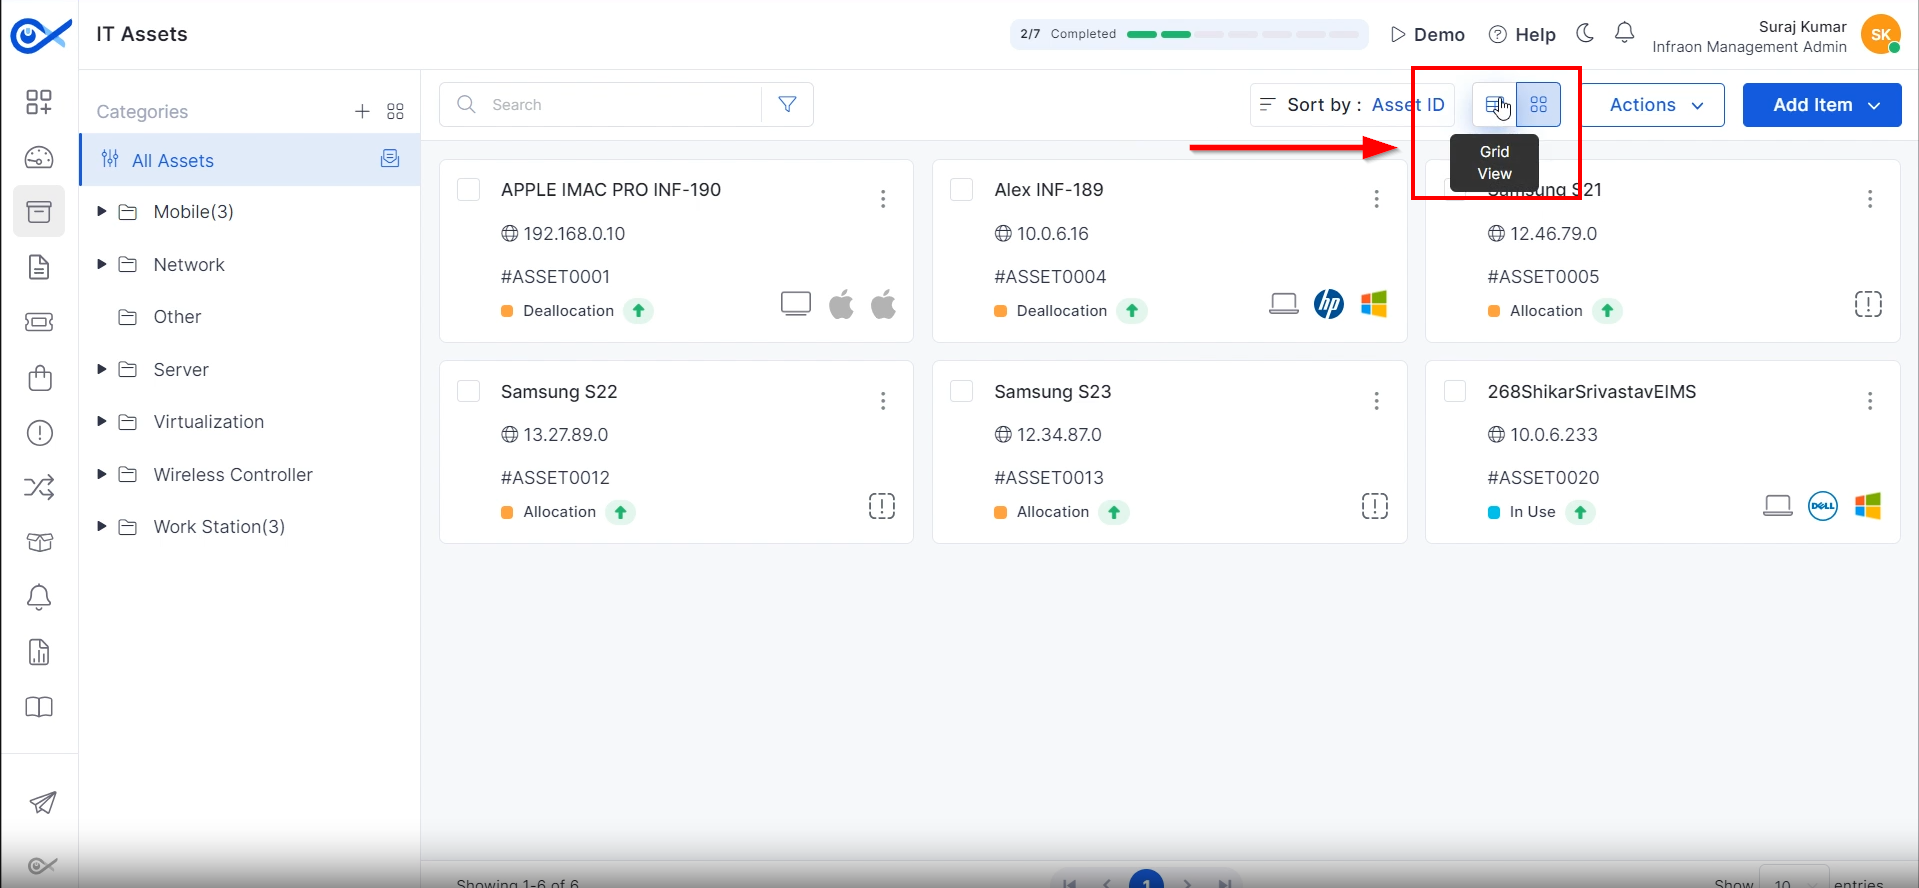
Infraon Infinity provides two viewing options: grid view and panel view.
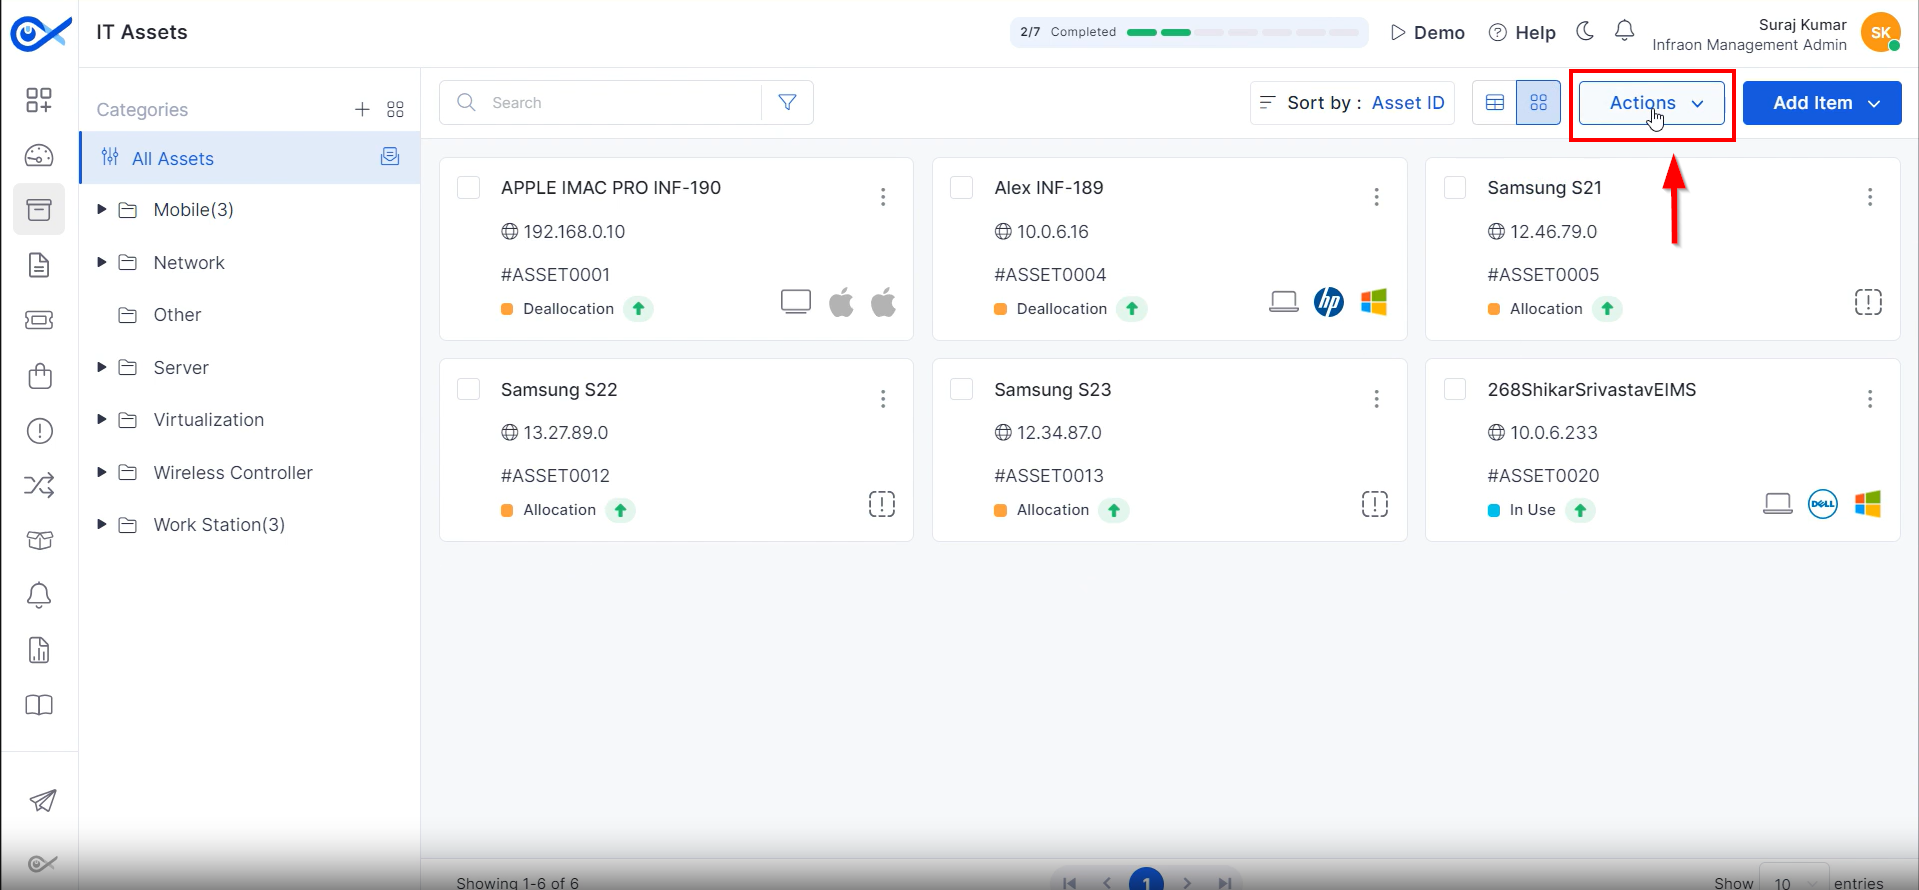
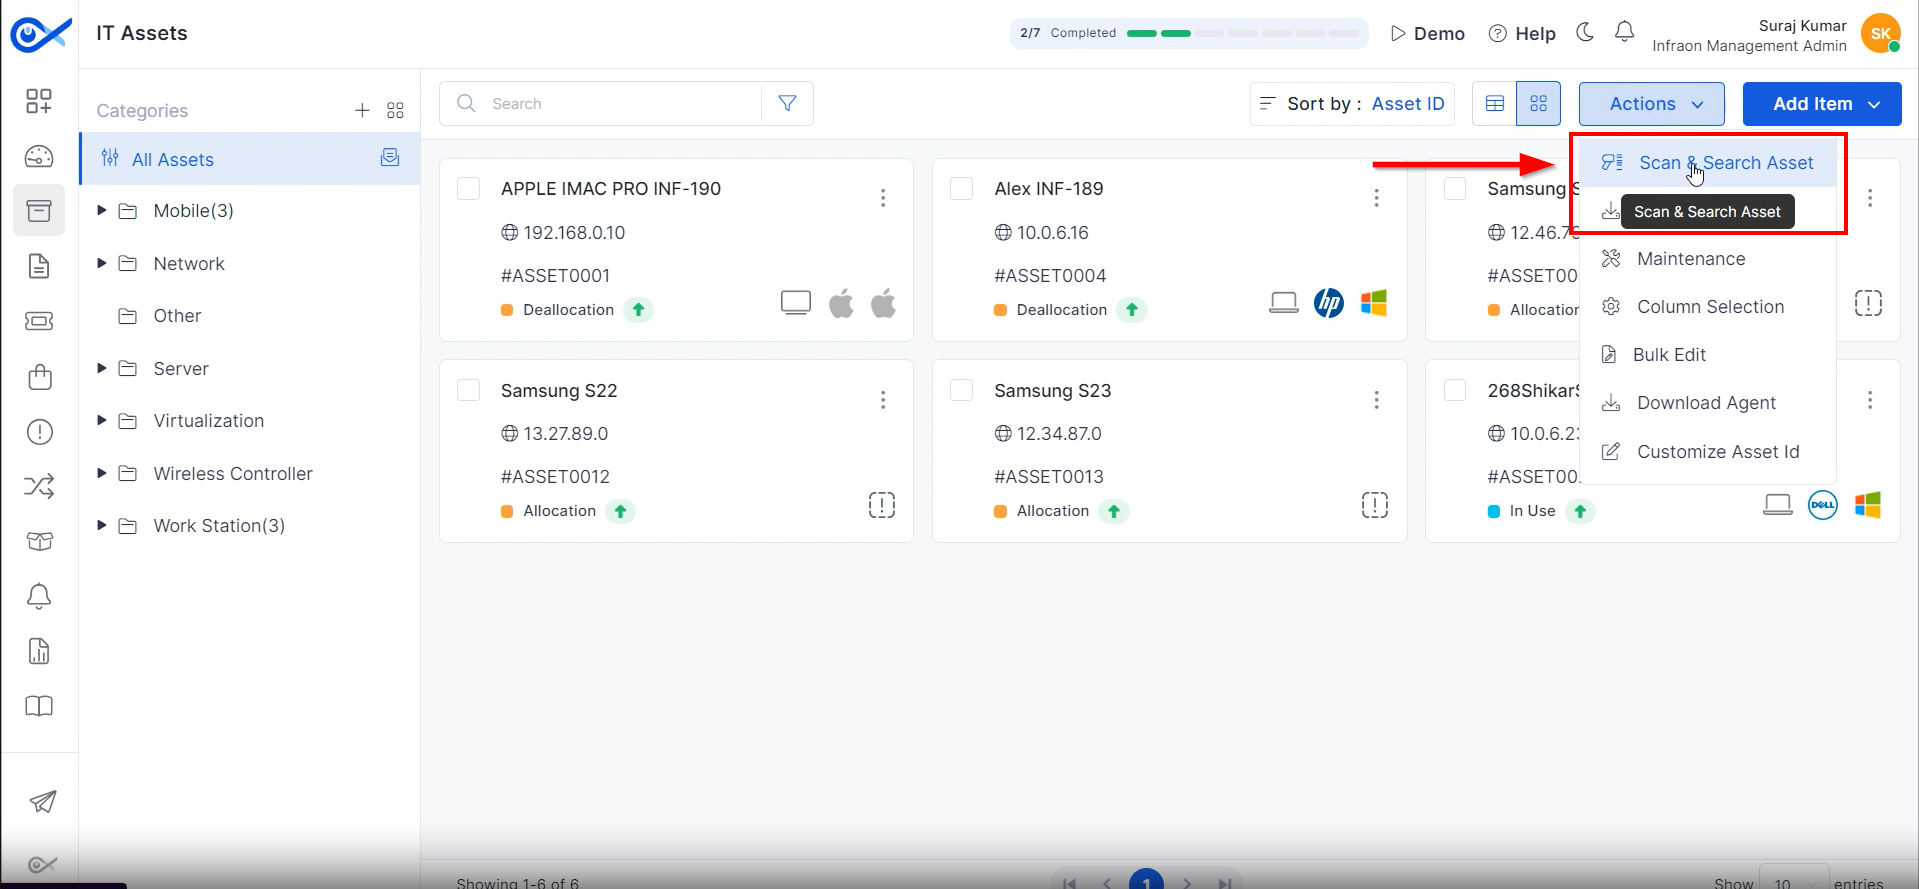
Find the actions tab adjacent to the view options.
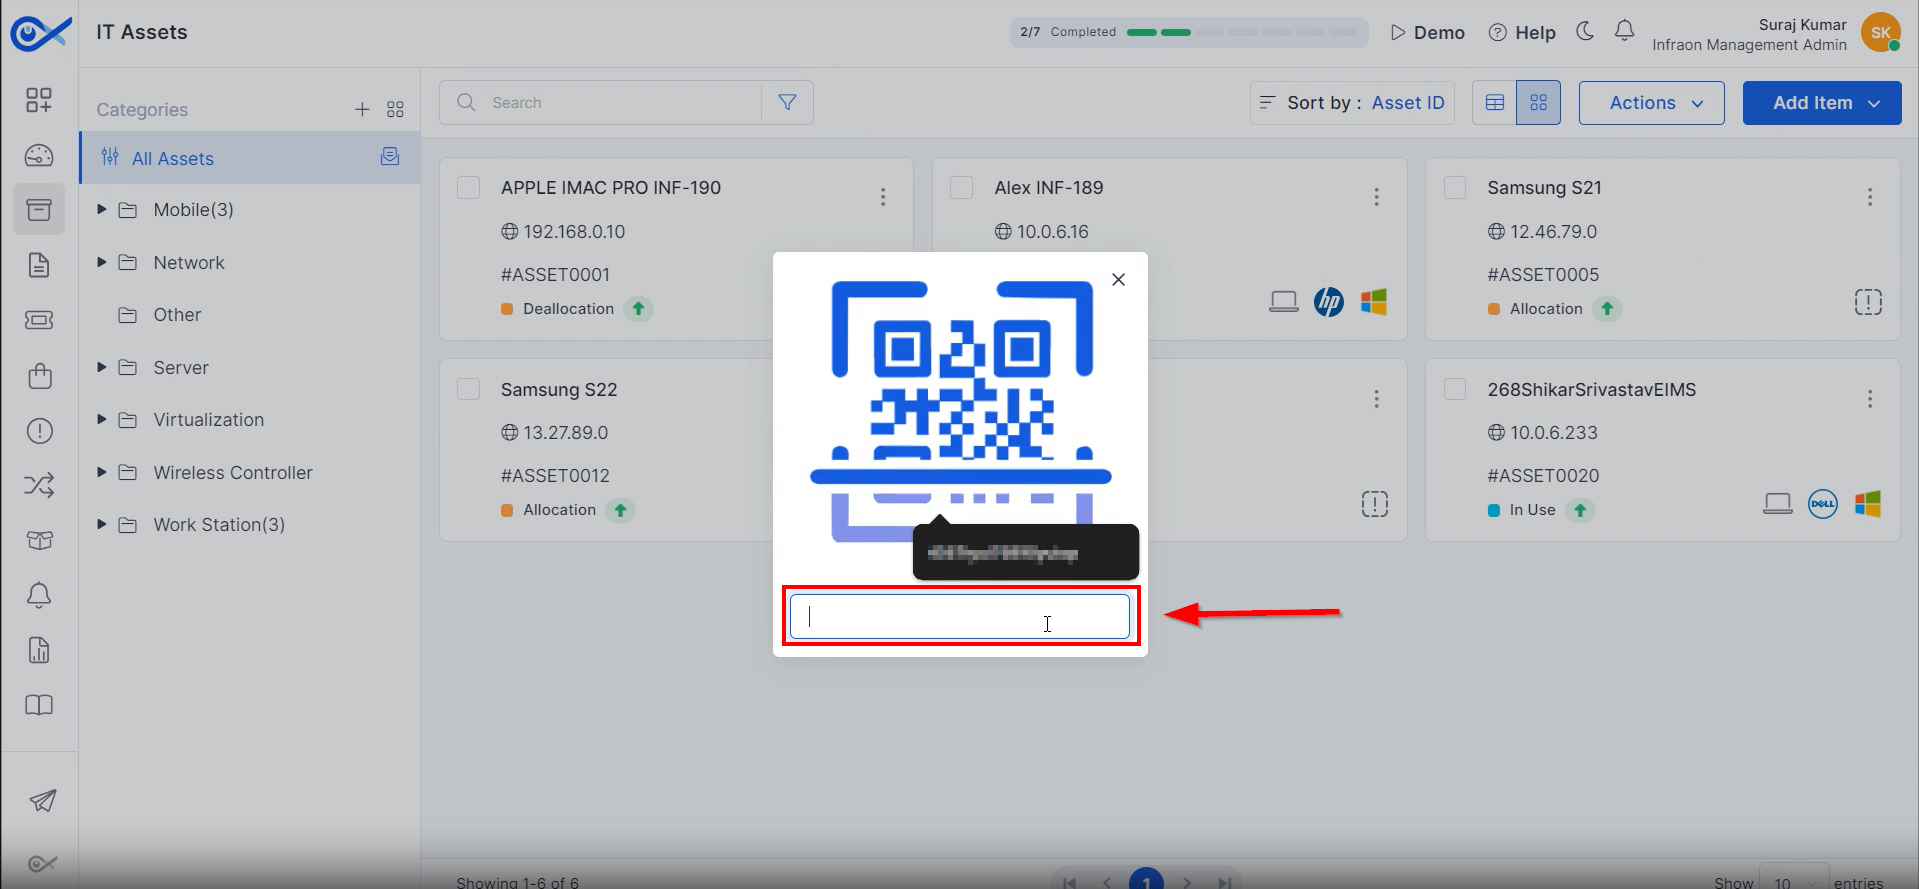
The first option in the actions tab is the scan and search asset feature. Technicians can add an asset directly using its barcode number.
Enter the barcode and the asset is added to the platform.
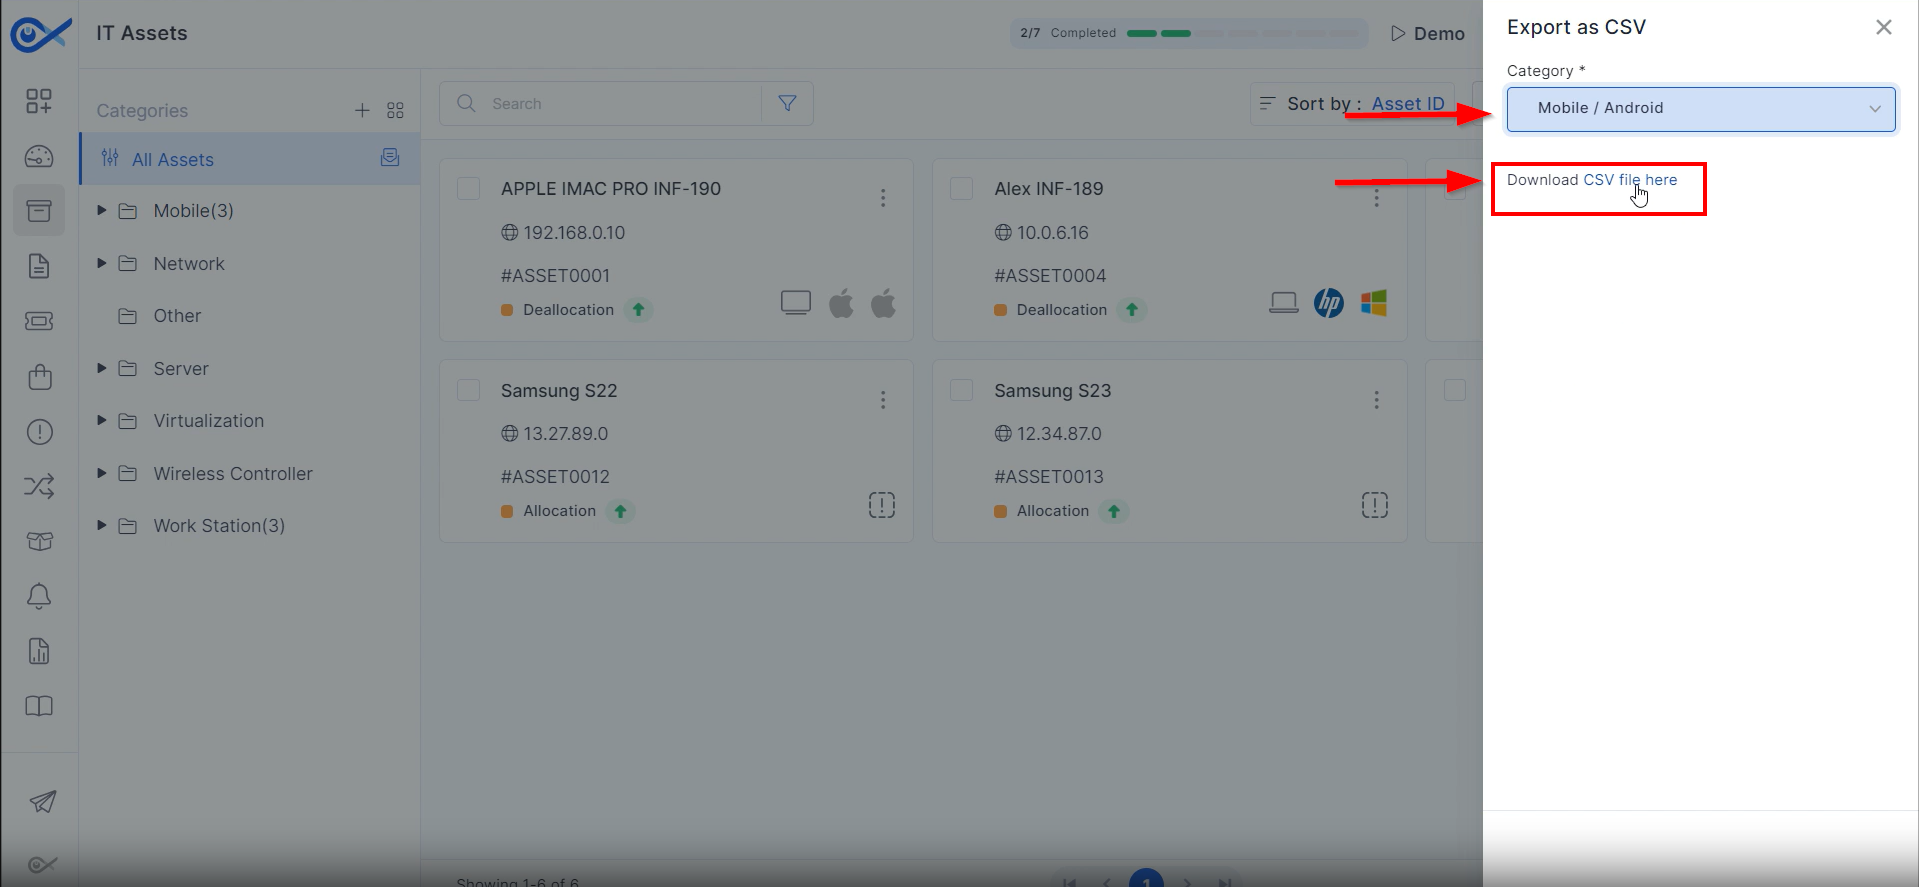
Further along, find the export option. Use this function to create a CSV file of the assets listed on the IT and Fixed assets page. Select the asset category for which the data is needed, then click on the download CSV file option. The downloaded CSV file contains all the information about the asset, including asset ID, name, owner, requester, tag, asset tags, location, and other details.
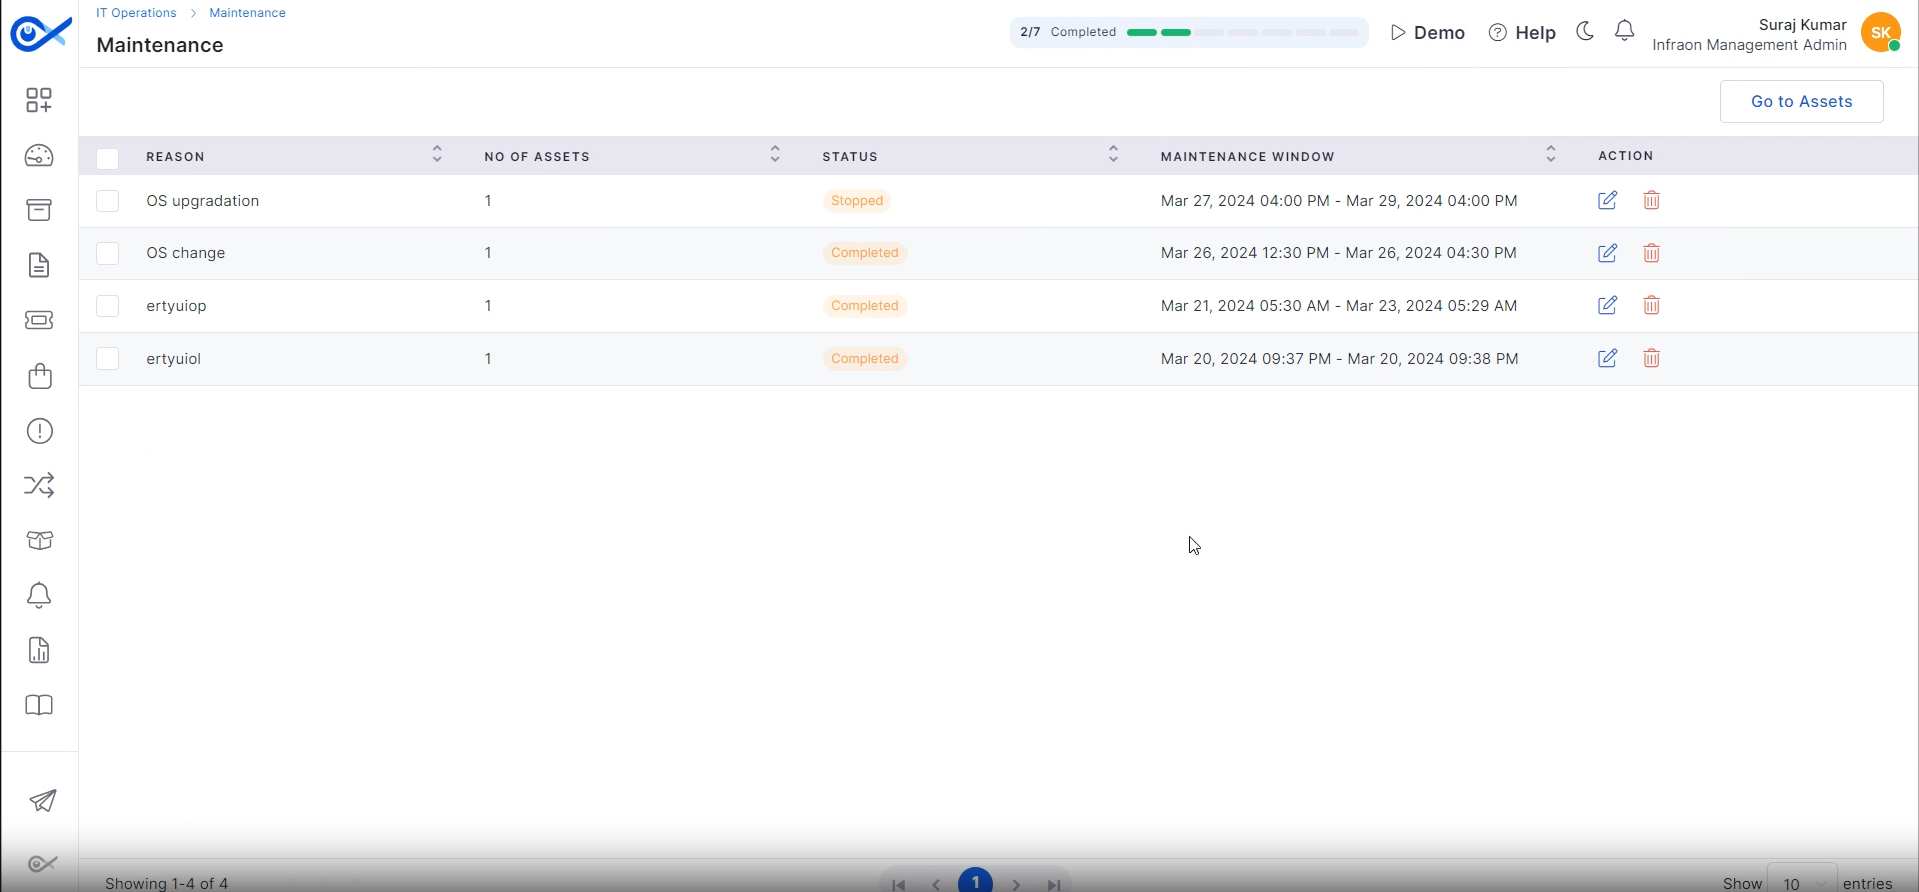
Also, in the action tab, find the maintenance option. Clicking on it will redirect you to the maintenance module, which will reflect all past and future maintenance assignments.
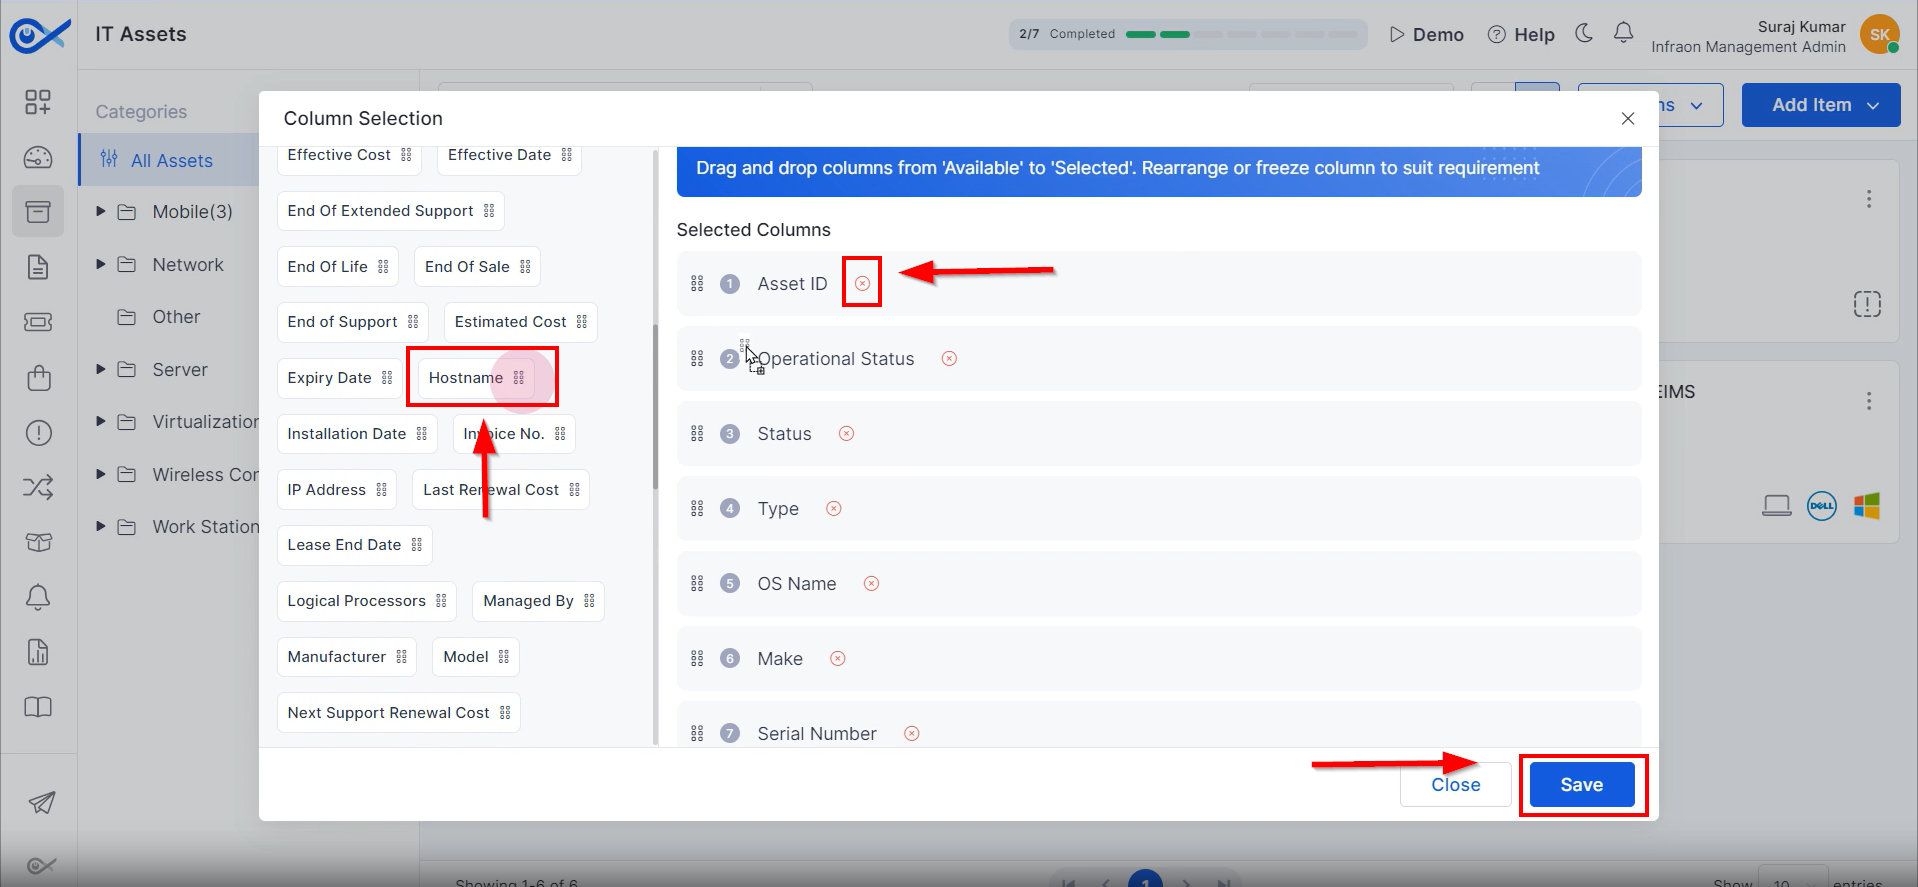
In the column selection, choose the information displayed on the asset page. To add or remove columns, click on the cross option to remove a column. To add a selection, drag and drop it from the column selection. Once done, click on save to apply the changes. The grid view now reflects the selections just made.
Click on bulk edit to make changes to a specific category of assets using a CSV file. This option is similar to adding an asset using a CSV file.
You can download the inventory agent. This option is also available in the inventory agent located in the IT operations module.
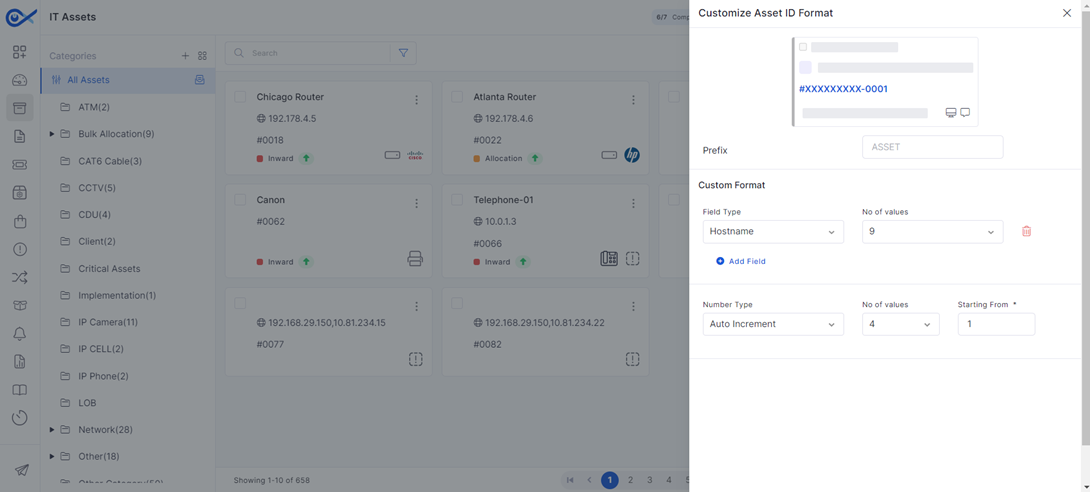
Lastly, find the customized asset ID feature. Customize the ID format of the assets created. Change the prefix and choose alphanumeric or random ID format. Define the number of values and set the conditions for them.
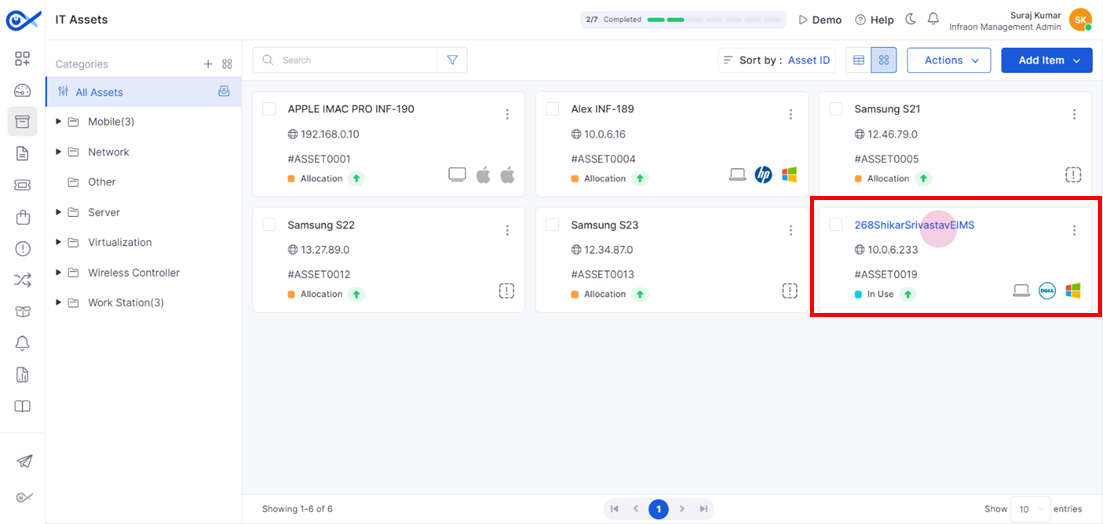
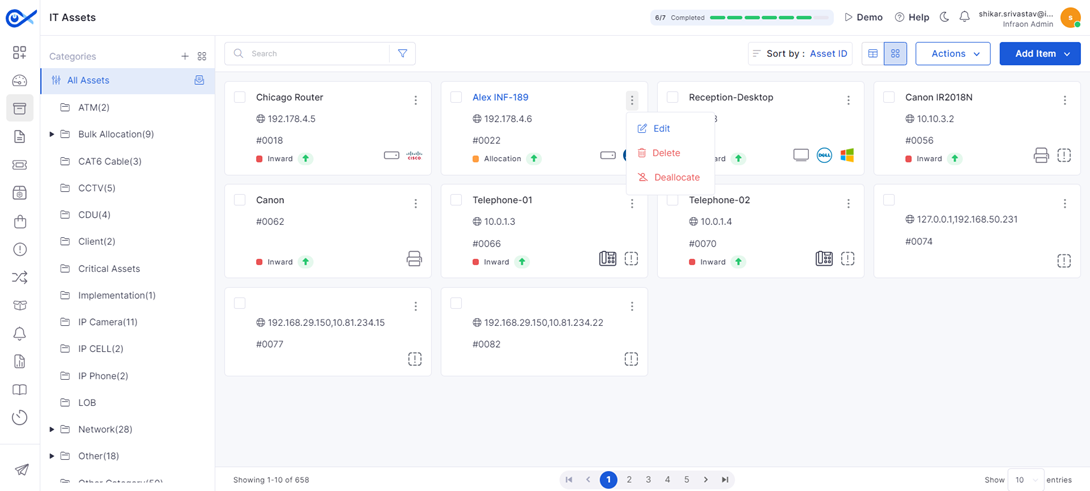
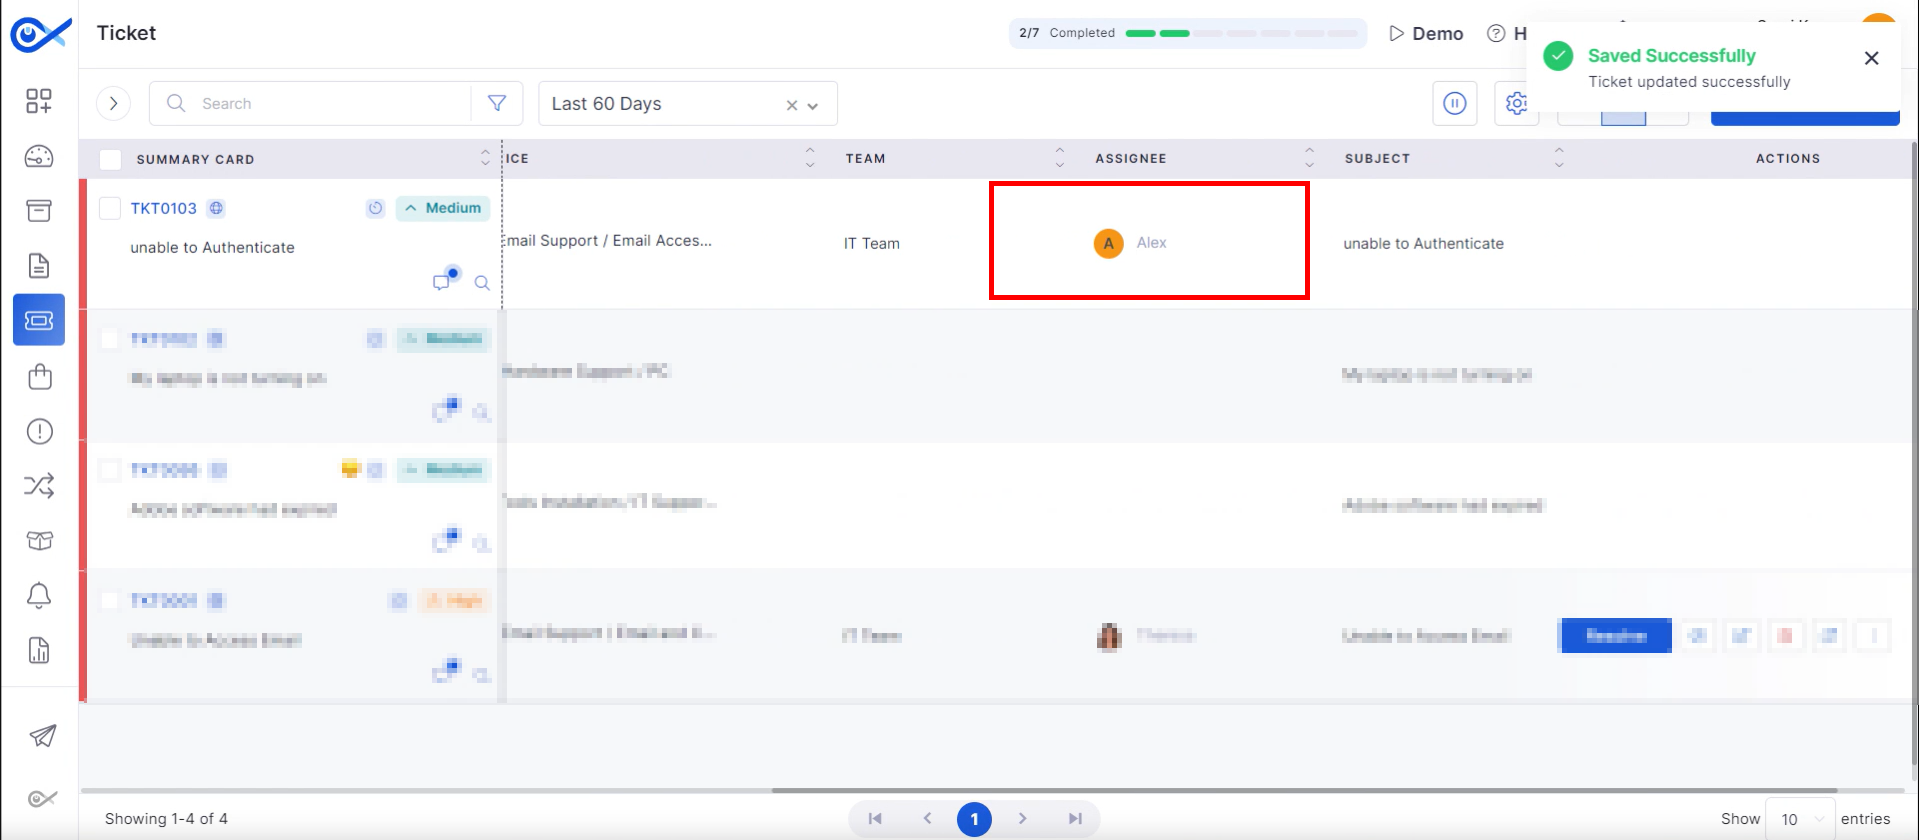
Examine an example with the asset ID "Alex INF-189" on the asset grid page. The asset name, IP, asset ID, and its status—whether it is deallocated or not—are reflected. The asset's status is also shown, indicating whether it is up or down. Next to it, the type of device, its manufacturer, and the OS version are displayed. Additionally, find a "more options" key, which allows users to edit or make changes to the asset. To delete the asset, click "delete." To allocate a user to this specific asset, click "allocate."
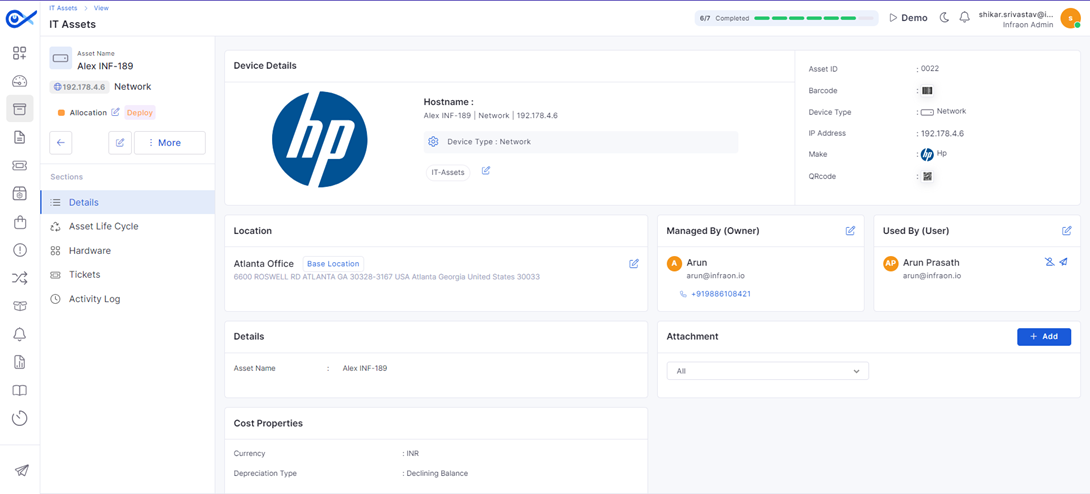
For a detailed view of the asset, click on the asset name.
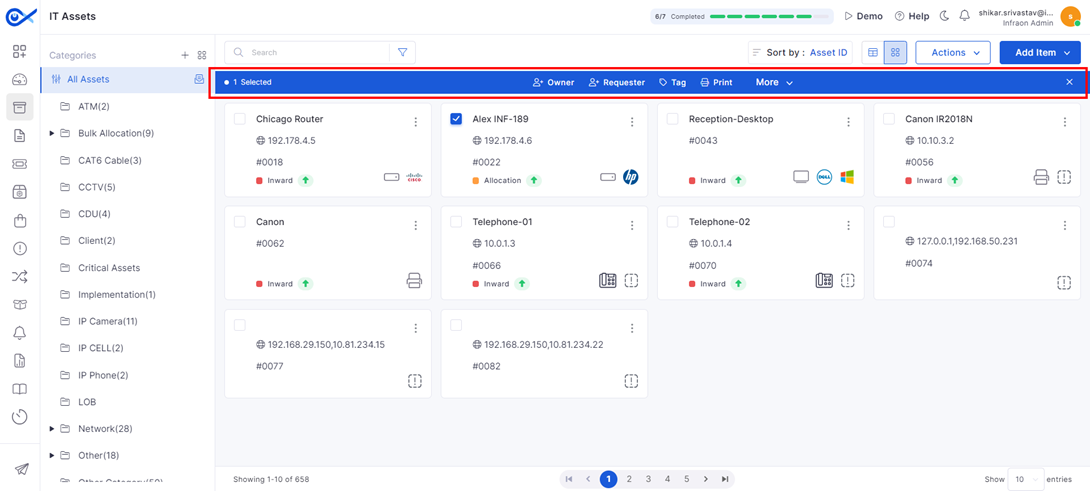
This page offers efficient bulk actions. By selecting multiple assets, a toolbar appears at the top of the page. From here, you can perform actions on selected assets, such as assigning owners, choosing requesters, applying group tags, printing, and accessing additional options.
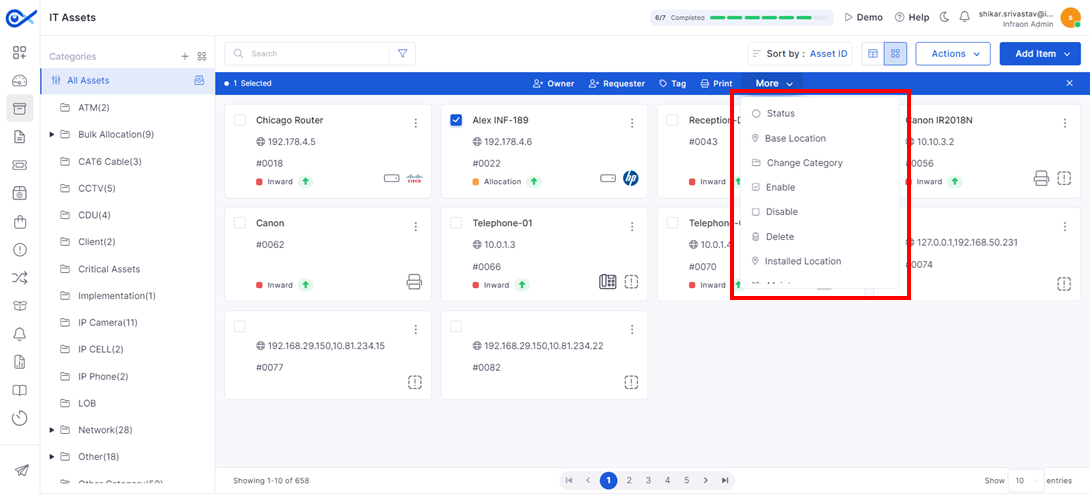
The 'More actions' option provides bulk management capabilities. By selecting multiple assets, technicians can activate, relocate, recategorize, enable/disable, delete, reinstall, schedule maintenance, or mark assets as CI.
The left panel displays categories and subcategories for both fixed and IT assets. You can also perform actions such as editing, deleting, adding new categories, creating category templates, and adding custom fields.
This concludes the overview of the Infraon Infinity IT asset and the fixed asset management tab.
This guide outlines a technician or engineer's process for working on a ticket, from creation to resolution. Tickets follow a specific workflow, which are the steps or guidelines to follow when resolving a ticket, request, or problem.
NOTE: This demonstration will outline a default ticket workflow process implemented in Infraon Infinity. A comprehensive understanding can be gained by exploring the “Ticket Workflow” module under “Infraon Configuration -> Infraon Automation -> Workflow -> Ticket.”
Ticket Workflow
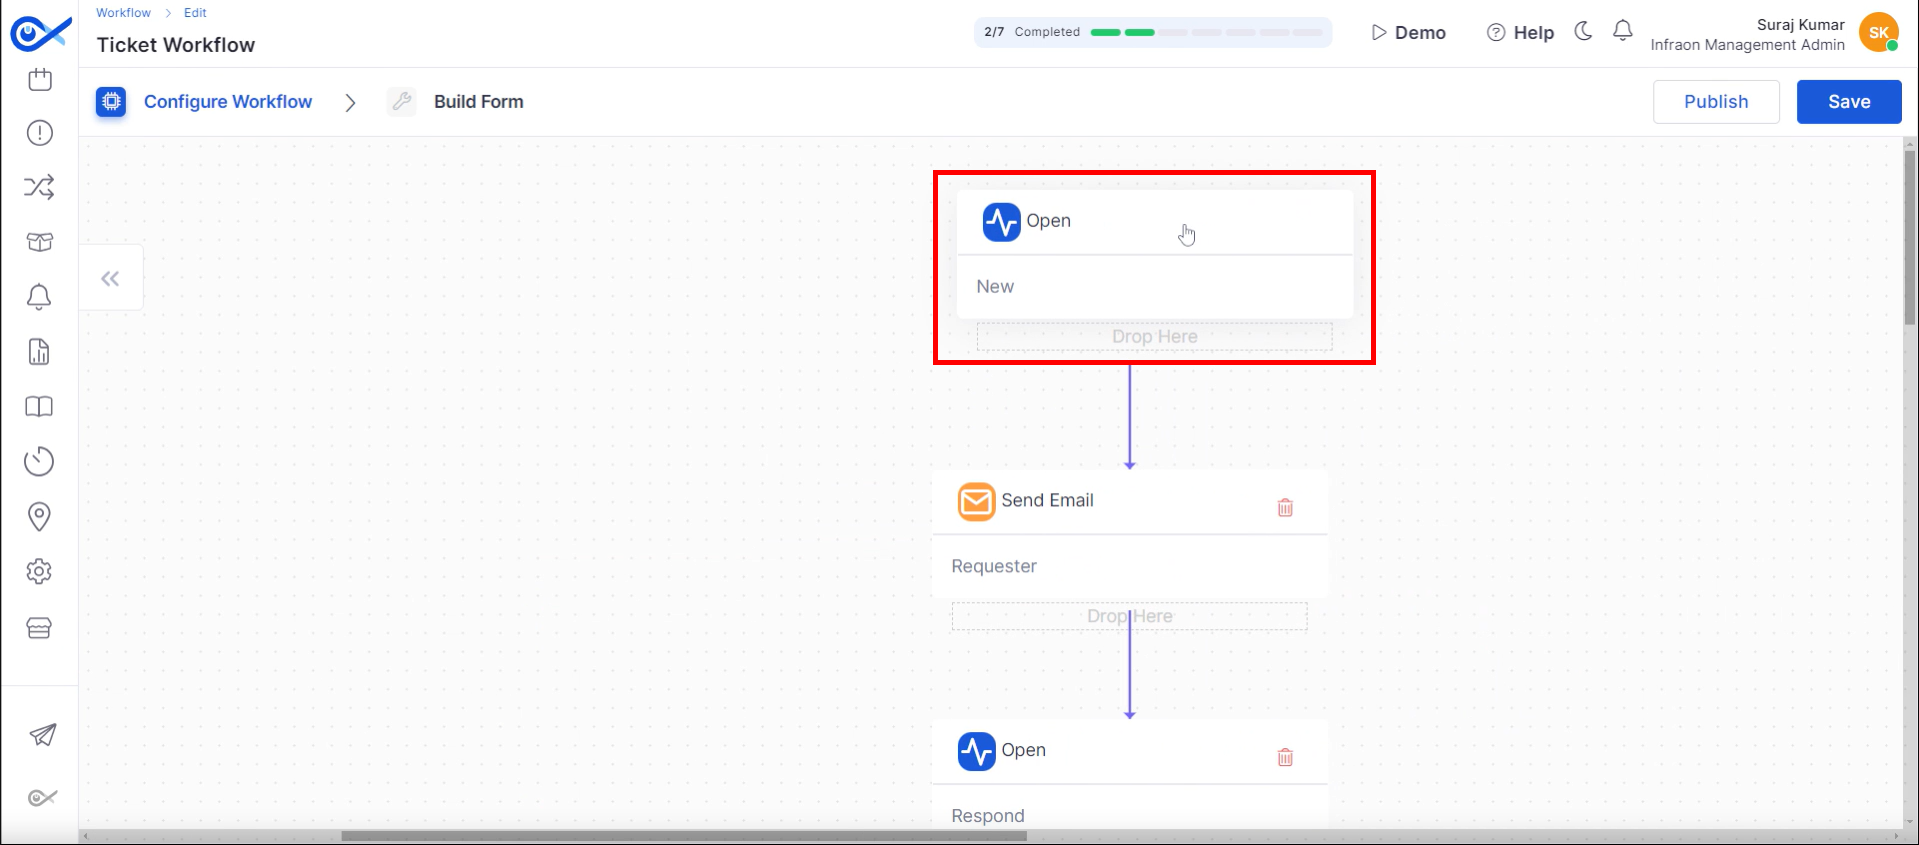
When a new ticket is generated within the system, its lifecycle is initiated in the “Open and New” state.
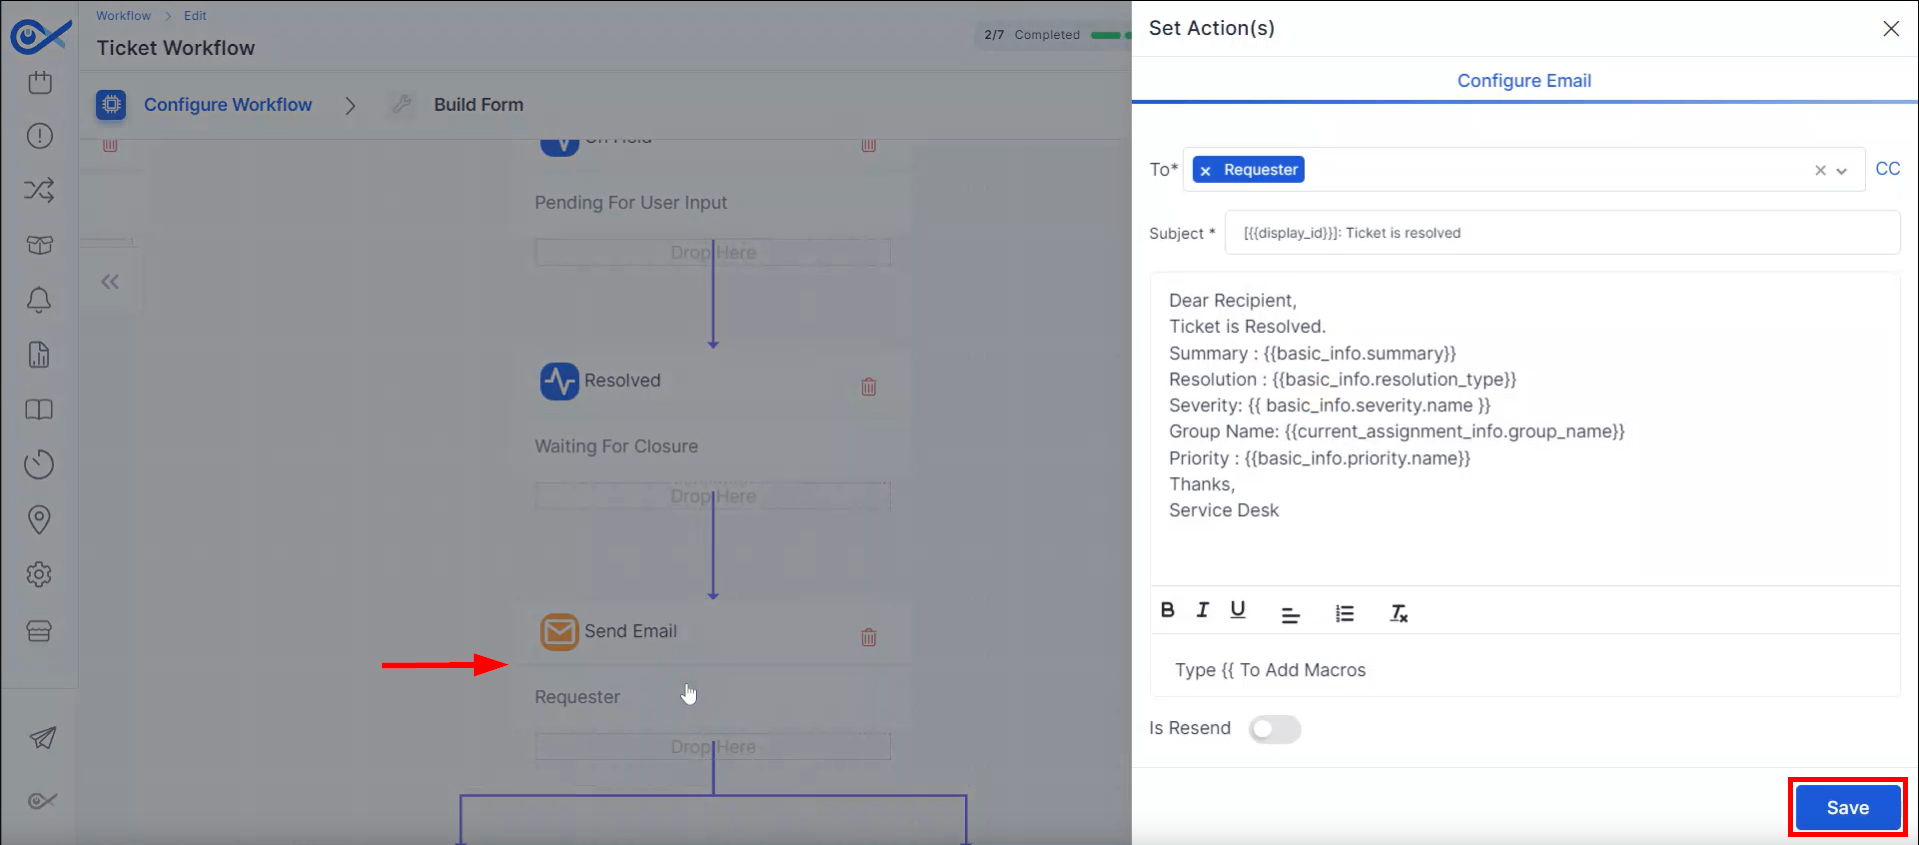
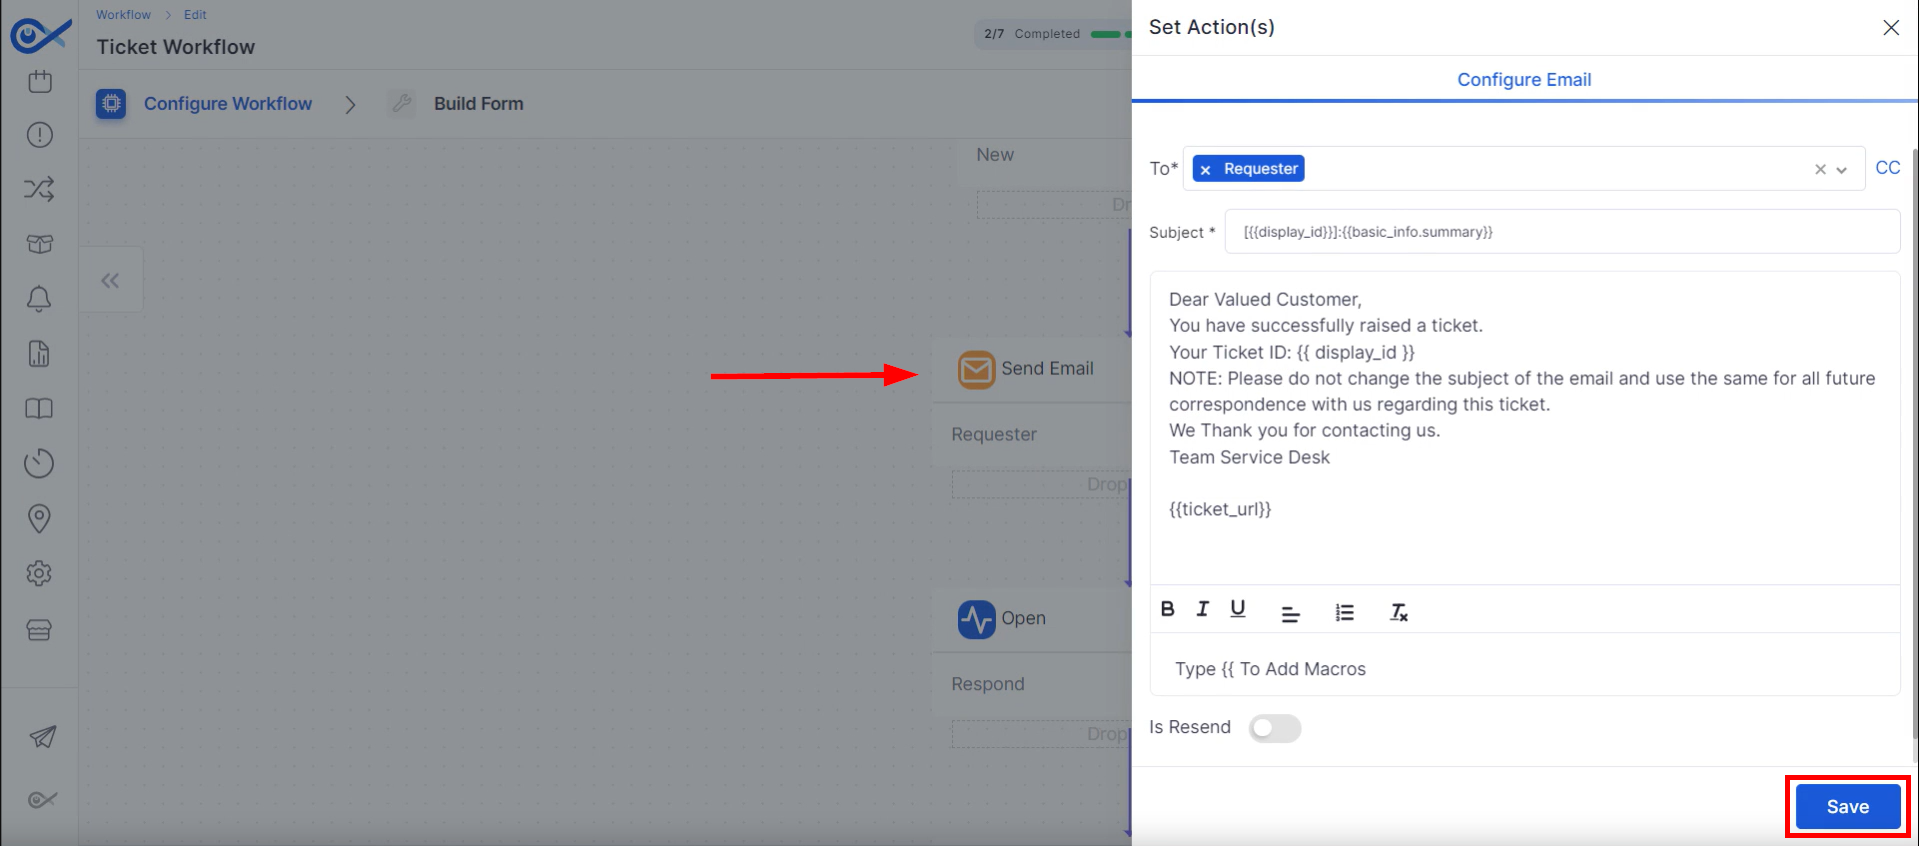
An automated email acknowledging ticket creation is sent to the end user. Email content can be customized using available macros.
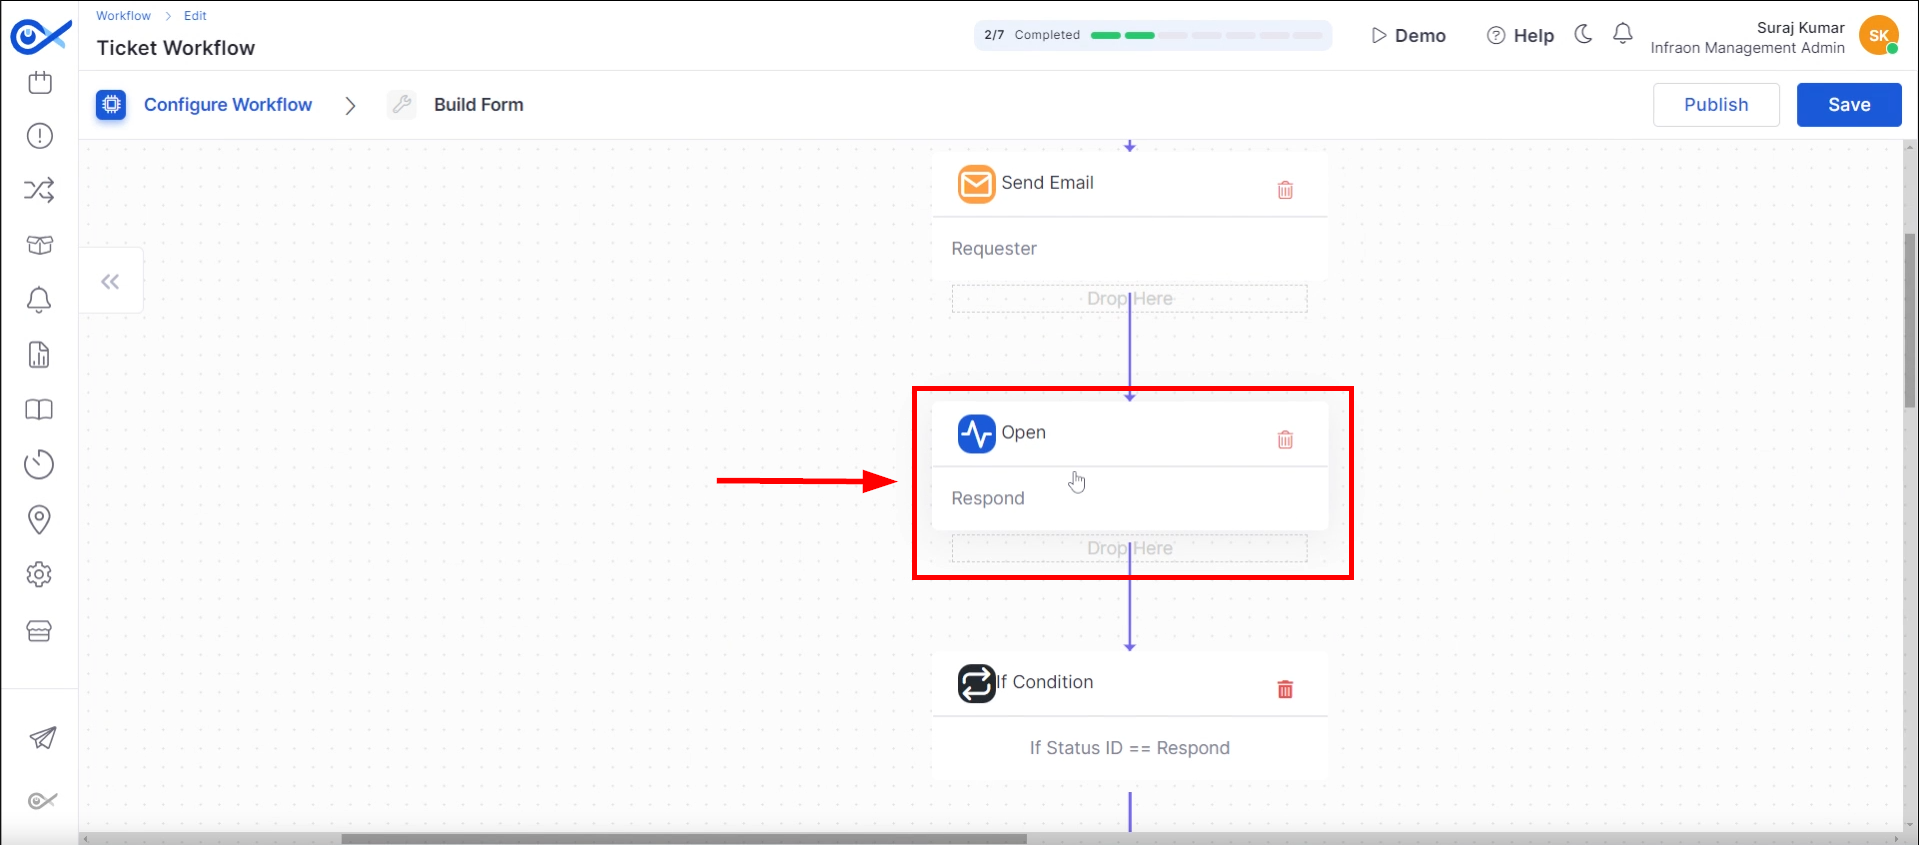
The ticket status is updated to “Open-Responded,” signifying the commencement of technician involvement.
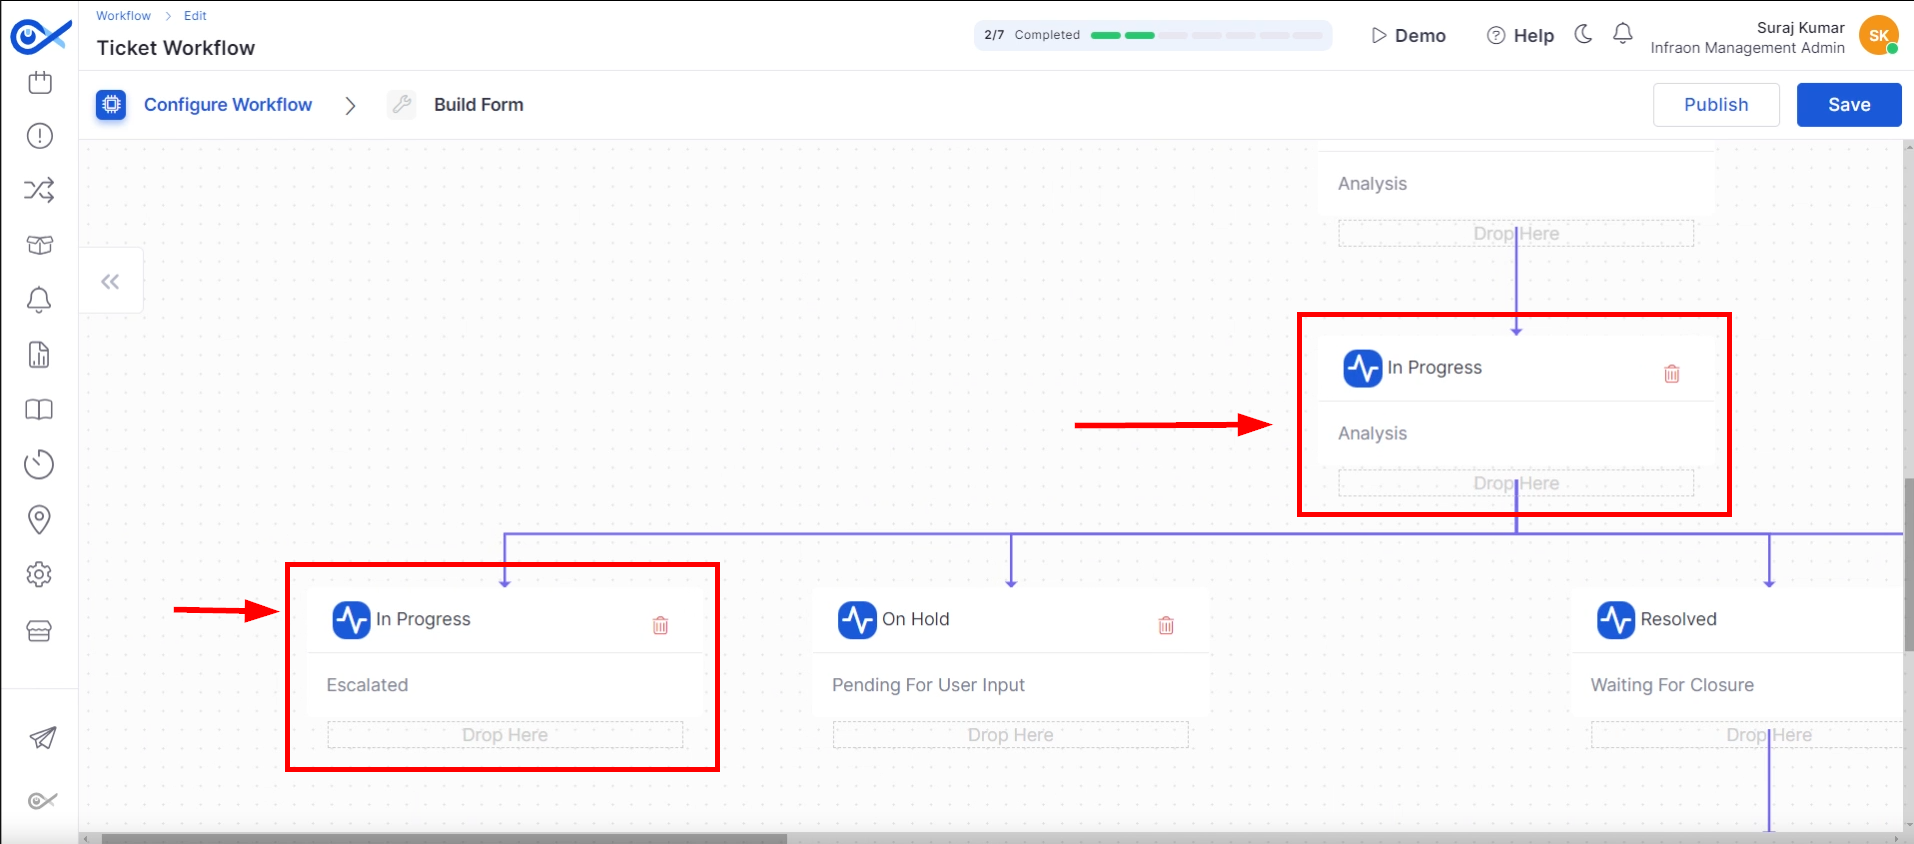
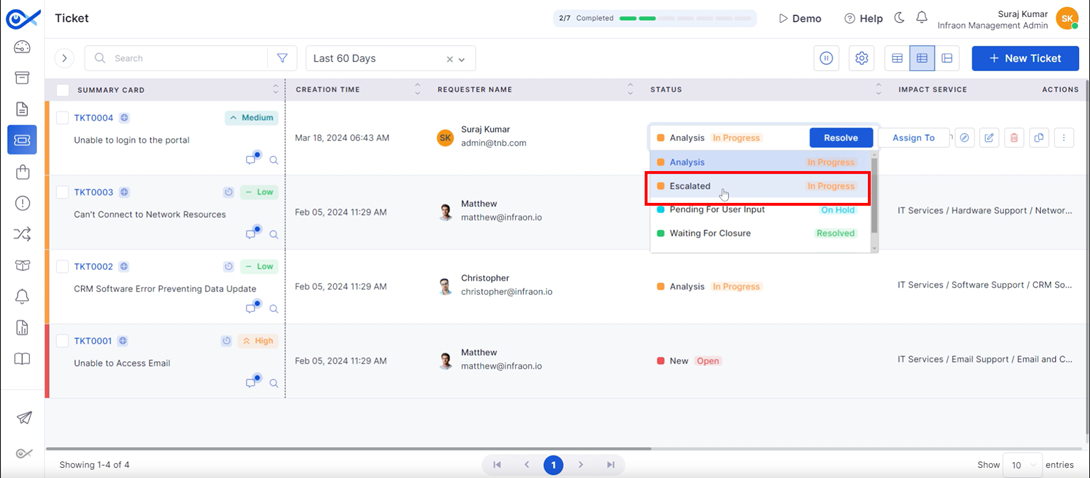
The ticket transitions to the “In-Progress Analysis” state. This phase may include sub-statuses like “In-Progress Escalated” for elevated issues.
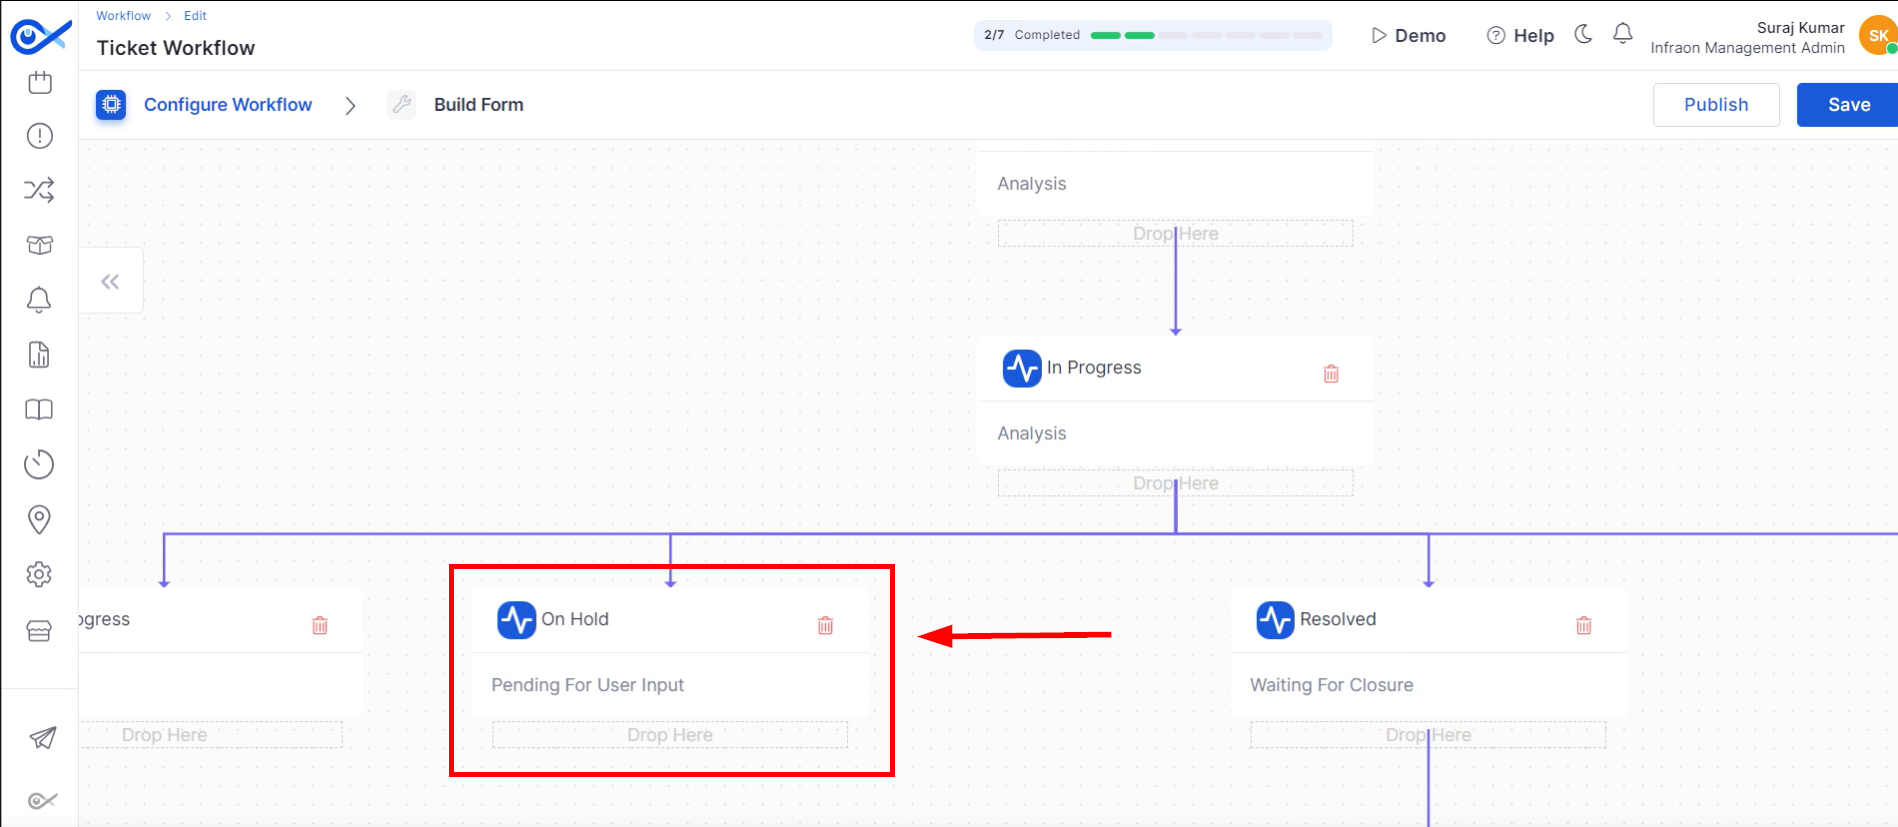
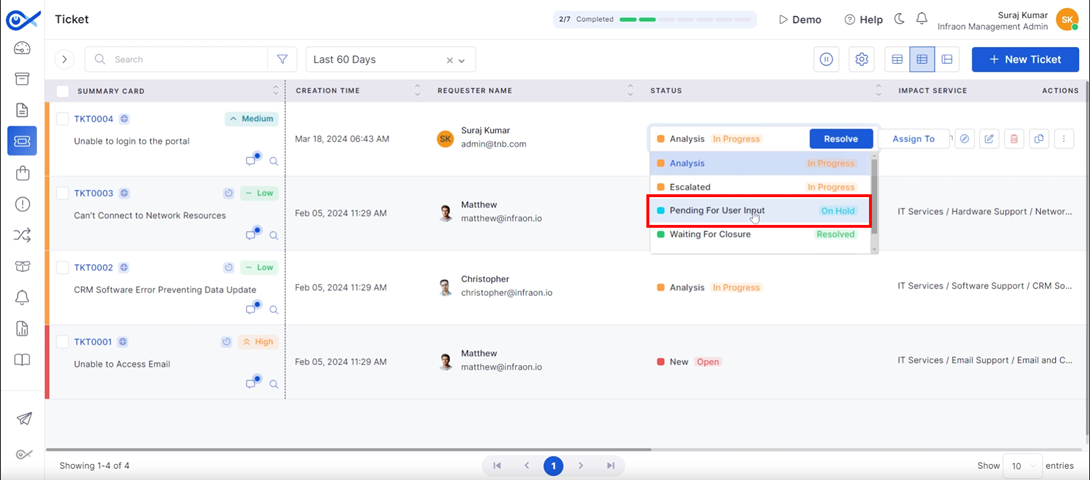
If the end user is required to provide additional information, the ticket can be placed on hold in the “Pending for User Input” state. SLA timers are paused during this phase.
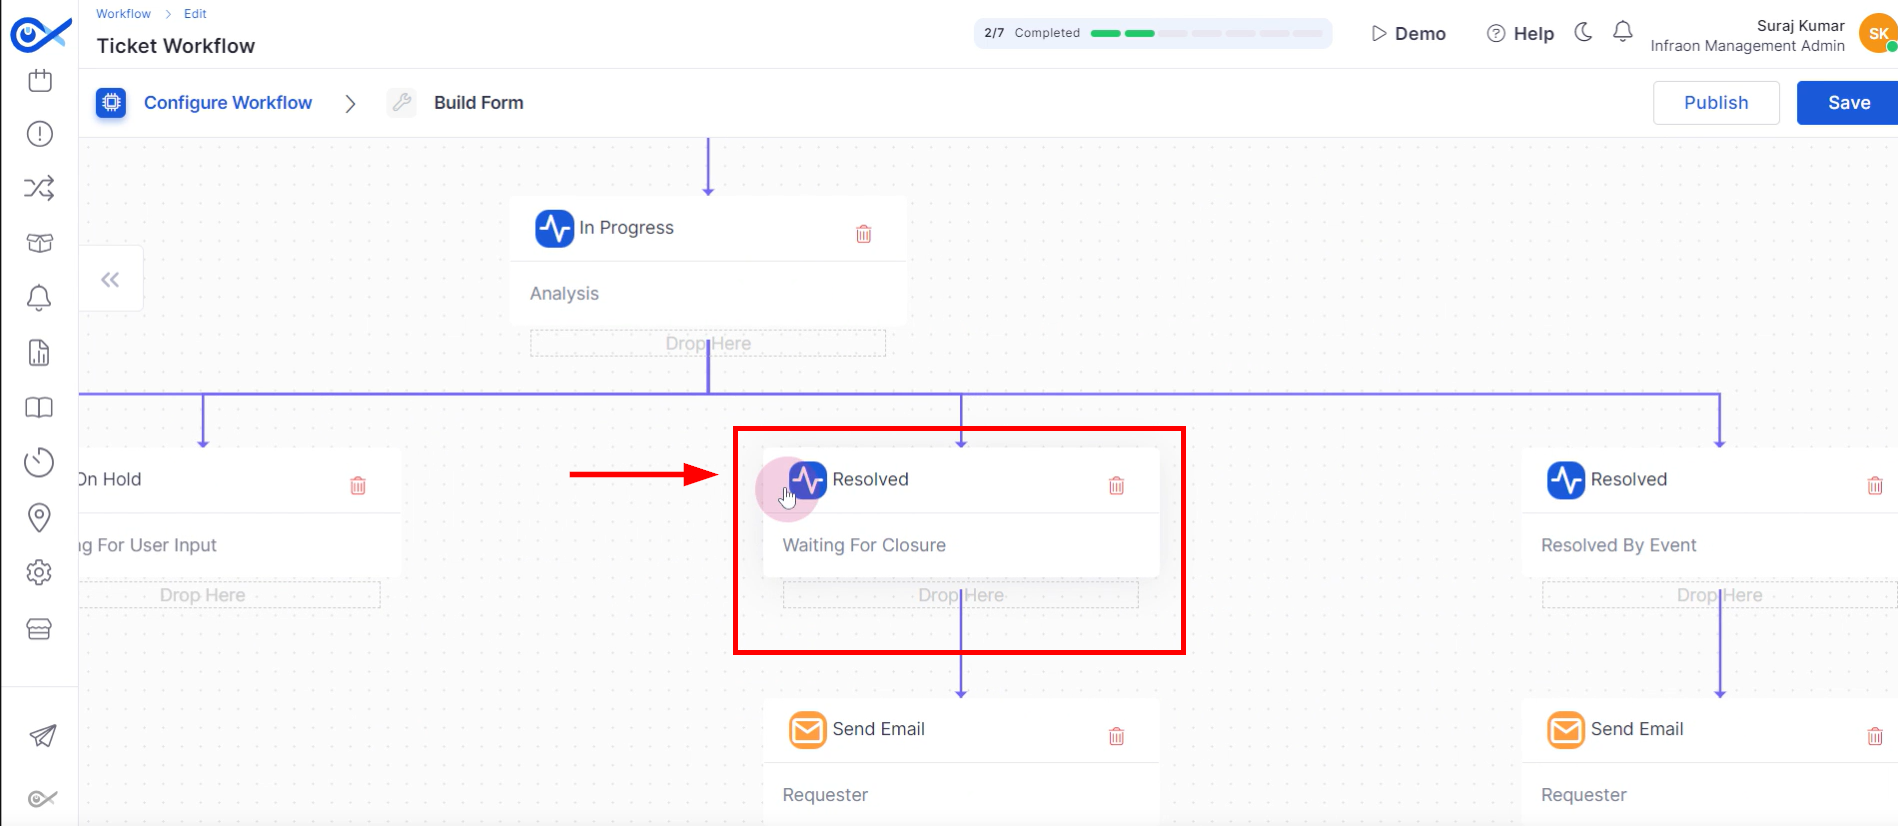
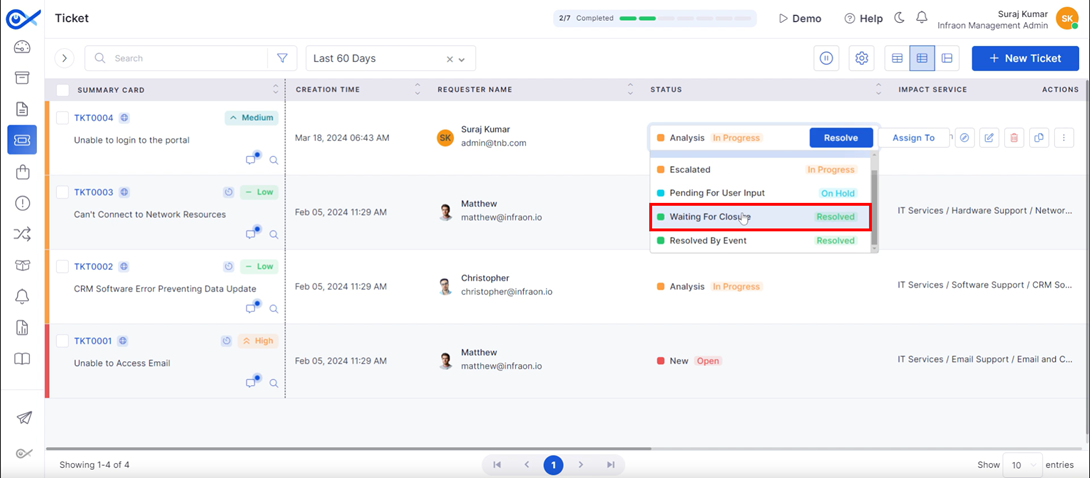
Once a solution is determined, the ticket status is changed to “Resolved and Waiting for Closure.”
An email is sent to relevant parties informing them of the ticket resolution, including a summary and solution details.
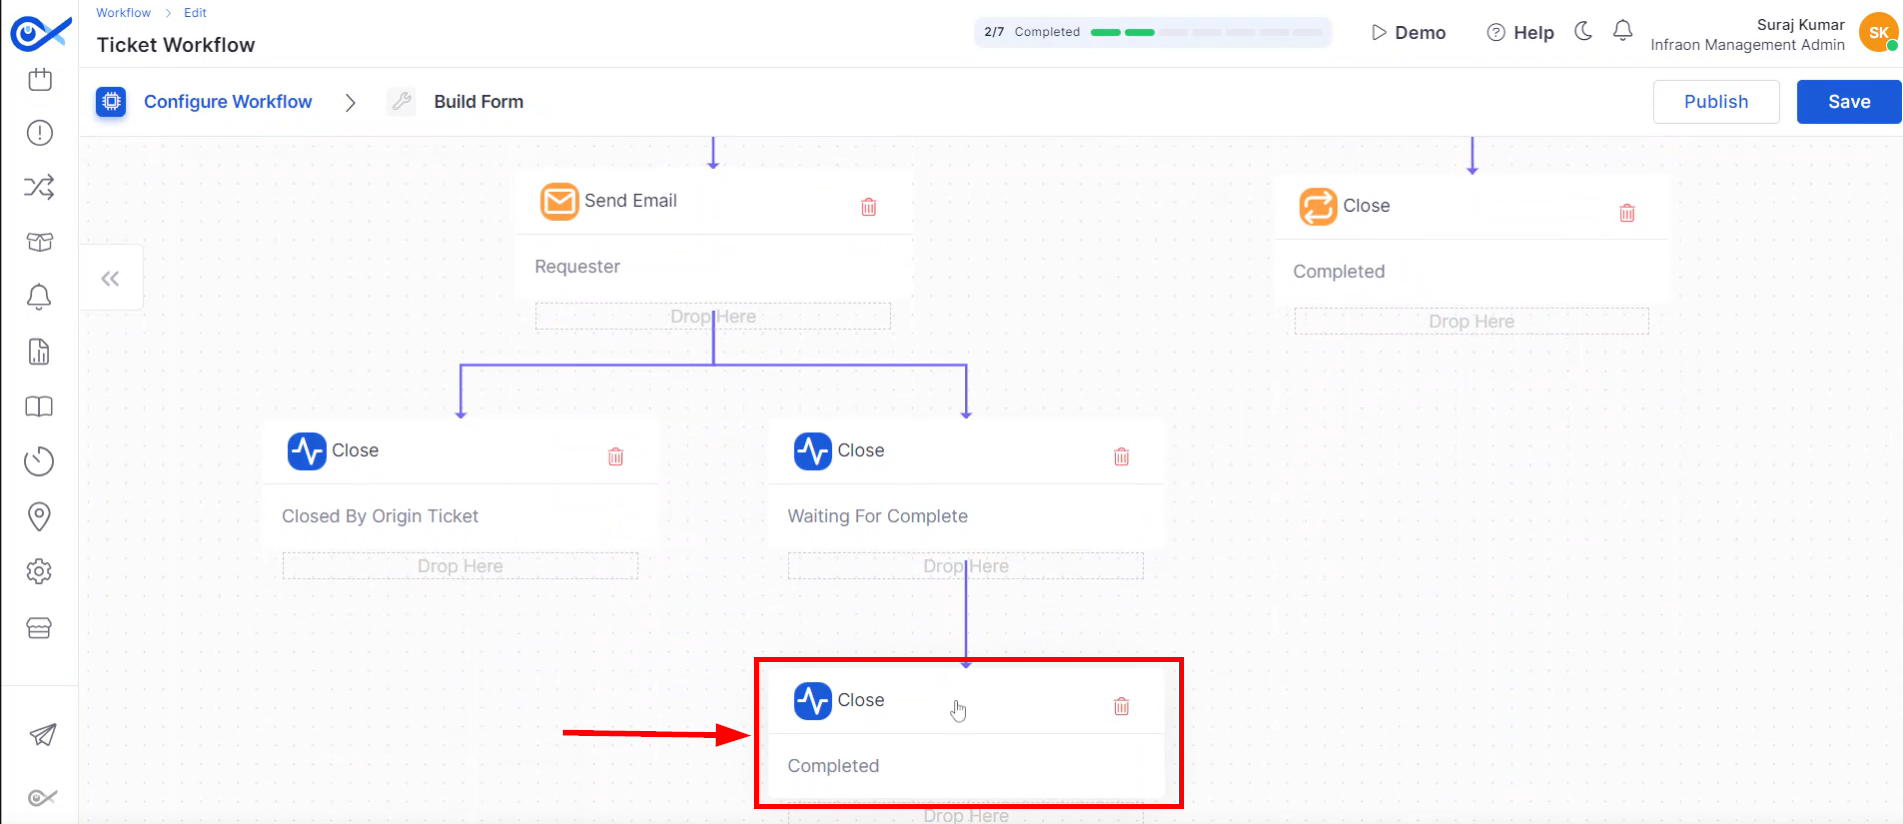
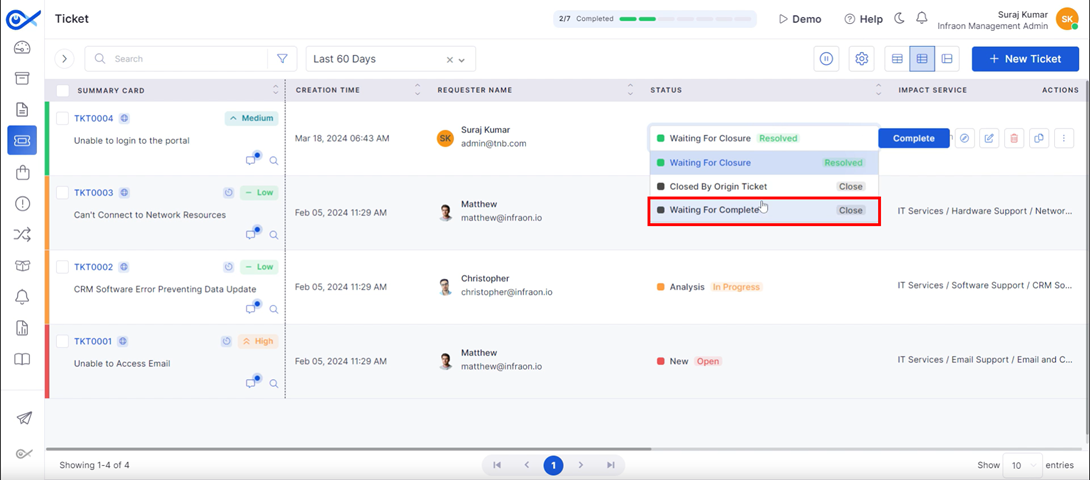
The ticket is officially closed upon confirmation from the end-user.
The ticket will be automatically closed if there is no response from the end user within a specified timeframe.
This outlines the standard ticket workflow. The following sections will detail how this workflow is implemented within the tool and technicians' specific actions when assigned a ticket.
Whenevera new ticket is generated, it is assigned to the technician based on predefined rules or manual allocation.
Essential ticket details, including the end-user, are populated. The ticket's initial status is then set to “New and Open.”
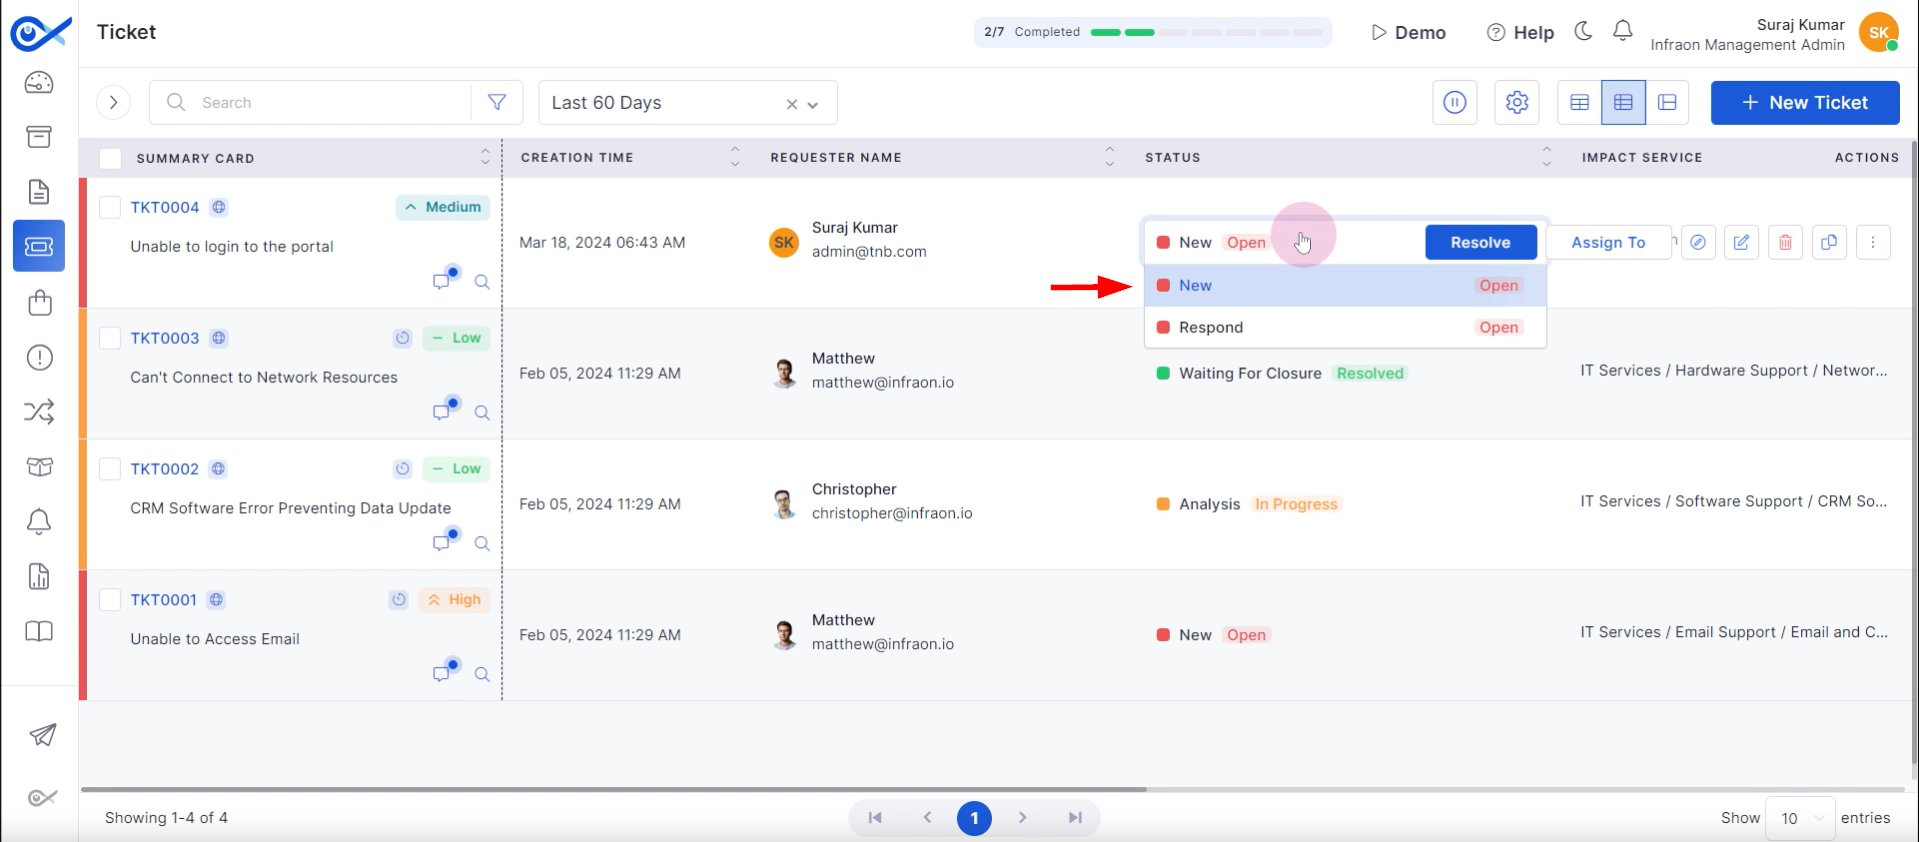
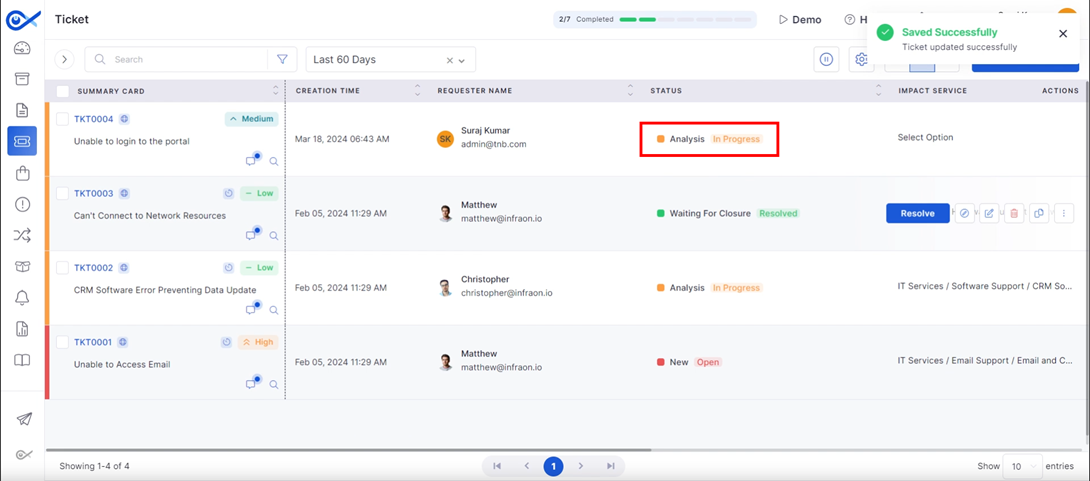
Upon acknowledging the ticket, the technician changes its status to “In-Progress Analysis.”
As the investigation progresses, the ticket status is updated accordingly. If additional information is required from the end user, the status is changed to “Pending for User Input.”
In case of escalation, the status is updated to “Escalated.”
Once a solution is determined, the ticket is marked as “Resolved and Waiting for Closure.”
The end user is then presented with options to close or reopen the ticket.
Upon closure confirmation from the end user or system timeout,
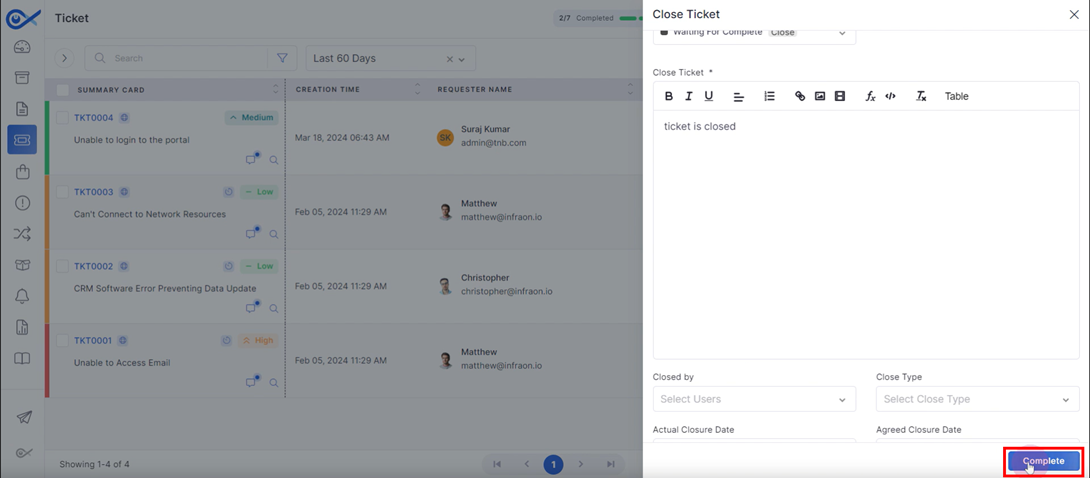
the ticket is finalized with a closing note.
This concludes the overview of a technician's workflow when handling an assigned ticket.
Ticket Assignment (Automatic)
This guide will explore the automatic ticket assignment feature in the Infraon Infinity platform. This feature offers two options: Team Assignment and Business Rule.
Team Assignment
Team assignment is a process of automatically allocating technicians to resolve issues. When a ticket is created, the associated impacted service triggers the assignment. Predefined linkages between impacted services and responsible teams direct the ticket to the appropriate team. Subsequently, the ticket is assigned to a specific technician within that team.
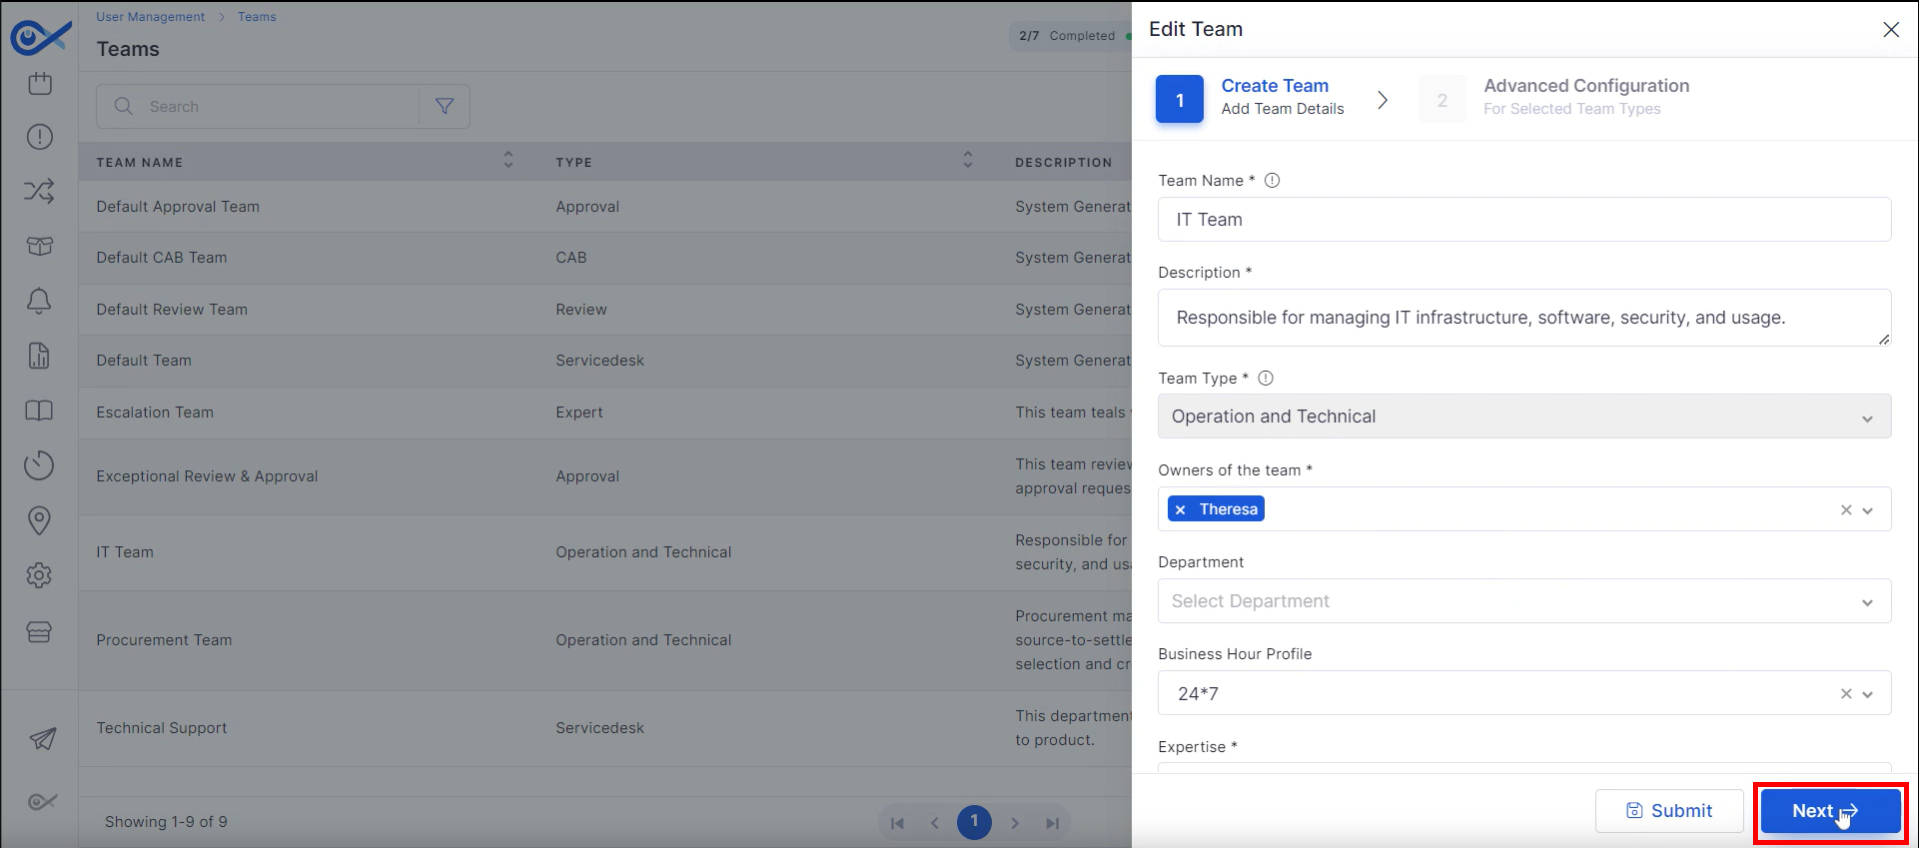
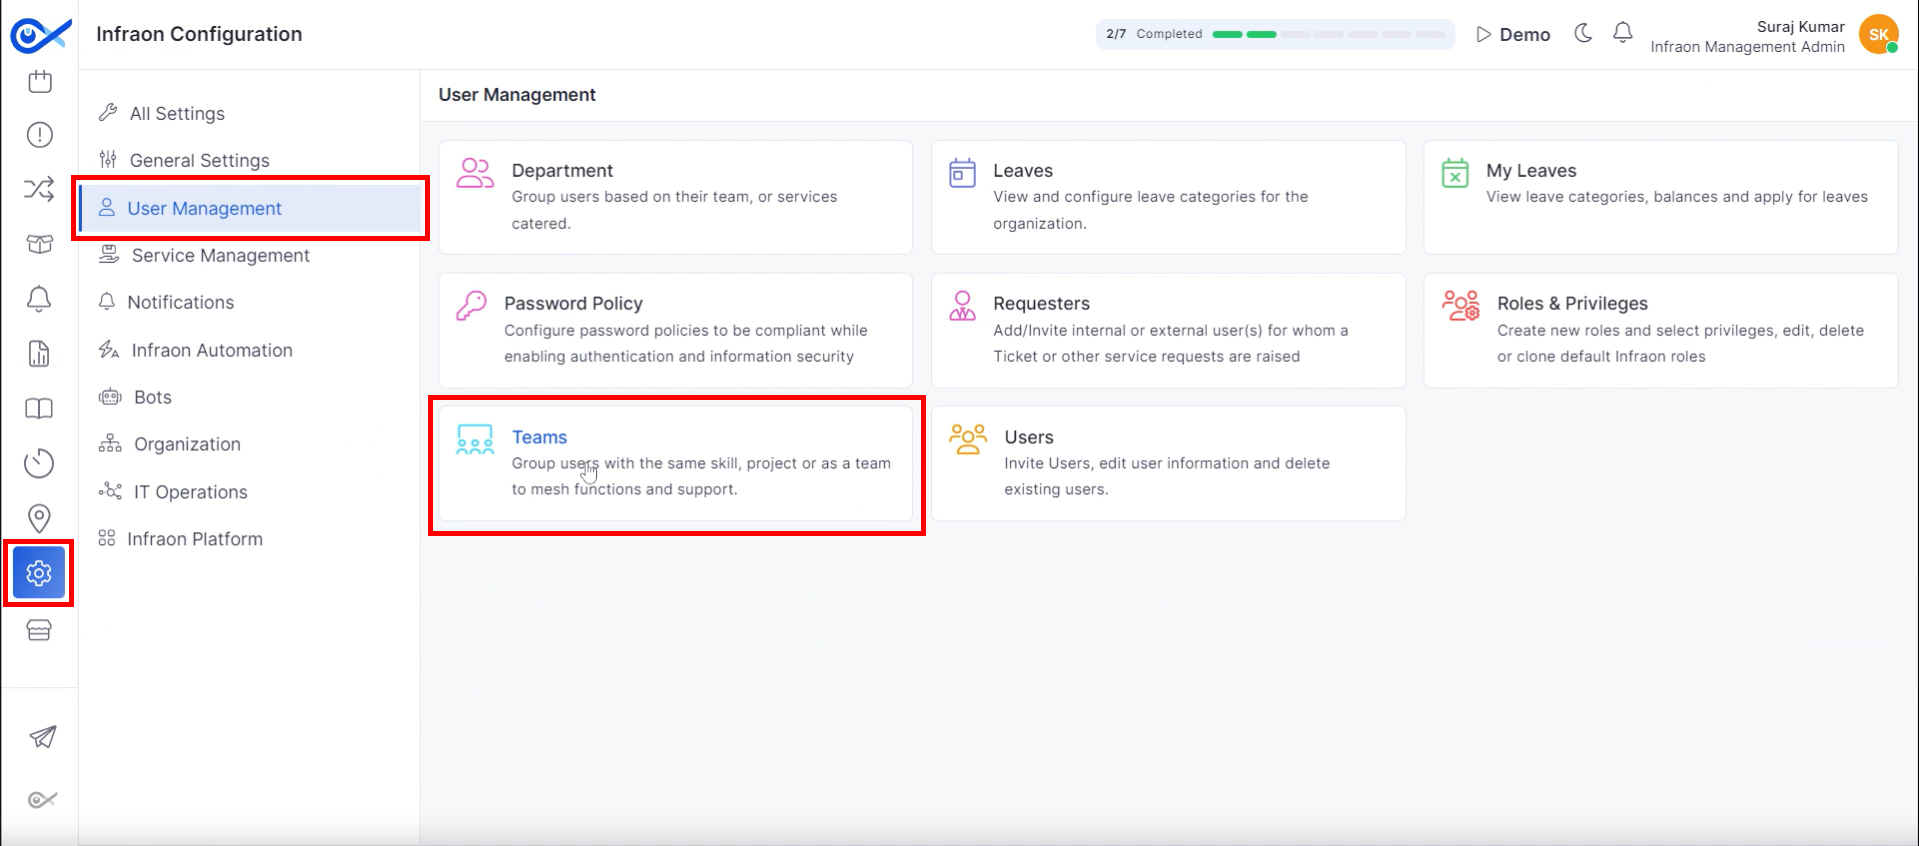
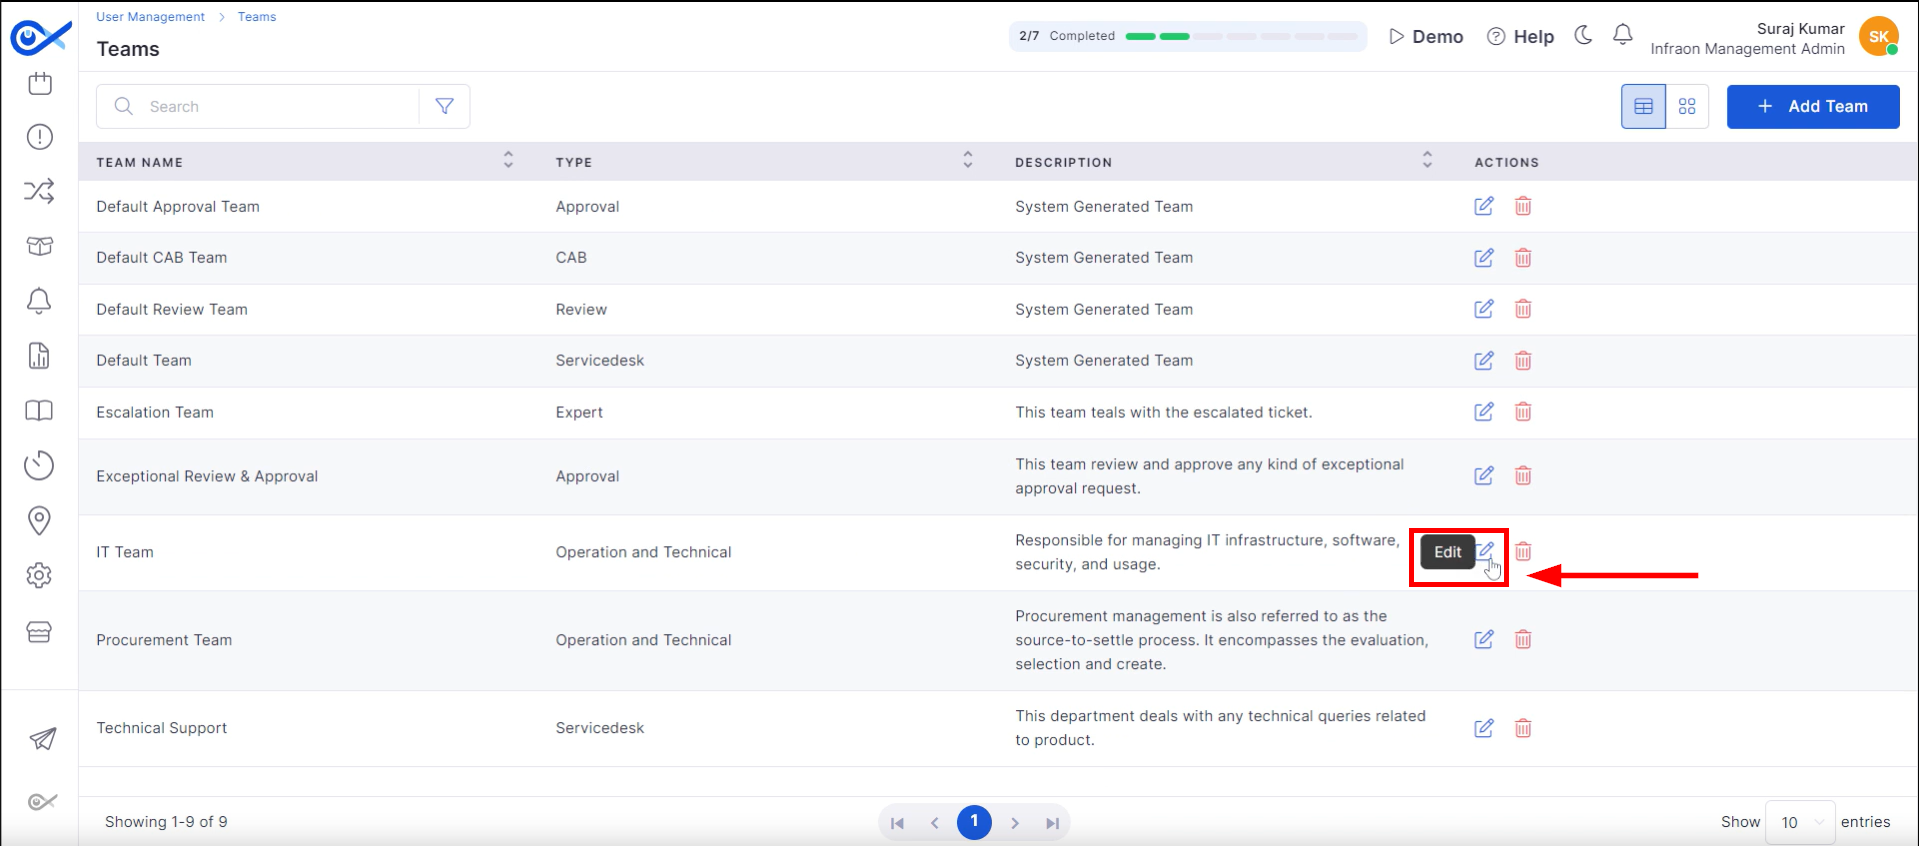
Step 1: Navigate to the “Infraon Configuration” module, then proceed to the “User Management” tab and select the “Teams” module to configure automated ticket assignment.
Step 2: To evenly distribute ticket workload among technicians within a specific team, select the desired team and click the “Edit” button to modify team assignments.
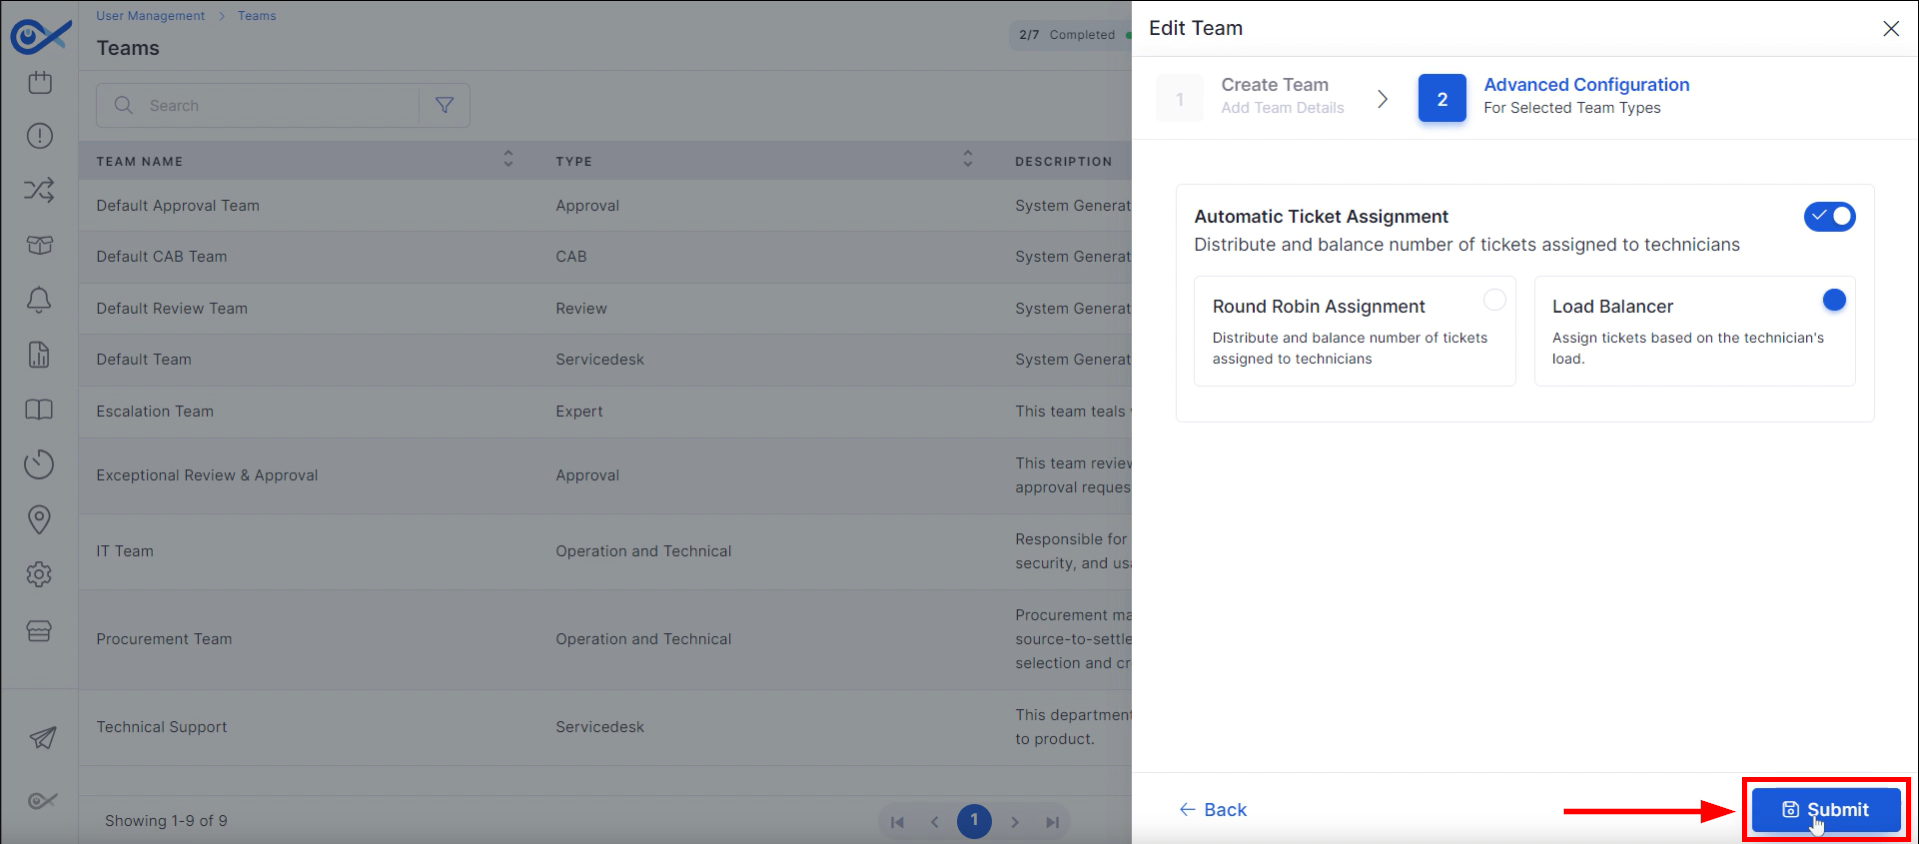
Step 3: Access the advanced configuration by clicking “Next” in the pop-up window. Within this section, enable automatic ticket assignment.
There are two methods: Round Robin Assignment and Load Balancer.
Round Robin ticket assignment evenly distributes incoming tickets among available technicians. For example, if a team consists of Alice, Bob, and Carol, the tickets would be assigned in the following order: Ticket 1 to Alice, Ticket 2 to Bob, Ticket 3 to Carol, Ticket 4 back to Alice, and so forth, continuing this cycle.
The load Balancer method considers the current workload of available agents to ensure a balanced distribution of tickets. For instance, if Alice is handling 6 tickets, Bob 2, and Carol 5, a new ticket would be assigned to Bob, as he currently has the lightest load. The load balancer continuously adjusts to distribute the workload evenly.
Step 4: Make appropriate configuration selections and confirm choices by clicking the “Submit” button.
This marks the end of the explanation of how automatic ticket assignment functions within the Infraon Infinity Teams framework.
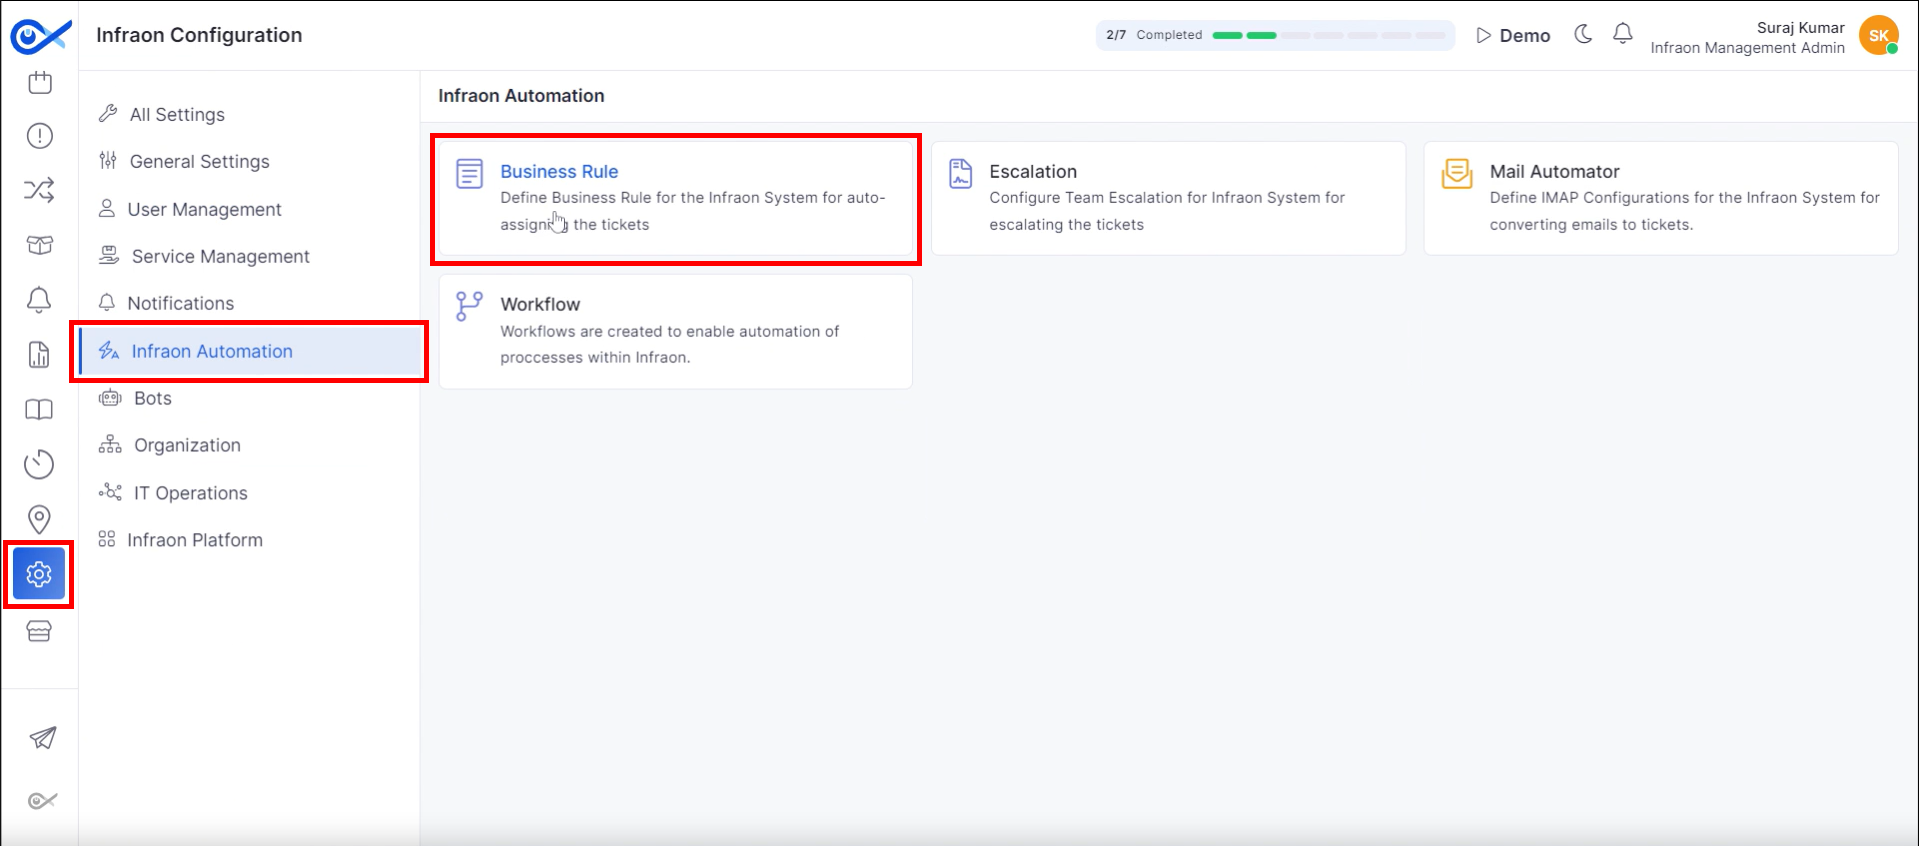
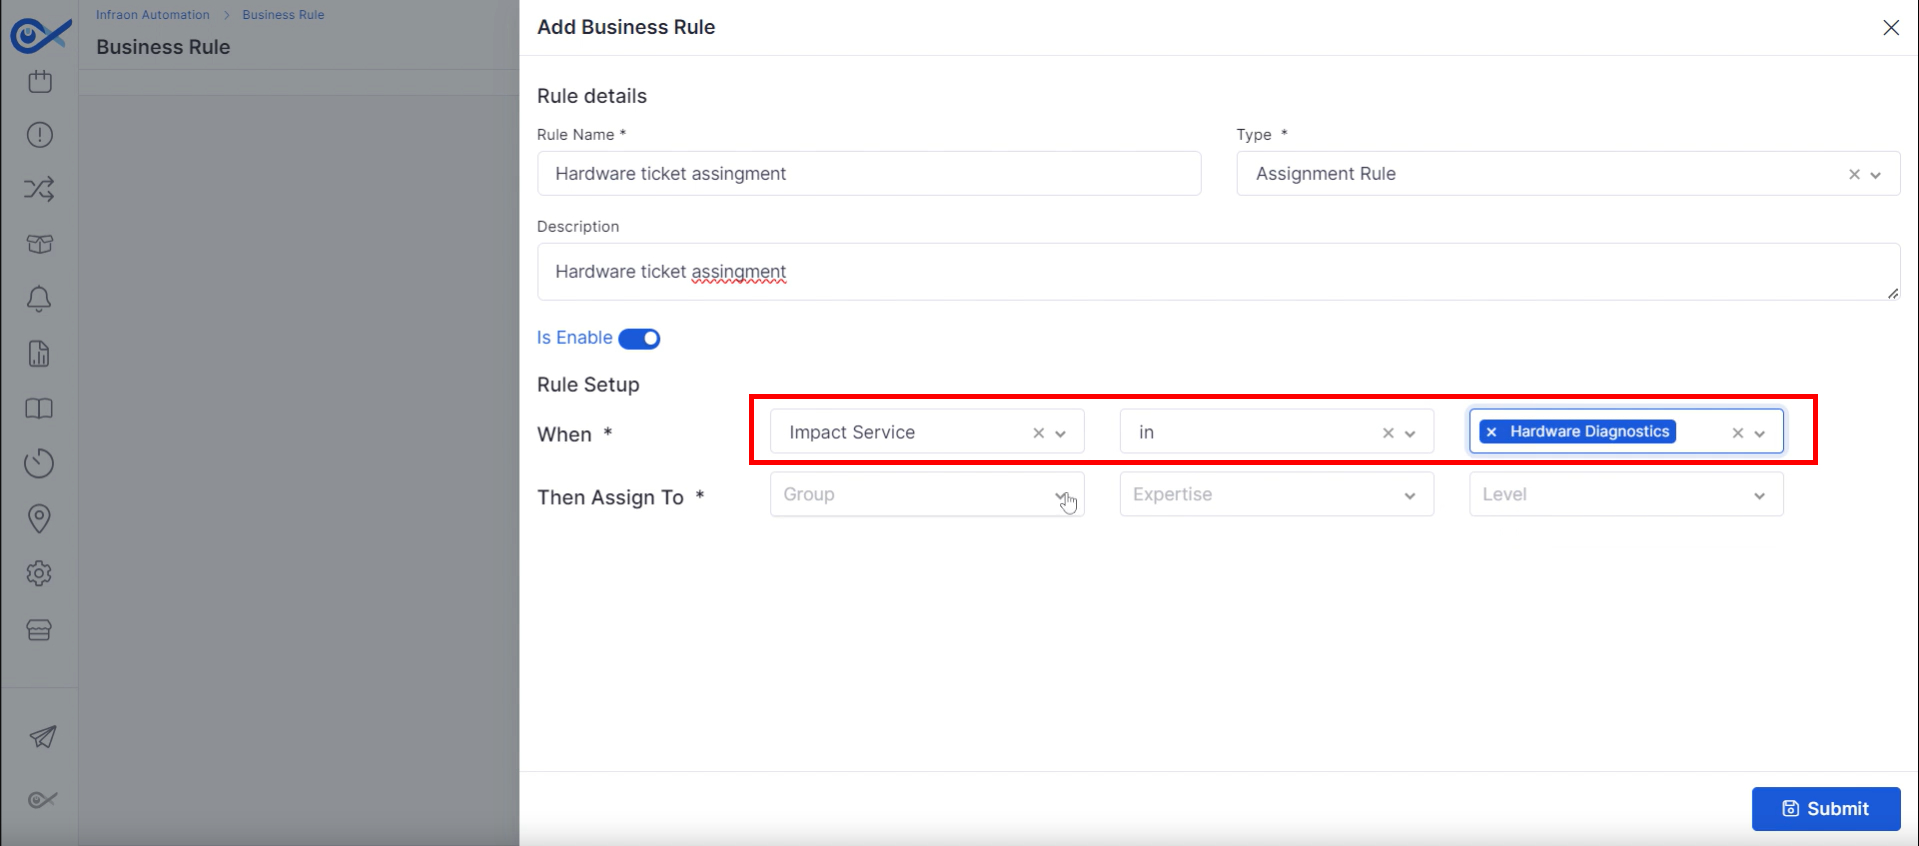
Business Rules automatically assign tickets based on the impacted service and requester tag. For example, if a ticket is created for a specific impacted service, it is automatically assigned to the Level configured for that service.
Step 1: Navigate to the “Infraon Configuration” module, then proceed to the “Infraon Automation” tab and select the “Business Rule” module to configure automated ticket assignment.
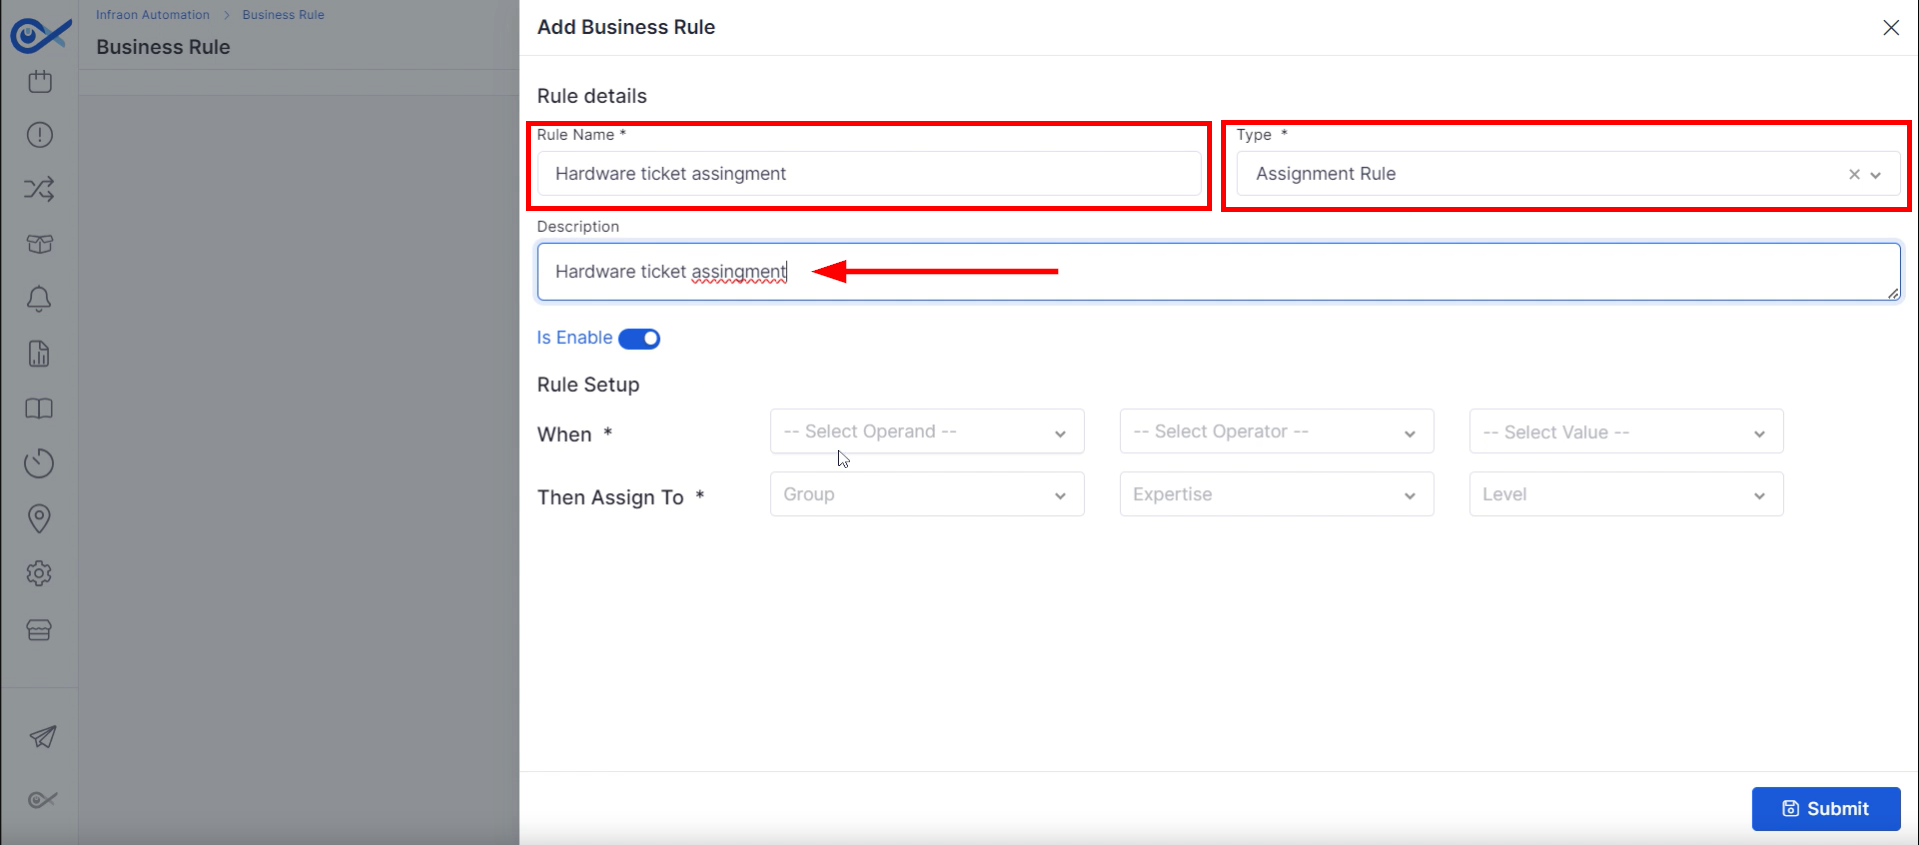
Step 2: Begin the rule creation process by inputting a rule name, determining the rule type, and supplying a brief description.
Step 3: In the “When” column, establish rule conditions by selecting an Operand (such as Impact service), applying an Operator (like 'in'), and defining the desired Value.
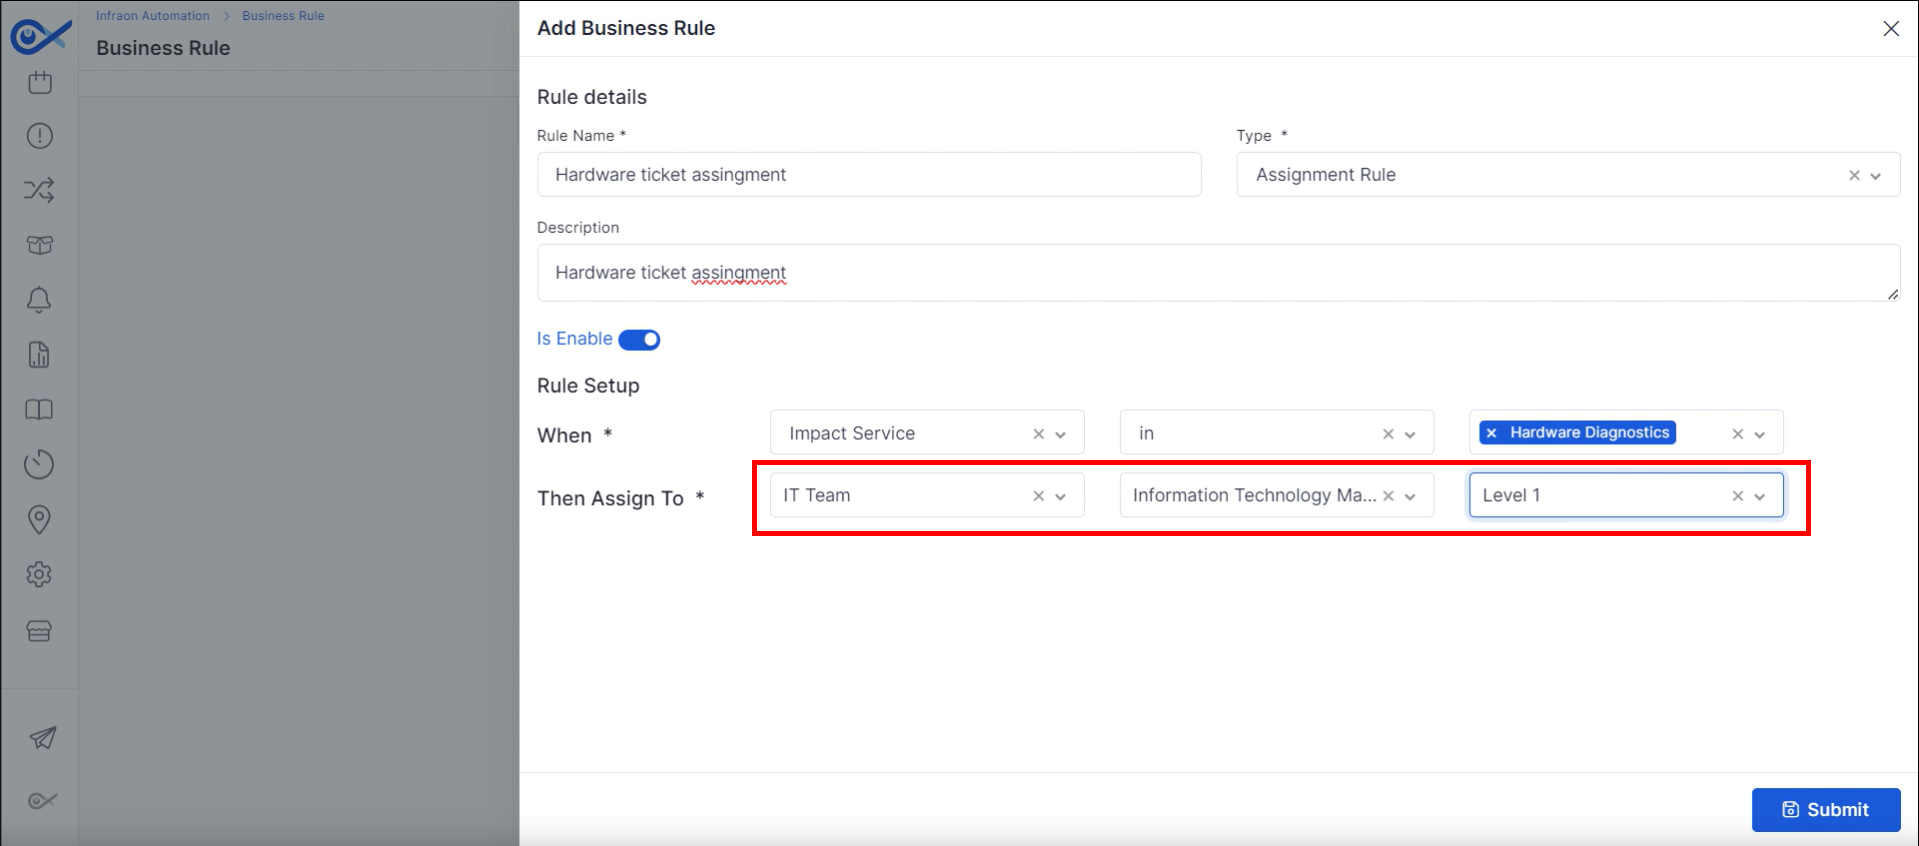
Step 4: In the "Then Assign To" section, define the assignment criteria by inputting the target Group, Expertise requirements, and impact service Level.
Once theconfiguration ismade, click “Submit.”
For example, if the impact service is hardware diagnostics, any ticket created with this service will be automatically assigned to the IT team level one technician.
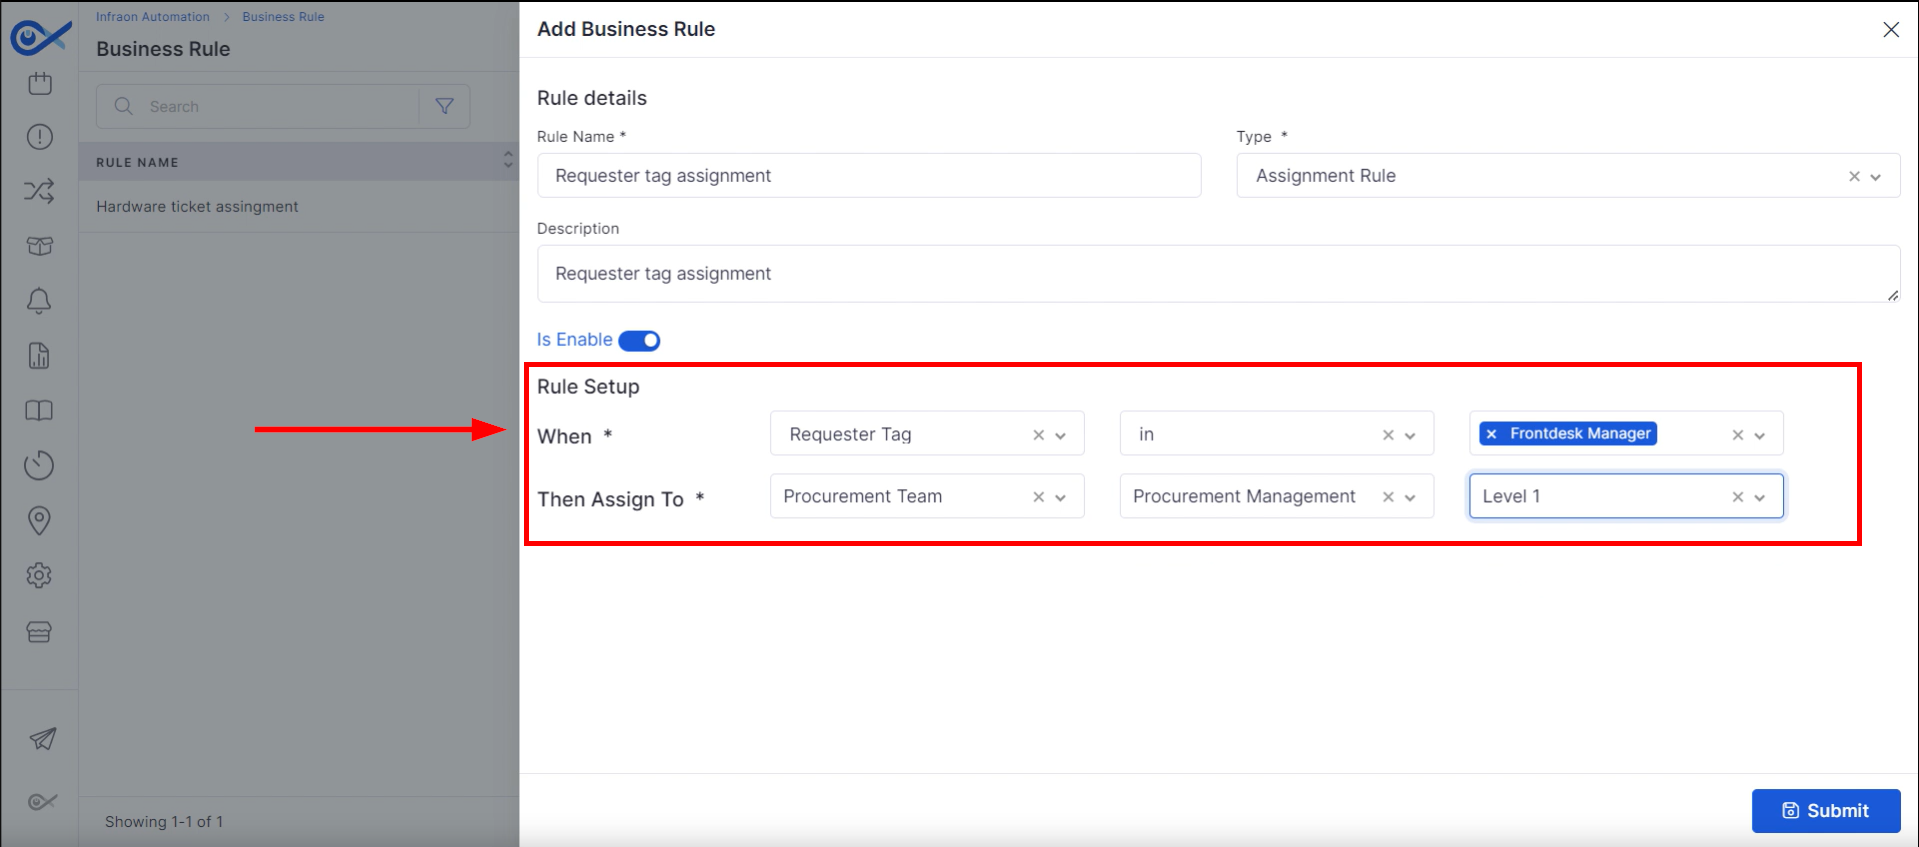
For the second case, if a business rule matches a requester tag, any ticket created by that requester is automatically assigned to the preconfigured level.
Step 1: Define a business rule for the requester tag by entering a rule name, selecting the rule type, and adding a descriptive explanation. Utilize the same procedure as described above.
Step 2: To set up a business rule based on the requested tag, select the operator as the front desk manager and "Assign To" details, respectively.
When an end user creates a ticket, it will be directly assigned to the procurement team to the level one technician in the procurement team.
This is how to use the auto-ticket assignment feature in the Infraon Infinity platform.
Self Service Portal
This guide explains how to raise a ticket from the self-service portal. The self-service portal is a dedicated platform for end users to raise tickets and request services. To access this portal, the user, technicians, or admin must first grant the requester access.
Granting Access to the Self-Service Portal
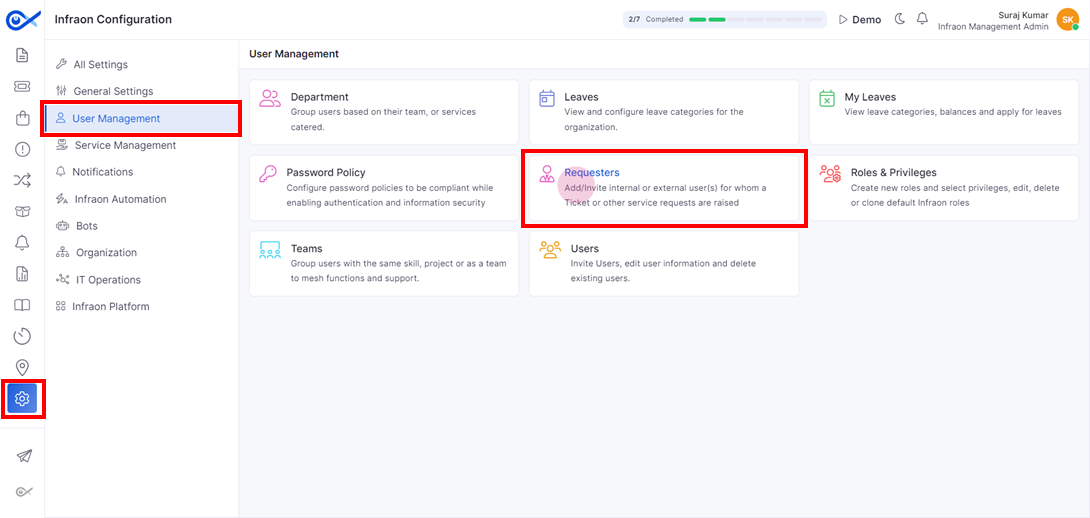
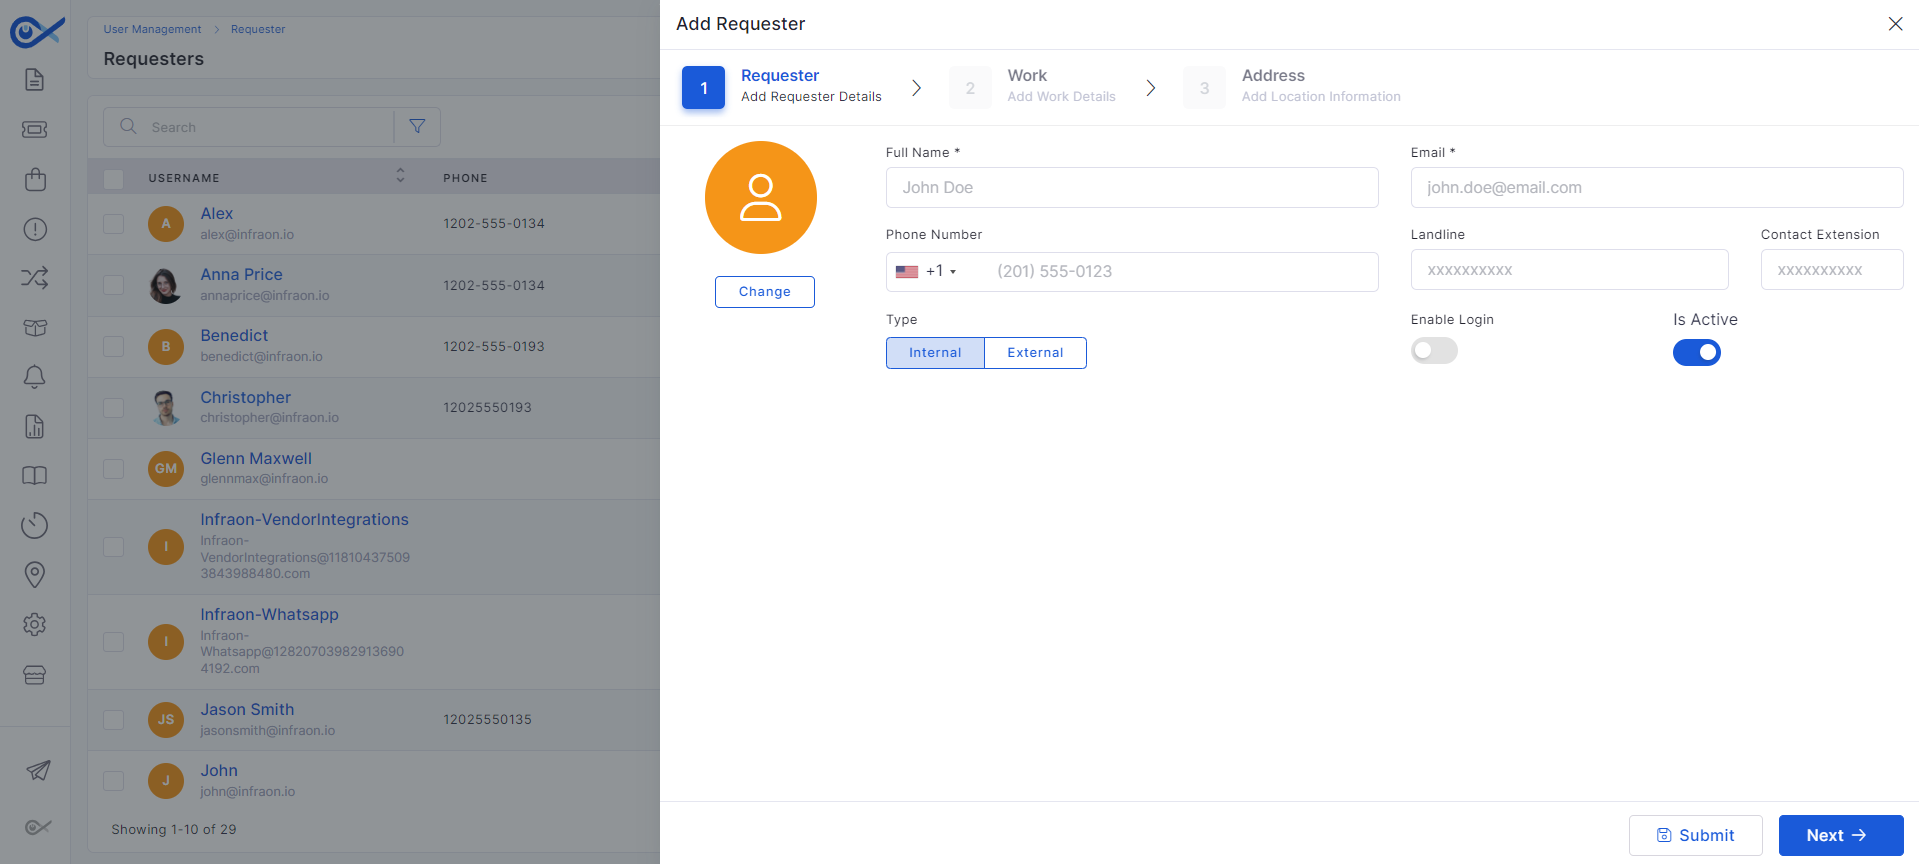
Step 1: In the Infraon Infinity platform, navigate to the Infraon configuration located on the left panel, proceed to user management, and select the requester module.
Step 2: Add the respective end user in the requester module.
Admins must then share the self-service portal credentials with the end user.
Logging in and creating a ticket
Once the requester has the portal credentials, they're able to create a ticket.
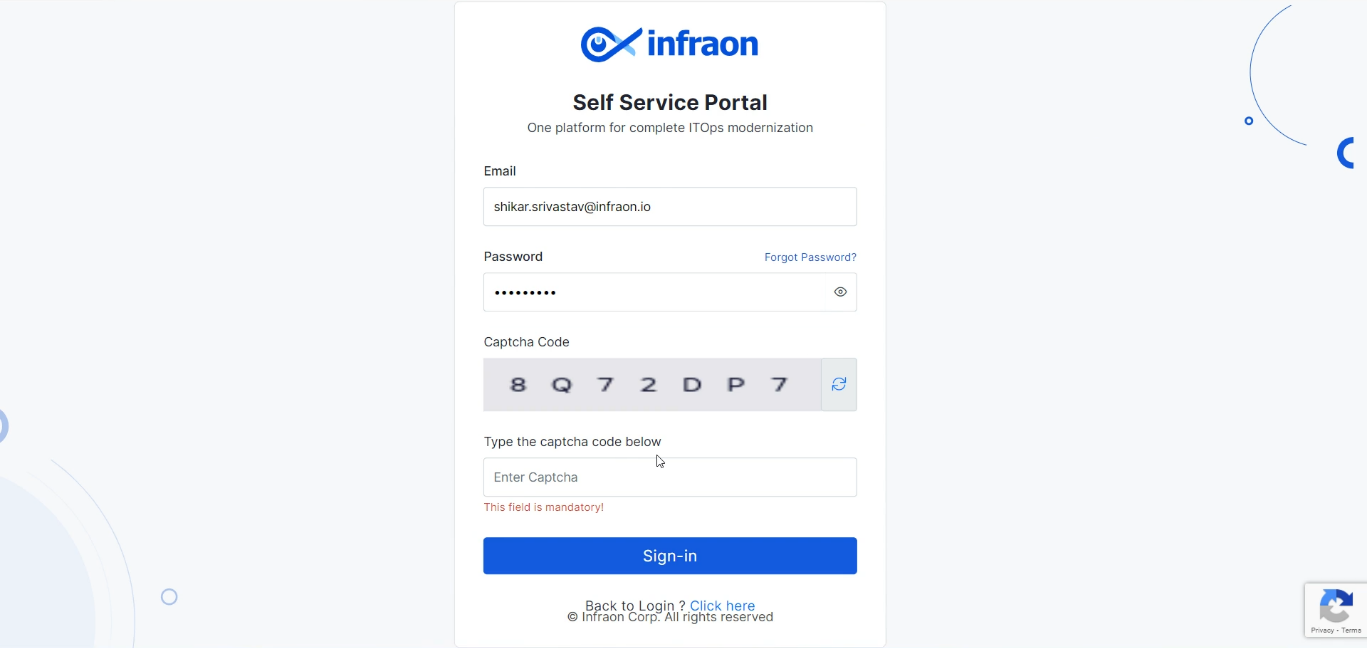
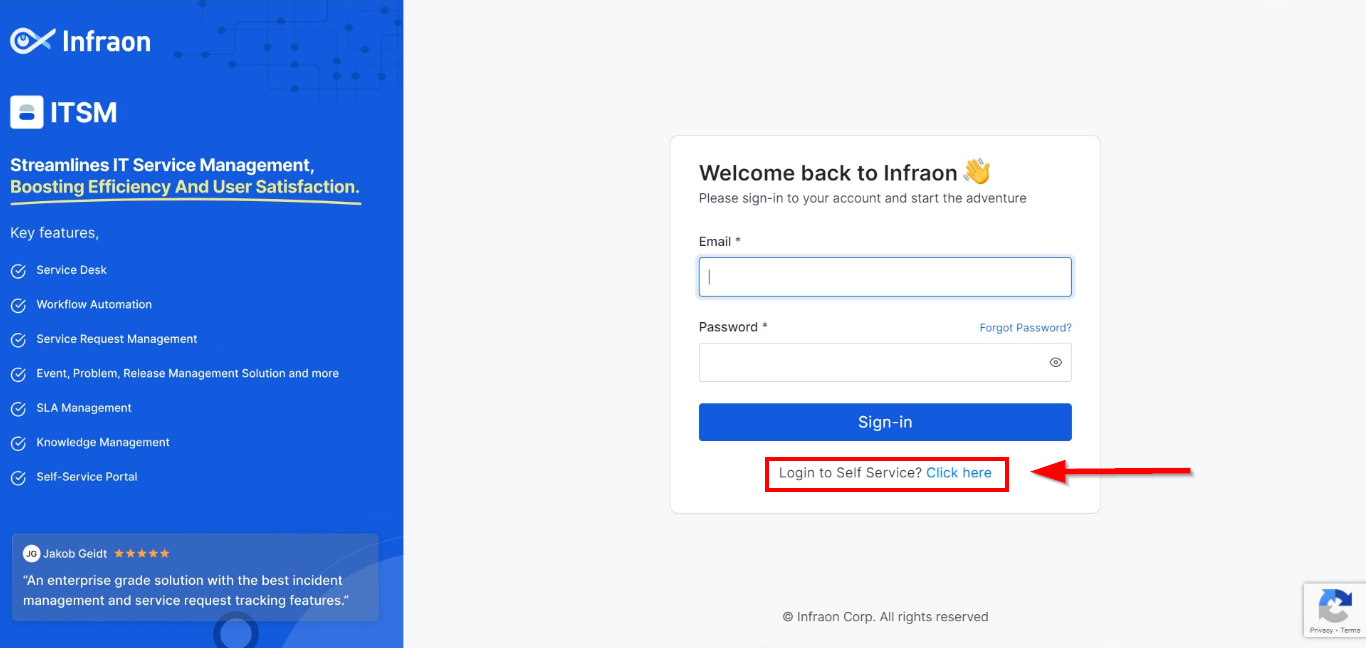
Step 1: Use the login URL shared by the admins to access the self-service portal. Select the self-service option to continue.
Step 2: Enter the valid login credentials provided by the admins.
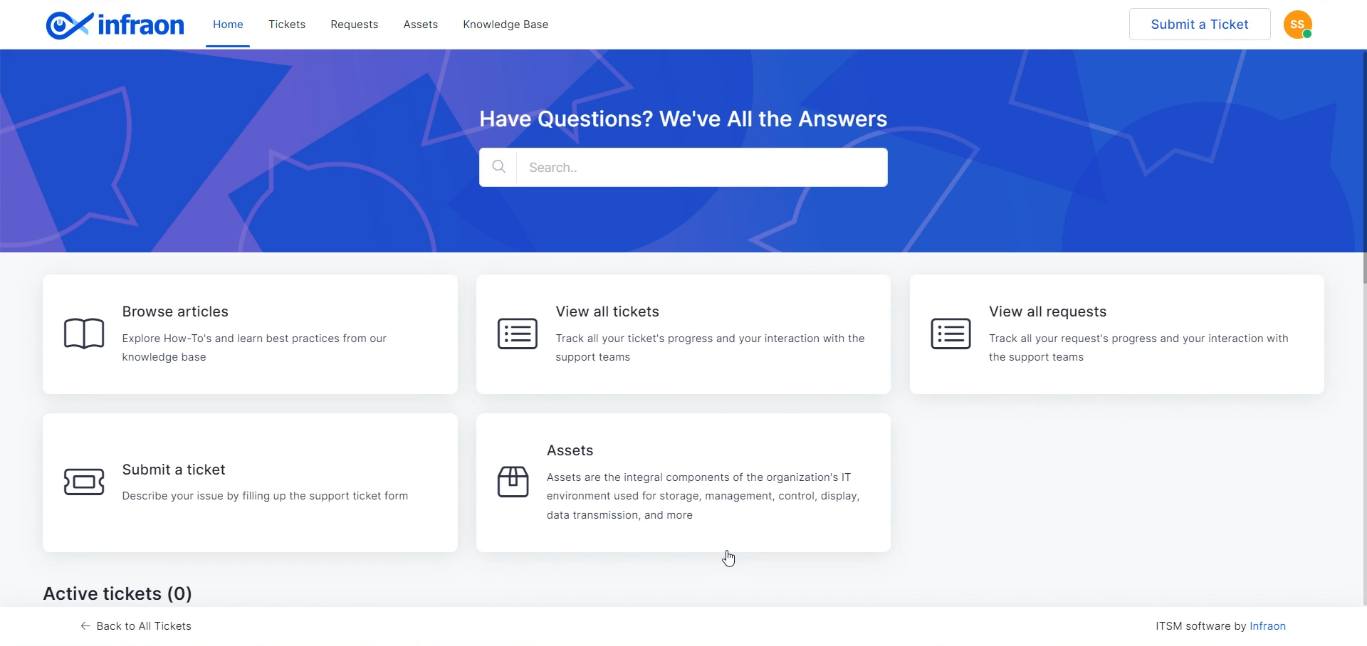
Step 3: After signing in, you'll be redirected to the homepage.
Here, requesters can browse articles, view raised tickets and requests and check allocated assets.
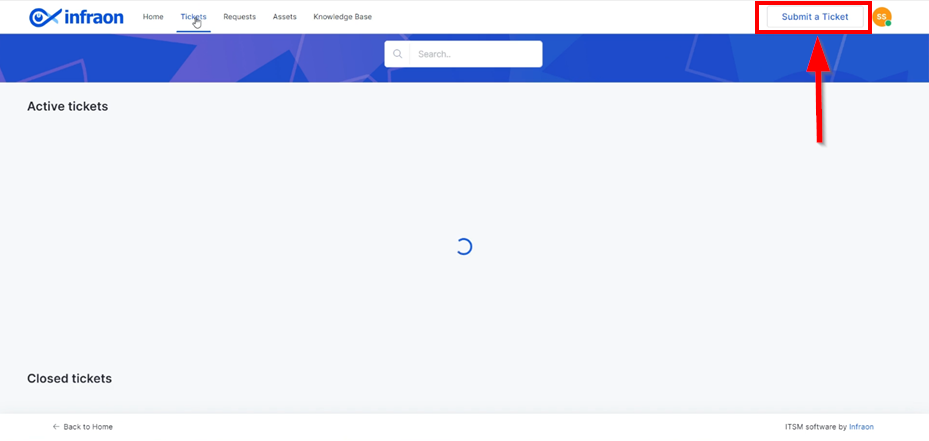
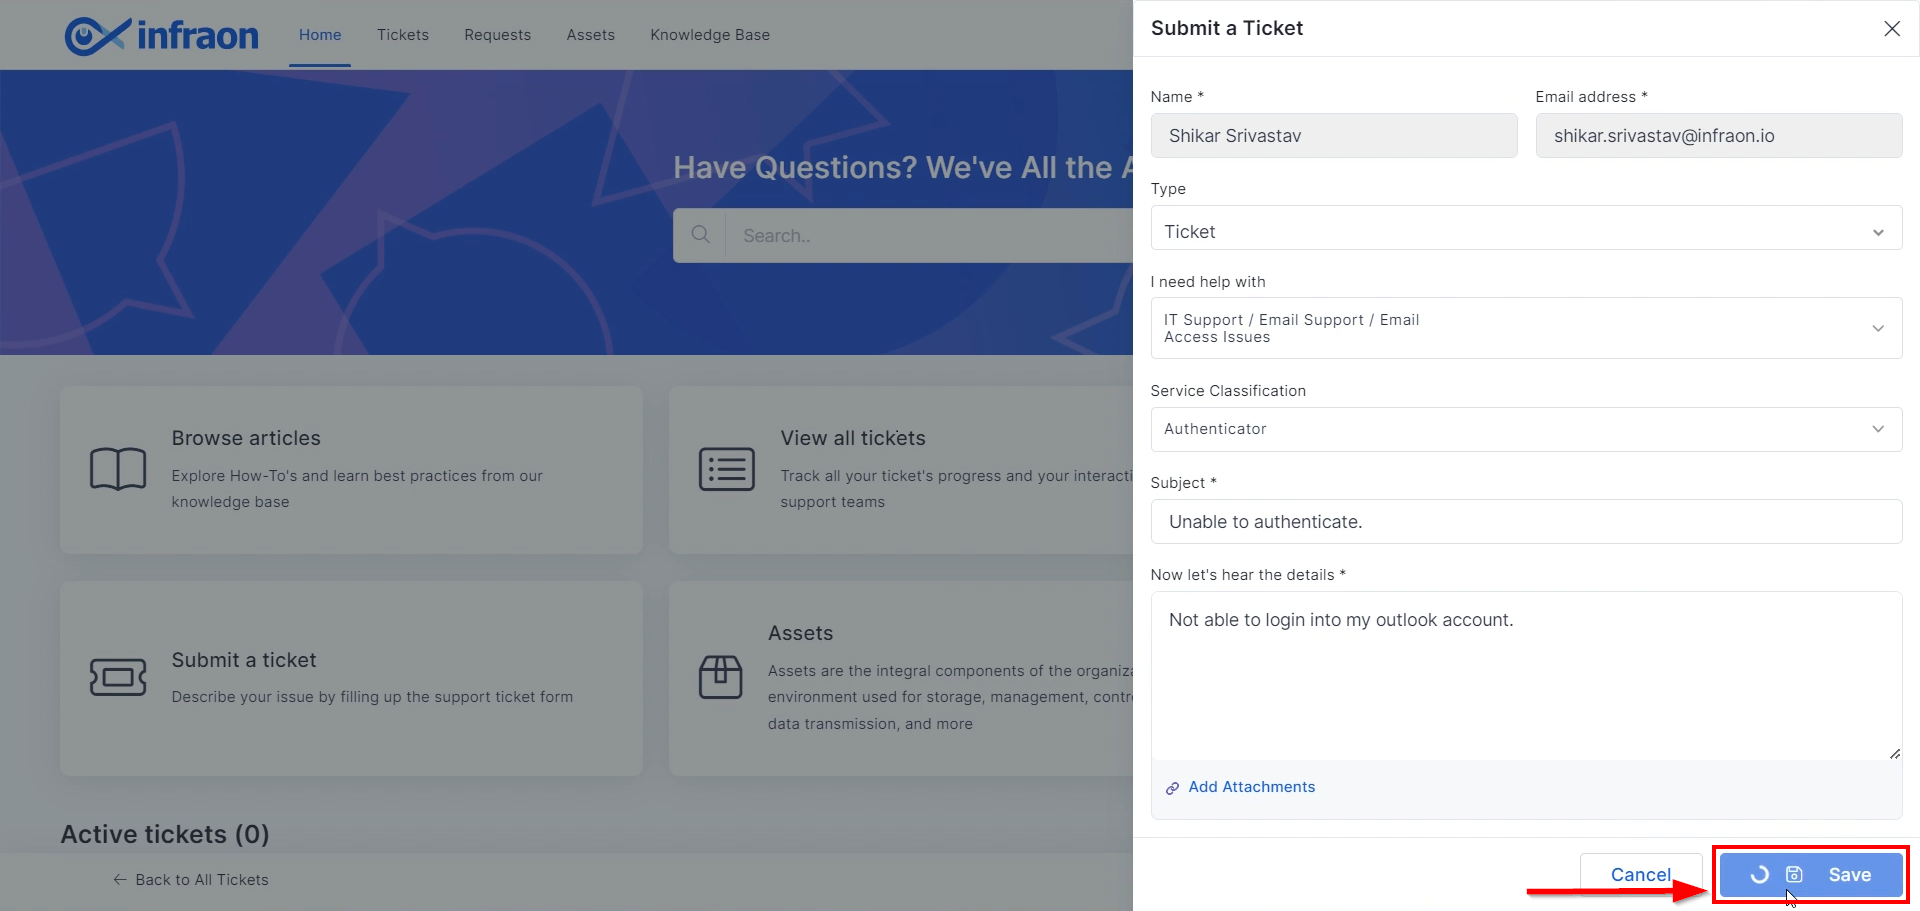
Step 1: To add a ticket, click on "Submit a ticket," located at the top right corner of the page.
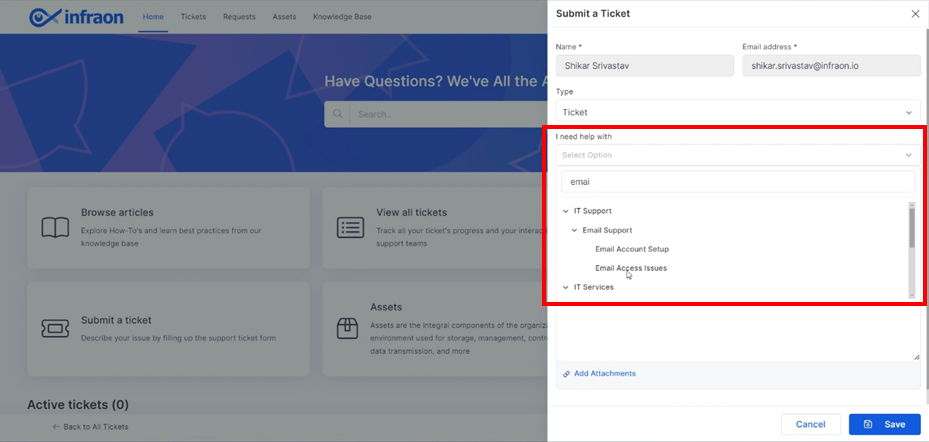
Step 2: In the "I need help with" call-out box, select the type of service where the issue has occurred.
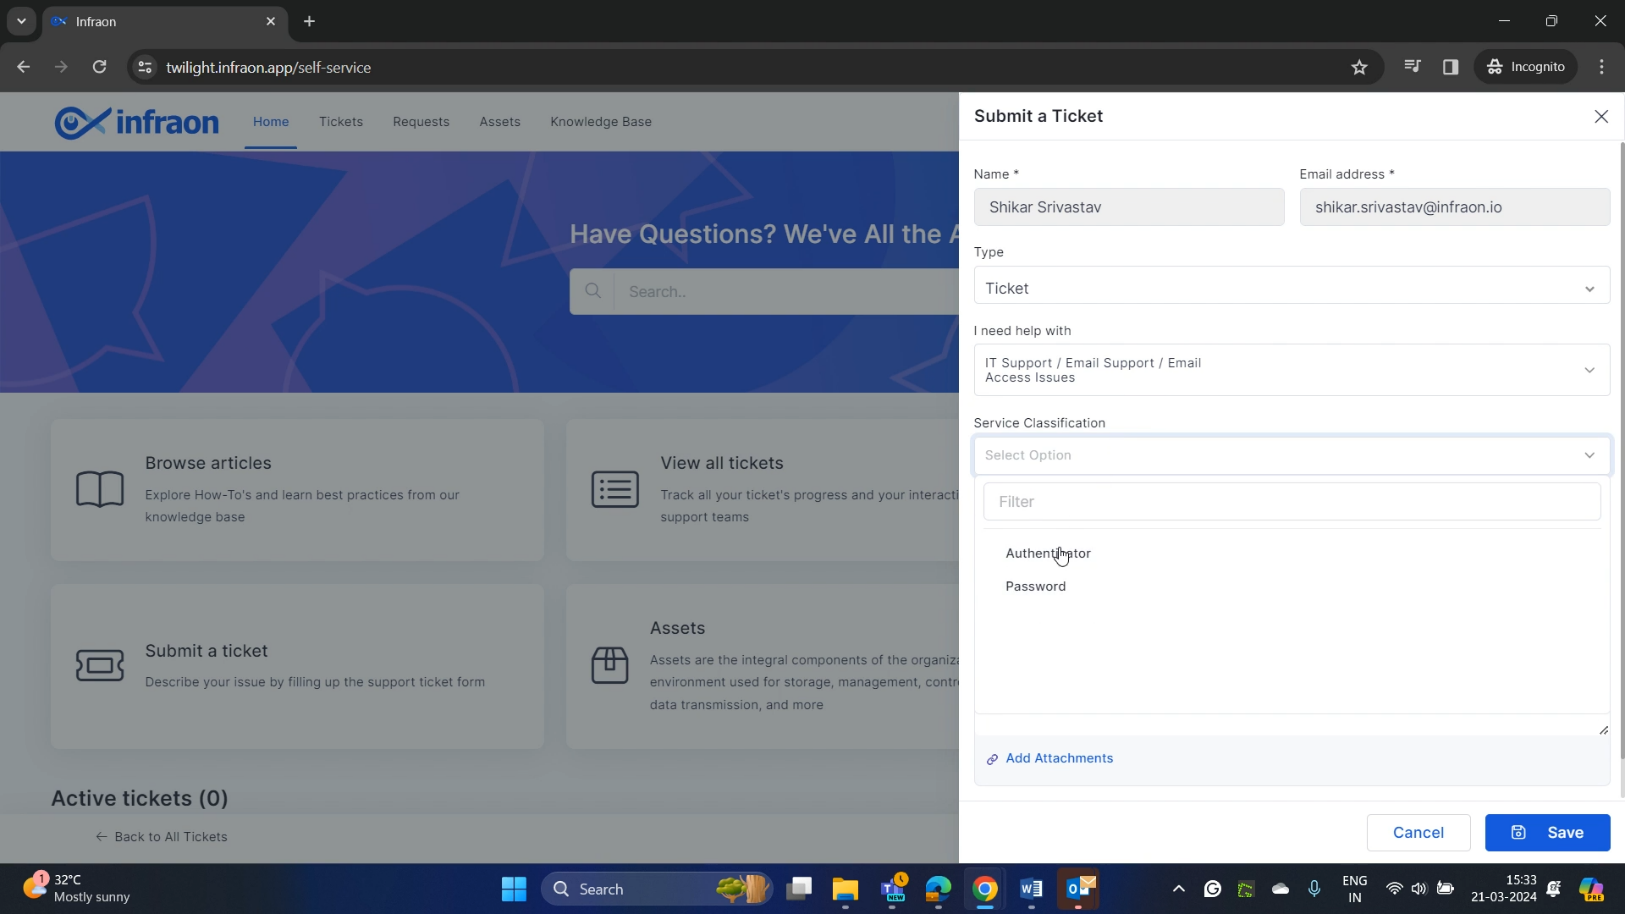
Step 3: Requesters can also add the Service classification in the respective call-out box.
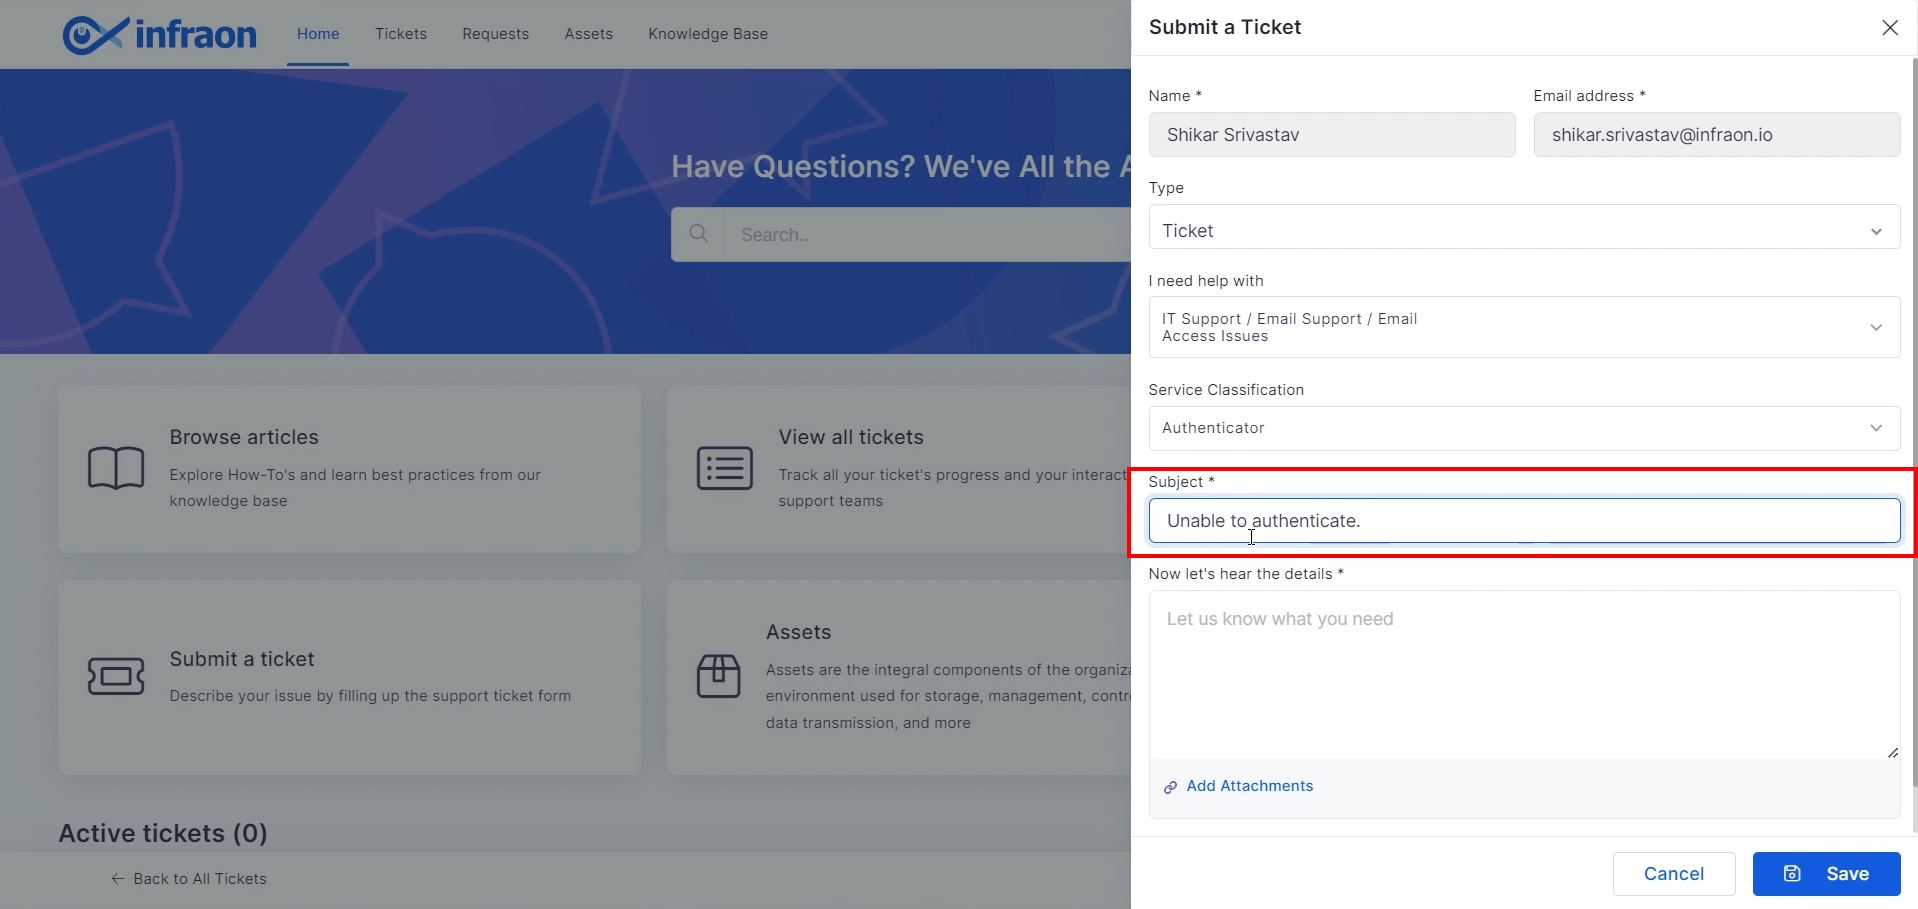
Step 4: Enter a subject line stating the reason for raising the
ticket, for example, "Unable to authenticate."
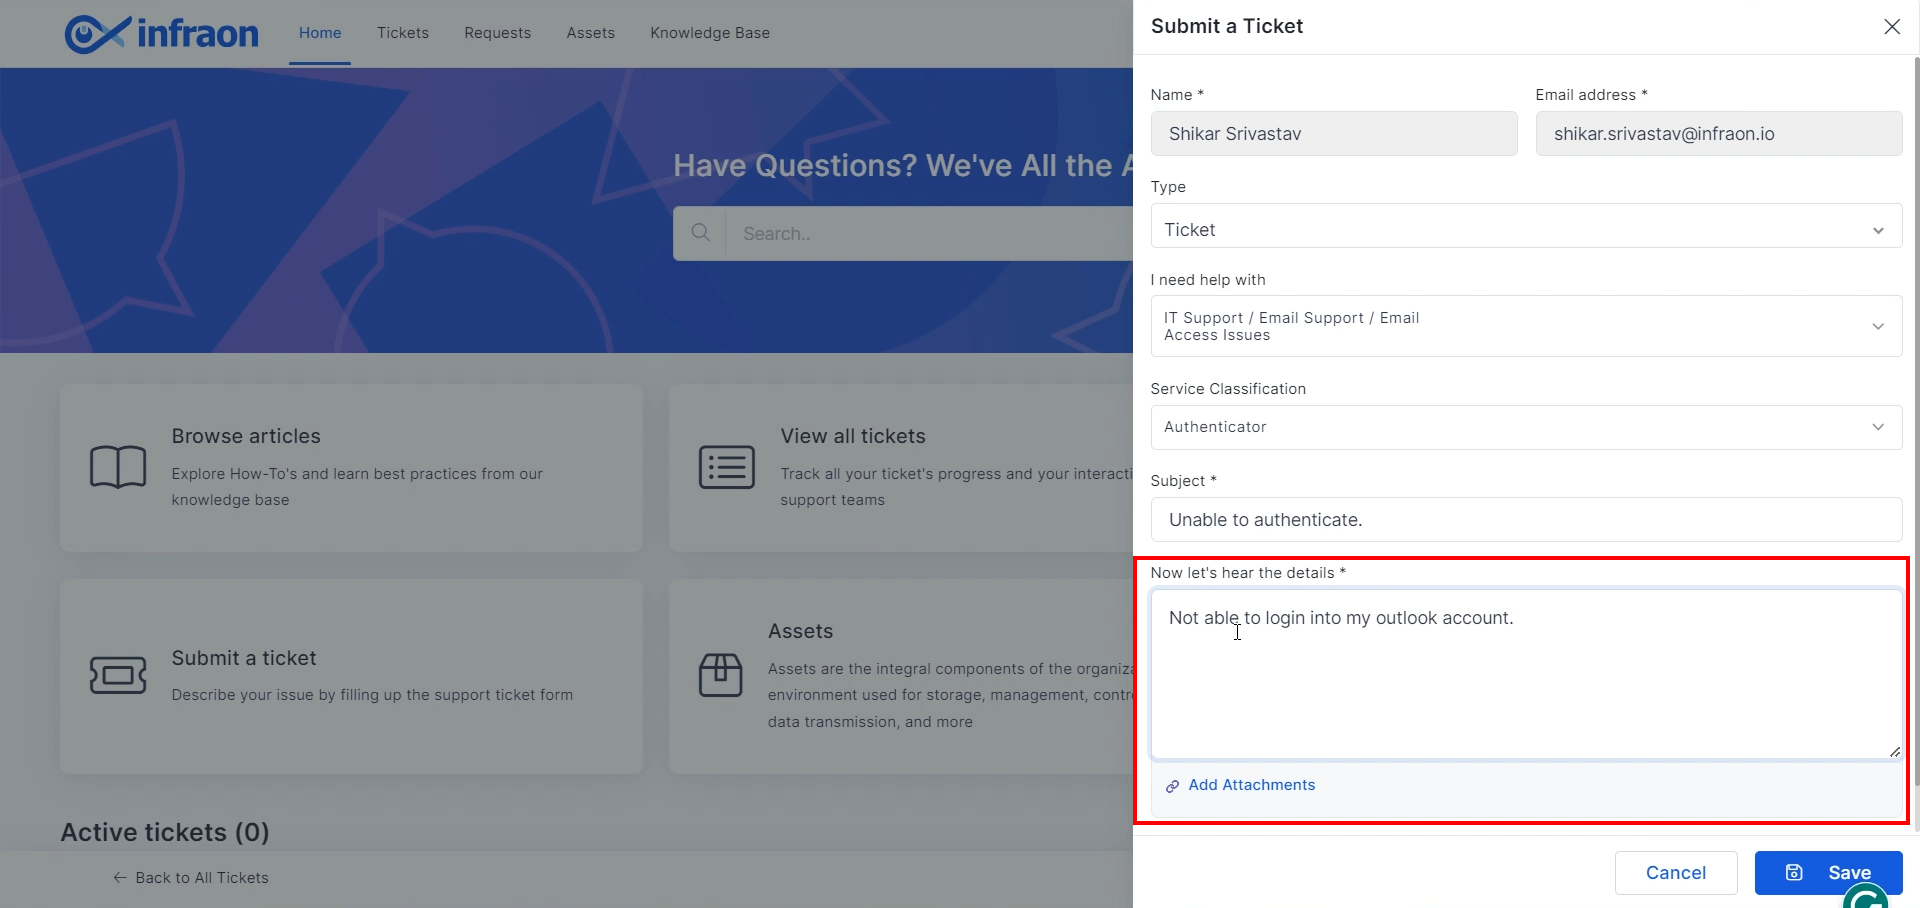
Step 5: In the "Now let’s hear the details" section, describe the issue you're encountering in detail. You can also upload any attachments that help explain the problem by clicking on 'Add Attachments.'
Step 6: After entering all details, review them and click "Save" to submit the ticket.
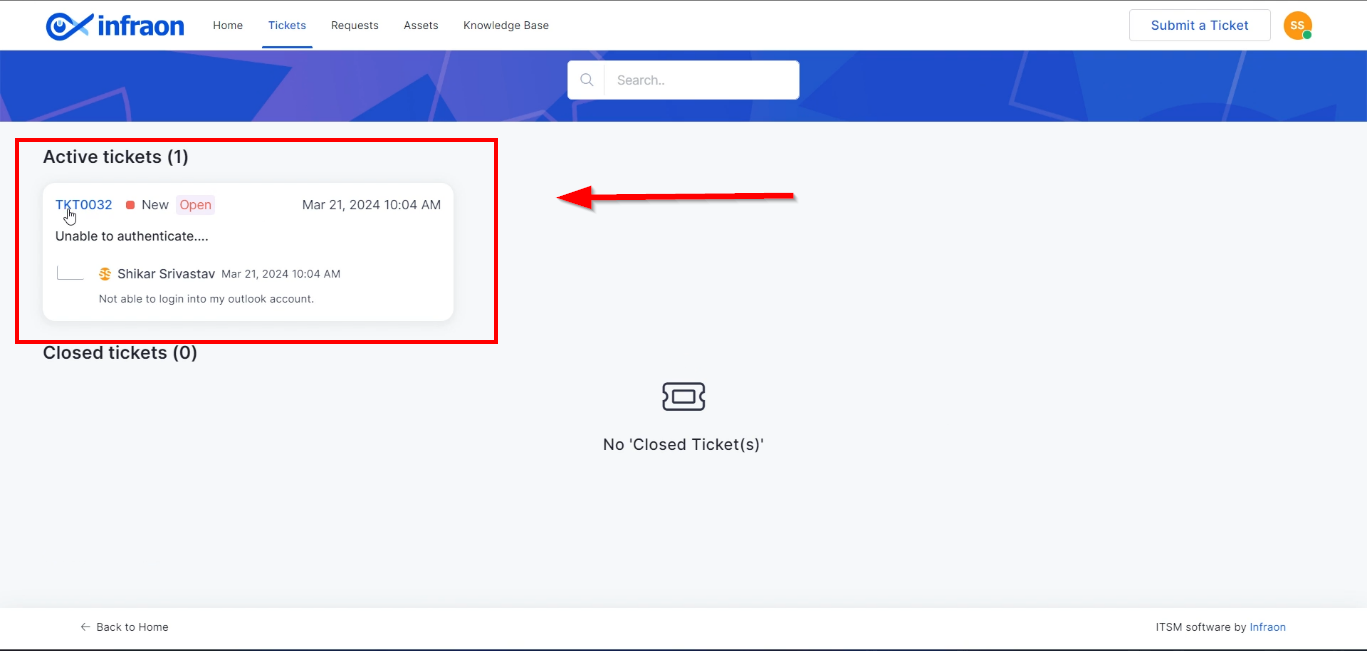
The ticket will then be created in the self-service portal, allowing the end user to check its status.
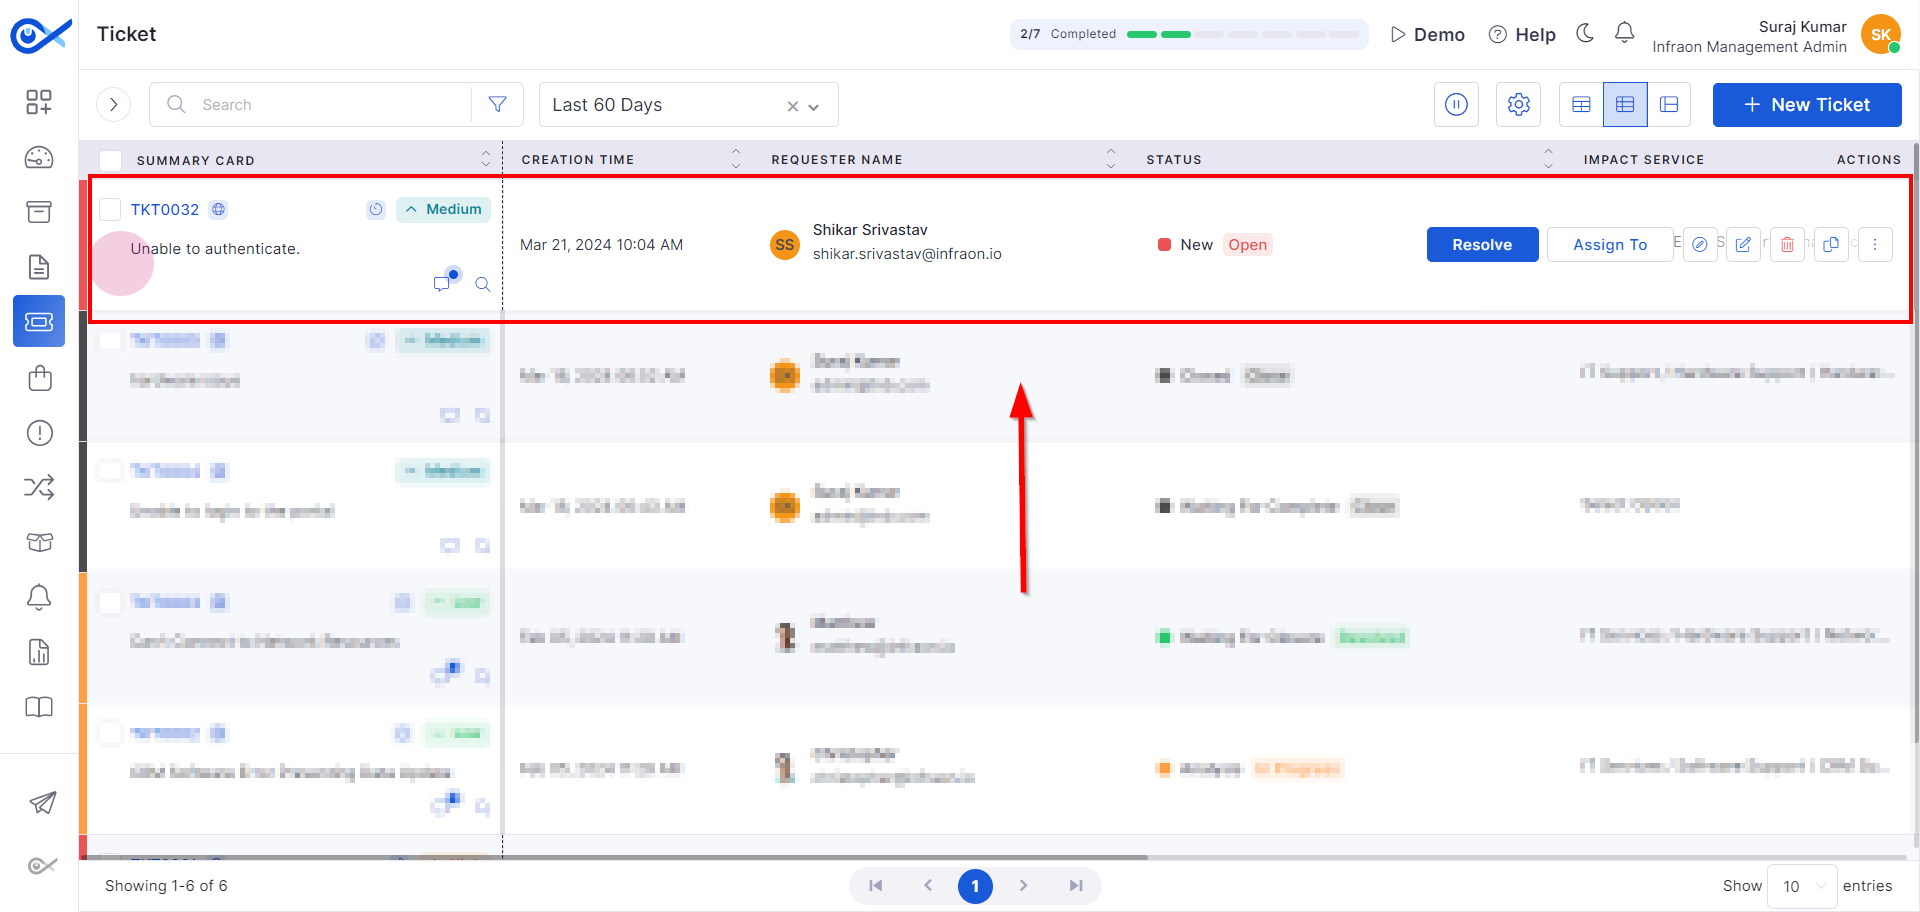
The same ticket will also appear in the technician or admin portal.
Here, the technician can work on the ticket, assist the end user in resolving the issue, and finally close the ticket.
Created by Techician
This guide outlines the process for a technician to create a ticket on behalf of an end user. This method is particularly useful when the end user cannot access their email or self-service portal, such as when their laptop or desktop won't power on. In these situations, the end user can contact a technician or service provider within the organization to create a ticket for them.
Creating a New Ticket
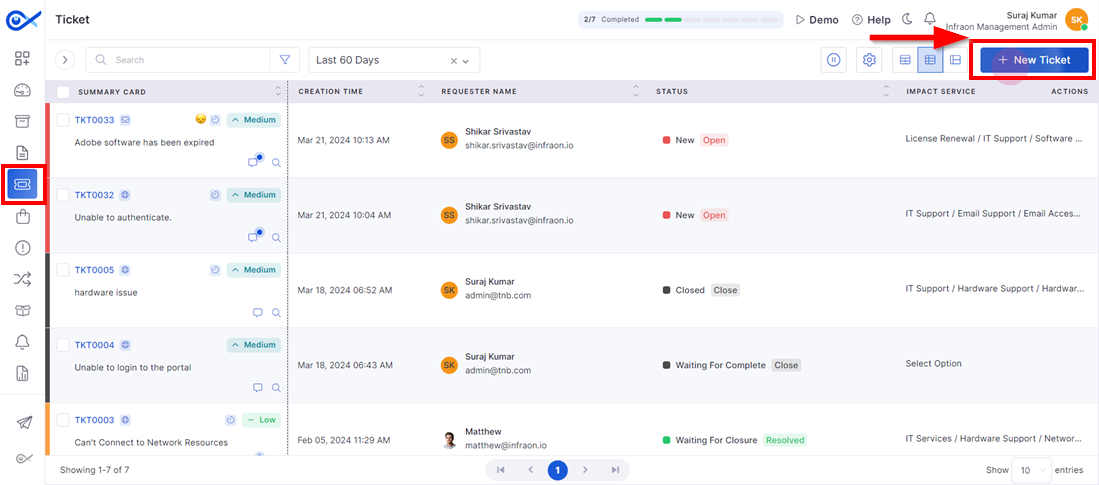
Step 1: To create a new ticket, navigate to the Ticket Management module on the left pane and click on New Ticket at the top right corner of the page.
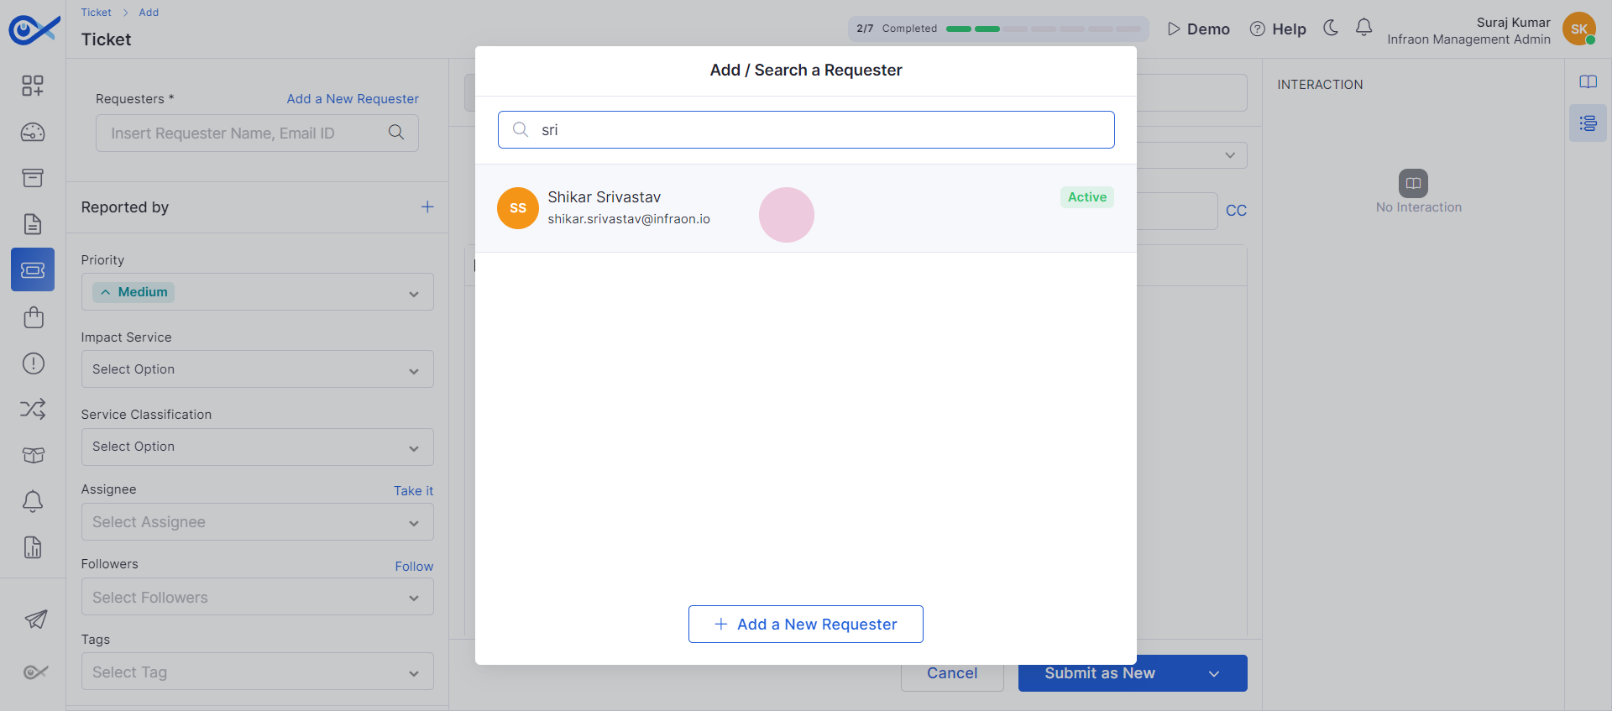
Step 2: In the pop-up tab, select the end user/requester experiencing the issue.
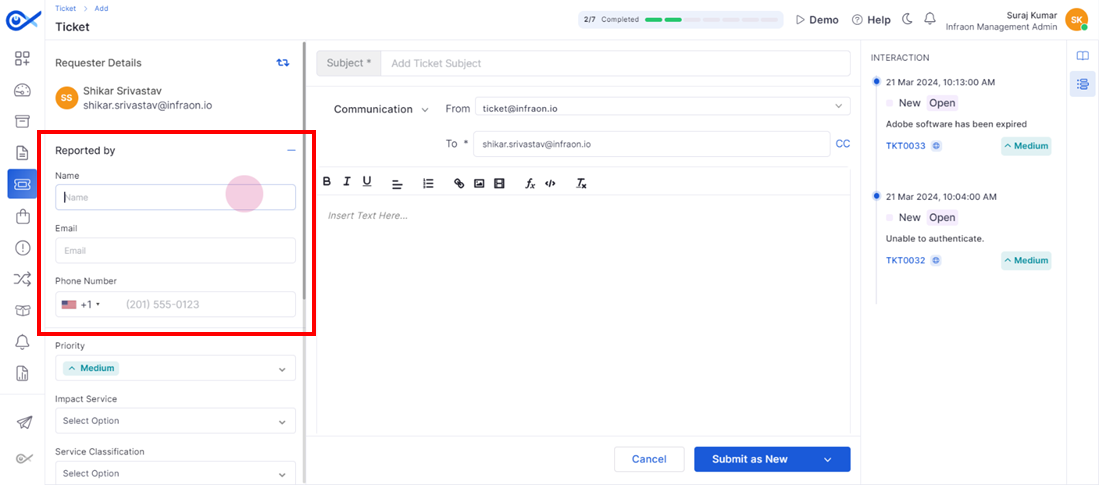
Step 3: Technicians can identify themselves in the 'Reported By' section by entering their Name, Email, and Phone Number. This ensures the requester and support team have a point of contact.
Specifying Service Area
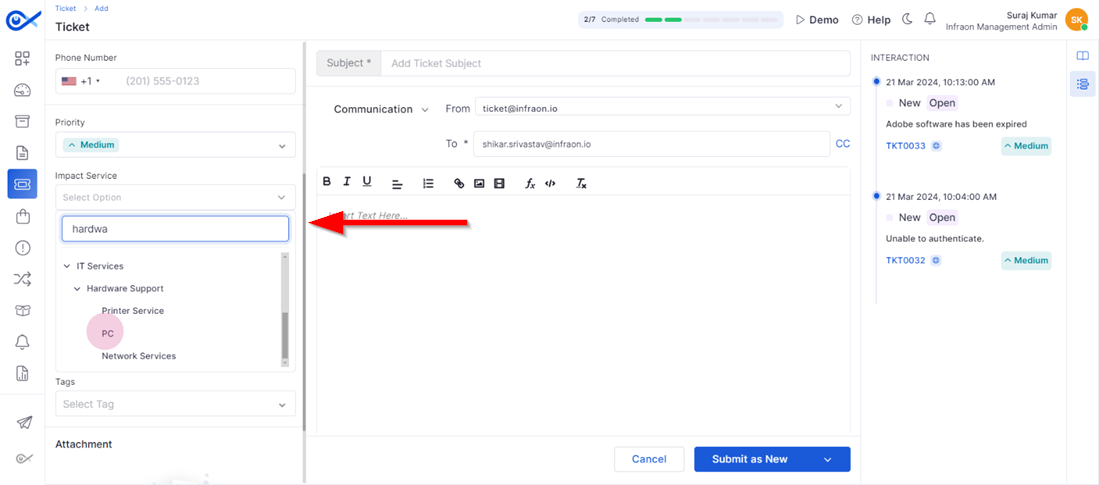
Step 4: Enter the impact service and specify the service area the end user is having trouble with.
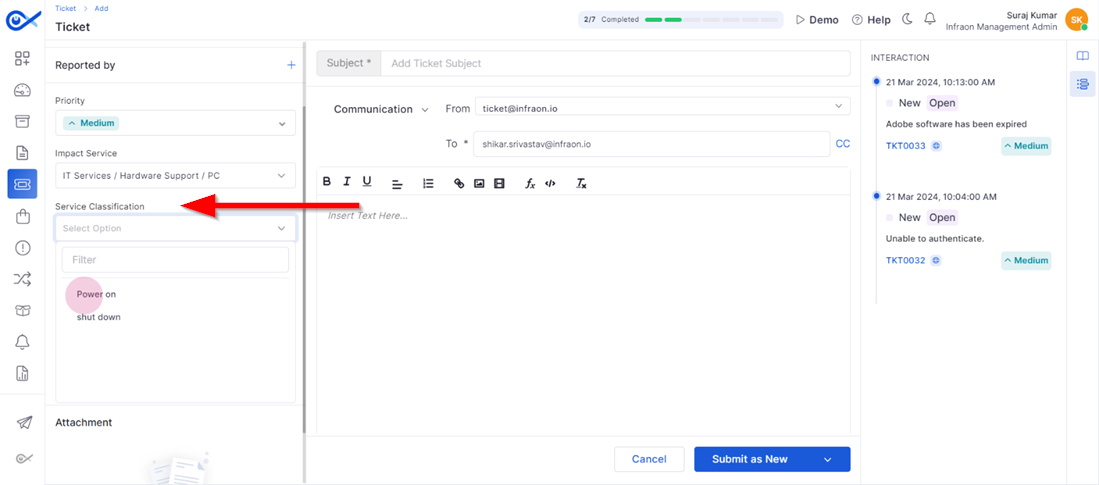
Step 5: Select the service classification based on the issue faced by the requester.
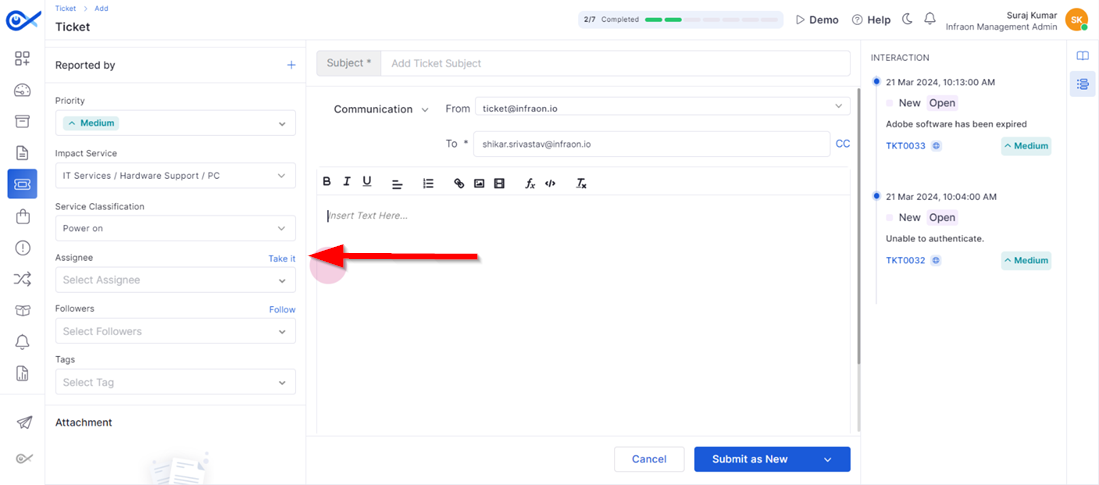
Step 6: Assign the ticket to the service technician working on the issue or to yourself if you're handling the problem. You can also add additional followers and relevant tags to the ticket.
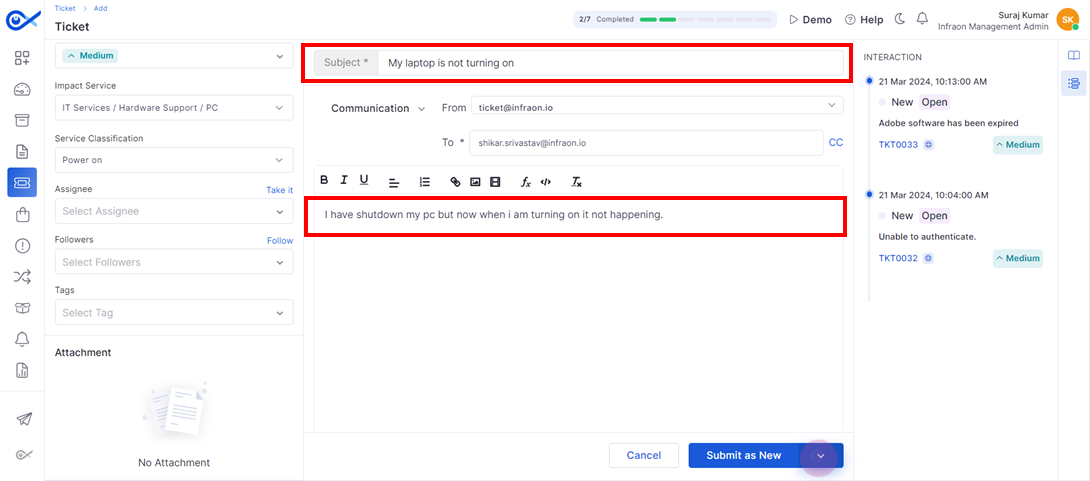
Step 7: Provide a subject for the ticket and a brief description of the problem faced.
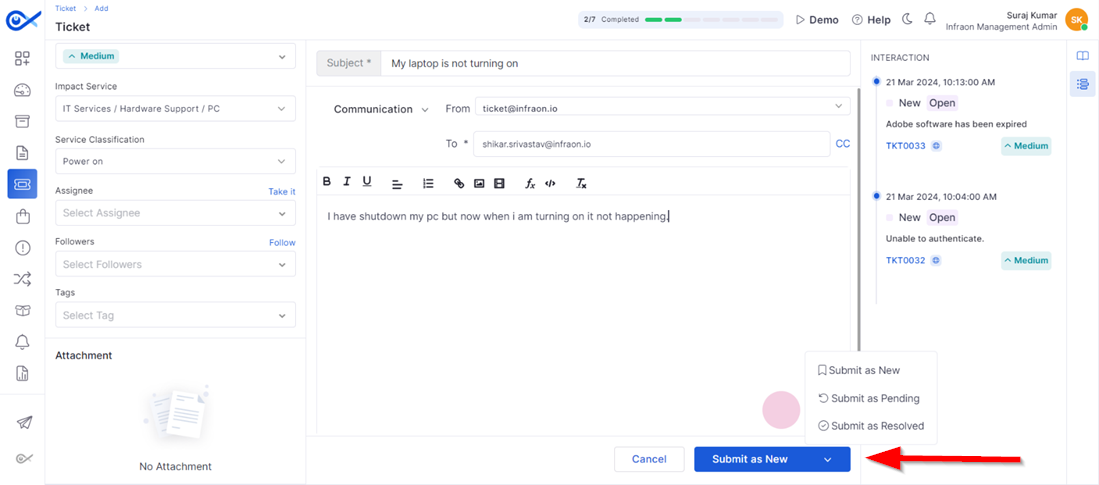
Step 8: Once all the necessary details have been filed, technicians can submit the ticket. If the issue is already resolved, submit the ticket as resolved. If work has started but the issue isn't resolved yet, submit it as pending. For new issues, click on submit as new.
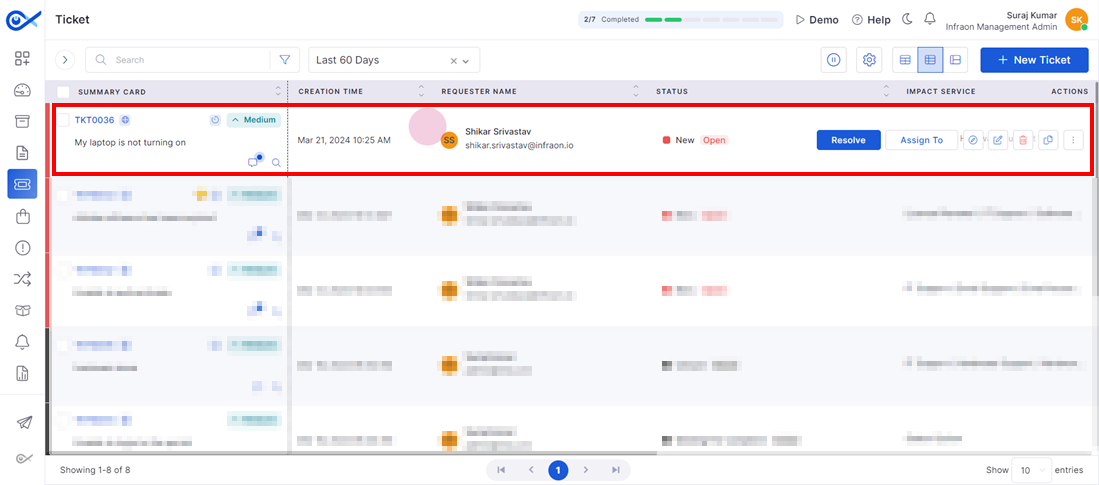
Upon clicking submit as new, the ticket is created in the Infraon Infinity tool on behalf of the end user.
Now, a ticket has been raised for the end user stating the reason, and a corresponding technician will rectify the issue.
This is how a technician creates a ticket for an end user who is unable to access their email or the self-service portal.
This guide explains the Trigger configuration module in the Infraon Infinity suit. Triggers are rules or configurations that trigger an alert or an event within Infraon. Infraon allows adding conditions to raise alerts or events when the specified rule is met.
There are two types of trigger configurations within Infraon. They are:
Alerts - Alerts are based on configured thresholds (refer to Threshold module for details)
Correlation - Infraon correlates events based on multiple conditions to trigger an action.
This functionality is crucial for automating ticket creation and sending alert notifications to users via email or SMS in response to system alarms, ensuring that users are promptly informed about any issues.
Navigating Trigger Configuration
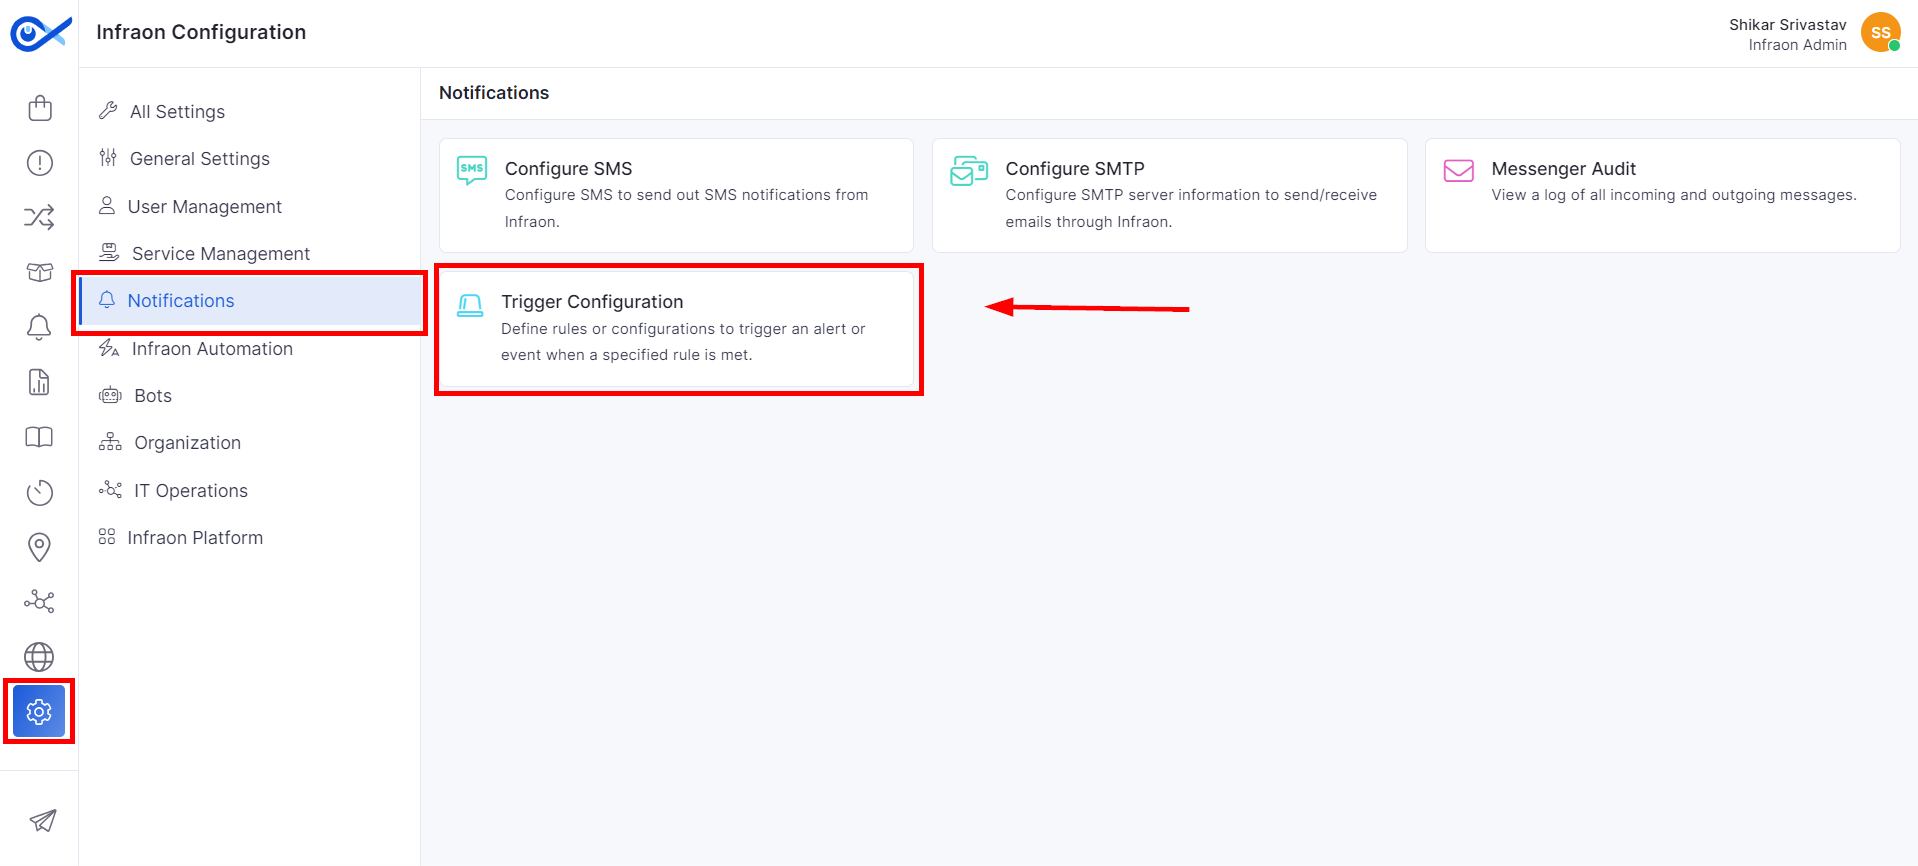
Step 1: To initiate trigger configuration in Infraon, access the Infraon Configuration from the left panel. From the main menu, select the Notifications option and locate Trigger Configuration within the menu.
After entering the Trigger Configuration section, a list of previously configured triggers will be displayed.
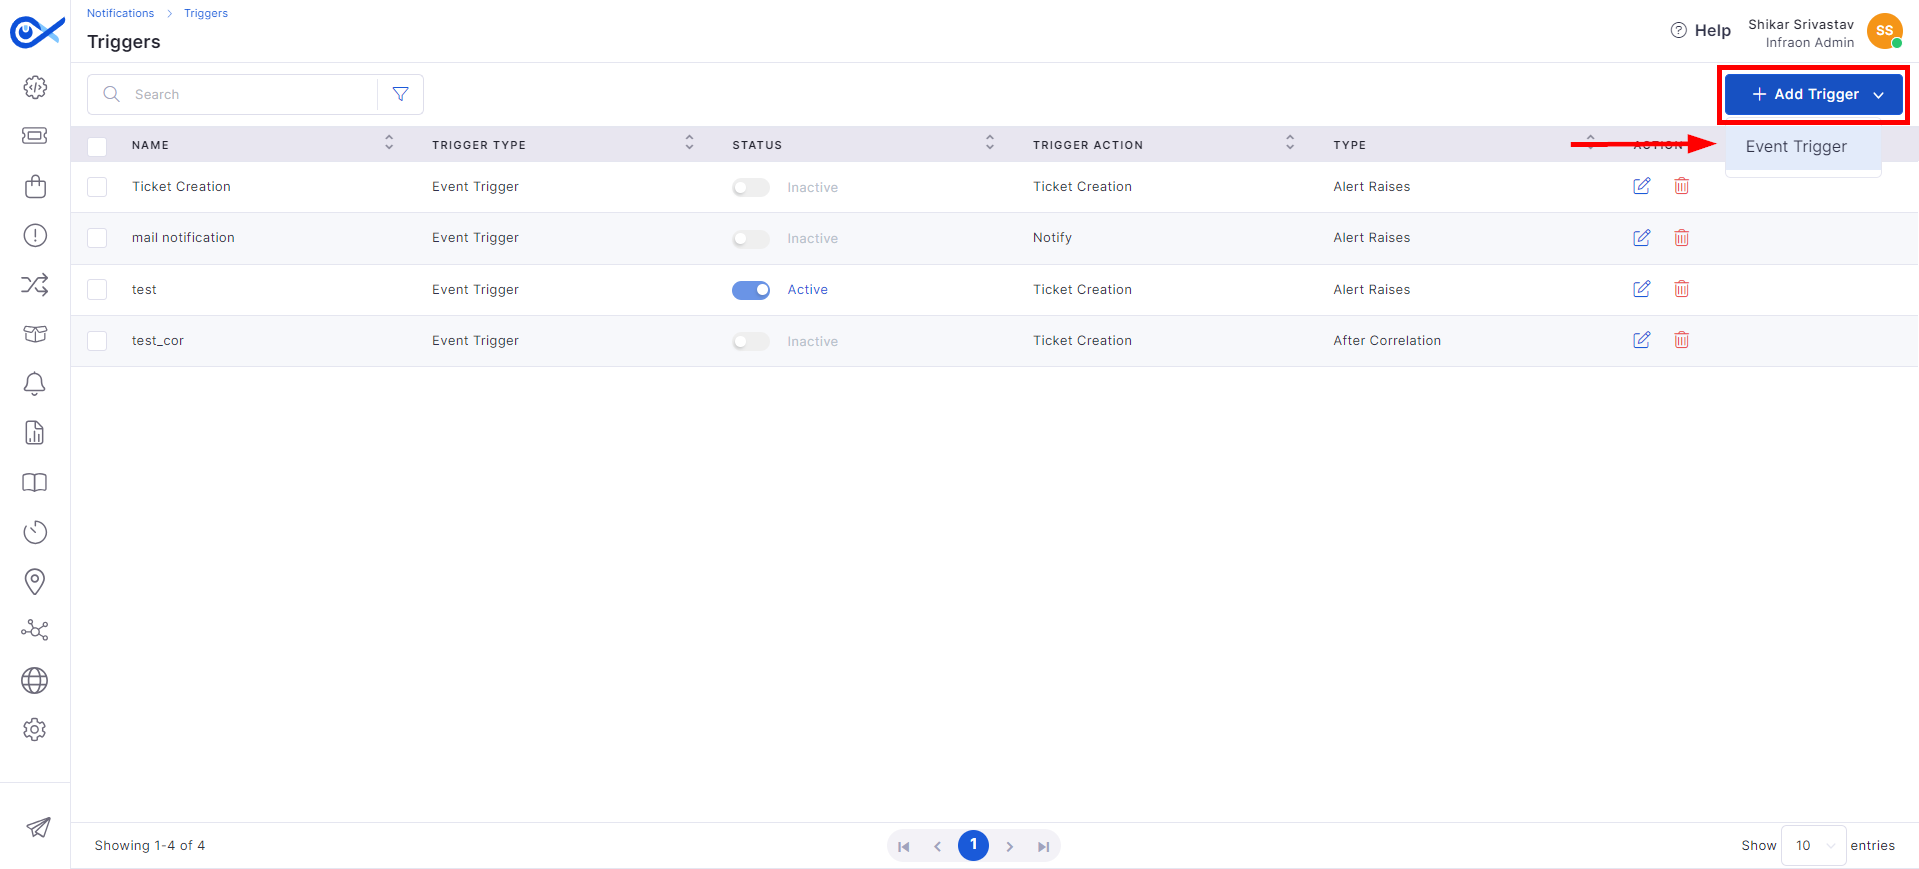
Step 2: Click on the 'Add Trigger' button at the top-right corner of the page. Choose 'Event Trigger' from the dropdown menu to set up a new event-based trigger.
Follow the steps below to add the required details in the 'Add Trigger Configuration' section.
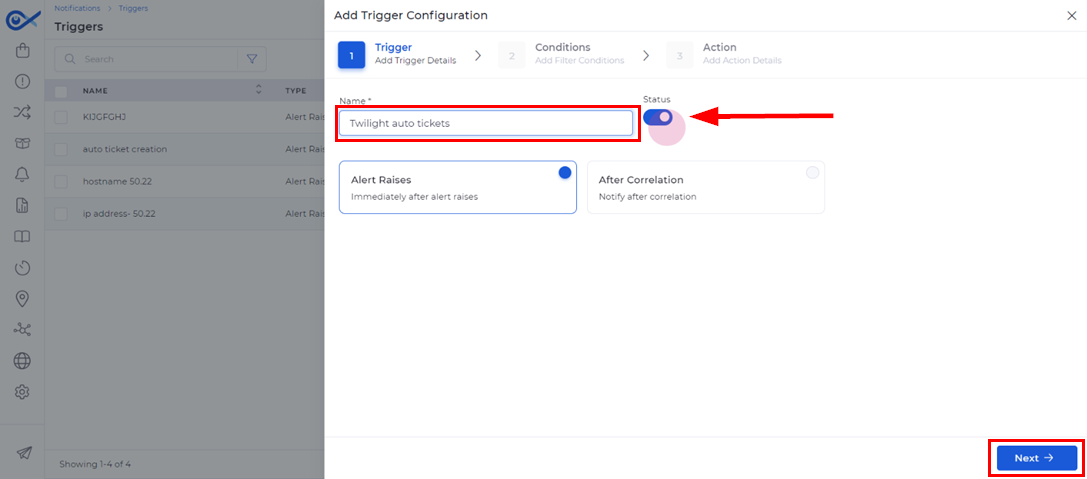
Step 3: Assign a name to your trigger configuration. Next, set the trigger's status, choosing between 'Active' and 'Inactive.'
Step 4: You have two main options:
'Alert Raises’: The trigger activates when event data meets the specified criteria.
'Notify After Correlation': The system waits for a correlation process to complete before activating the trigger.
After making your selection, click Next to proceed.
Step 5: Define specific filters to determine which events should activate the trigger.
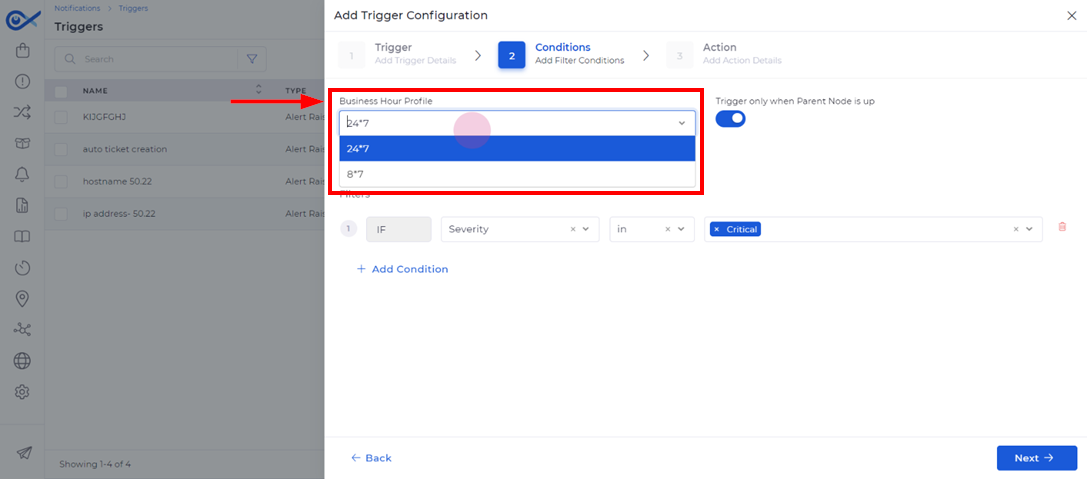
Additionally, you can apply a Business Hours Profile from the available system options.
For instance, selecting a 24/7 profile ensures that alarms generated during these hours automatically trigger notifications or ticket creation.
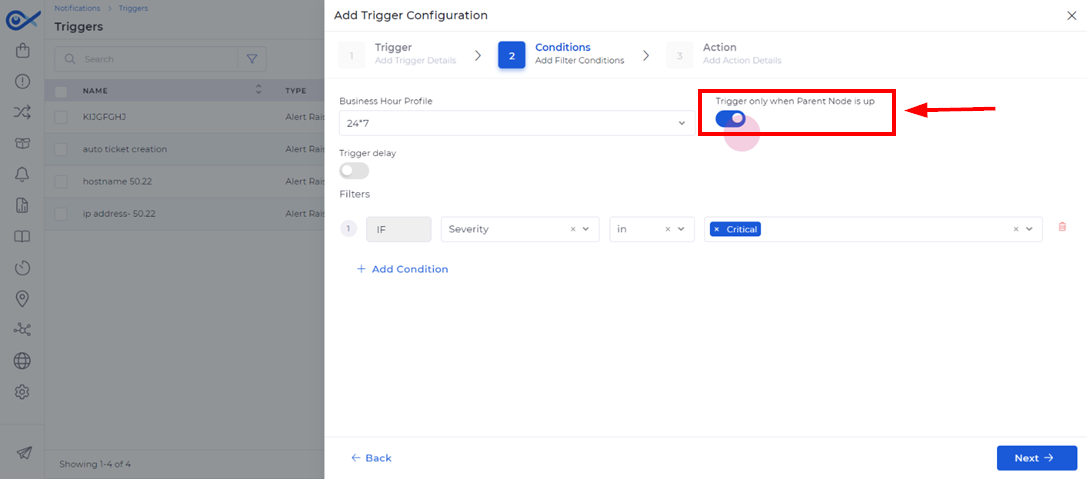
Step 6: Optionally, you can configure notifications to trigger only when the Parent Node is operational using a toggle button.
For example, if the parent node is active but child nodes are down, alarms will still be triggered for the non-operational links. Activating this option means alarms are only generated for the parent node if both parent and child nodes are down.
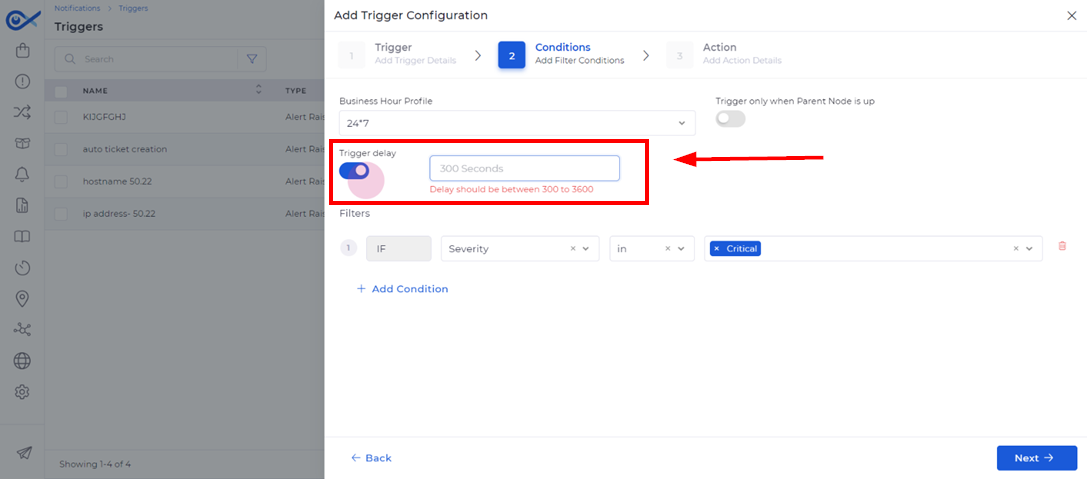
Step 7: Users can delay the trigger action by setting a specific time delay in seconds.
The delay option allows for a range between 300 and 3600 seconds. Toggling the option off when necessary disable the delay.
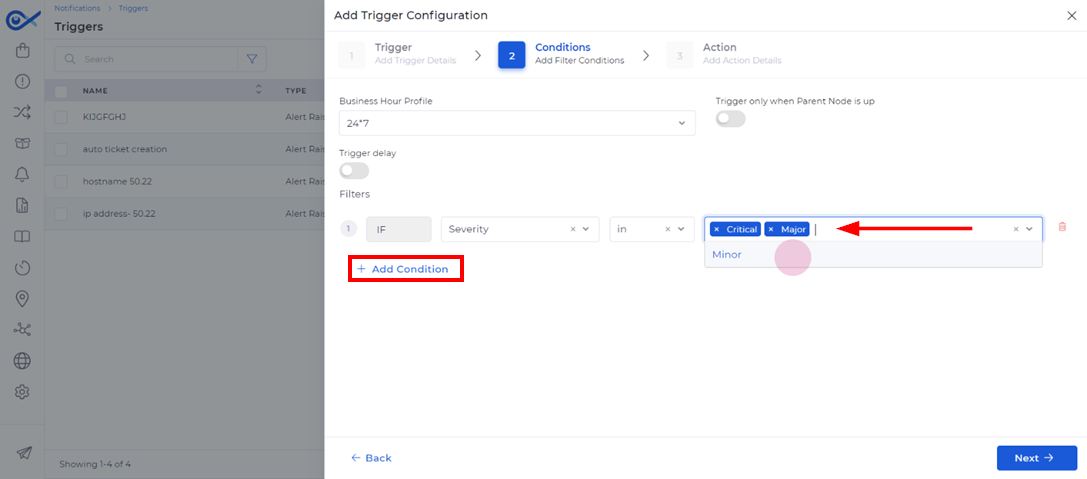
Step 8: To refine the trigger criteria, multiple filter conditions can be added. By default, the severity filter is set to Critical, but you can include additional conditions for Major and Minor severities.
To add more conditions, select 'Add Condition' and choose 'AND' to apply them cumulatively. Filters include Alarm Message, Asset ID, Hostname, IP Address, Device Type, and more, ensuring that the conditions match your requirements.
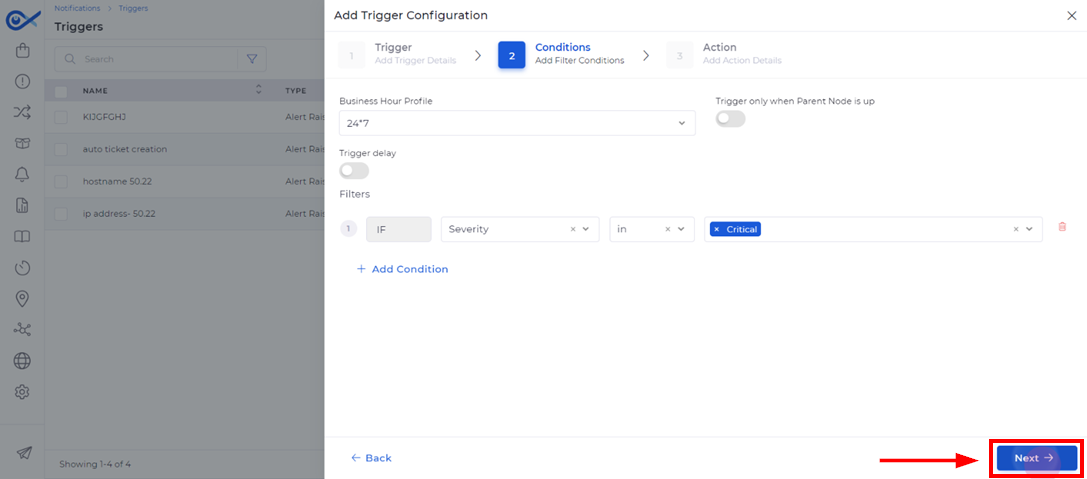
Step 9: Click Next to proceed to the action details after defining your conditions.
The action page has two main options: Notify or Create a Ticket.
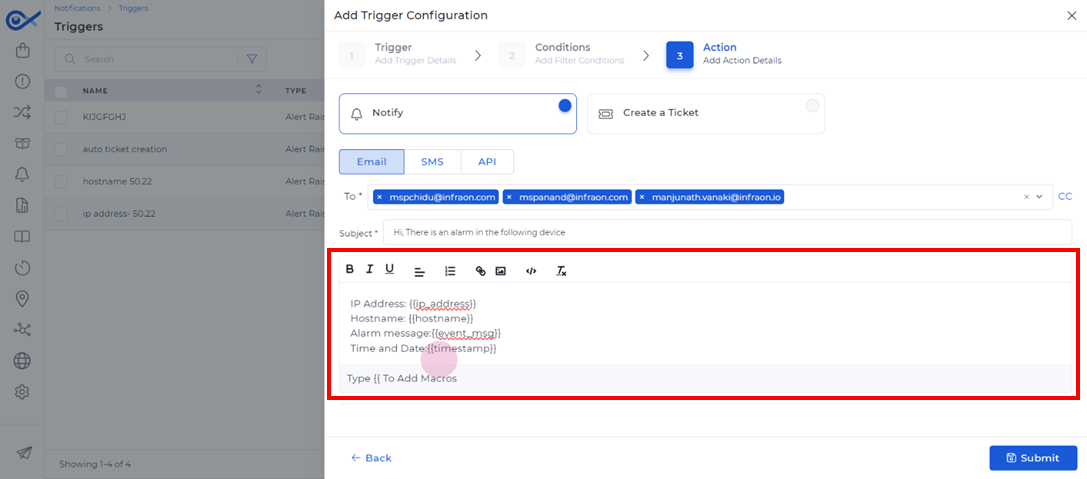
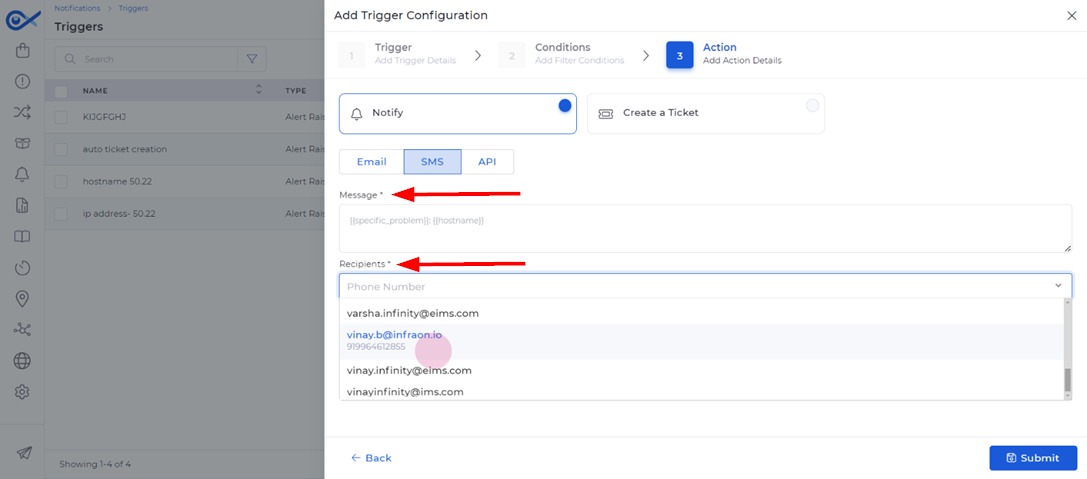
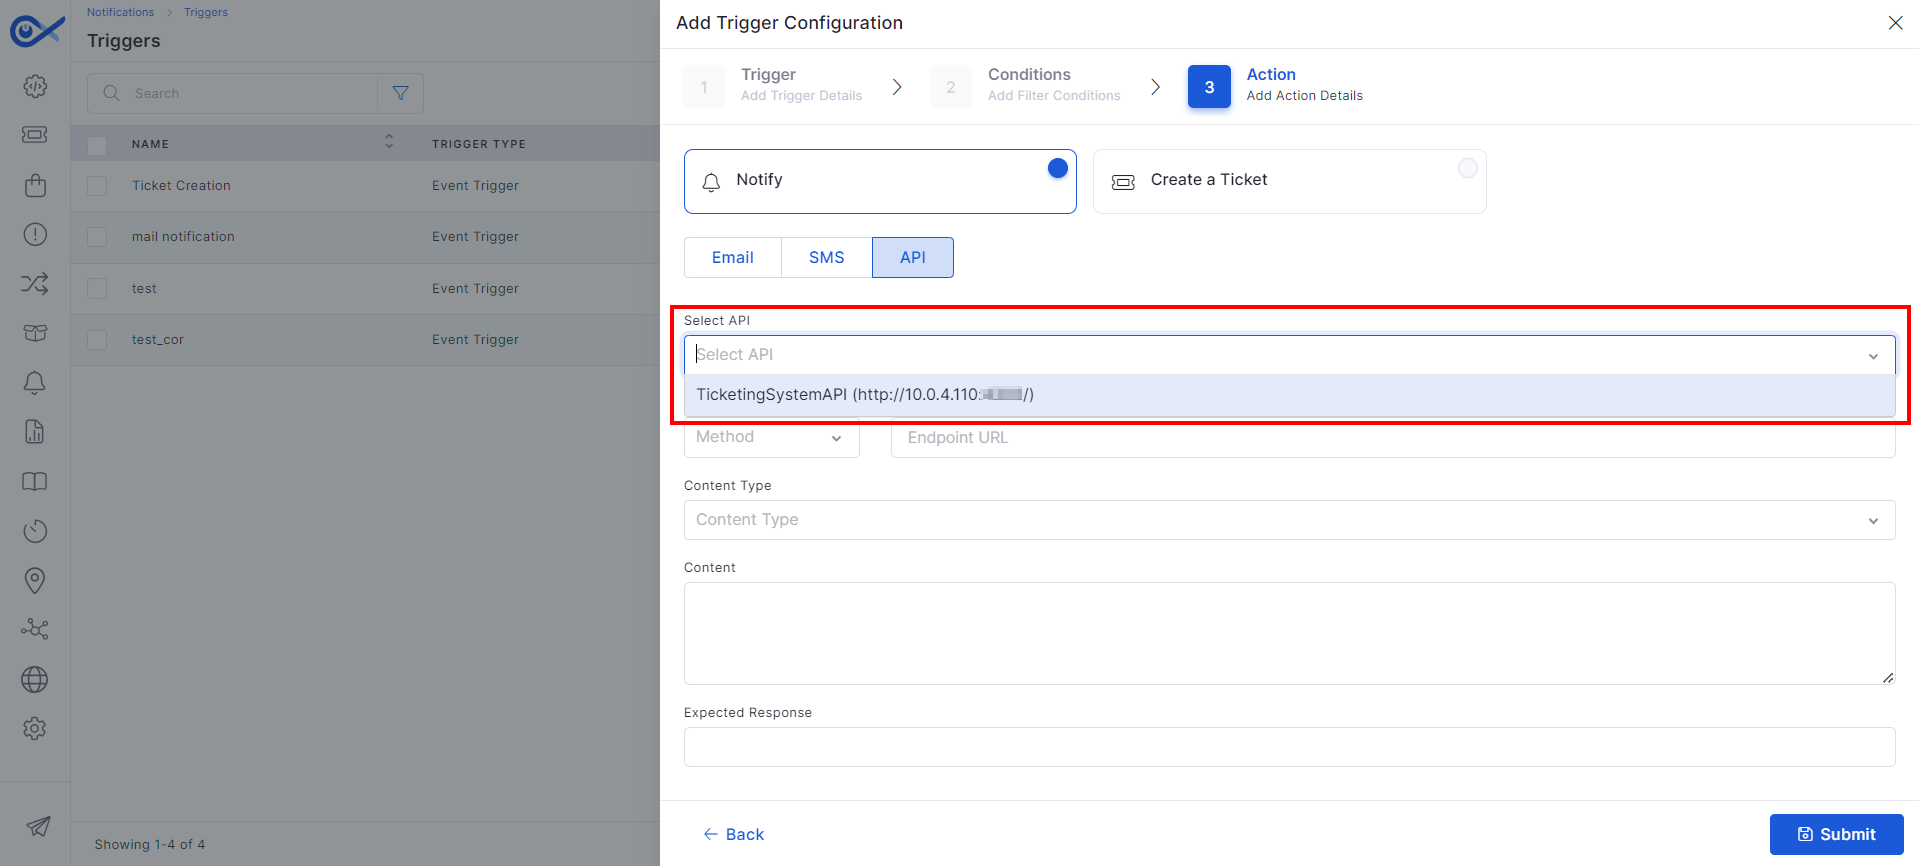
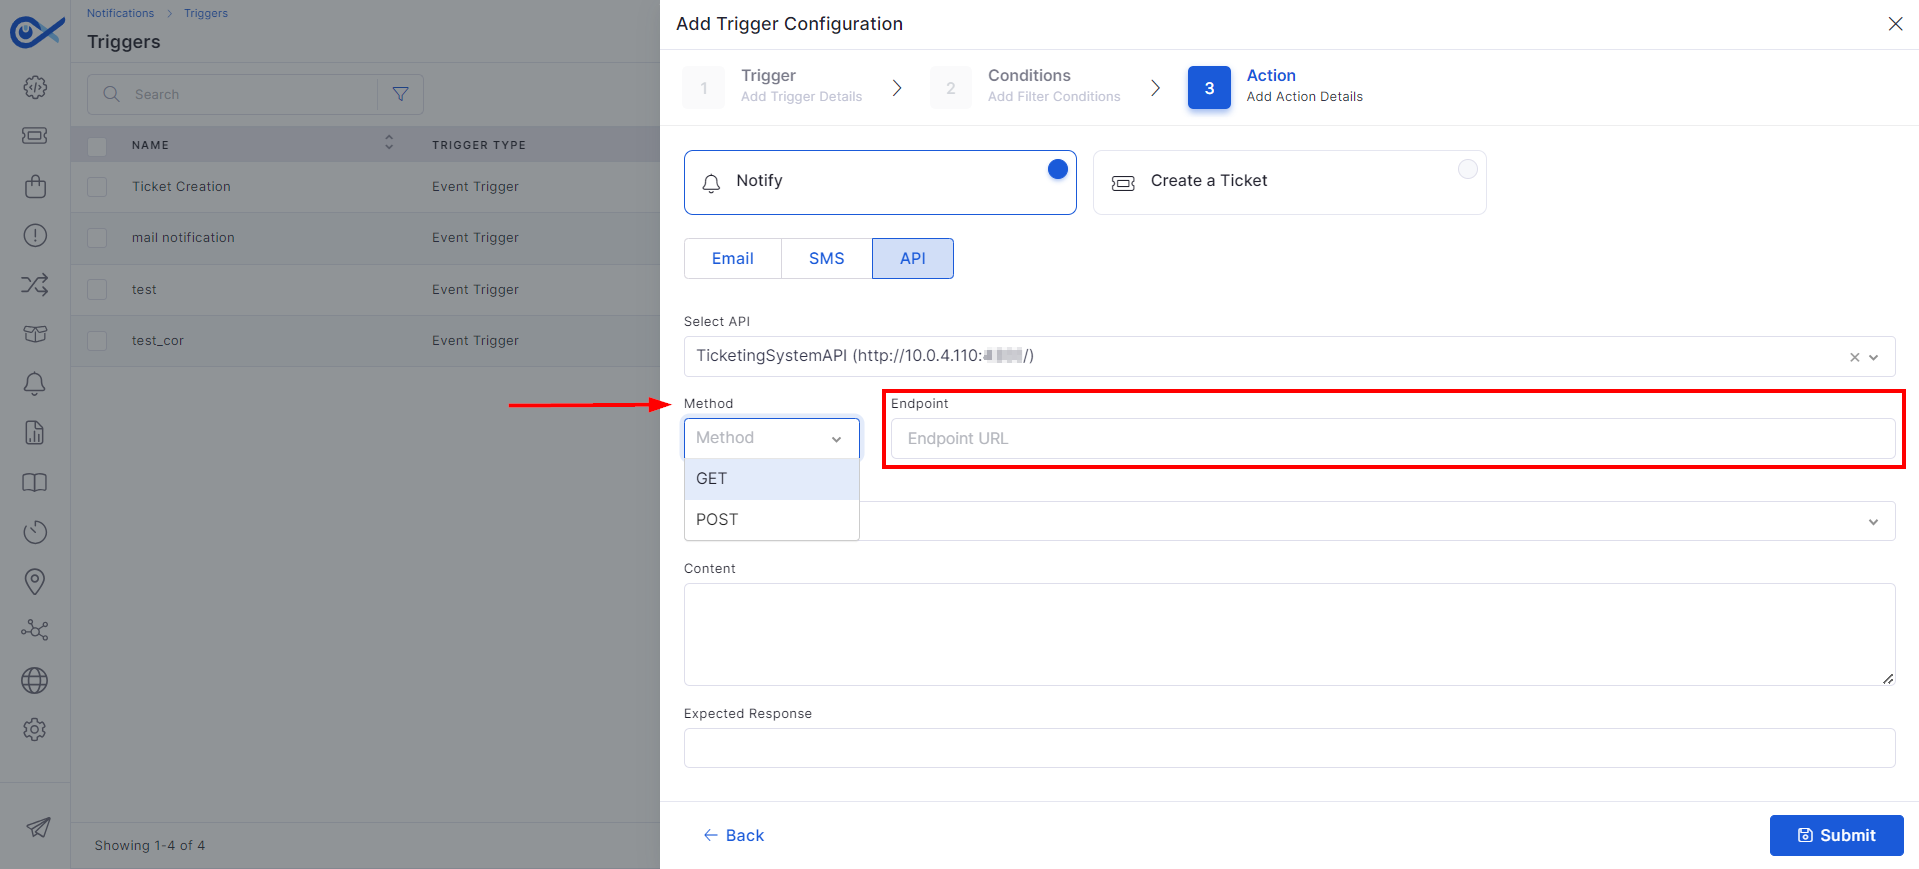
The system supports multiple notification protocols, including SMTP (email), SMS gateway integration, and REST API endpoints. The notification delivery mechanism is executed based on the selected protocol configuration.
Let’s see each one in detail:
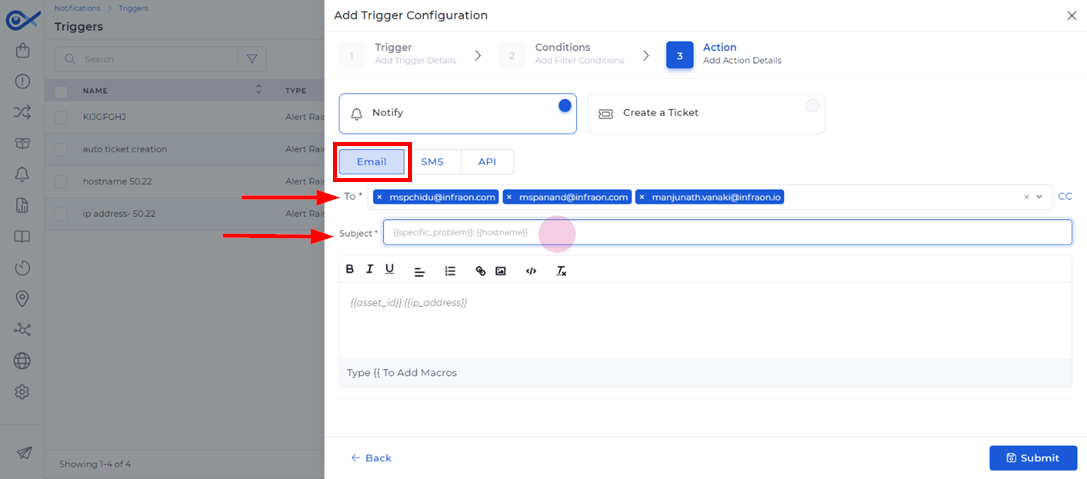
Step 1: Select the recipient email address from a dropdown or enter it manually. Optionally, you can add a CC and define the email subject.
Step 2: The email body supports dynamic content injection through macro implementation using double curly braces ({{). The system provides predefined macro variables, including network parameters (IP_ADDRESS, HOSTNAME) for customized alert messaging.
Step 1: Create a custom SMS message describing the trigger action.
Step 2: Specify the recipient's phone number from the dropdown box.
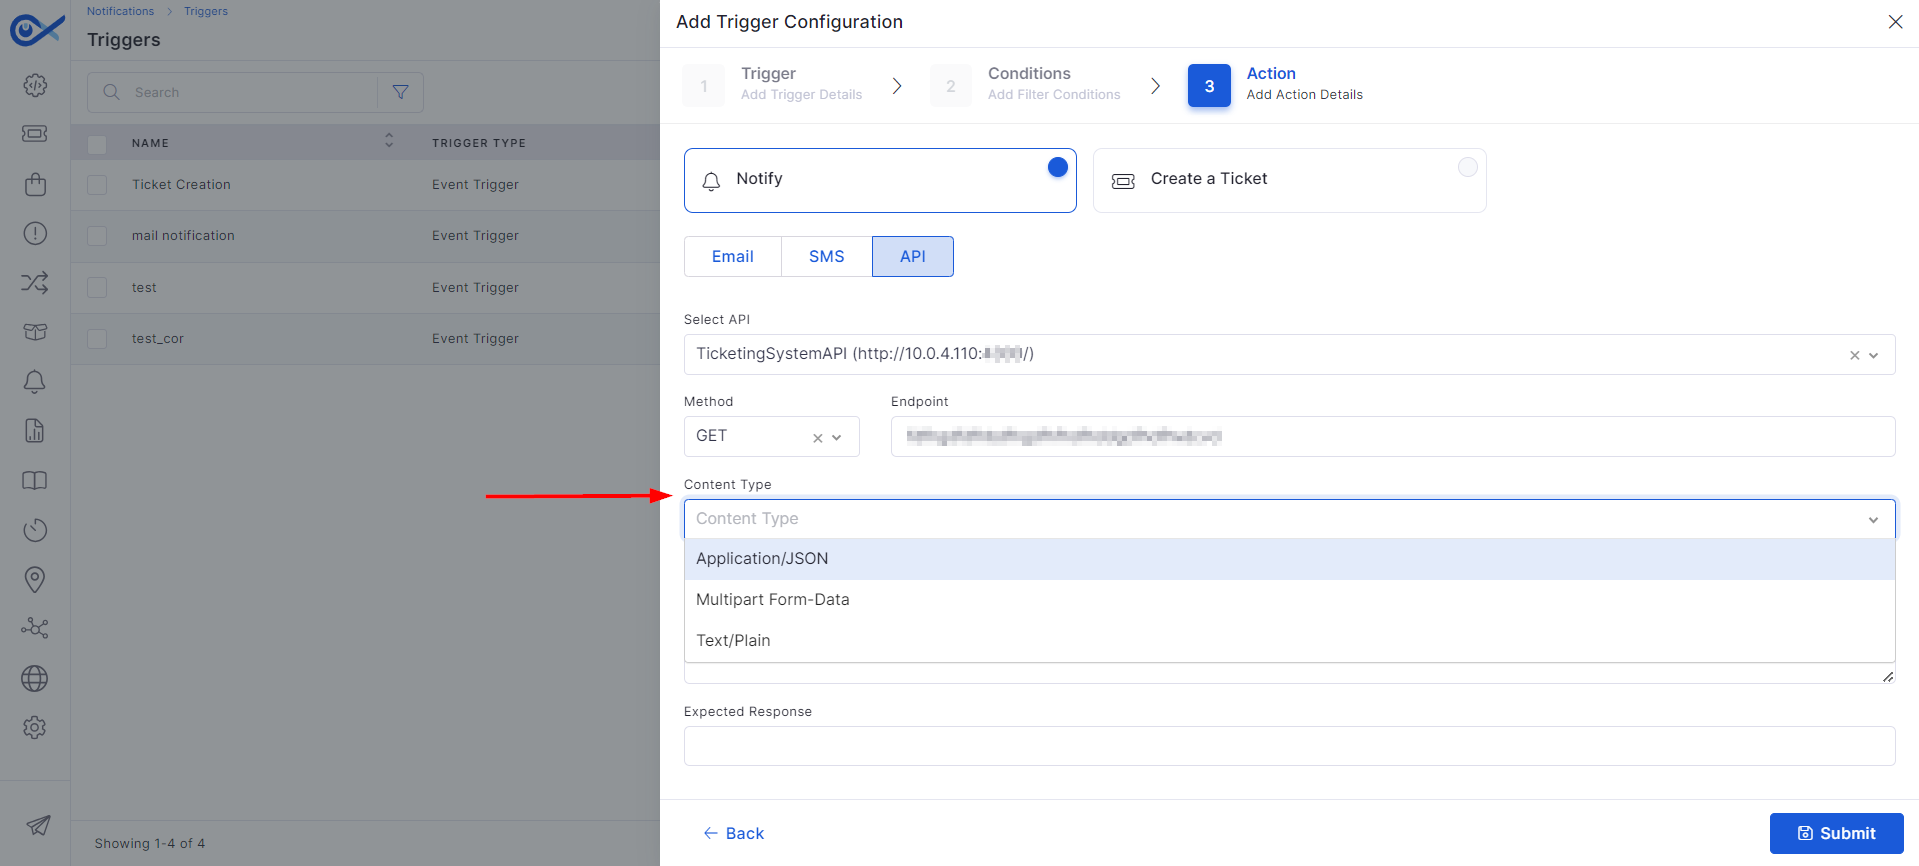
Step 1: Select the appropriate API from the list of registered APIs.
Step 2: Choose the GET or POST method and enter the endpoint respected URL.
Step 3: Select the content type (e.g., application/JSON) and provide the required data in the corresponding fields.
Once the notification channel configurations are completed for the selected protocol (email, SMS, or API), the system executes a validation sequence and confirms successful trigger deployment.
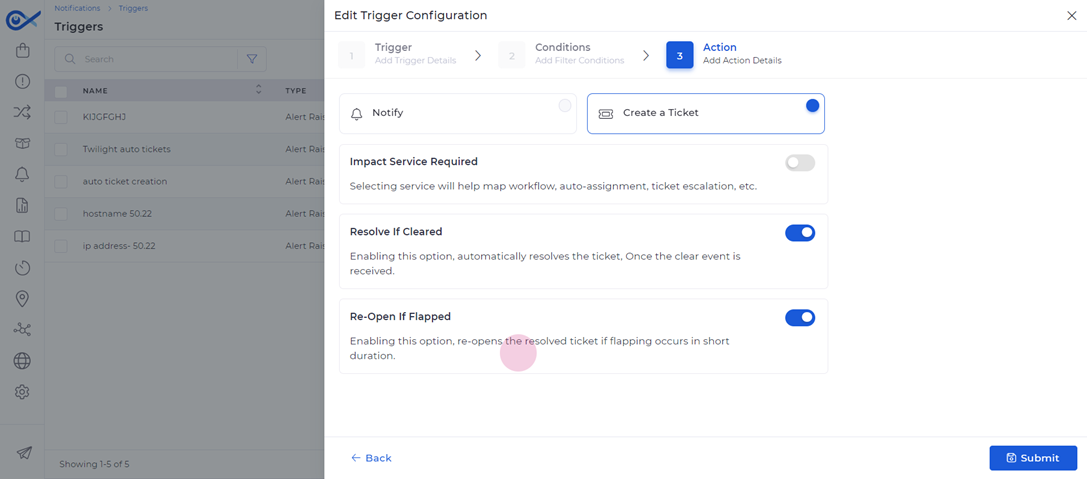
Several toggles are available during ticket creation, such as 'Impact Service,' 'Resolve if Cleared,' and 'Reopen if Necessary.' Let’s break down these options:
Impact Service: If this toggle is enabled, users are prompted to choose a service impacted by the event for ticket creation. The available services will be displayed in a dropdown menu. Once a service is selected, the created ticket will be automatically linked. This optional step allows users to associate a service or leave the feature disabled.
Resolve if Cleared: Enabling this option allows the system to resolve the ticket automatically when the event has been cleared. This feature is optional and should be selected if users wish the ticket to close upon resolution of the alarm.
Reopen on Re-alarm: Activating this toggle ensures the system reopens the ticket if a re-alarm or event recurrence occurs. Initially, the ticket moves from an open to a resolved state, but with this option enabled, the ticket status will change to 'in progress' upon re-alarm.
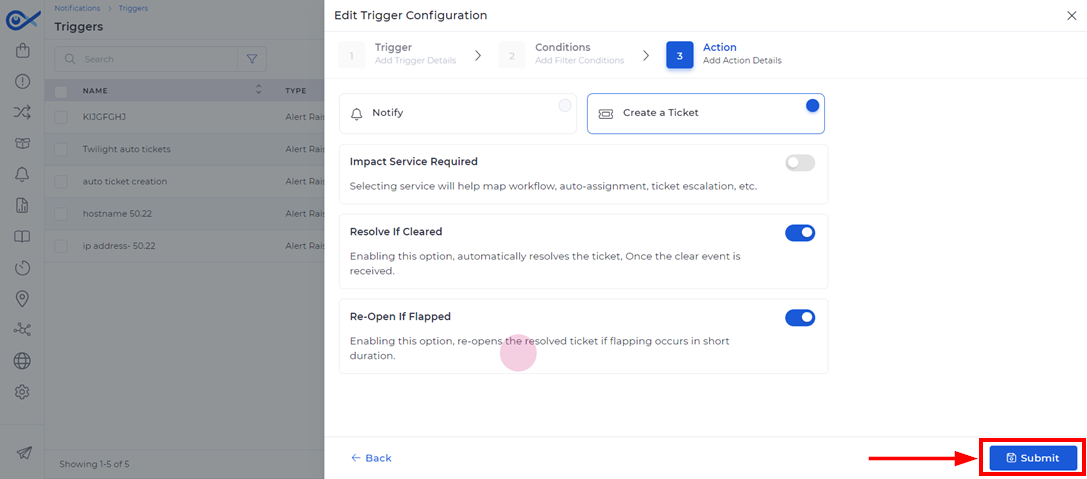
After adjusting the necessary settings, click the Submit button.
A confirmation message will appear, indicating that the trigger has been successfully created and is visible in the trigger list.
You can configure multiple triggers for scenarios requiring multiple actions (e.g., notifying users and creating tickets for the same event).
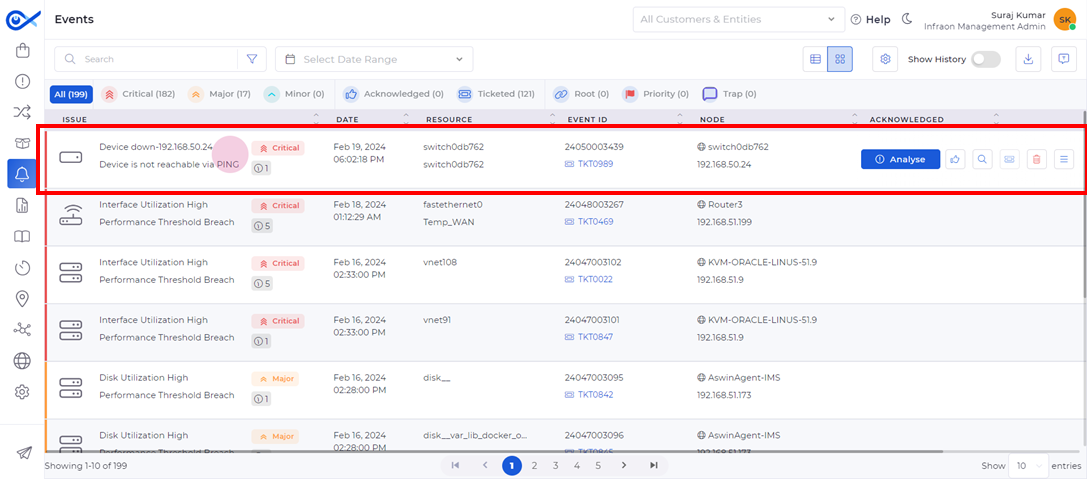
Once configured, triggers will activate based on the predefined thresholds. You can monitor triggered events in the events module, where details like event ID and ticket ID are displayed.
Tickets can be accessed through the ticket module, and corresponding notifications are sent to designated recipients, providing full traceability of the trigger configuration process.
Configuring Trigger Details
Note: Trigger actions will only execute when the status is Active. If the status is set to Inactive, no actions will be triggered.
Adding Conditions
Note: You can assign a business service by configuring specific business hours. (To know more, )
Defining Trigger Actions
Notify
Notify via Email
Notify via SMS
Notify via API
Create a Ticket
Submitting the Configuration
Miscellaneous
Miscellaneous
This guide provides a comprehensive overview of the ticket management page, explaining its features and functionalities. These pages offer various tools for managing and organizing tickets effectively.
Navigating the Top Panel
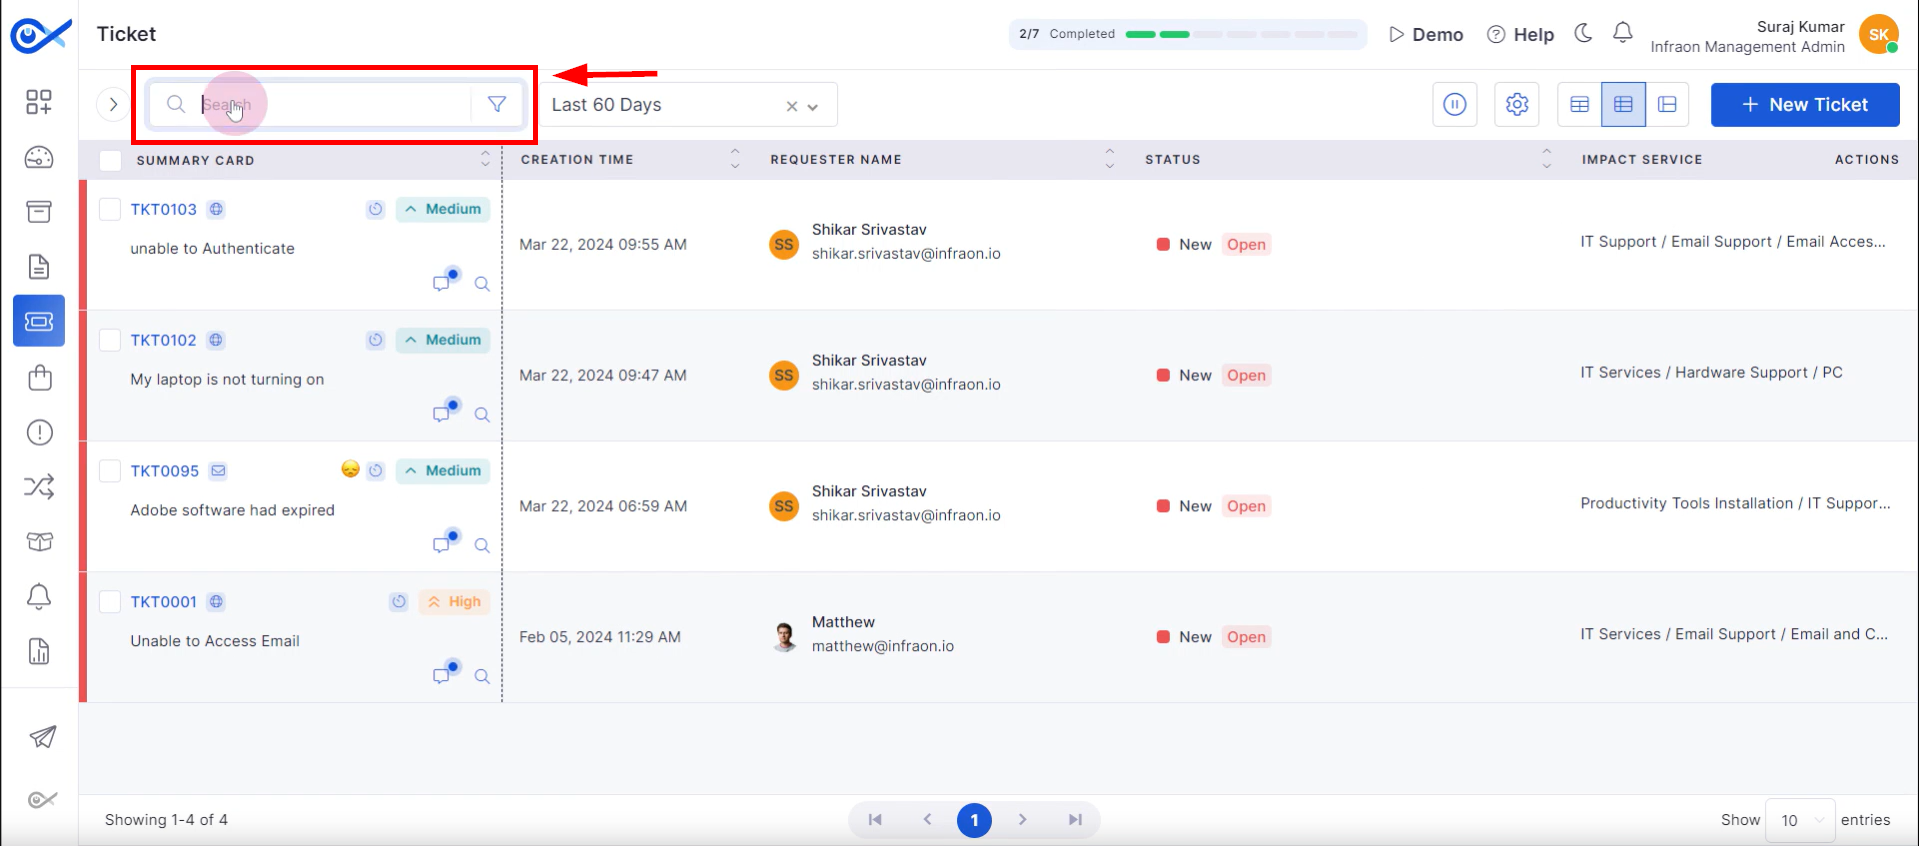
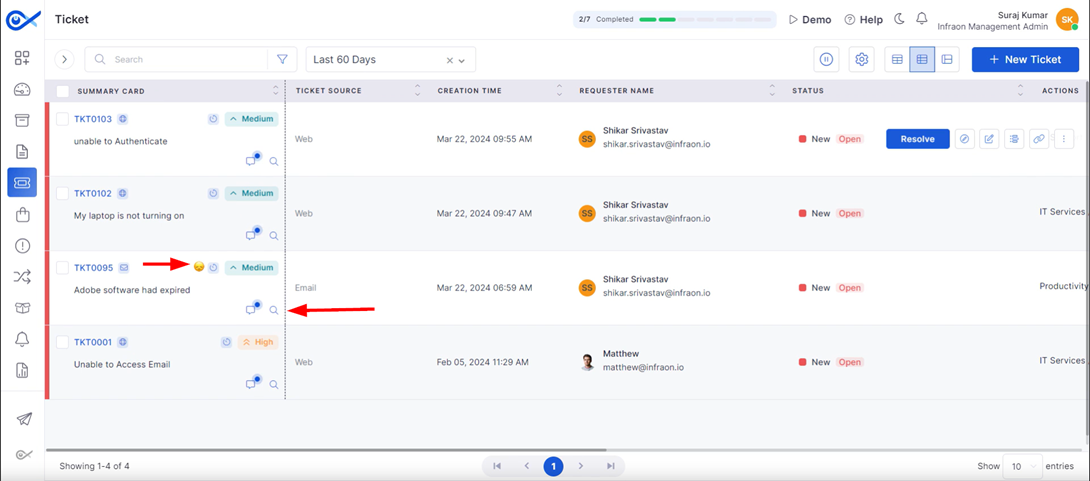
Locating the “Search” option on the top panel will assist technicians in finding a specific ticket based on its ID, requester, and more.
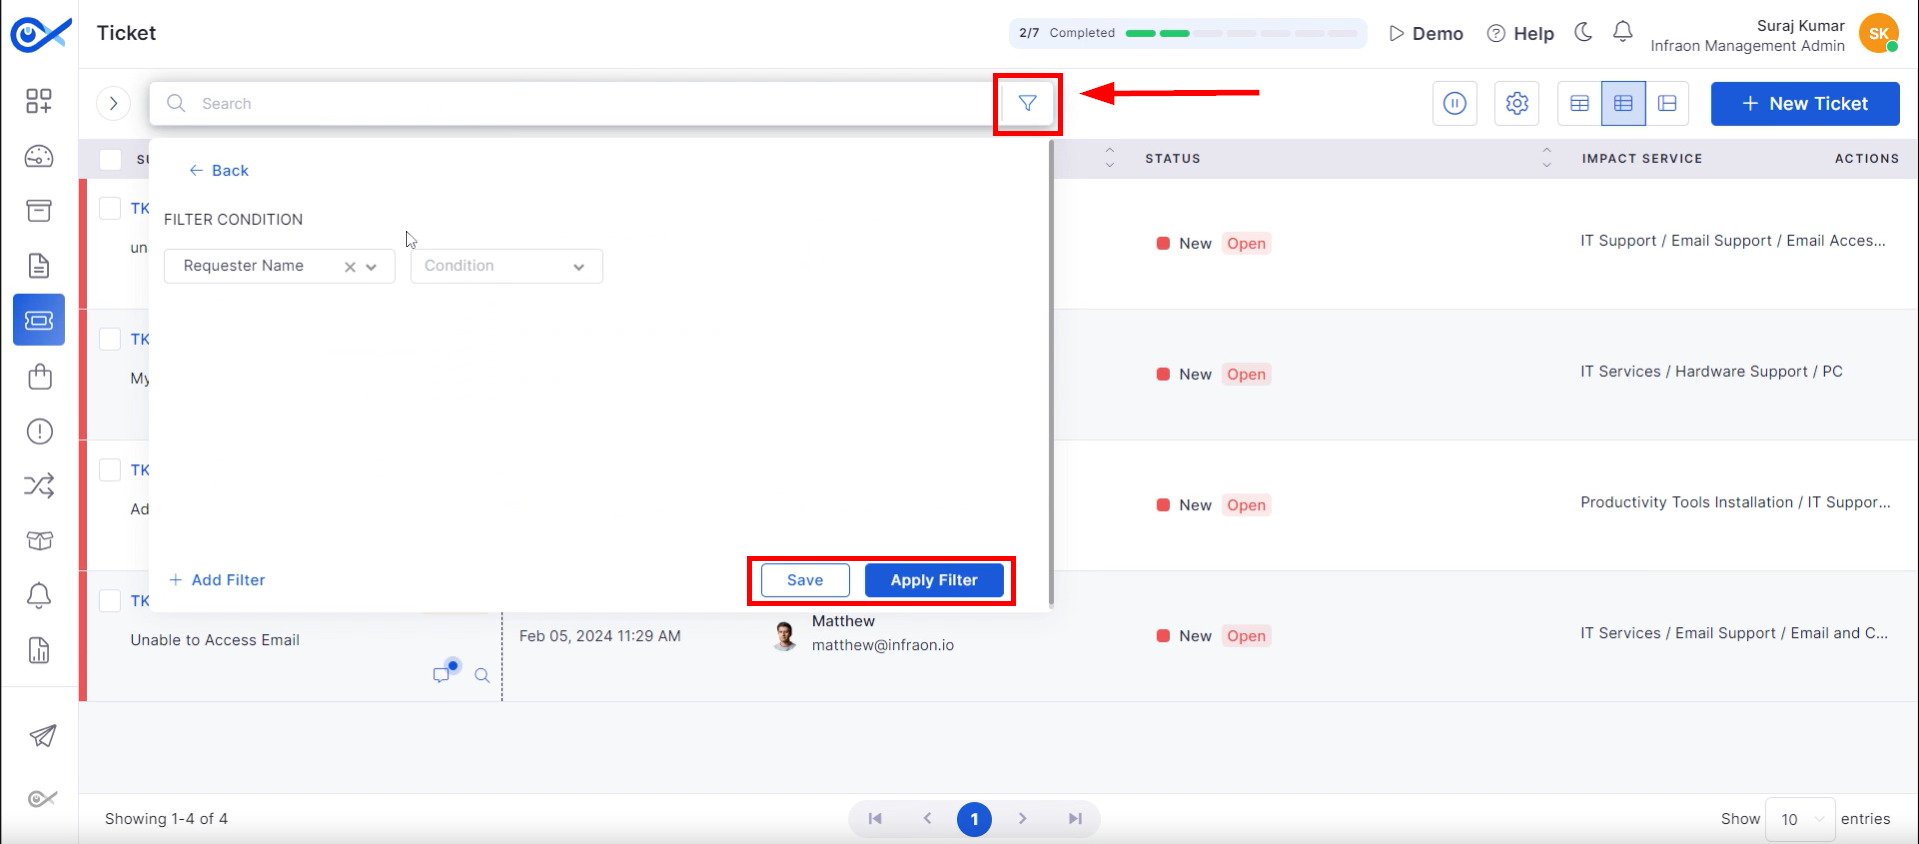
Use the “Filter” option adjacent to the search bar to refine your ticket search. Apply filters based on criteria like ticket ID, requester, technician, issue, ticket type, etc. “Save” your custom filter settings for future use.
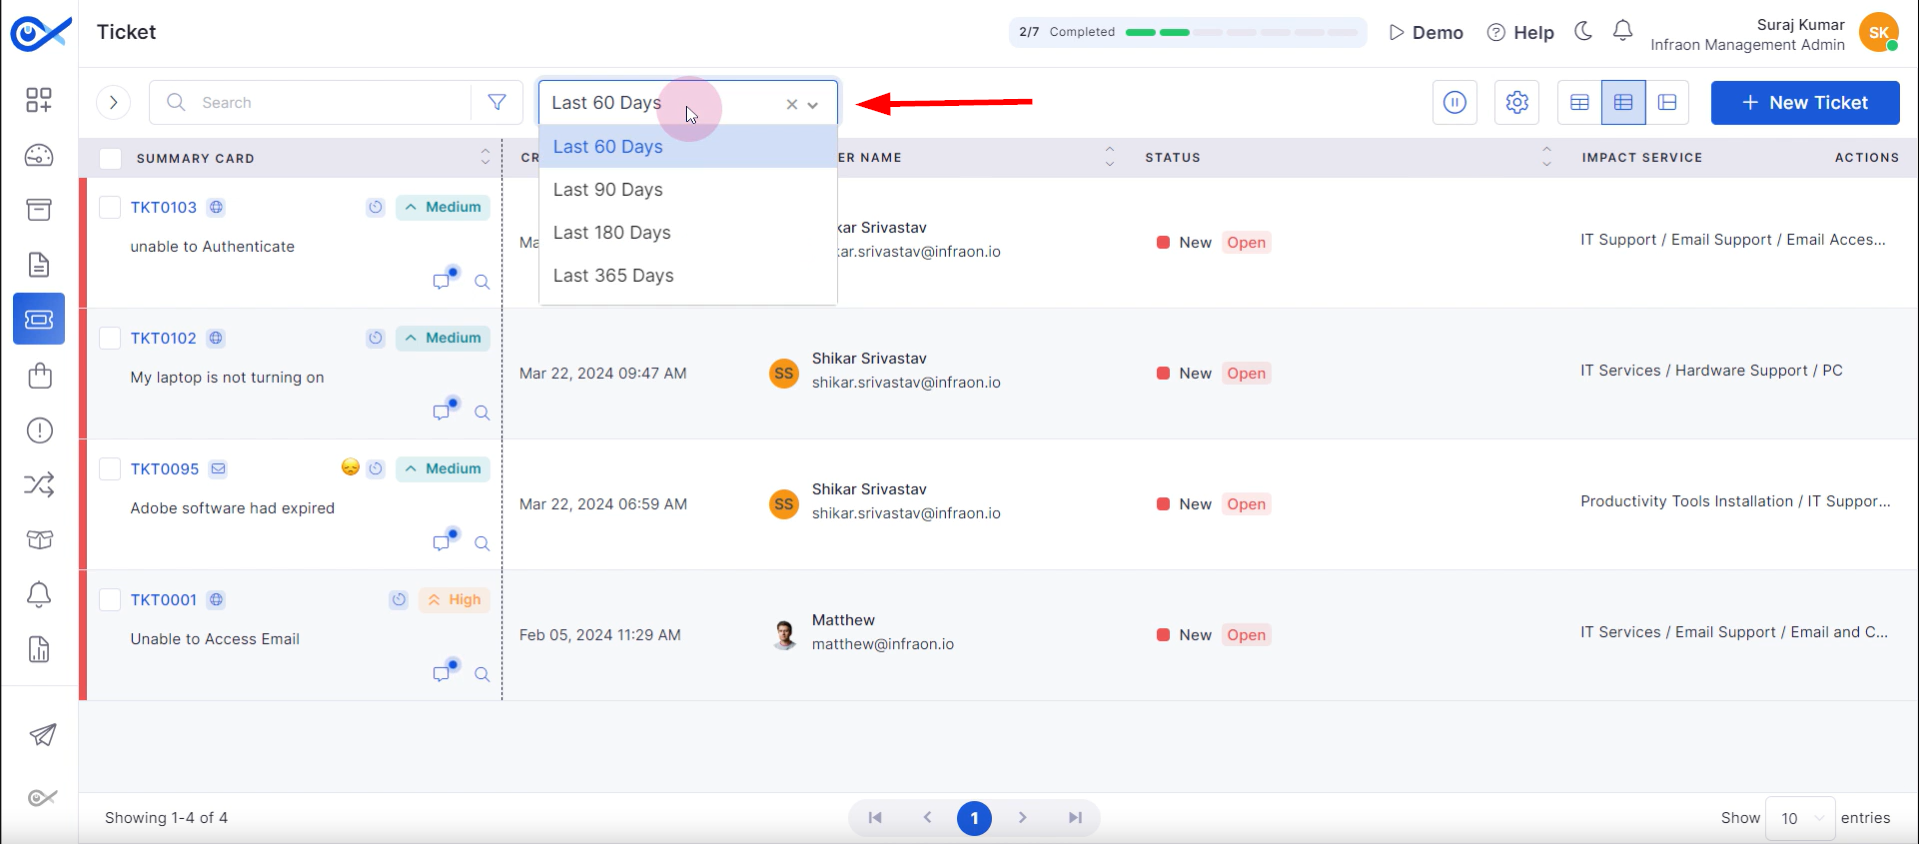
Adjacent to the search and filter options is a “Timeframe Selector,” which enables users to view tickets within specific timeframes, such as the past thirty, sixty, or ninety days or the entire previous year.
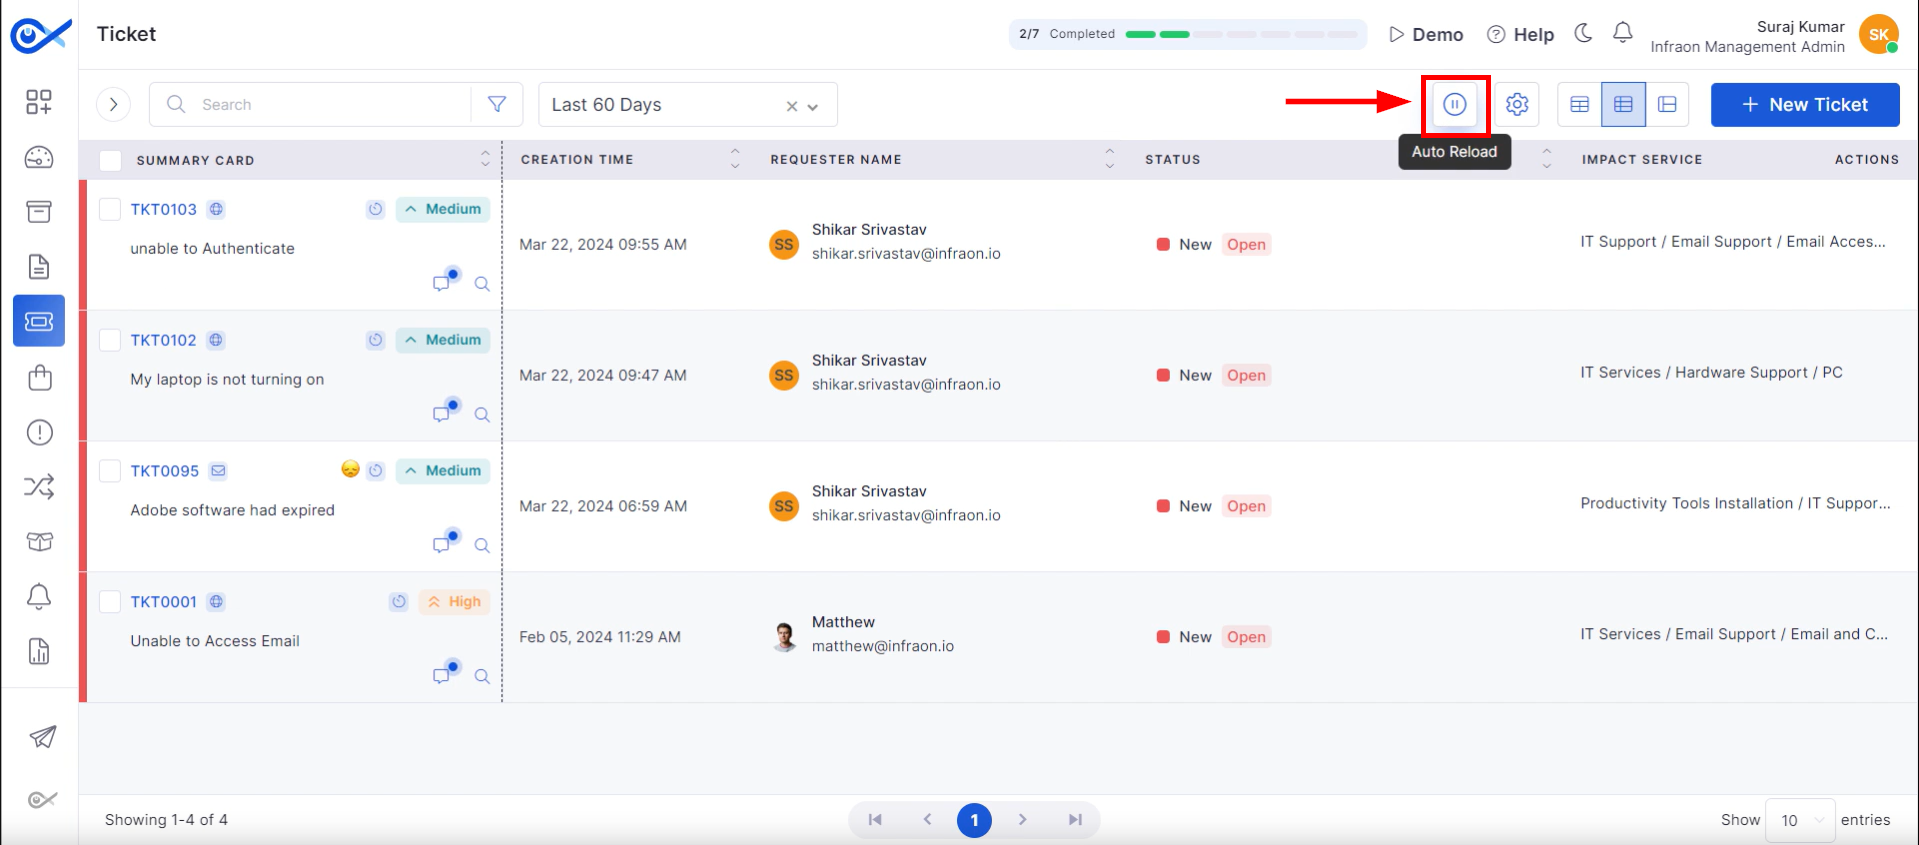
The top panel includes an “Auto-Reload” feature, which refreshes the page every five minutes by default. This allows for real-time updates on ticket statuses. To manually disable this feature, click the auto-reload icon.
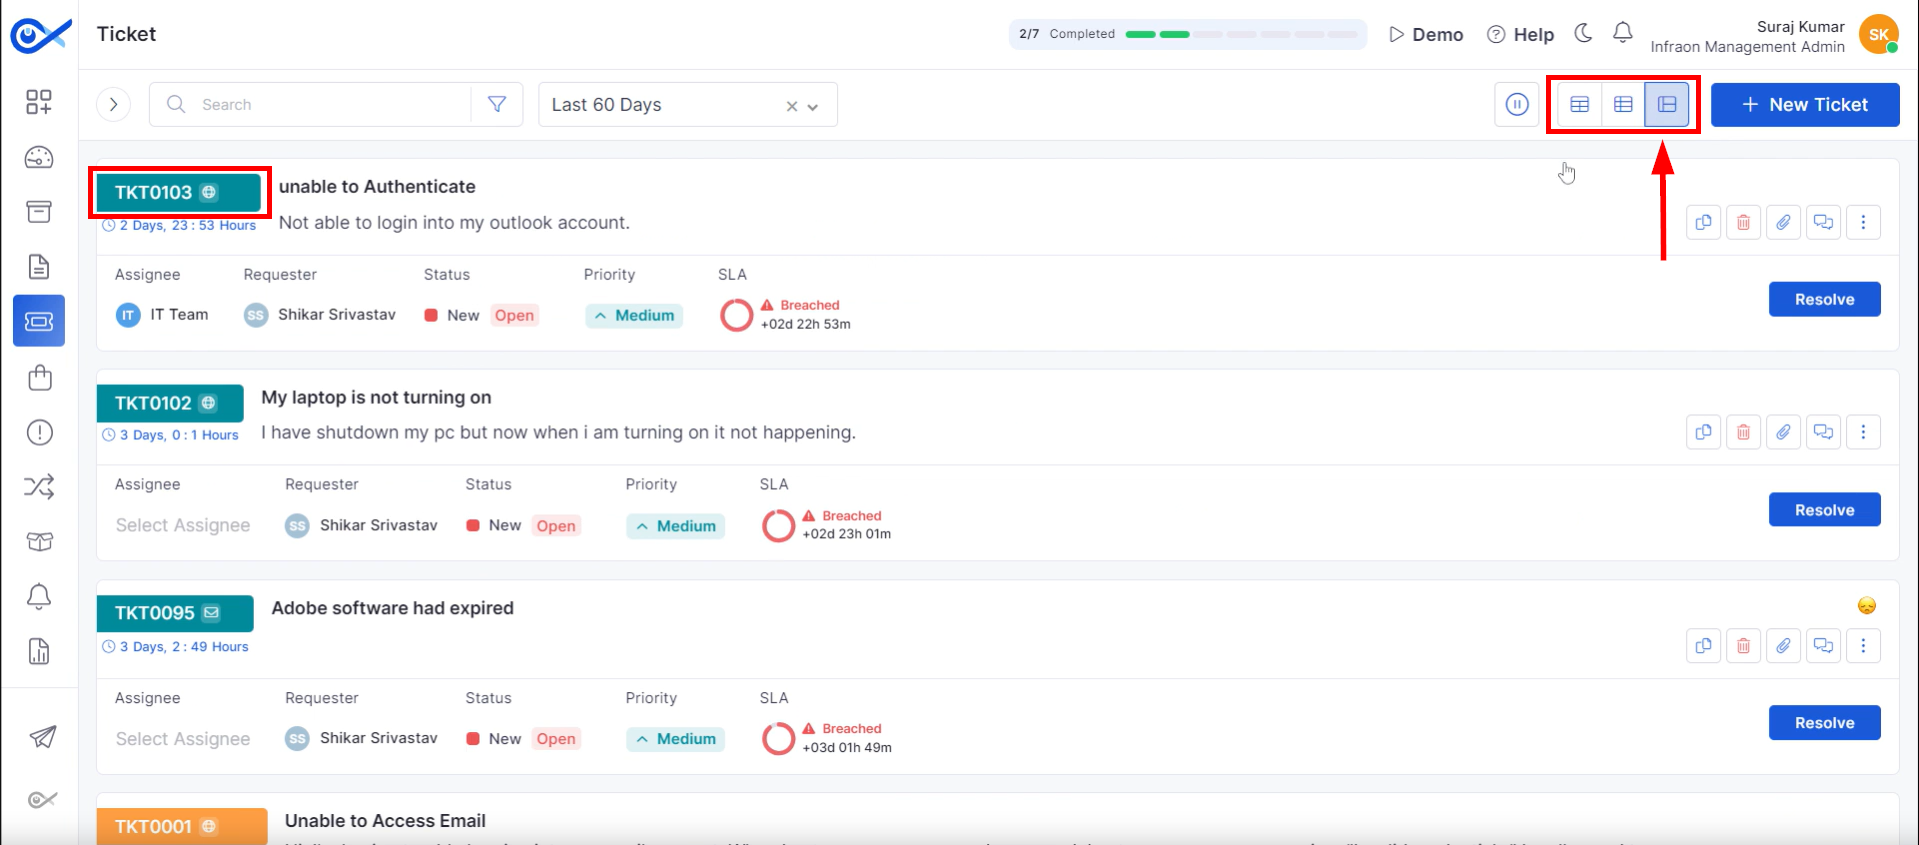
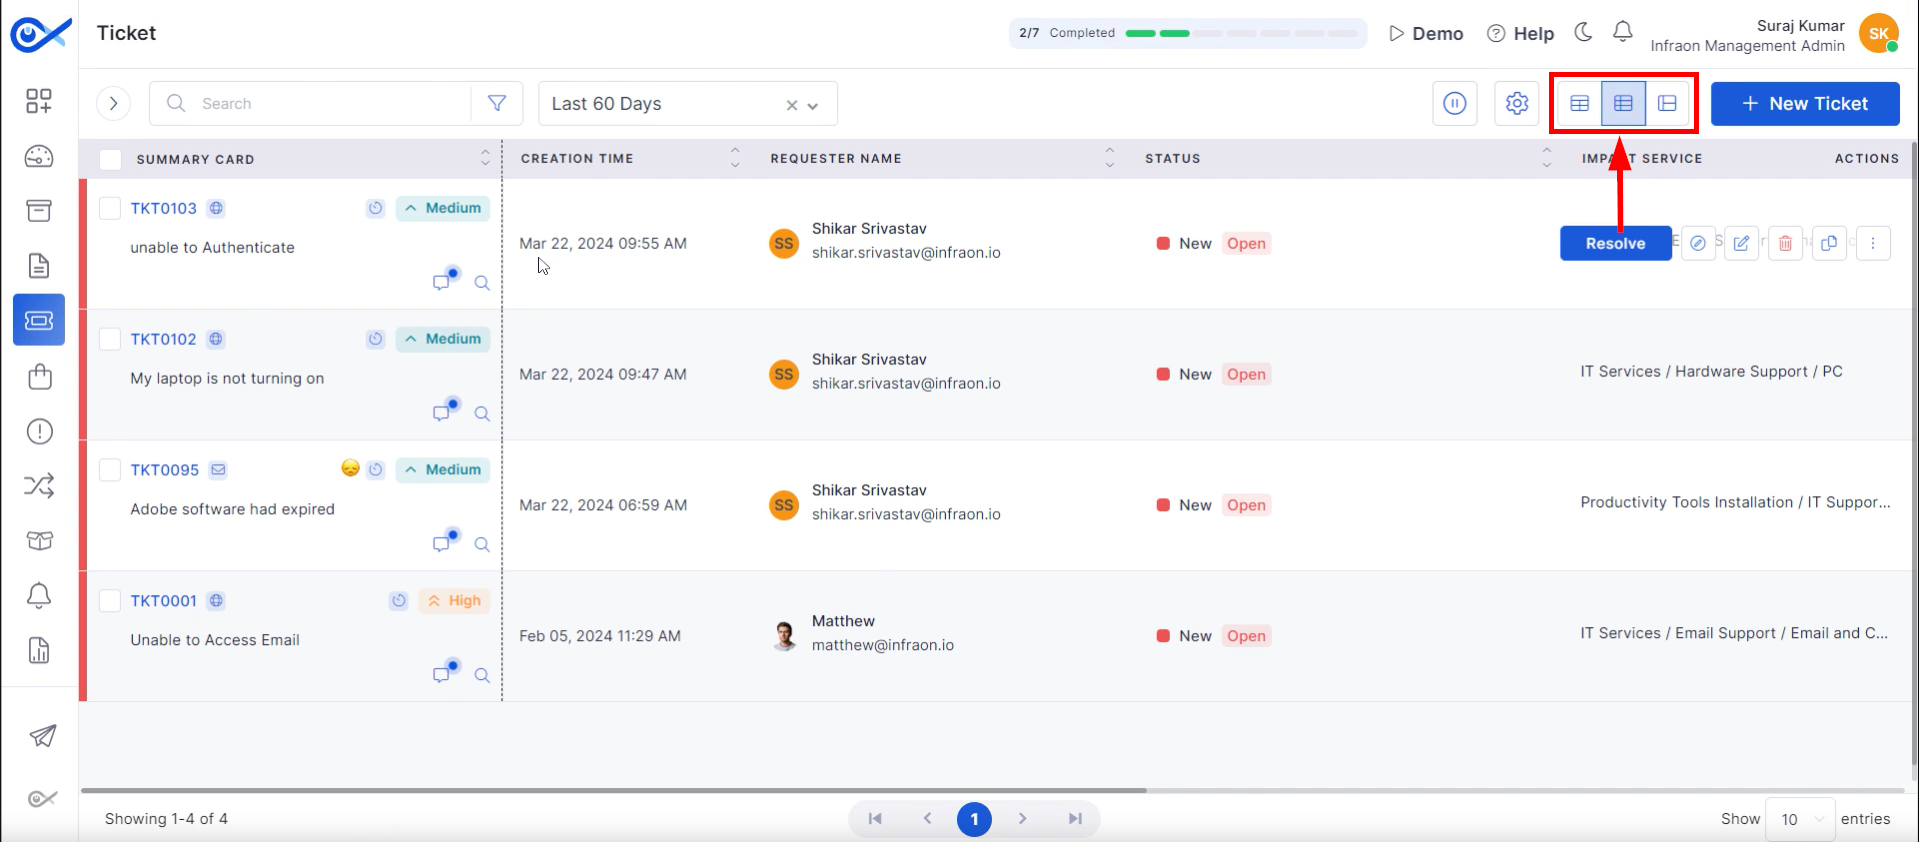
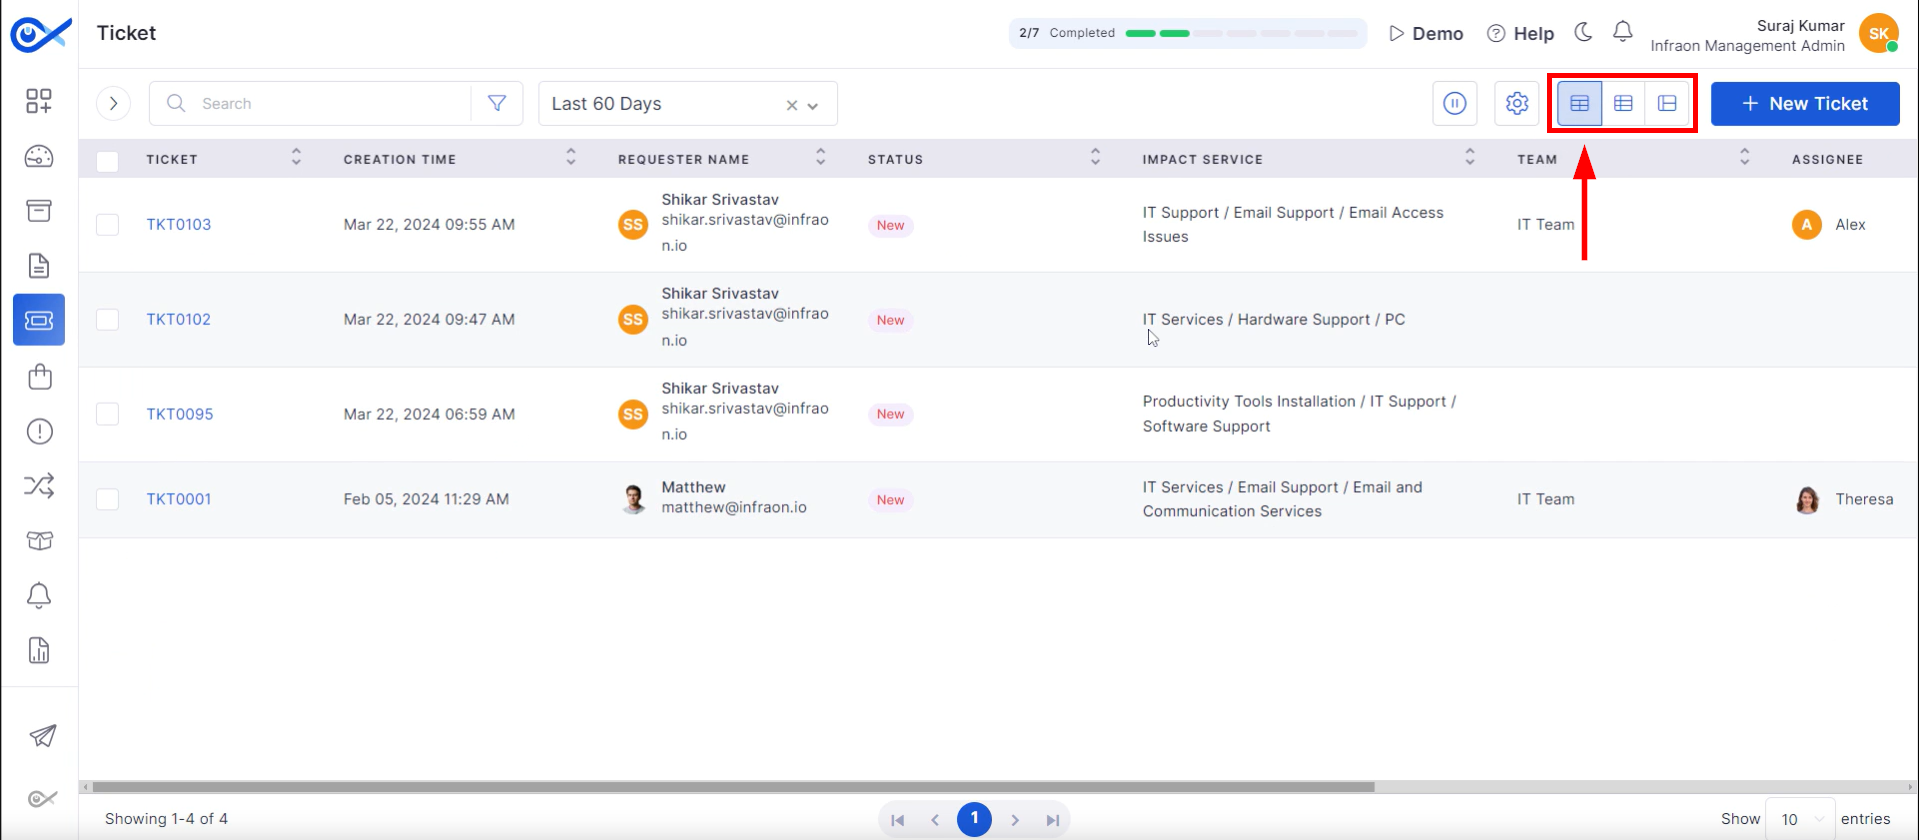
Tickets can be toggled between panel view, smart grid, and grid view.
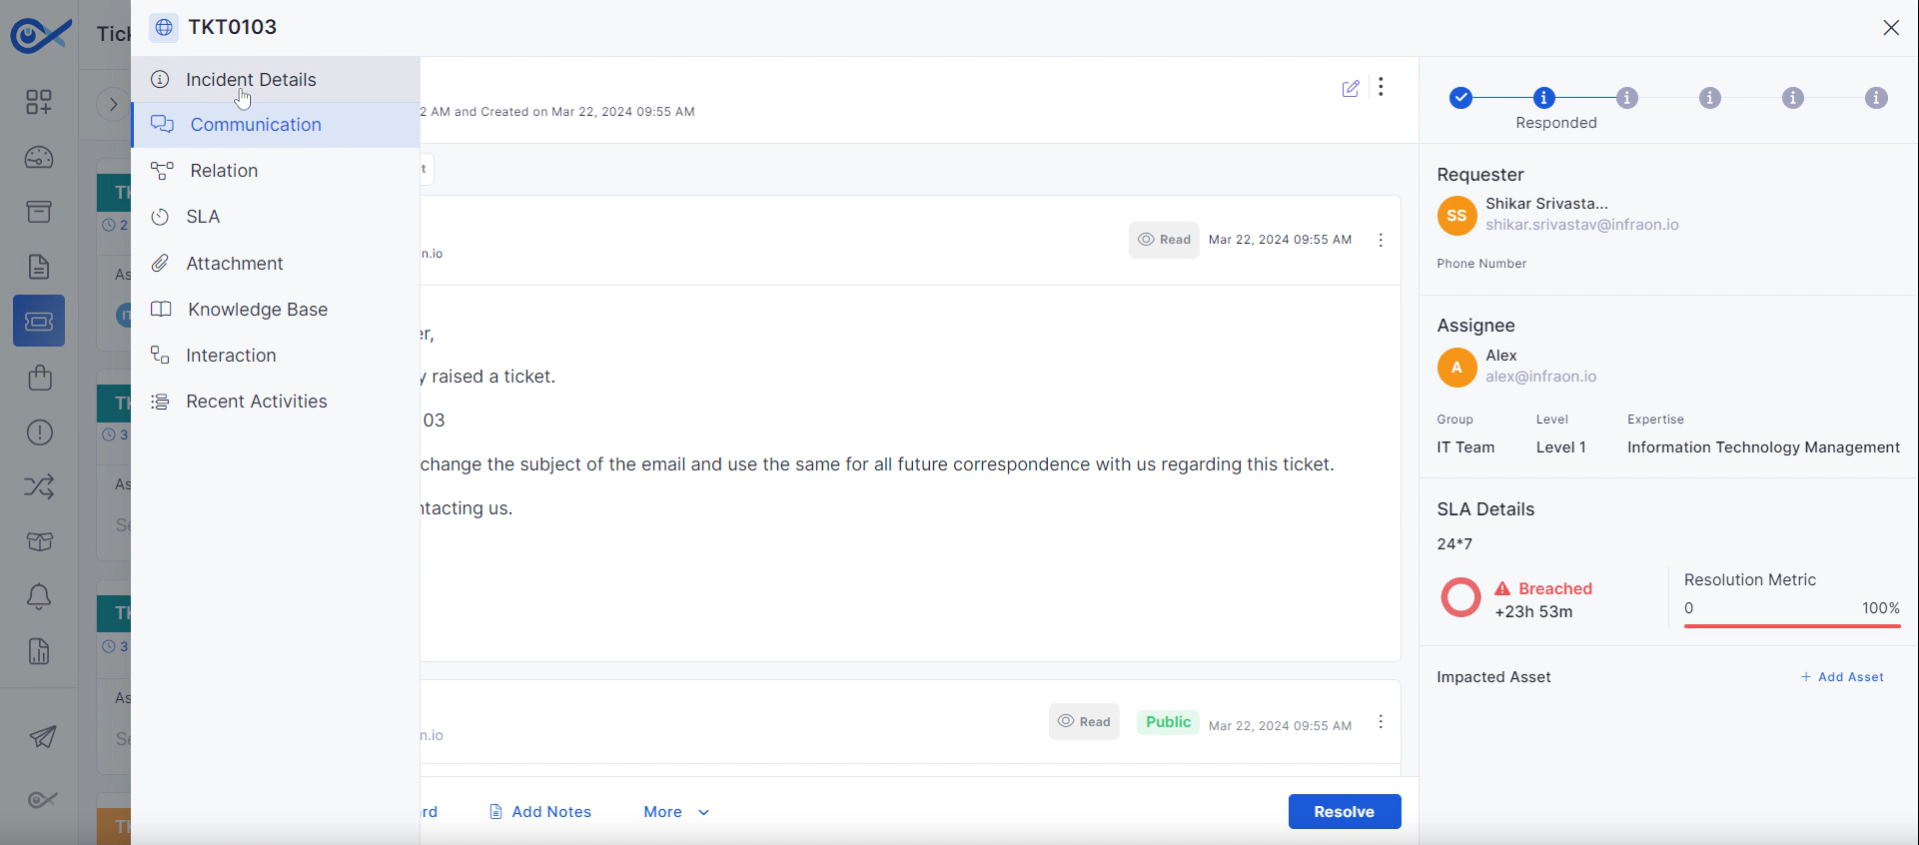
The panel view provides a concise overview of tickets, displaying key details such as assignee, requester, status, priority, and SLA. Selecting the Ticket ID,
It opens its dedicated module, which provides comprehensive information on incident details, communication, relationships, SLAs, attachments, knowledge base, interaction, and recent activities.
The smart grid provides a concise overview of tickets through summary cards that include creation time, requester, status, affected service, and actionable items.
The grid view presents ticket data in a tabular format, displaying key information such as ticket number, creation date, requester, status, and affected service in dedicated columns.
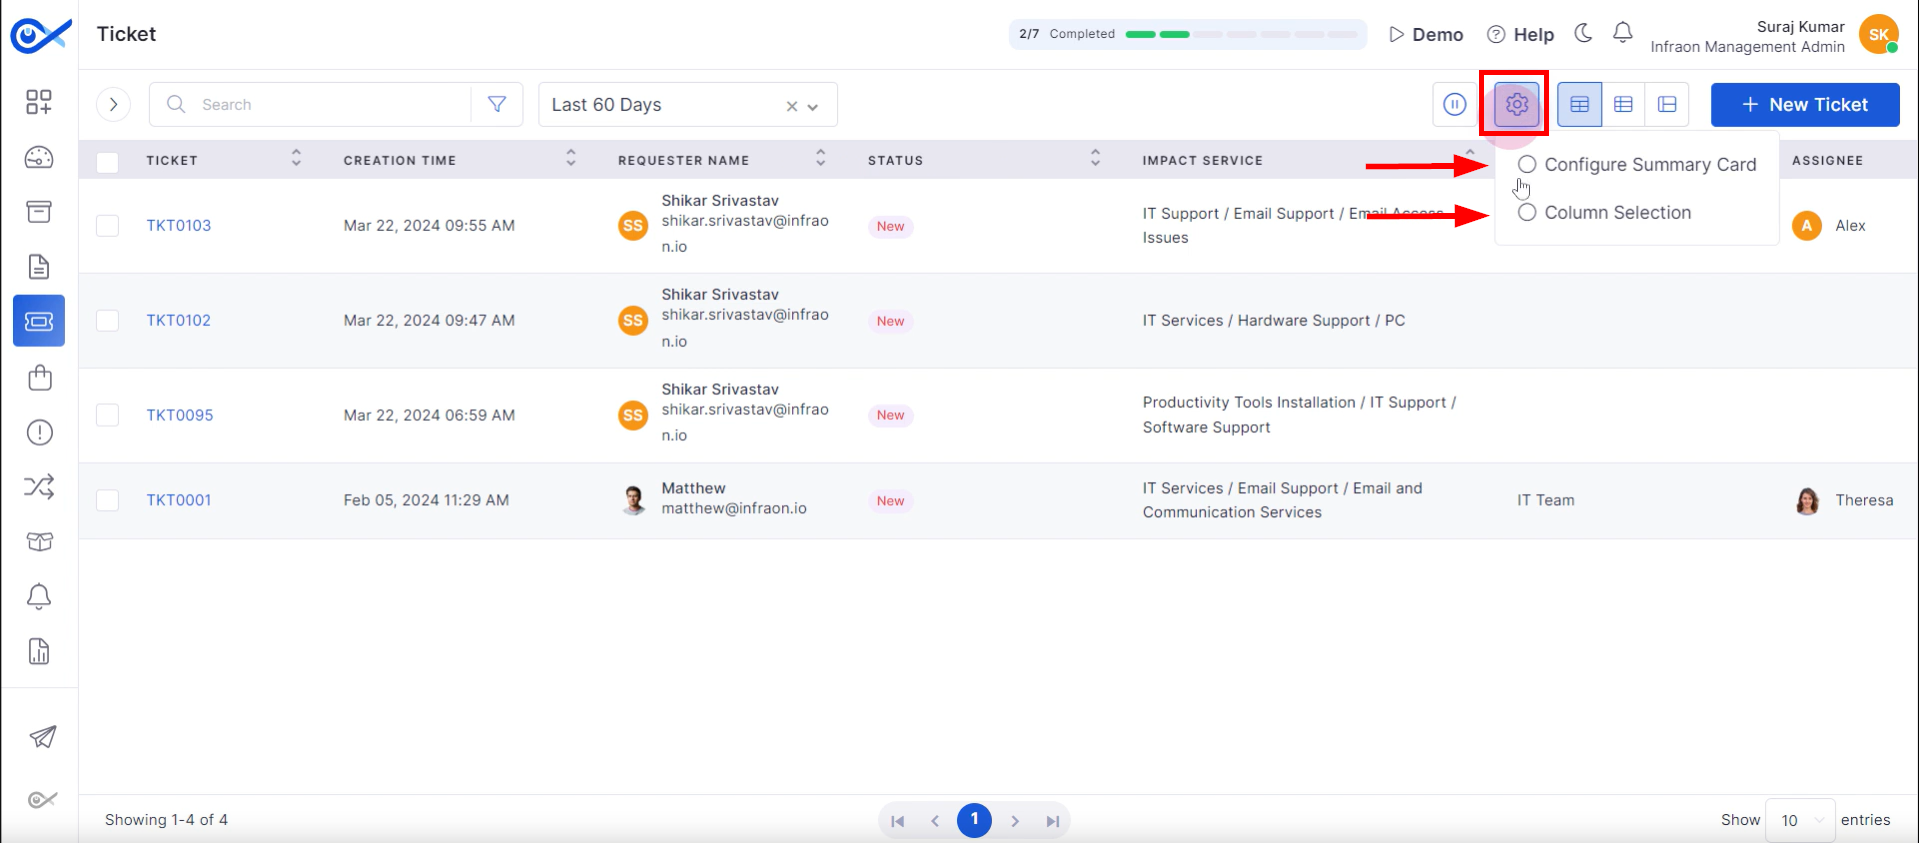
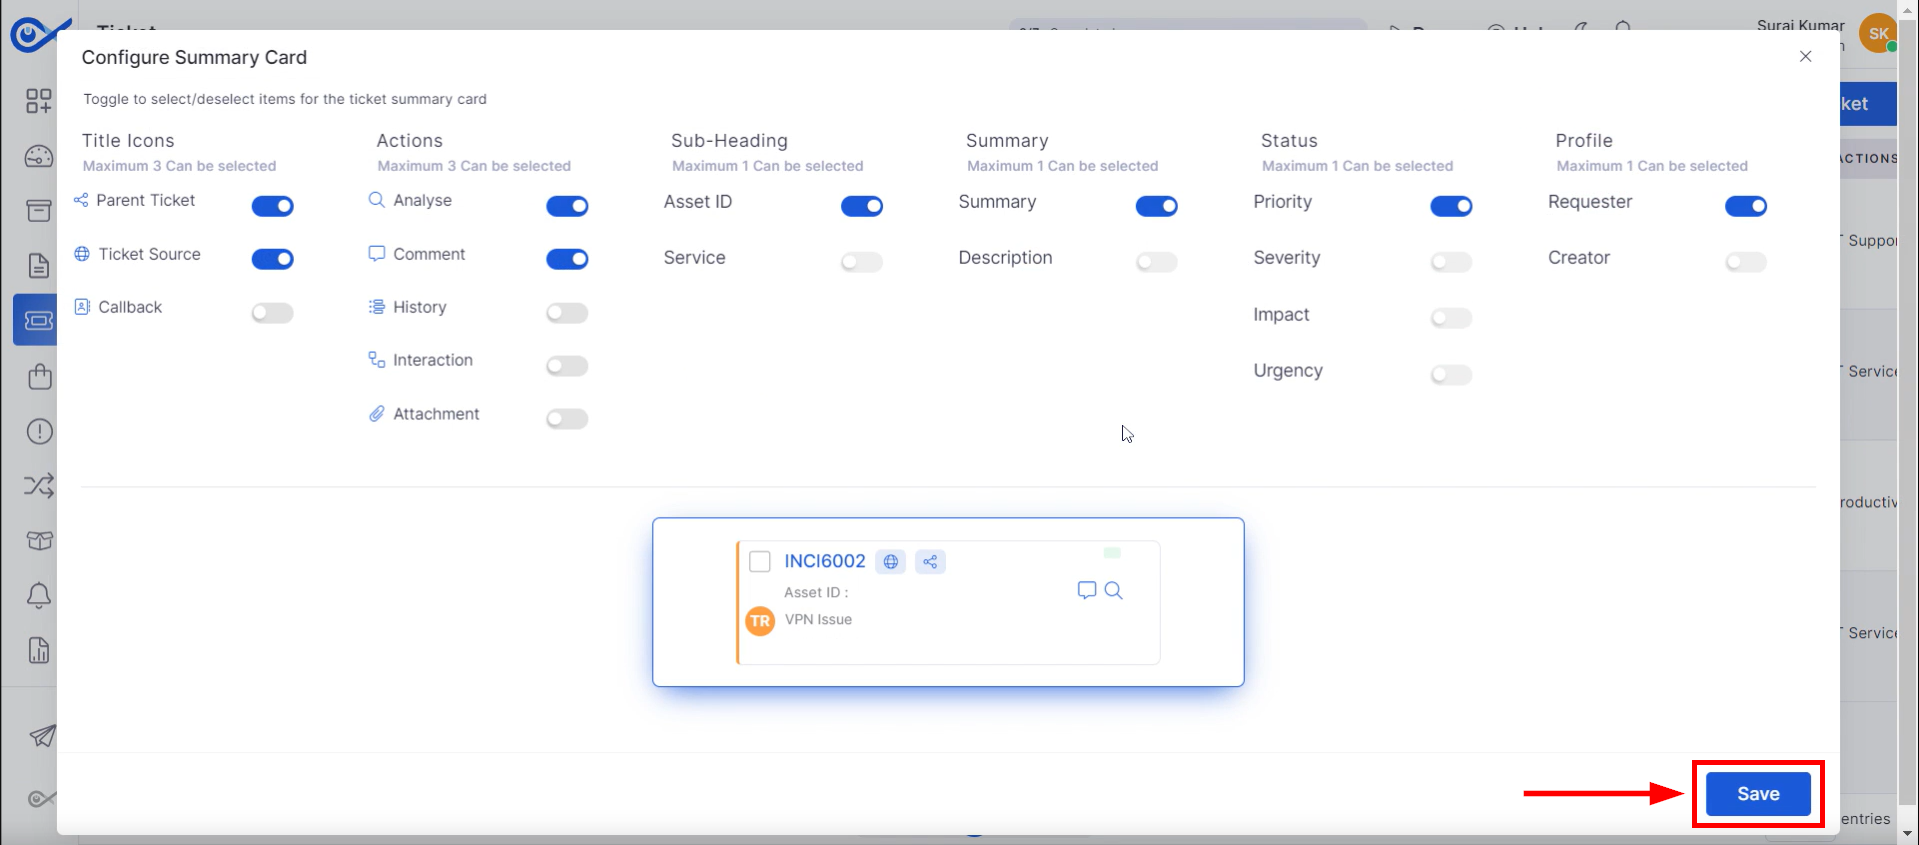
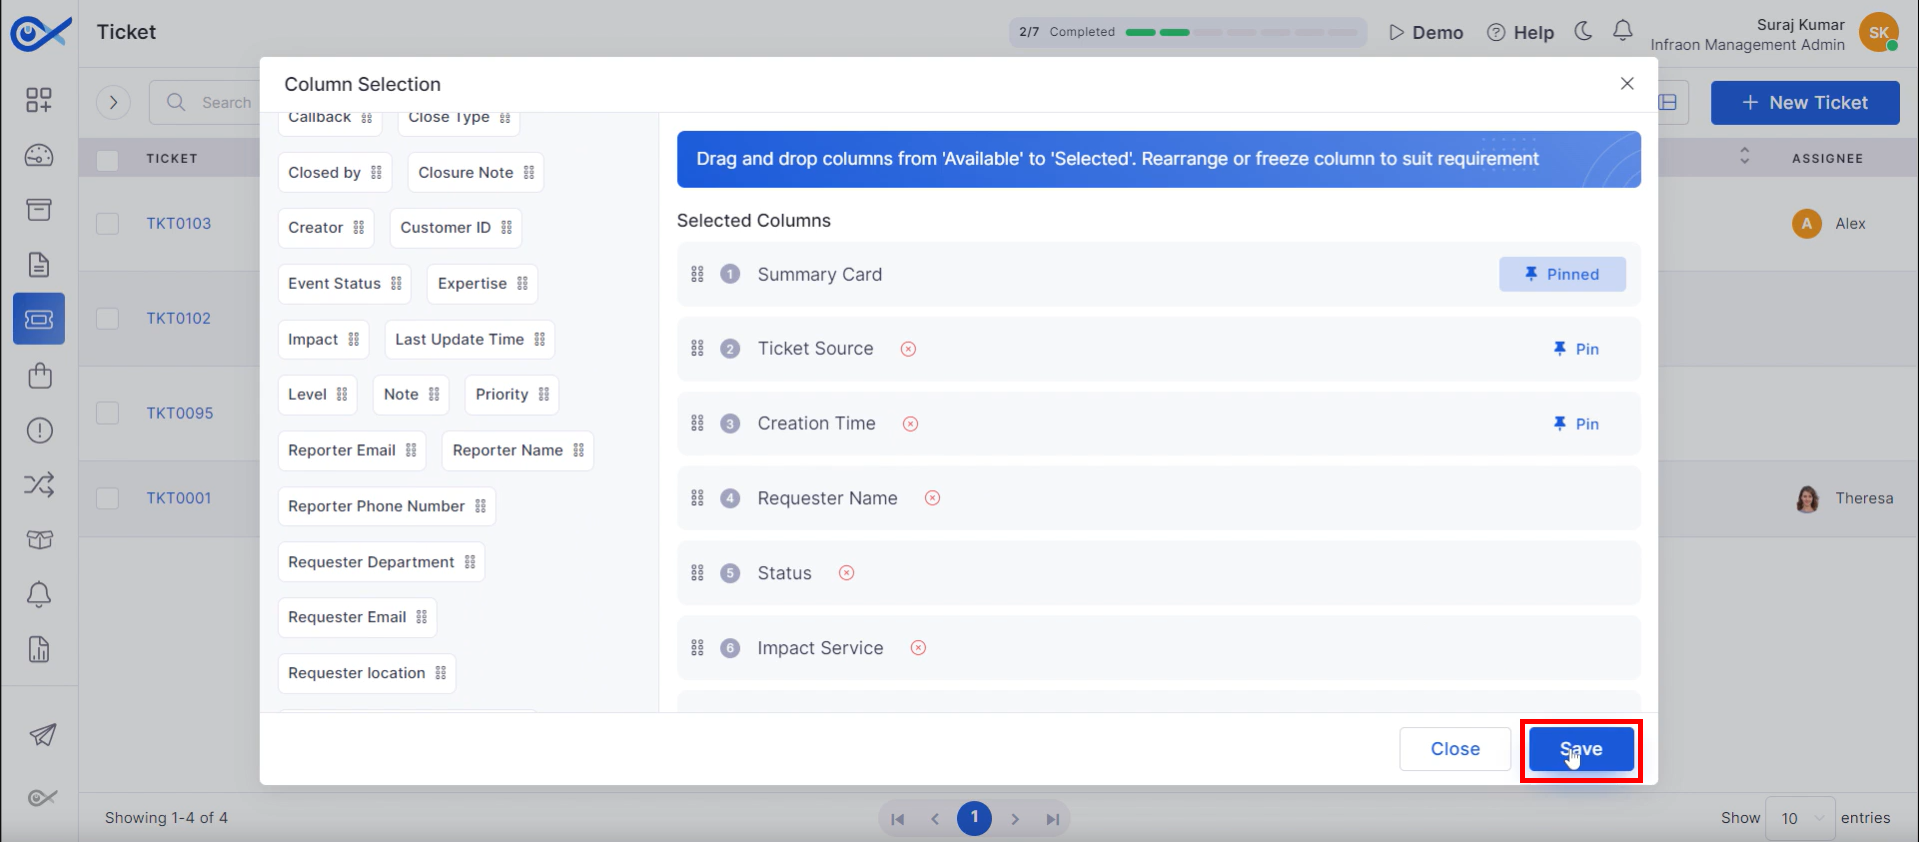
Locate the “Configure” icon on the top panel next to the view options to customize the displayed columns. This will open a menu allowing users to select the “Configure Summary Card” or “Column Selection” format.
The smart grid offers a “Configure Summary Card” option, enabling users to customize the card's content. This includes adding ticket source and analysis details and toggling the visibility of impact and severity indicators. Alternatively, the impact status can be displayed directly on the main page by selecting the corresponding option and saving the changes.
In Column Selection, users can modify the displayed columns by dragging and dropping desired fields from the available options to the active column list. Once satisfied with the selection, save the changes and apply them to the view page.
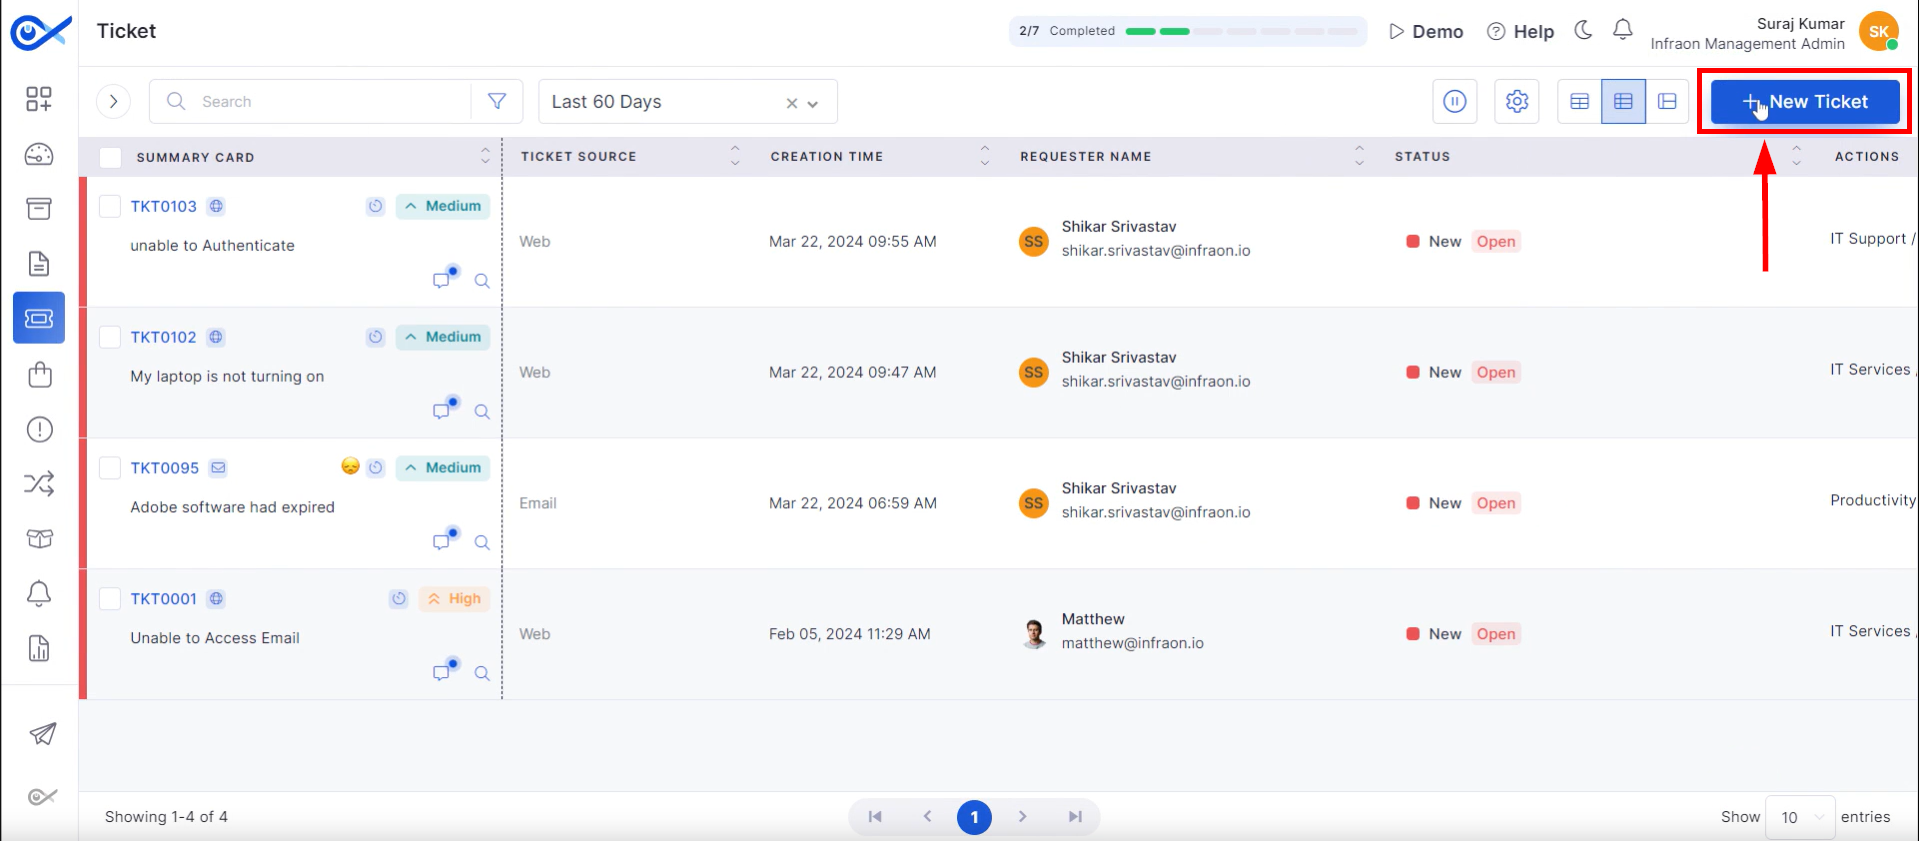
The "New Ticket" button, located in the upper right-hand corner of the page, is the entry point for creating new tickets.
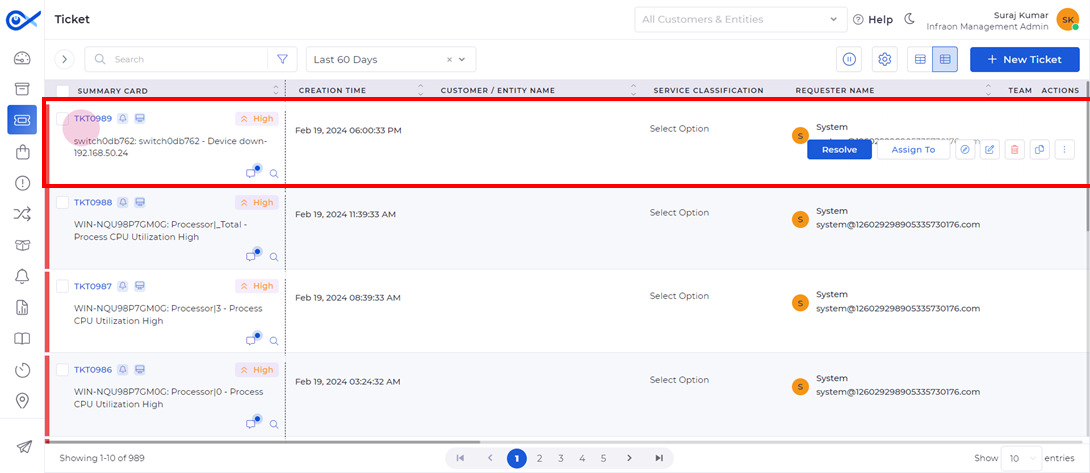
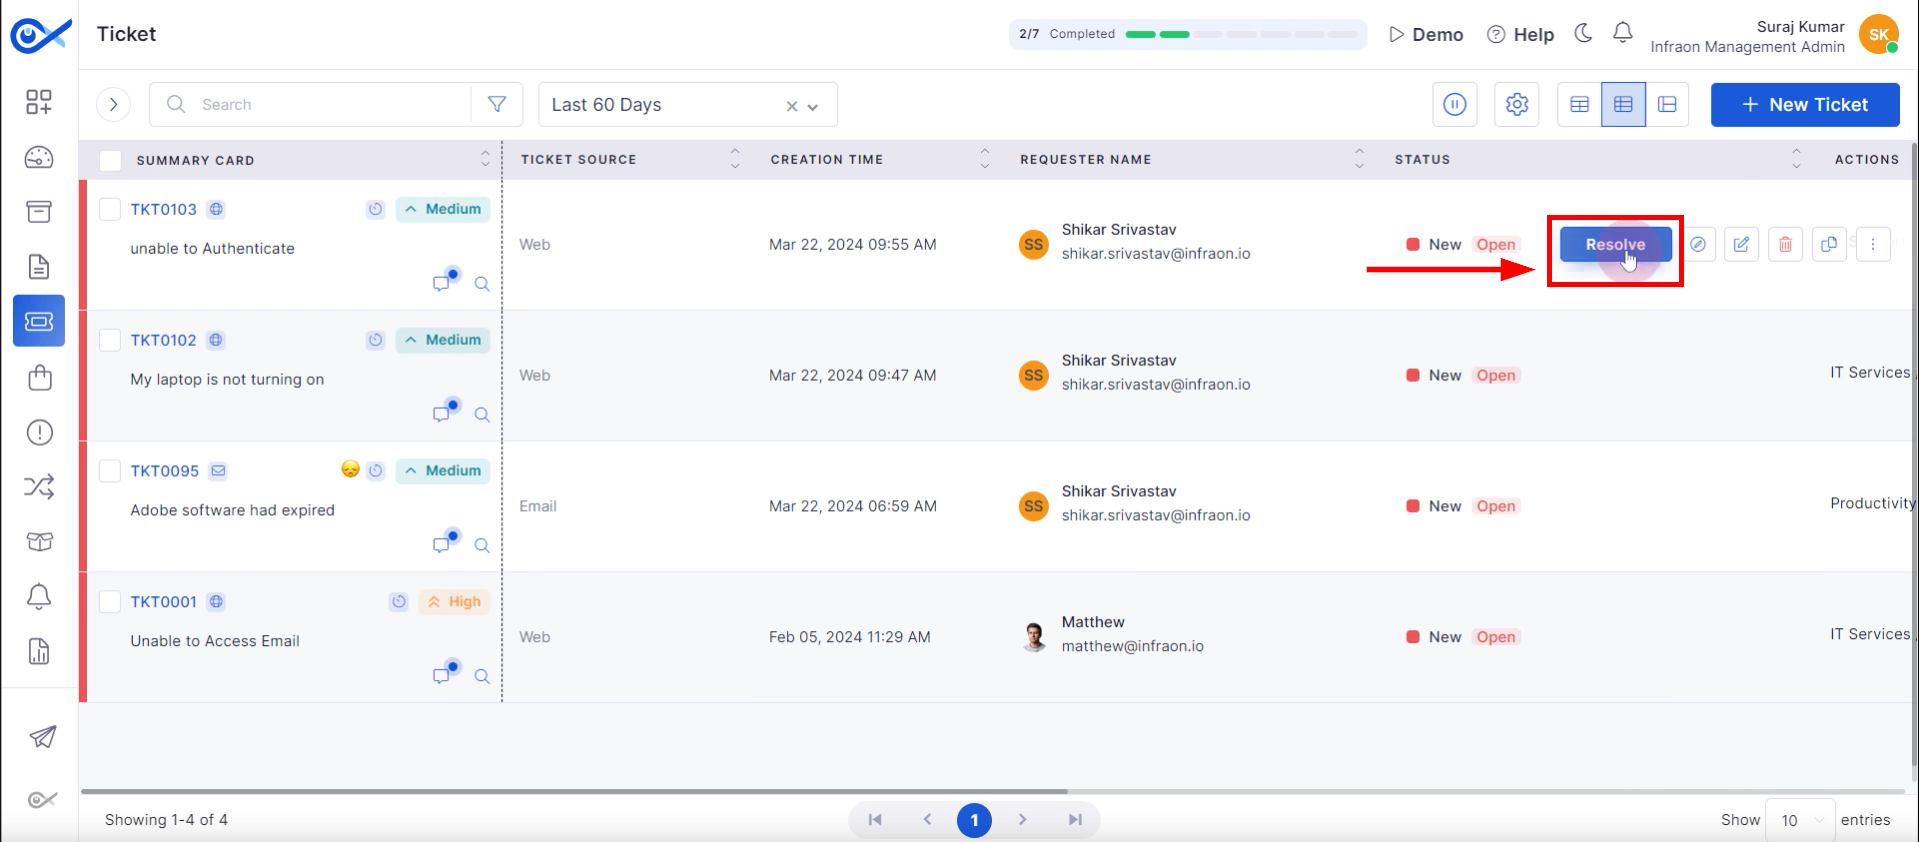
Mouse-over interactions on ticket listings reveal accessible quick-action controls.
The initial quick action available is "Resolve," which allows for the direct closure of a ticket upon execution.
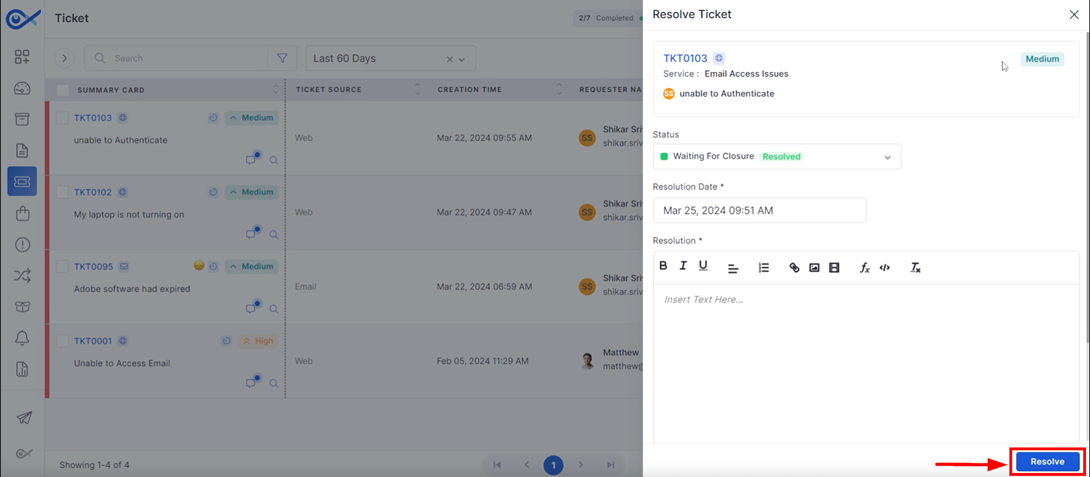
Upon selecting "Resolve," a pop-up window appears prompting for a resolution summary. Click “Submit” to finalizes the ticket closure process.
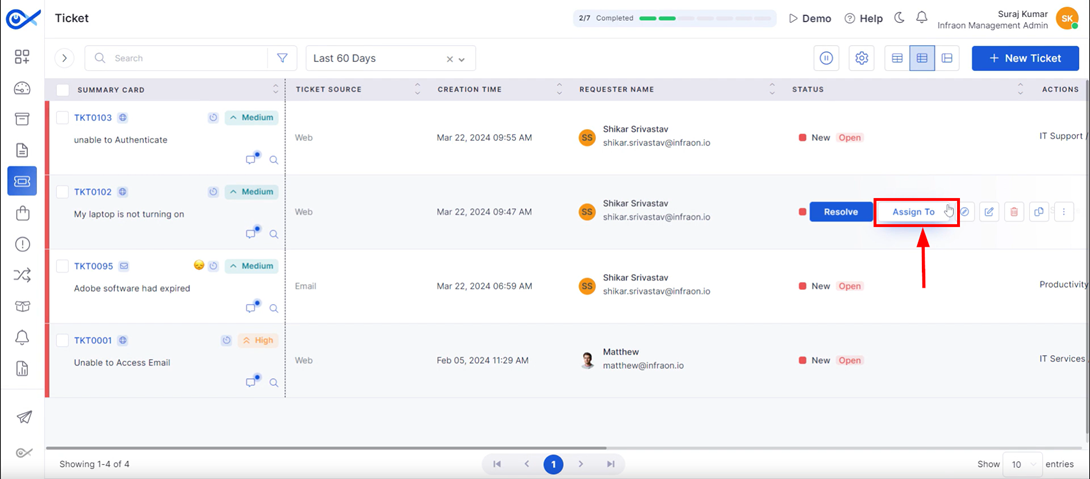
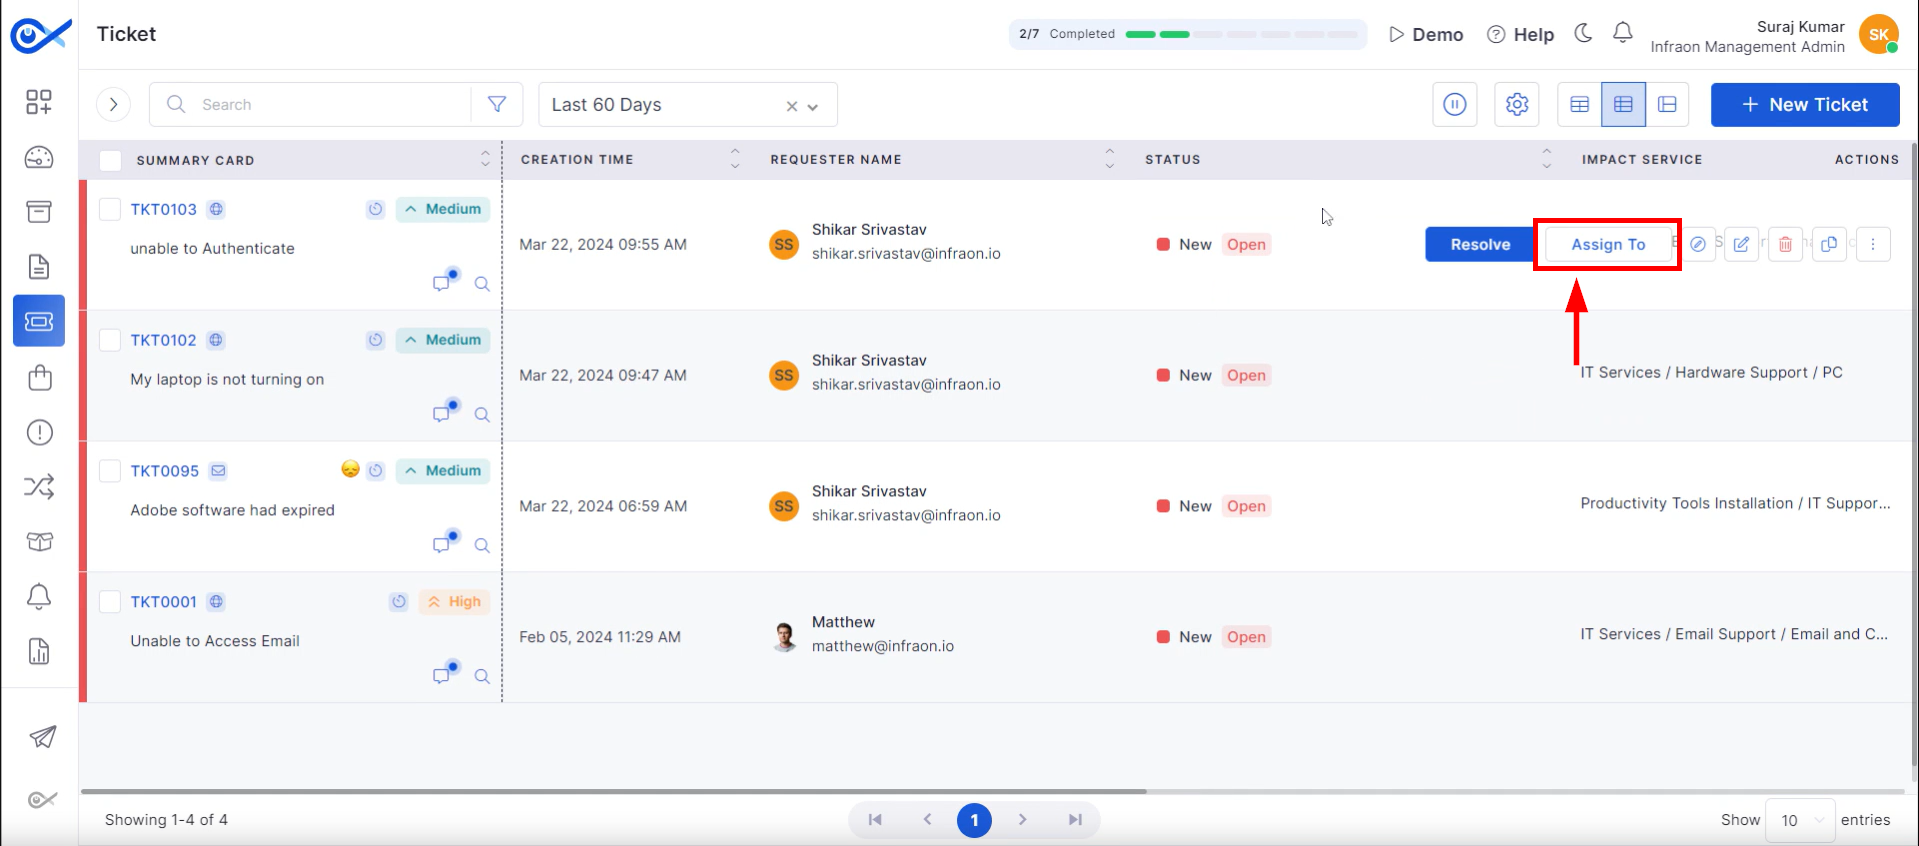
The "Assign To" quick action allows for immediate ticket reassignment within the management interface.
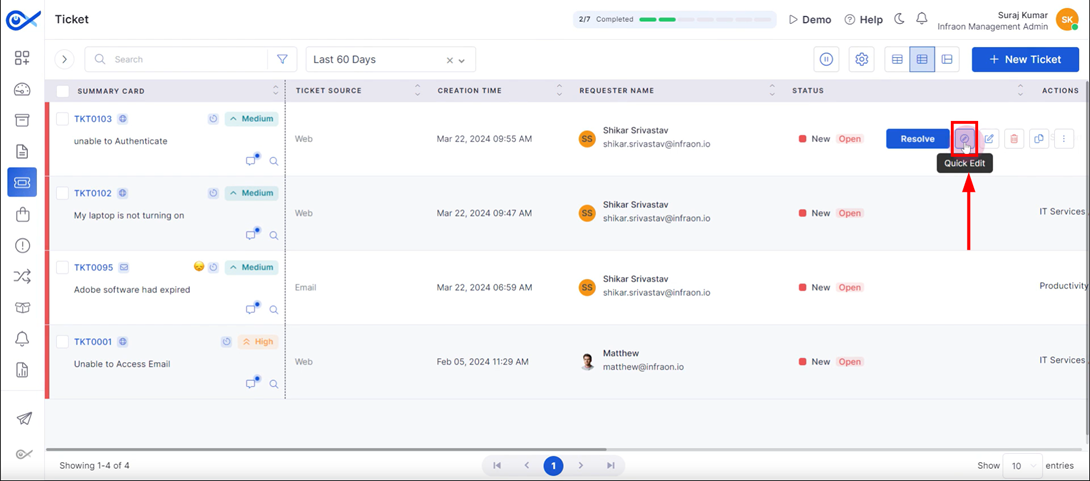
A “Quick Edit” function is accessible for expeditious modification of ticket attributes including priority, urgency, severity, and impact levels. The impacted service and assembly can also be amended via this streamlined process.
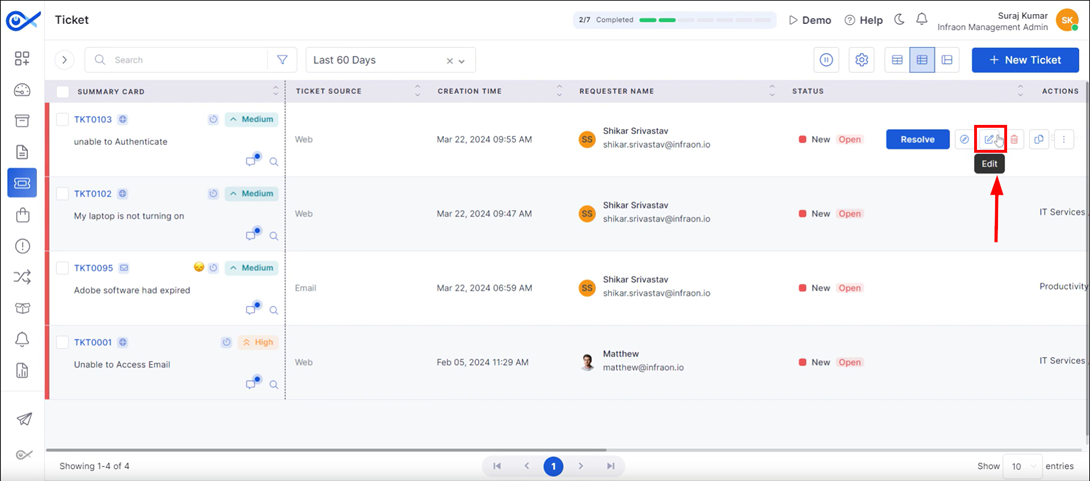
For comprehensive ticket modification, access the detailed “Edit” function.
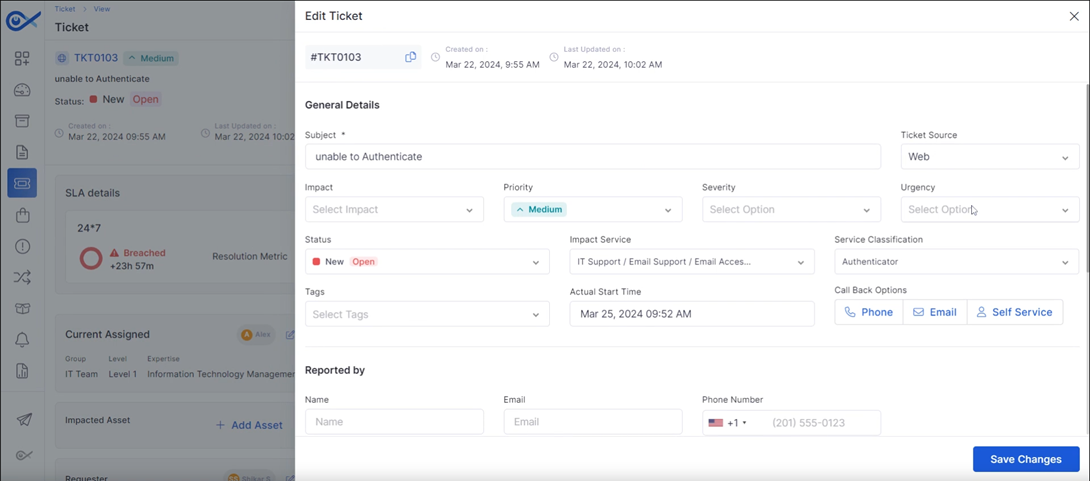
The “Edit” view provides visibility into ticket source, urgency, severity, and priority. Additionally, users can add followers or reassign the ticket within this interface.
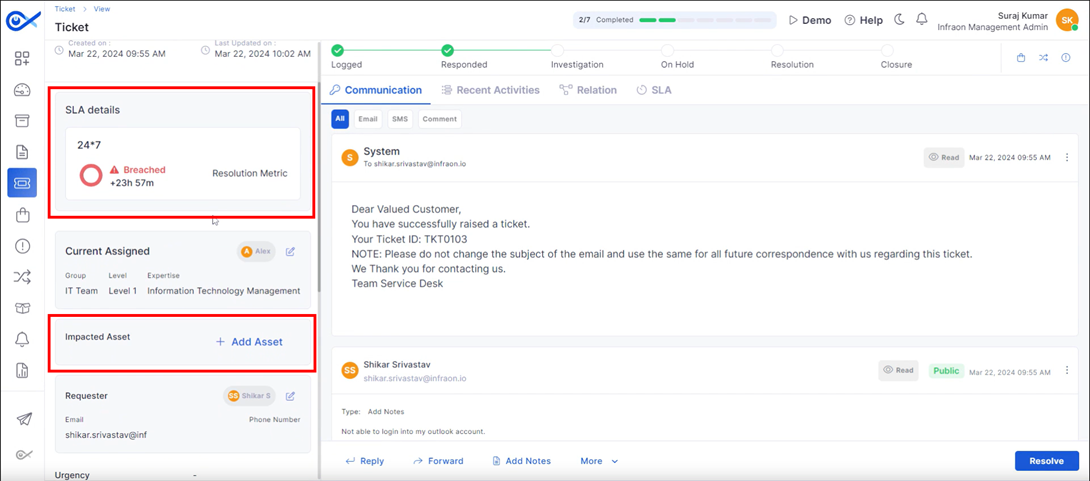
The edit page displays “SLA” metrics and assigned technician details. “Impacted assets” relevant to the ticket can also be linked within this section.
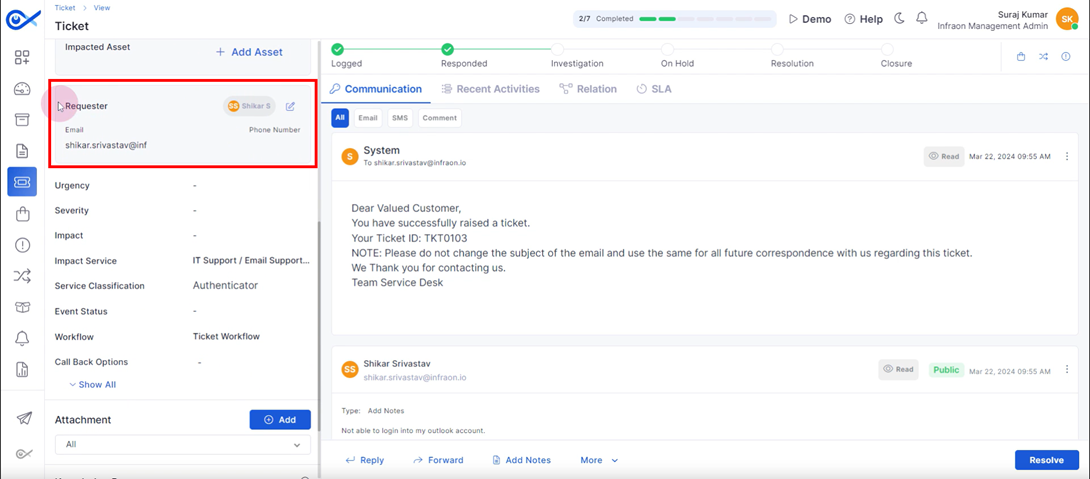
“Requester” information is accessible within the ticket details section, alongside urgency, severity, and impacted service data.
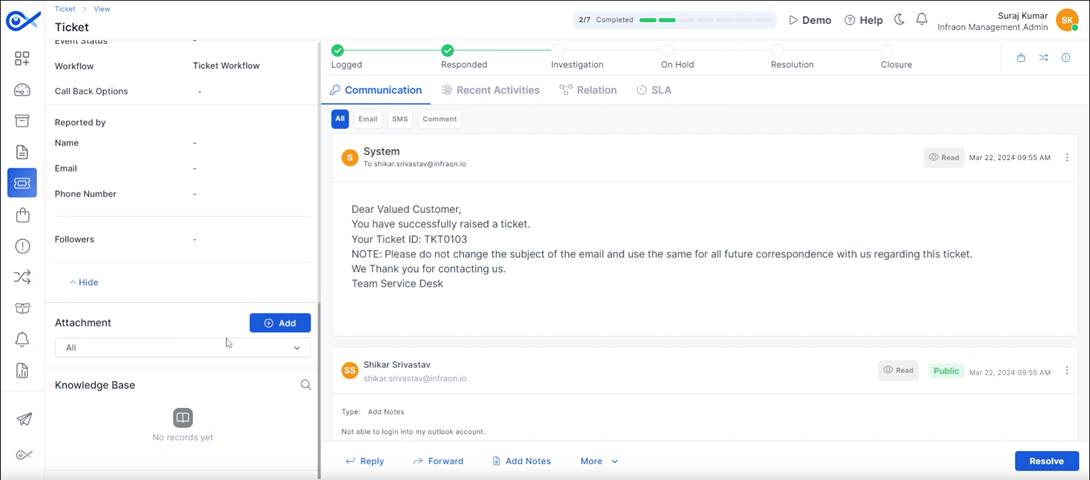
Relevant “Attachments” can be added directly within the ticket. Additionally, the “Communication” section provides a view of associated emails, SMS messages, and comments.
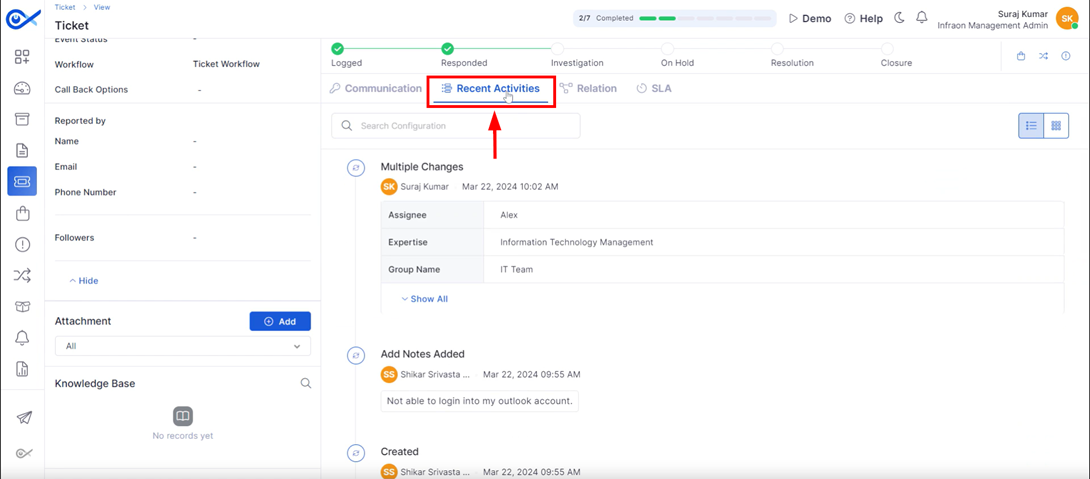
The "Recent Activities" section maintains a chronological record of modifications made to the ticket, providing transparency into the ticket's evolution.
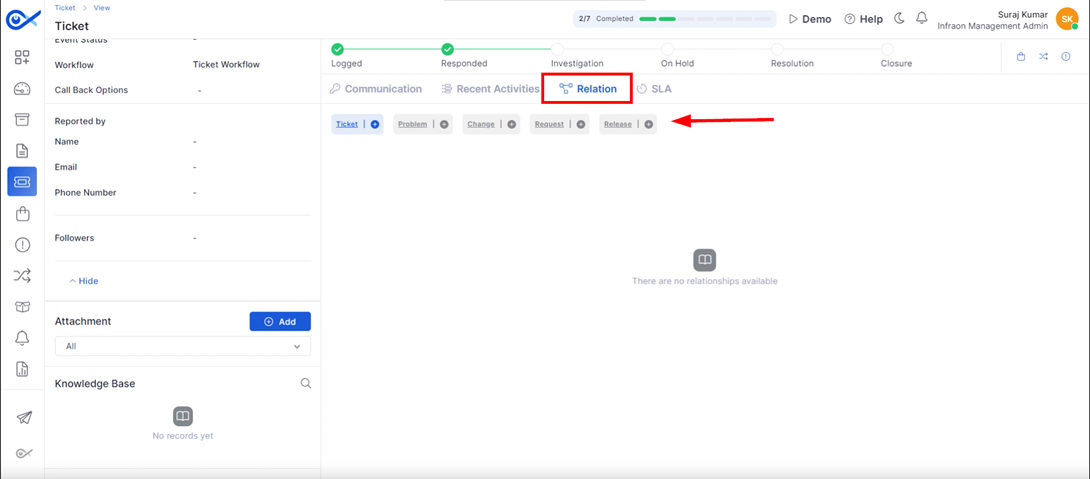
The "Relations" area facilitates the association of related problems or changes to the primary ticket, enabling comprehensive issue management.
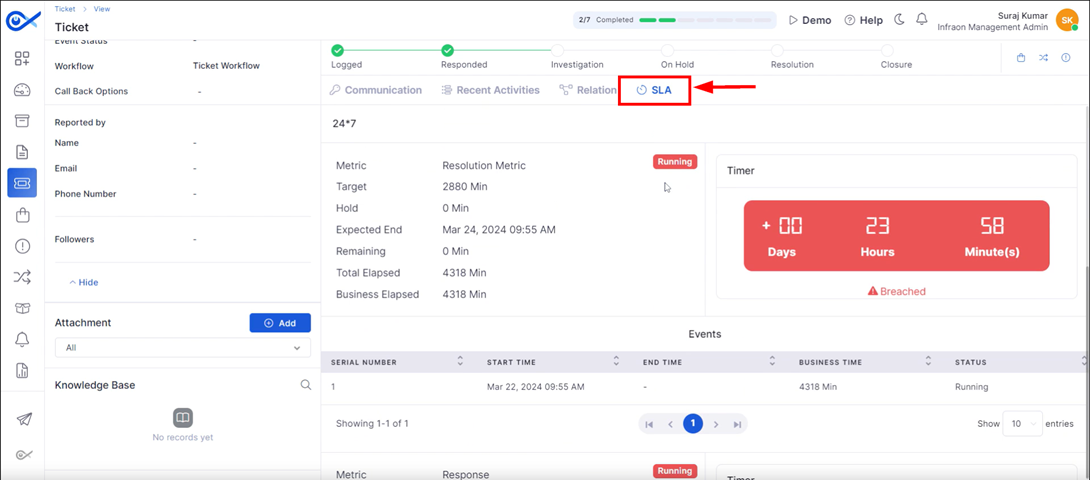
Real-time “Service Level Agreement (SLA)” metrics are readily accessible within the ticket interface, allowing for proactive monitoring of performance against agreed-upon service levels.
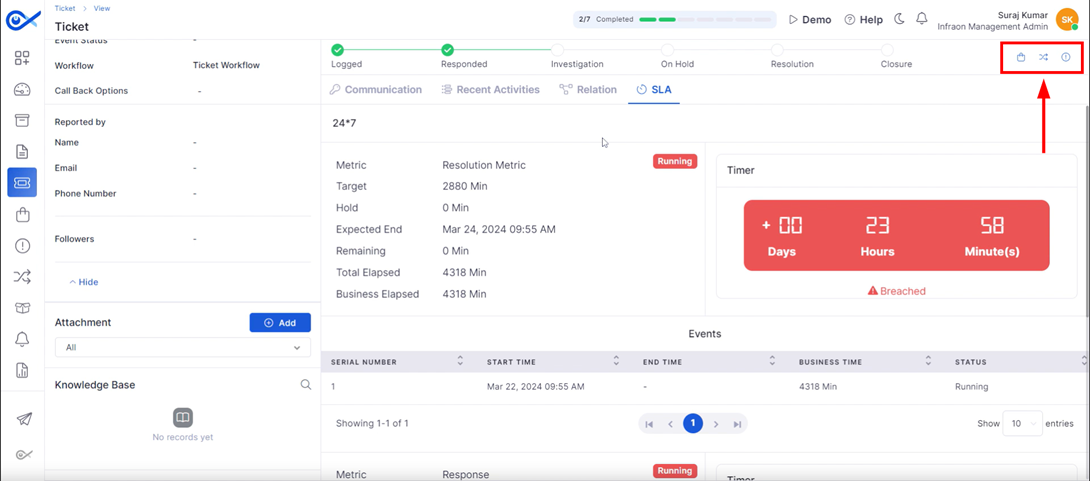
Technicians can Convert “Ticket to Request,” “Add Change,” or “Add Problem” here. Once the ticket is resolved, technicians can also convert it into a “Knowledge Base” article if needed. That concludes the overview of the ticket editing options.
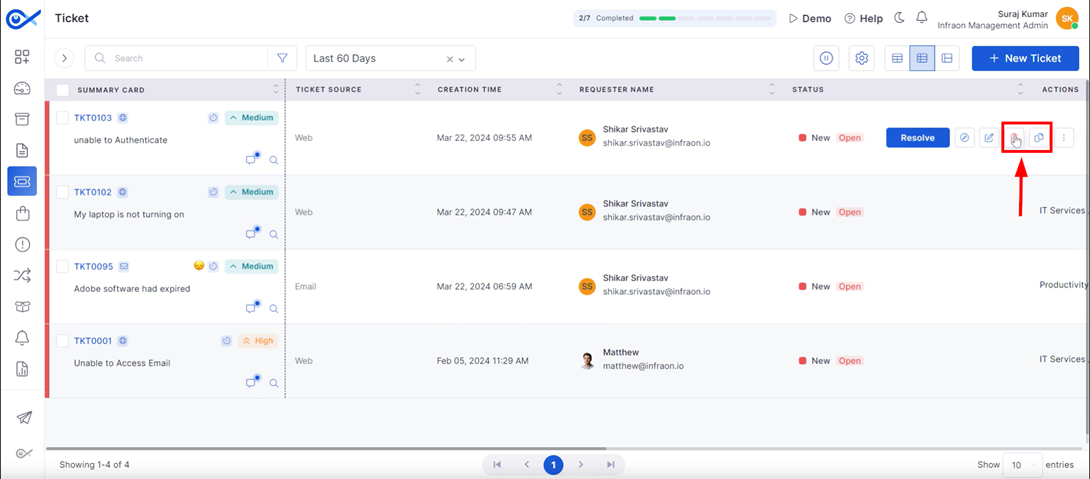
Tickets can be deleted by clicking the designated “Delete” icon. To create a duplicate, utilize the “Copy” function. The copied ticket requires the addition of requester details and other relevant information before finalization.
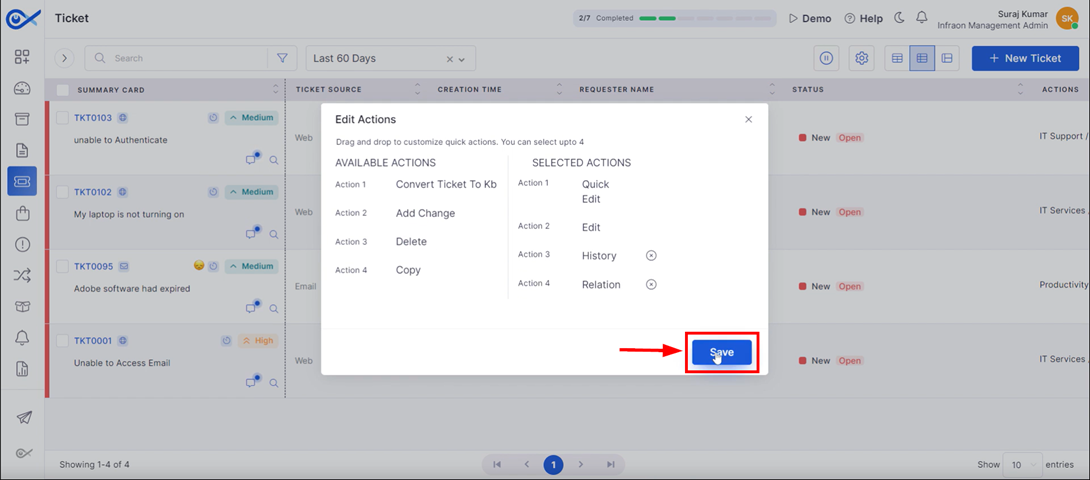
Customize action keys, navigate to the 'Quick Actions' menu and select “Edit Actions.” This allows for configuration, such as enabling a drag-and-drop function to view ticket history and related records.
The ticket summary card incorporates a “Ticket Source” metadata field, indicating the originating channel for the ticket, whether it be a web-based interface, email, or self-service portal.
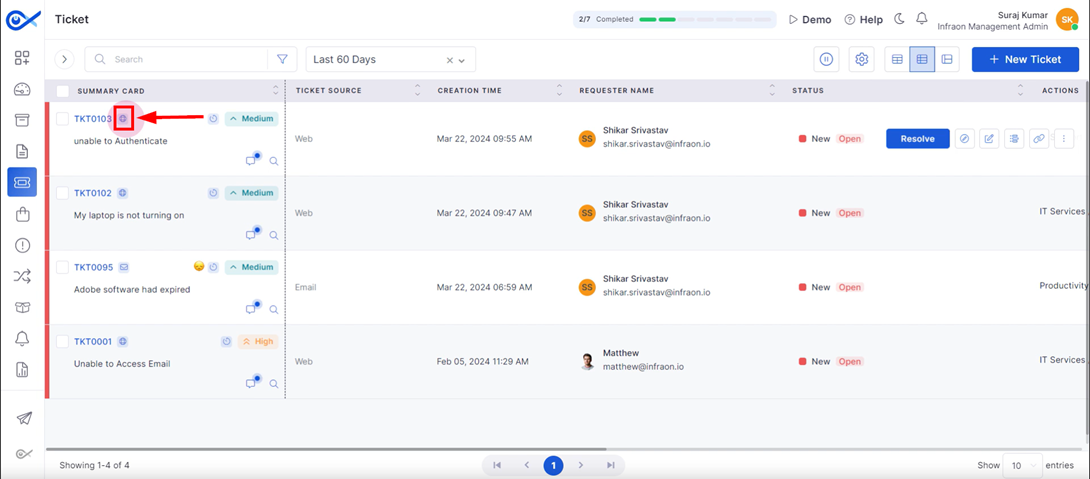
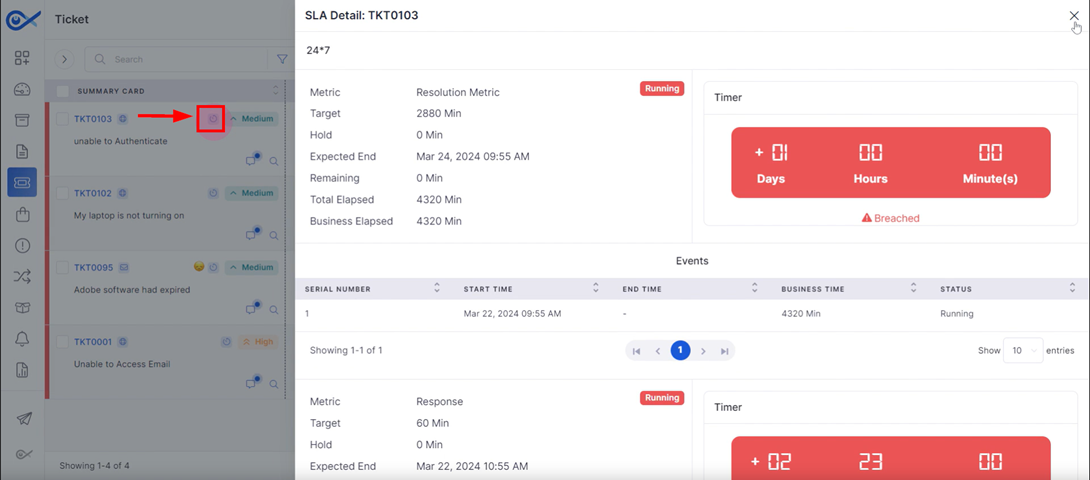
The summary card includes an “SLA” indicator which, when clicked, expands to display detailed SLA information.
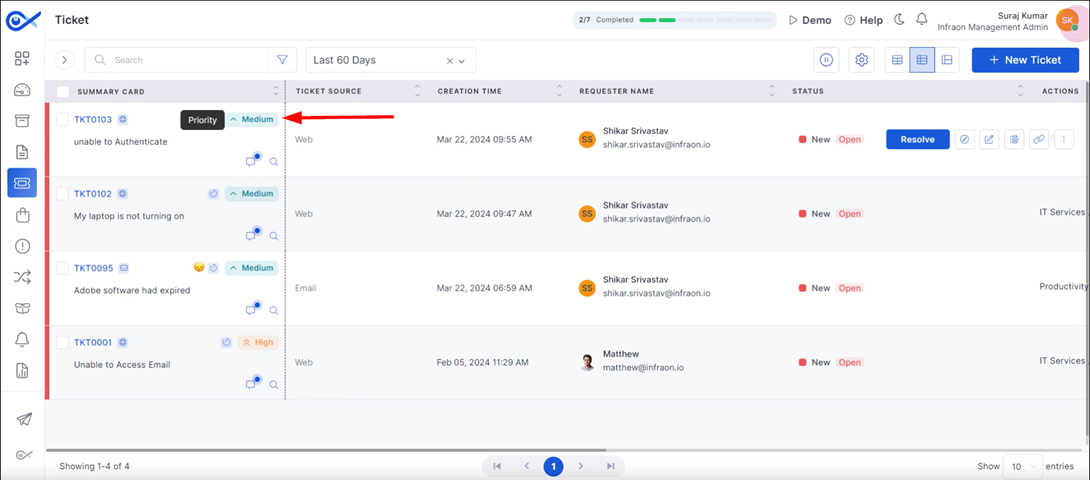
The summary card displays the ticket “Priority” adjacent to the SLA indicator.
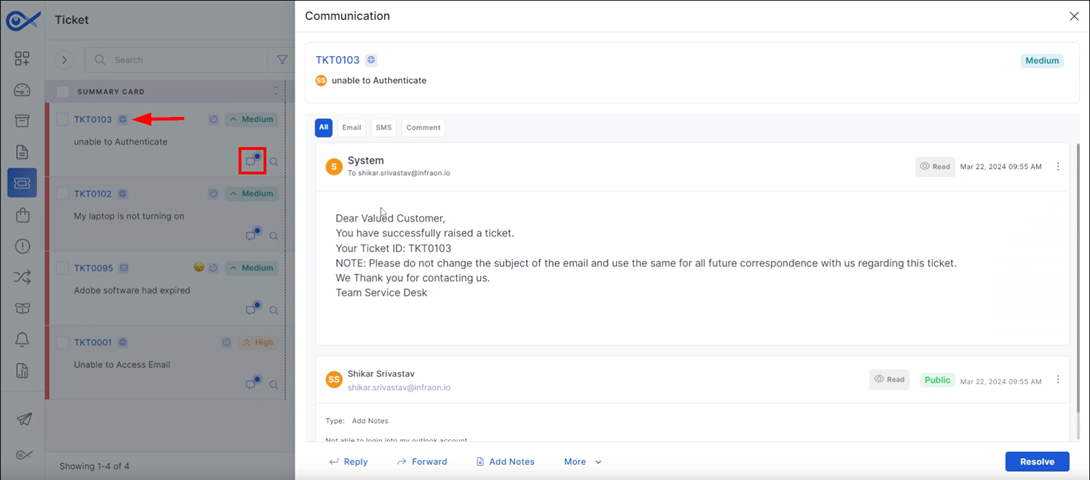
To initiate ticket-related communication, click on the “Ticket ID” to access the dedicated communication tab. This area provides a comprehensive view of all interactions associated with the ticket. Users can directly respond to the end-user, including adding a personalized signature, with new message notifications indicated by a blue pointer icon.
The “Search” icon enables ticket history analysis. Ticket creation initiates an automated emoji assignment process based on subject line content.
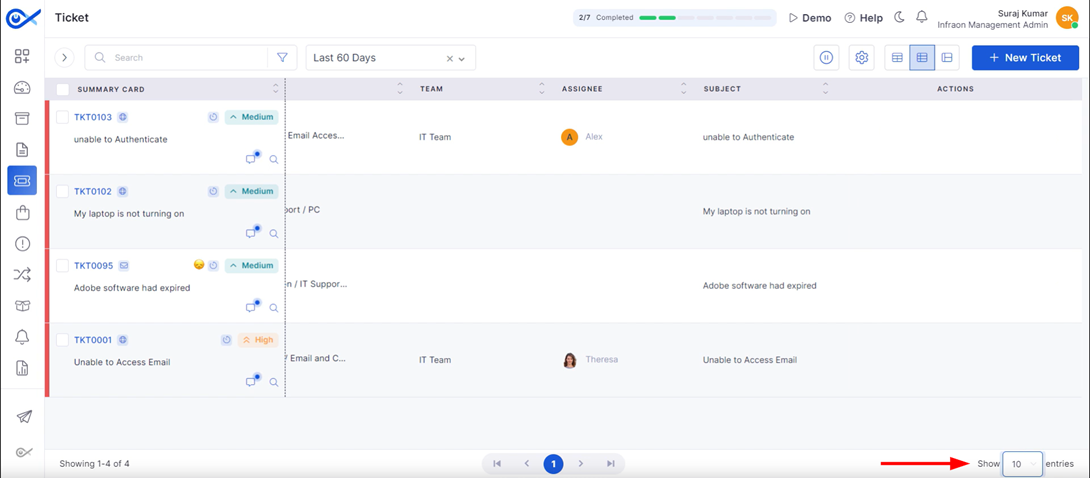
The "Show entries" option at the bottom of the page enables users to customize the number of tickets displayed per page, ranging from 10 to 200.
The “Views” pop-up, accessible via the right arrow icon located at the top left corner of the page, provides various ticket overviews for technicians. Technicians can analyze ticket counts by groups based on unsolved, unassigned, new tickets in the group, solved tickets, pending, unsolved, my group solved tickets, my approval, and unread message.
This concludes the complete details of the ticket management page.
click here
Quick Actions
Summary Catalogue
Ticket Assignment (Manual)
This guide explains the manual ticket assignment process in the Infraon Infinity platform. In this process, the Admins or the Service Desk team assign tickets by selecting the appropriate team, expertise, level, and technician. The ticket is then directly assigned to the selected technician.
Start with the following steps:
Step 1: Hover over the ticket and click on the “Assign To” option.
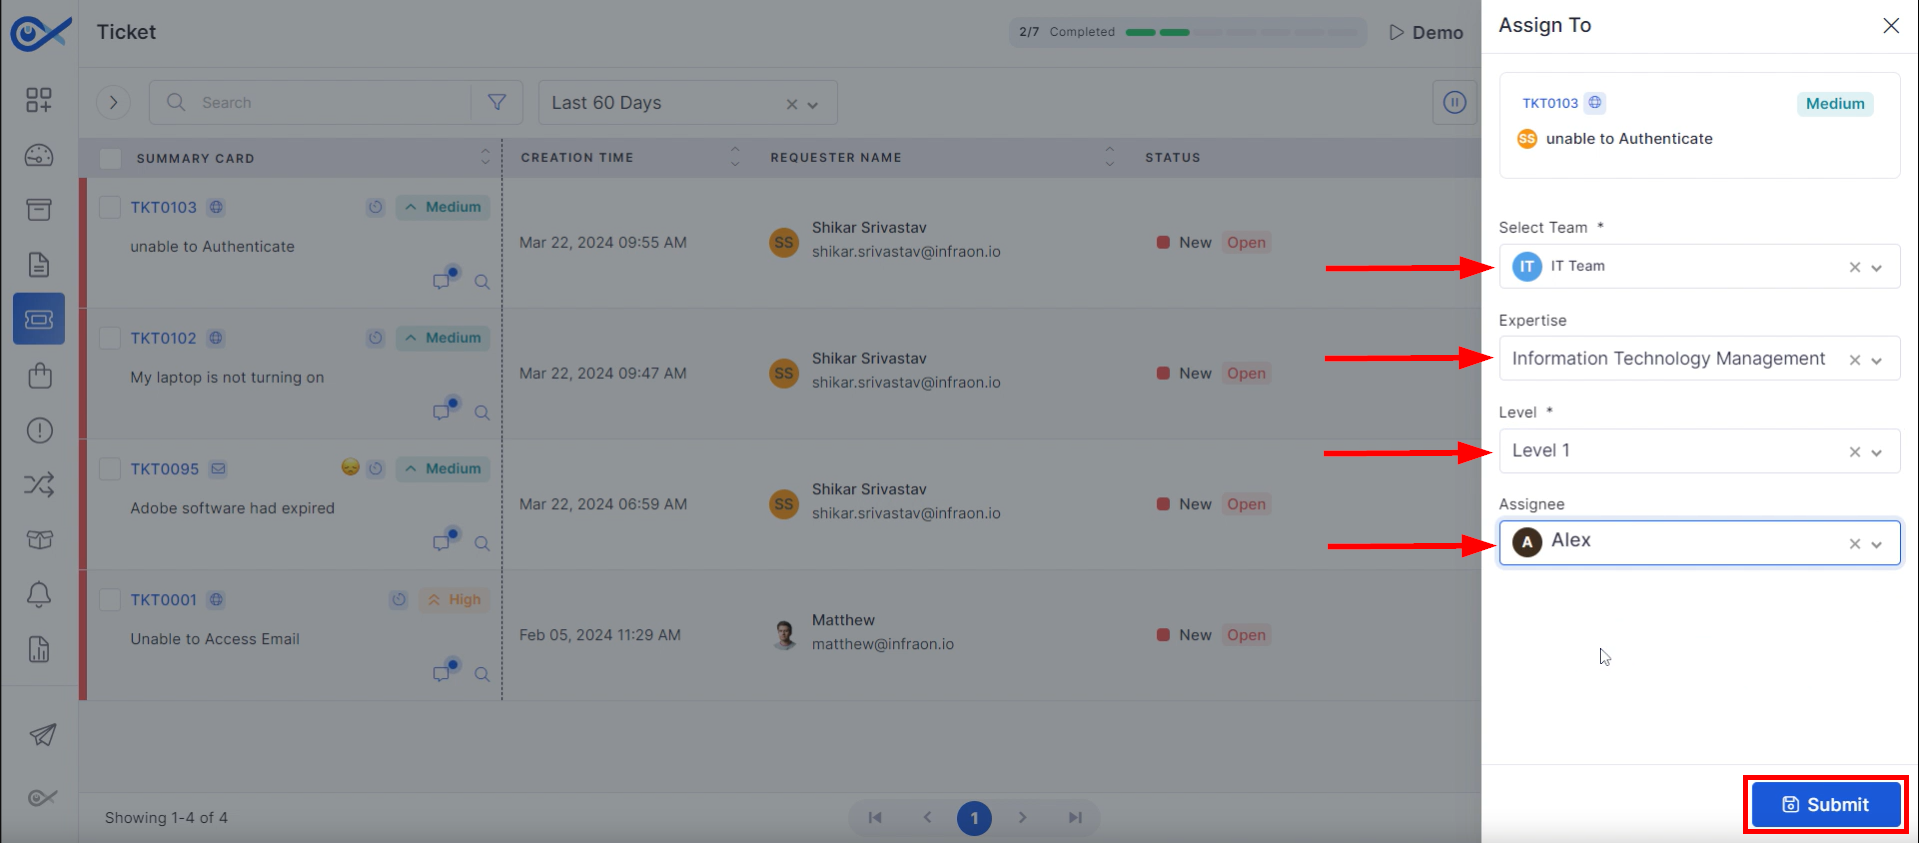
Step 2: A new pop-up window will appear where you can specify ticket ownership and handling.
Select the target “Team” responsible for the ticket and the appropriate Expertise group. Determine the ticket's priority “Level,” indicating the required skill tier within the designated team. Finally, choose the specific technician or the “Assignee” who will be assigned to address the ticket.
Click on Submit to finalize the assignment.
The ticket is now assigned to the selected technician.
This concludes the guide on manual ticket assignment in the Infraon platform.
Dashboard
Explore our comprehensive dashboard module guide, which includes visual aids and step-by-step instructions. Easily grasp the user interface and navigate the module effortlessly.
This guide focuses on the dashboard module of the Infraon Infinity platform. Dashboards serve as visual representations of crucial data, offering detailed views of various monitoring and performance metrics. They are customizable, allowing users to add metrics and reports to suit their needs.
Dashboards are visual interfaces that provide an overview of vital Key Performance Indicators (KPIs), metrics, and other relevant IT services and operations information.
A visual display of key data offers in-depth monitoring and insights into performance metrics.
Create a personalized dashboard. Infraon lets you add custom metrics and reports to fit your specific needs.
The dashboard provides a visual snapshot of key performance indicators (KPIs), metrics, and essential IT service information.
Dashboards centralize critical data for quick access and analysis. They help stakeholders monitor performance, identify trends, and make informed decisions to optimize IT services.
Infraon Infinity's dashboards empower IT teams by providing real-time insights and performance metrics, driving informed decision-making and operational efficiency.
This guide will explore the various actions and edit the keys available on the dashboard page in the Infraon Infinity platform. These keys allow for customization and efficient dashboard management.
Click on the blue arrow at the page's top left corner. Hover the mouse over a category to reveal multiple action keys.
The initial key provides functionality to elevate a dashboard to a prominent position within the dashboard hierarchy.
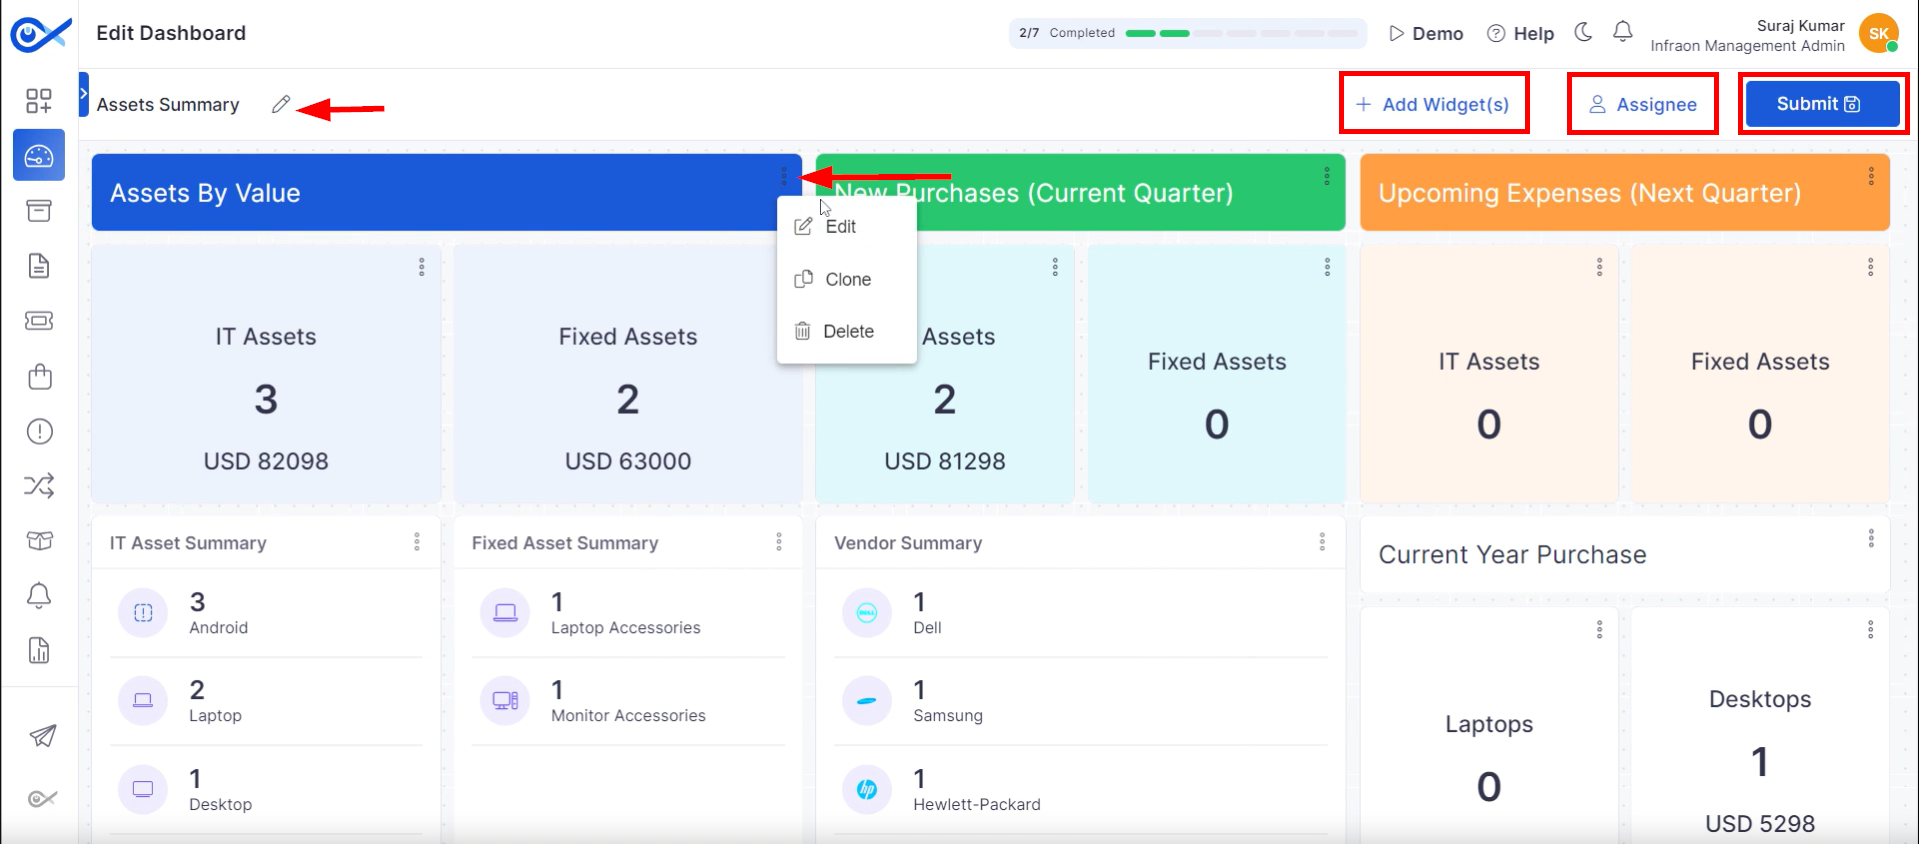
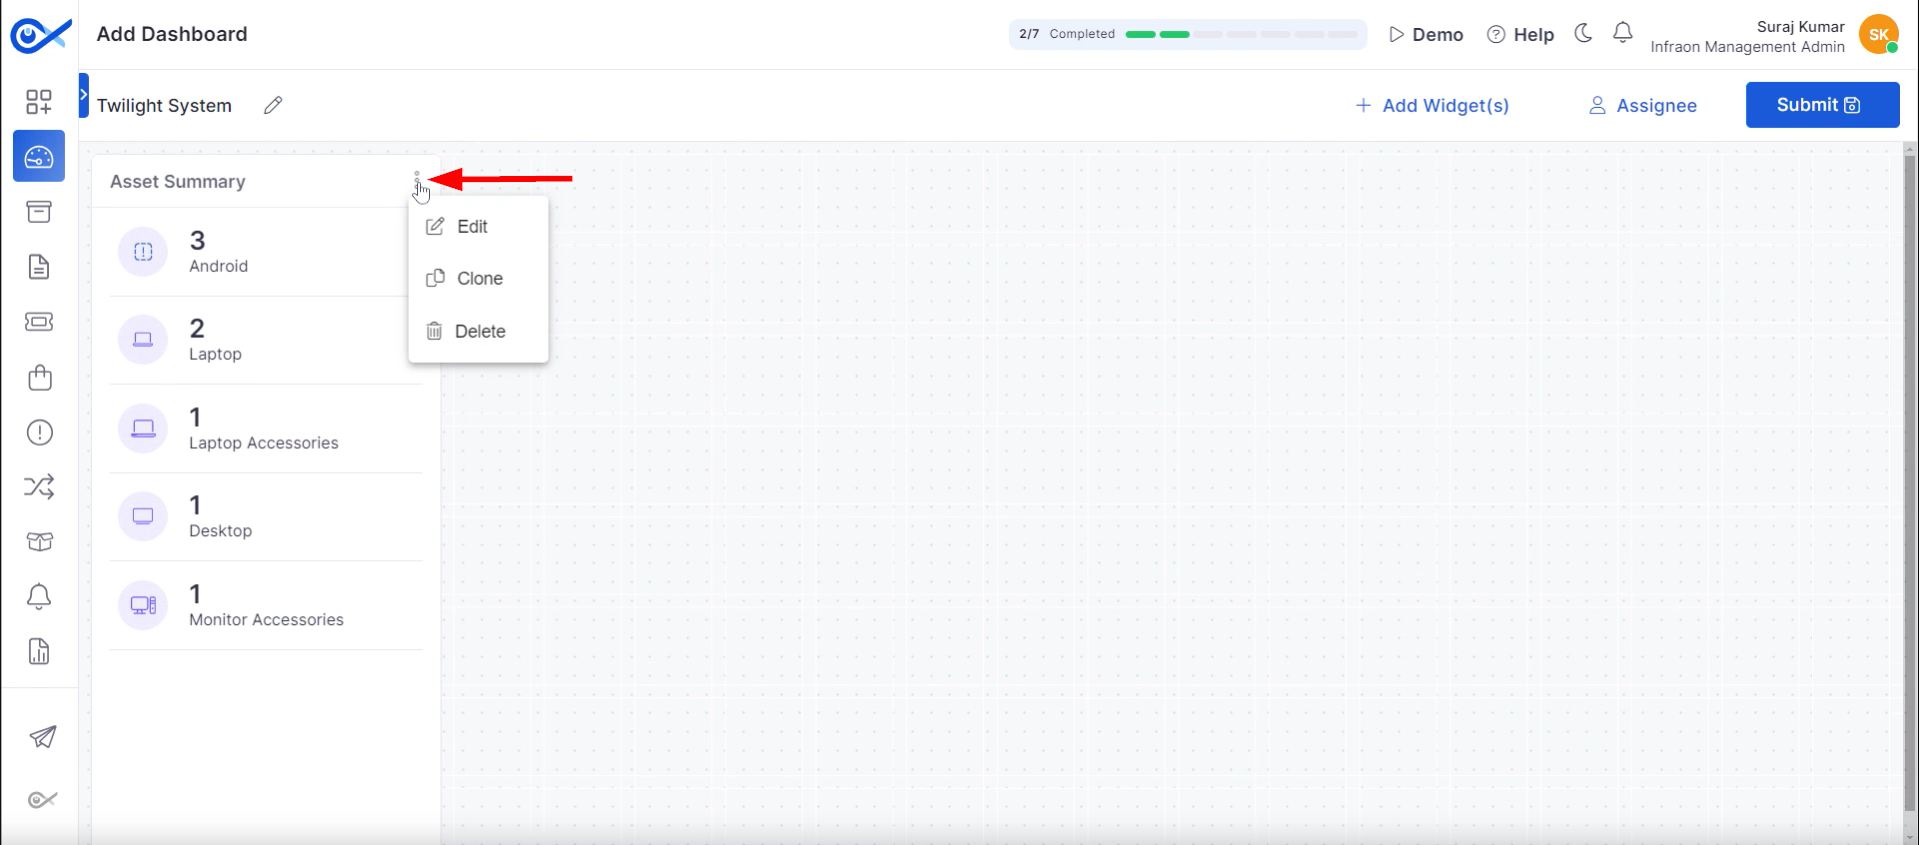
The secondary key facilitates dashboard modification, encompassing actions such as “Add Widget(s),”“Assignee,” and “Dashboard Renaming.” Upon activating the “Edit” function, widgets can be customized via the “More actions” menu at the top right corner of each widget.
Technical personnel can Edit, Clone, or Delete widgets as required. Additional refinements, such as filter implementation, are permissible. Technicians can modify the background color and apply other configurations contingent upon widget compatibility. To finalize changes, click the “Submit” button.
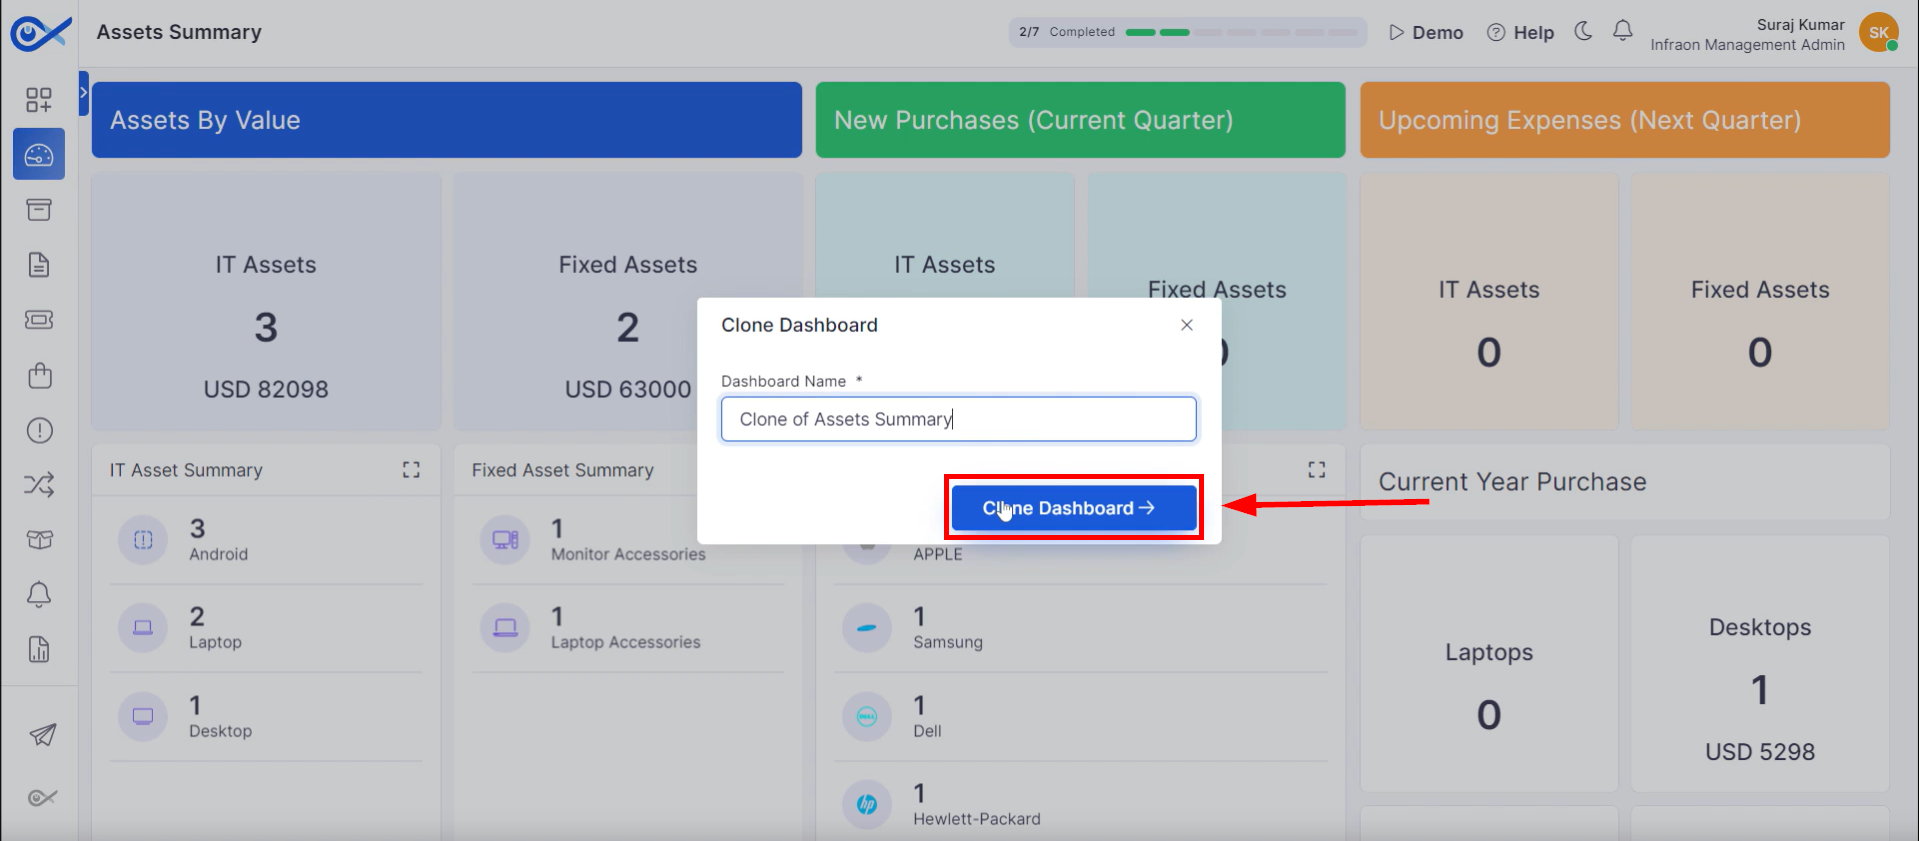
The tertiary action key facilitates dashboard replication through the “Clone Dashboard” function. Upon selection of this option, a new dashboard name must be inputted. The cloning process is initiated by clicking the “Clone Dashboards” button, creating a duplicate dashboard instance.
Utilize the “Delete” function to eliminate a specific dashboard from the dashboard inventory.
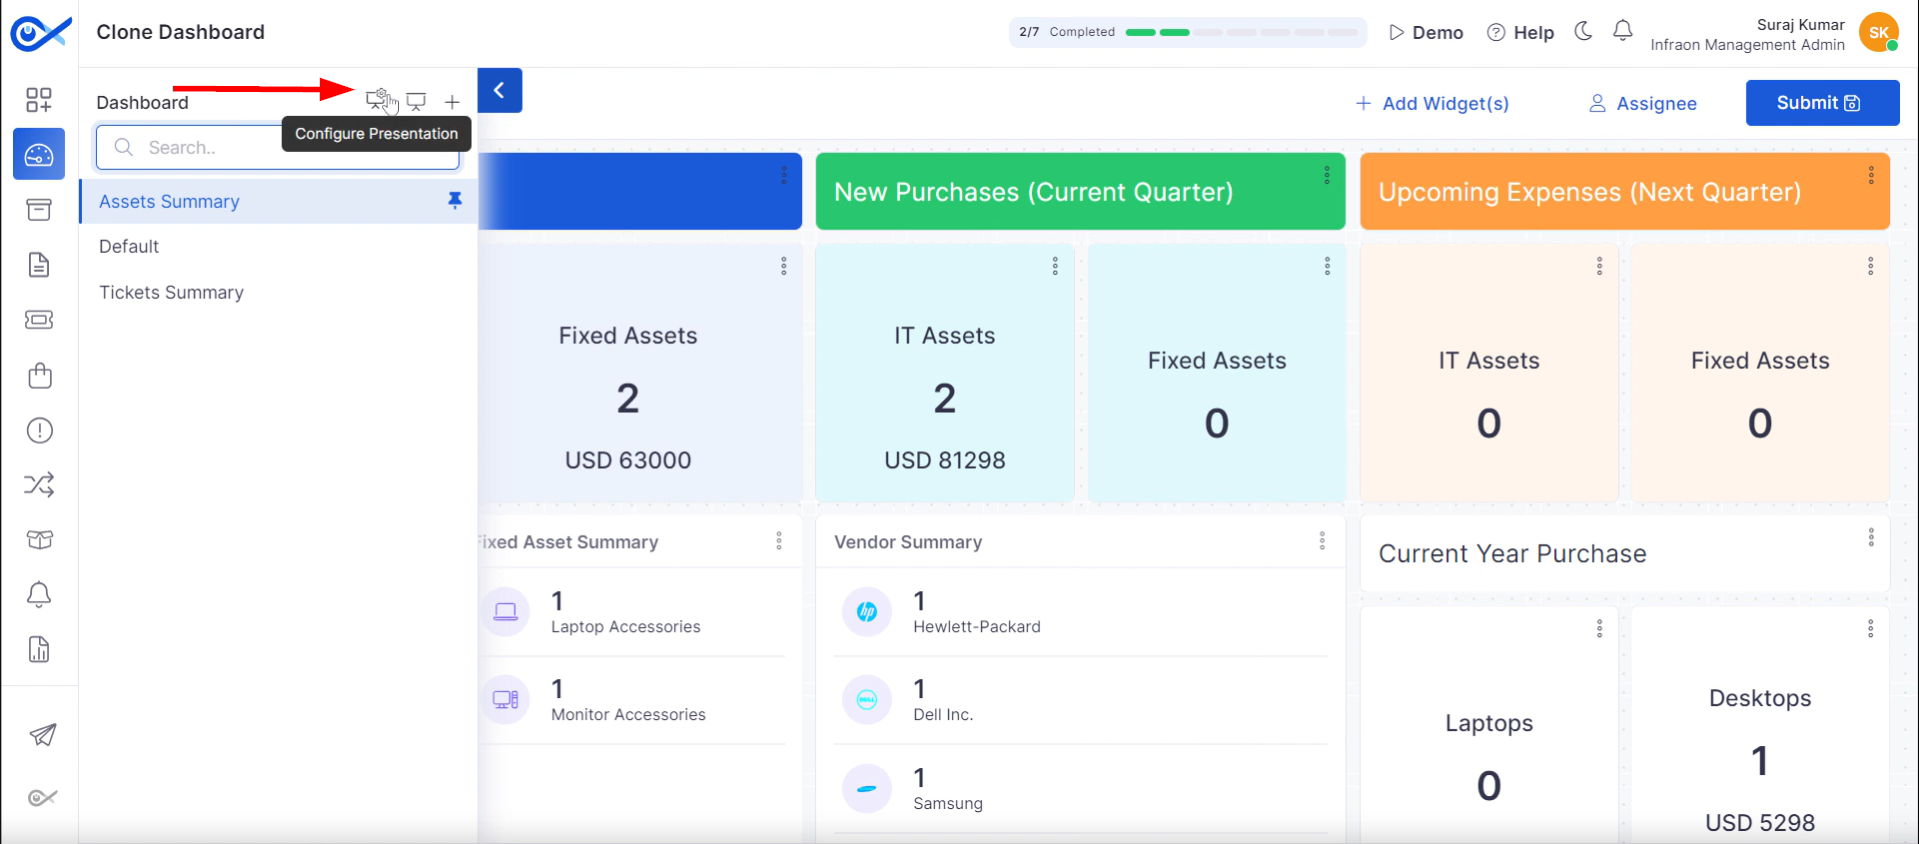
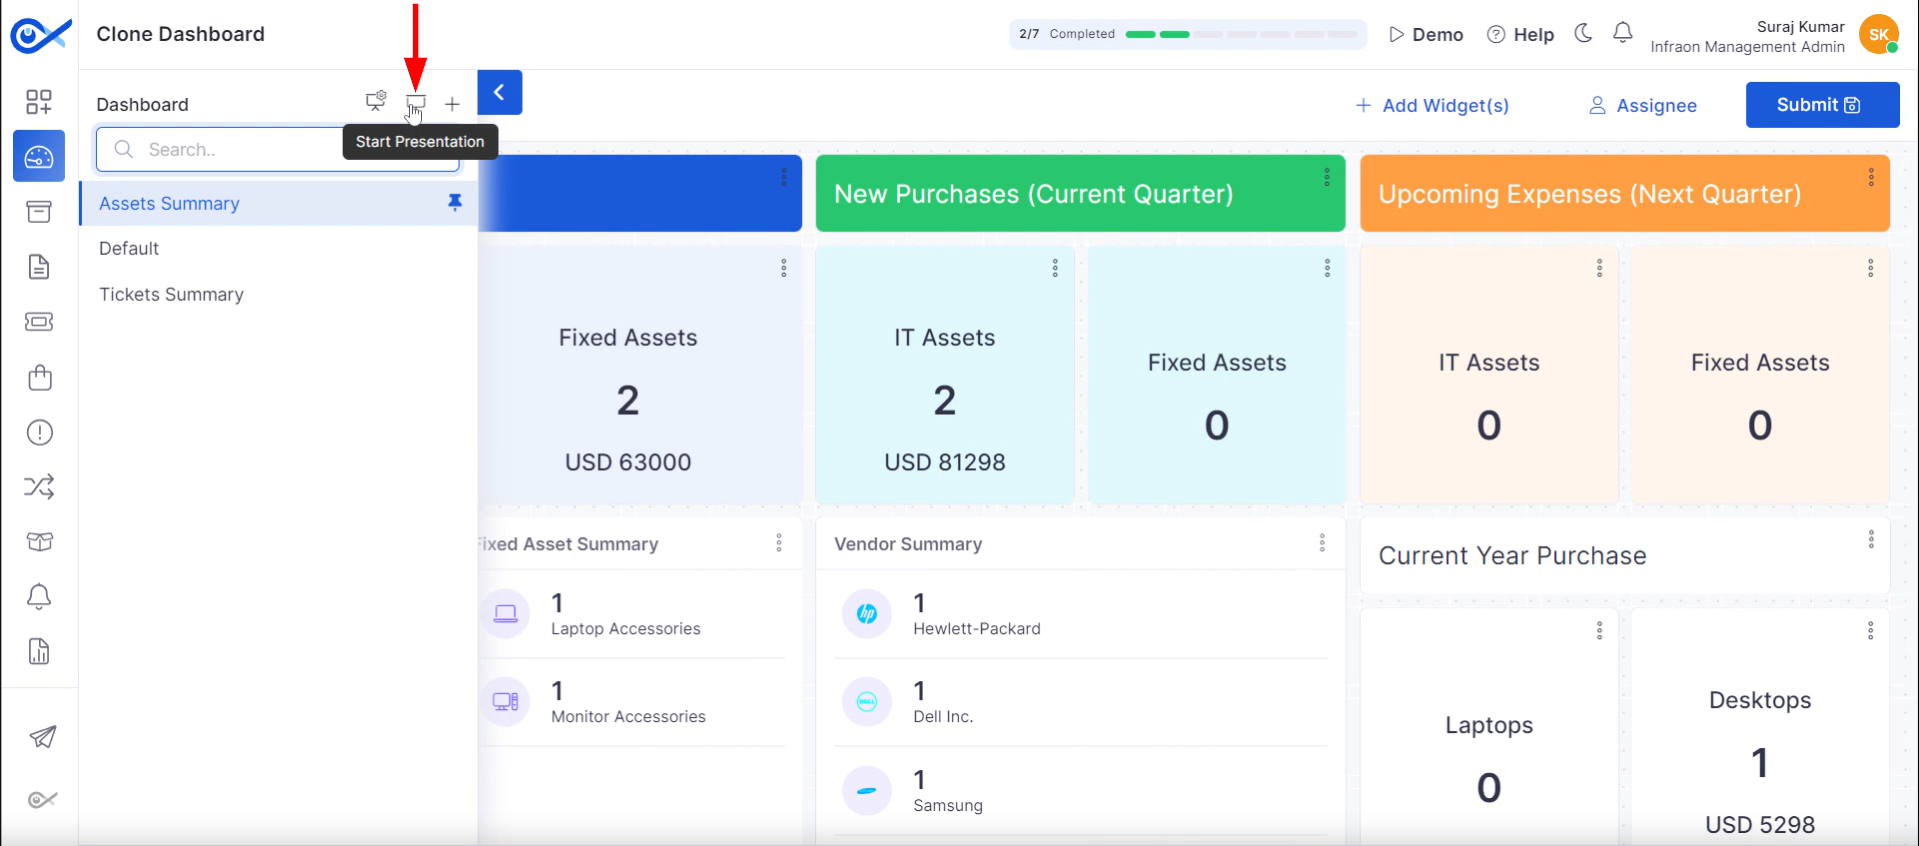
Step 1: Locate the “Configure Presentation” function in the upper left-hand section of the interface.
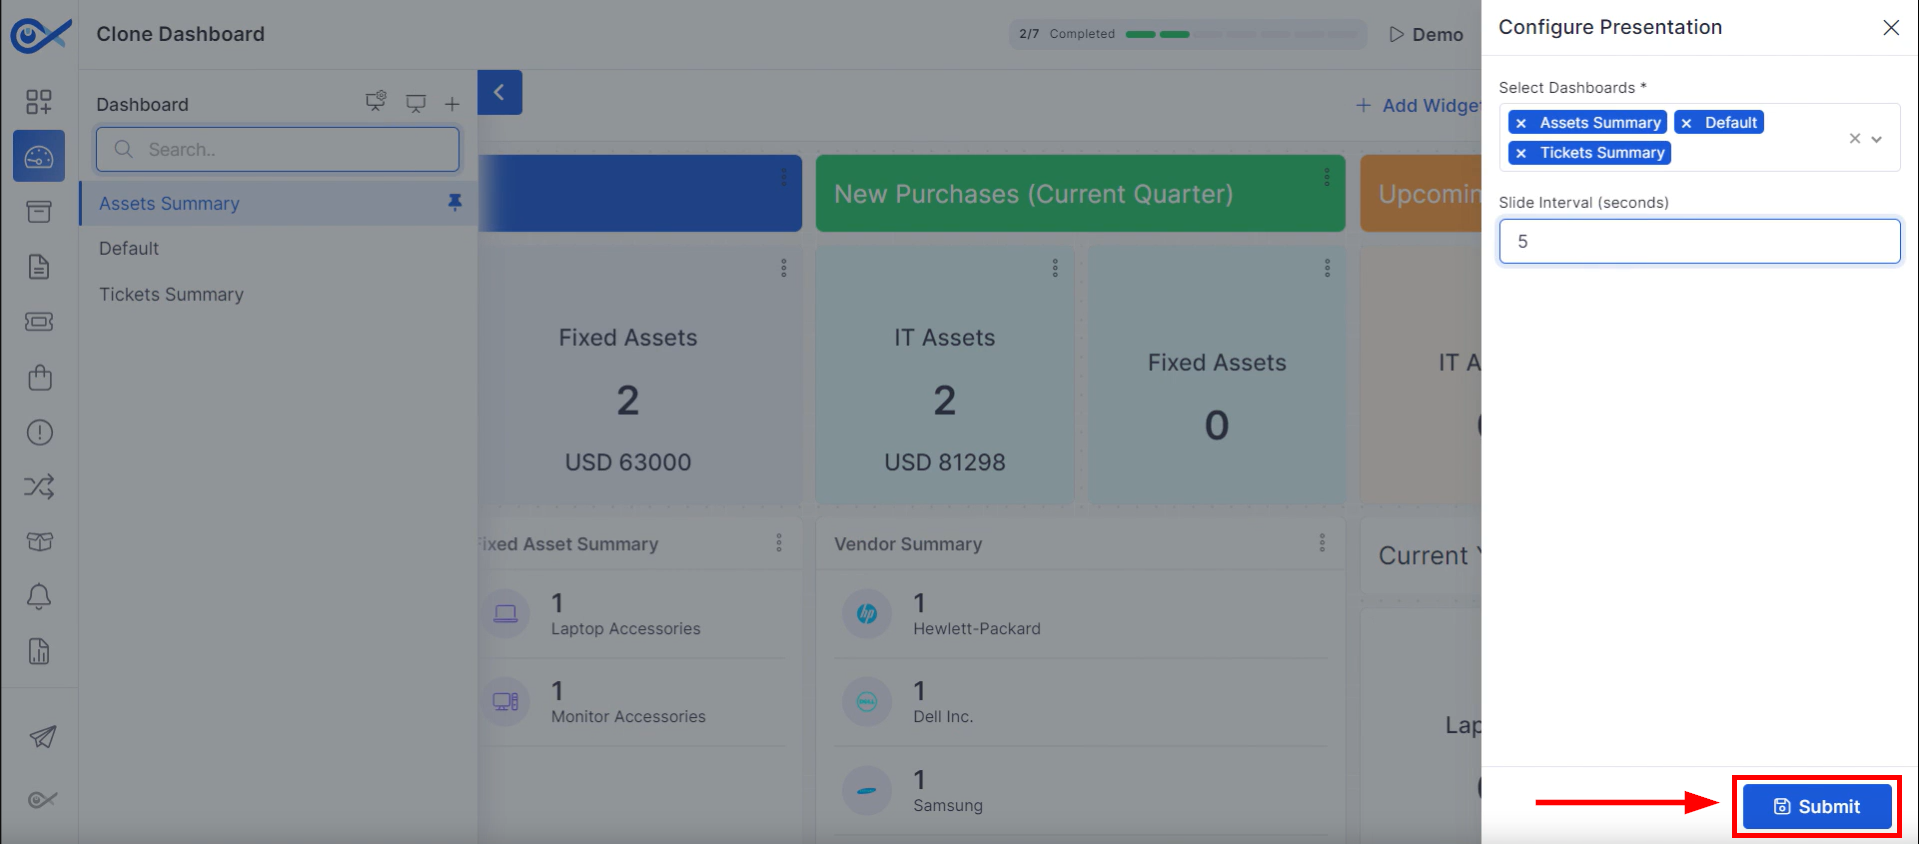
Step 2: A configuration pop-up will open, enabling customization of the dashboard presentation. Choose dashboards for display and set the slide transition time. Apply changes by clicking “Submit.”
Step 3: Click on Start Presentation to begin showcasing the dashboard.
The dashboard will be displayed in a presentational format.
This guide covers all the miscellaneous icons available on the dashboard page in the Infraon Infinity platform.
Asset
Explore a comprehensive guide to the Asset module featuring visual aids and step-by-step instructions. This guide provides detailed directions for specific asset submodules, including IT Assets, Fixed Assets, Software, Software License, CMDB view, and Asset Lifecycle. With clear What you see on the screen and How-to guides with pictorial representations, you can easily navigate the user interface and thoroughly understand the module.
This guide explores the Configuration Management Database (CMDB) view in this guide. This interface provides a structured visualization of configuration items (CIs) and their relationships.
Accessing the CMDB View
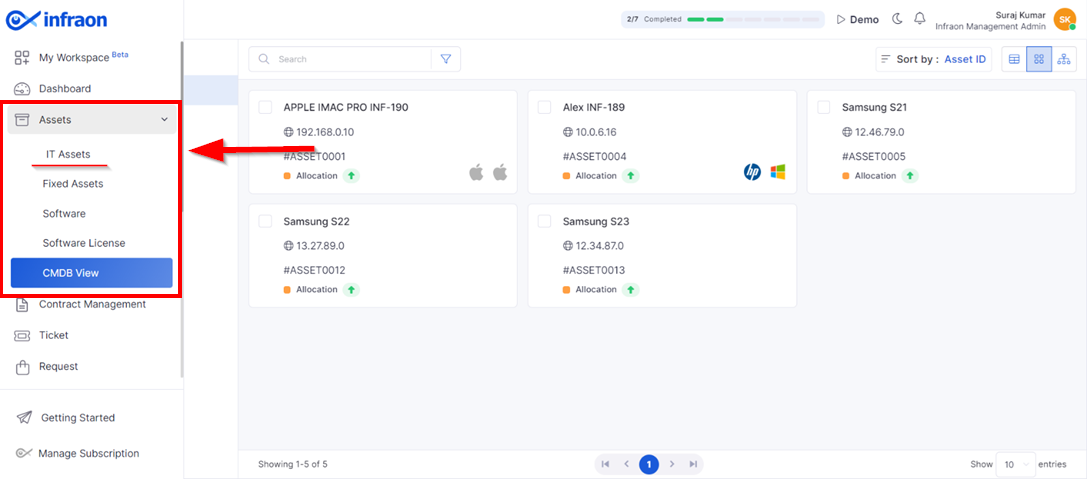
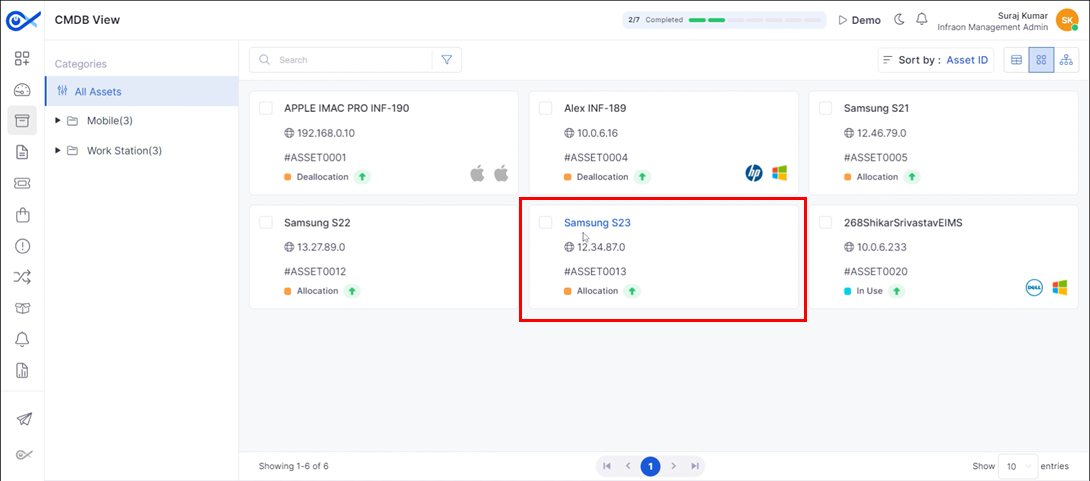
Locate the "CMDB View" option in the left menu of the asset catalogue. This view's left panel displays categorized configuration items.
Adding and Viewing Relationships
Step 1: Click on an asset to add or view a relationship.
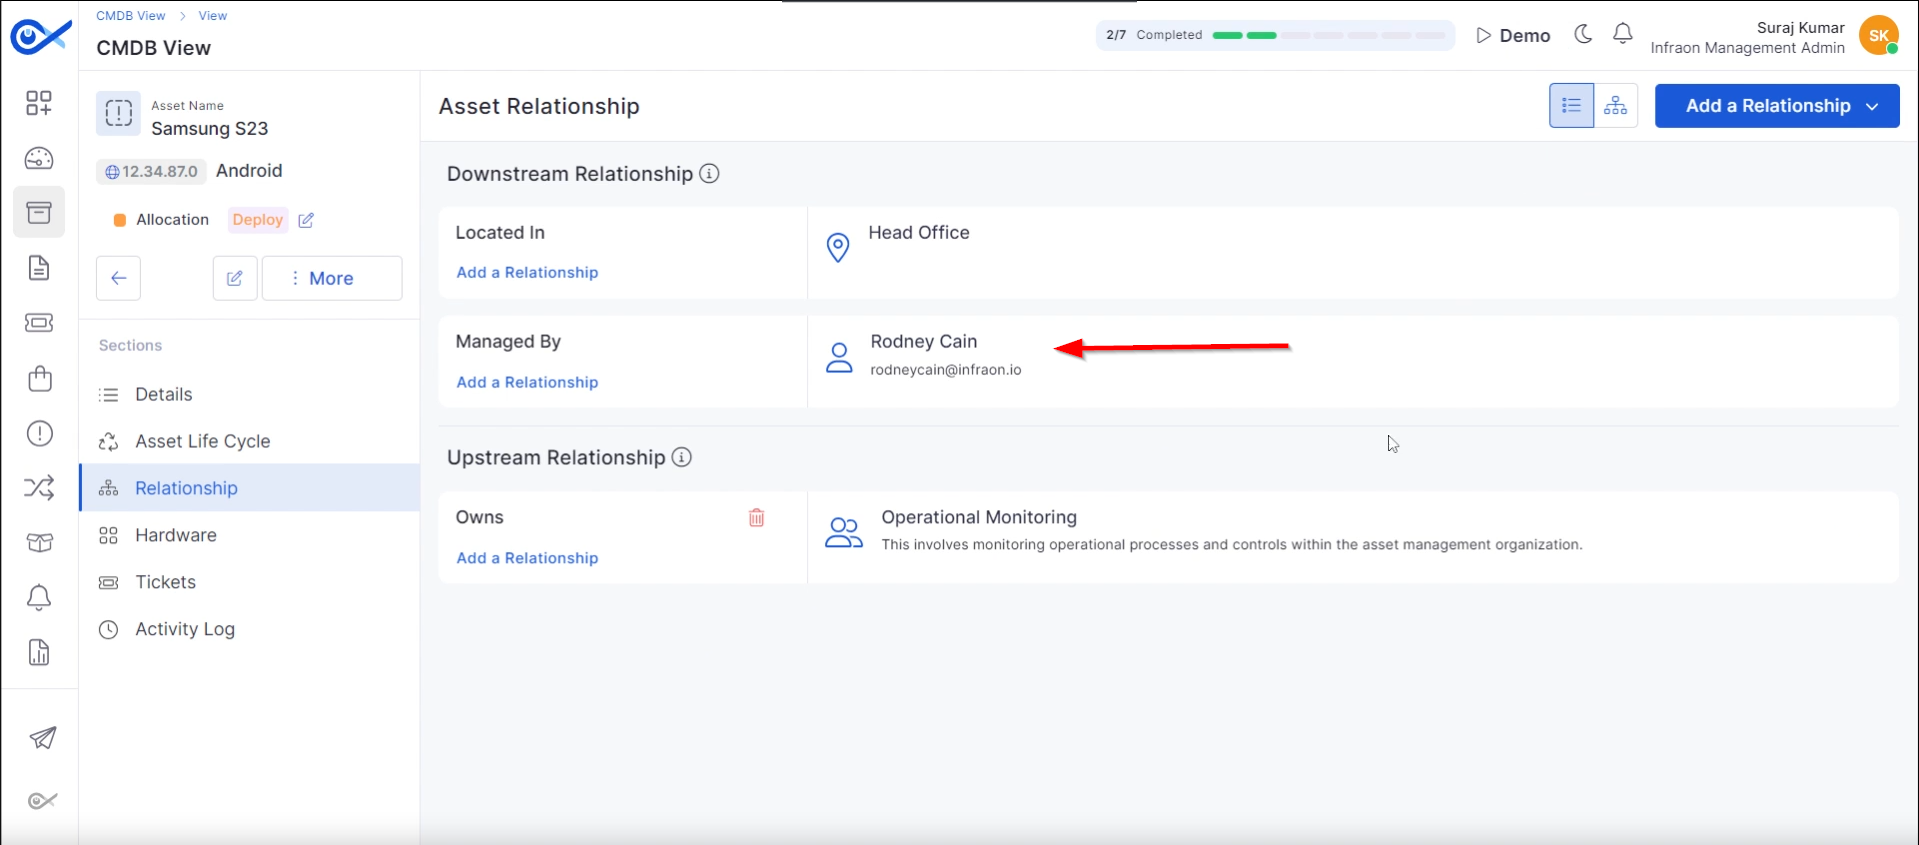
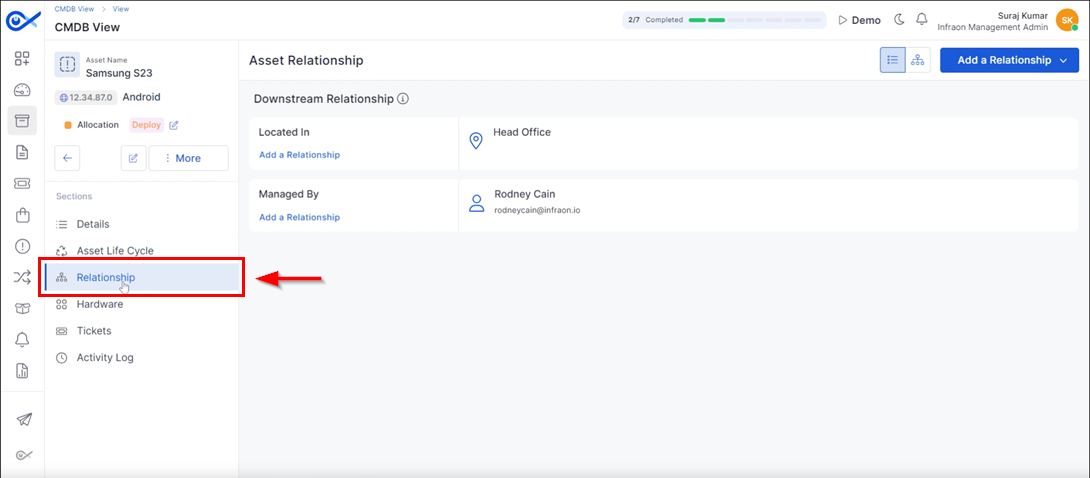
Step 2: Navigate to the asset information page and select the “Relationship” tab. This displays the asset's configured upstream and downstream connections.
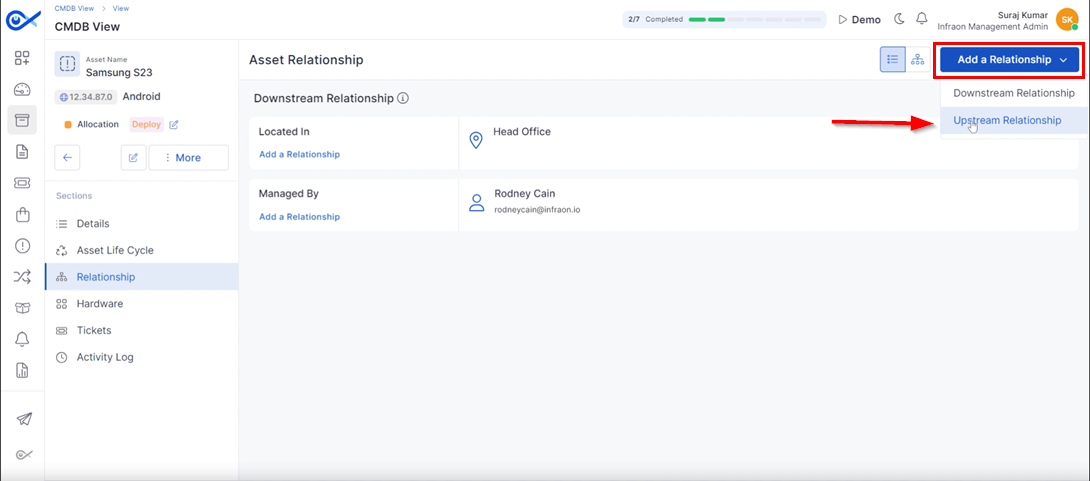
Step 3: To add a relationship, click on Add a relationship at the top right corner of the page.
Mapping Properties
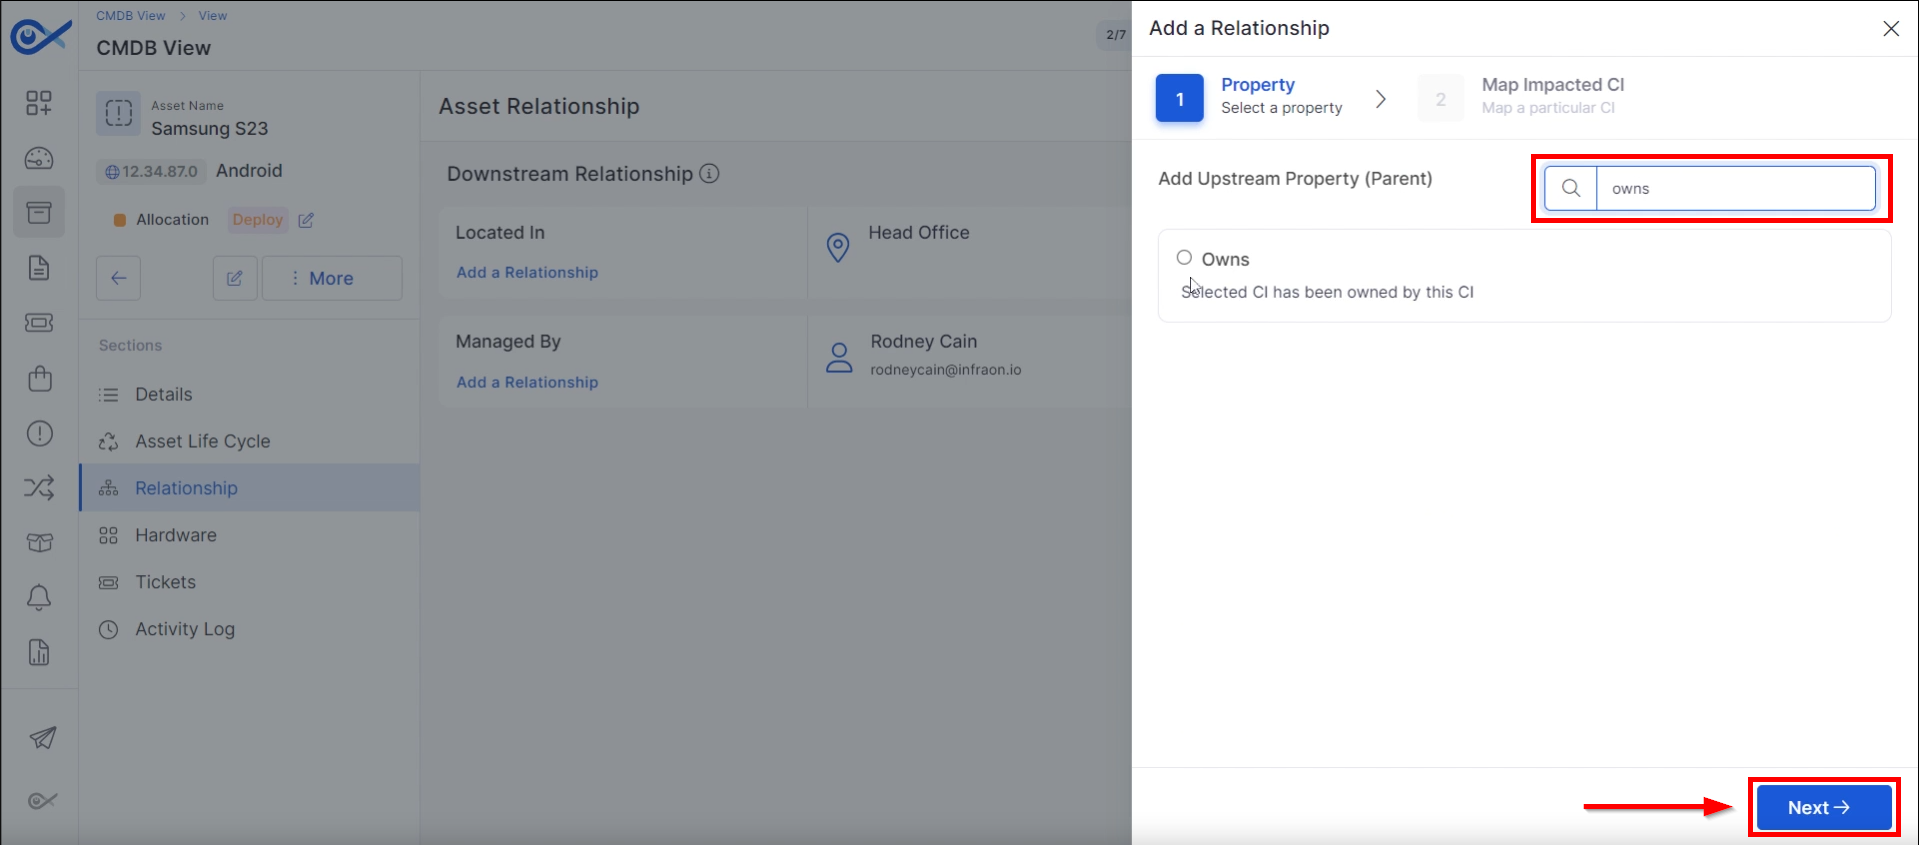
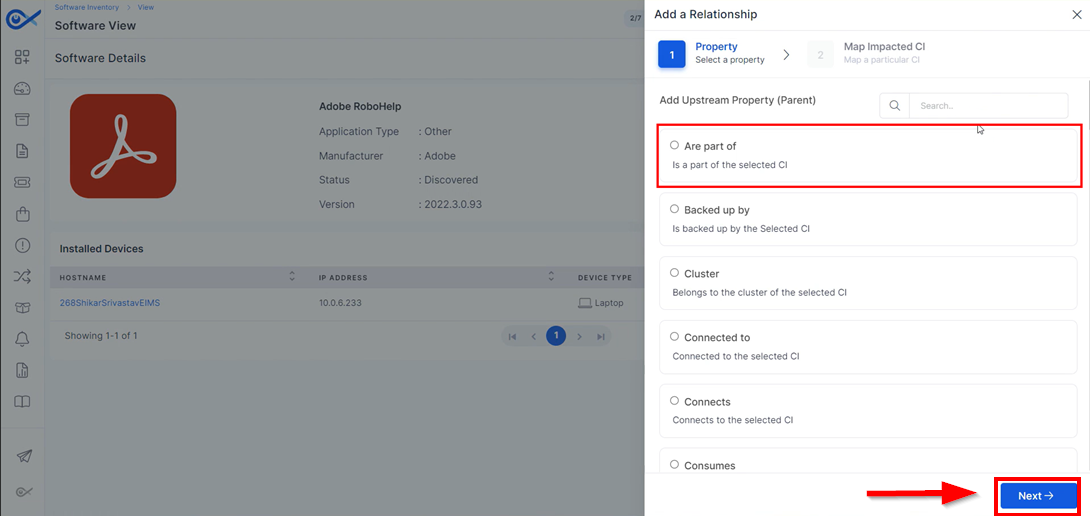
Step 4: In the property tab, fields are presented with properties such as 'Part Of,' which defines if it is part of the selected Configuration Item (CI), backed up by selected CI, etc.
Step 5: Search for the required property in a CMDVB view. Once the property has been selected, Click on Next.
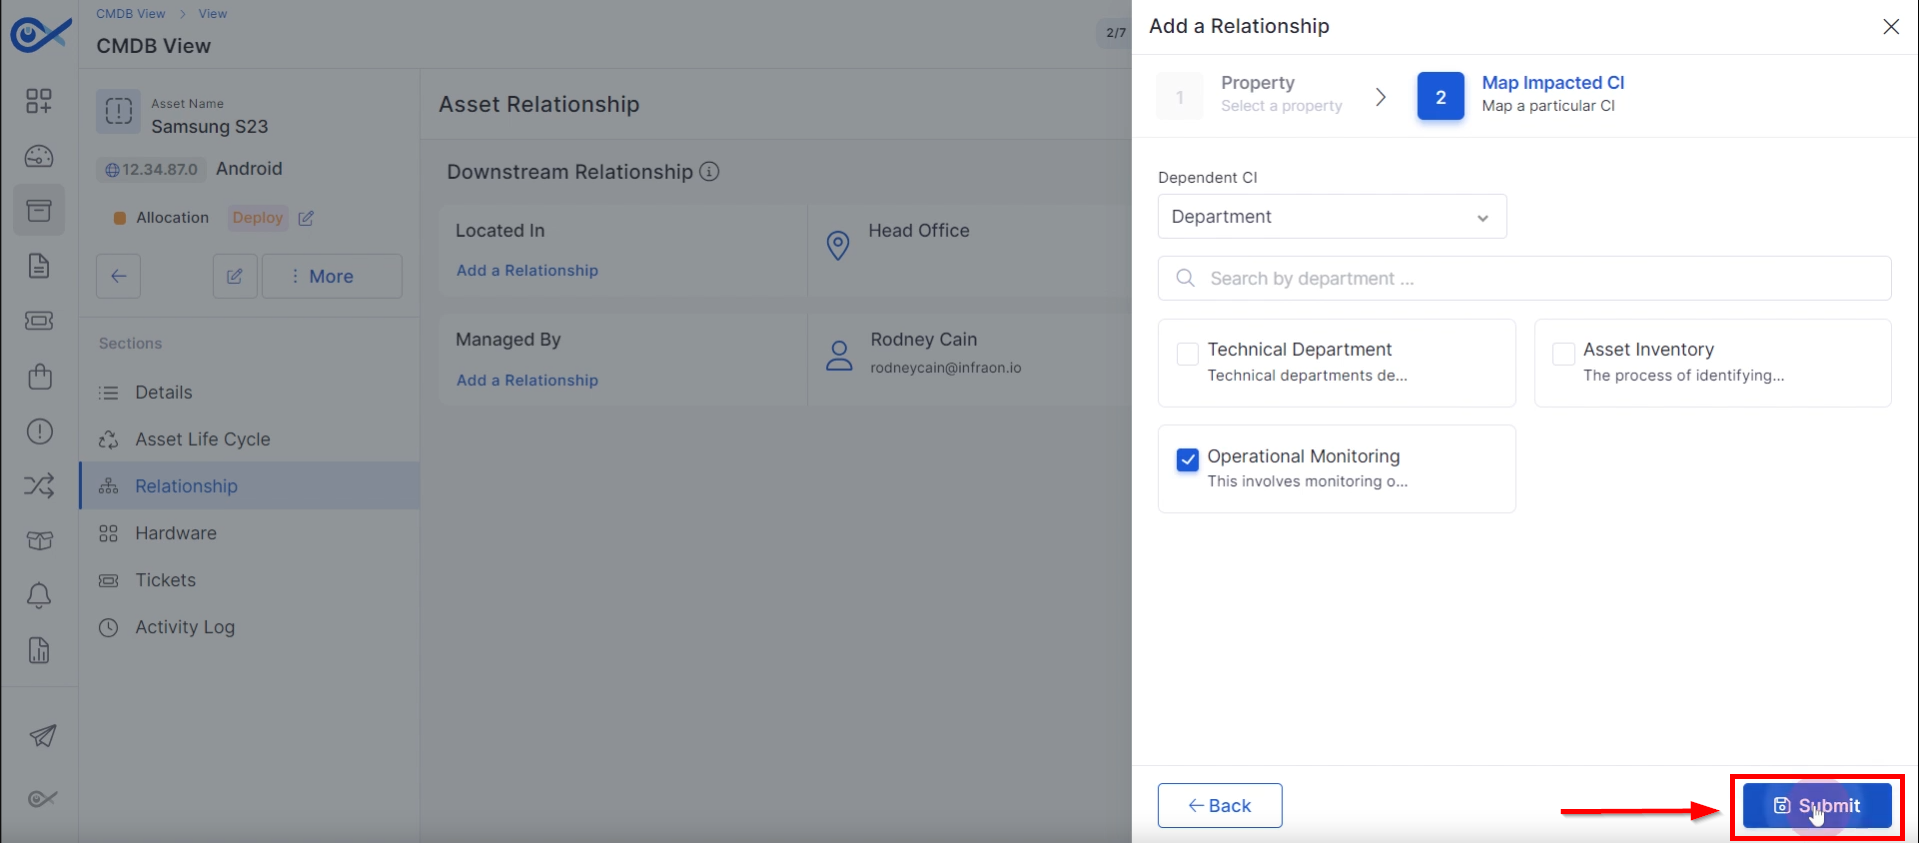
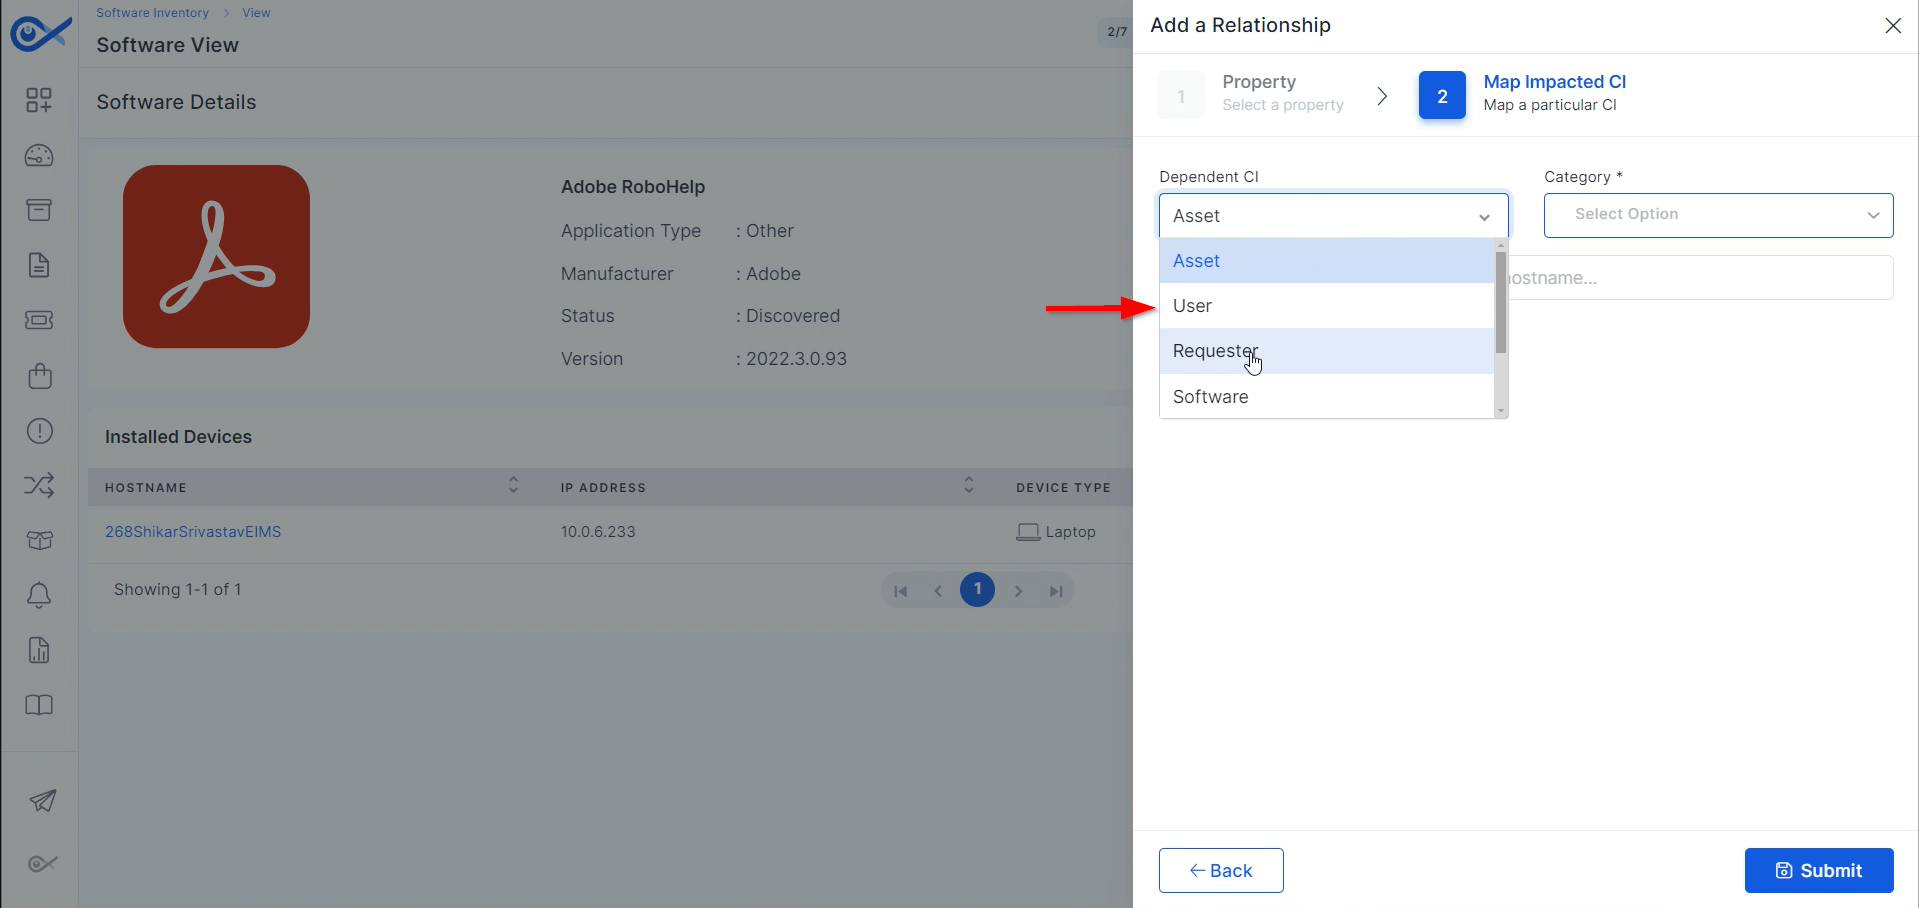
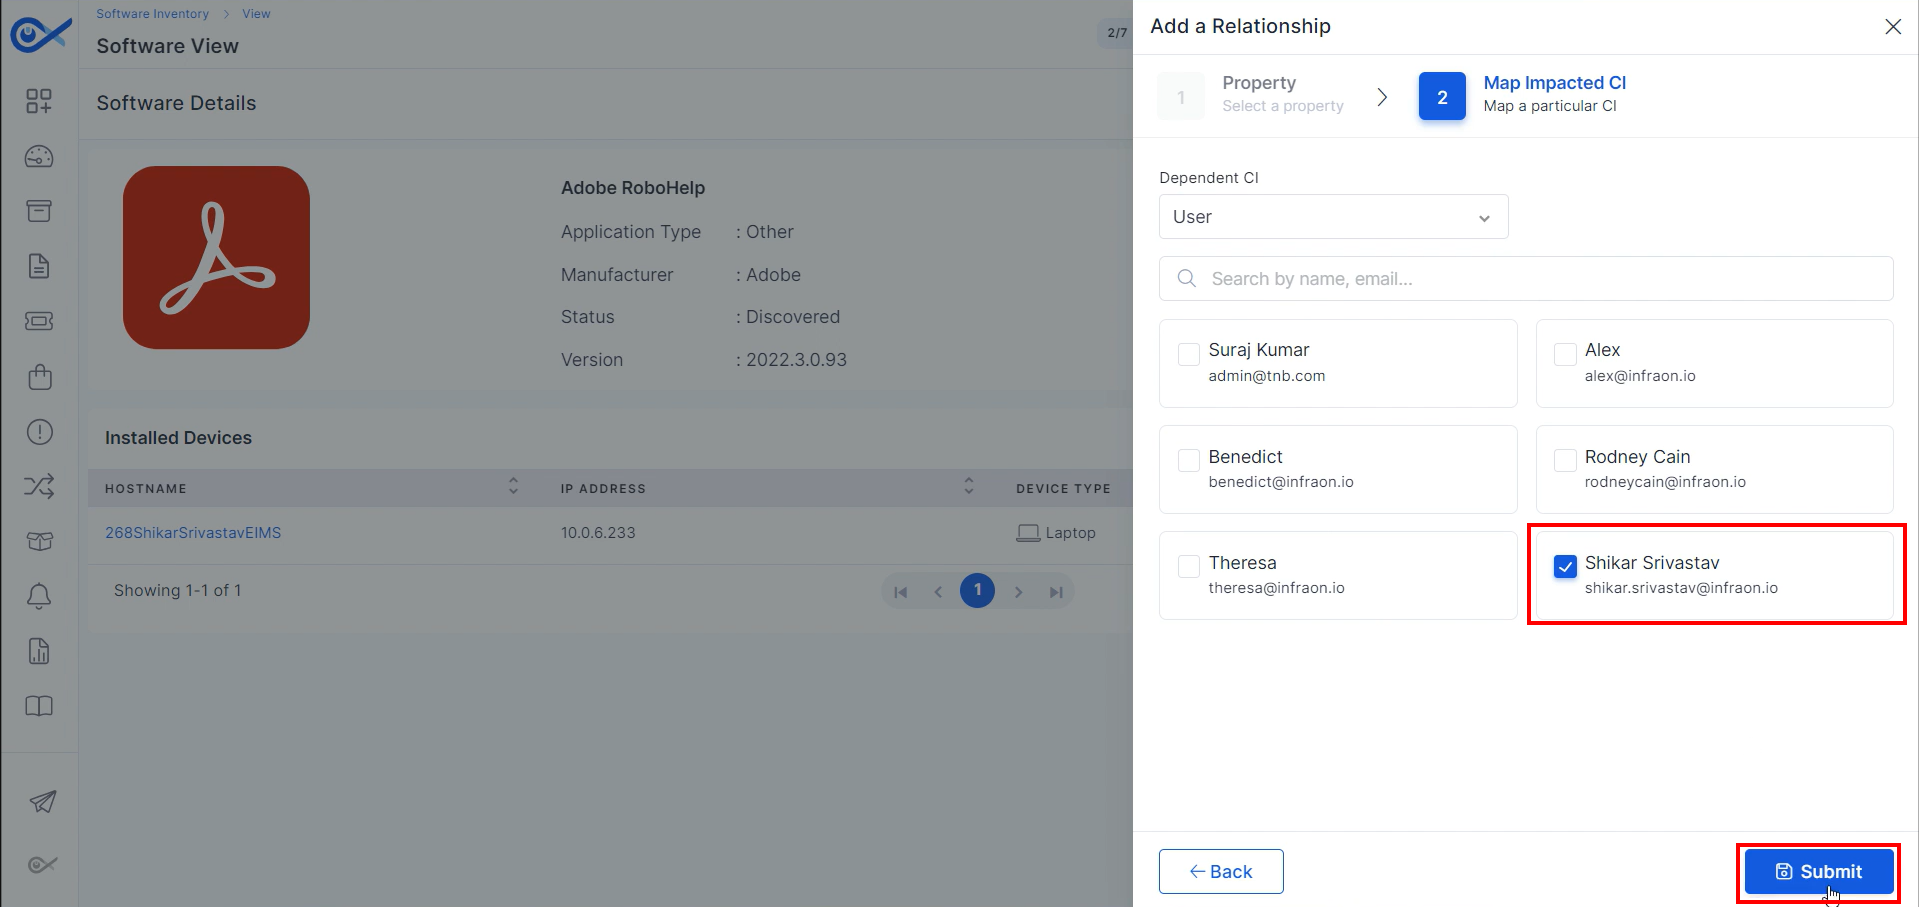
Step 6: Select the Dependent CI from the drop-down list in the Map impacted CI. Tick the appropriate selection to add the relationship. Once you've done this, Click on Submit.
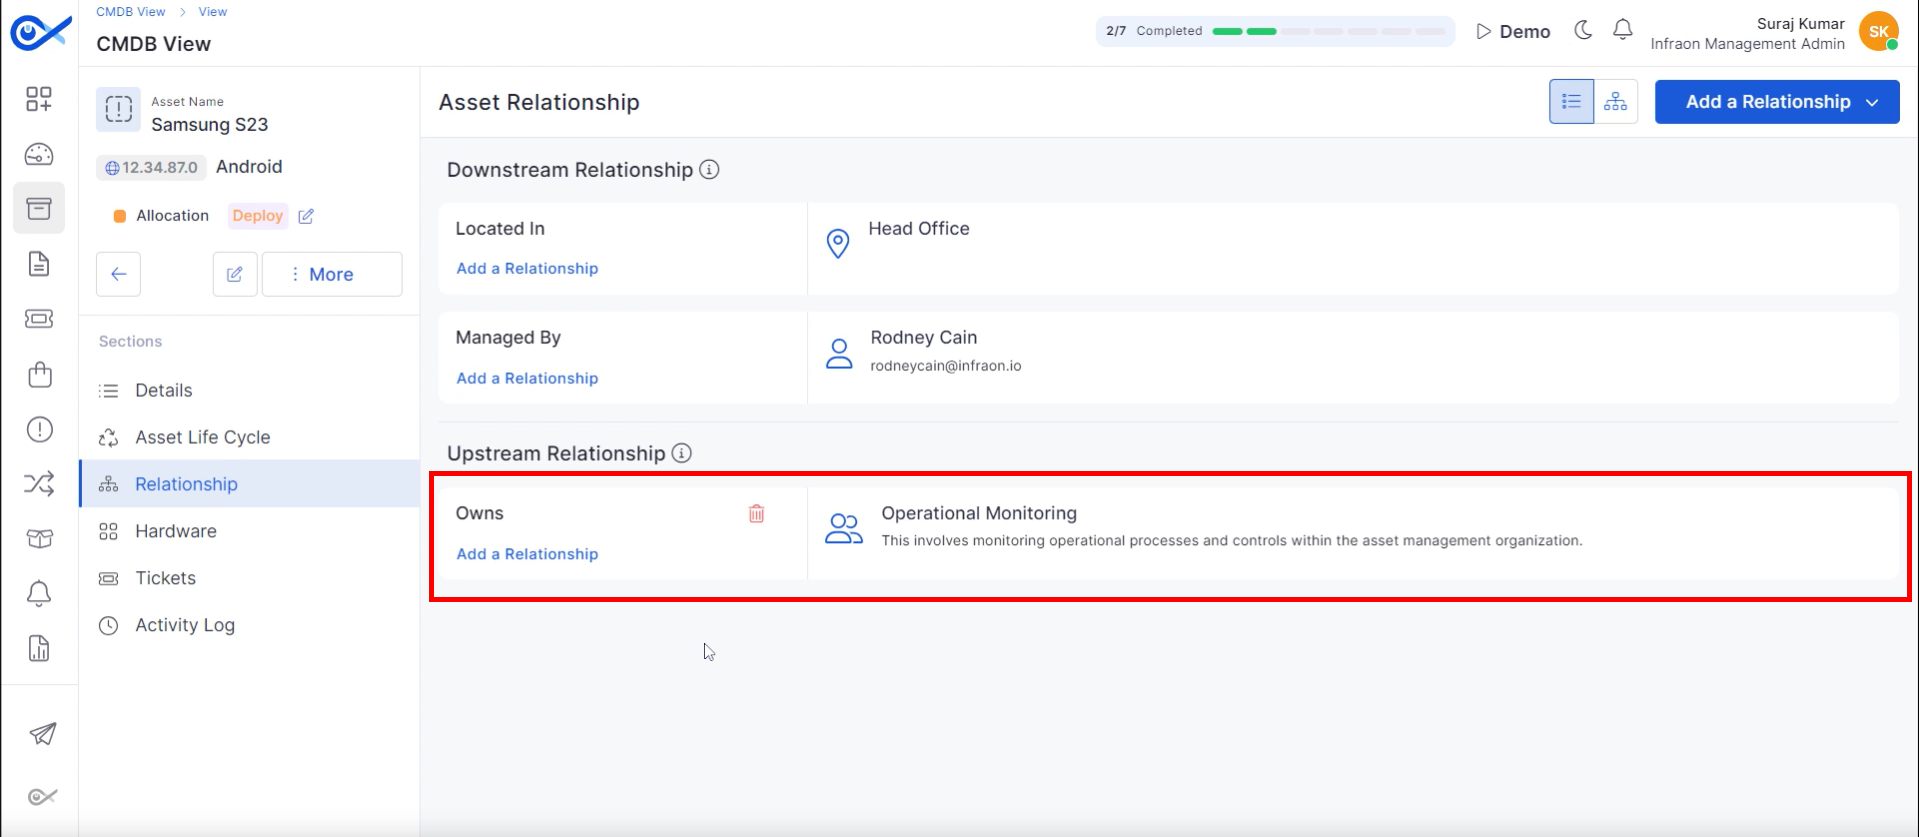
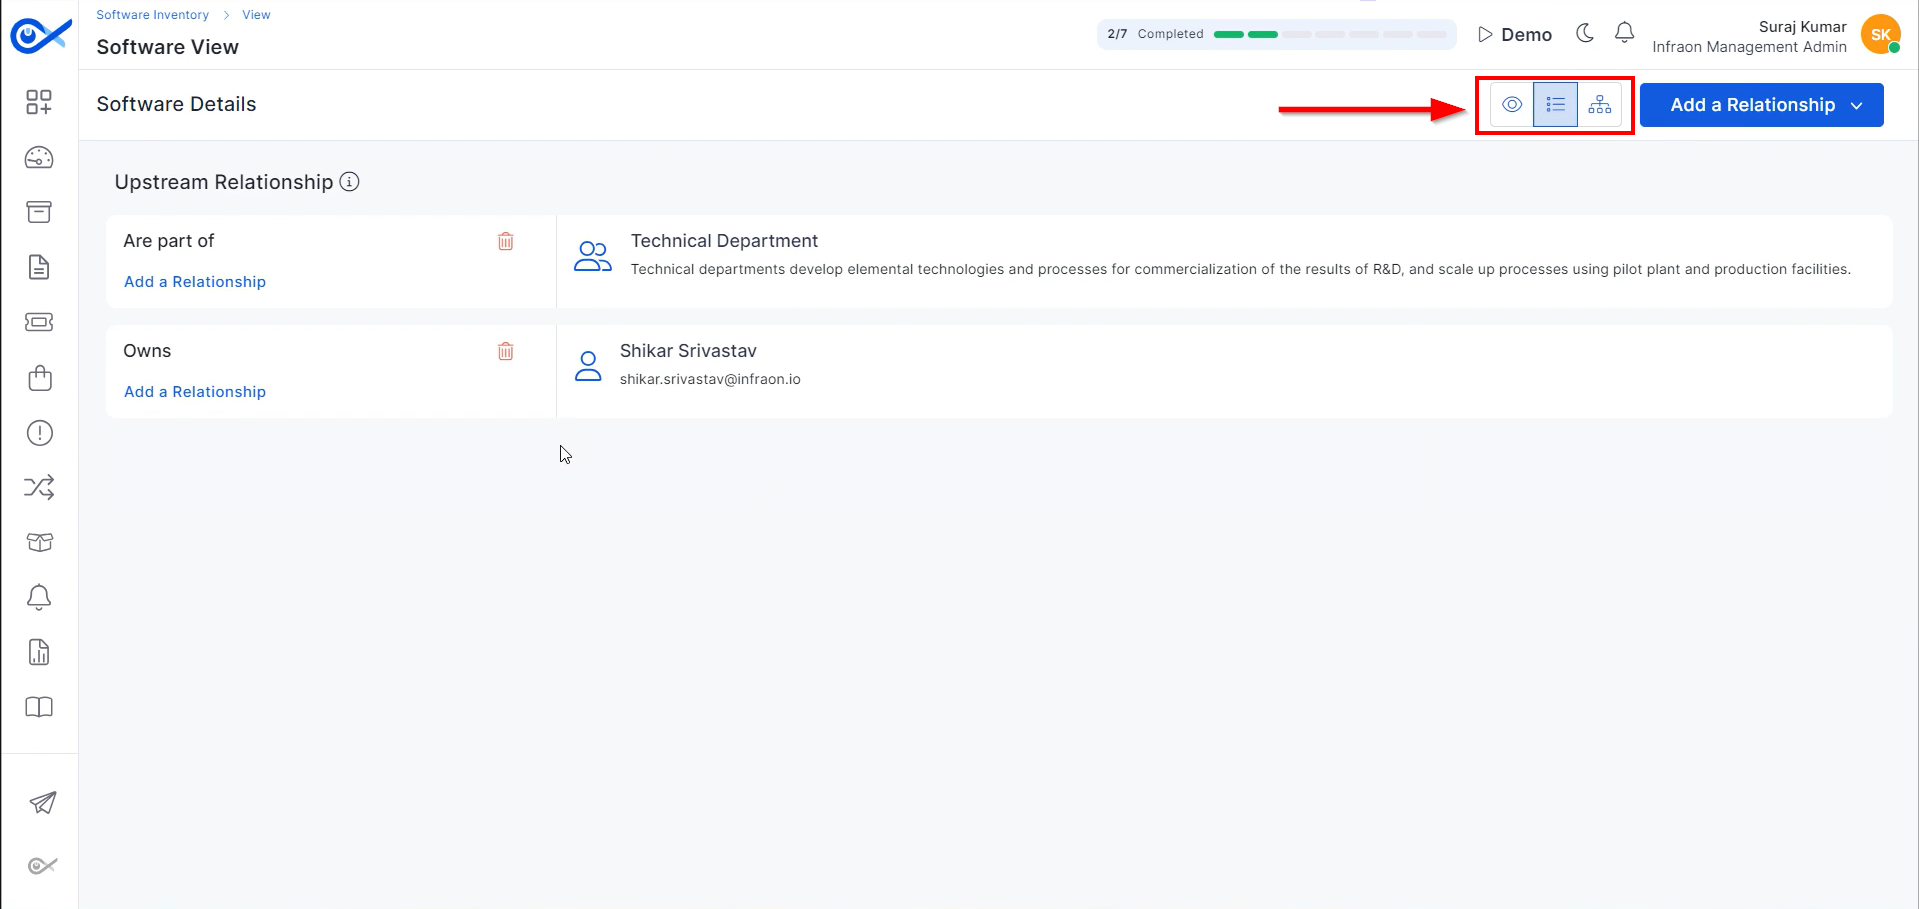
Step 7: The changes will be reflected on the asset relationship page after submission.
The configured relationship means that the asset is located in the head office and managed by Rodney Cain in the downstream relationship. The upstream relationship shows the asset is "Owned by" the Operational Monitoring Department.
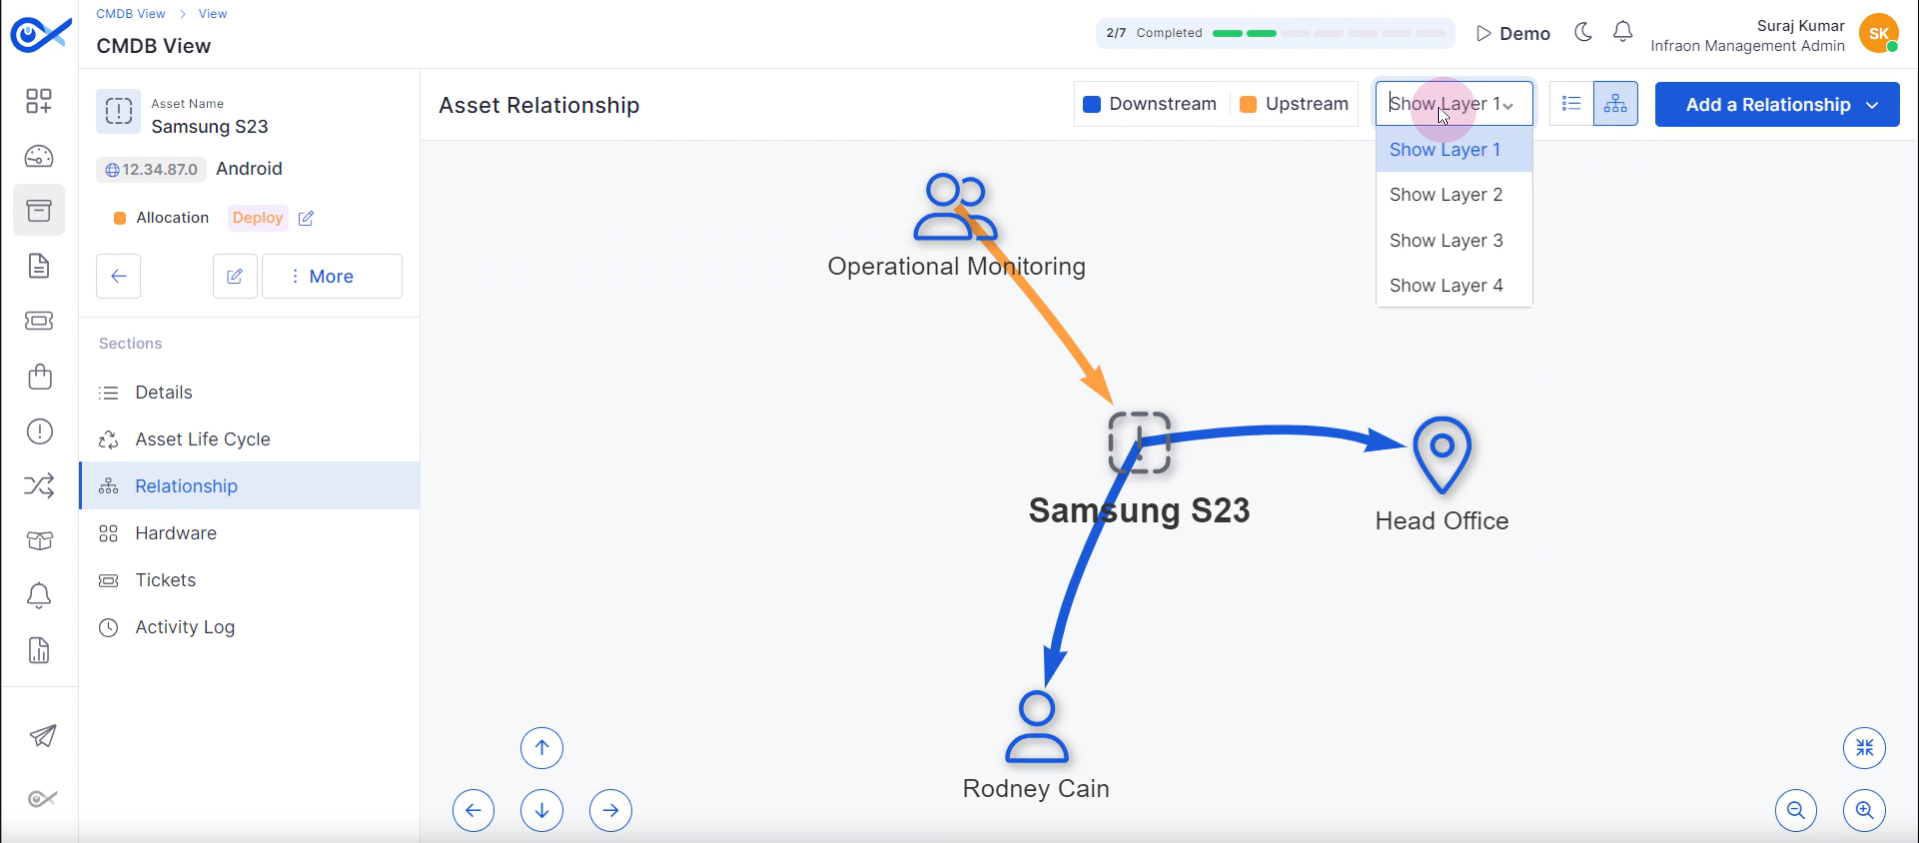
Infraon offers two views to view the relationship page: List View and Map View.
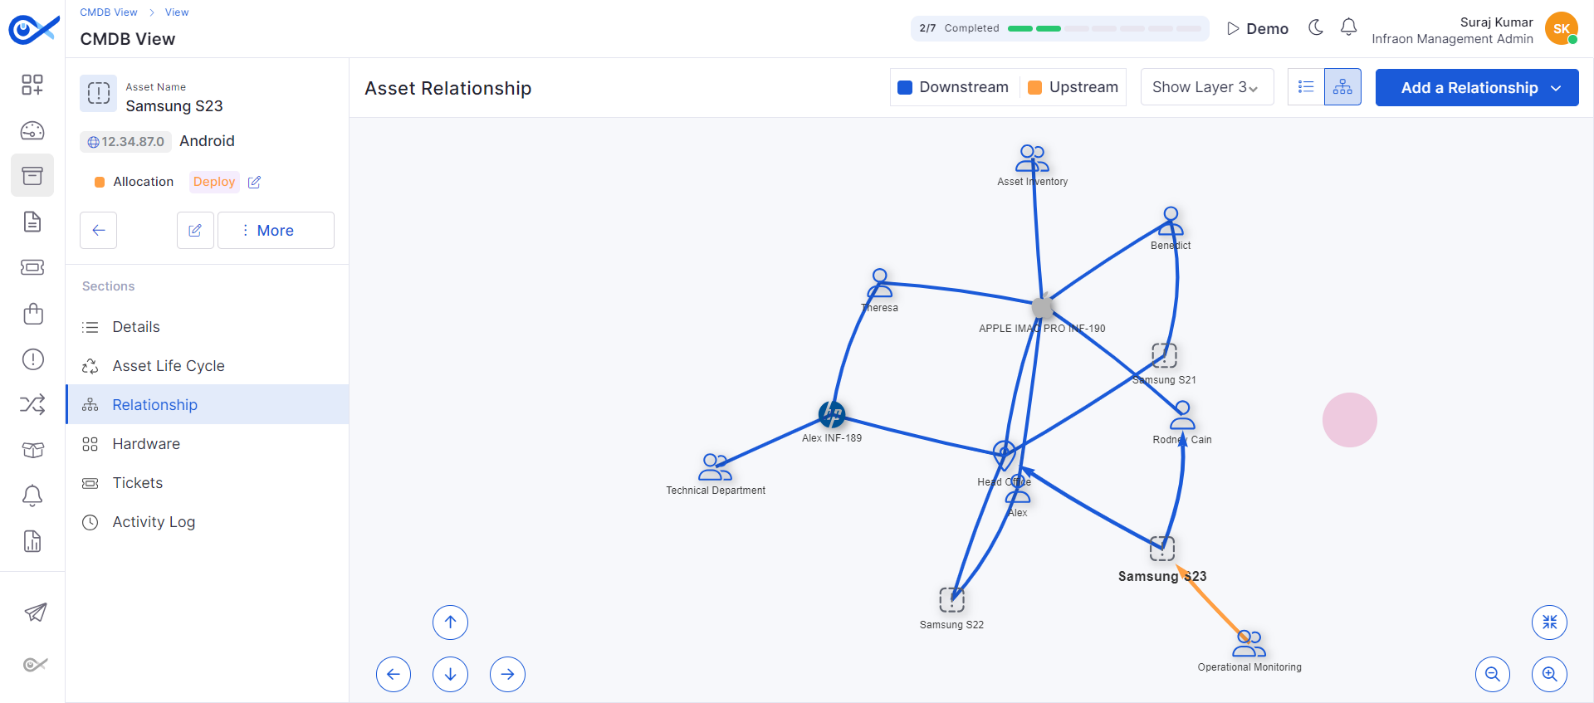
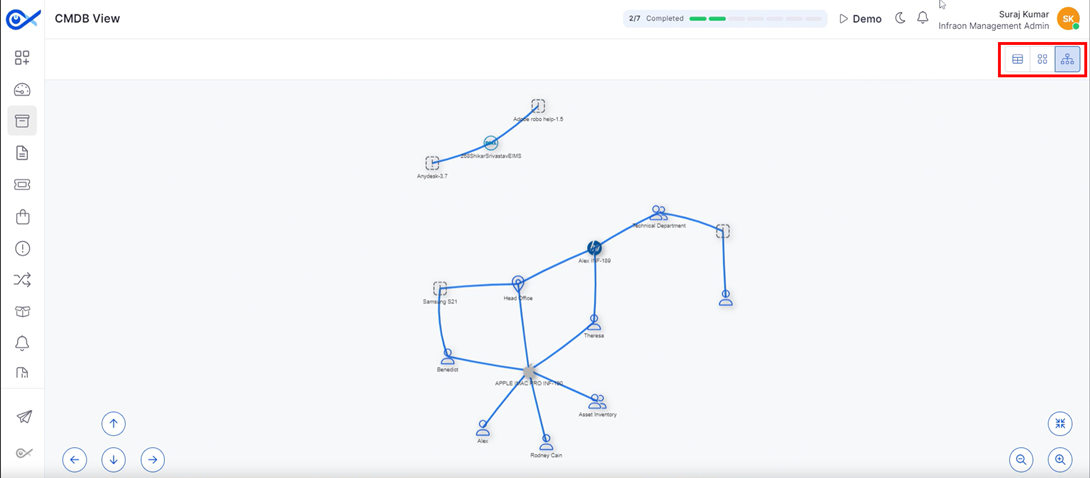
The Map view visually represents asset connections, showing upstream and downstream relationships. Technicians can view the topology based on different layers, with Layer 3 CI relationships as the default.
The map view offers multiple layers (1-5) for visualizing asset relationships. The default view shows Layer 3 connections. Selecting a different layer will adjust the map to display the corresponding level of relationships.
The screen navigation controls are located at the bottom. Technicians can zoom in, out, and pan using the provided buttons or arrow keys.
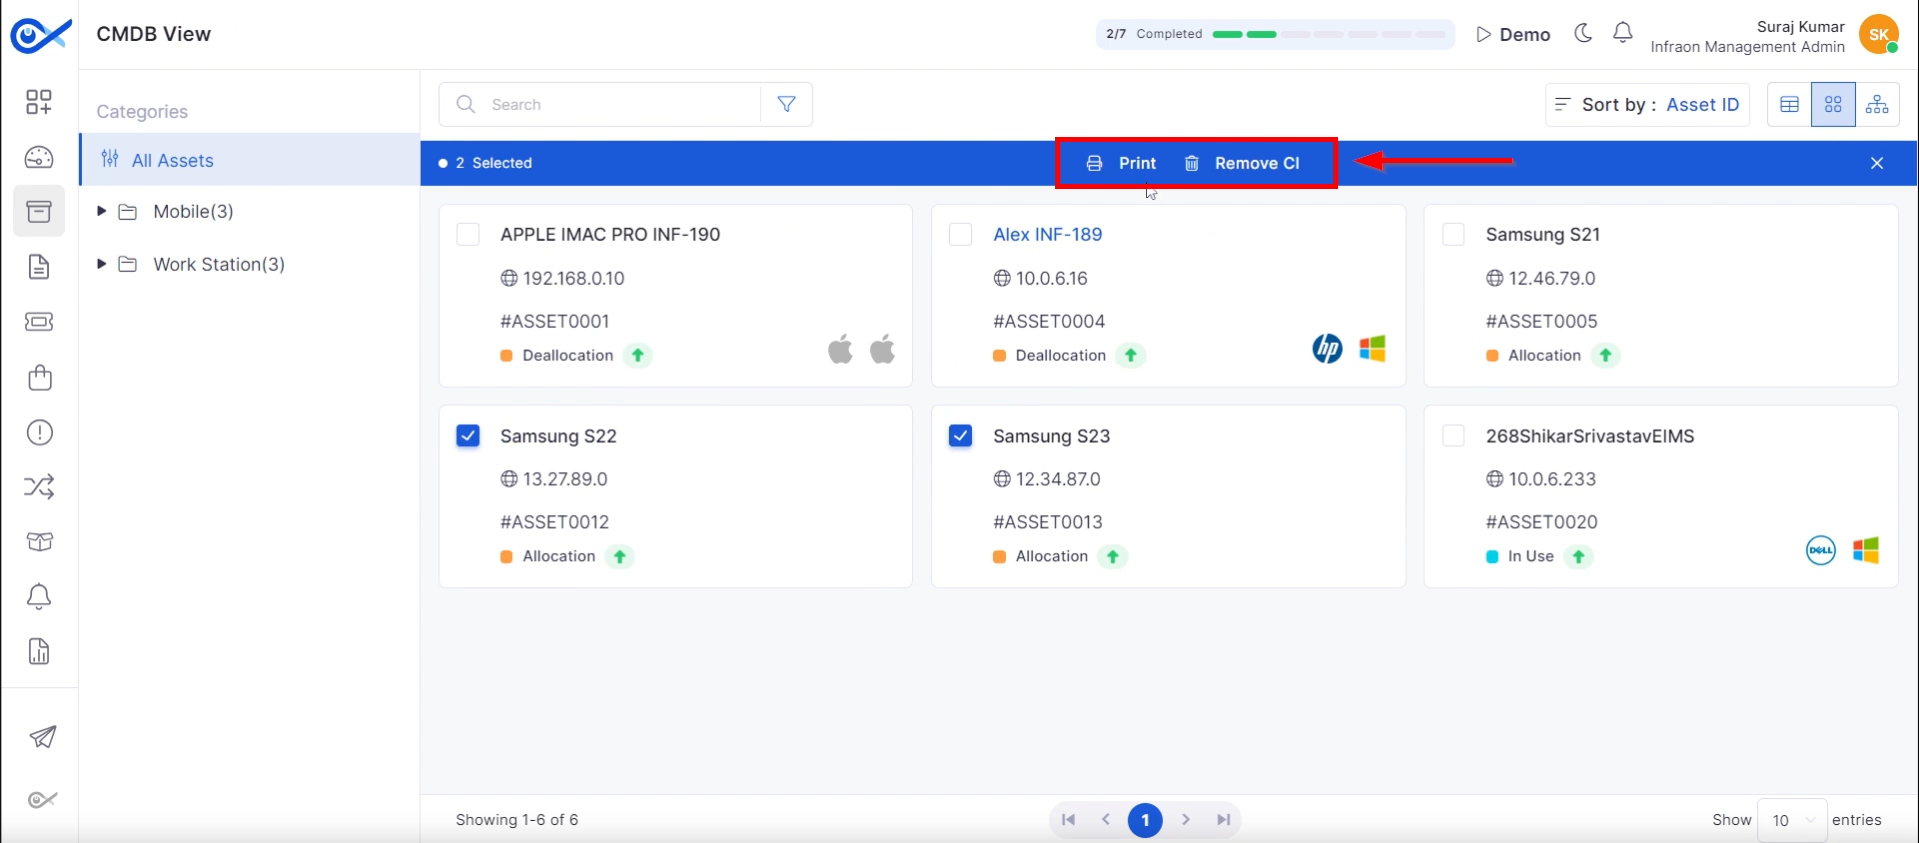
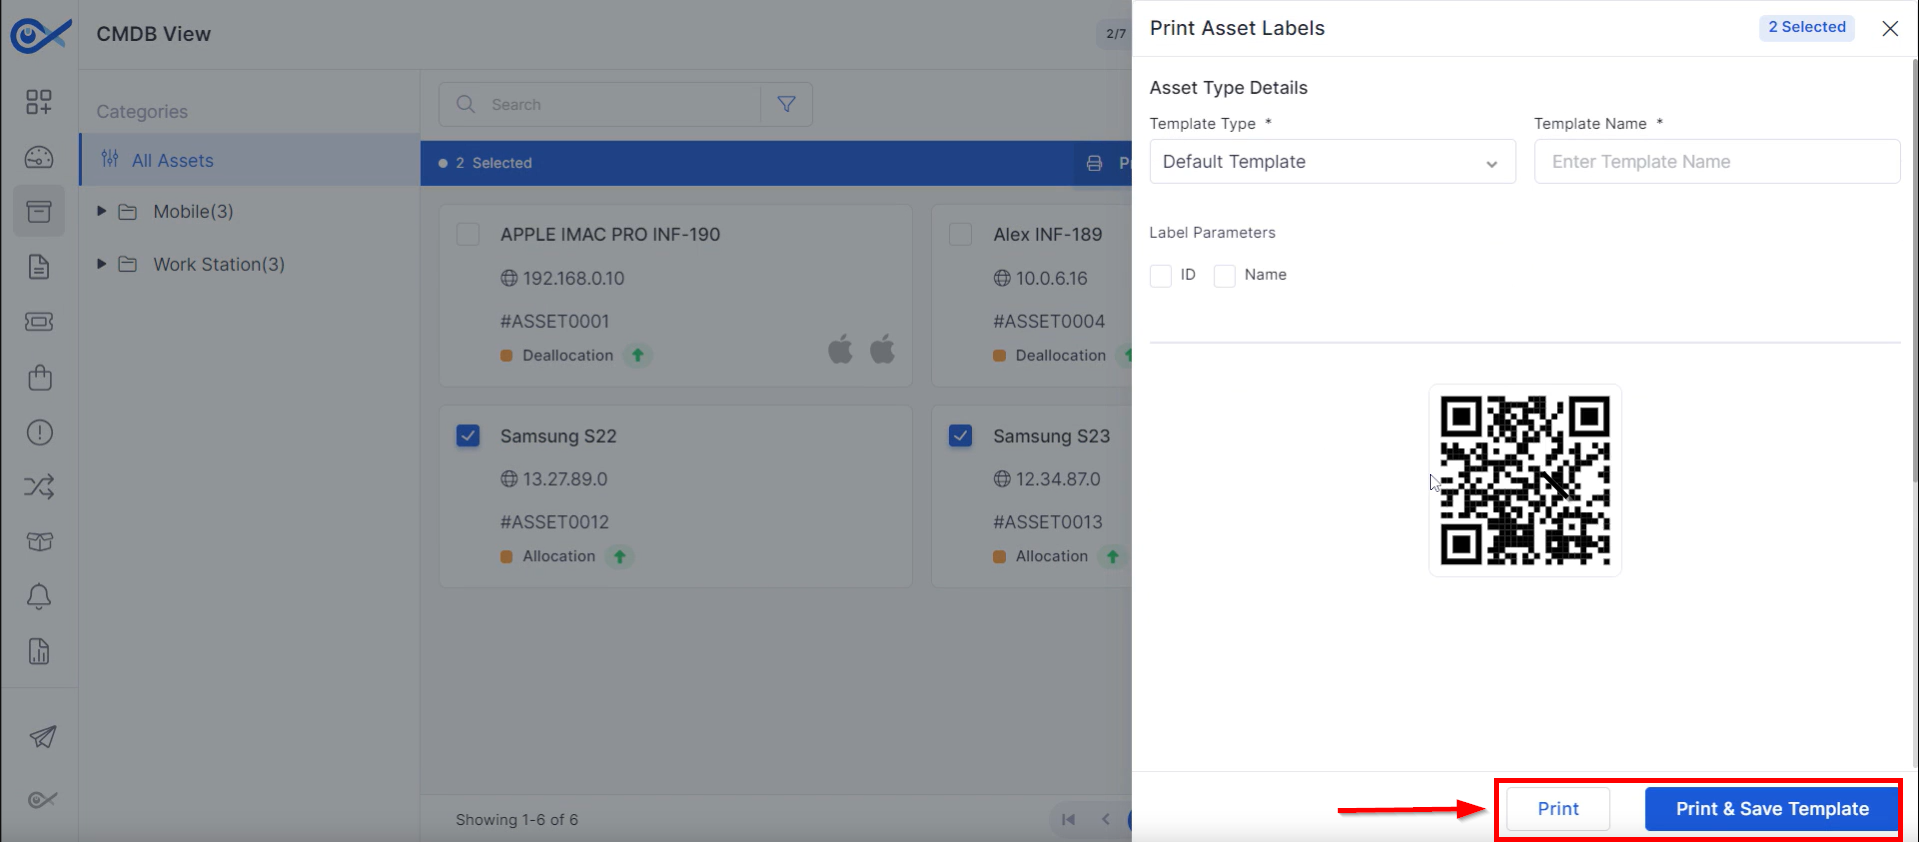
Select multiple assets on the CMDB view page. A top panel with options to Print or Remove CI will appear.
Step 1: Click the print option to print QR or barcode labels for selected assets. Customize labels by including the asset ID, name, or other relevant information.
Step 2: To print and store the template later, click 'Print and Save a Template.'
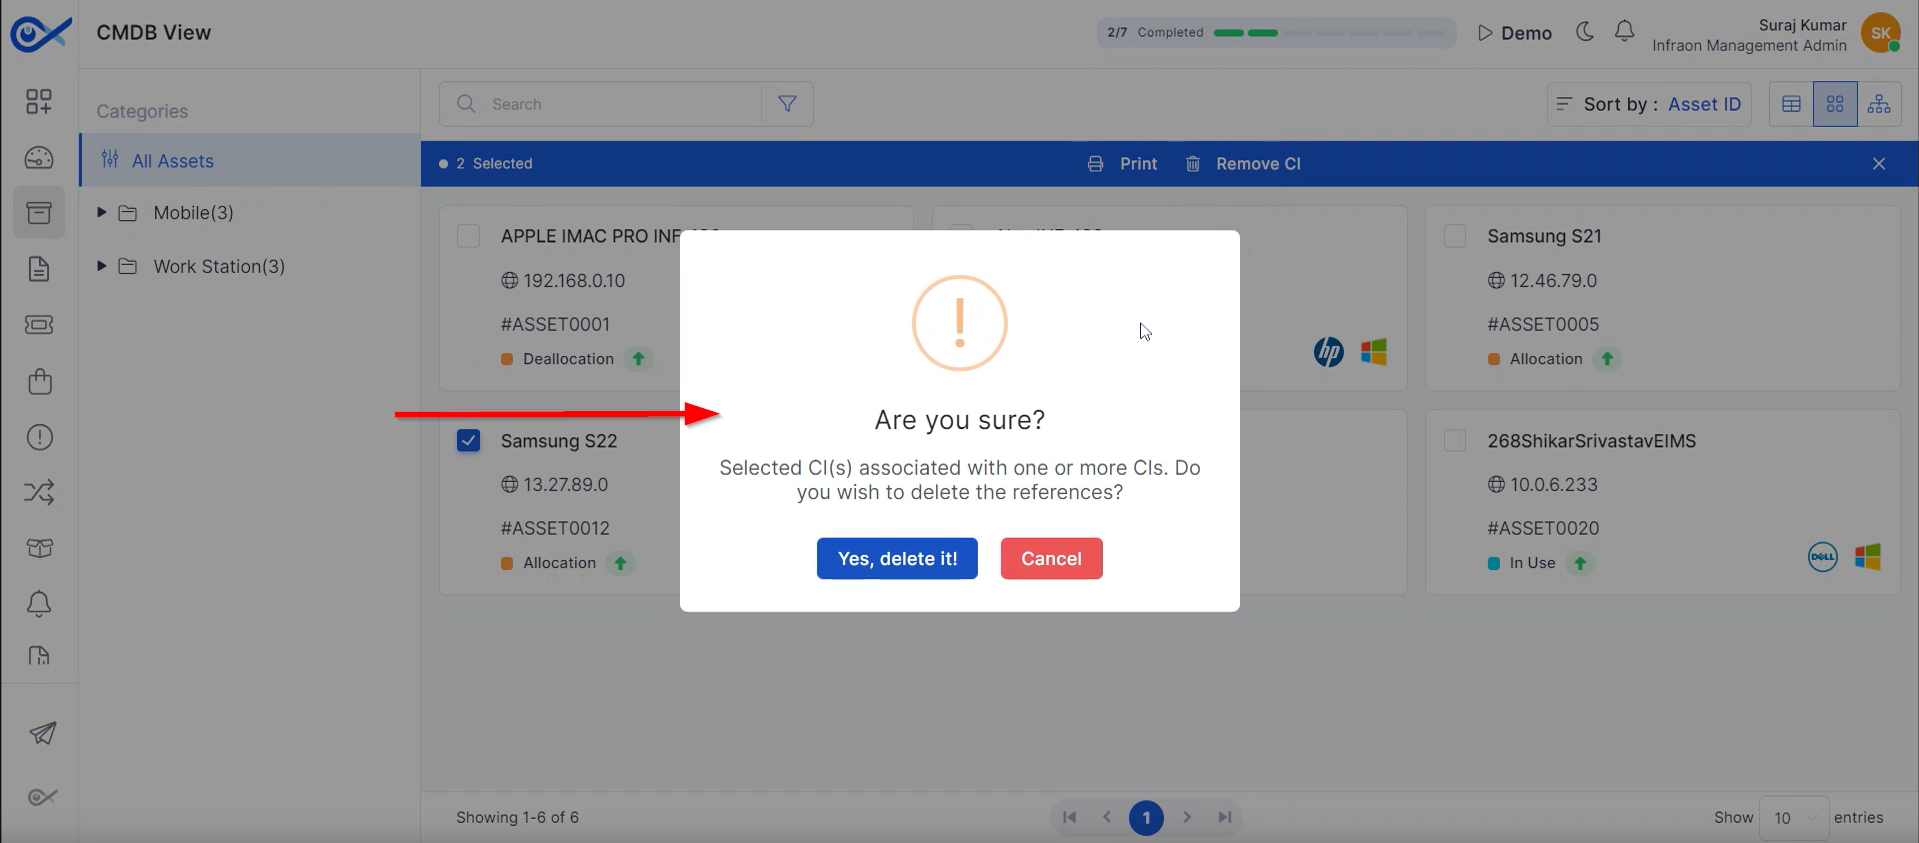
To remove a configuration item (CI) from an asset, select the asset and click “Remove CI.” Confirm the action to delete the CI from the CMDB view permanently.
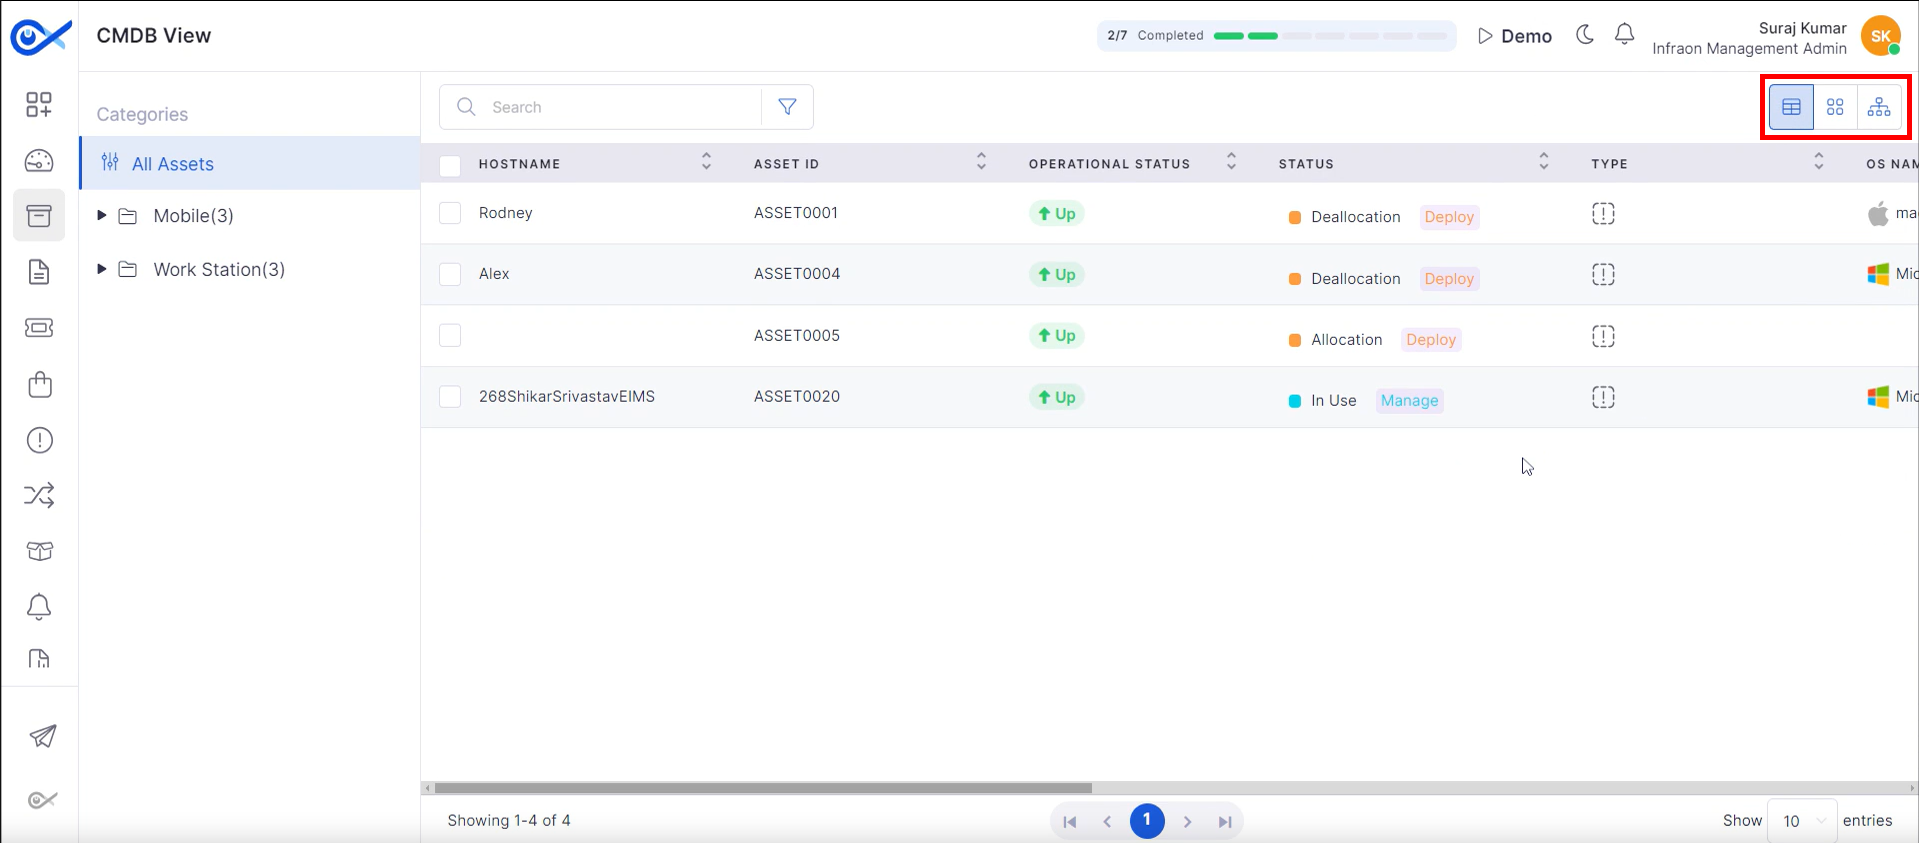
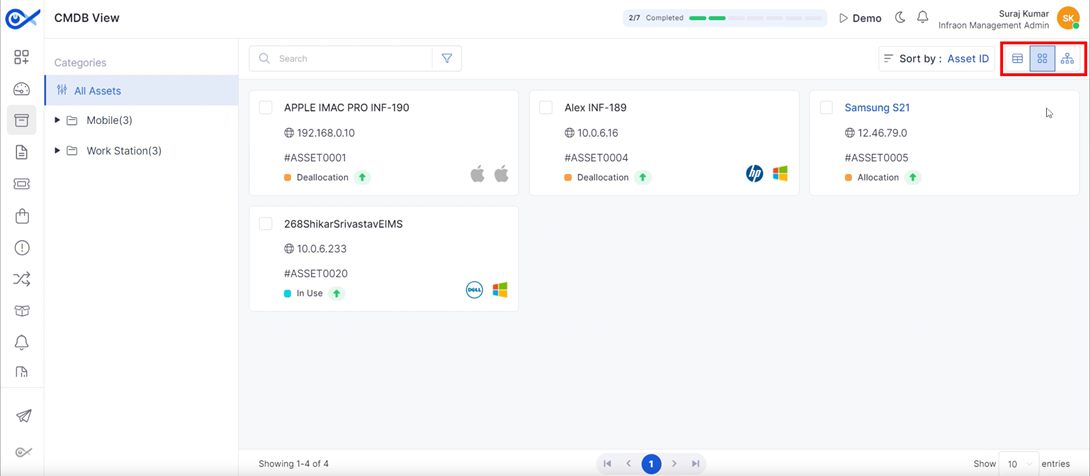
Infraon provides three CMDB view options.
The Grid view presents data in a tabular format, offering a quick overview of configuration items.
The Card view, the default format, offers a more detailed asset overview in a card-like layout.
The Map view presents asset information in a visual, geographical format.
This concludes the CMDB view of the Infraon Infinity platform.
Software Inventory
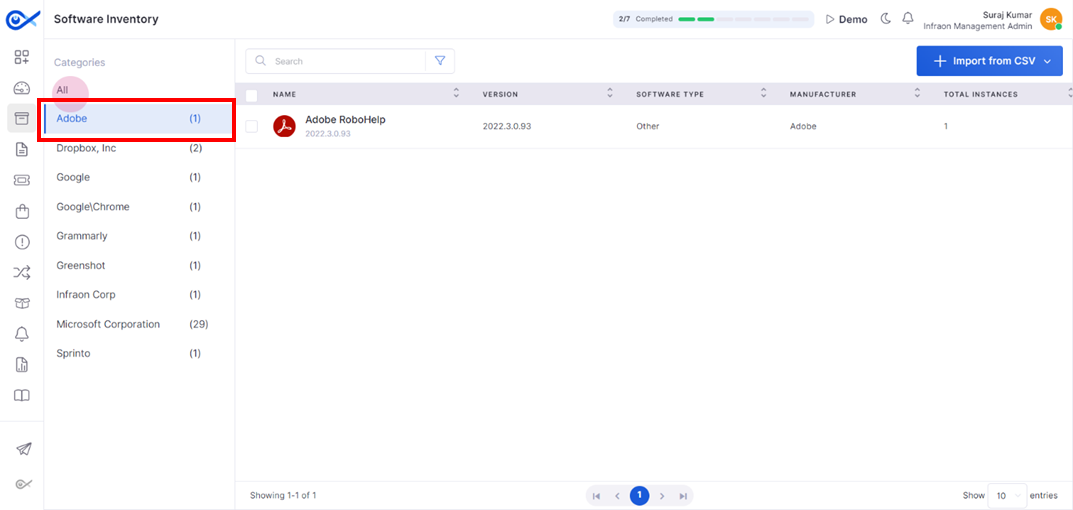
This guide will explore the software inventory tab in the Infraon Infinity platform. This tutorial guides technicians through managing software inventory, establishing CI relationships, and importing software via CSV file.
In the Software inventory tab, view the software installed on systems where the agent has been deployed.
Select the desired manufacturer from the left panel to view software for a specific manufacturer.
Identify the software name, version, type, manufacturer, and total instance count on the software page.
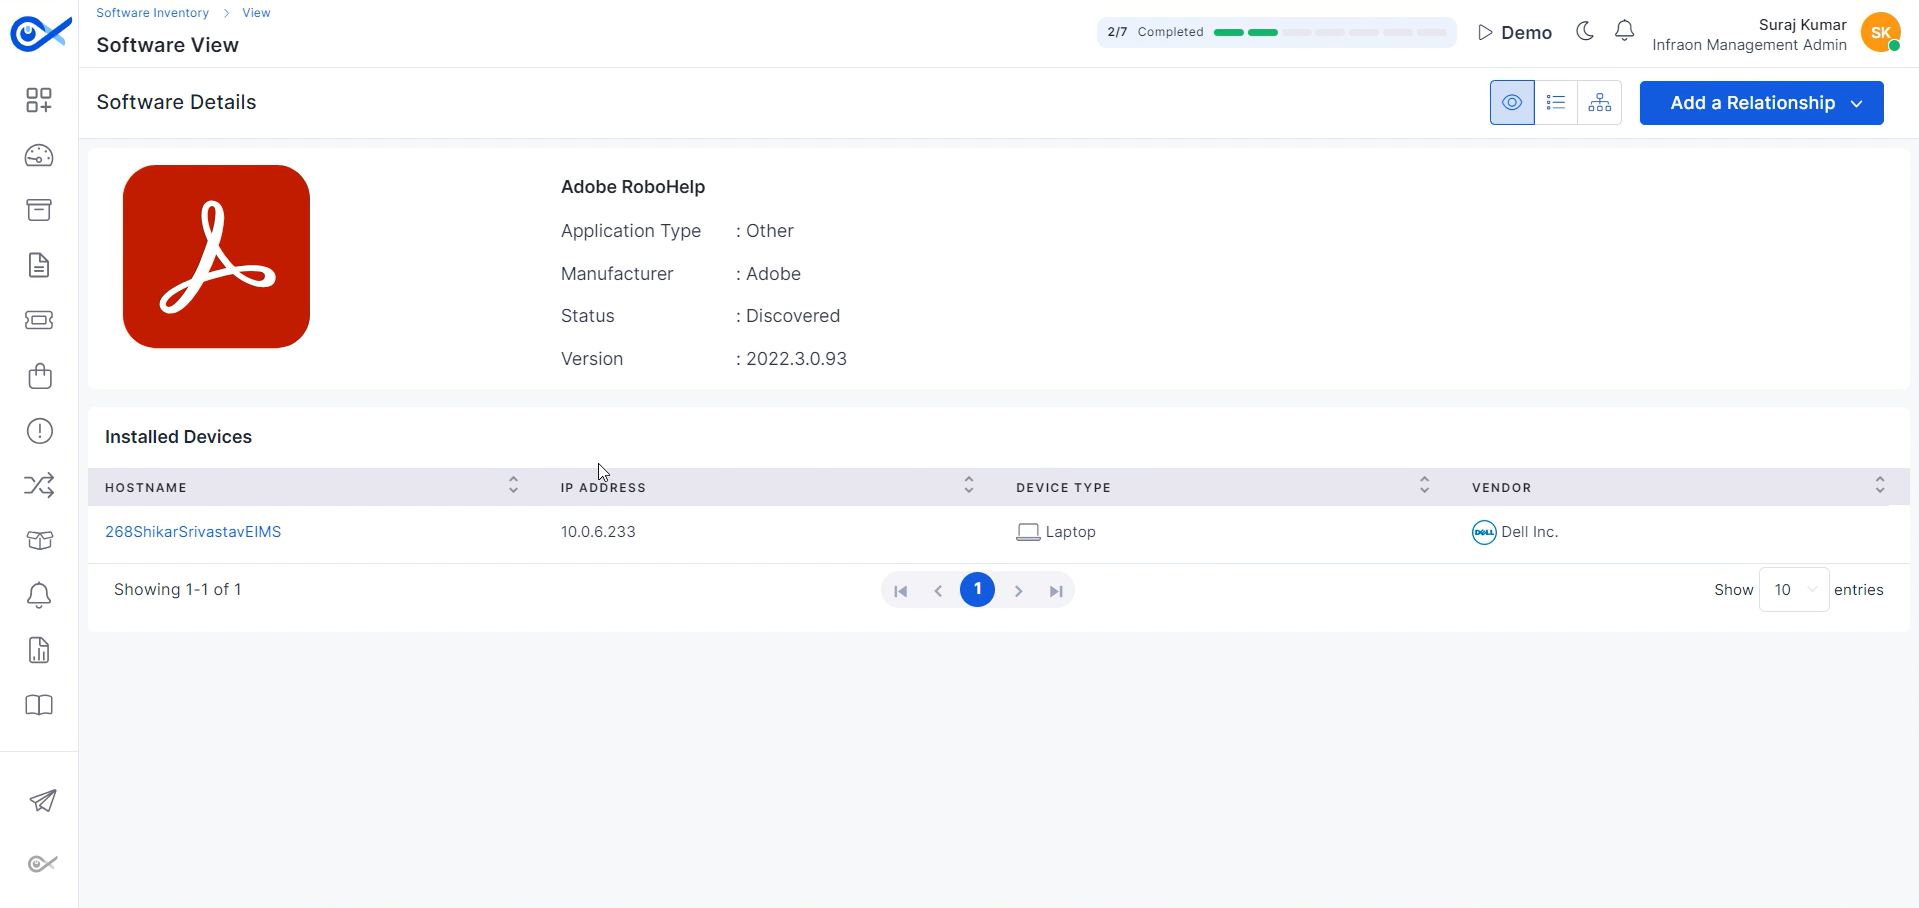
Click on the software listing to access in-depth software details. Information includes hostname, installation path, type, manufacturer, status, and version.
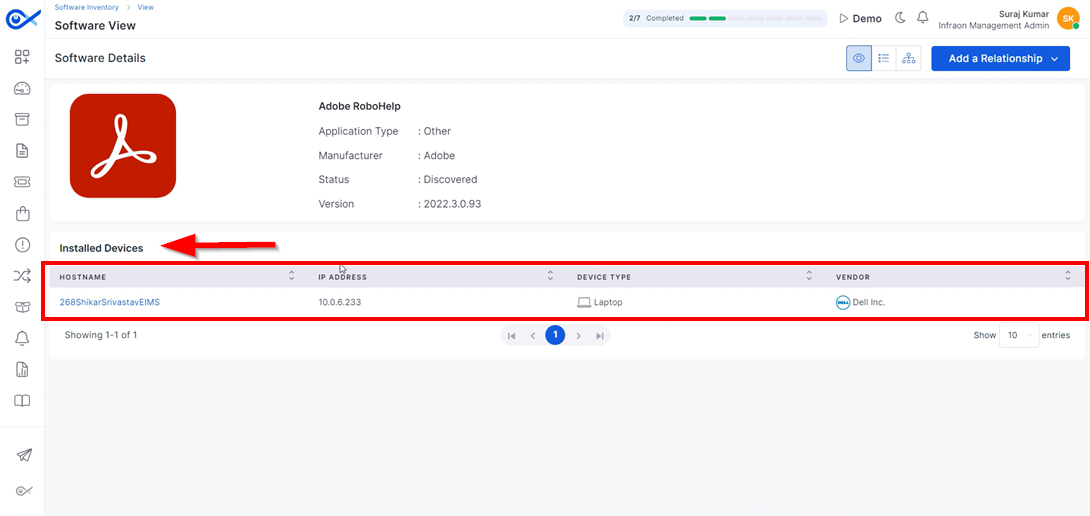
The “Installed Devices” section displays the hostname, IP address, device type, vendor, and installed assets.
Learn More
Mapping Impacted CI
Viewing Relationships
Navigating the Map View
Managing Multiple Assets
Print
Removing CI
Viewing CMDB Page
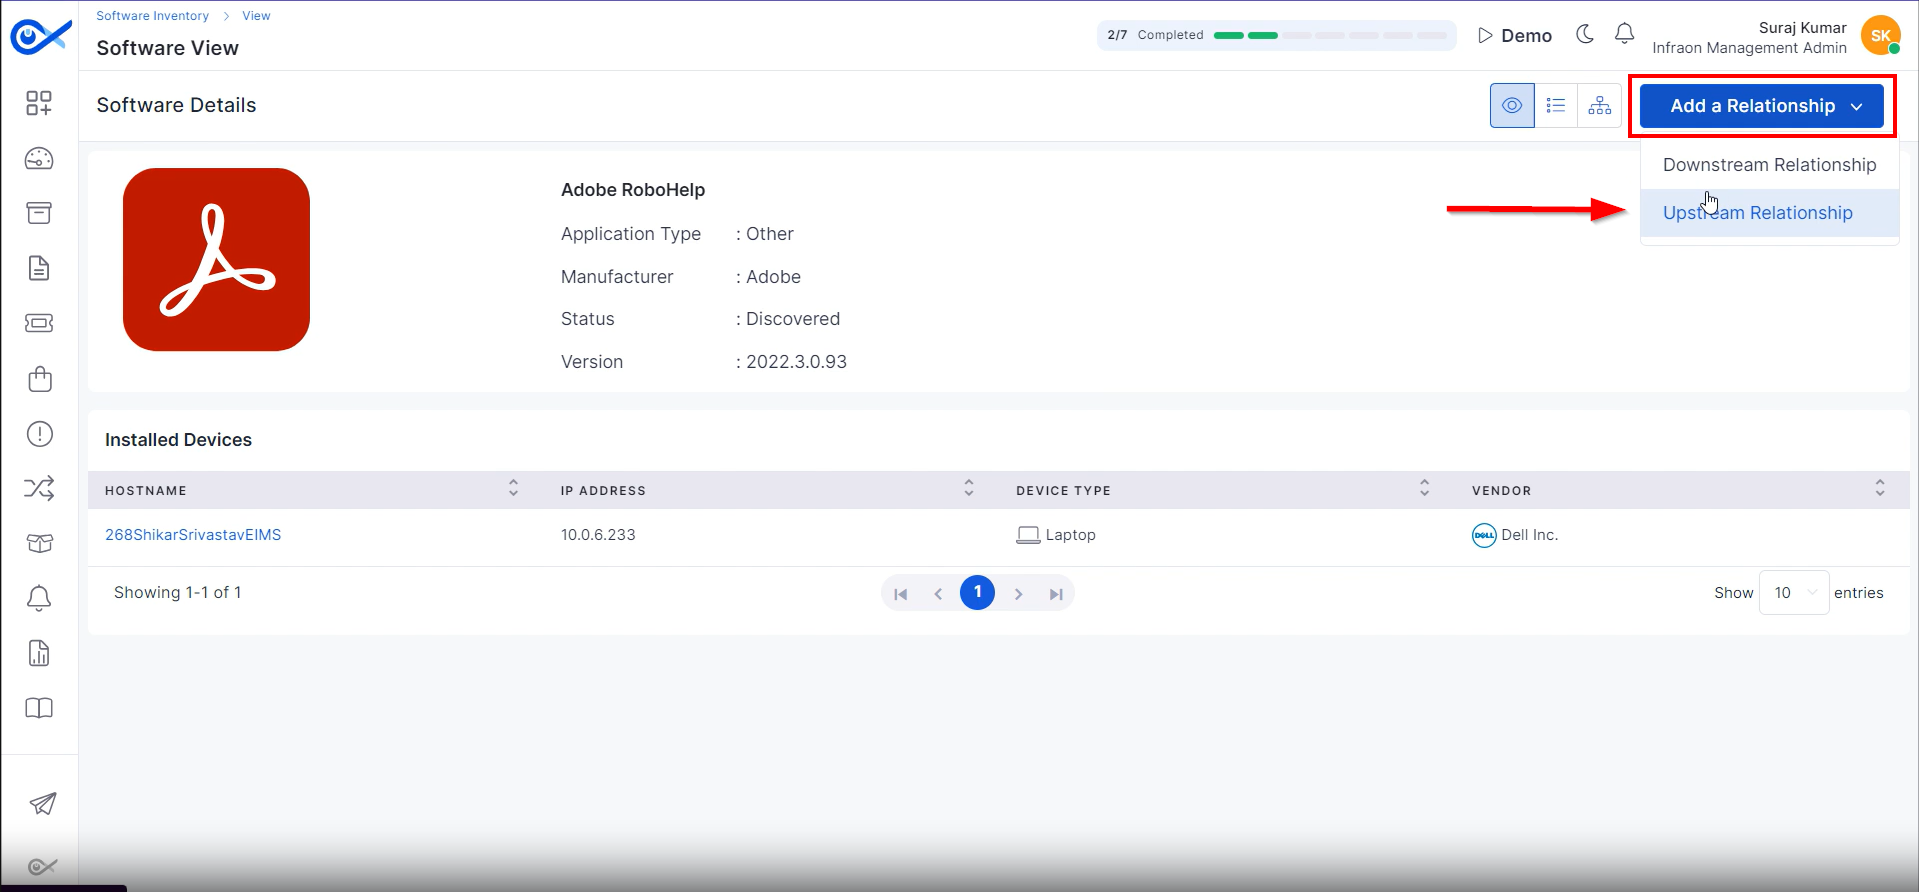
Step 1: Click the "Add a Relationship" option at the top right corner of the page.
Step 2: Manage both downstream and upstream relationships.
Step 3: Select the part of the selected Configuration Item (CI) among the available properties. After selecting the property, click on “Next.”
Step 4: Add the dependent CI from the drop-down column in the map-impacted CI tab.
Step 5: Choose “User.” This will filter the list of users who have been added to the tool. Click “Submit” to create the relationship.
Infraon provides three different types of views: software view, list view, and map view.
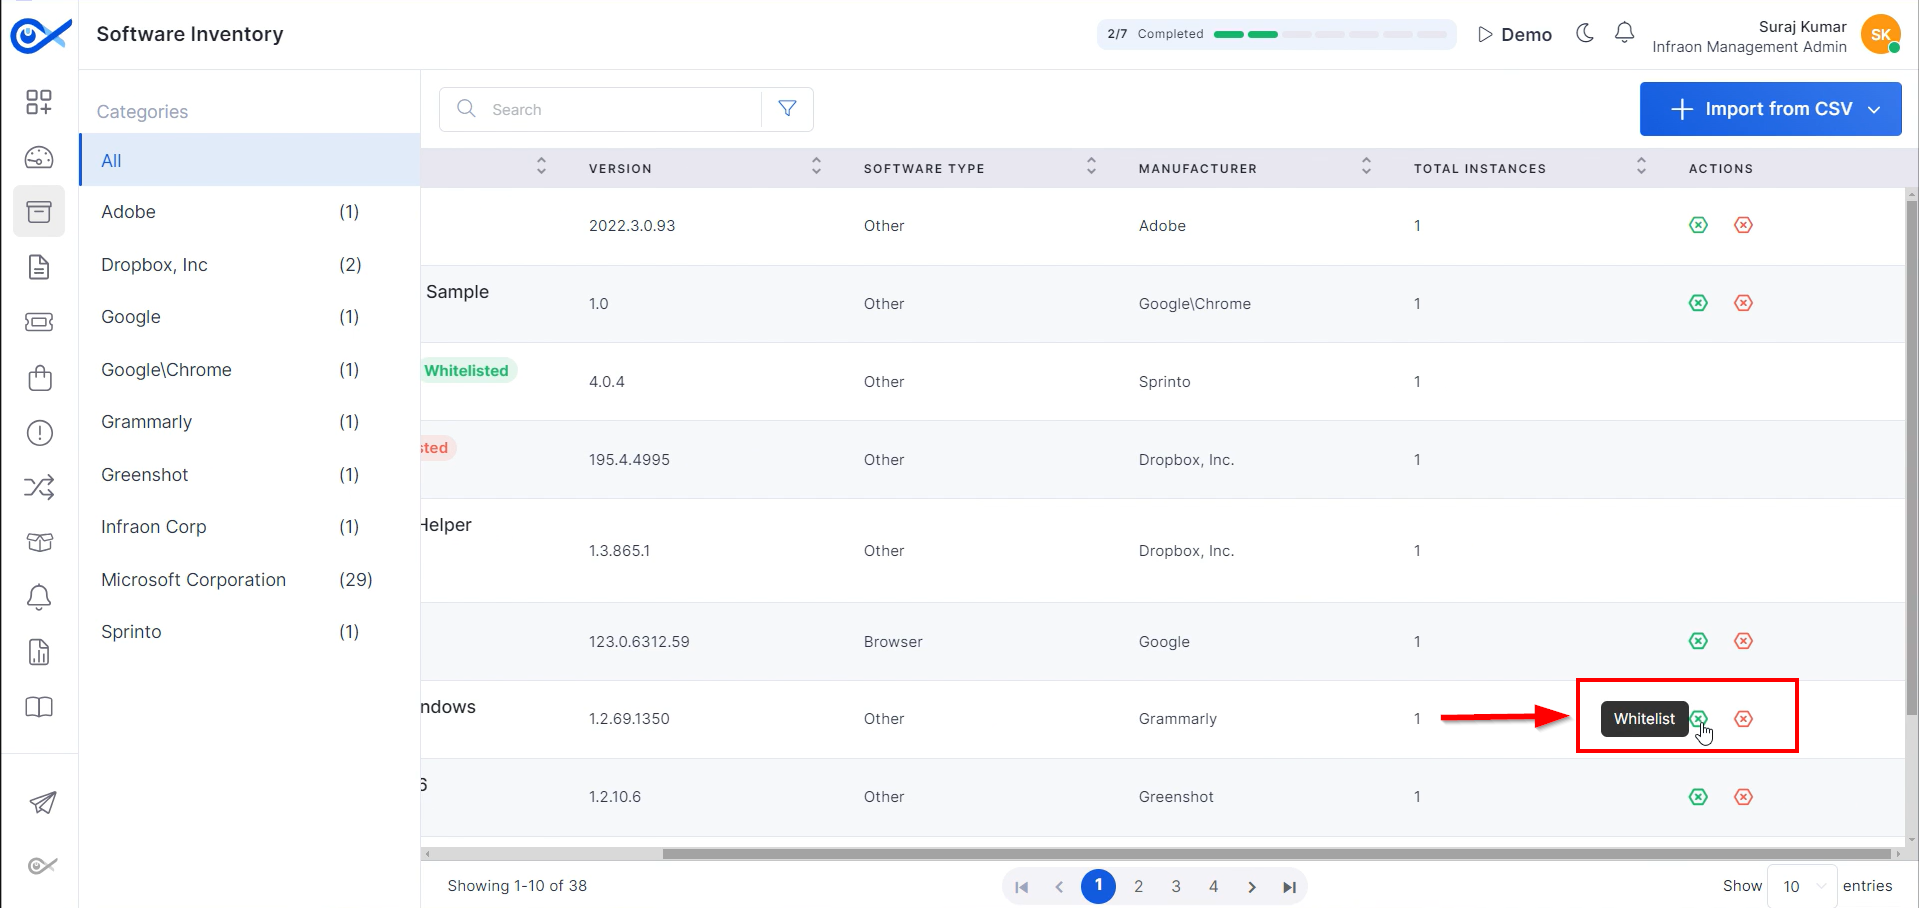
Step 1: To label software items as whitelisted or blacklisted, navigate to the software inventory page. Use the green icon to whitelist and the red icon to blacklist specific software.
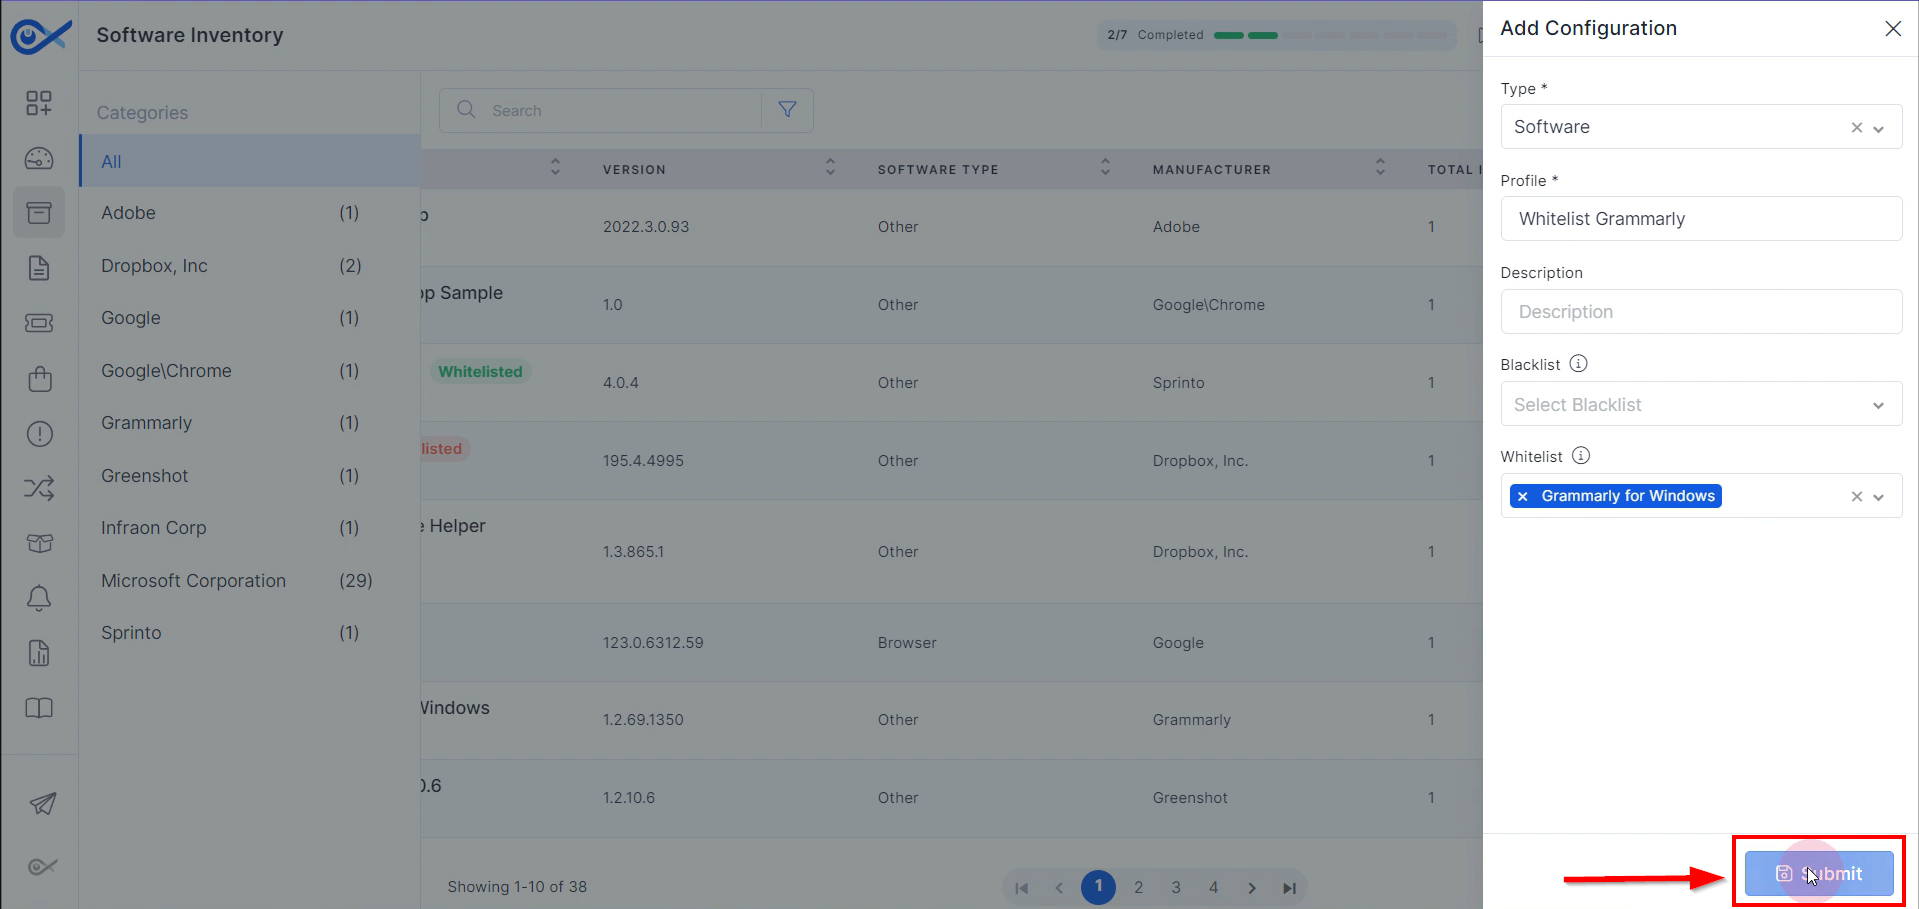
Step 2: After clicking on the whitelisting option, a configuration page will appear. Provide a profile for the specific software, including a description.
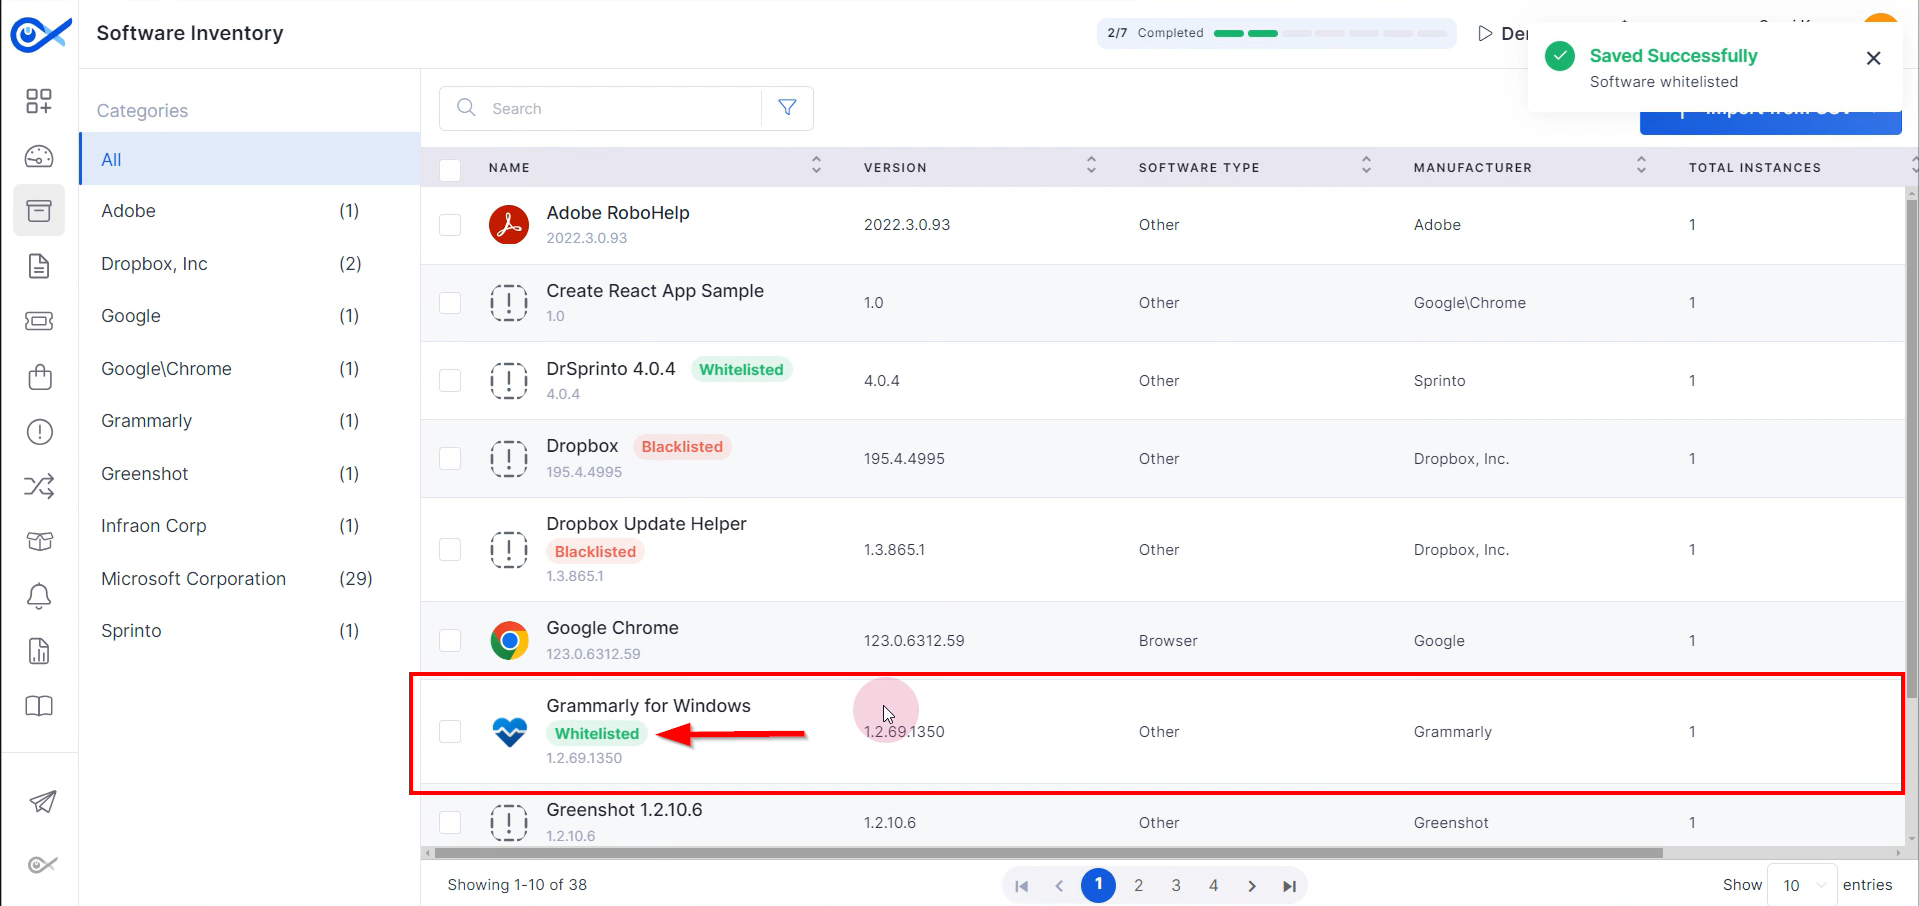
Step 3: After submitting, the software is labelled as whitelisted.
The process for adding software to the blacklist is identical to the process for whitelisting.
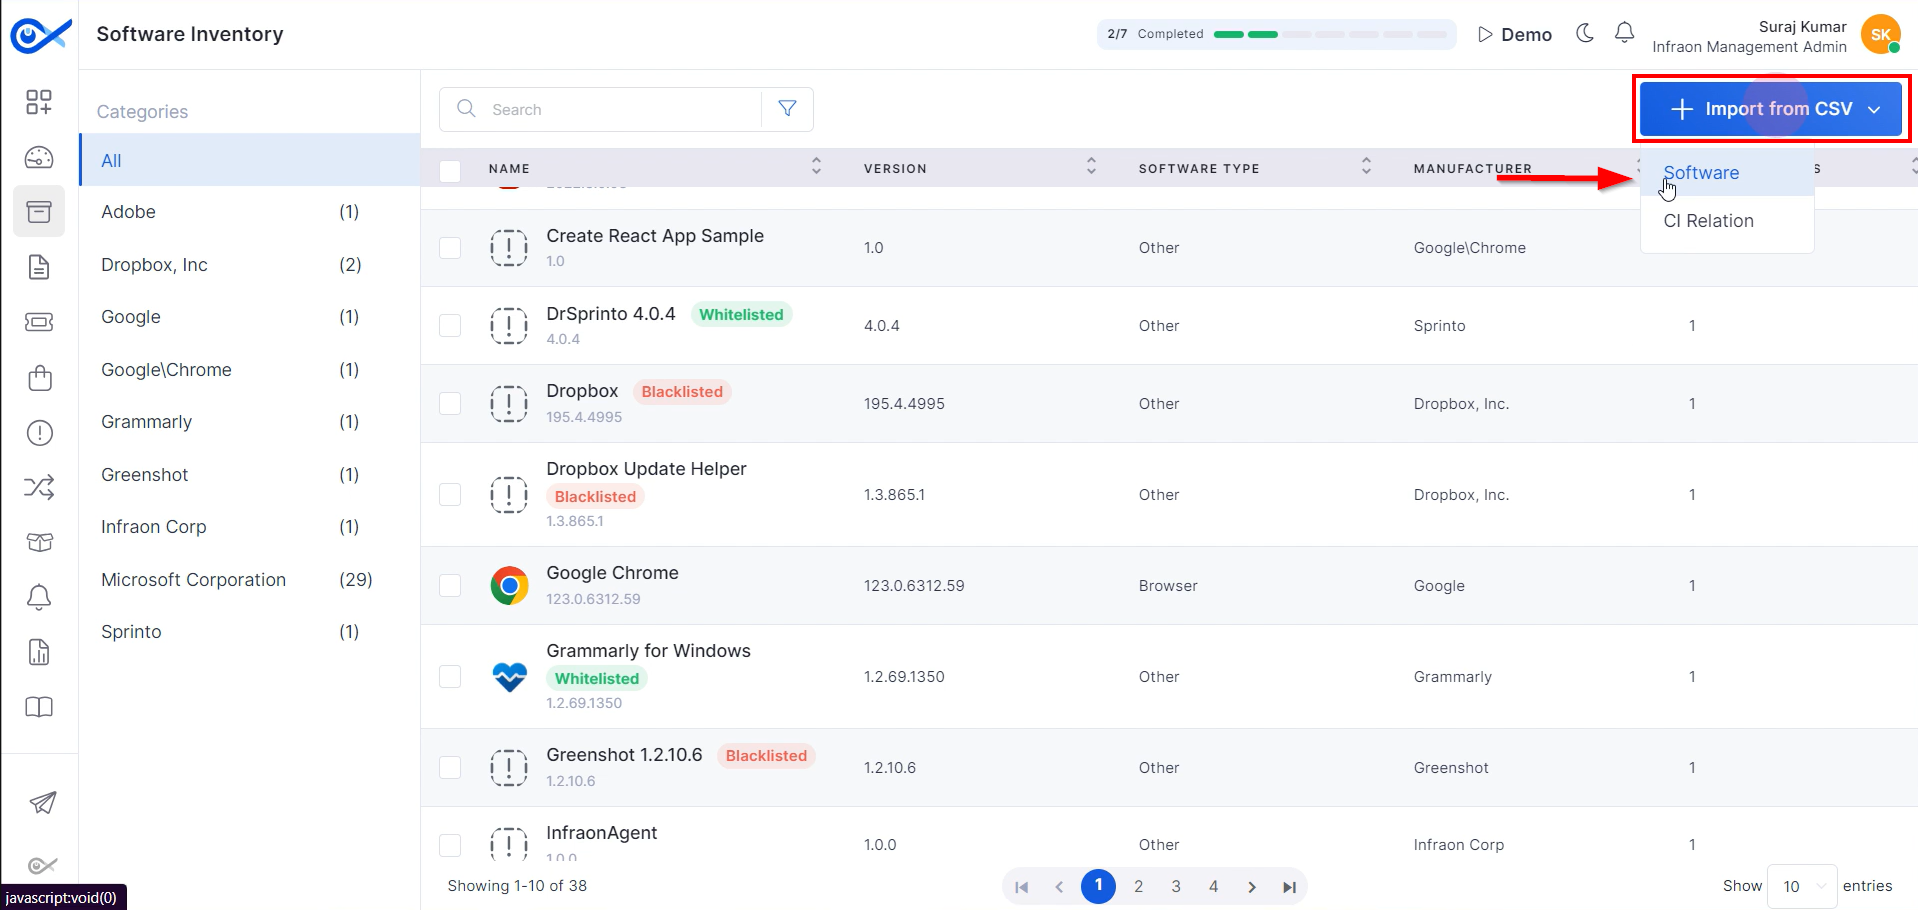
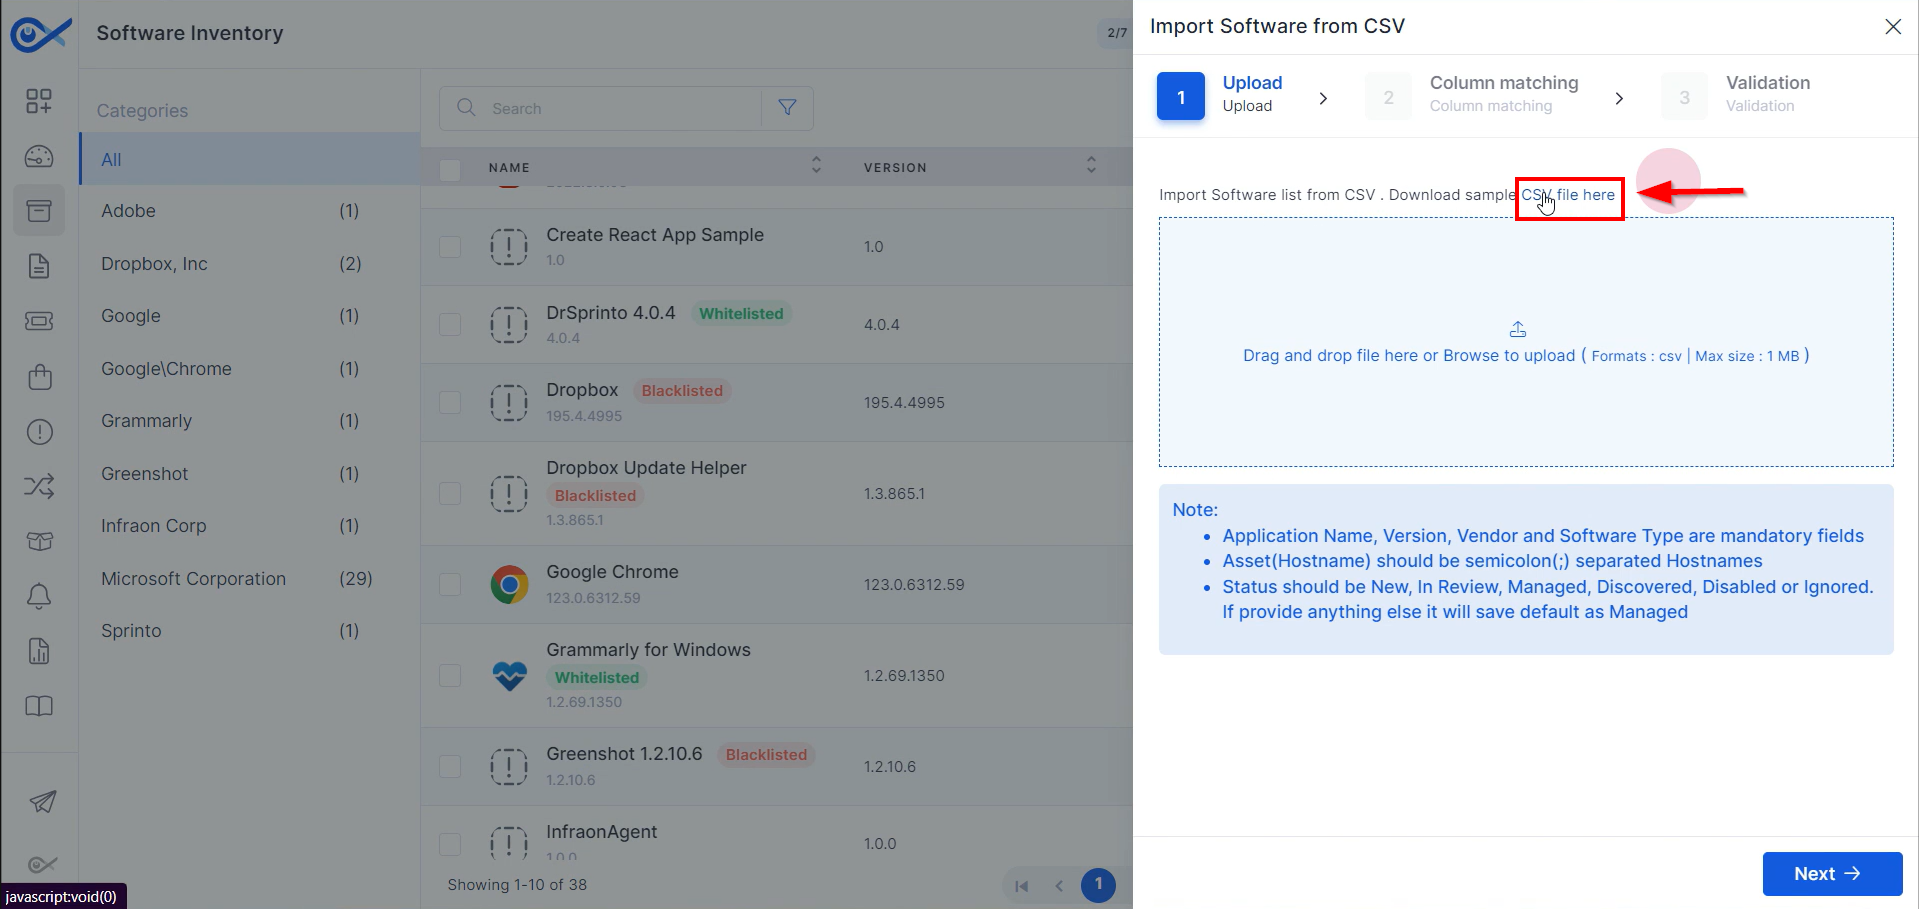
Step 1: Click on 'Import from CSV' at the screen's top right corner, and select "Software."
Step 2: Download the CSV template by clicking on "CSV file."
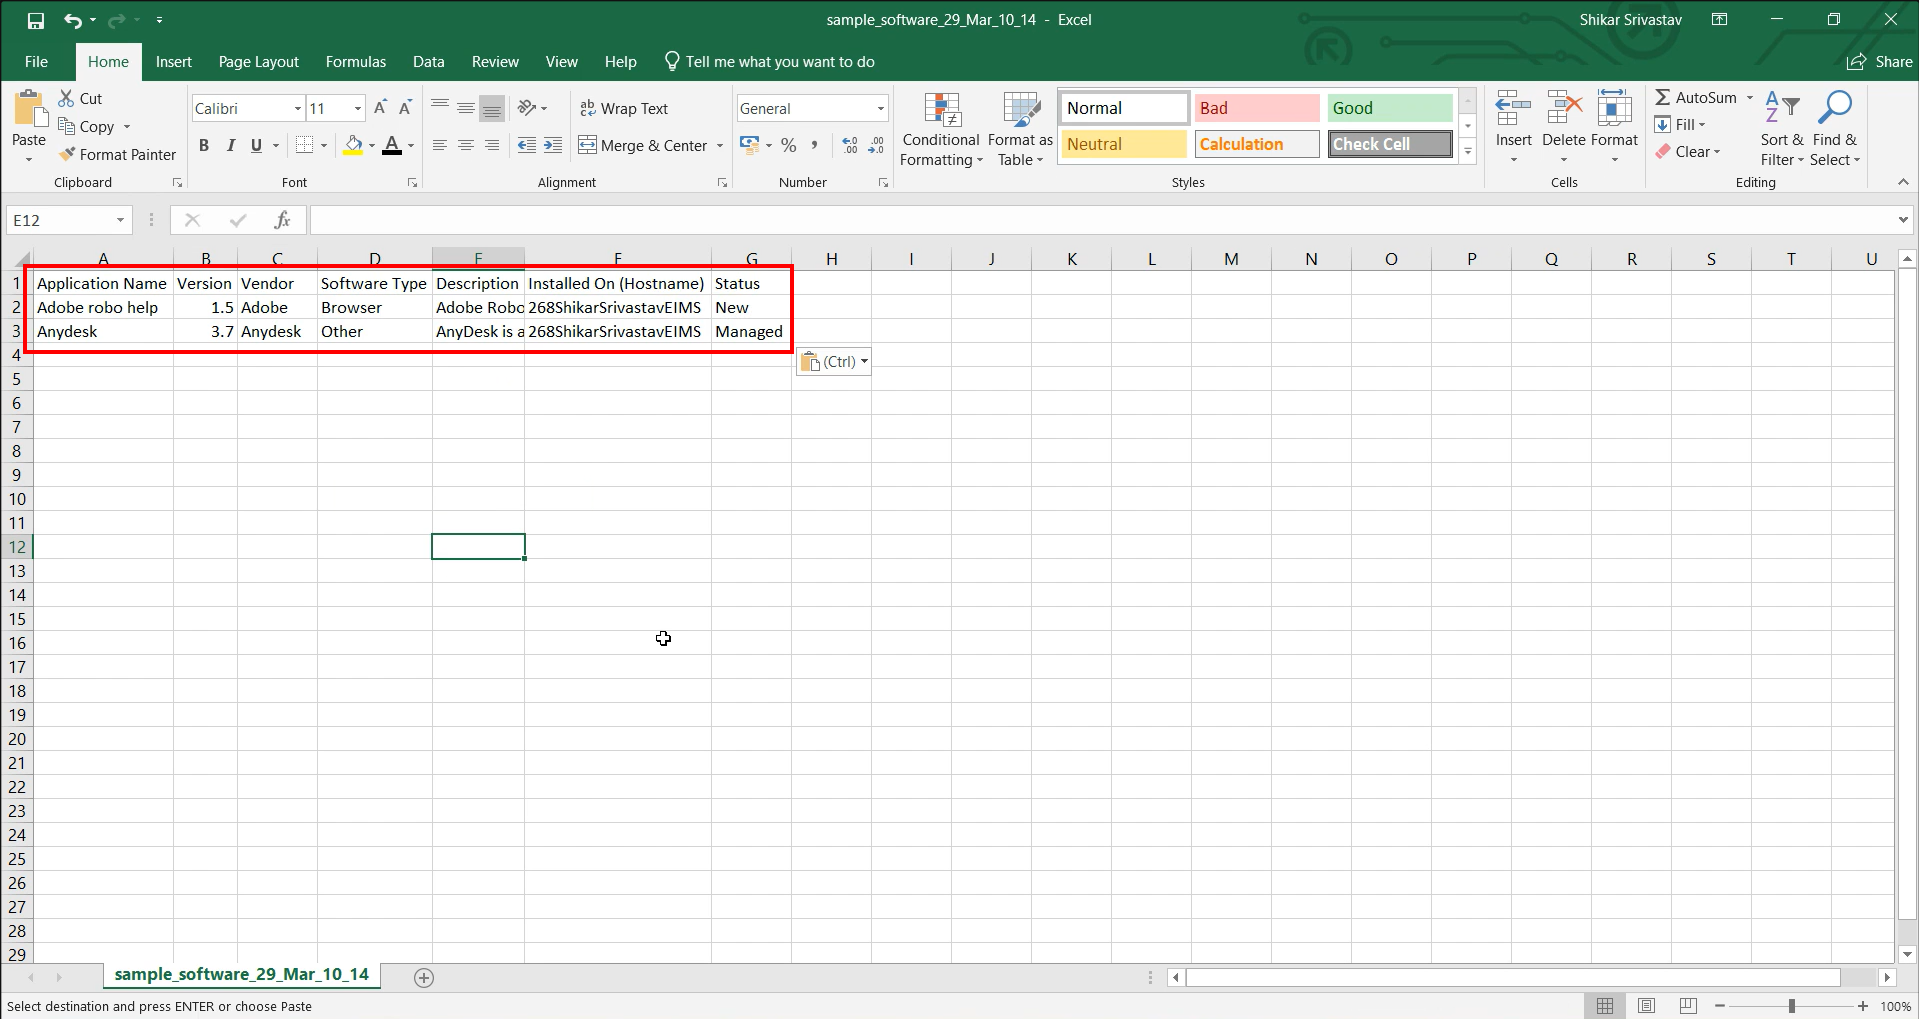
Step 3: Open the downloaded file and add the necessary details.
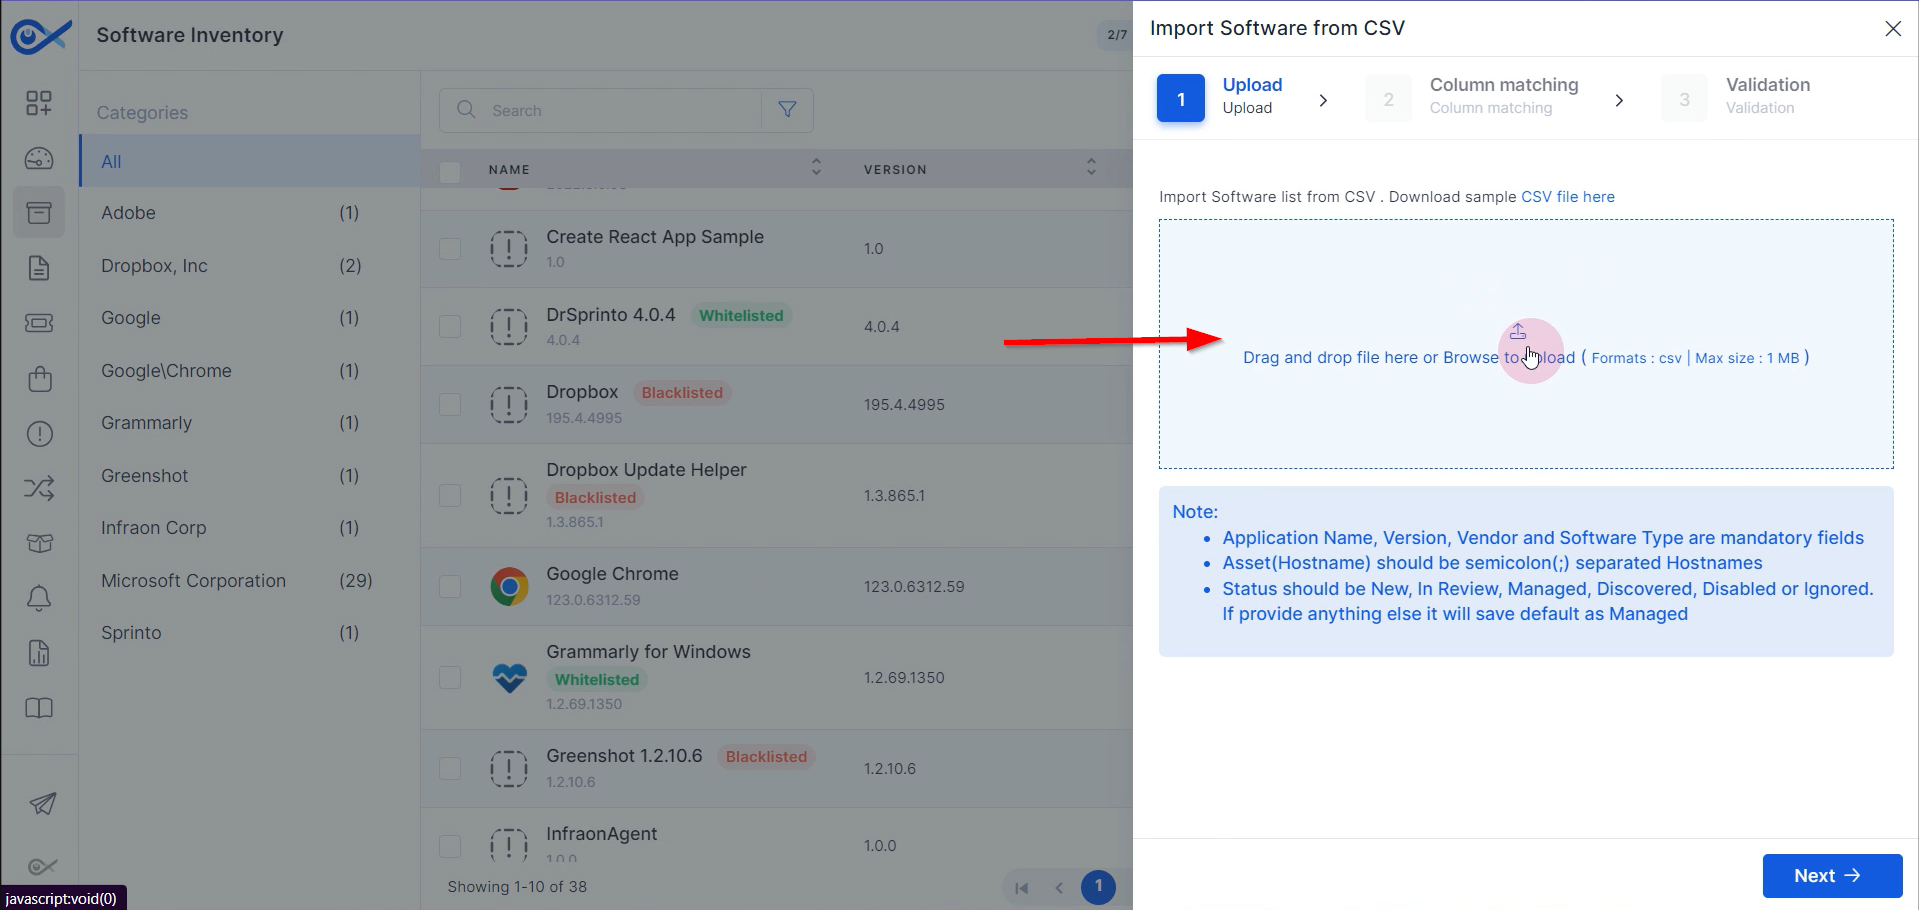
Step 4: Click "Upload" to upload the edited file.
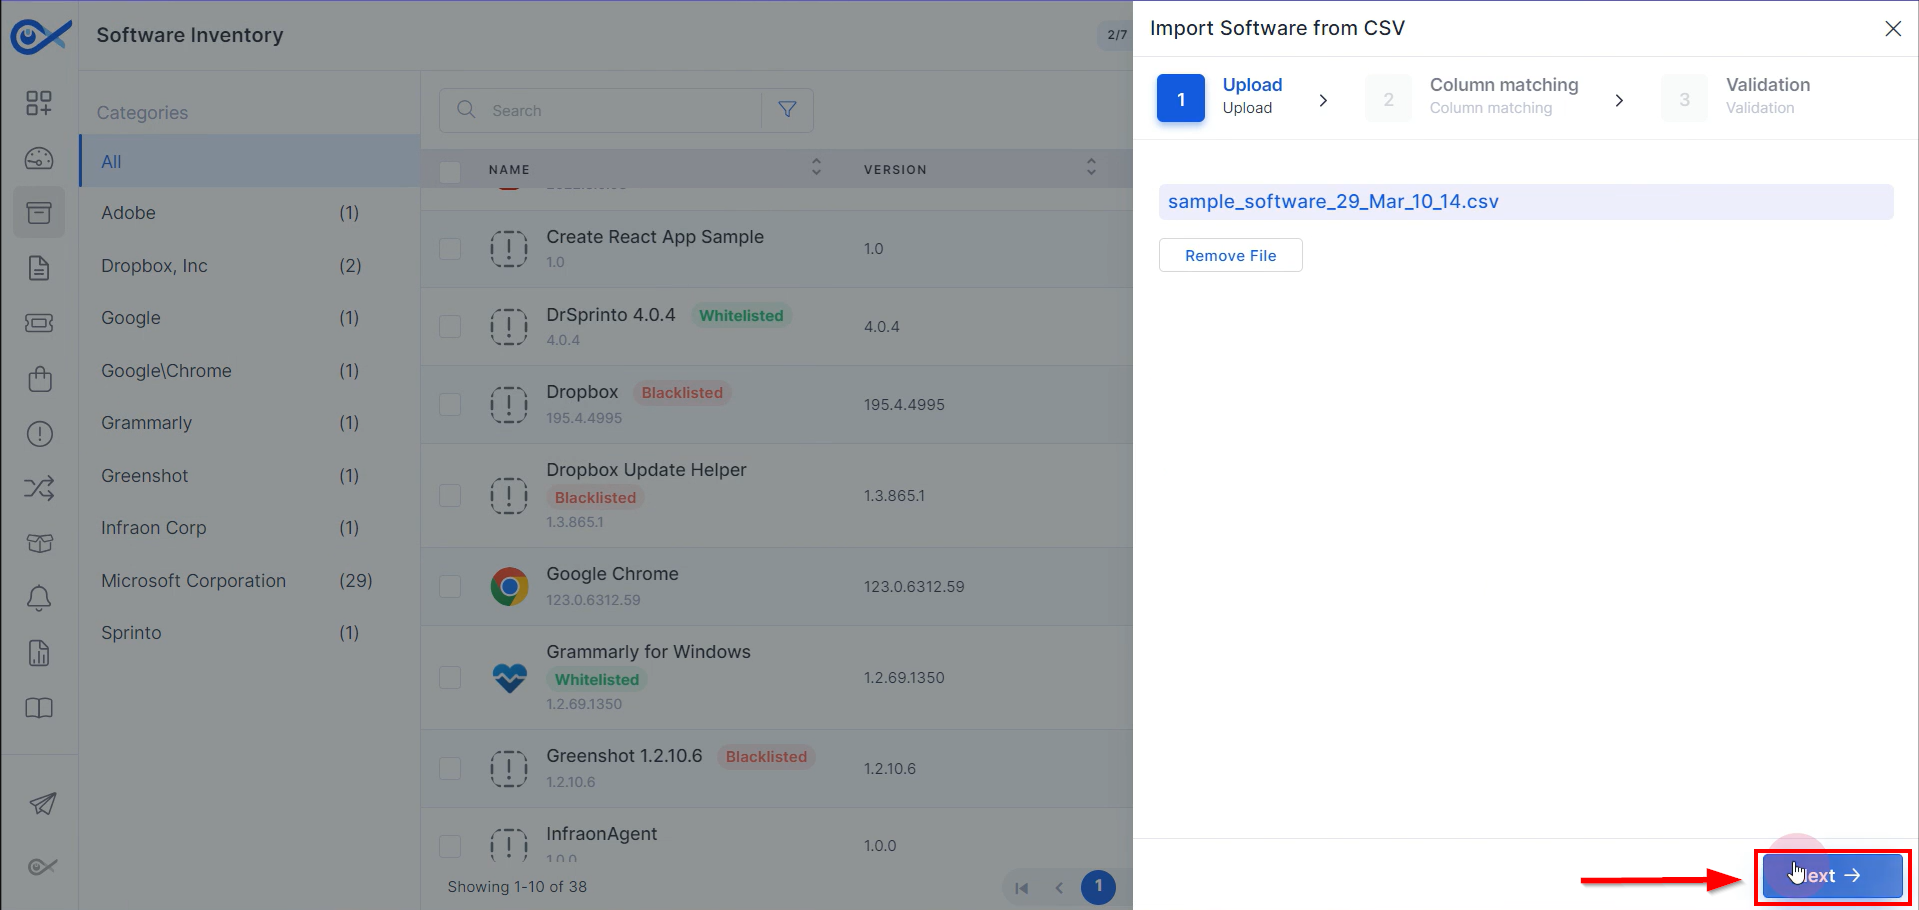
Step 5: Click “Next” to move forward.
Step 6: Match the mandatory fields to CSV columns as needed on the column matching page. Once done, click “Import” to complete the process.
Step 7: Proceed with the valid records to add the software details on the software details page.
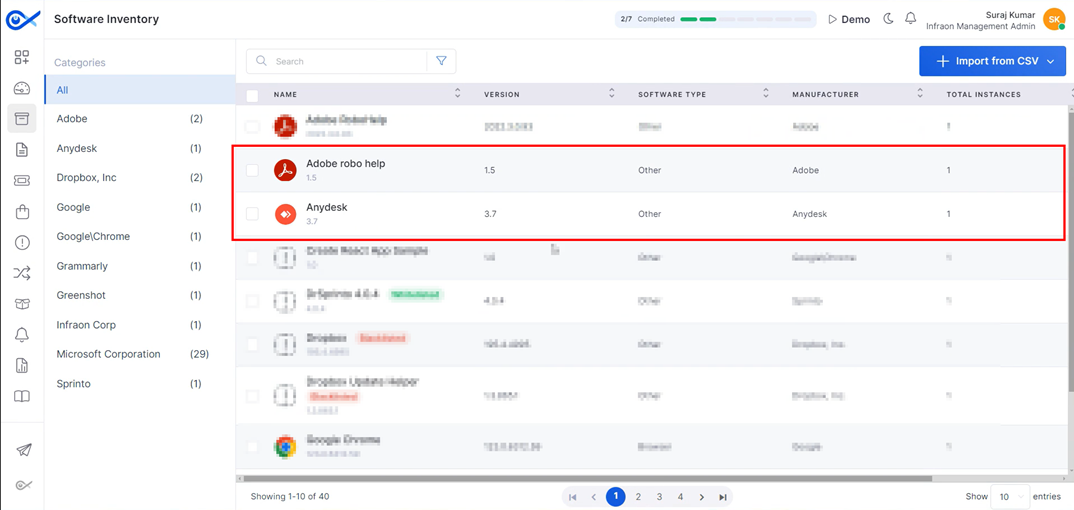
Step 8: Once the software has been added, it will be reflected on the software inventory page.
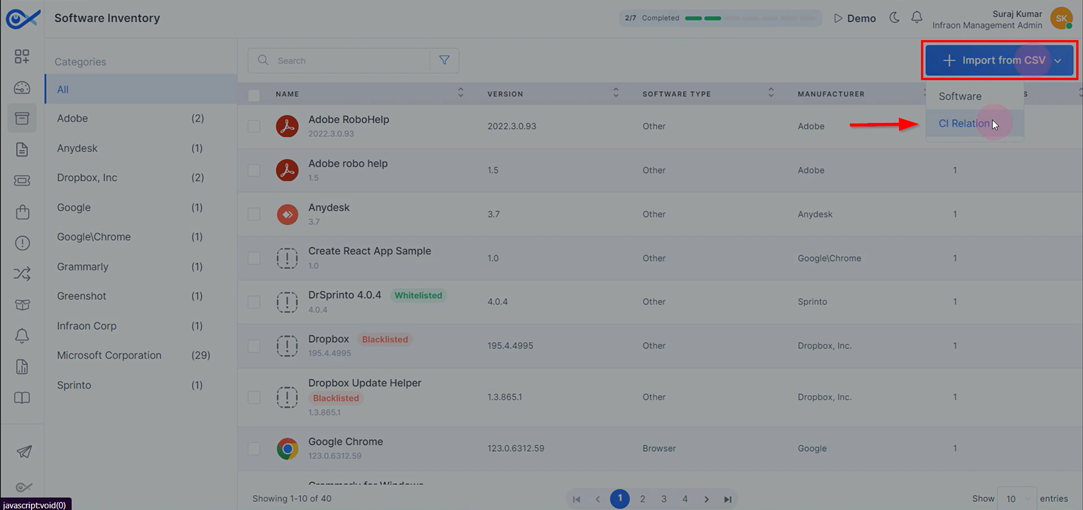
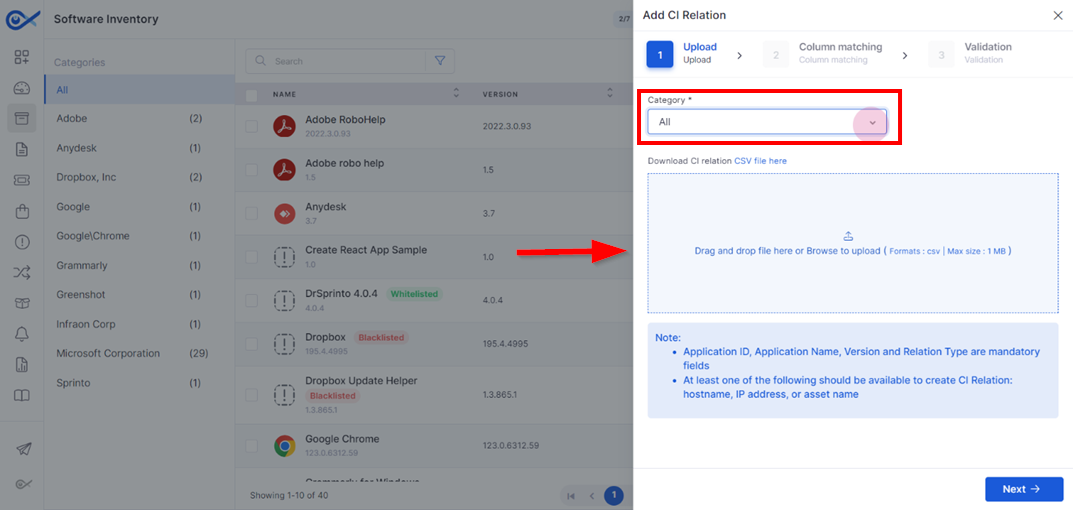
Step 1: Click on the “Import from CSV” option and select “CI Relation” to add the CI relation for the software listed on the software inventory page.
Step 2: Select the software category that best meets the technician's needs. Download the corresponding CSV file, fill in the details, and upload it after adding the CI relations.
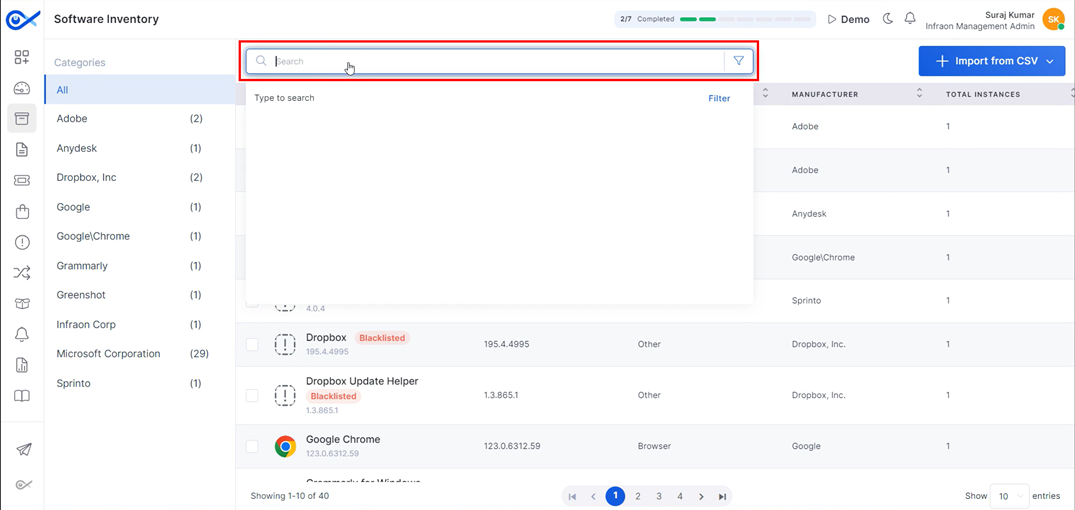
Locate the search bar at the top of the software inventory page. Use it to find software by name, hostname, or version number.
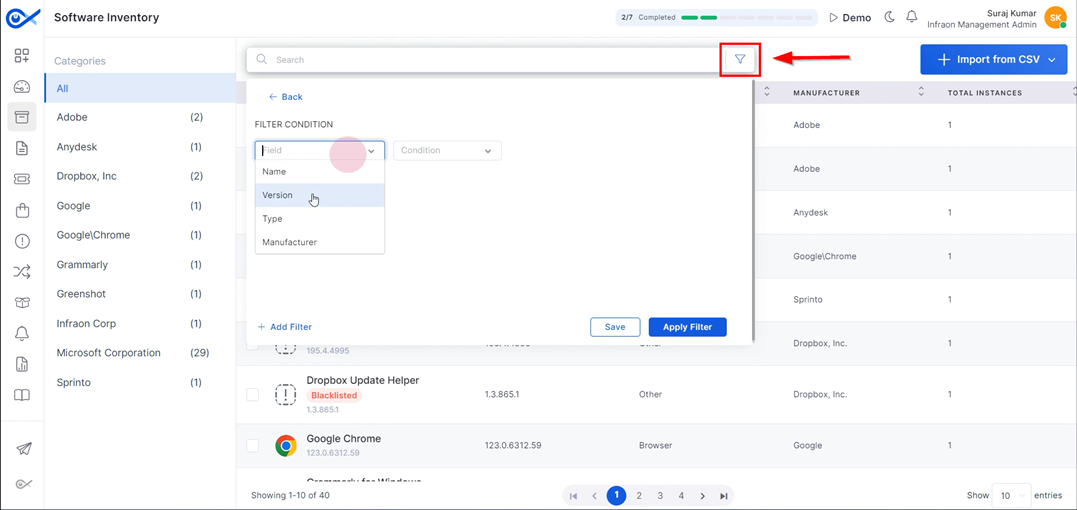
Filter software by name, version, type, or manufacturer. Customize filter conditions as needed. Save filter settings for future use.
Installed Devices Section
Establishing CI Relations
Views in Infraon
Whitelisting and Blacklisting Software
Importing Software via CSV
Adding CI Relation for Software
Searching and Filtering Software
Software License Management
This guide covers the software license module in the Asset module.
A software license outlines the permissions granted by software developers to users and details how the software should be used and paid for. The software license management page displays all software licenses captured by the Infraon agent.
Adding a Software License
There are two main methods for adding a software license: manually or importing from a CSV file. When an Infraon agent is installed on an asset, it automatically captures the operating system license of that asset.
Manual Method
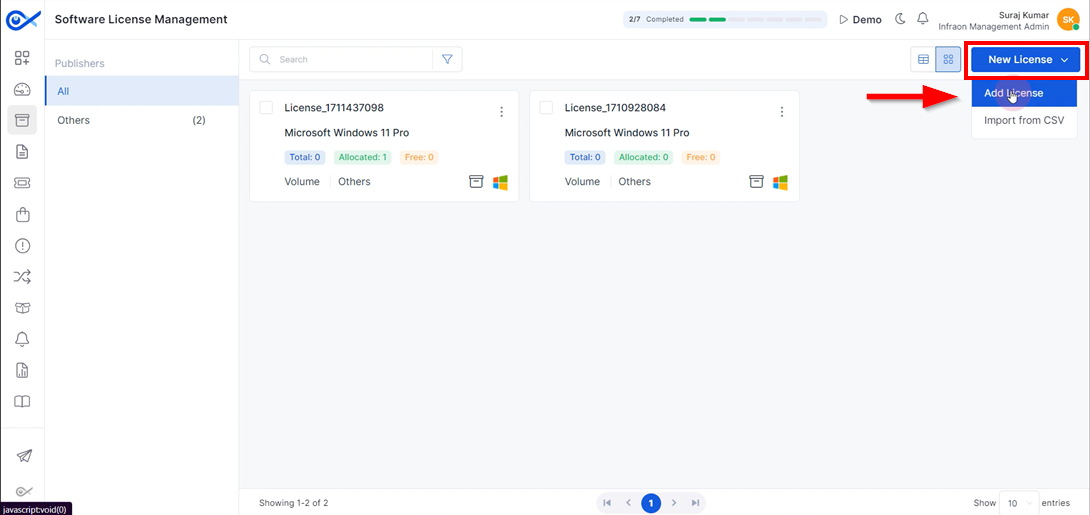
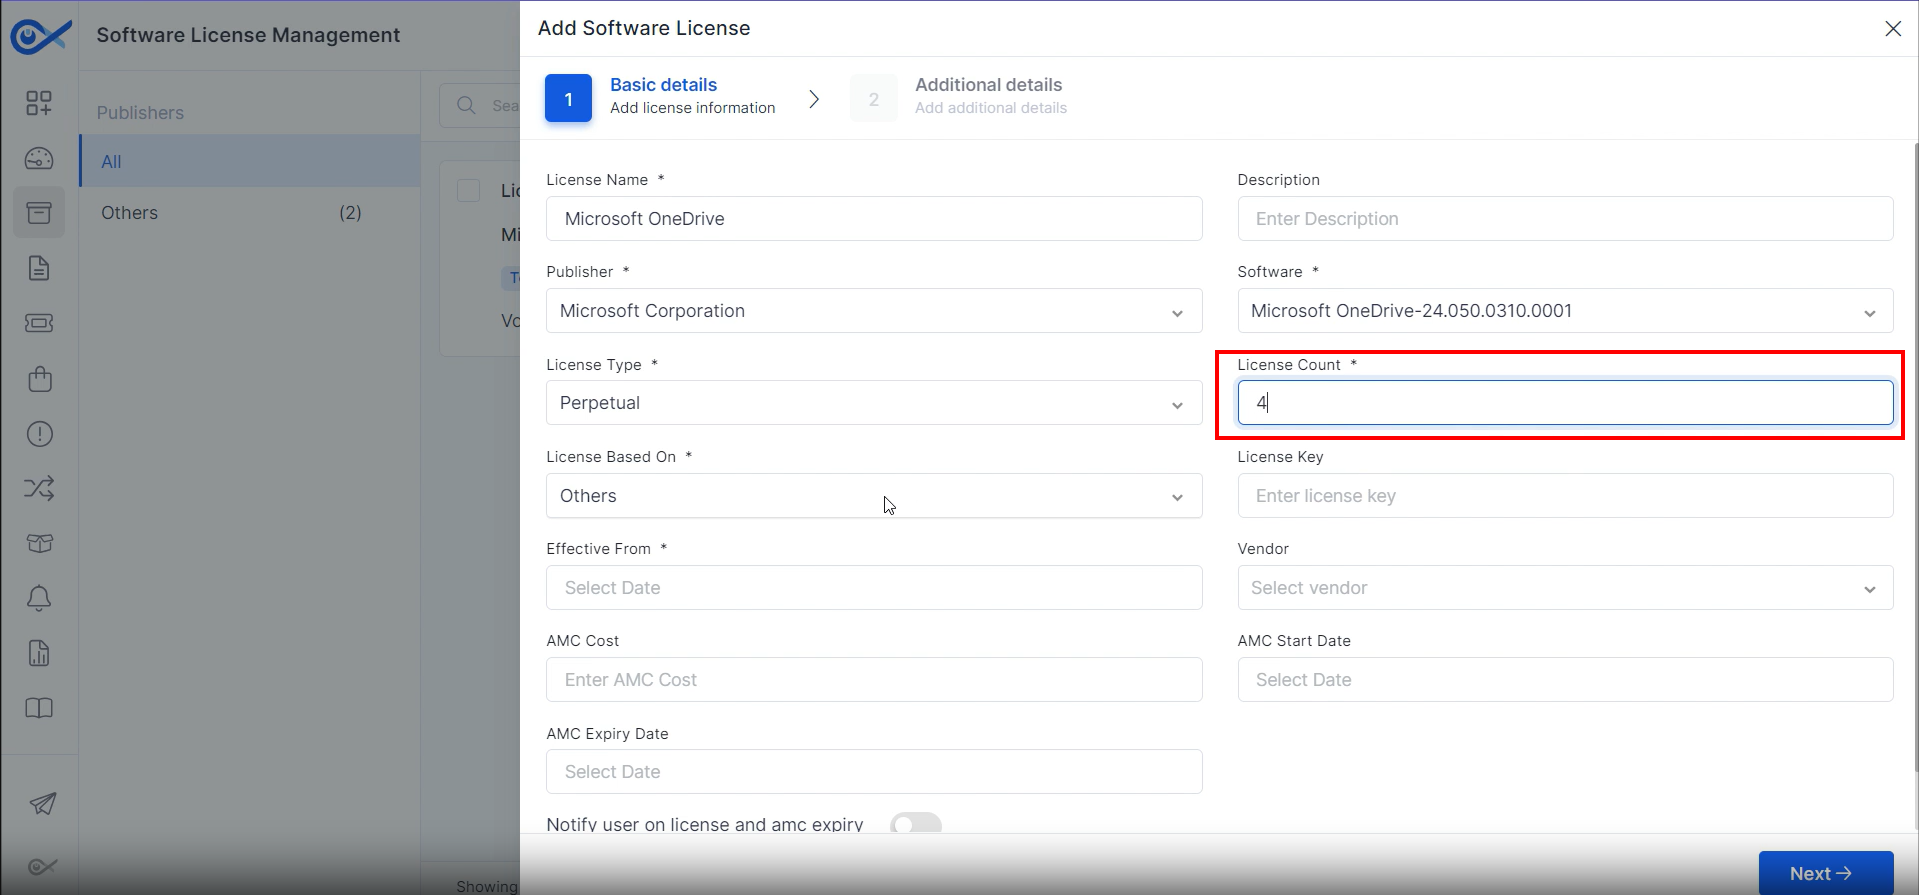
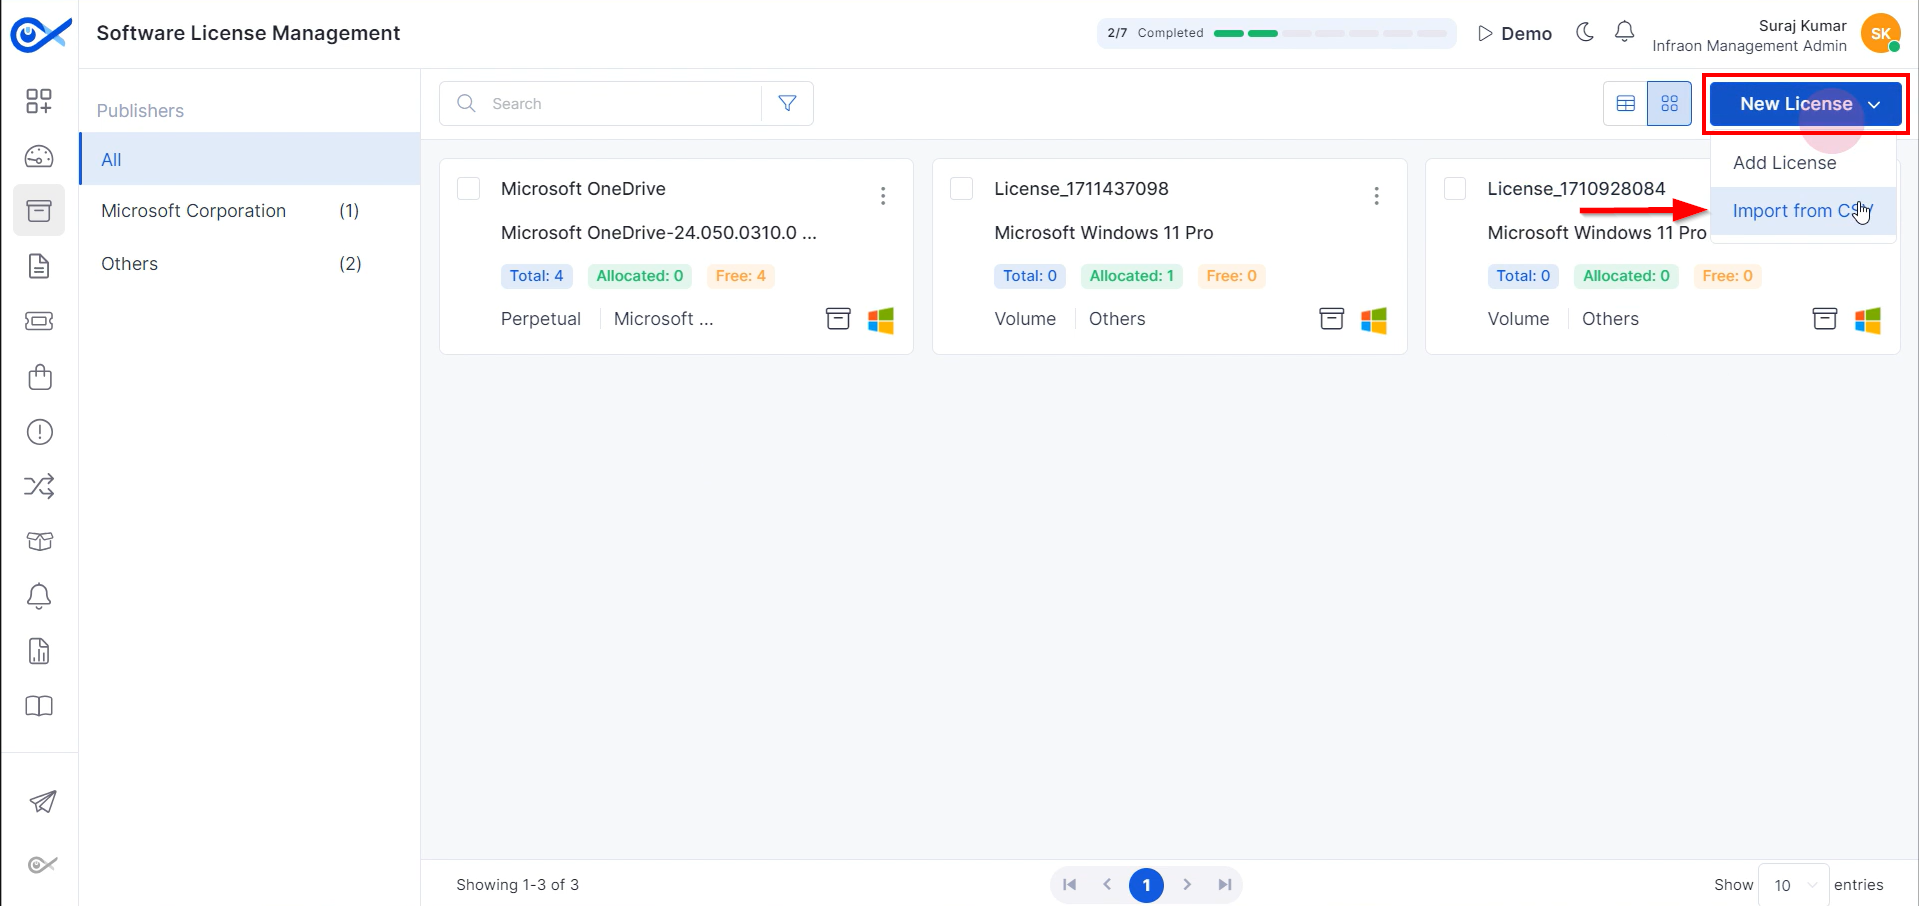
Step 1: Click “New License” at the top right corner of the page and select “Add License.”
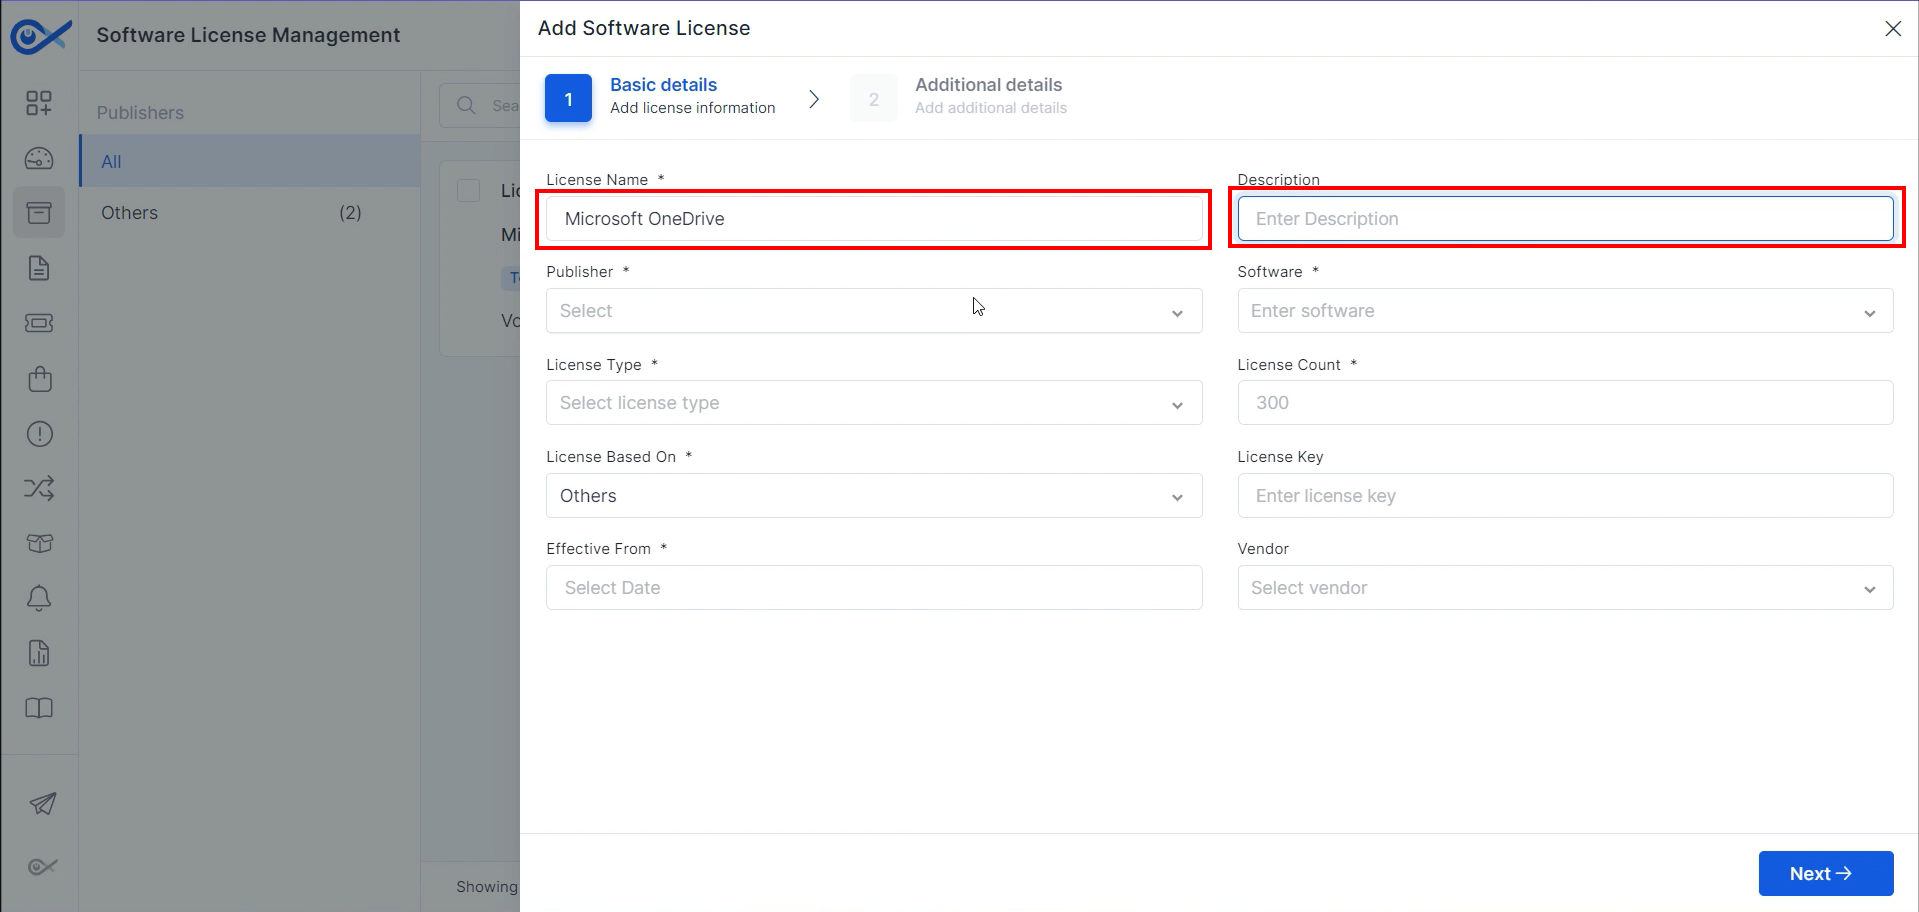
Step 2: Add the license information in the Basic Details tab. Begin with the license name and provide a description.
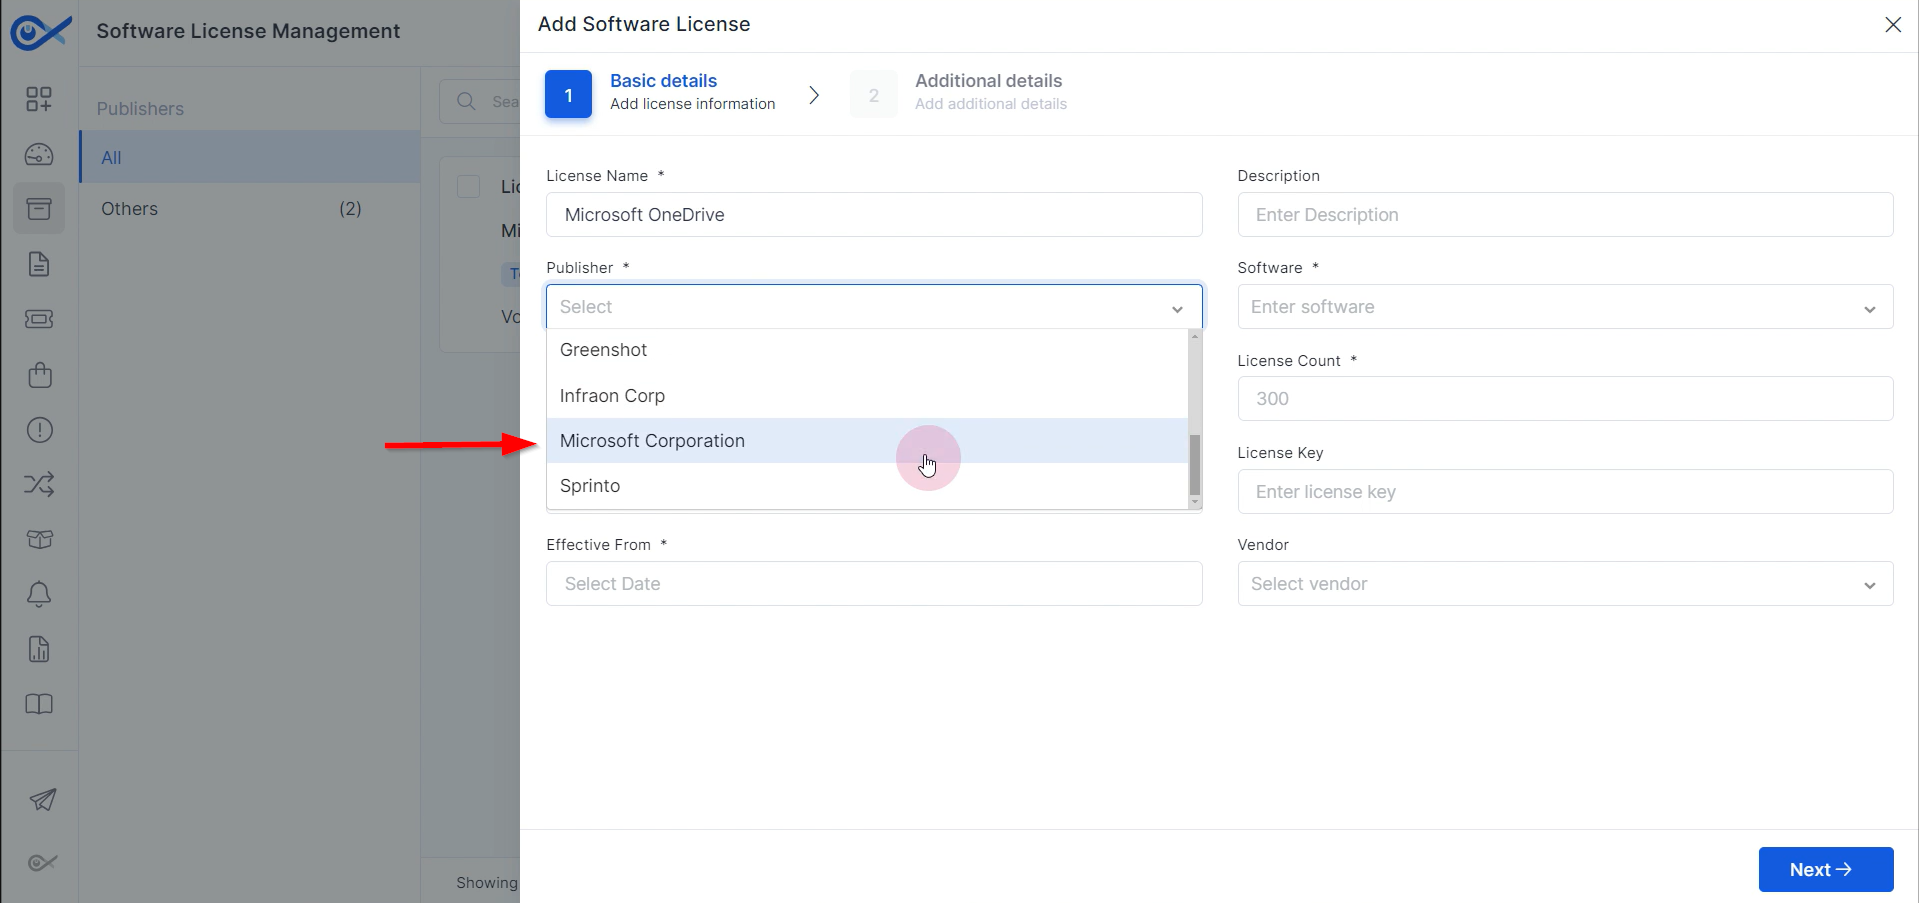
Step 3: Add the publisher from the dropdown list, which displays all the software added.
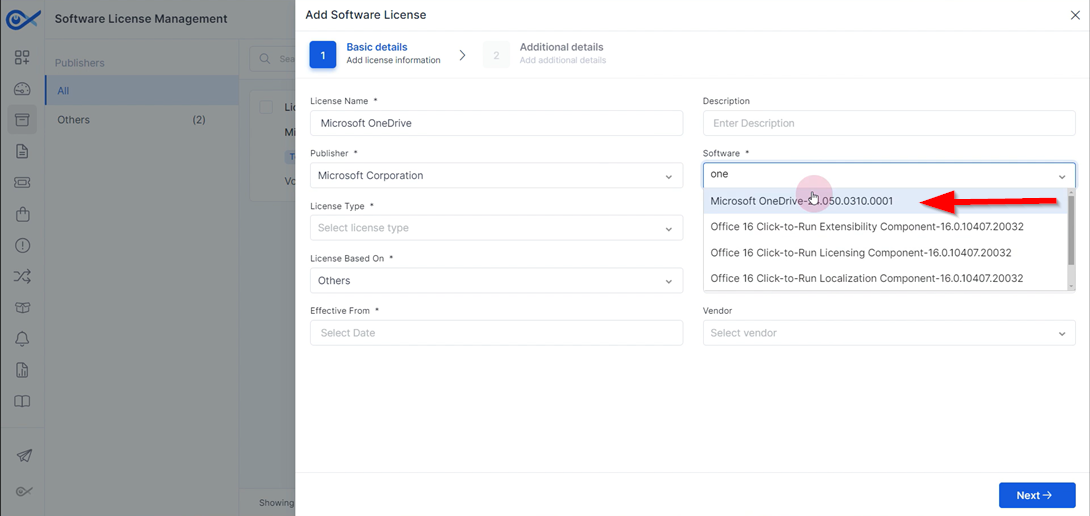
Step 4: After selecting the publisher, choose the software for which the license has been generated.
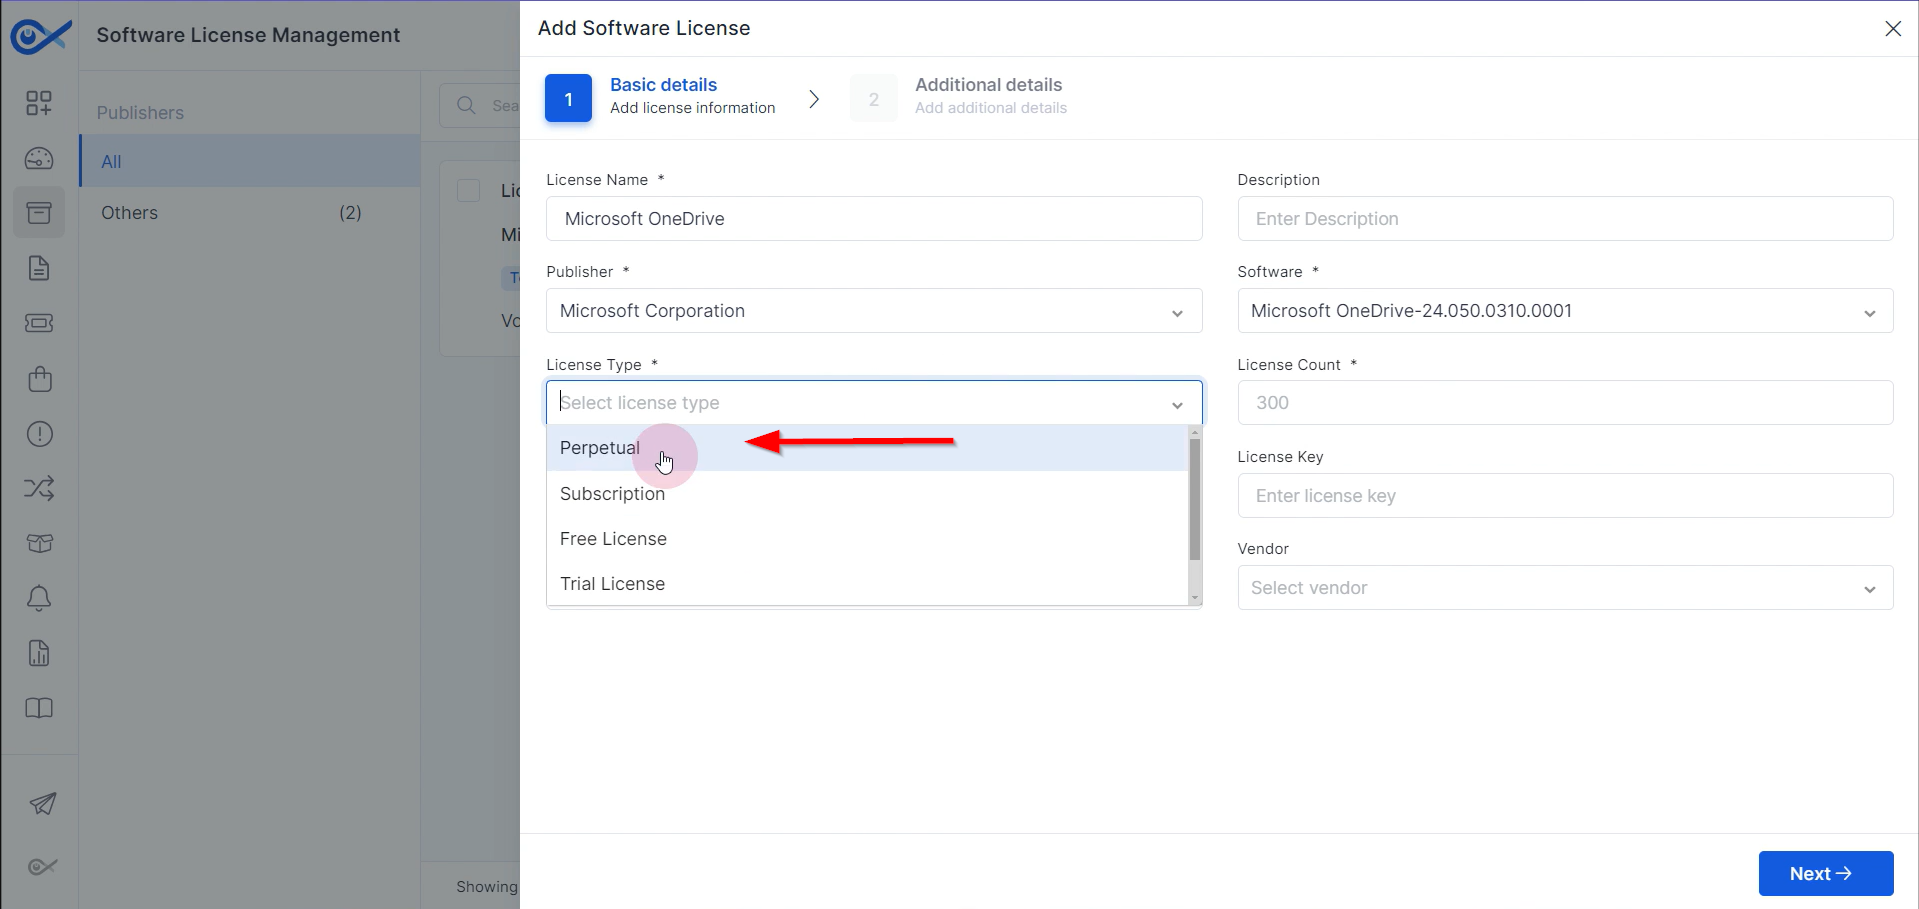
Step 5: Select the license type. Infraon offers a perpetual subscription-free trial license and volume license. Choose according to requirements.
Step 6: Choose the desired license count. License count refers to the total number of software licenses owned or allocated by an organization for the authorized use of specific software products or services.
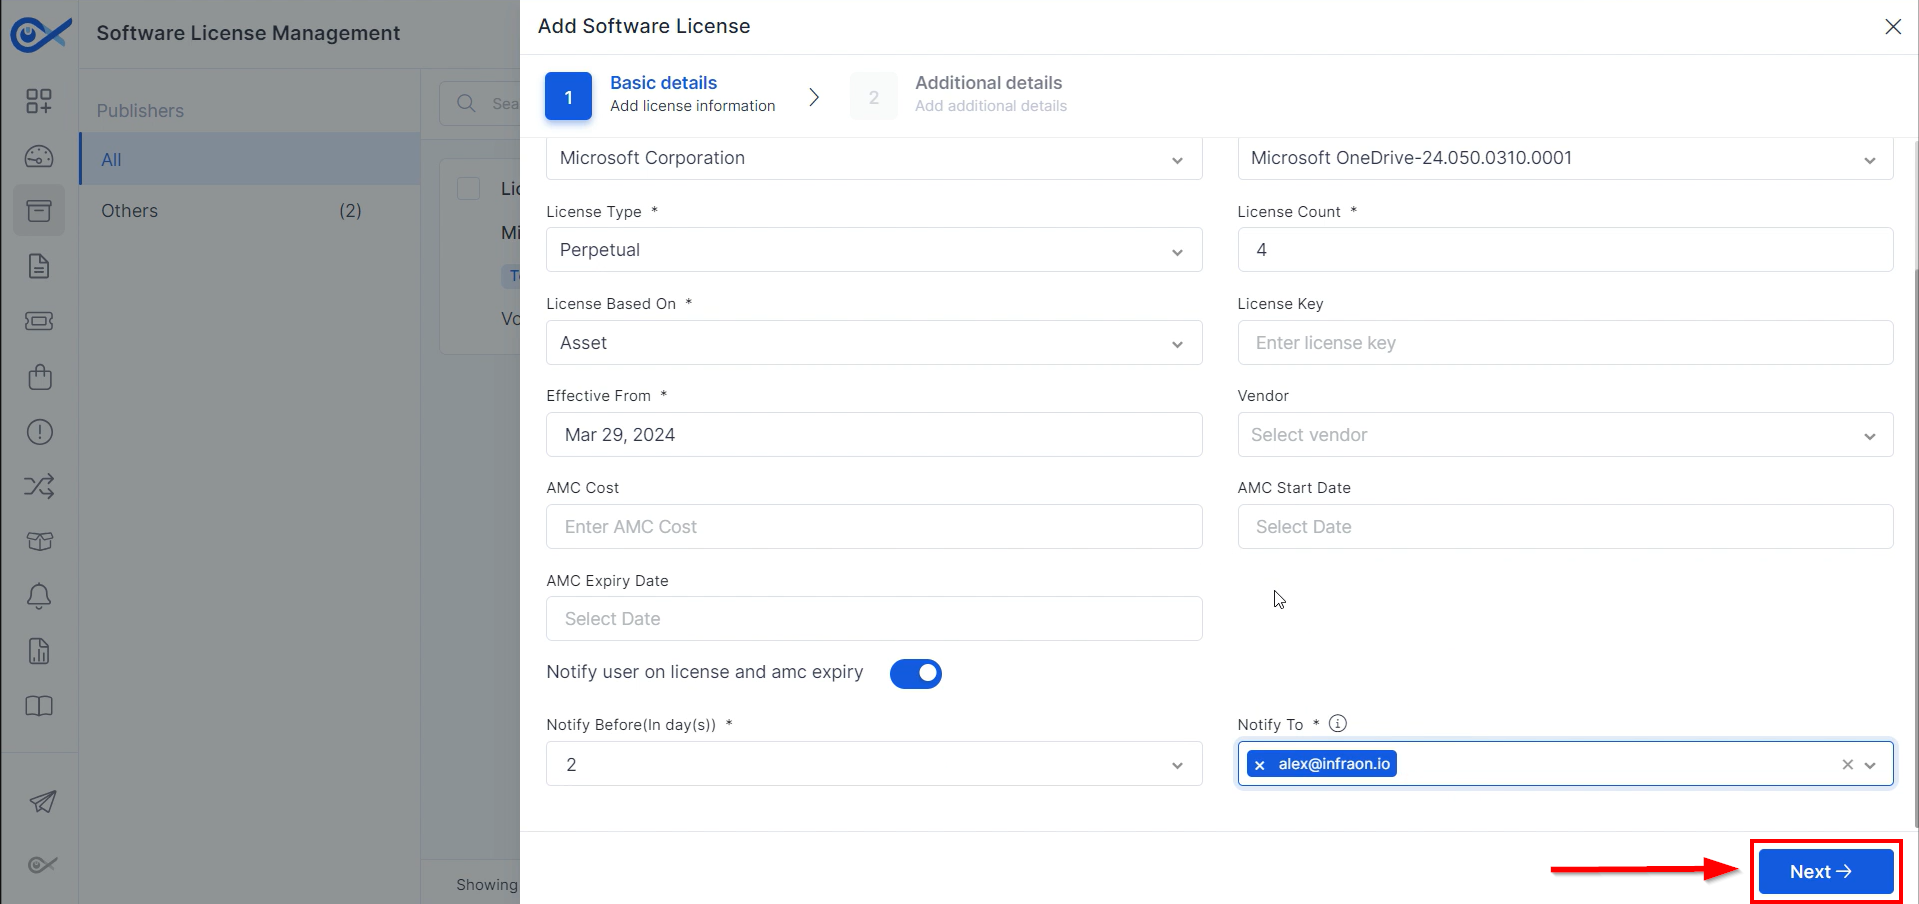
Step 7: If standard license options are insufficient, create a custom license based on asset, user, or other criteria. Provide a license key if available. Specify the license start date. Include vendor details, AMC cost, and start and end dates if applicable. Set up license and AMC expiration notifications, choosing recipients and notification timing. Once complete, click “Next.”
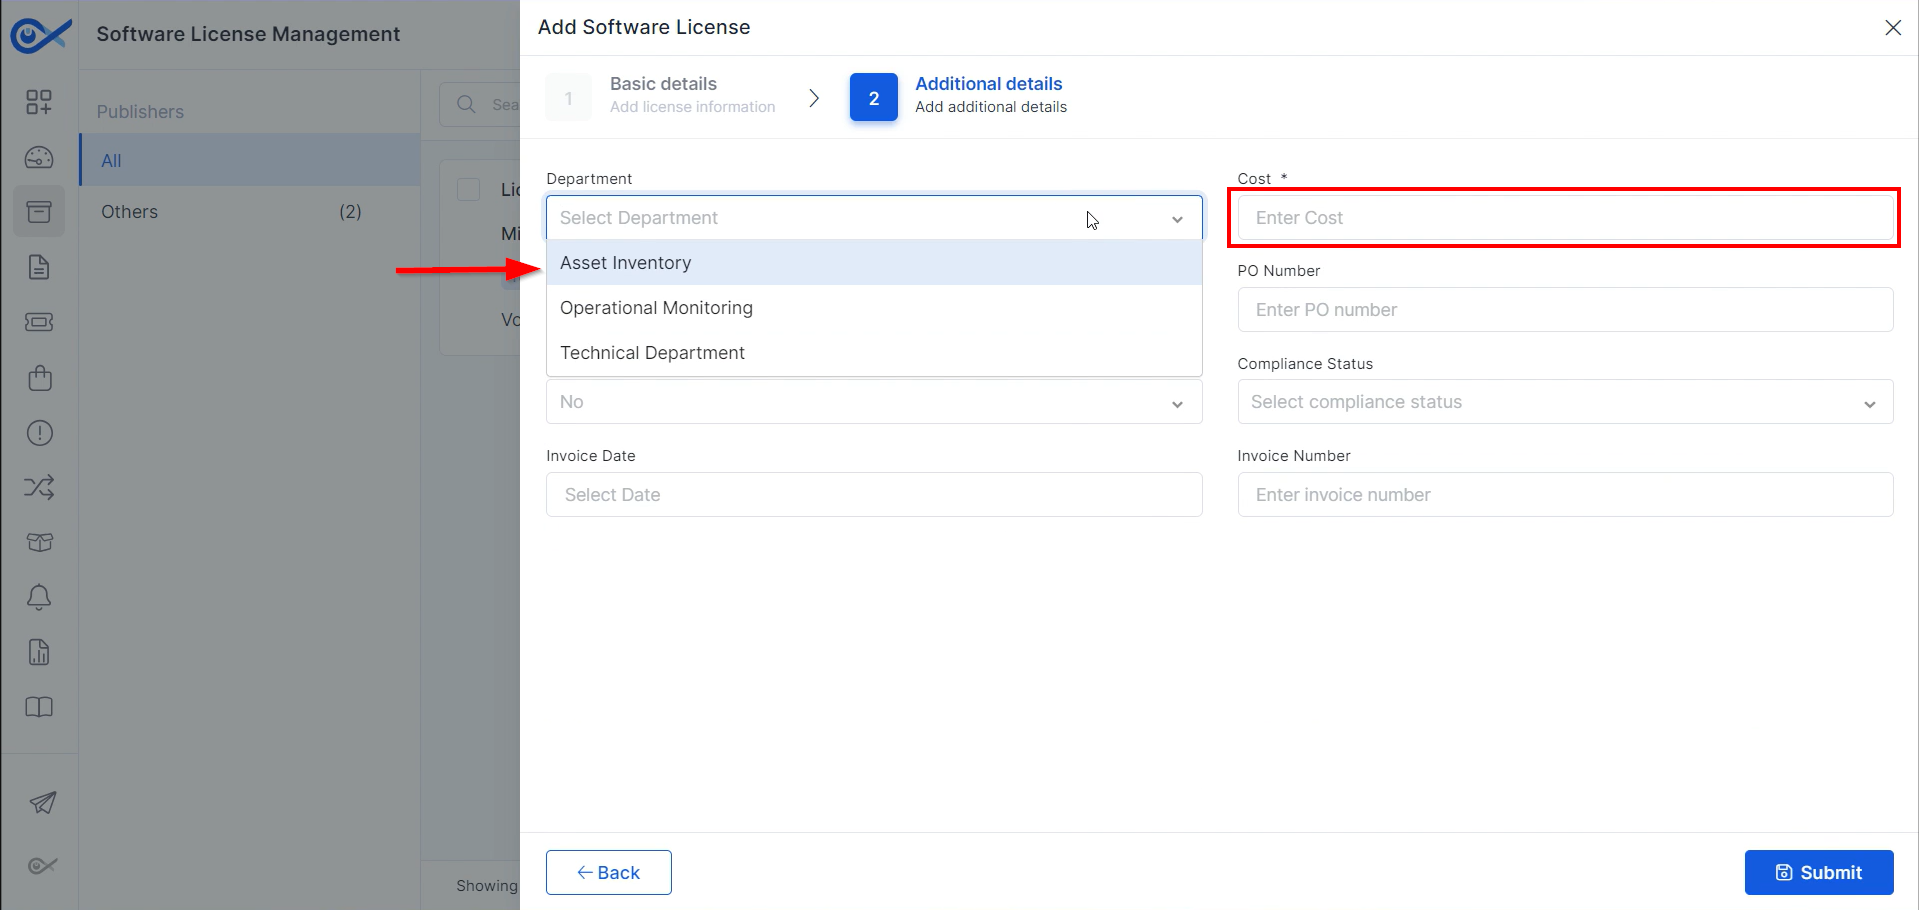
Step 8: Add the department name and cost of the license to map the license to a particular department in the additional details tab.
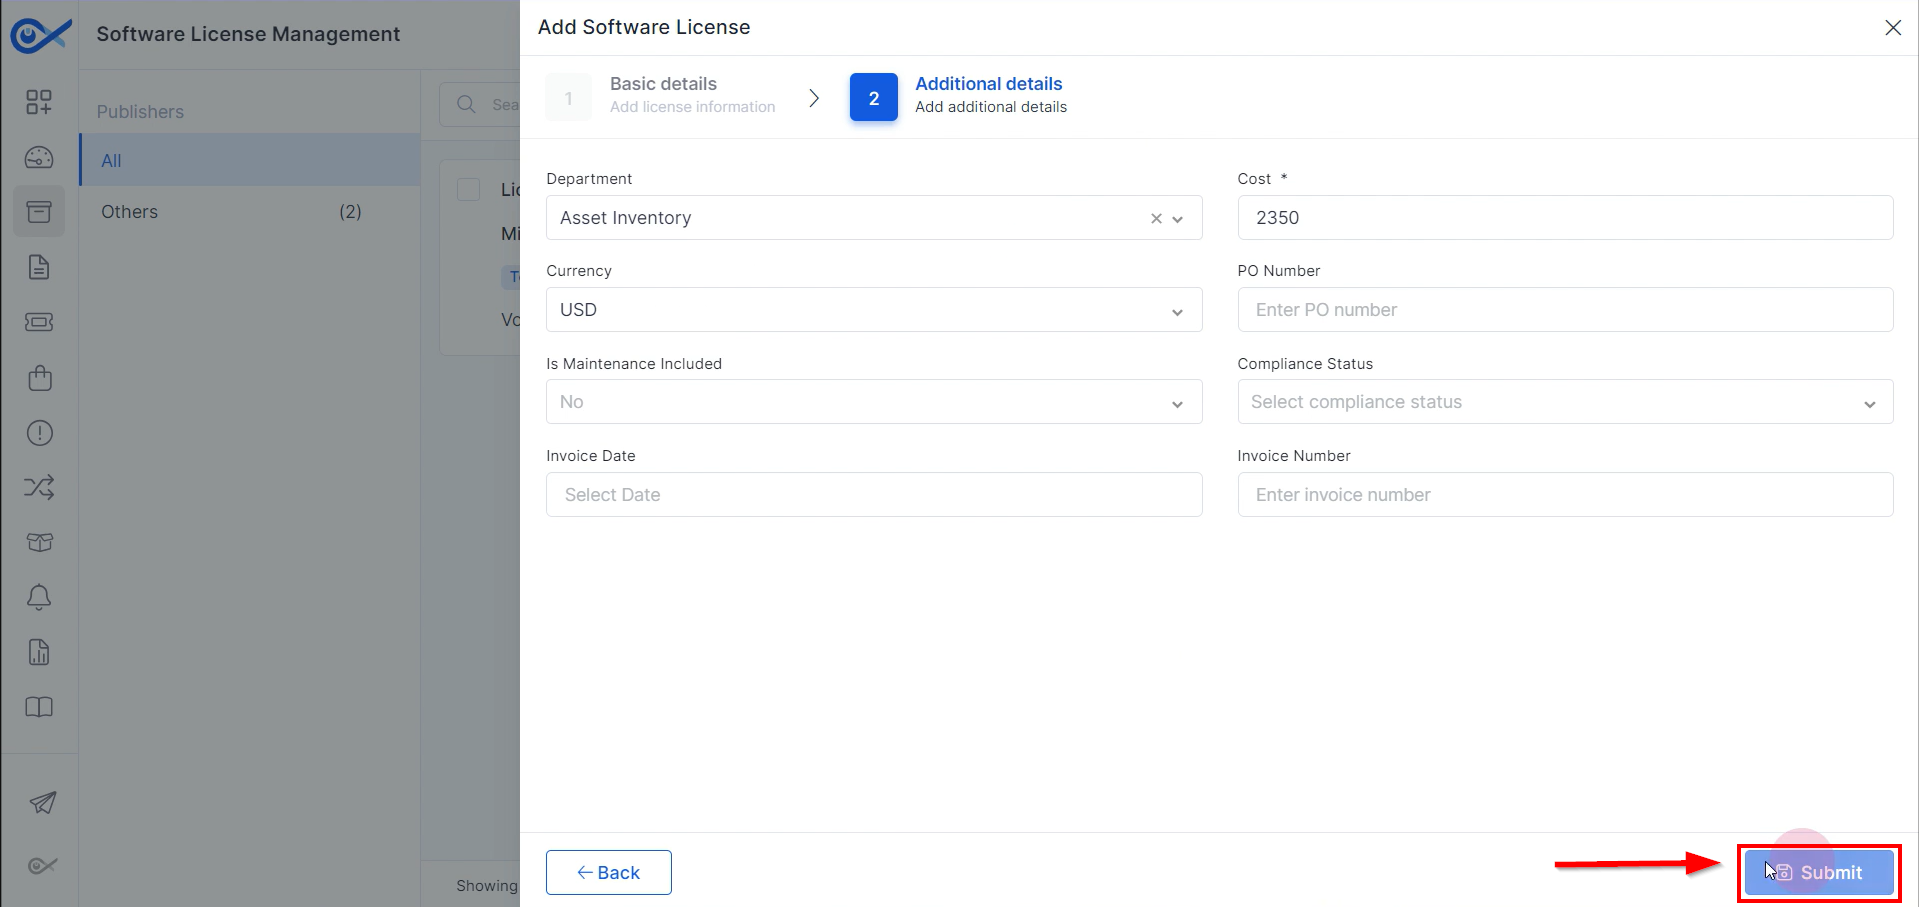
Step 9: Select the currency, include the PO number, and note the compliance status, invoice date, and invoice number if applicable.
After inputting all details, click “Submit.”
The license will then be added to the software license management tab, where it can be viewed.
Step 1: Click “New License” at the top right corner of the page and select “Import from CSV.”
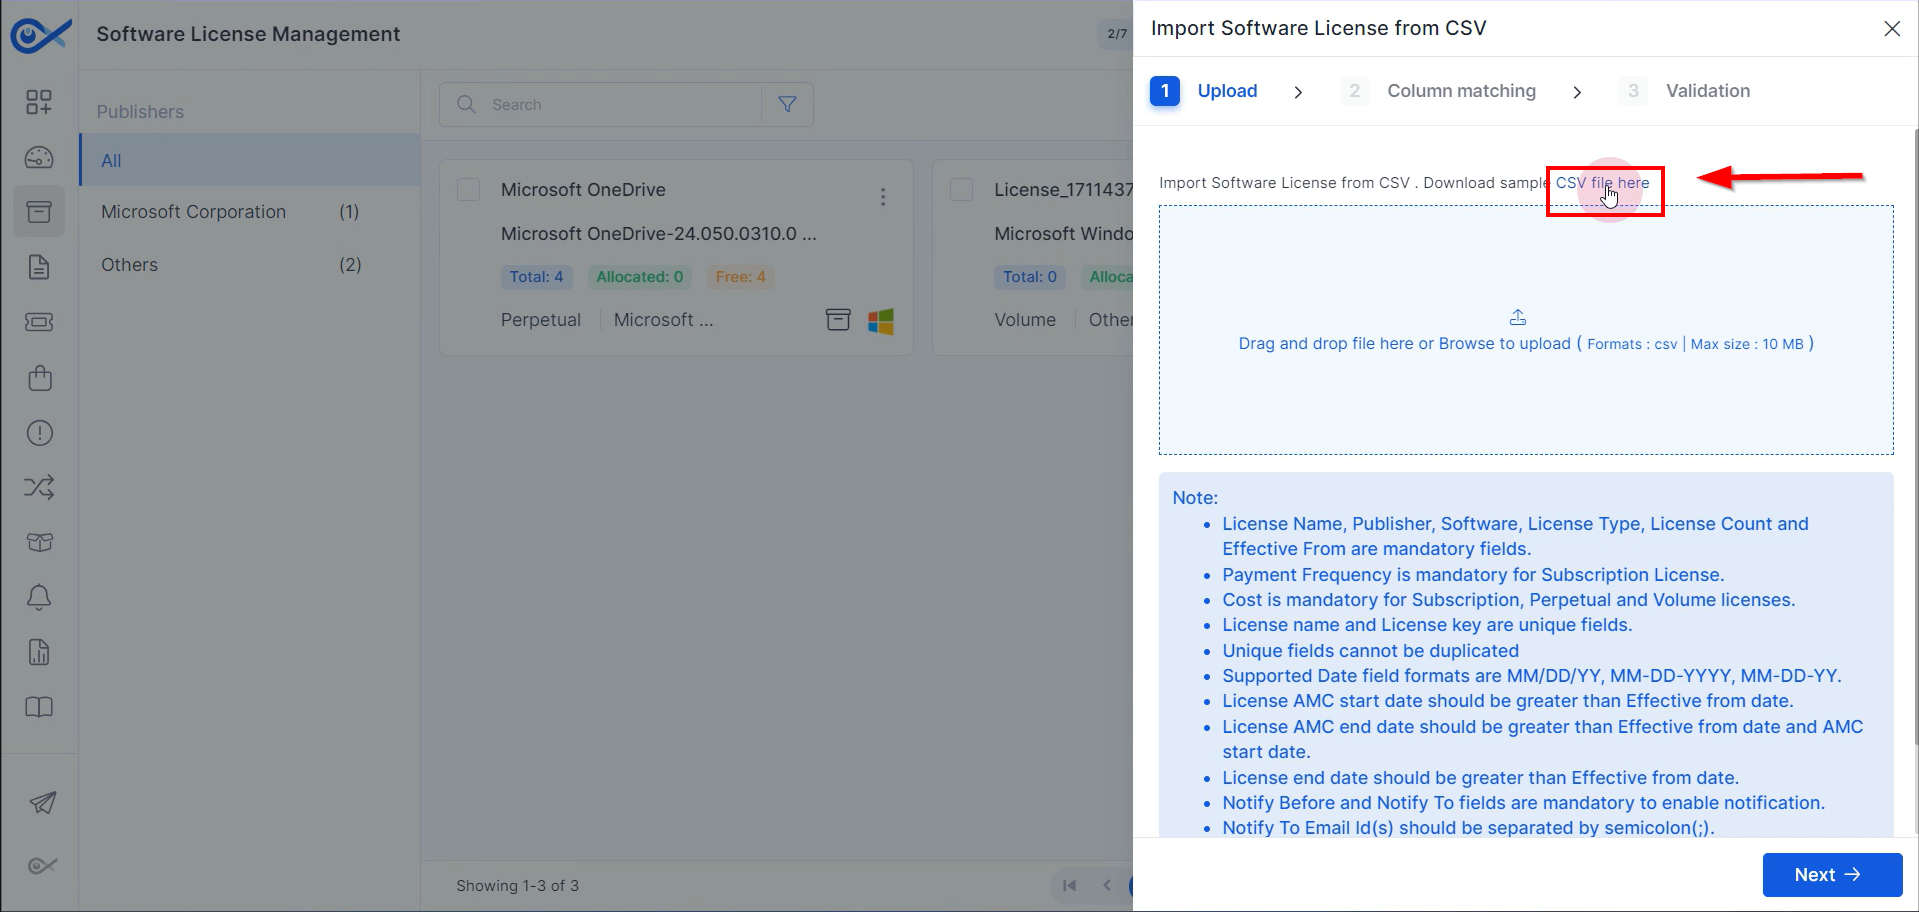
Step 2: Download the sample CSV file by clicking on the appropriate option.
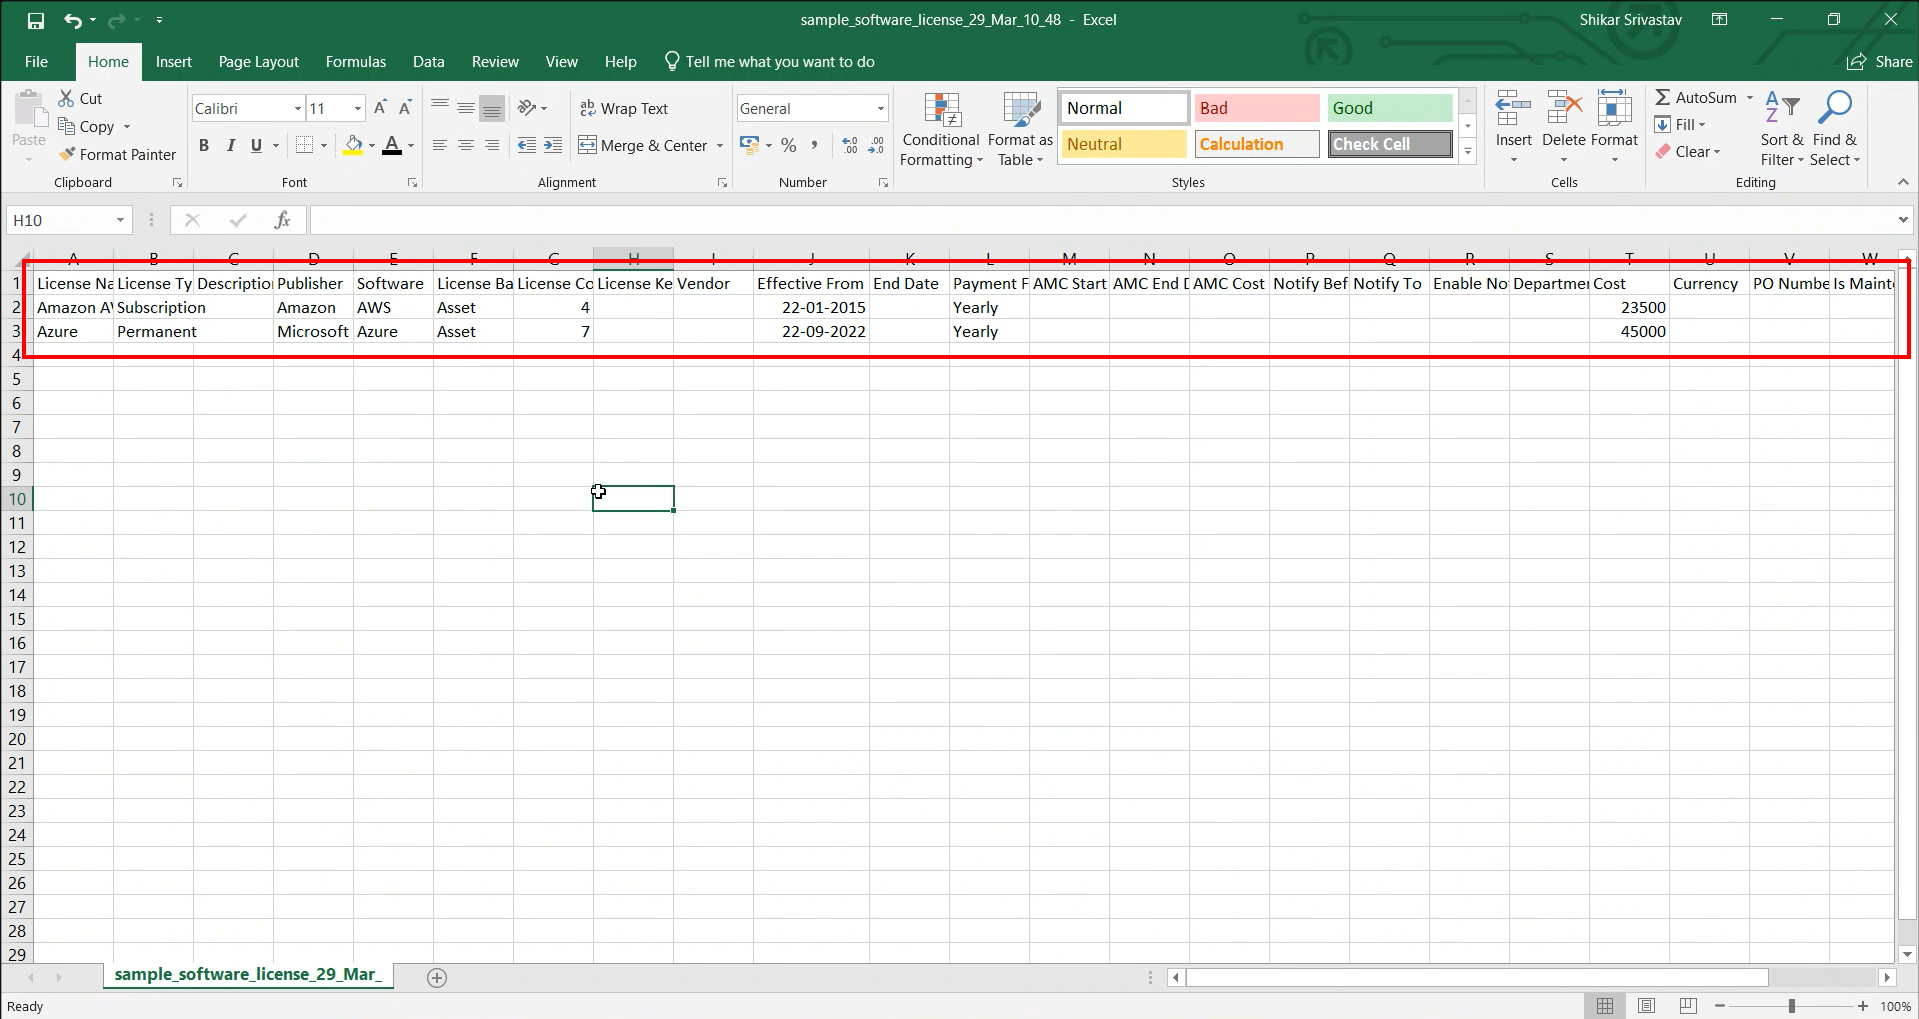
Step 3: Open the CSV file and enter the required details to add software license information. After filling it out, save the file.
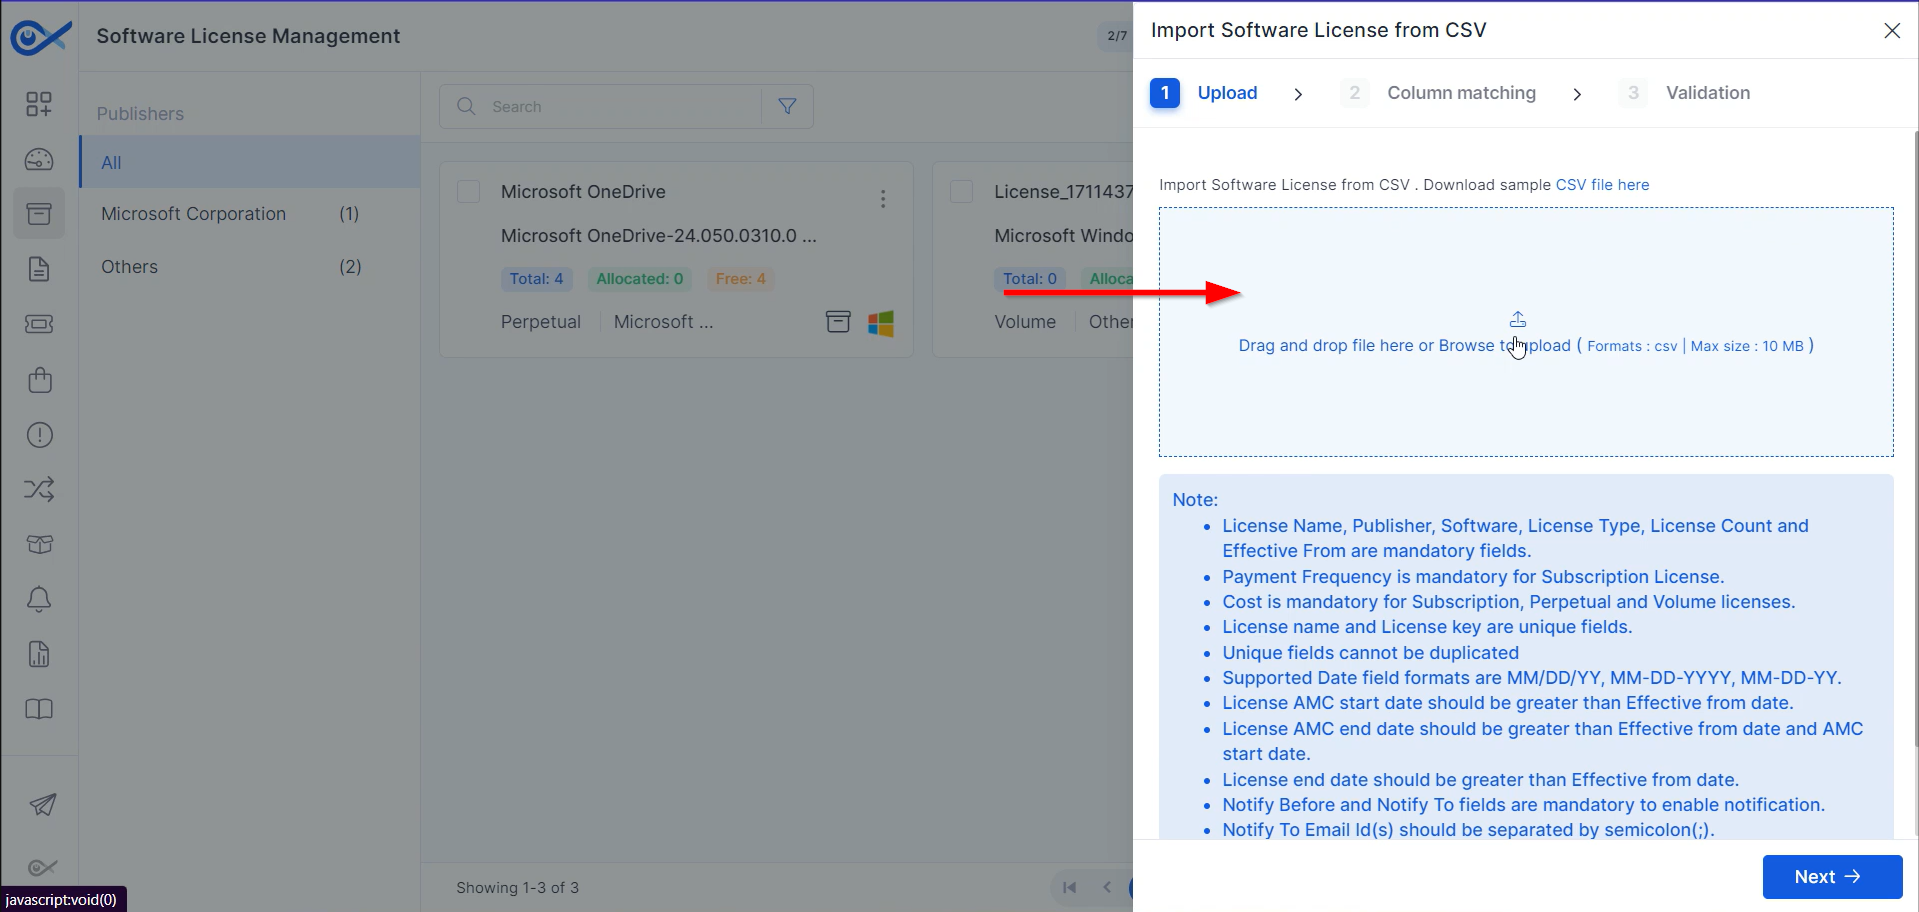
Step 4: Upload the prepared CSV file and click Next.
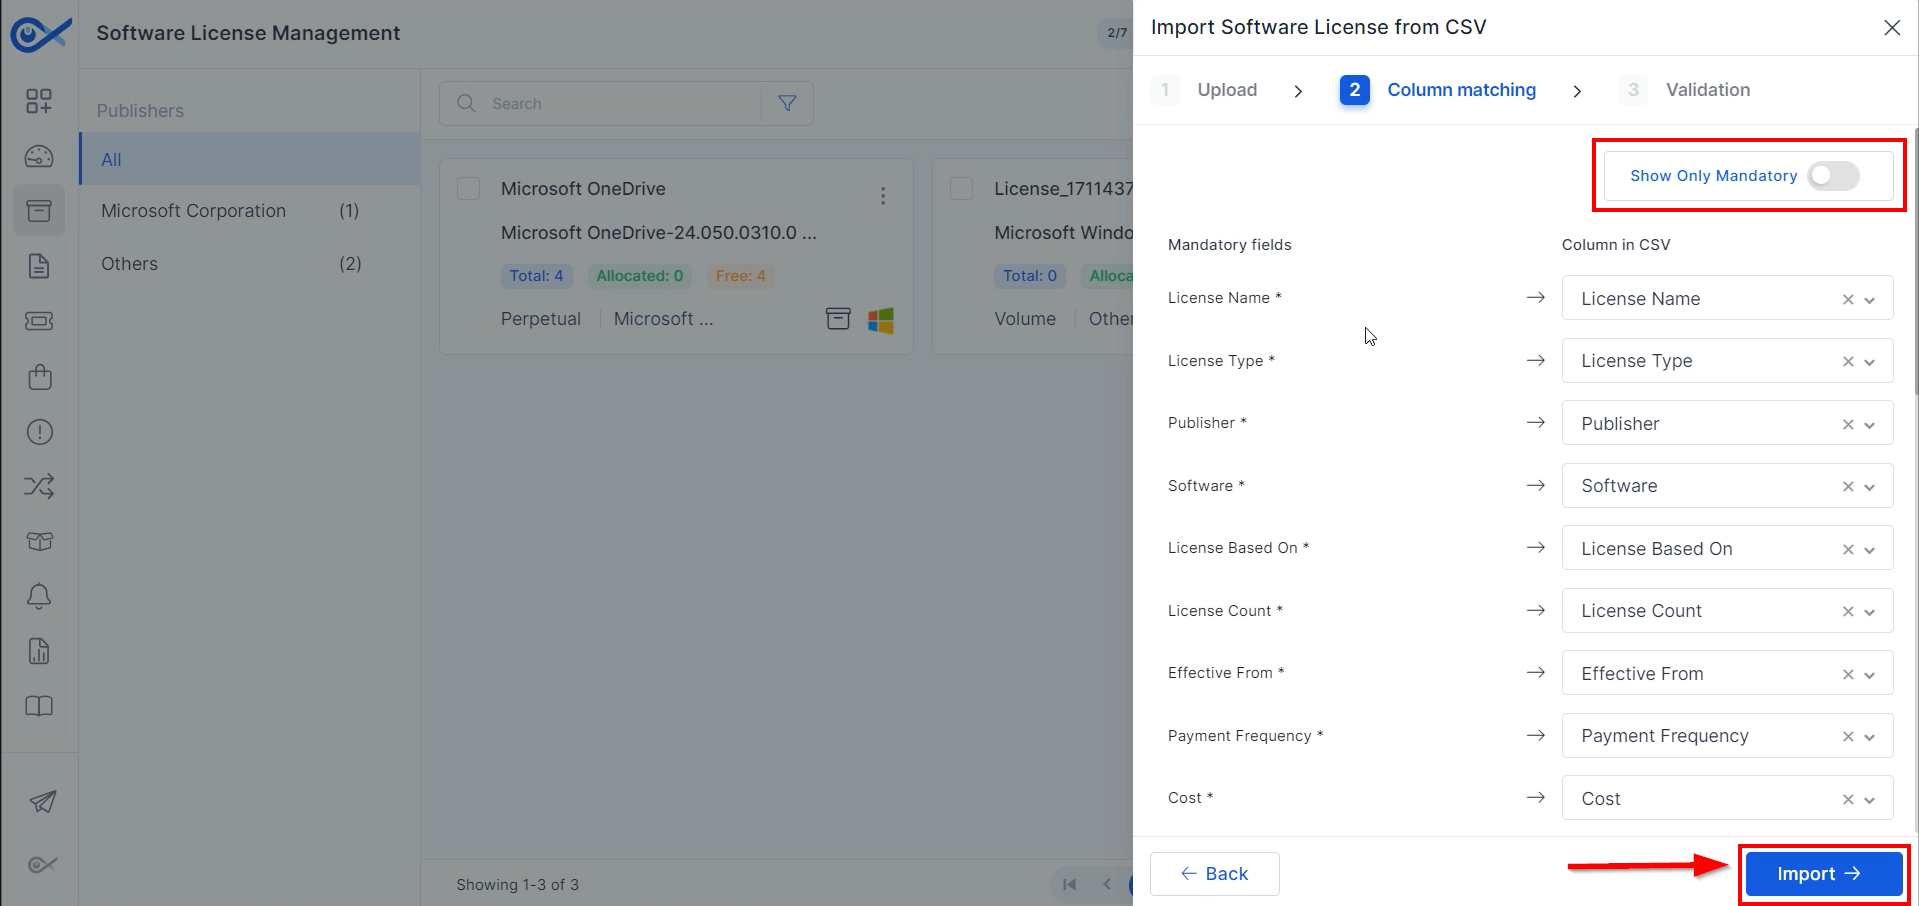
Step 5: Perform any necessary column matching on the column matching page. Click on the Show Only mandatory icon to view the mandatory fields. Once done, Click Import.
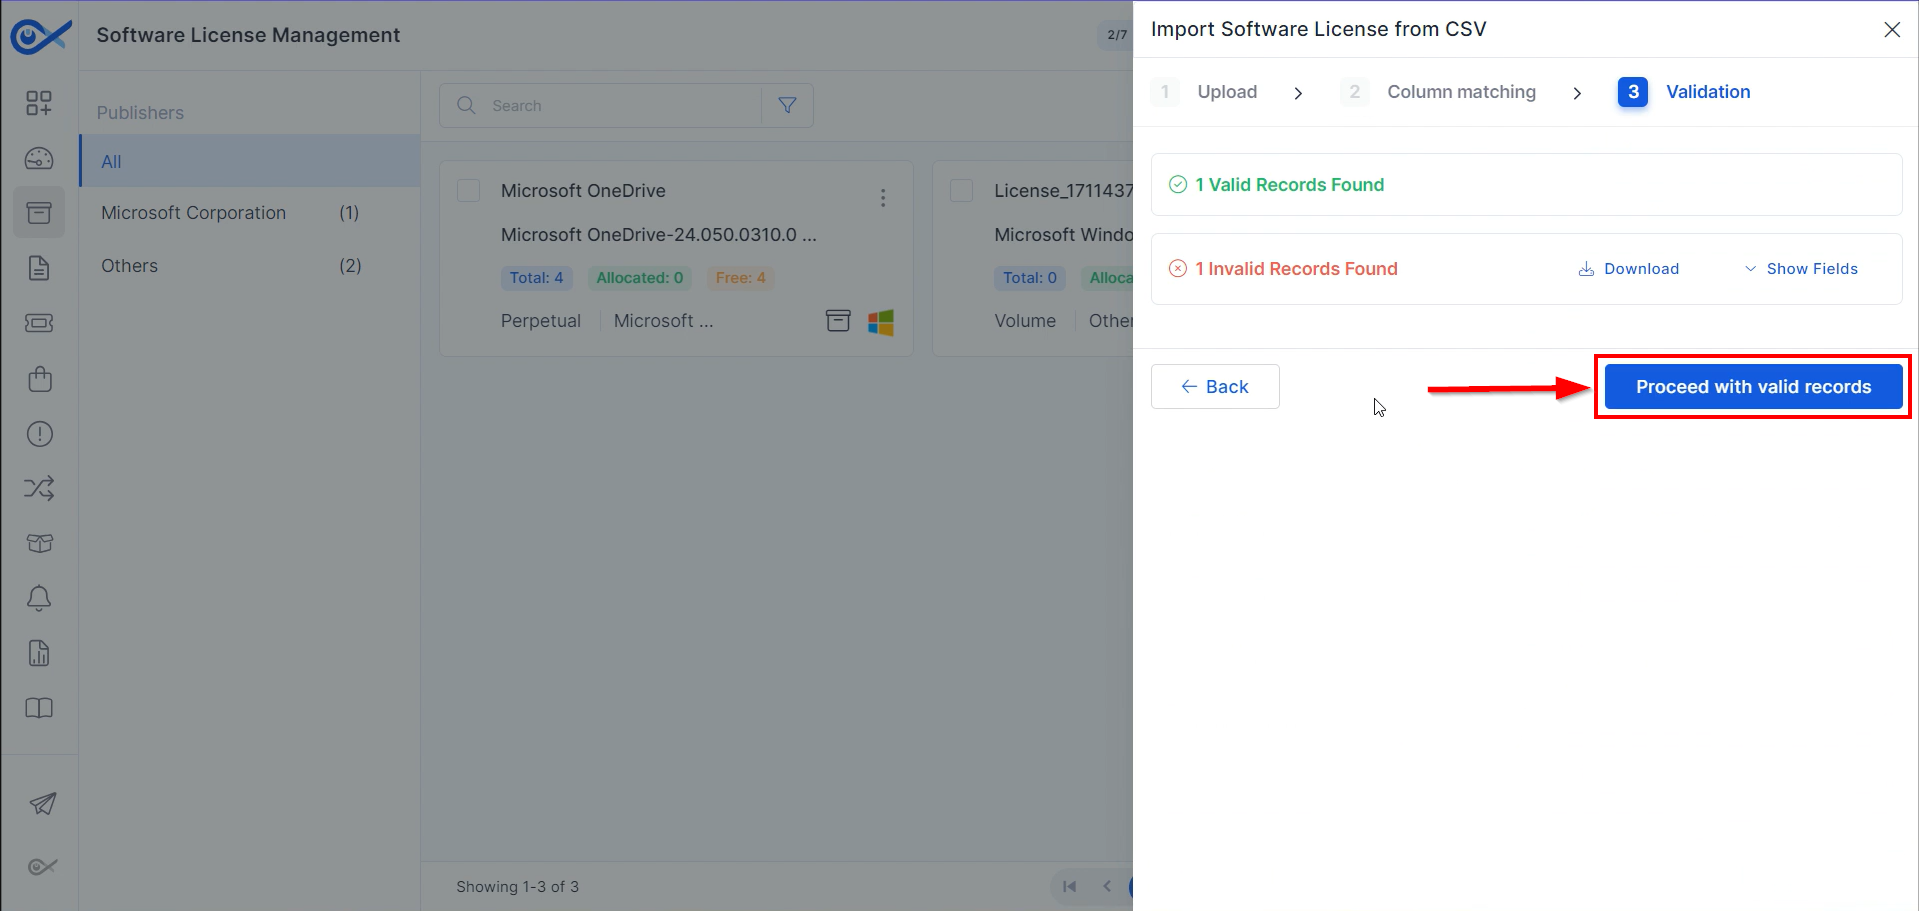
Step 6: The valid records will be processed after importing the CSV file. Click on Proceed with valid records to add the software licenses.
The licenses will then be added to the Infraon Infinity platform.
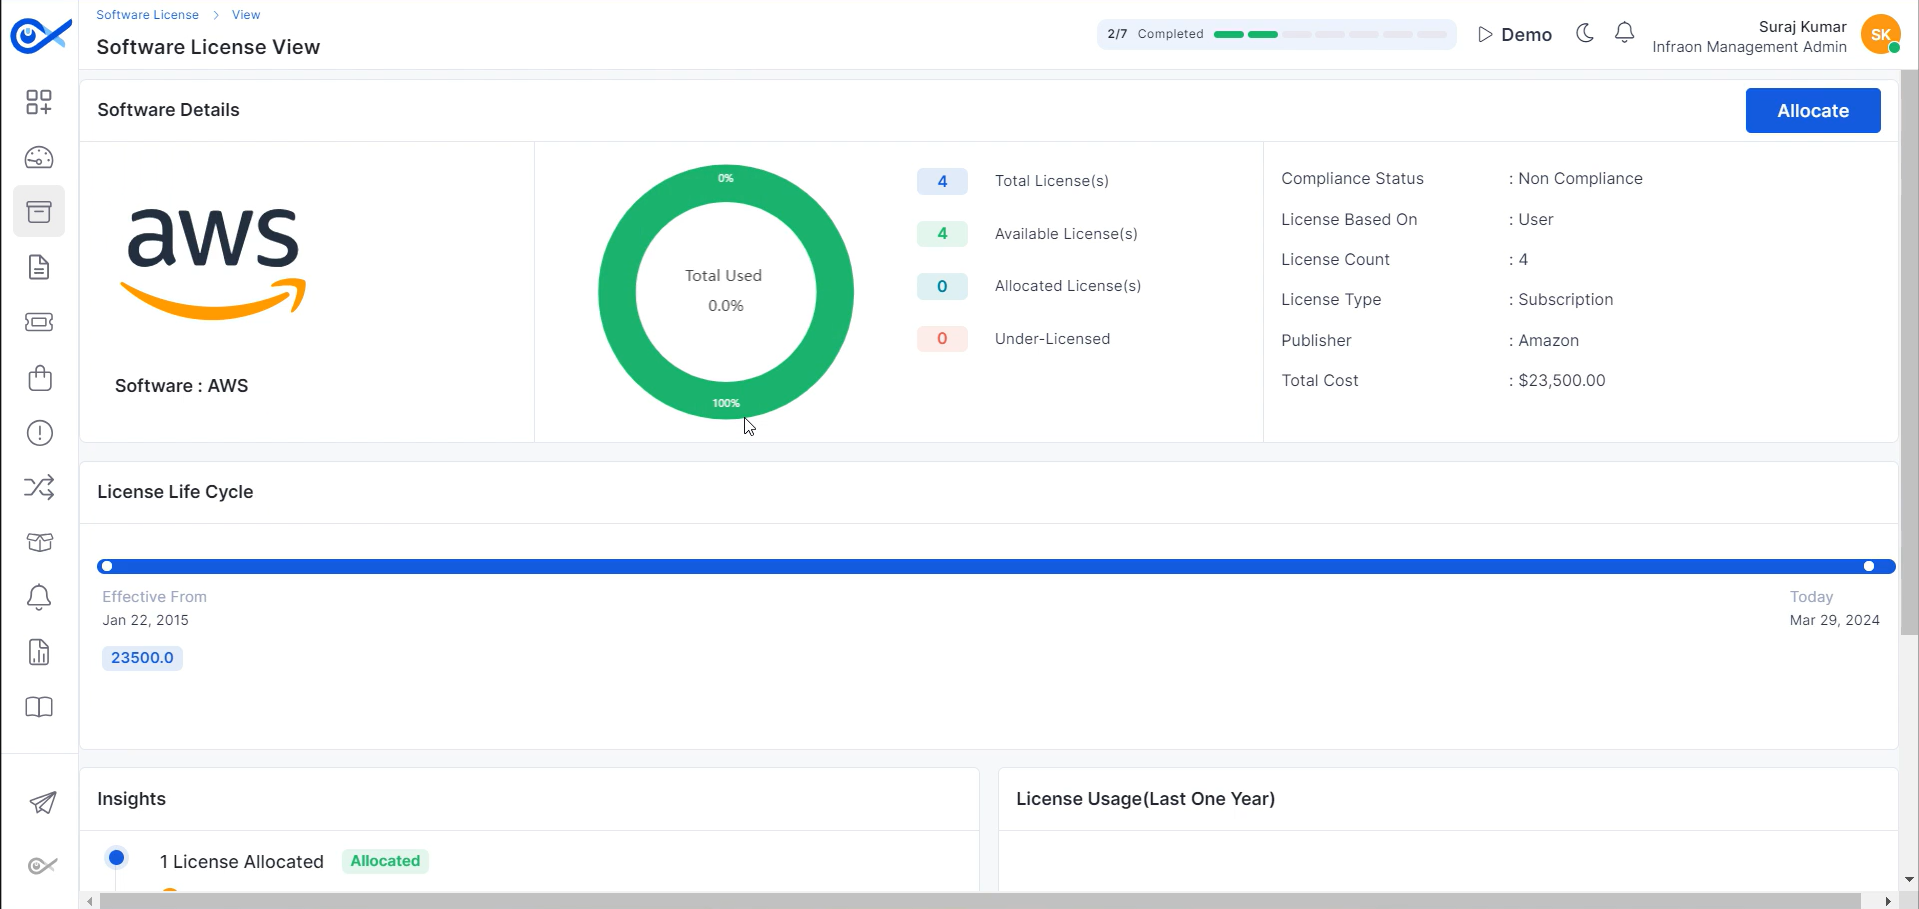
Click on the name of the added software licenses to view software details, including the license's software image and version.
The pie chart showing the total licenses, available licenses, allocated licenses, under-licensed status, and compliance status based on the license type can also be found here.
In the software license lifecycle section, the start date is noted as "Effective from," and the end date of the license can be viewed.
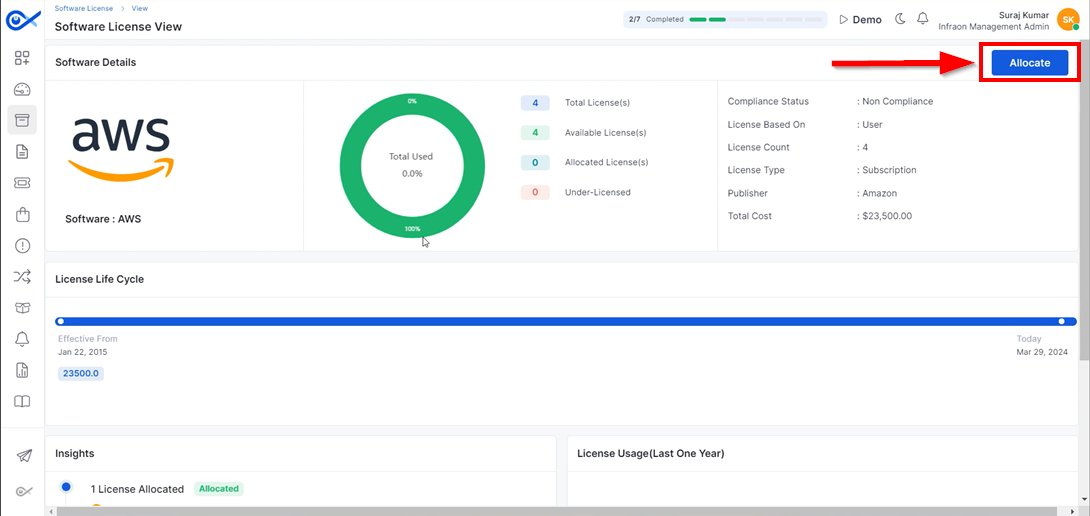
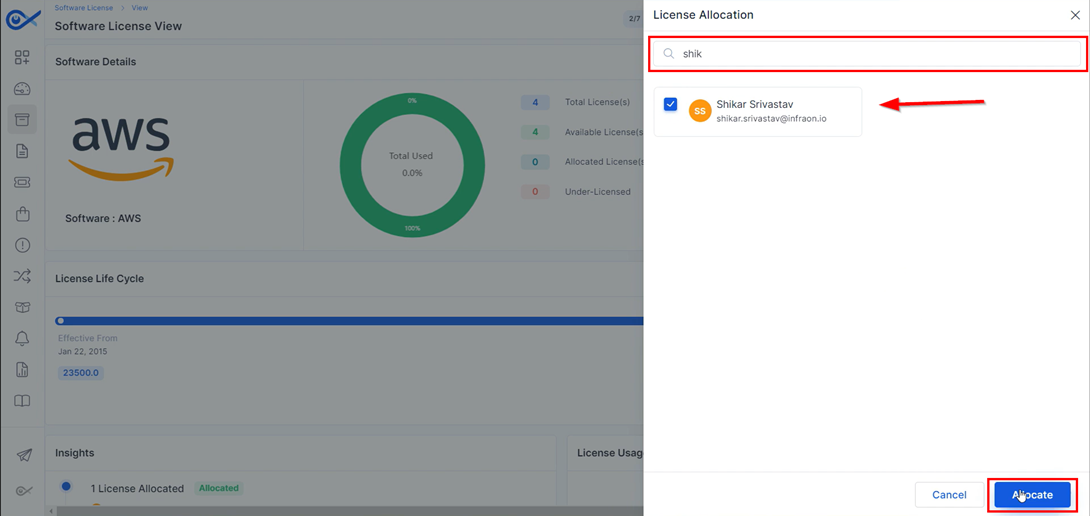
Step 1: Click on the Allocate option.
Step 2: Search for the requester and click Allocate.
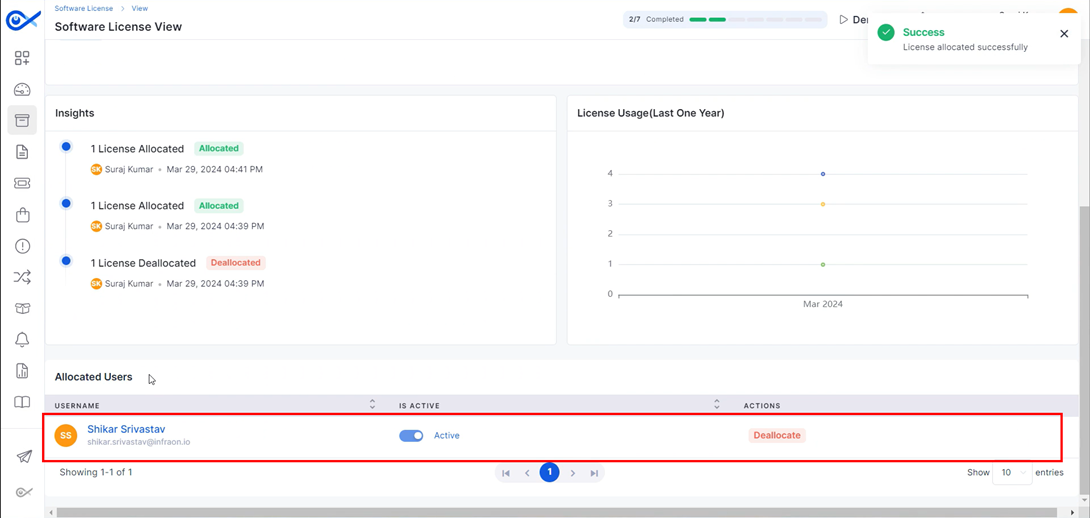
The allocated user will then appear in the Allocated User tab below.
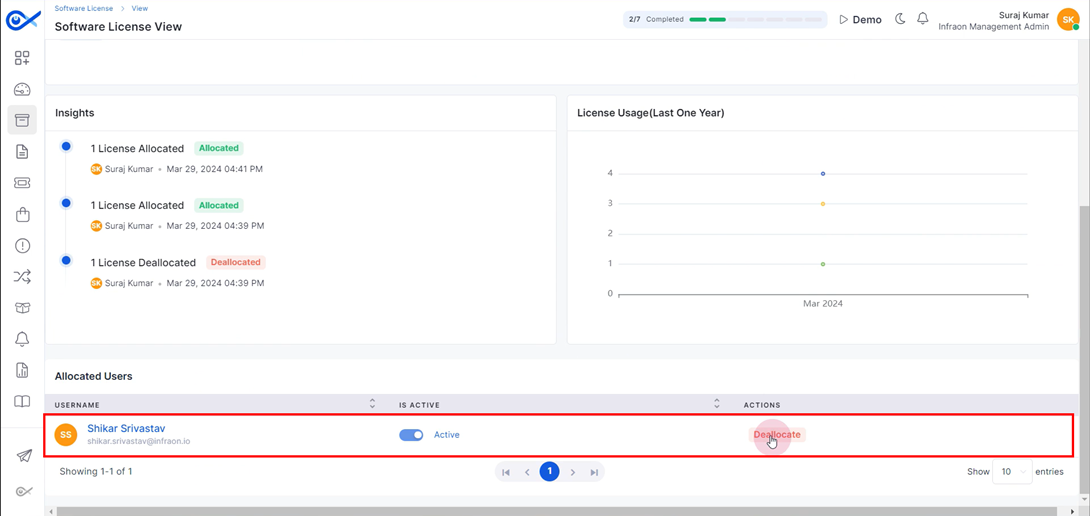
Click on the Deallocate button and proceed with the valid option.
The software licenses will then be deallocated from the selected requester.
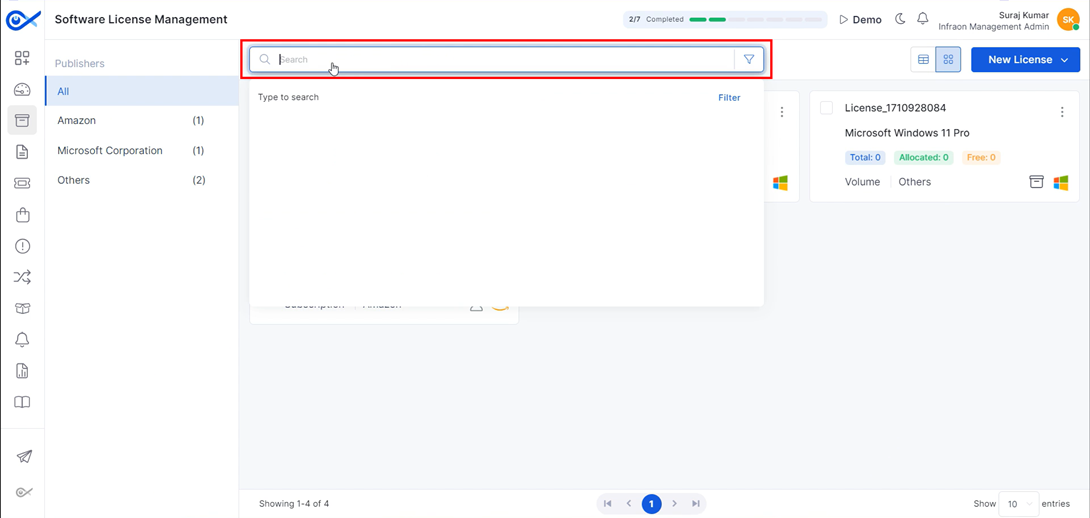
The software license management page features a search bar at the top for finding licenses by name or number.
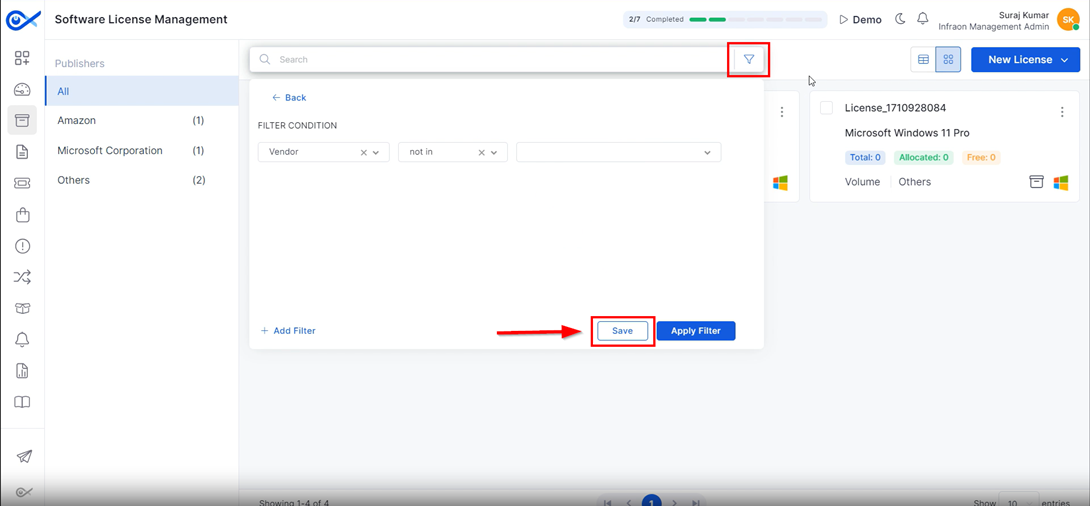
Filter software licenses by name, software, publisher, type, vendor, or other criteria. Save custom filter settings for later use.
Infraon's license management tab offers Grid and Card View formats. Each license displays details, including name, associated software, total licenses, user allocations, available licenses, category, company, assigned assets, and the software's logo.
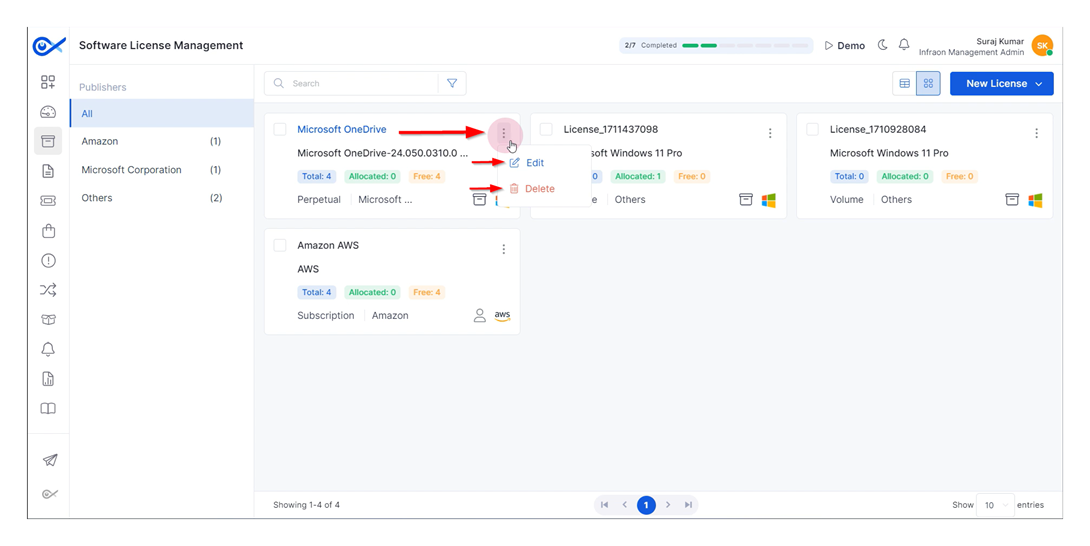
To modify or remove a software license, click the "More" option. This will display additional actions, including the ability to edit license details.
Select the "delete" button to remove a license and follow the on-screen prompts permanently.
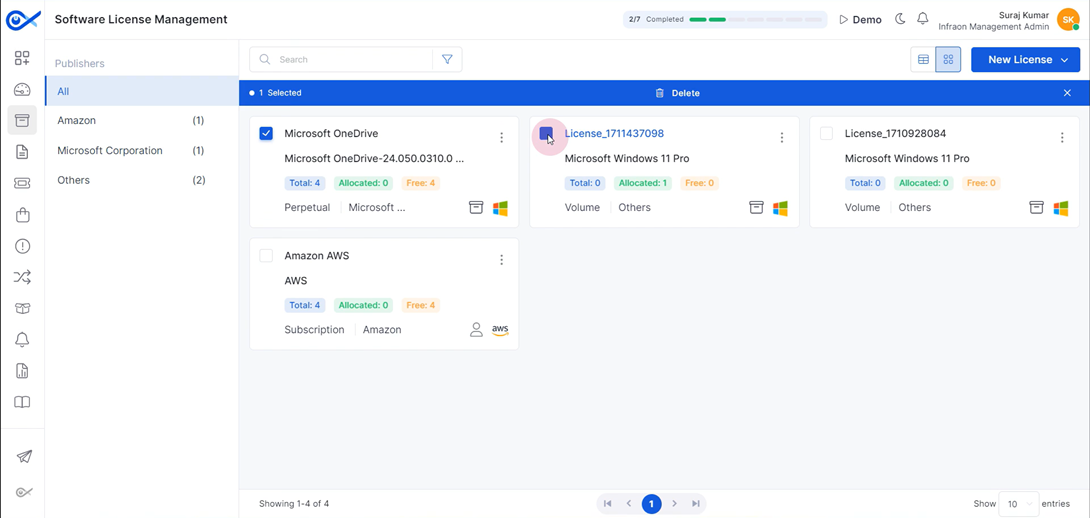
Select the Take Multiple Options feature to delete multiple software licenses simultaneously. This concludes the overview of the software license management functionalities within the Infraon Infinity platform.
Import from CSV Method
Viewing and Managing Software Licenses
Allocating a Software License
Deallocating a Software License
Searching and Filtering Software Licenses
Viewing Software Licenses
Editing and Deleting Software Licenses
Ticket Assignment
This guide explains the ticket assignment process within the Infraon Infinity platform, focusing on the Ticket Visibility section.
Admins can view, manage, and allocate all tickets generated in the portal. In contrast, Engineers only have access to tickets assigned to them. During ticket creation, they can also self-assign tickets if they are linked to their team in the "Impacted Service" column.
The Service Desk Team can view all tickets and manually assign them to a team or a specific technician.
Infraon provides both manual and automatic ticket assignment options:
This guide explains creating a personalized dashboard in the Infraon Infinity platform.
Creating a new dashboard
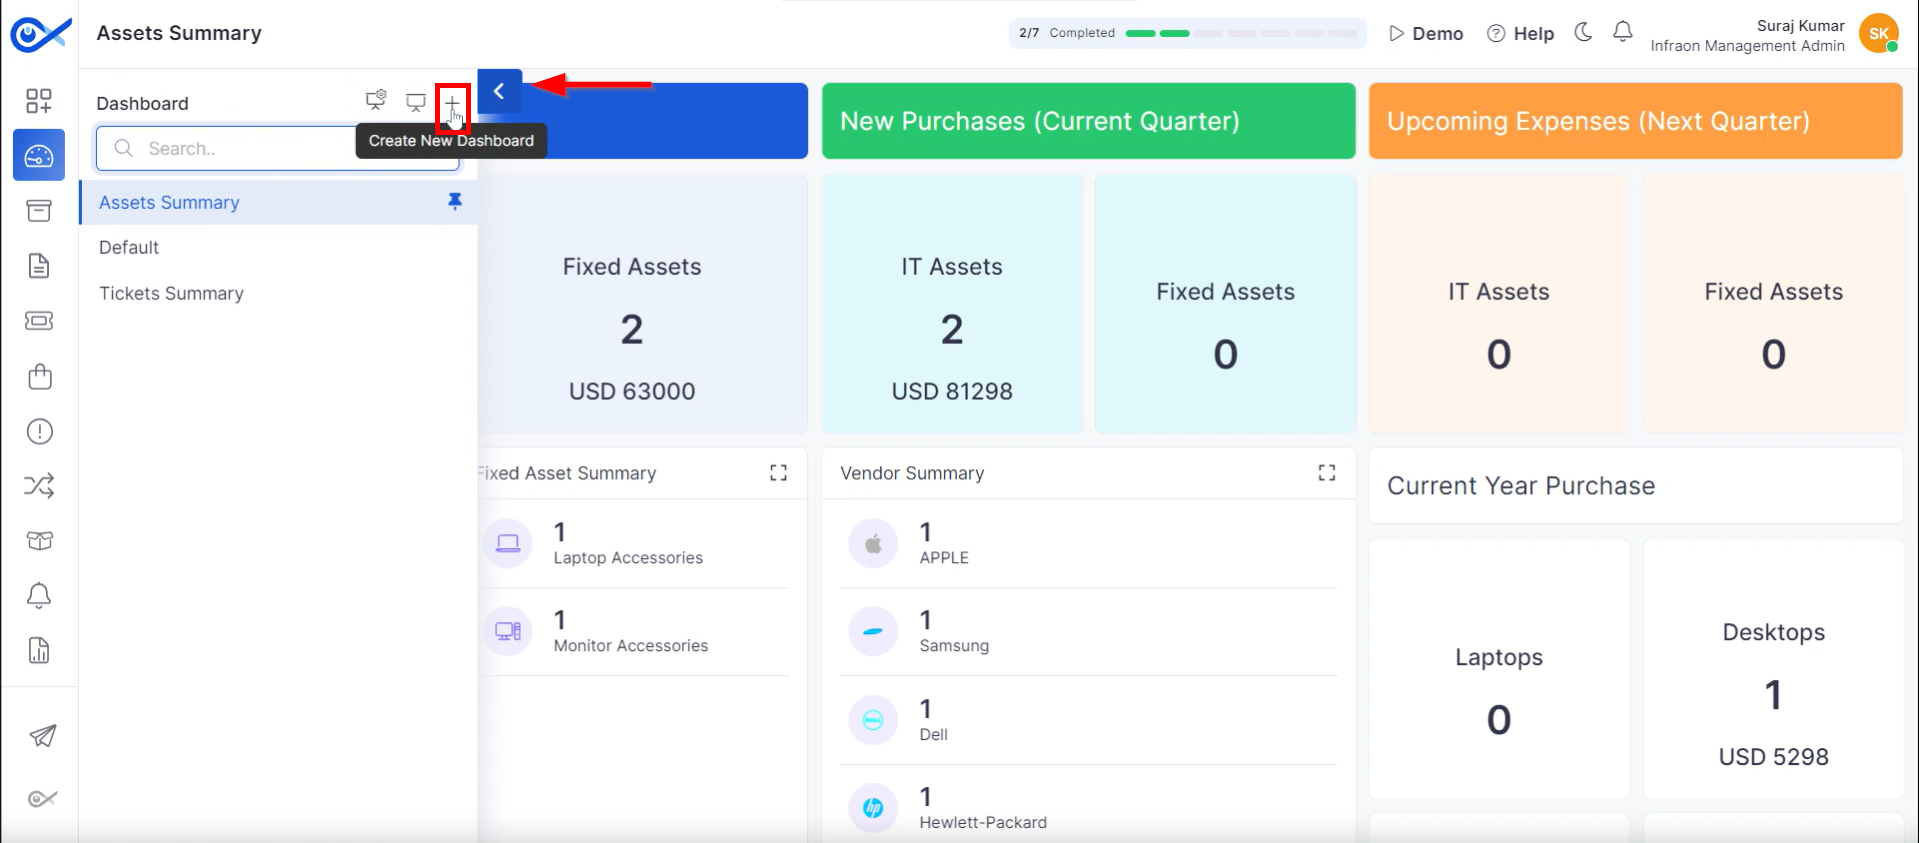
Step 1: Click the arrow icon in the top left corner to open the left panel. Then, click the (+) "New Dashboard" icon to create a new dashboard.
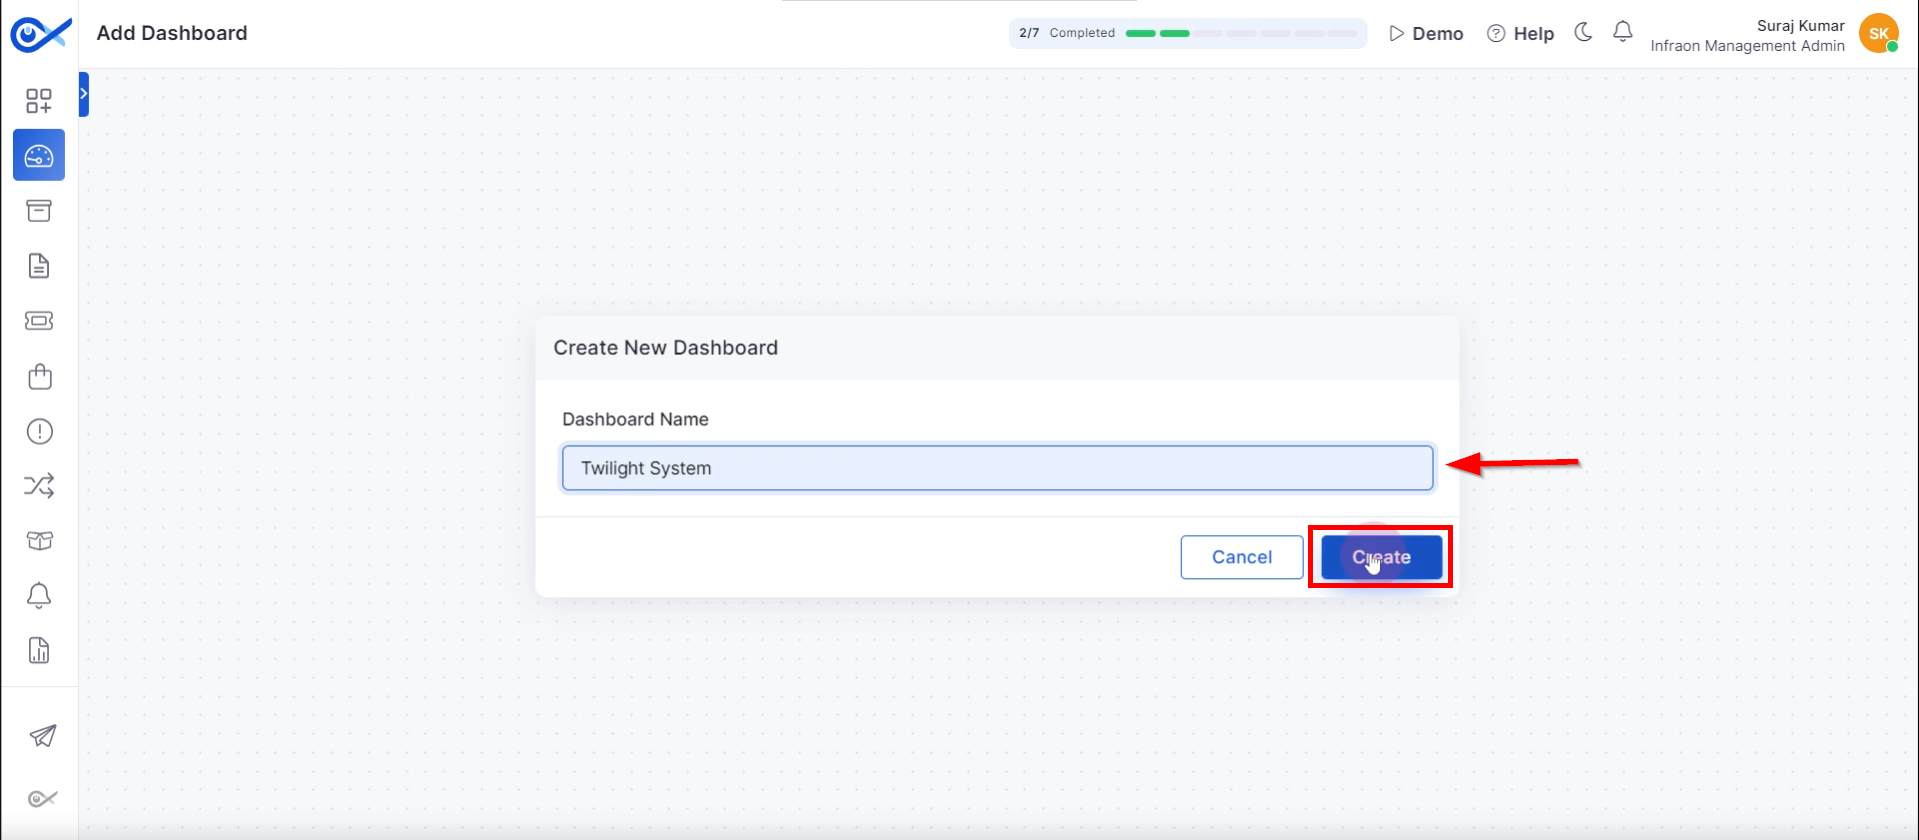
Step 2: Enter a name for the dashboard in the provided field, then click “Create.”
Adding widgets
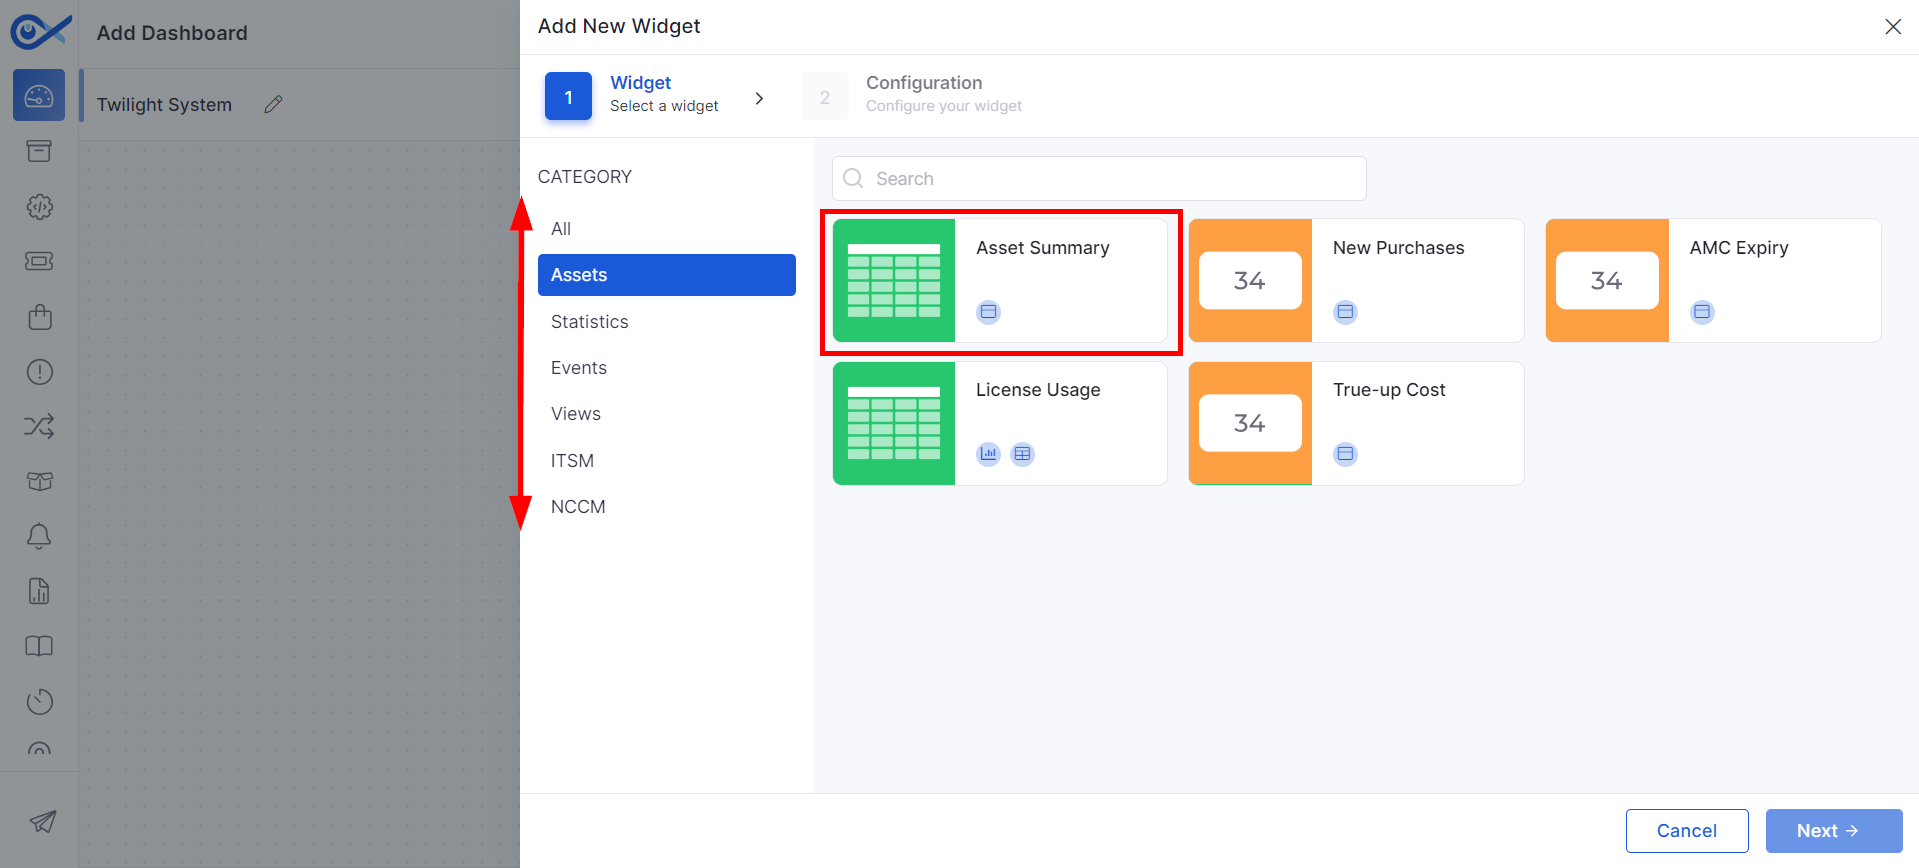
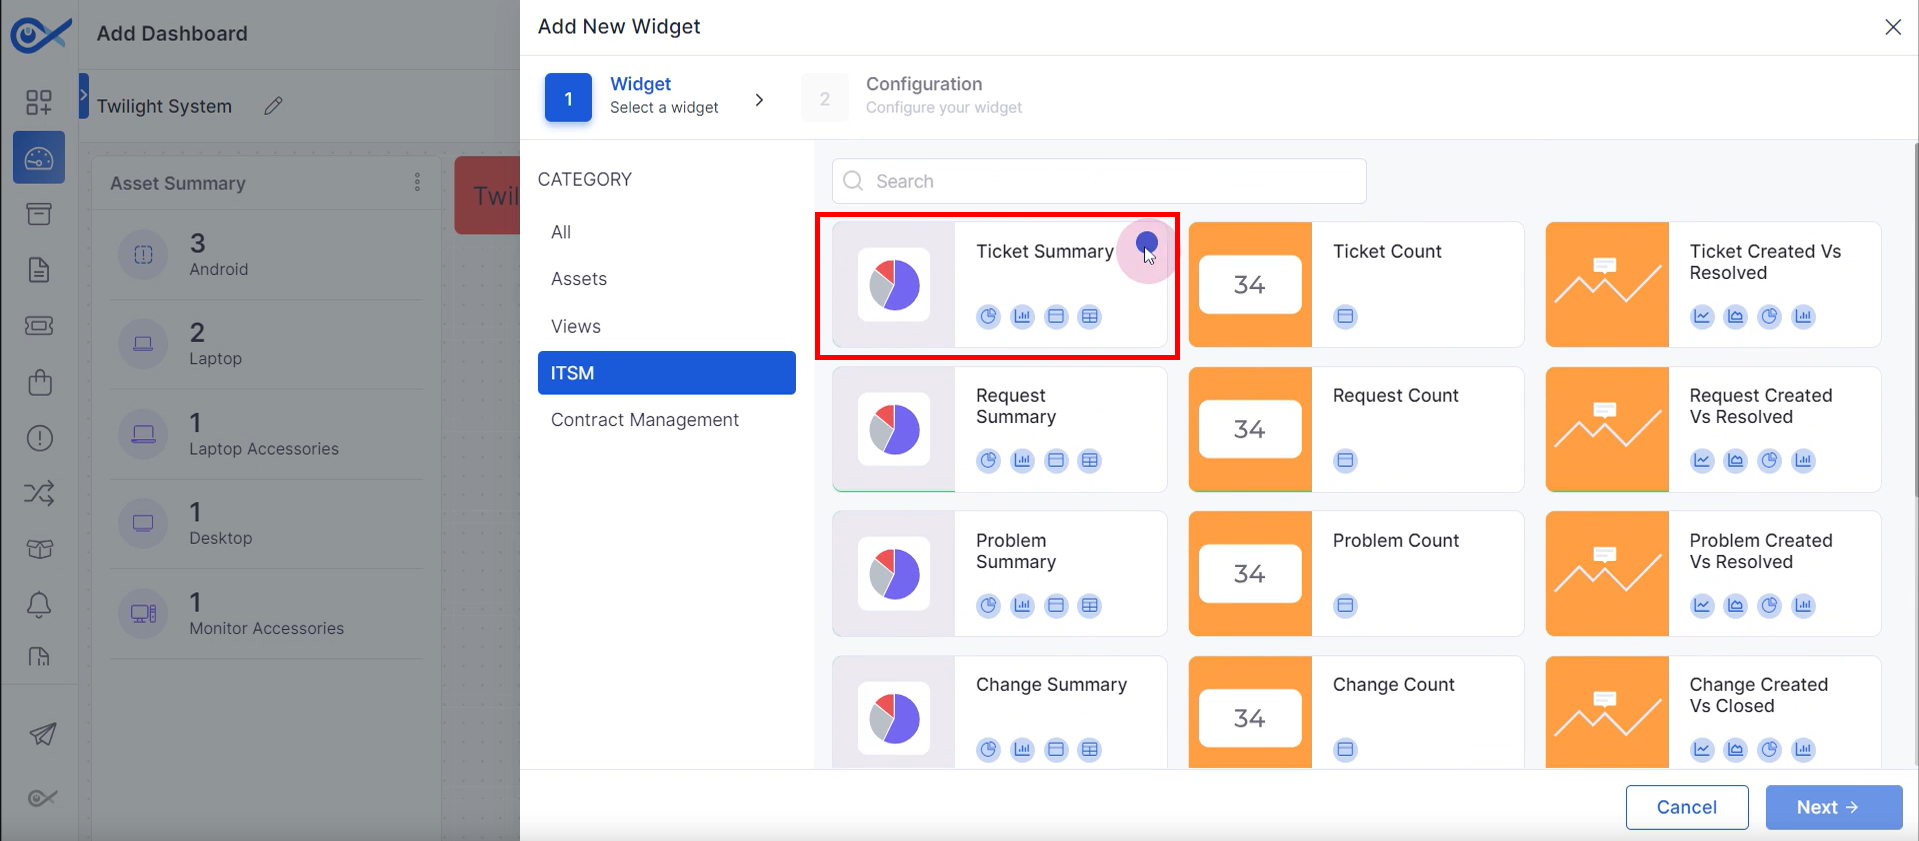
Step 1: A pop-up will appear where technicians can add widgets to personalize their dashboard. Widgets are categorized into Assets, Statistics, Views, ITSM, Contract Management, and NCCM. Select a widget to add.
NOTE: Only one widget can be added at a time.
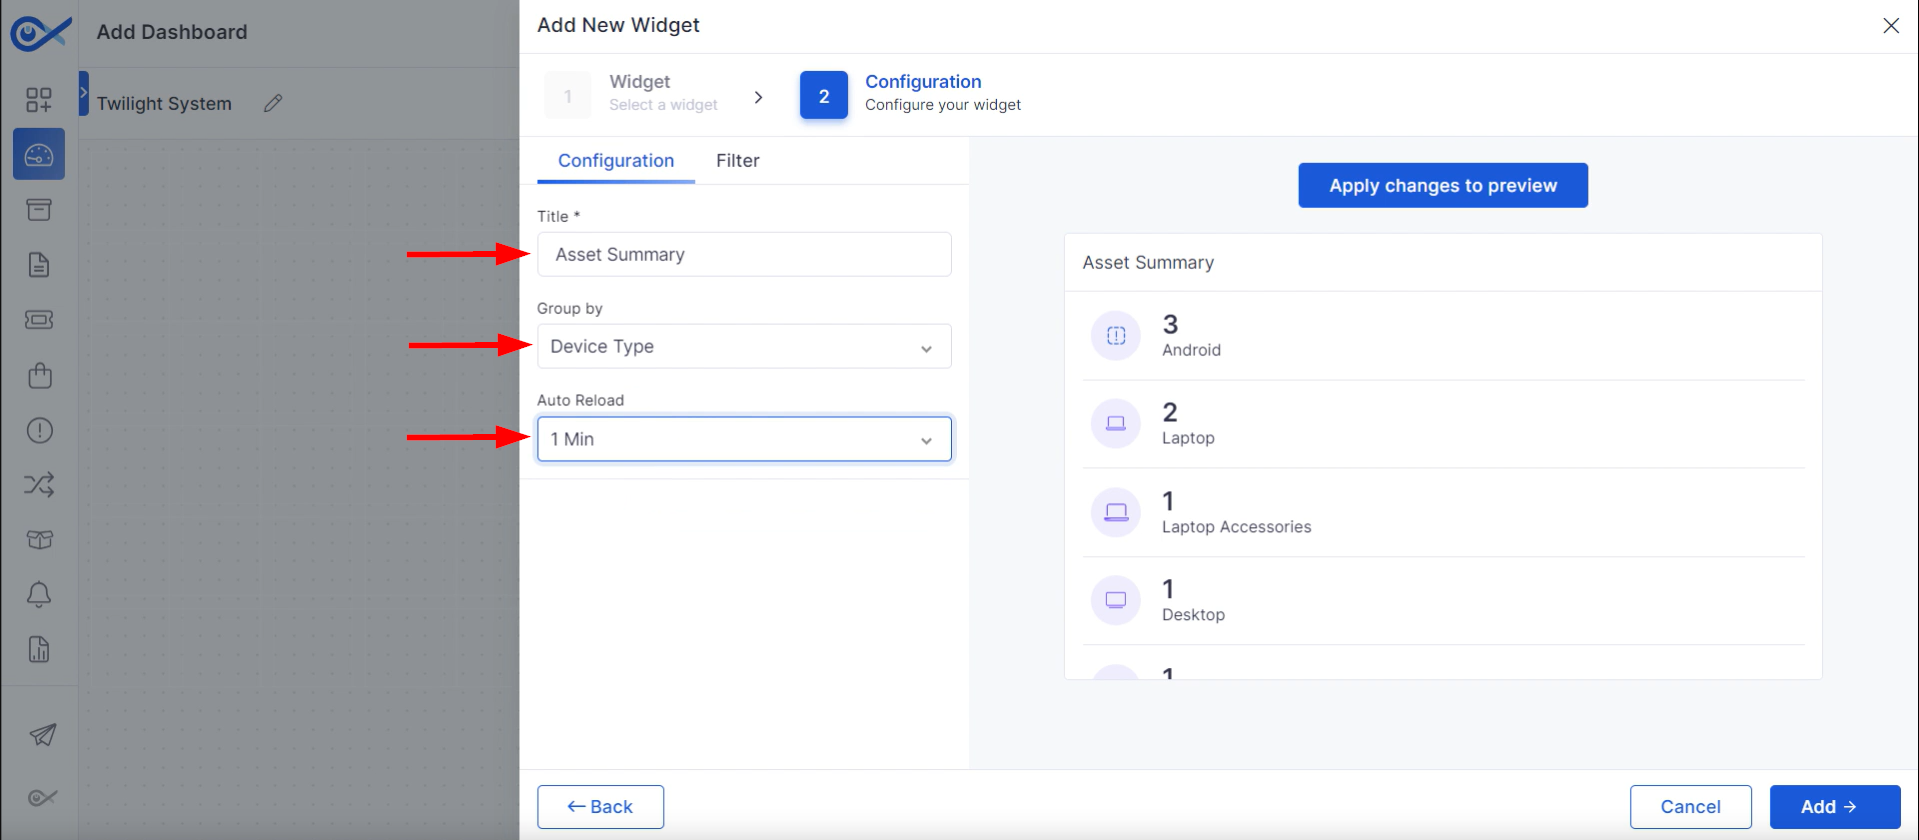
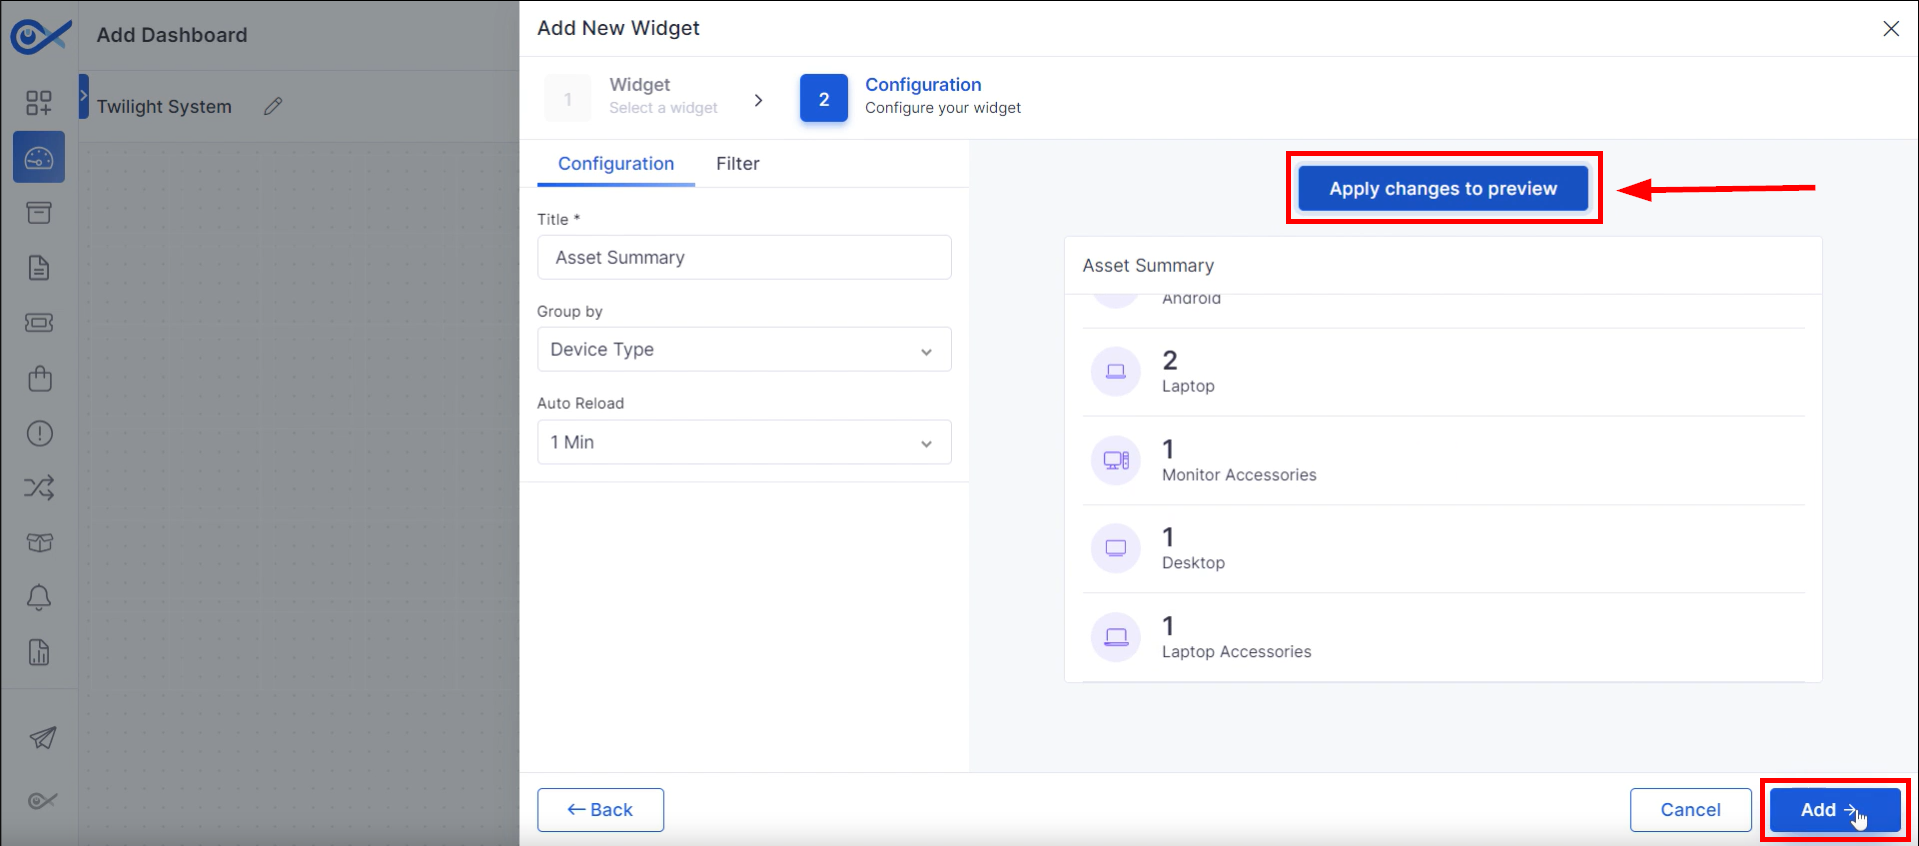
Step 2: Customize each widget by setting its “Title” and choosing a grouping option from the dropdown menu. Select the appropriate “Group By” criteria to categorize the data.
Finally, determine how often you want the dashboard to refresh by setting the “Auto Reload” time.
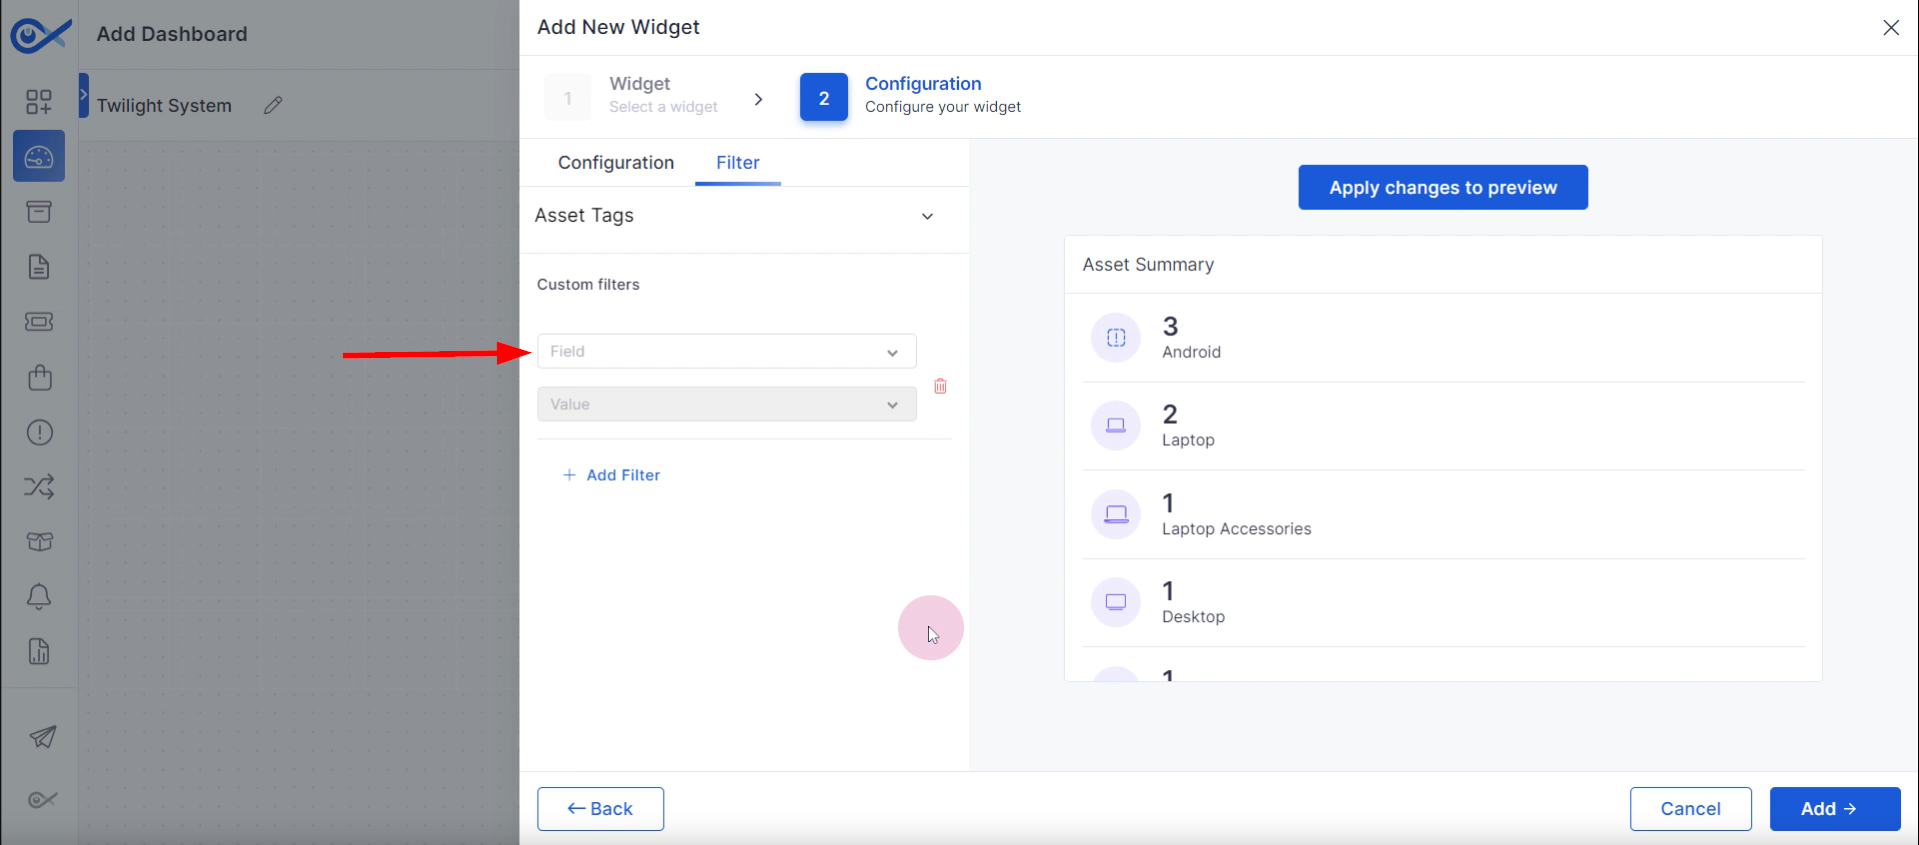
Step 3: To filter the data, click on "Filter." Technicians can then add filters based on asset ID, IP address, or other criteria to control the information displayed. Select the desired filters and apply them.
Step 4: After customizing the required configurations, click “Apply Changes” to view the changes. To include a new widget, click “Add."
Step 5: To rearrange widgets, drag and drop them on the dashboard. Clicking the “More Options” icon will enable the technicians to edit, copy, or remove a widget.
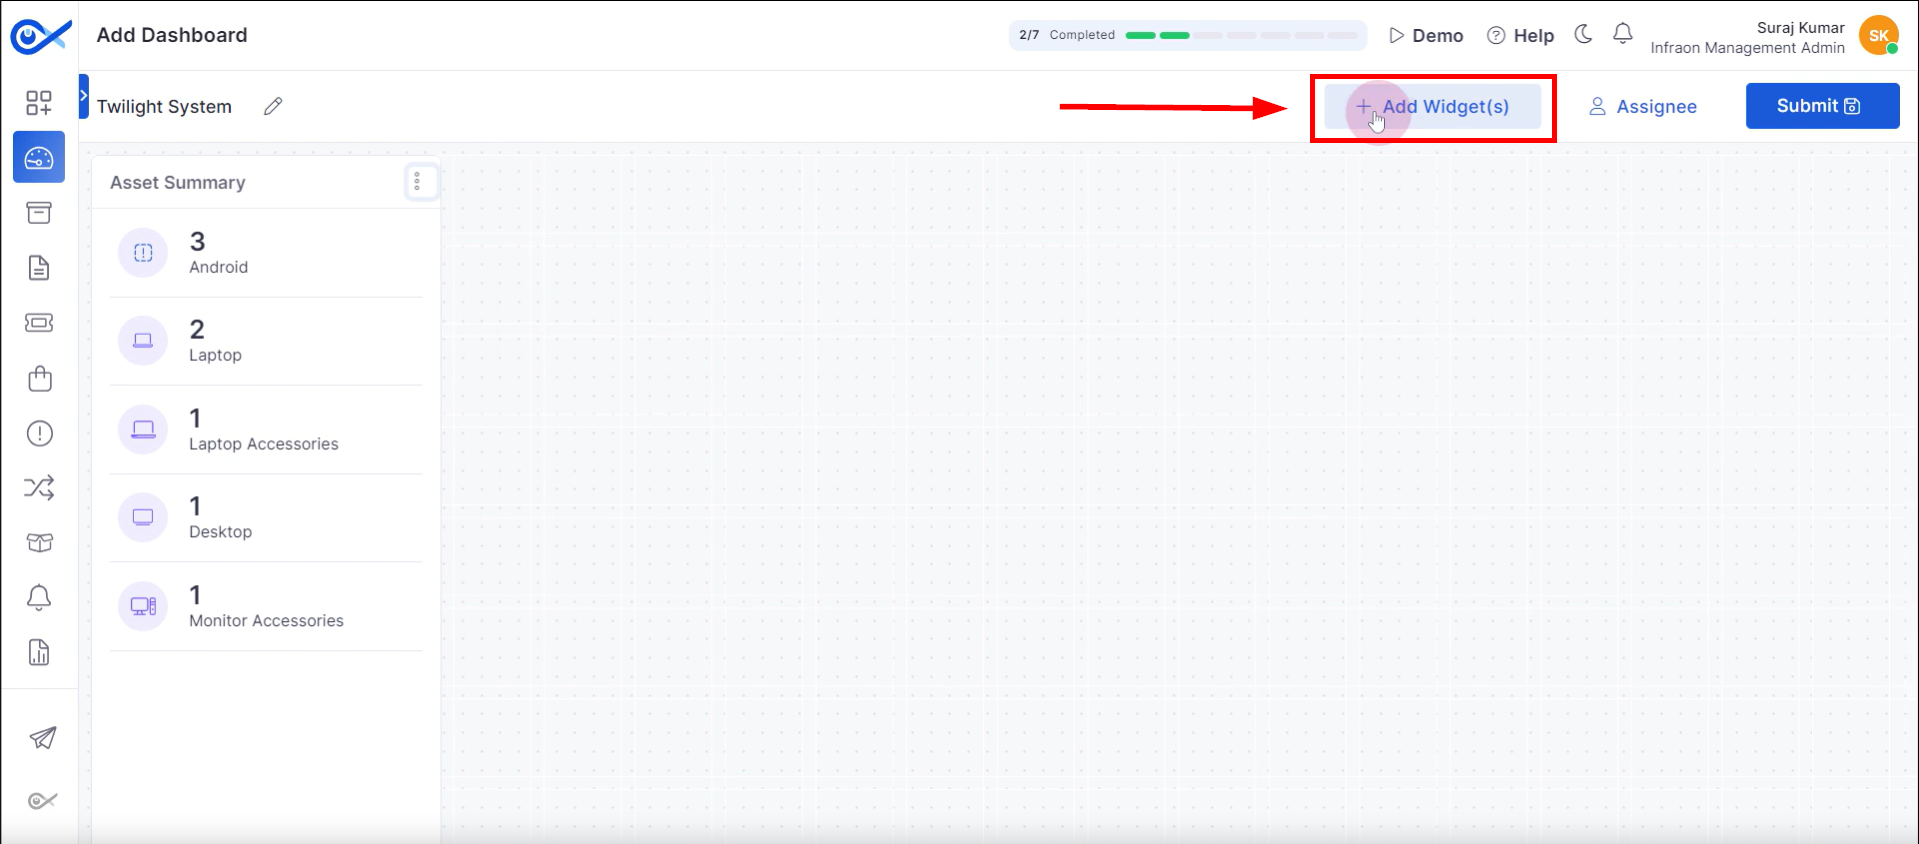
Step 1: Locate the “Add Widget(s)” button on the top panel to add a new widget.
Step 2: The ITSM category offers a range of widgets, including ticket summary, count, and creator-versus-resolved breakdowns. Similar widgets are available for requests, problems, and changes. Select the desired widget to proceed.
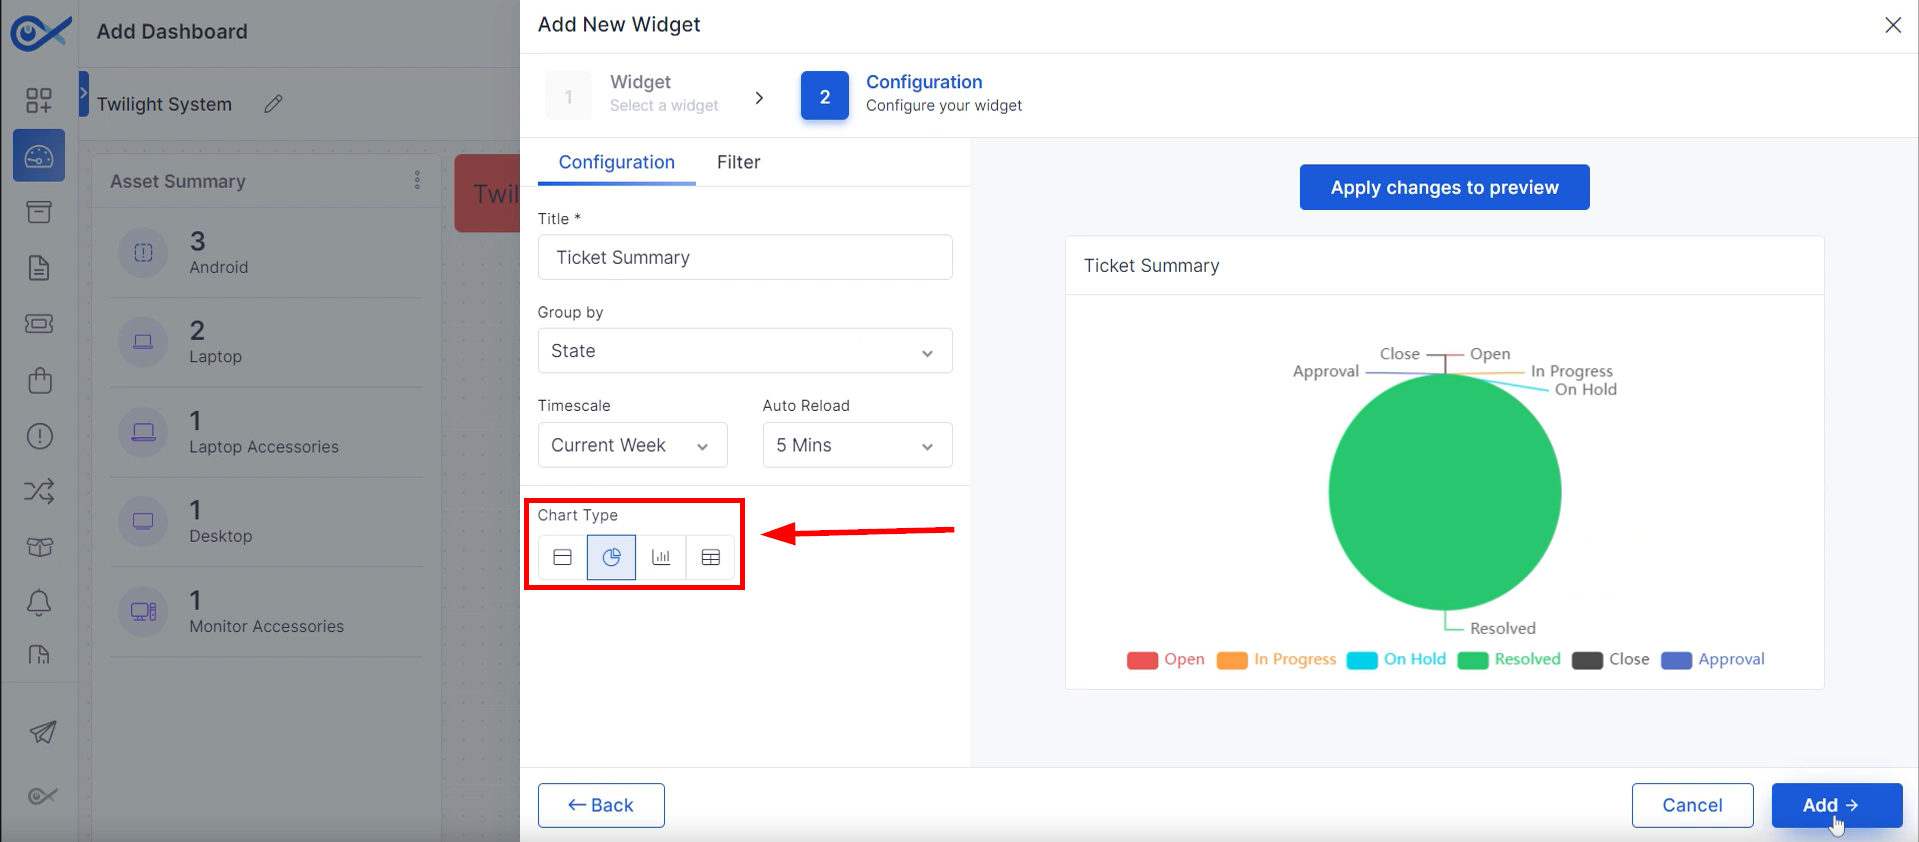
Step 3: Input a “Title” for the widget within the configuration tab and determine the “Group by” parameter from the available options. Use the dedicated “Timescale” configuration panel to filter data based on time.
Step 4: Customize the widget's appearance on the configuration page by selecting from Data Panel, Pie Chart, Bar Chart, or Data Table. Apply the changes to view the preview, then “Add” the widget to the dashboard.
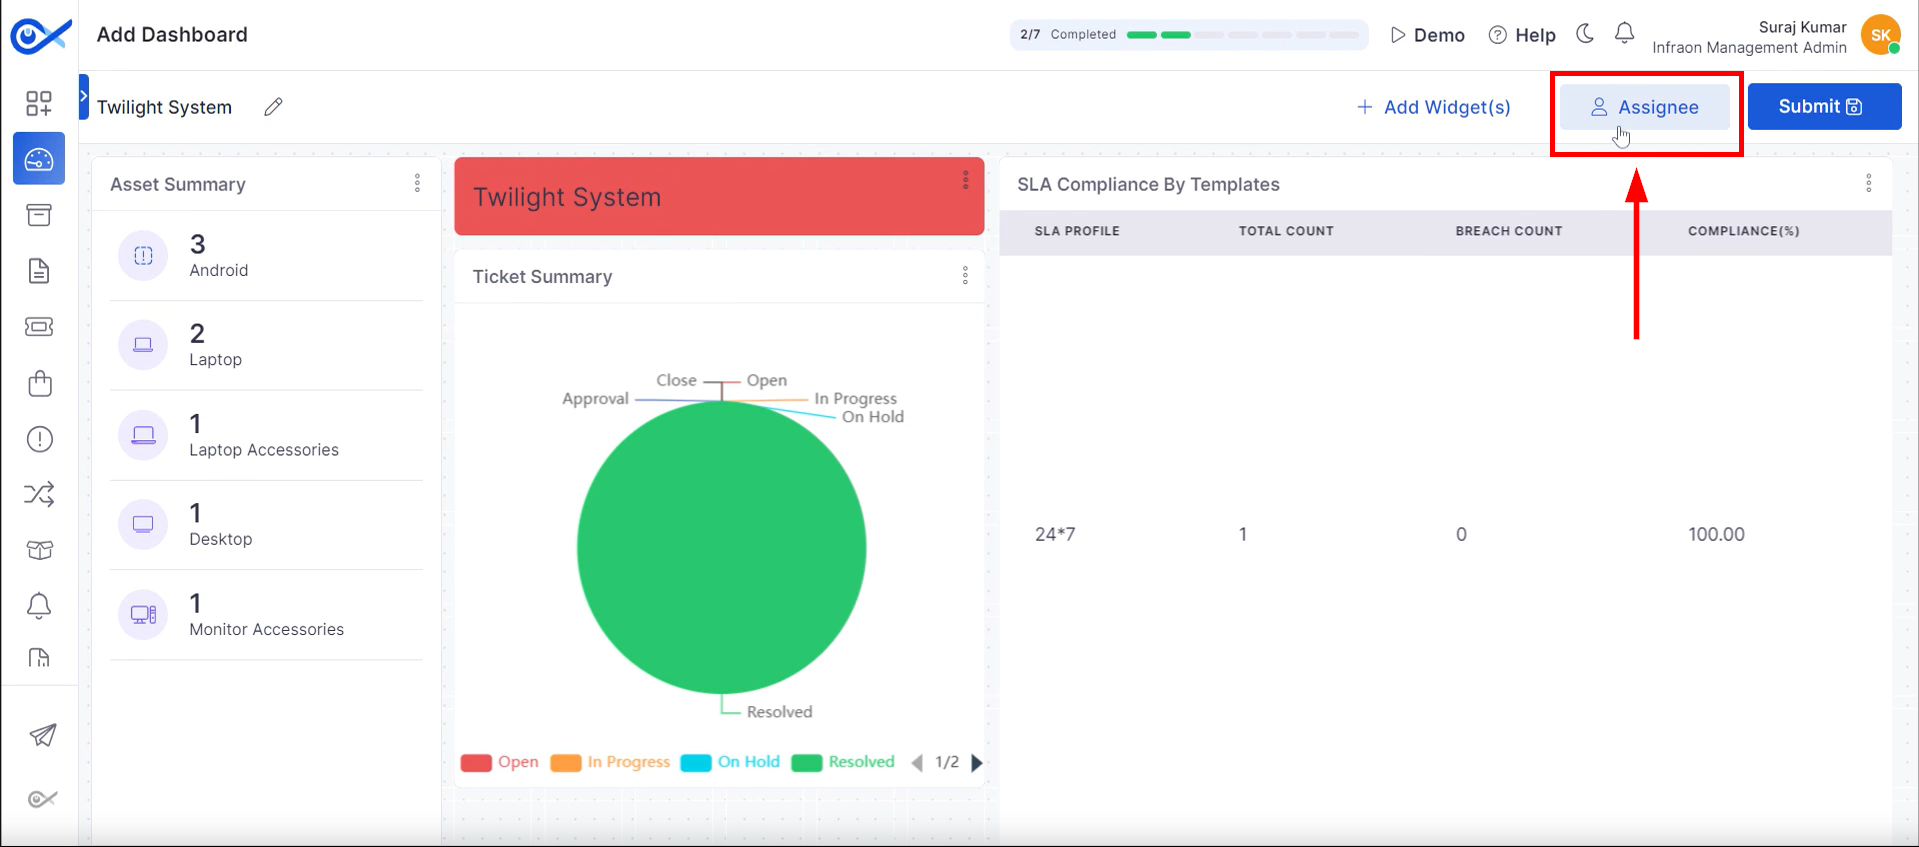
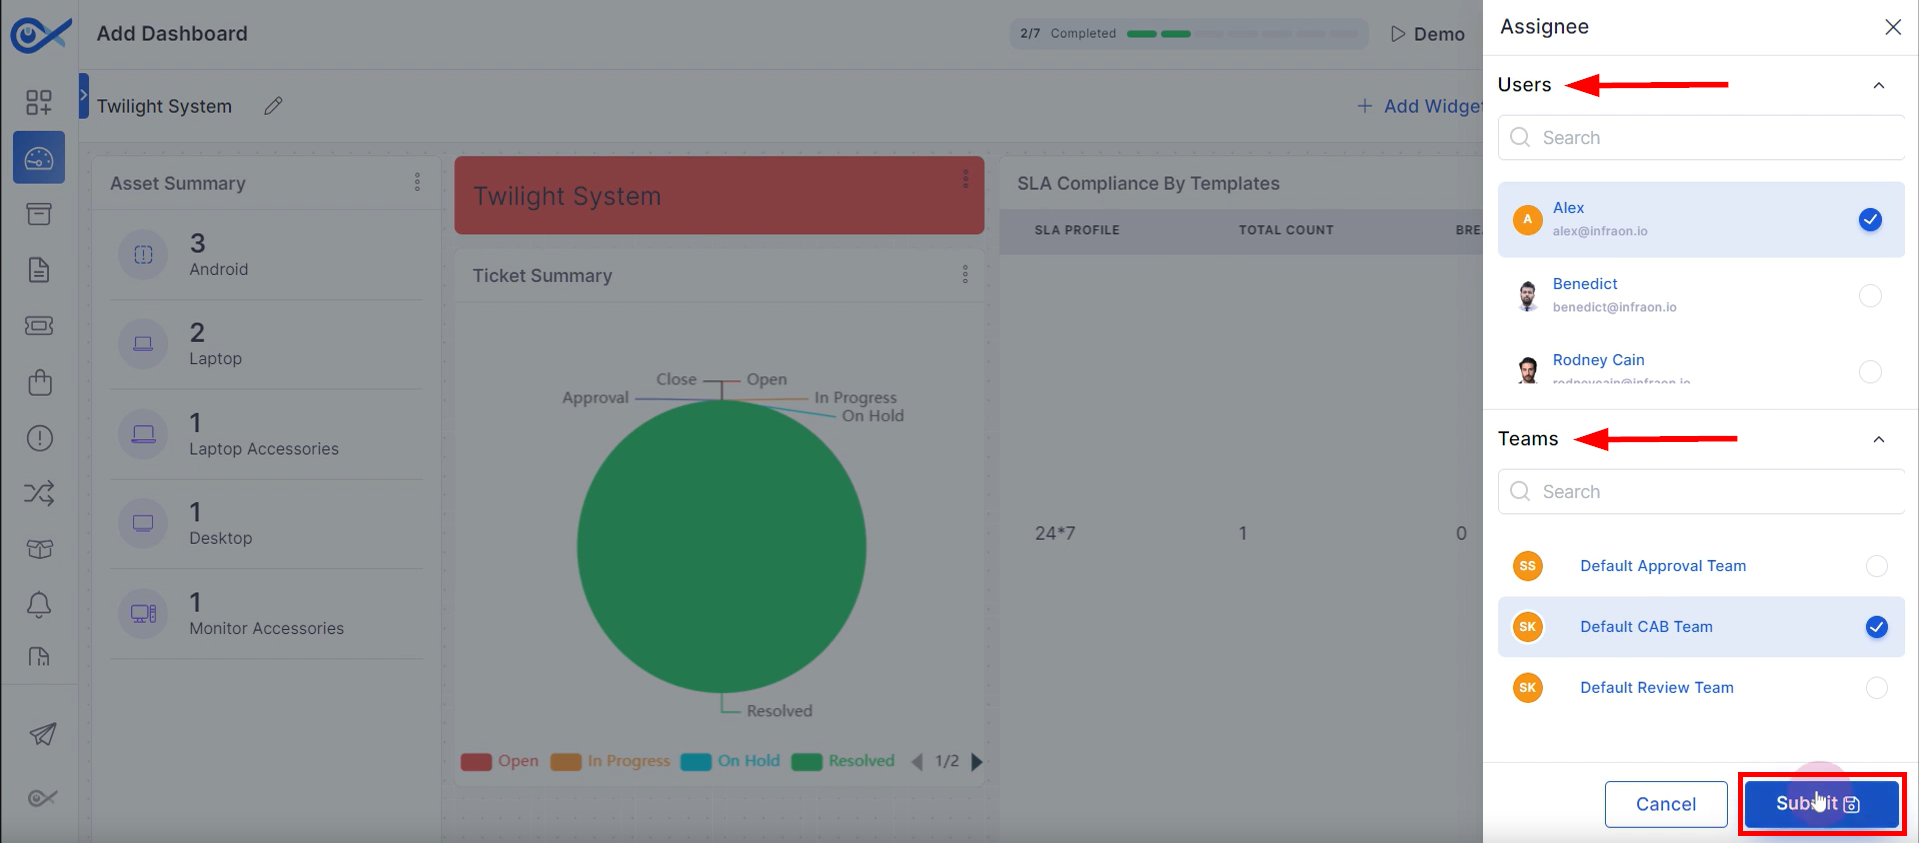
Step 1: To allocate dashboard access privileges to specific users or groups, click on the “Assignee” tab.
Step 2: Select the desired entities from the available list to specify the target “Users” or “Team” recipients for dashboard access. Upon completion of the assignee selection process, “Submit” the configuration to save the changes and apply the specified permissions.
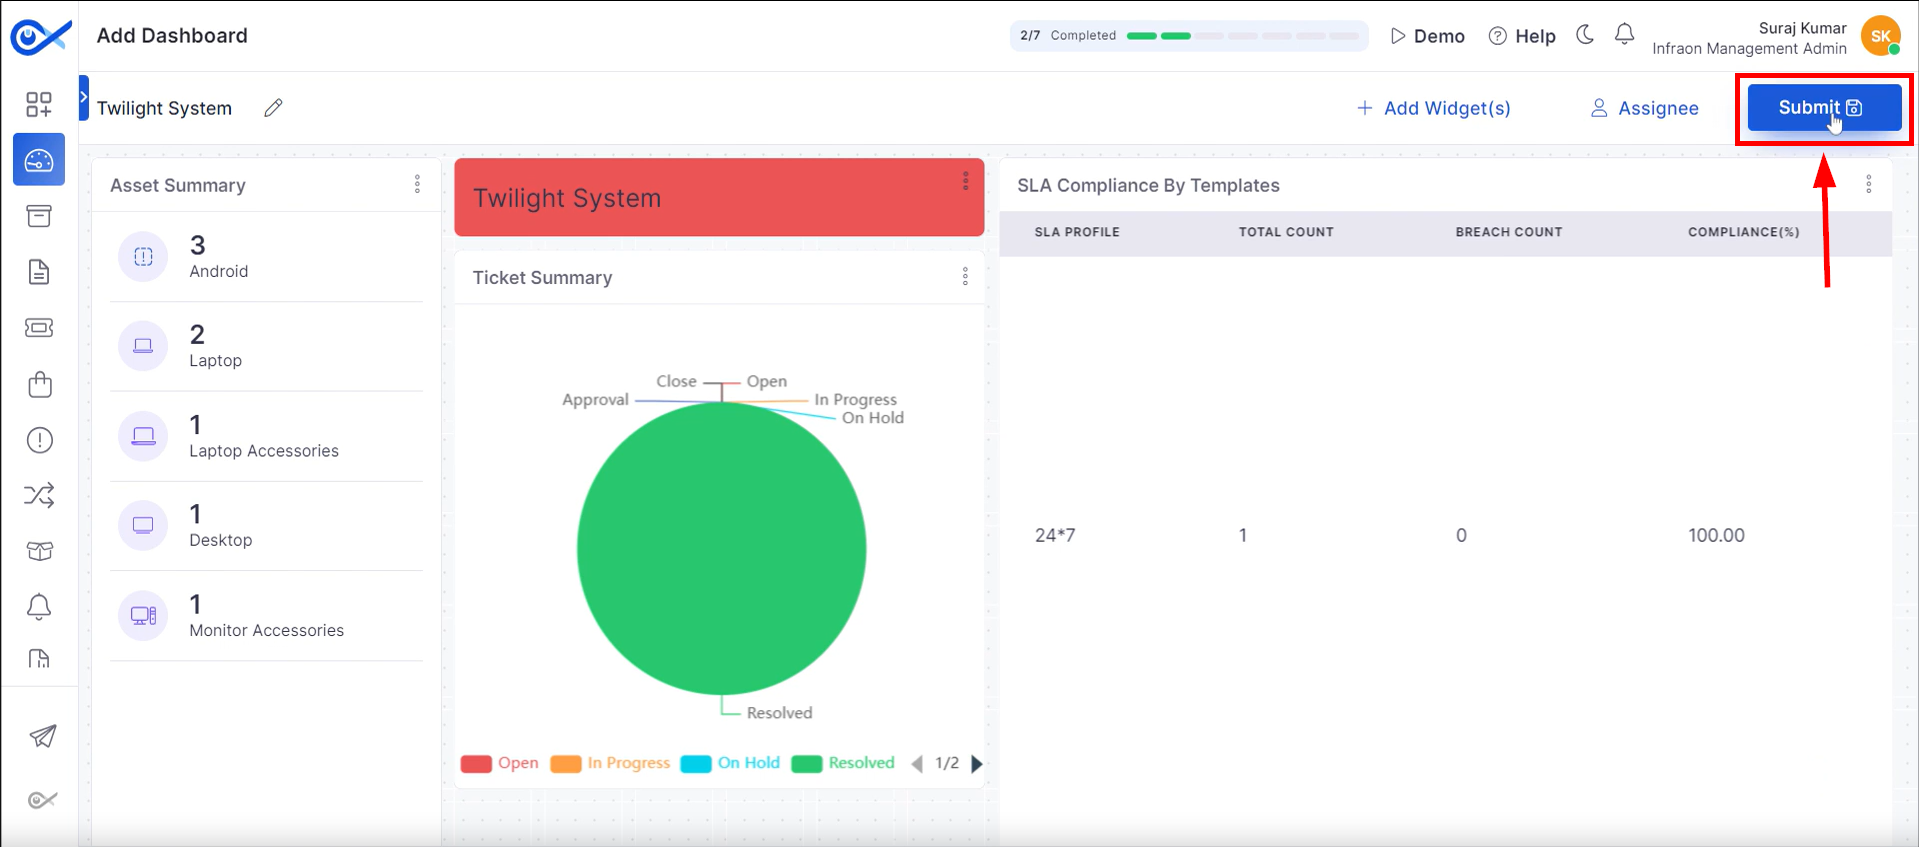
Once the desired dashboard modifications have been implemented, click “Submit” to finalize and store the updated configuration.
That's how to create a dashboard in the Infraon Infinity platform.
NOTE: Customization capabilities differ between widget types. Refer to individual widget types for specific options.
Miscellaneous
NOTE: Widget customization options vary based on their respective data types and functionalities. For detailed customization parameters, consult the specific widget documentation. Infraon Infinity provides a user-friendly interface for data visualization through various graphical representations, including pie charts, graph views, panel views, data tables, bar charts, and line charts.
 Overview