This guide provides a detailed walkthrough of ticket management within the Infraon Infinity platform. The ticketing module on the left panel is crucial for managing incidents.
In Infraon Infinity, tickets are synonymous with incidents, a term used to simplify the concept for end-users.
Understanding Incident Management
Incident management in the Infraon Infinity platform is designed to restore normal service operation as quickly as possible following an unexpected disruption or incident. An incident usually refers to an unplanned interruption or degradation of service that affects the regular operation of an IT service or system, disrupting users or stakeholders. These incidents can occur due to various factors, including hardware failures, software bugs, network issues, human errors, security breaches, or environmental events.
Ticket Creation
Ticket Assignment
Ticket Resolution
Miscellaneous
Ticket Creation
Creating Tickets in Infraon Infinity
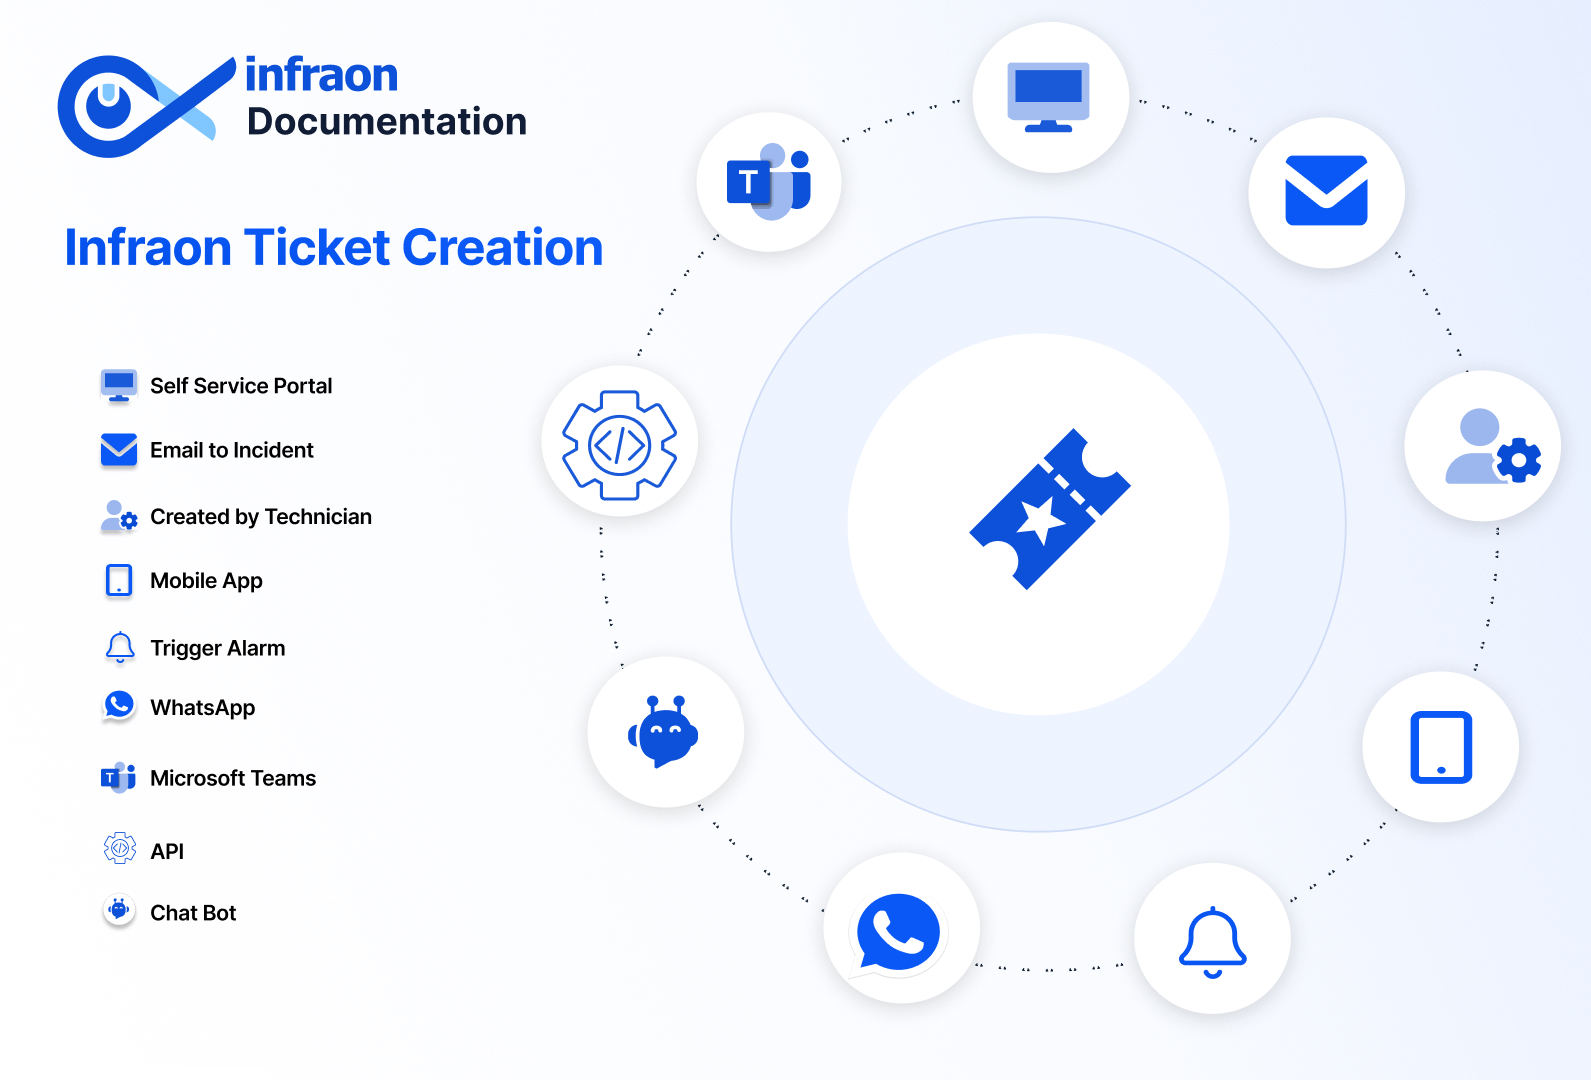
Infraon Infinity offers three primary methods for creating tickets.
The first method is through the Self-service portal, where end users can log in and raise their tickets.
The second method involves an email-to-incident feature. By configuring the support email, any emails sent by an end user automatically generate a ticket in the Infraon Infinity platform.
The third method is via the technician portal. If an end user cannot use email or the self-service portal, they can directly contact a technician. The technician can create a ticket for the end user within the admin portal.
The following sections provide a detailed look at these different methods of ticket creation.
Created by Technician
Email to Incident
Self Service Portal
Trigger Configuration
Ticket Assignment
This guide explains the ticket assignment process within the Infraon Infinity platform, focusing on the Ticket Visibility section.
Admins can view, manage, and allocate all tickets generated in the portal. In contrast, Engineers only have access to tickets assigned to them. During ticket creation, they can also self-assign tickets if they are linked to their team in the "Impacted Service" column.
The Service Desk Team can view all tickets and manually assign them to a team or a specific technician.
Infraon provides both manual and automatic ticket assignment options:
This guide explains how to create a ticket using the email-to-incident feature in the Infraon Infinity tool. This feature allows a requester or end user to send a ticket directly to a technician or the front-end administrator via a designated email ID. Before using this feature, it's necessary to configure the support mail ID in the Infraon Infinity tool.
Configuring the Support Mail ID
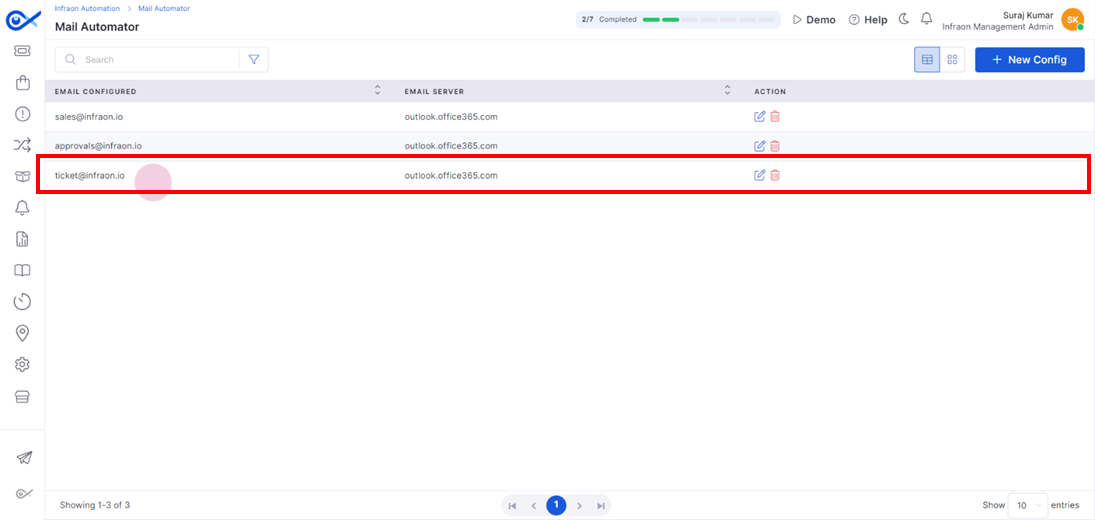
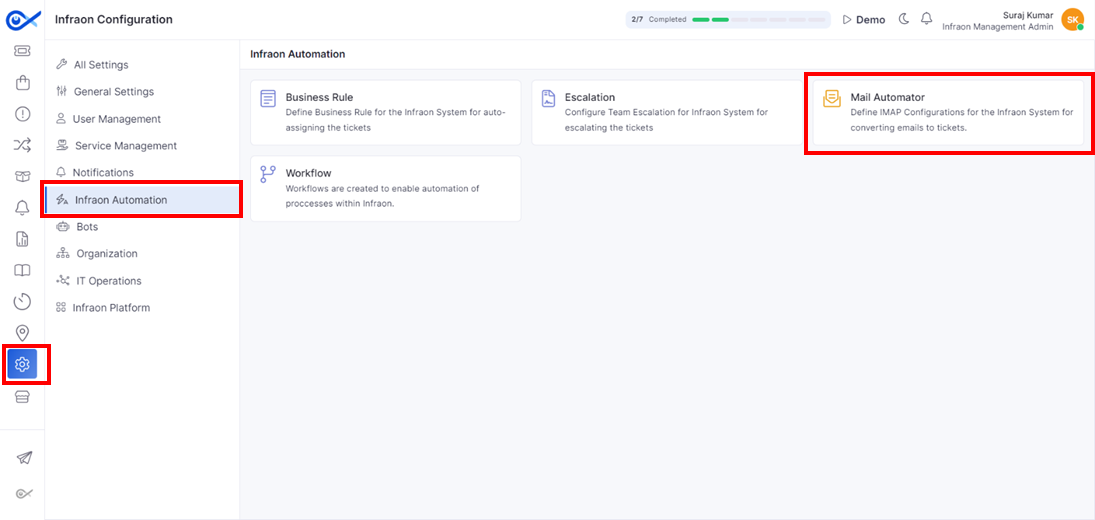
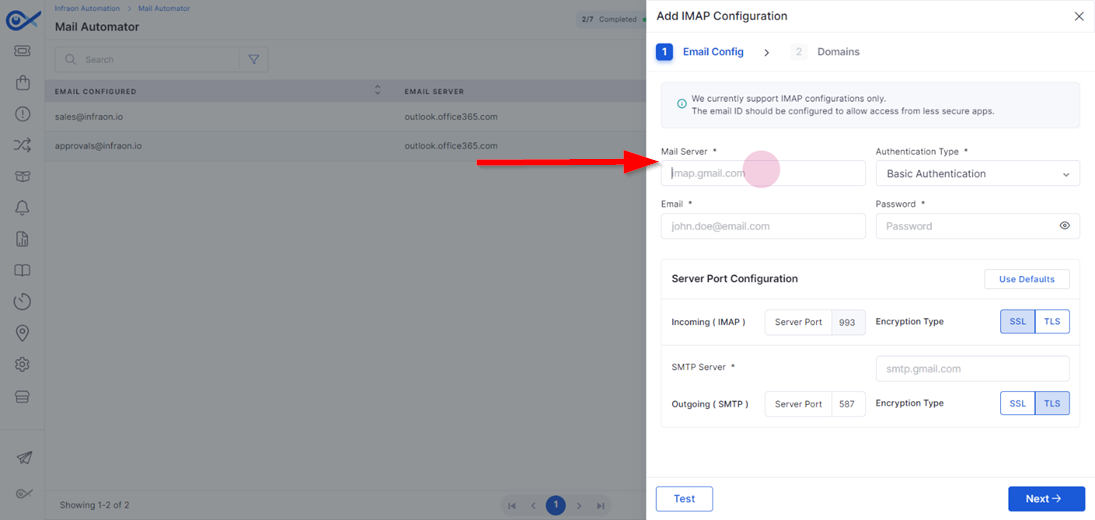
Step 1: Navigate to Infraon configuration and locate Mail Automator, also known as IMAP configuration, which resides in the Infraon Automation module. This allows you to set up automatic ticket creation from emails.
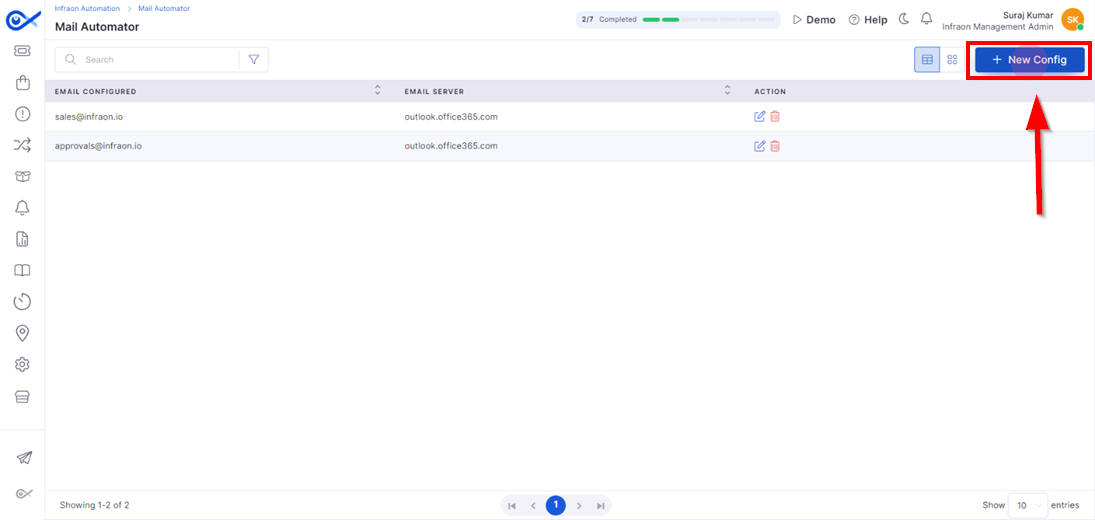
Step 2: Click on the New Configuration located at the top right corner of the page to create a new IMAP configuration.
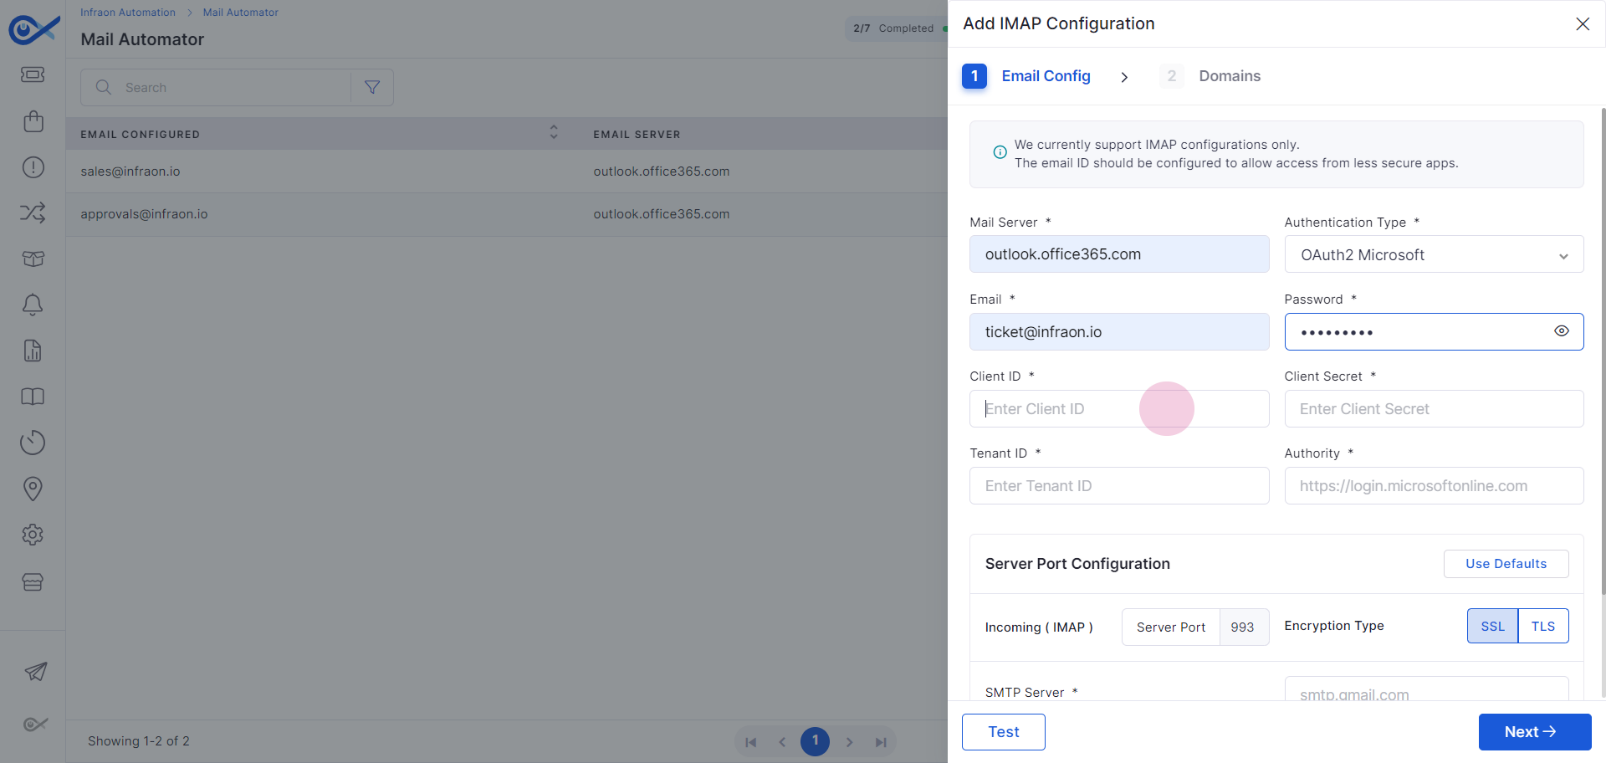
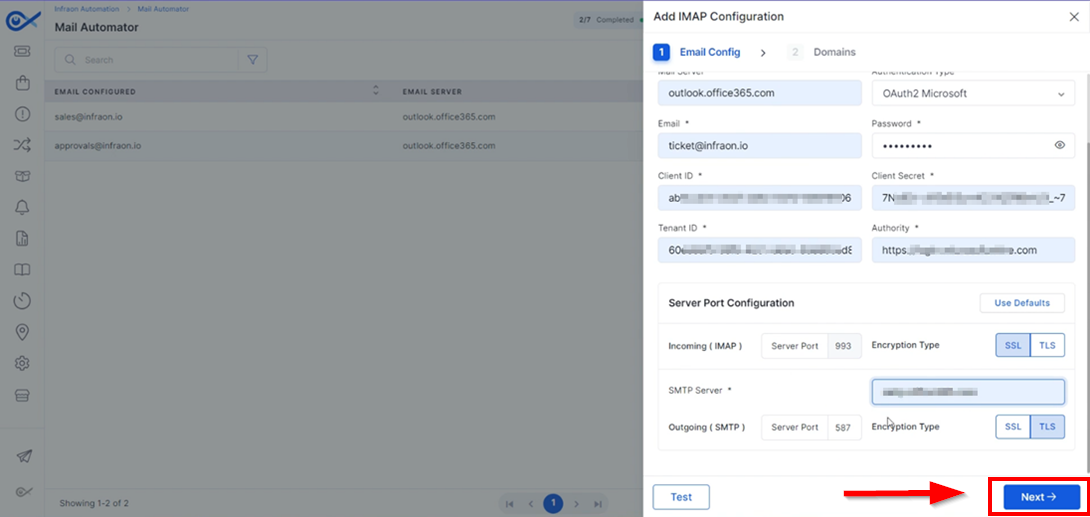
Step 3: Enter the necessary details for the mail configuration. Start by entering the mail server.
Step 4: Choose the authentication method and enter the email address and password in the designated fields. Requesters will use this email address to submit tickets via email.
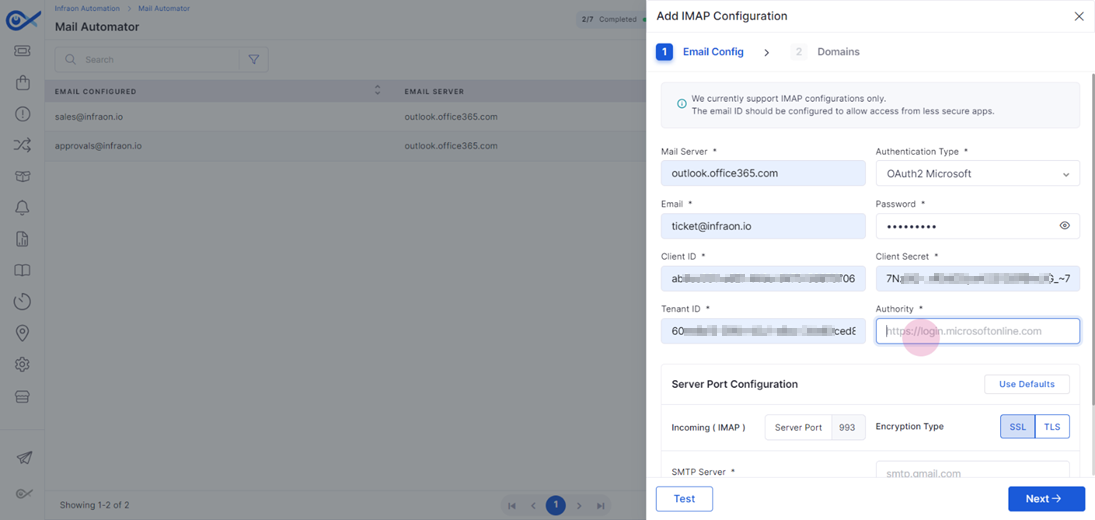
Step 5: Now, specify the Client ID, Client Secret, Tenant ID, and Authority in the respective call-out boxes.
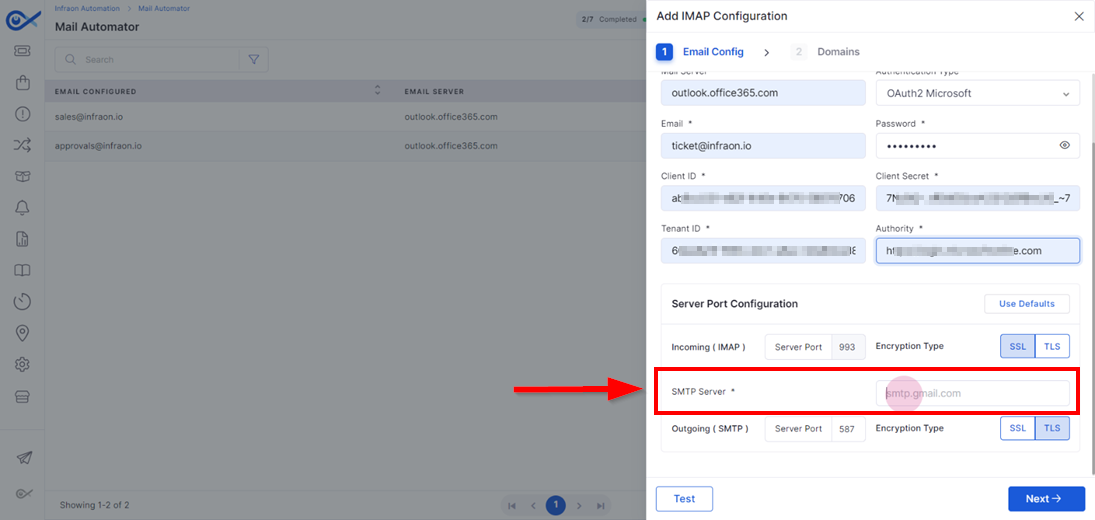
Step 6: Enter the SMTP server details in the Server Port Configuration section.
Step 7: After entering all required information, click Next.
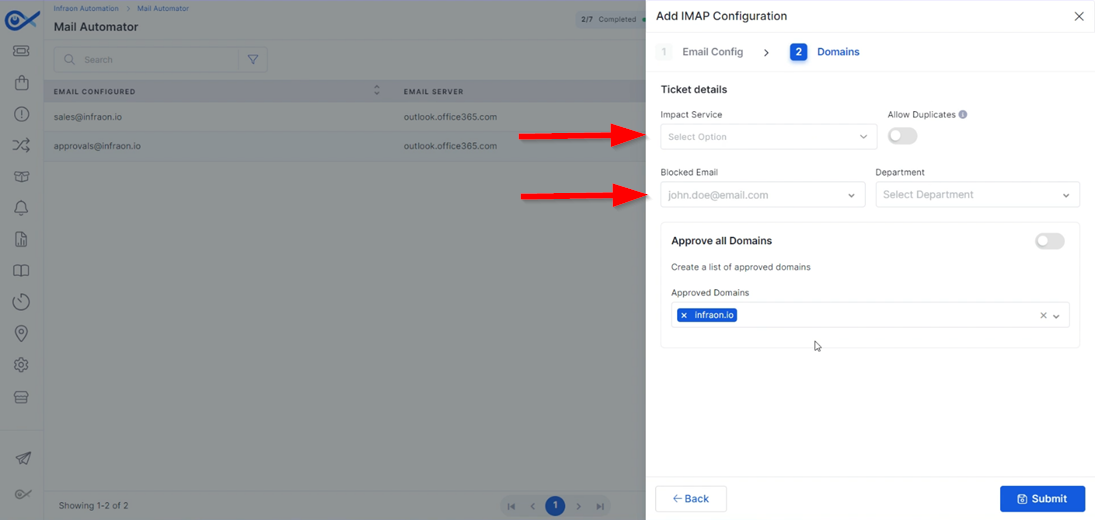
Step 8: On the domains page, add the impact services. Use the Allow Duplicate toggle button as needed. To block any email accounts, select the Blocked Email option.
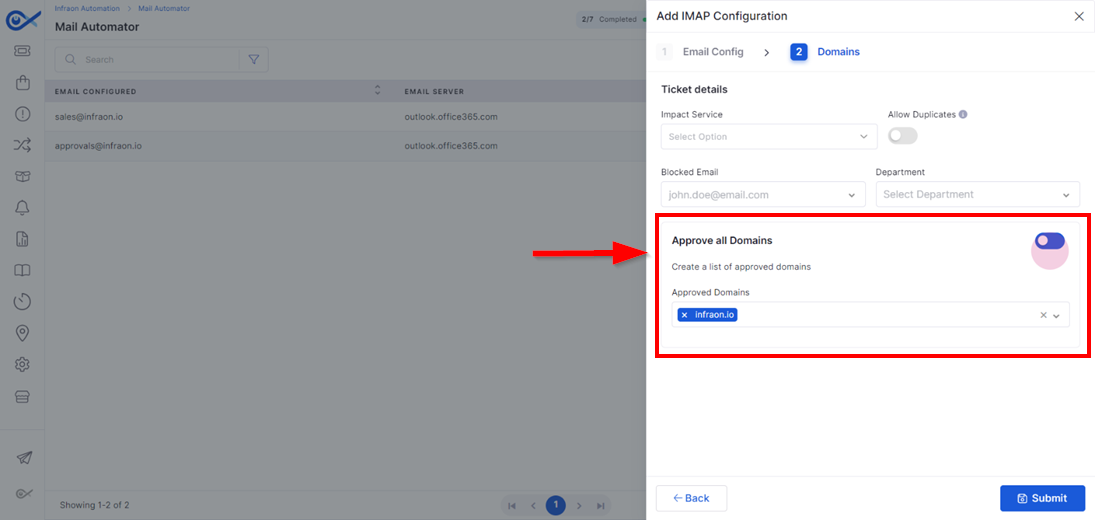
Step 9: For the "Approve all Domains" option, choose the domain ID from which tickets are to be created, or click on Approve All Domains to allow tickets from all domain IDs to be created in the administrator's portal.
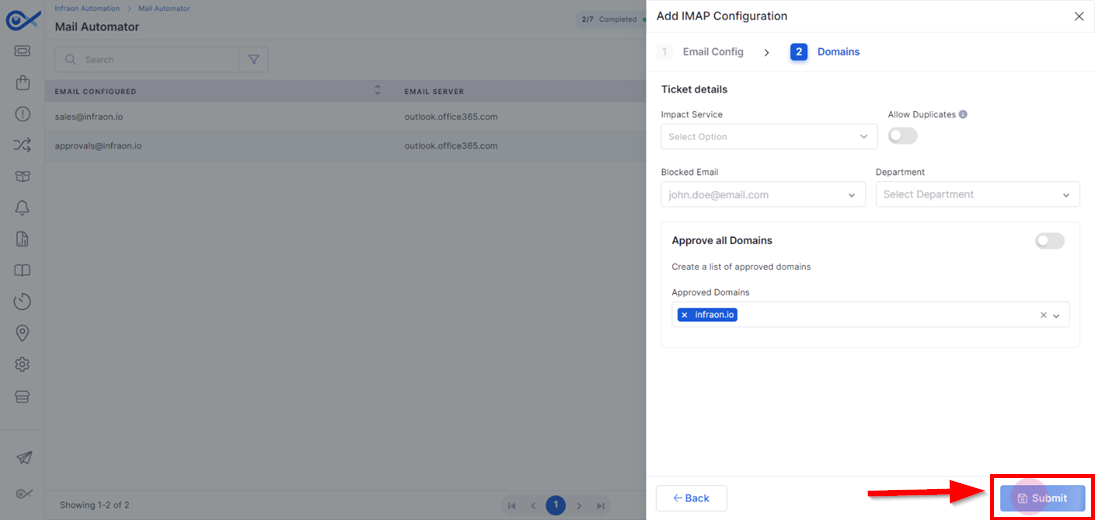
Step 10: Once the necessary configurations are made, click ‘Submit’ to add the IMAP Configuration.
Step 11: Now, admins or users can share this configured email ID with the requesters or end users to create tickets using the email-to-incident feature.
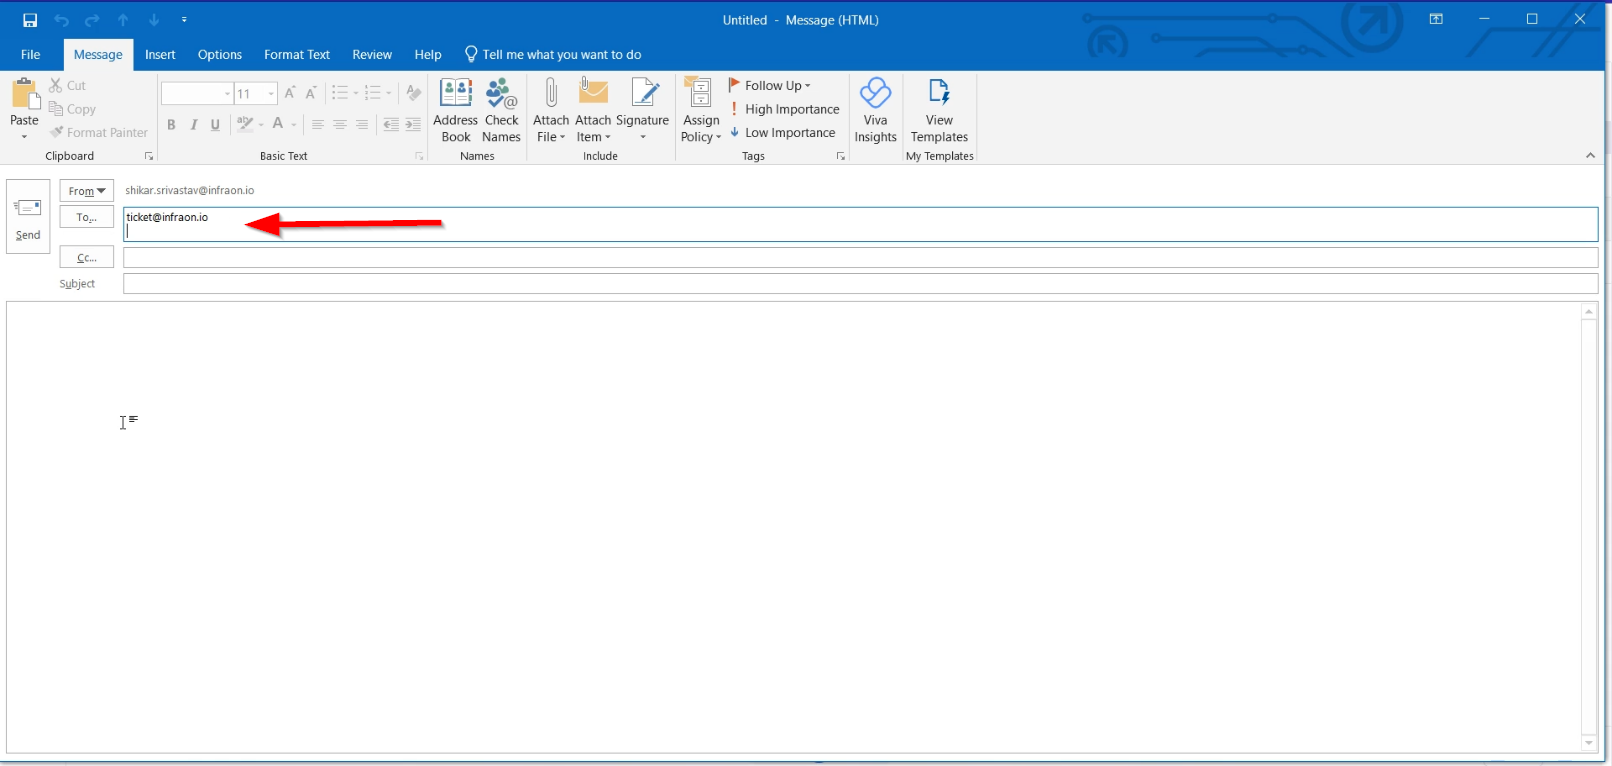
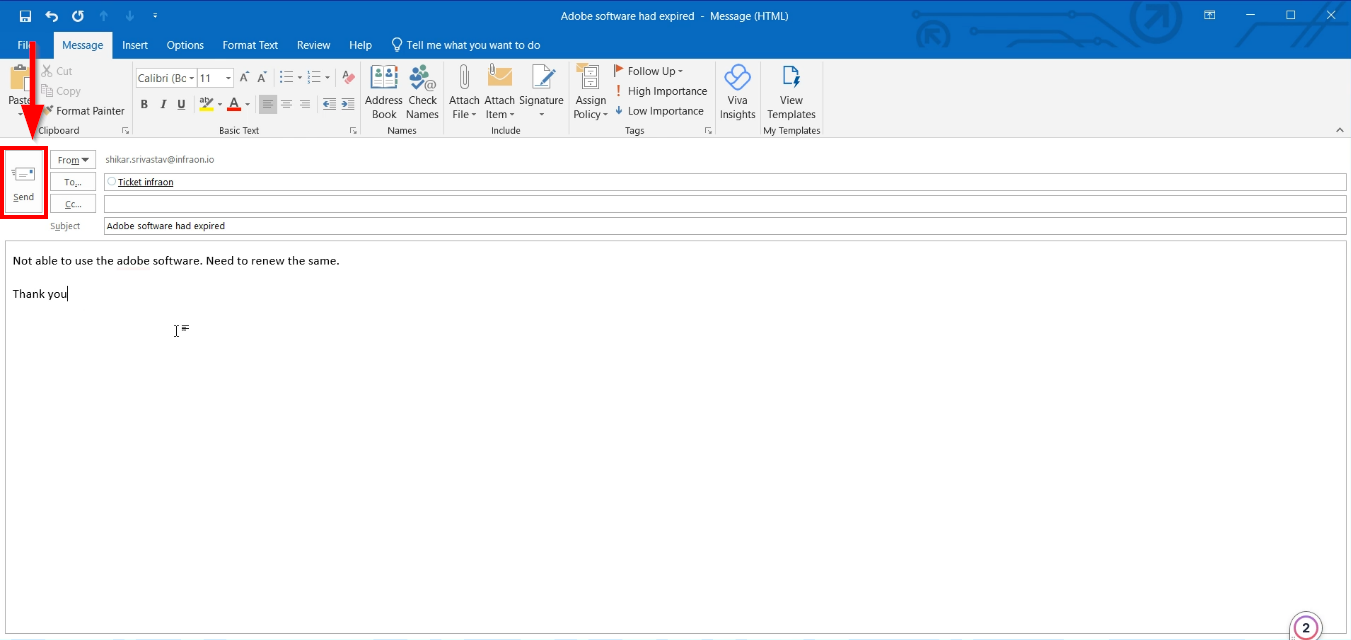
Step 1: To submit a ticket via email, compose a new email and address it to the configured email address.
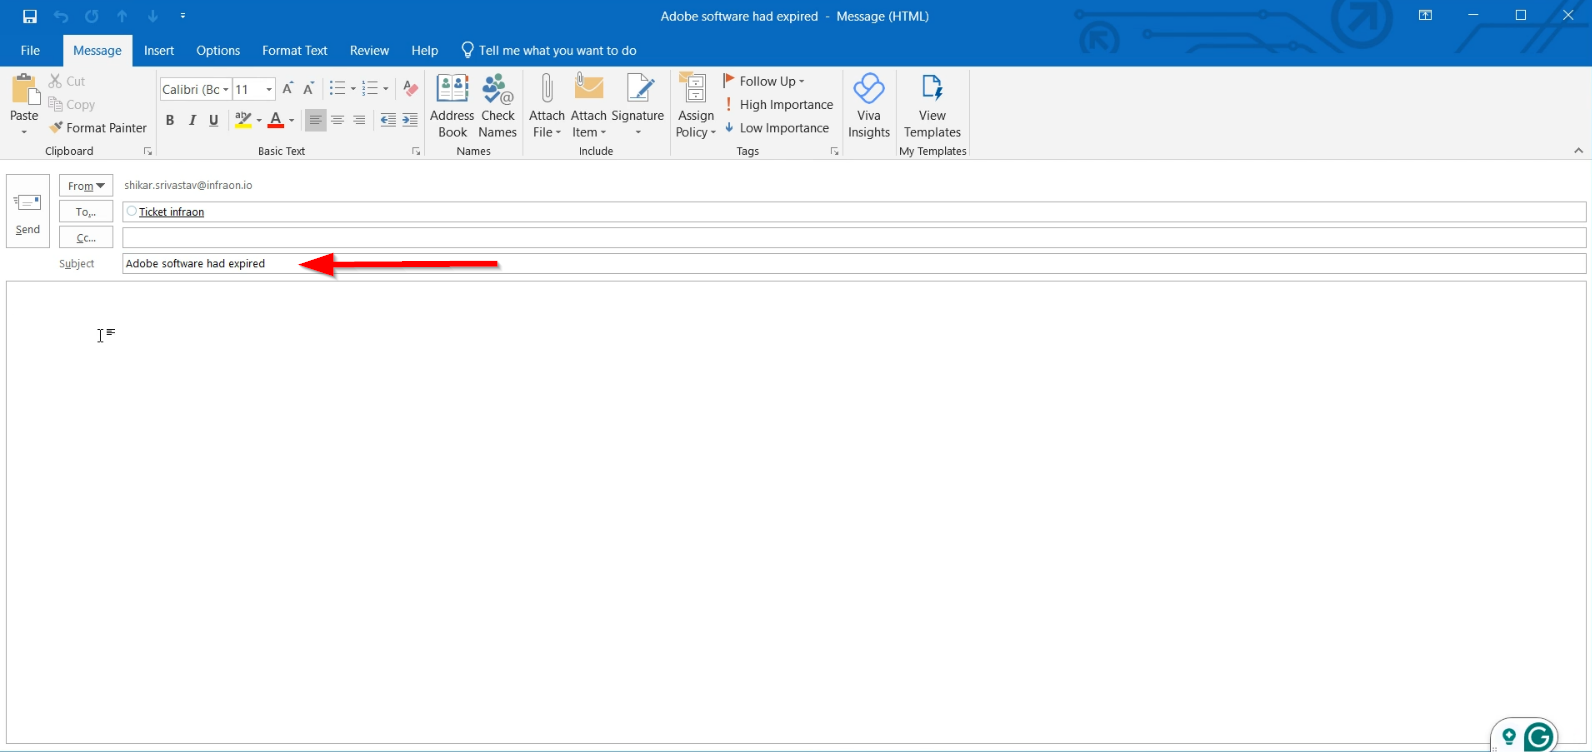
Step 2: Include a subject line for the ticket. Without a subject, the ticket won't be created in the admin portal.
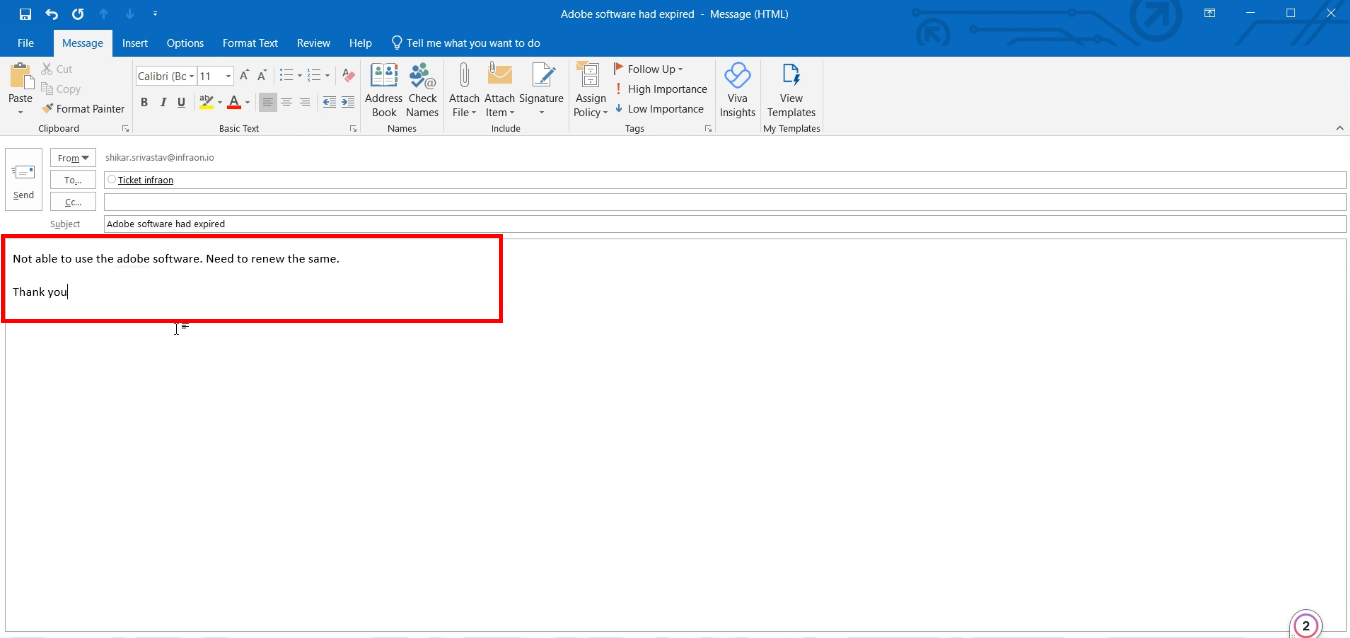
Step 3: Summarize the issue for the technician. This helps the technician resolve the issue more quickly.
Step 4: After filling in the details, click Send.
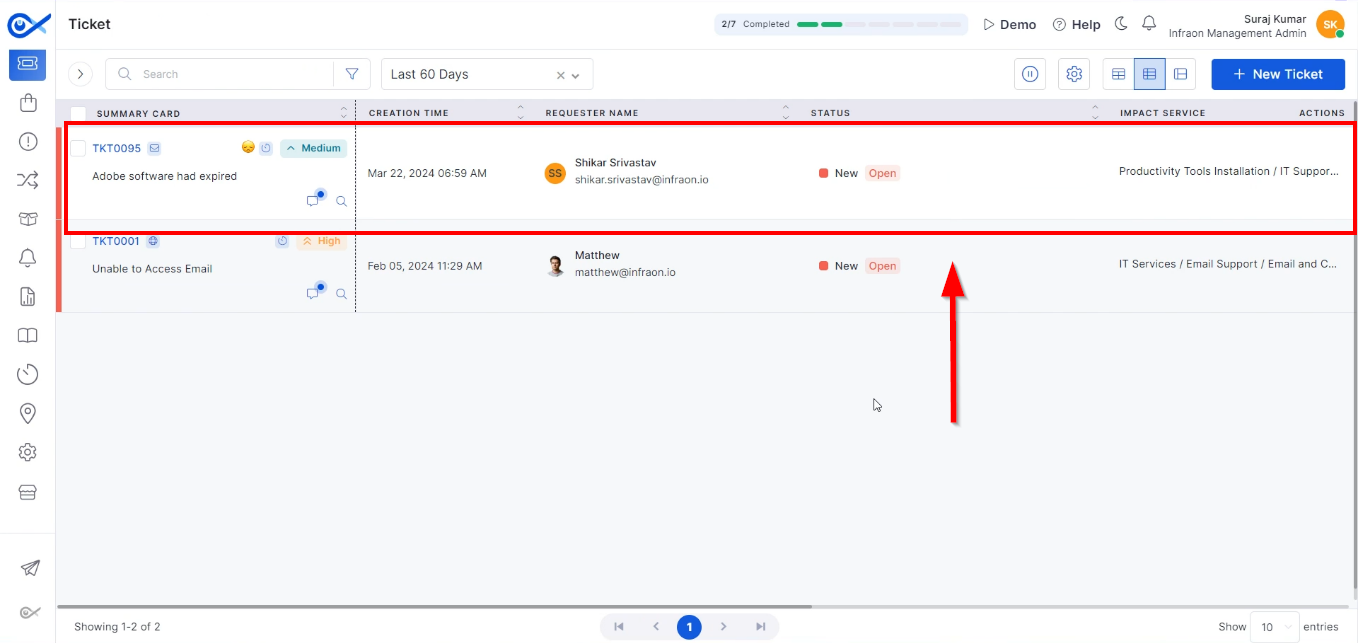
Once the email is sent, a ticket is generated in the admin portal. Technicians can see the created ticket, source (email), subject line, summary, and the requester's name.
The technician can then start working on the ticket and provide a resolution to the end user.
This process, known as "email to incident," allows the end user to send an email that is converted into a ticket in the Infraon Infinity tool.
Self Service Portal
This guide explains how to raise a ticket from the self-service portal. The self-service portal is a dedicated platform for end users to raise tickets and request services. To access this portal, the user, technicians, or admin must first grant the requester access.
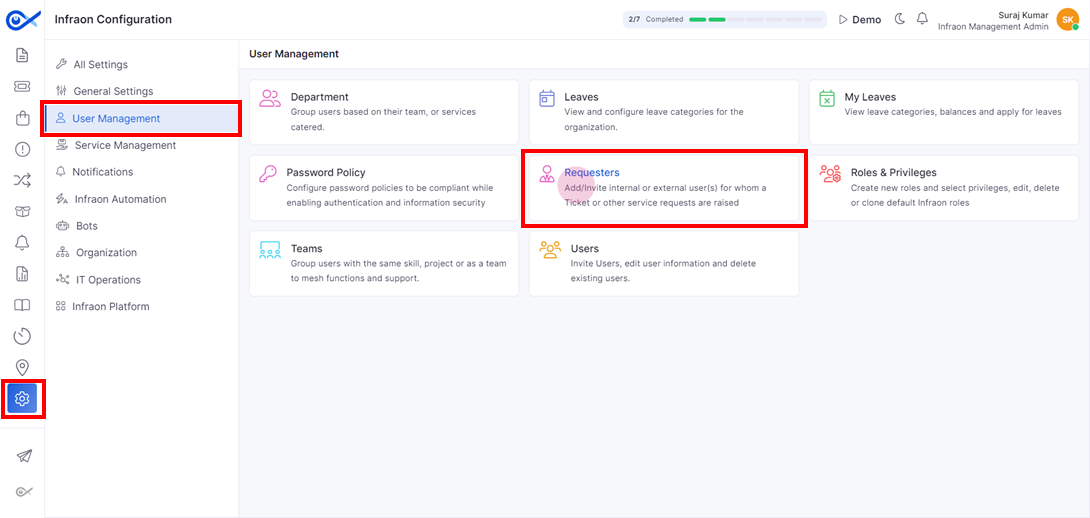
Step 1: In the Infraon Infinity platform, navigate to the Infraon configuration located on the left panel, proceed to user management, and select the requester module.
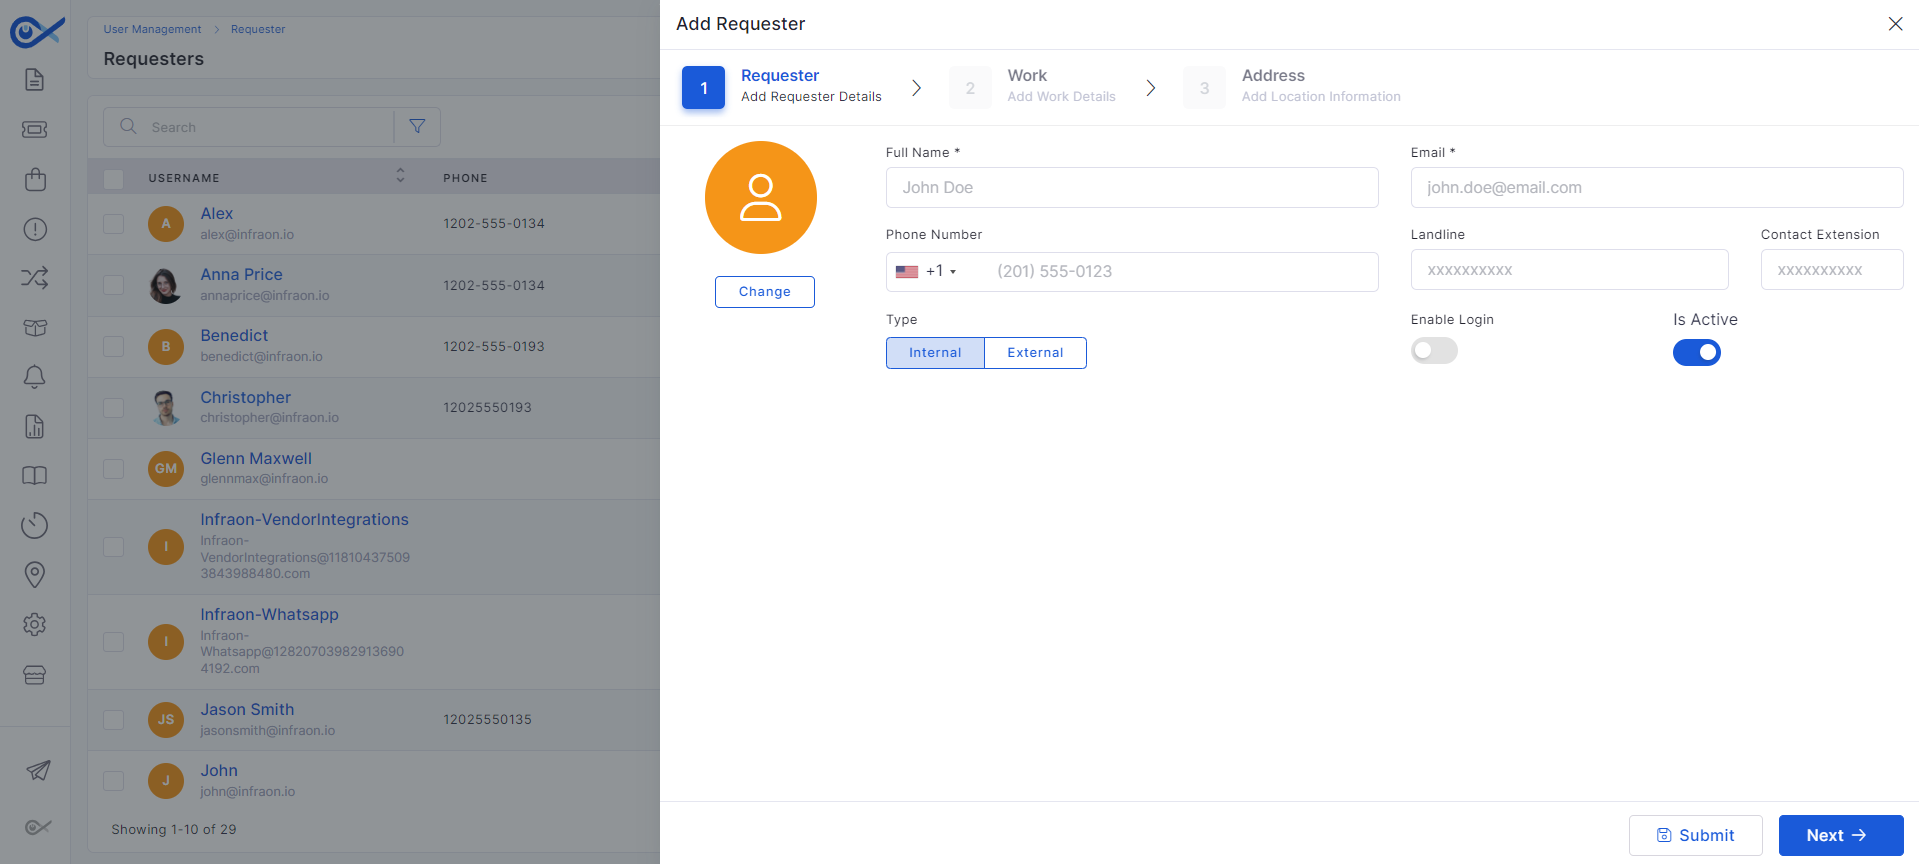
Step 2: Add the respective end user in the requester module.
Admins must then share the self-service portal credentials with the end user.
Once the requester has the portal credentials, they're able to create a ticket.
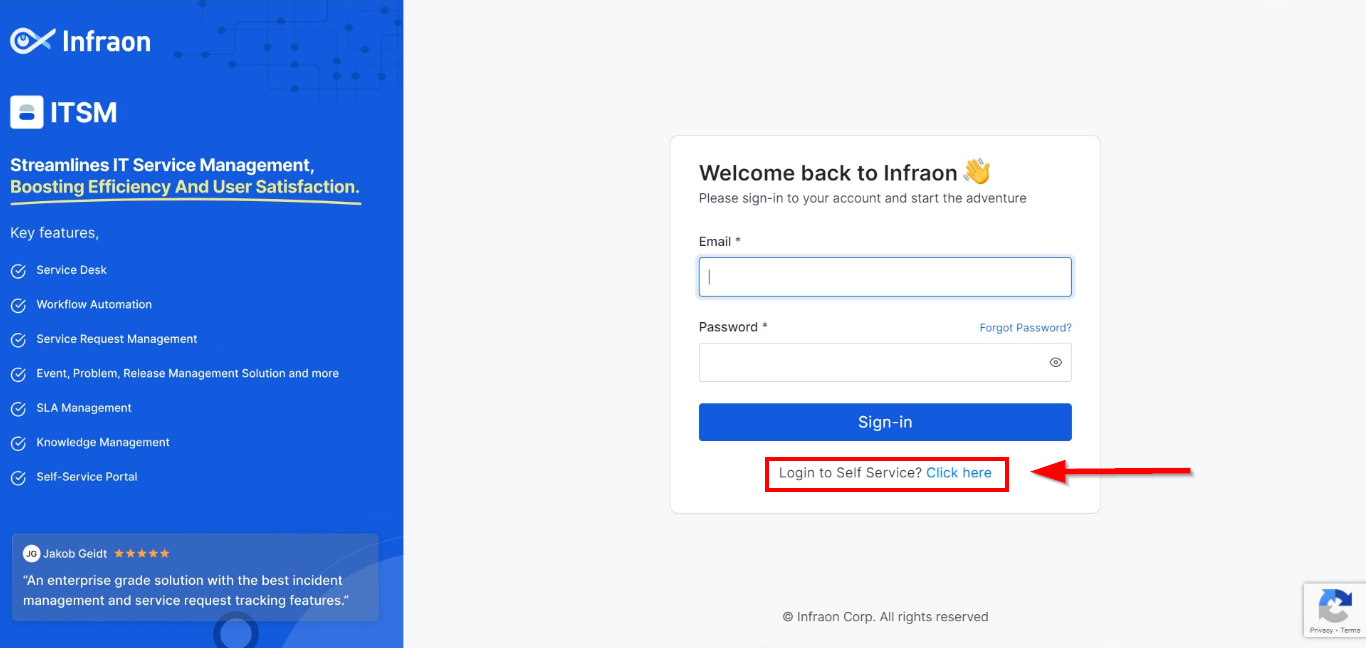
Step 1: Use the login URL shared by the admins to access the self-service portal. Select the self-service option to continue.
Ticket Assignment (Manual)
This guide explains the manual ticket assignment process in the Infraon Infinity platform. In this process, the Admins or the Service Desk team assign tickets by selecting the appropriate team, expertise, level, and technician. The ticket is then directly assigned to the selected technician.
Start with the following steps:
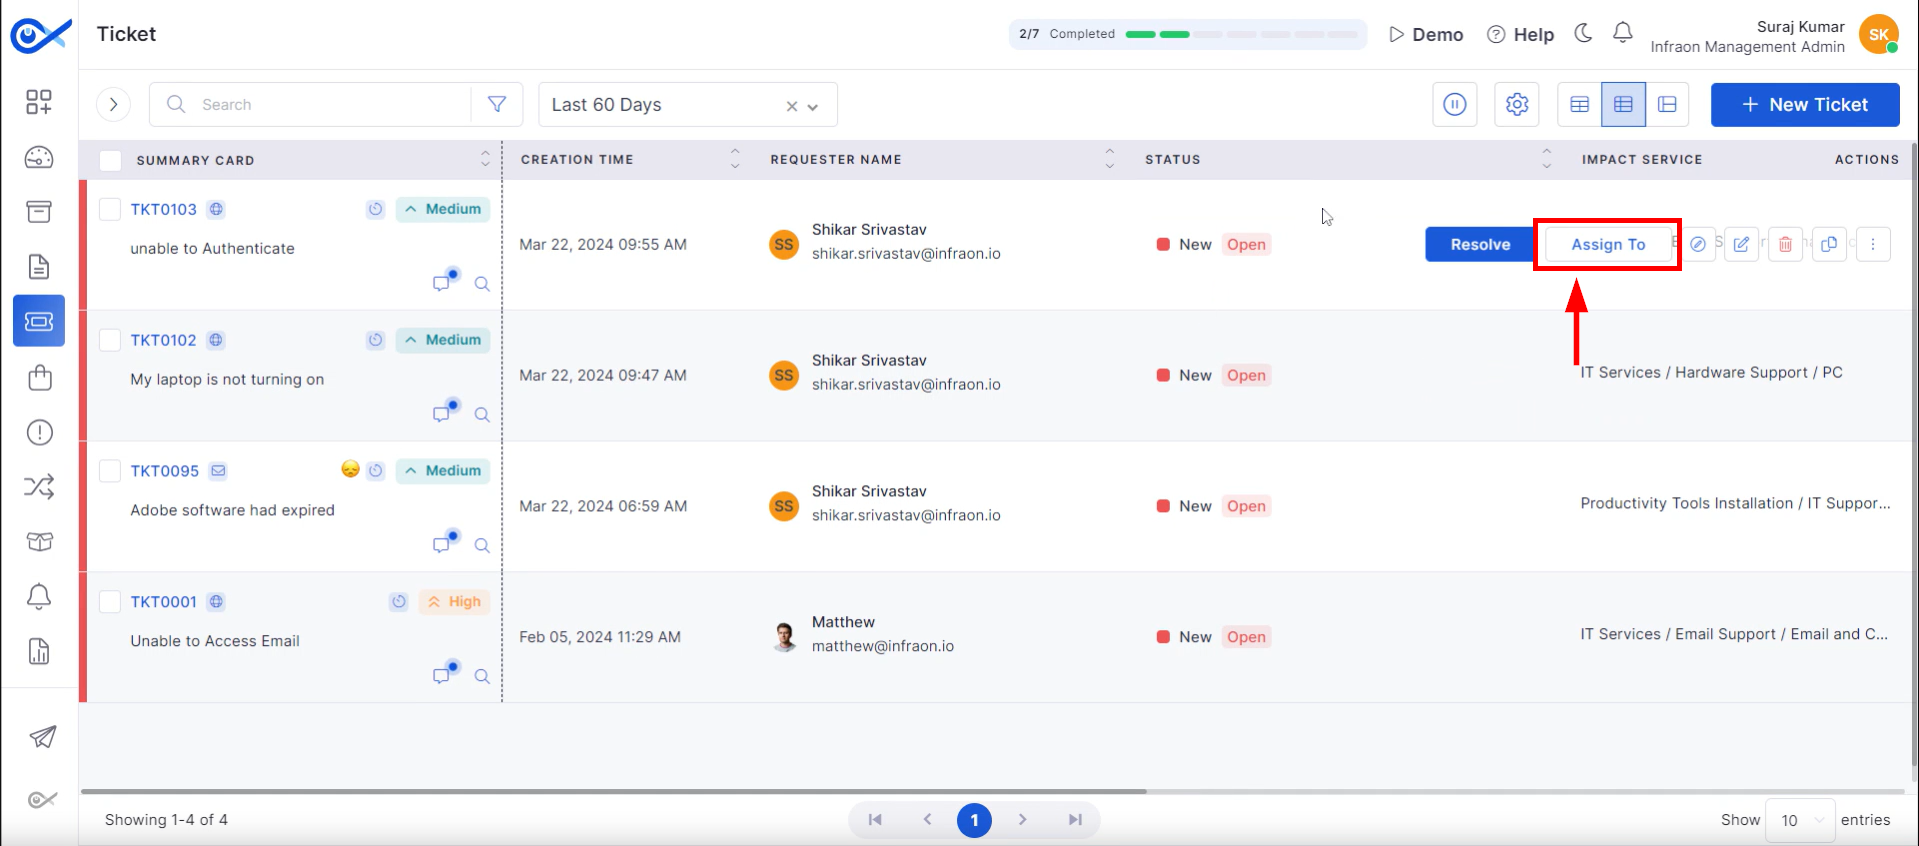
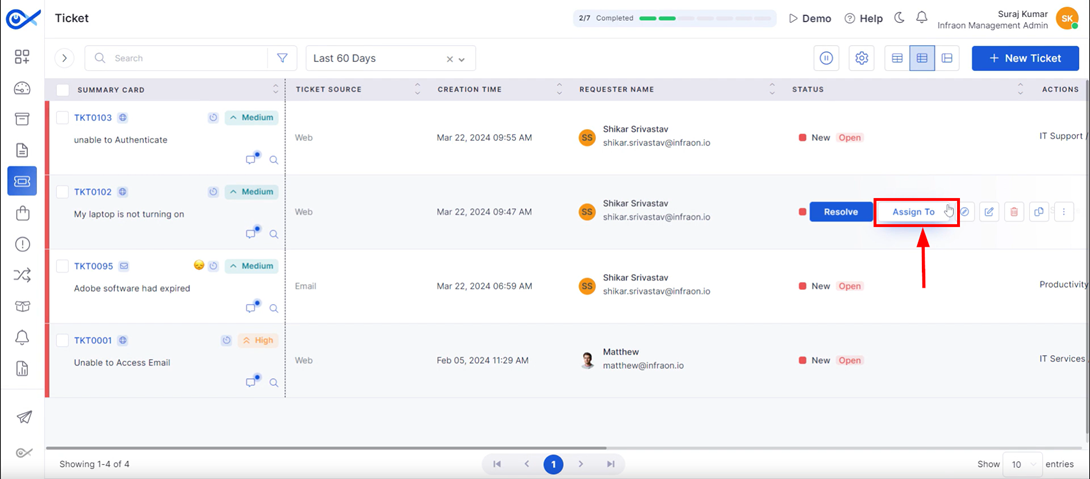
Step 1: Hover over the ticket and click on the “Assign To” option.
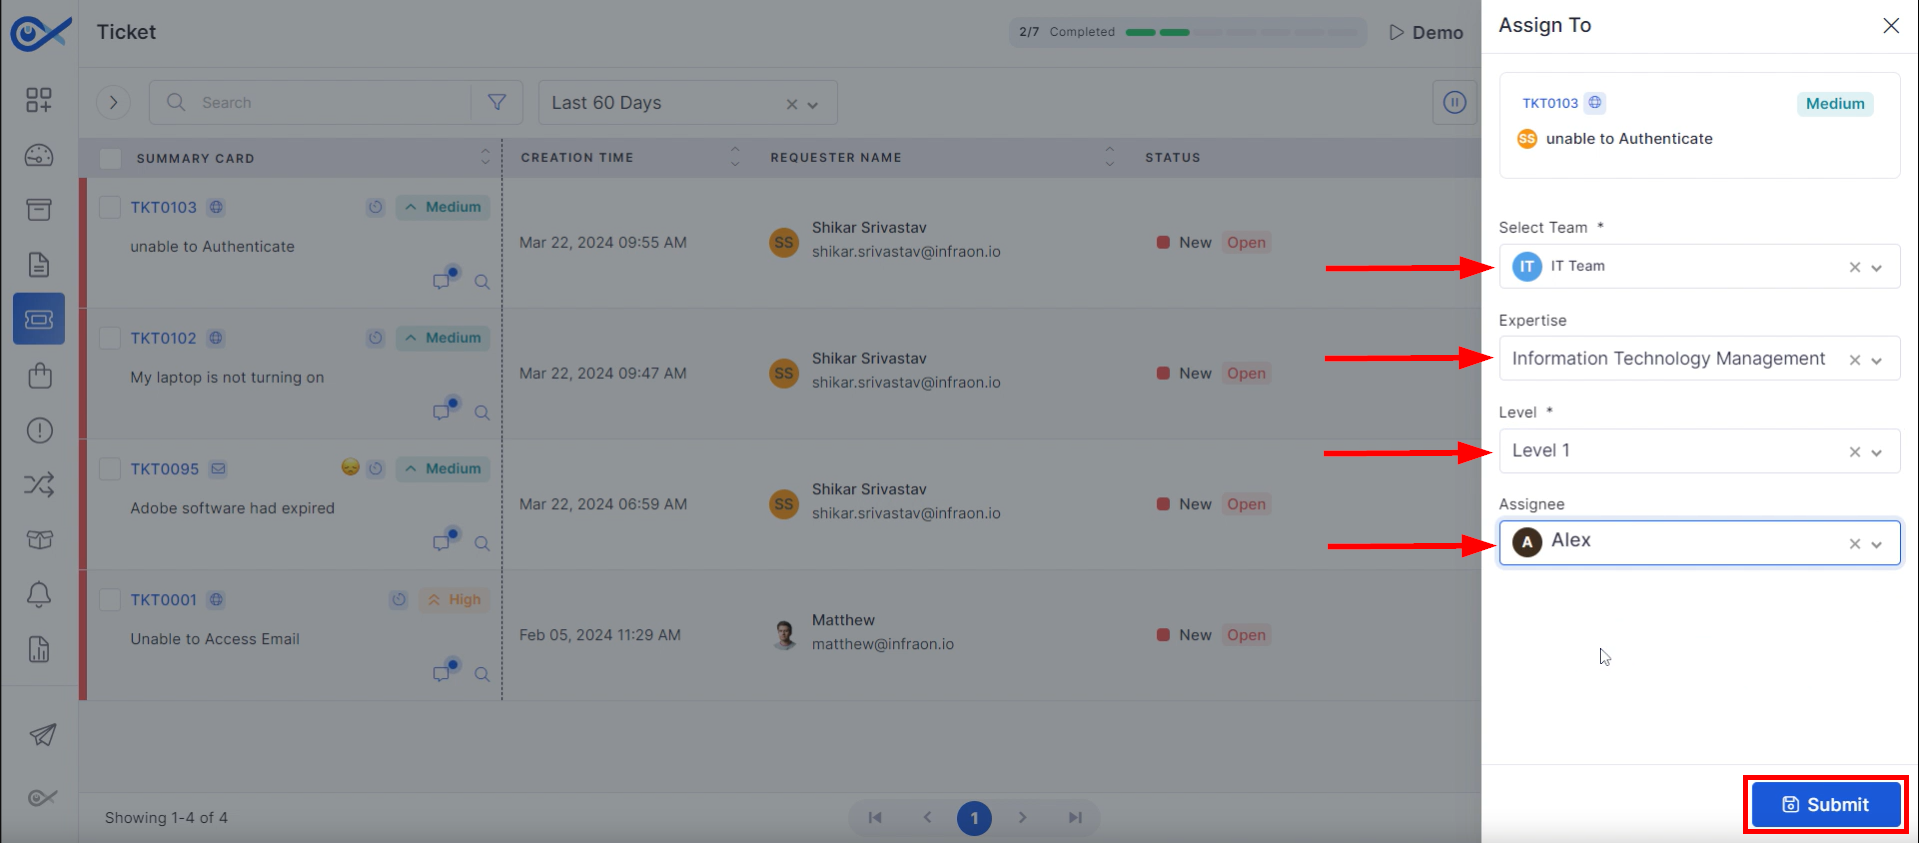
Step 2: A new pop-up window will appear where you can specify ticket ownership and handling.
Select the target “Team” responsible for the ticket and the appropriate Expertise group. Determine the ticket's priority “Level,” indicating the required skill tier within the designated team. Finally, choose the specific technician or the “Assignee” who will be assigned to address the ticket.
Click on Submit to finalize the assignment.
Setting Up Domains and Submitting Configuration
Creating Tickets as an End User
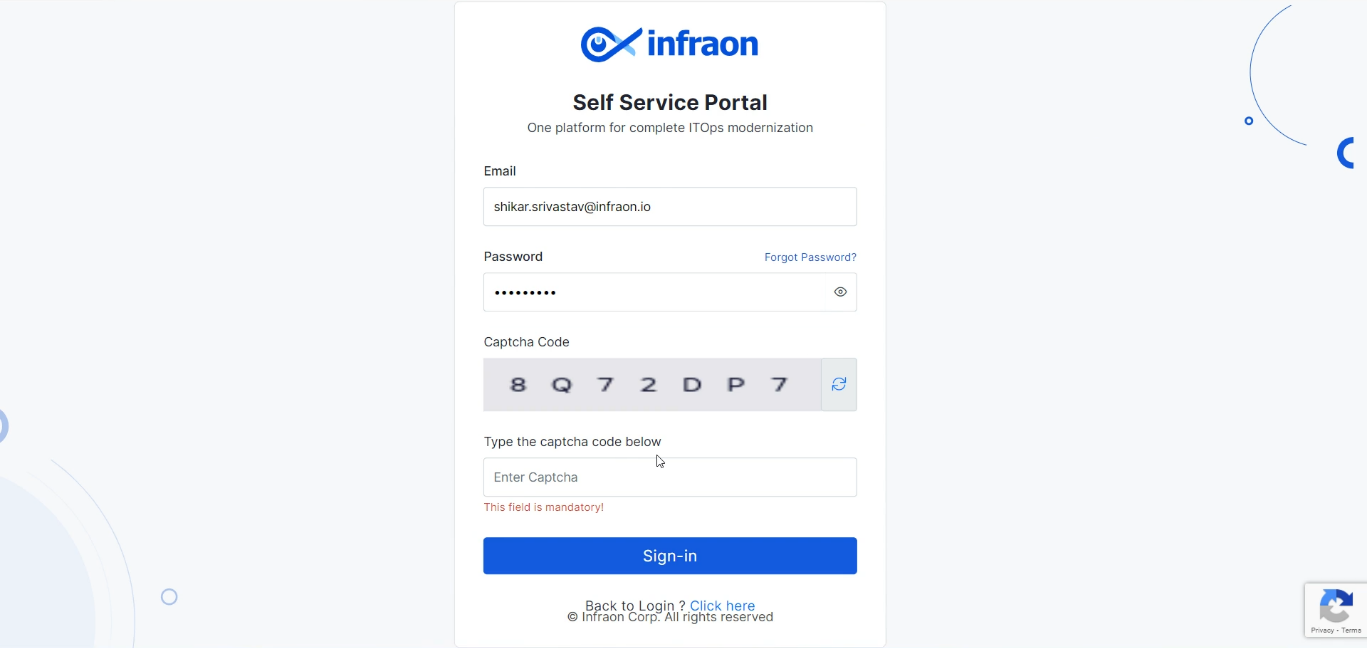
Step 2: Enter the valid login credentials provided by the admins.
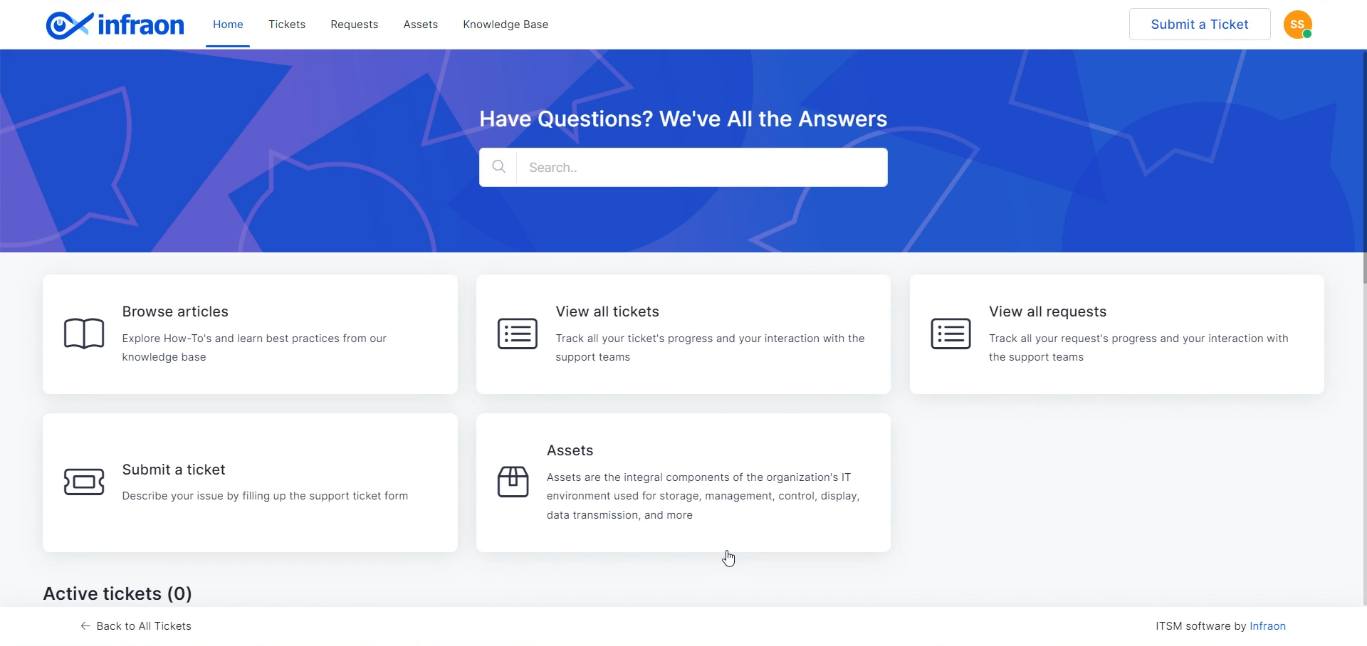
Step 3: After signing in, you'll be redirected to the homepage.
Here, requesters can browse articles, view raised tickets and requests and check allocated assets.
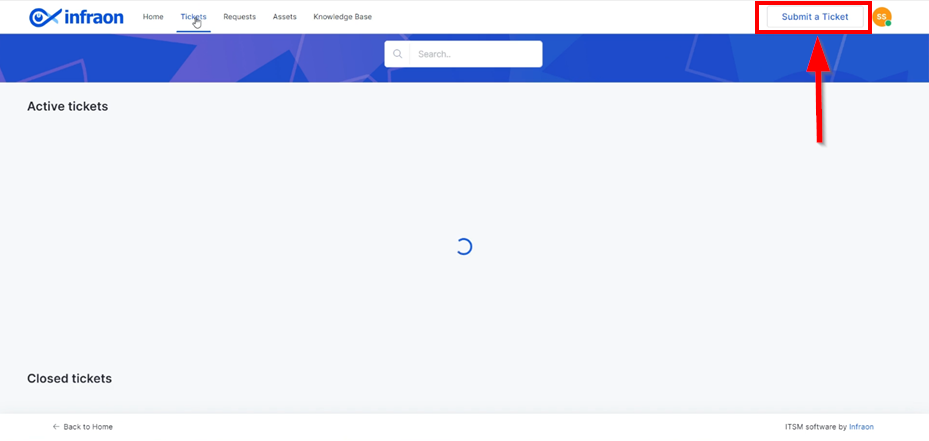
Step 1: To add a ticket, click on "Submit a ticket," located at the top right corner of the page.
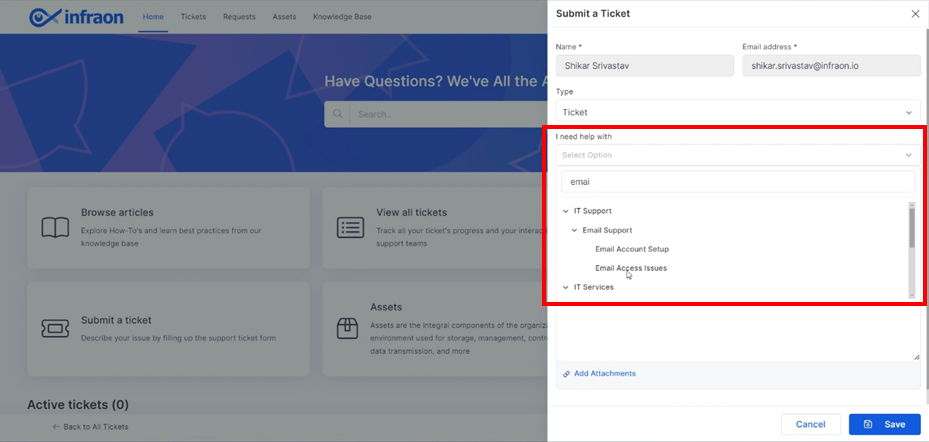
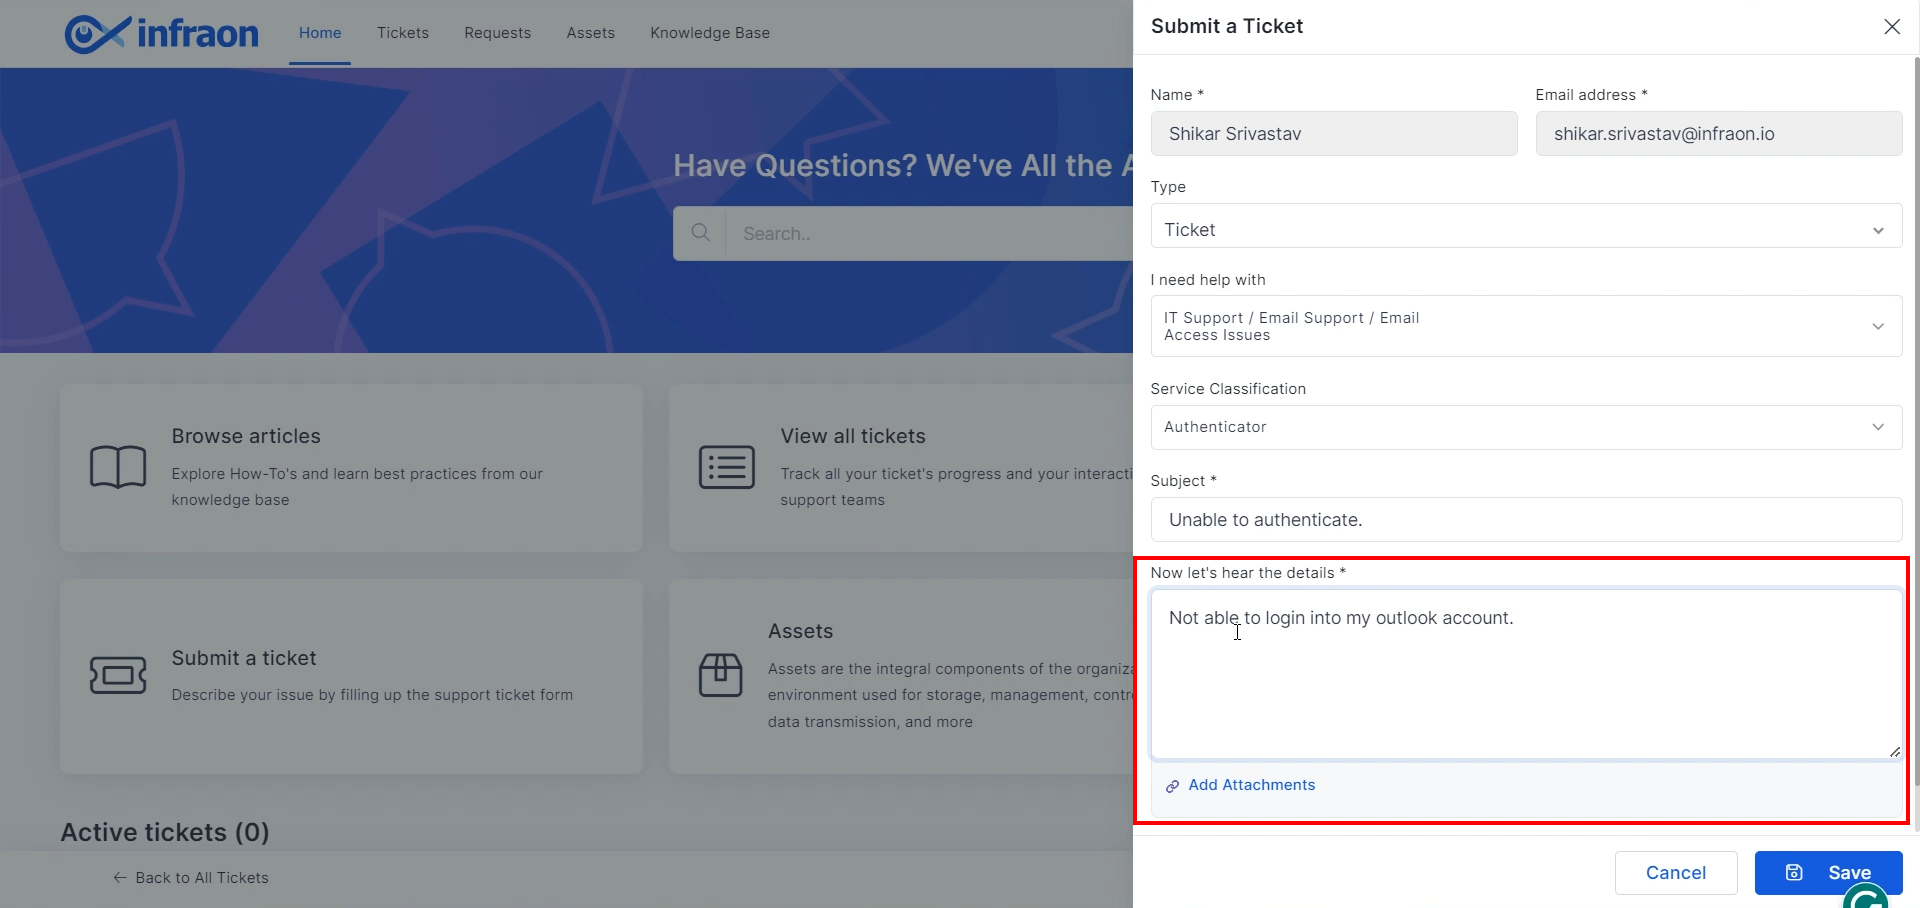
Step 2: In the "I need help with" call-out box, select the type of service where the issue has occurred.
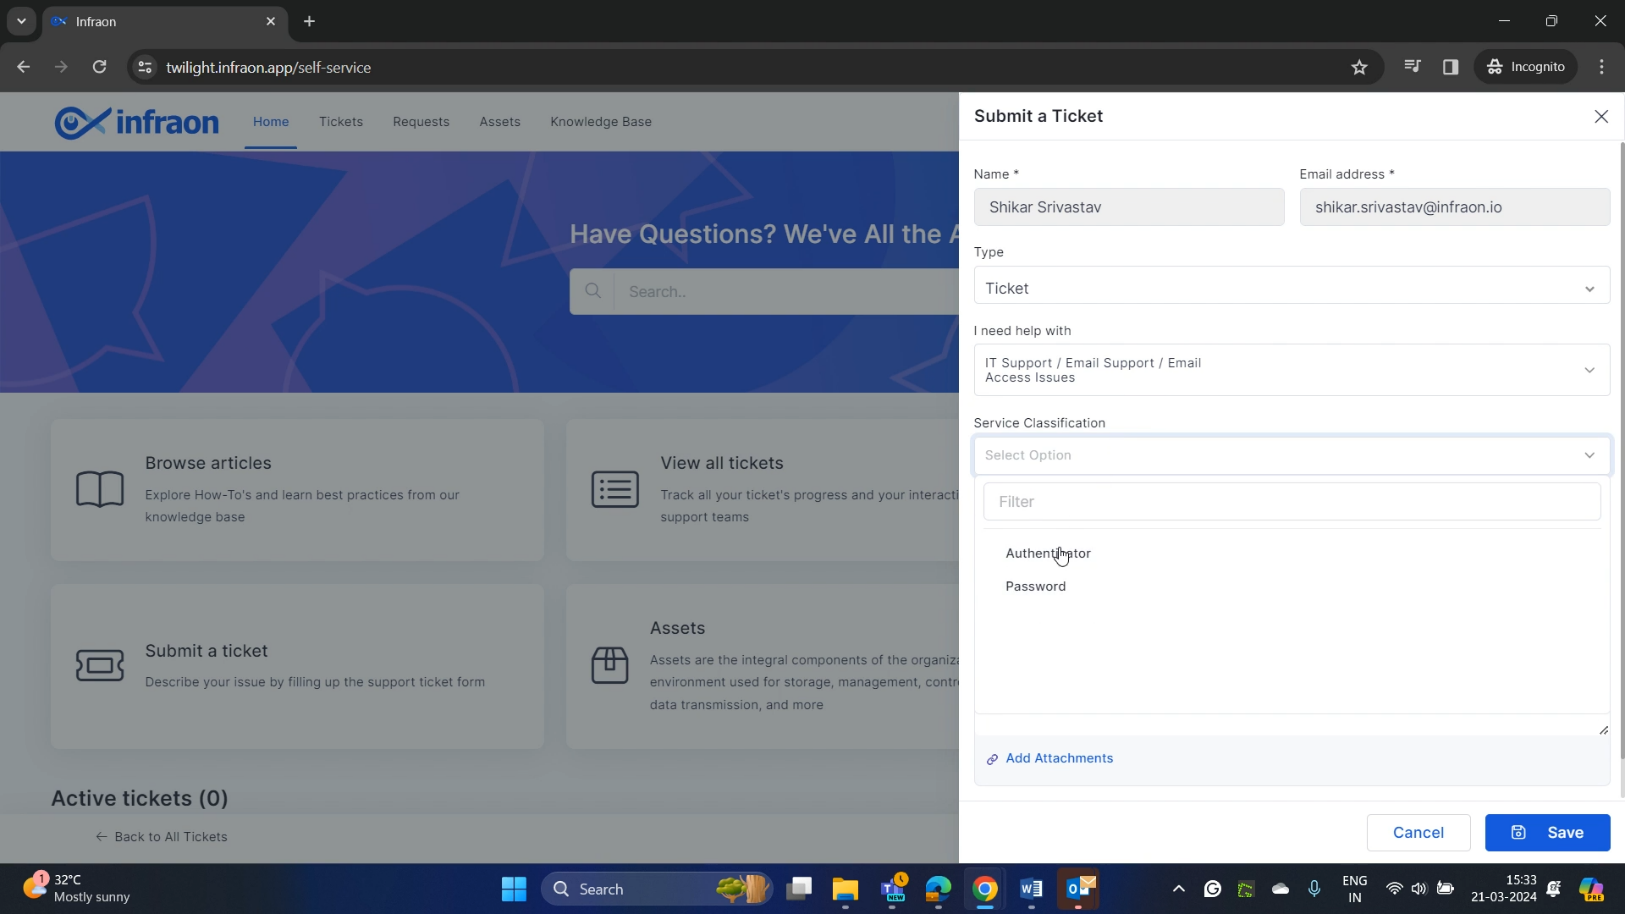
Step 3: Requesters can also add the Service classification in the respective call-out box.
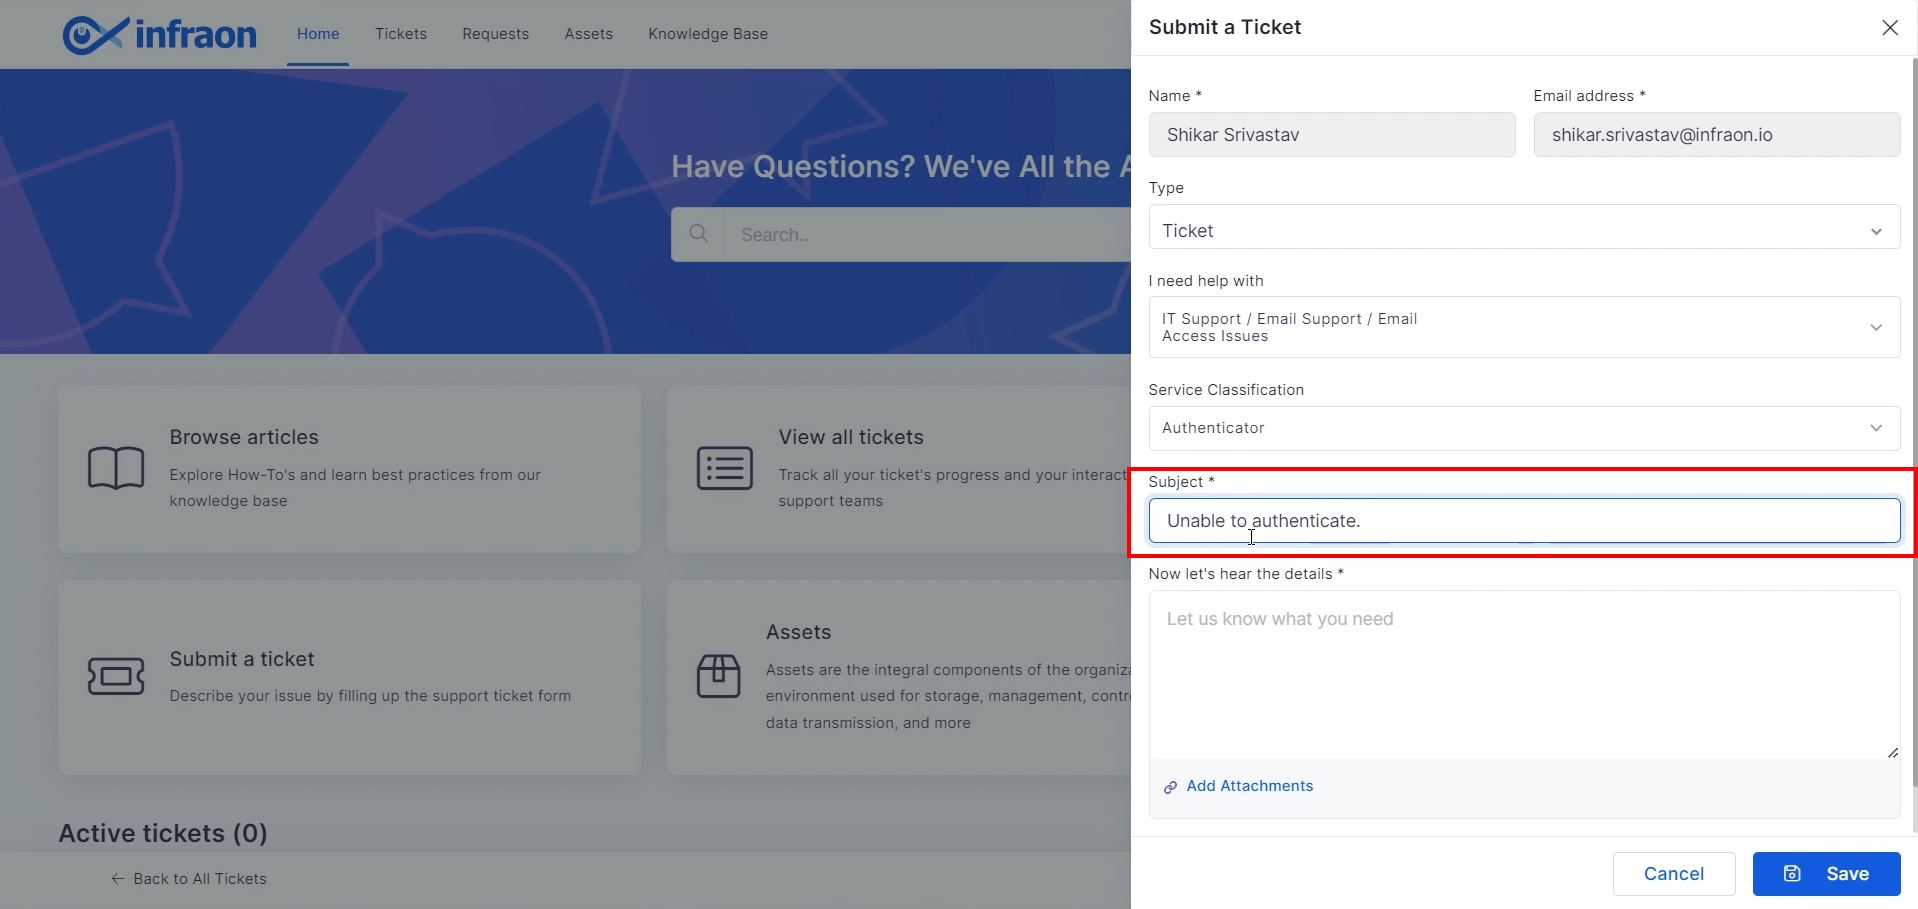
Step 4: Enter a subject line stating the reason for raising the
ticket, for example, "Unable to authenticate."
Step 5: In the "Now let’s hear the details" section, describe the issue you're encountering in detail. You can also upload any attachments that help explain the problem by clicking on 'Add Attachments.'
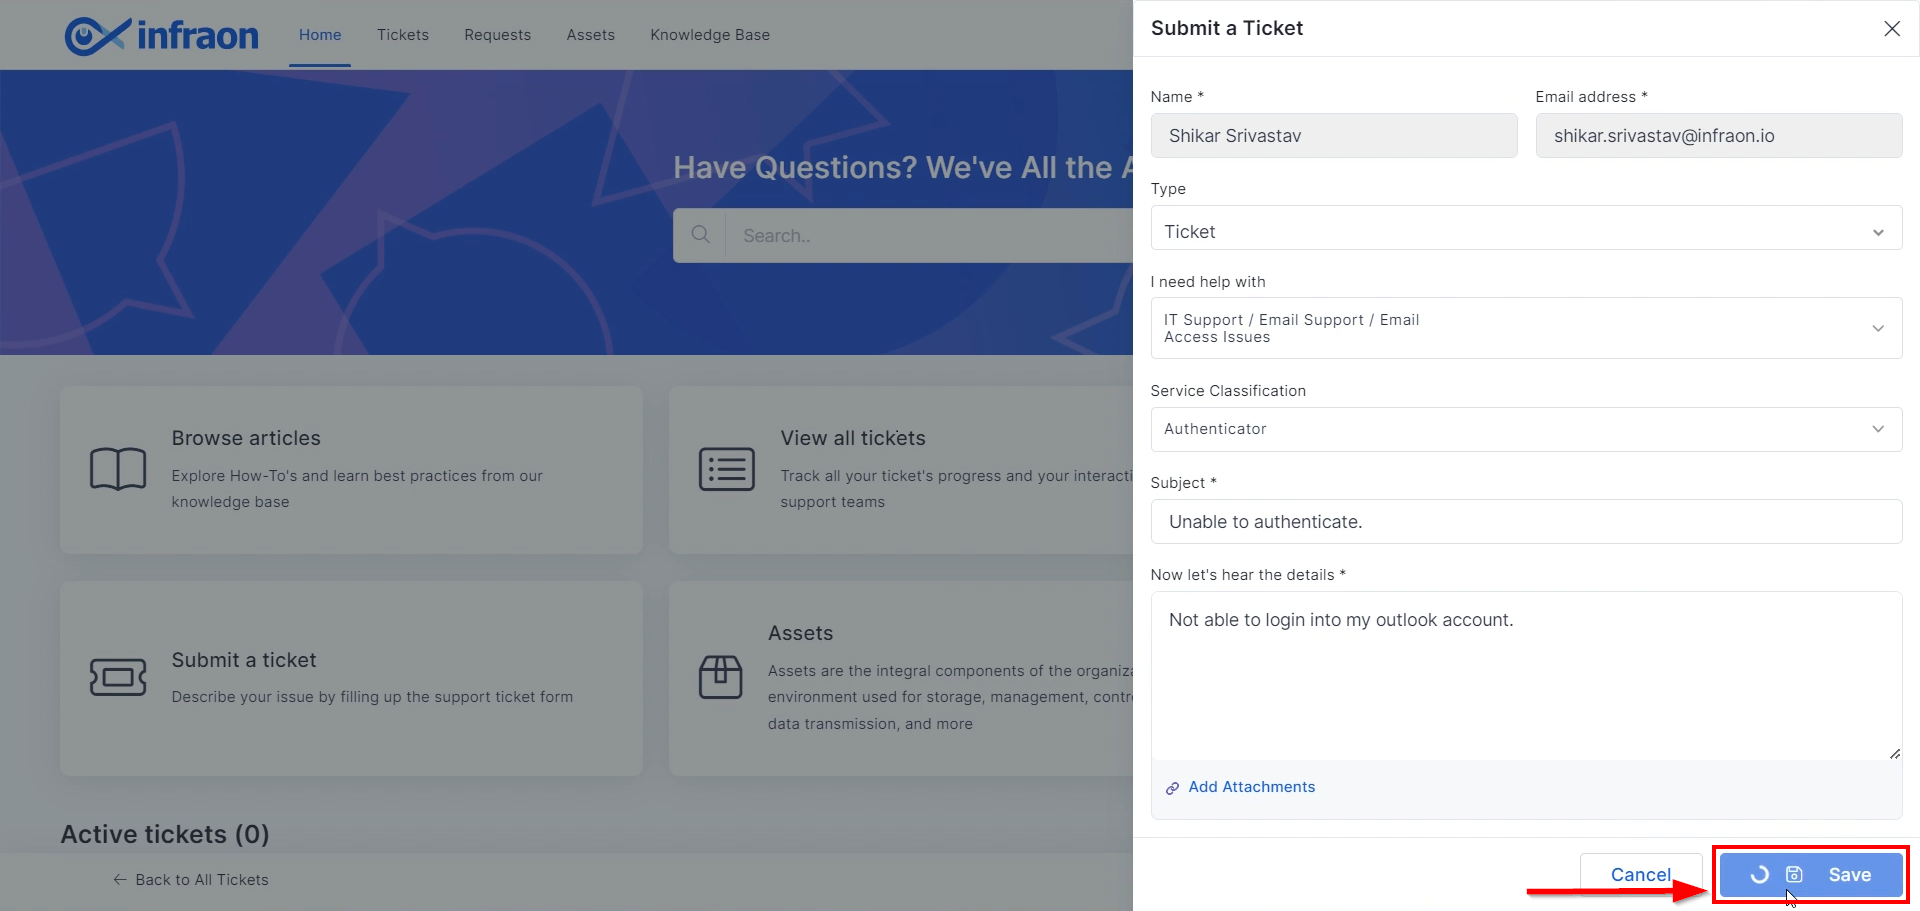
Step 6: After entering all details, review them and click "Save" to submit the ticket.
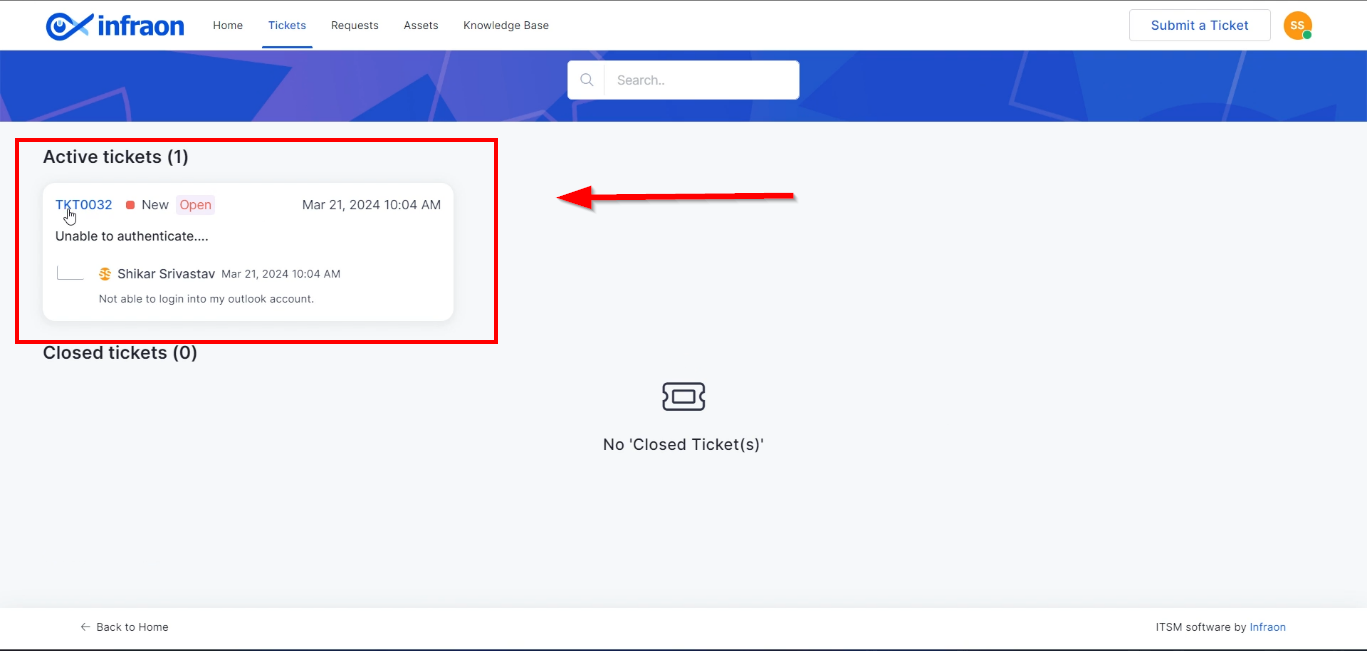
The ticket will then be created in the self-service portal, allowing the end user to check its status.
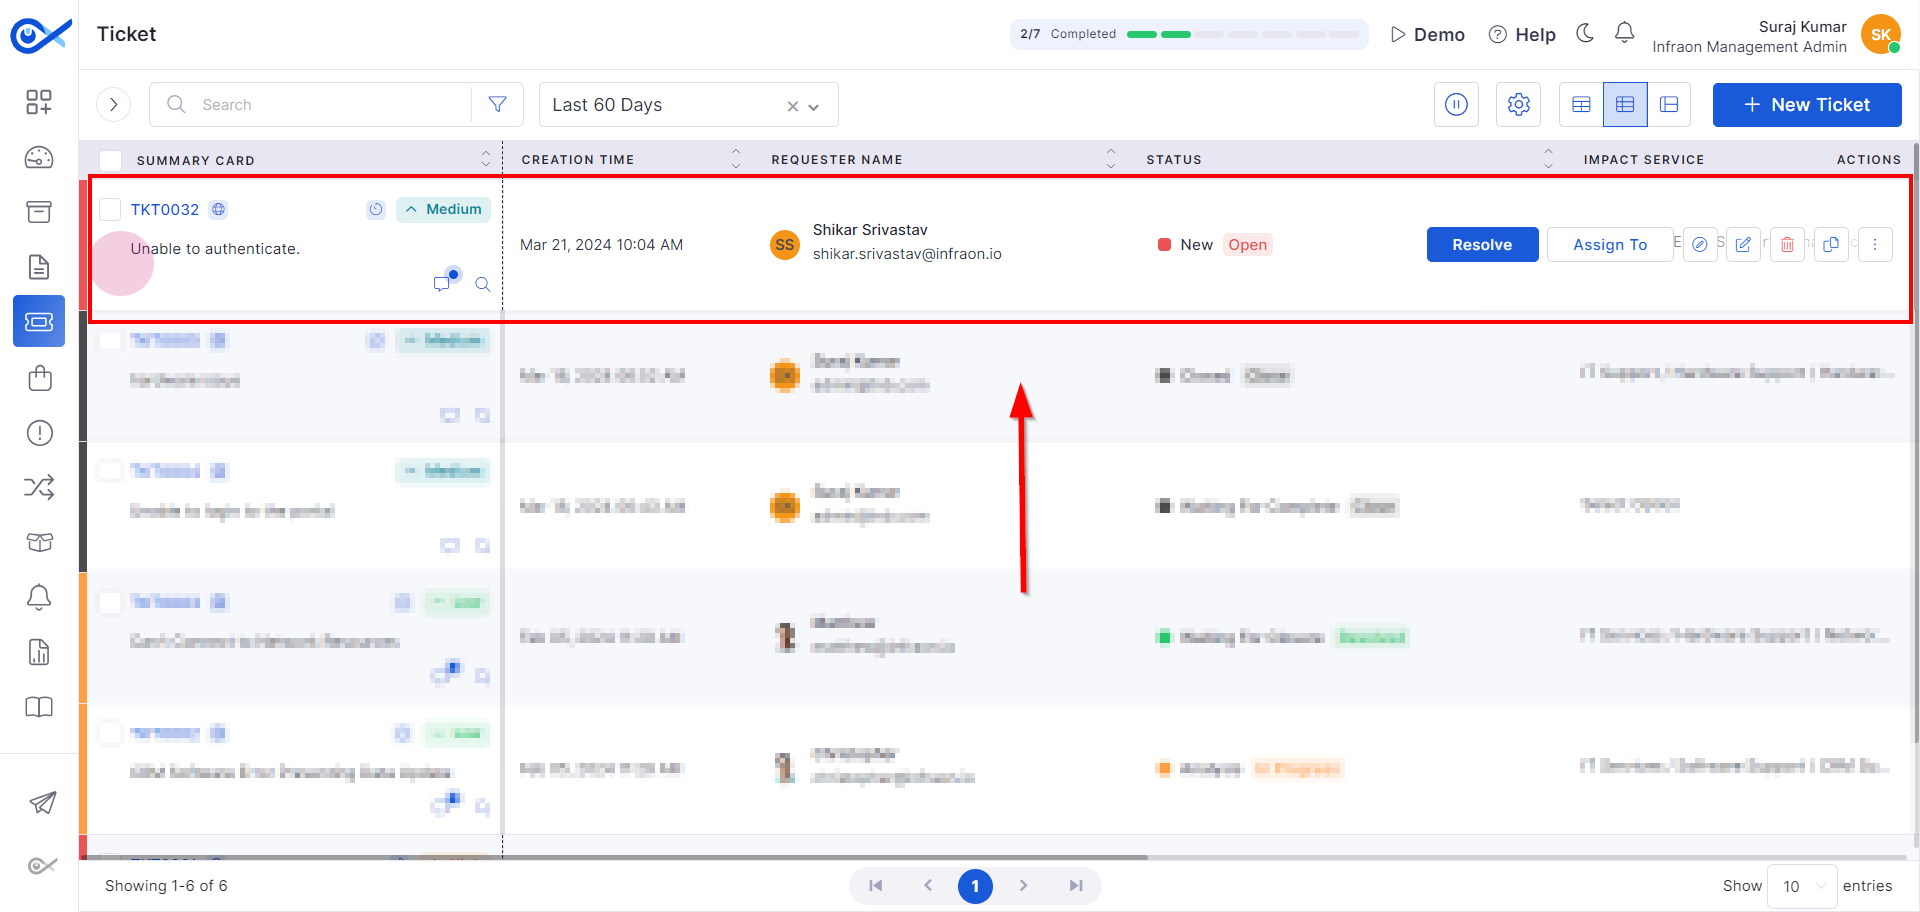
The same ticket will also appear in the technician or admin portal.
Here, the technician can work on the ticket, assist the end user in resolving the issue, and finally close the ticket.
Granting Access to the Self-Service Portal
Logging in and creating a ticket
Creating a Ticket
Ticket Management by Technicians or Admins
The ticket is now assigned to the selected technician.
This concludes the guide on manual ticket assignment in the Infraon platform.
Created by Techician
This guide outlines the process for a technician to create a ticket on behalf of an end user. This method is particularly useful when the end user cannot access their email or self-service portal, such as when their laptop or desktop won't power on. In these situations, the end user can contact a technician or service provider within the organization to create a ticket for them.
Creating a New Ticket
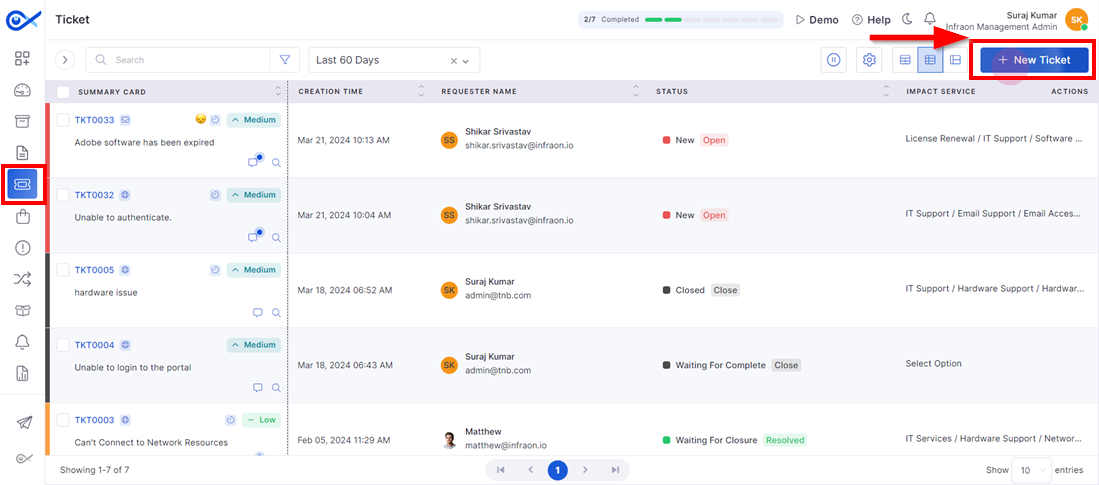
Step 1: To create a new ticket, navigate to the Ticket Management module on the left pane and click on New Ticket at the top right corner of the page.
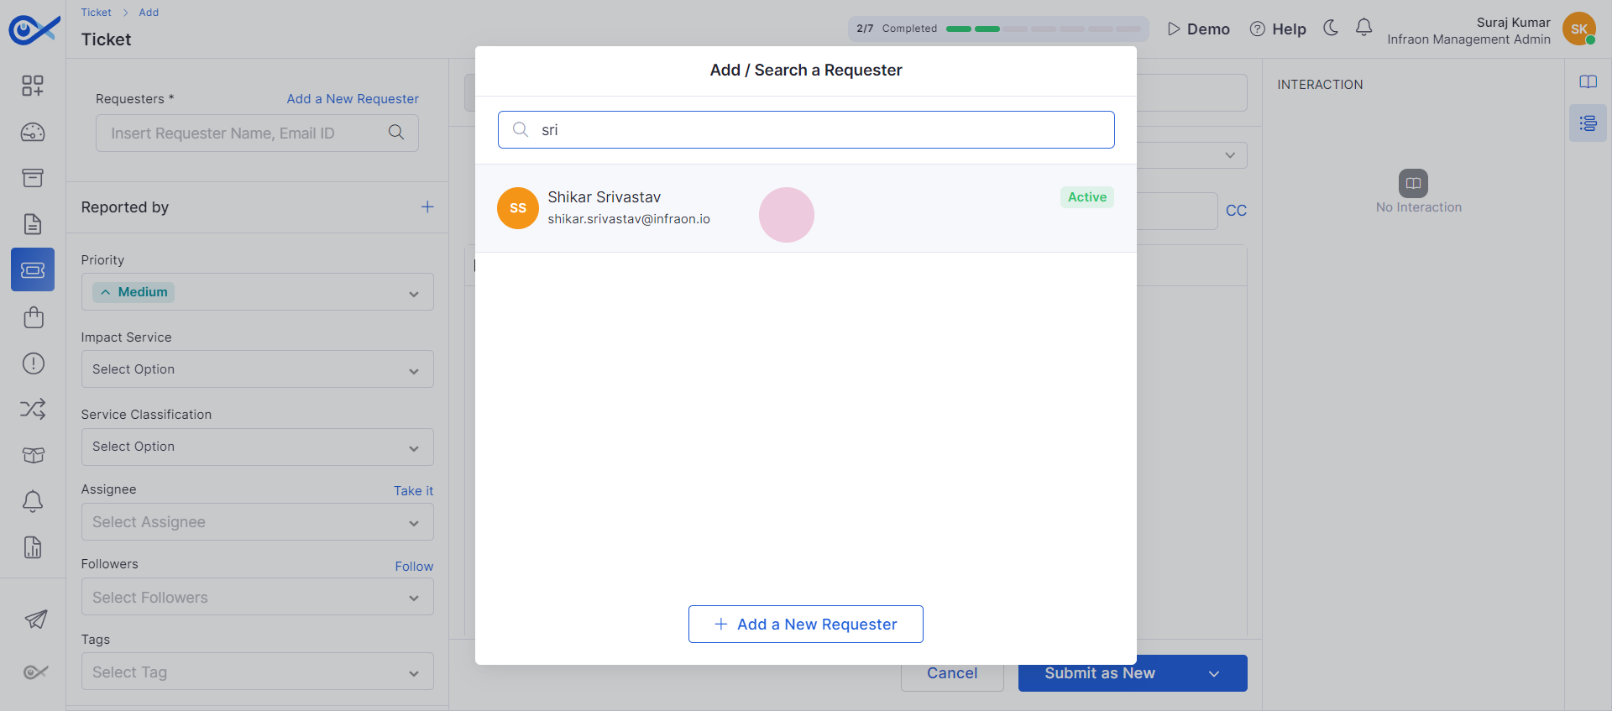
Step 2: In the pop-up tab, select the end user/requester experiencing the issue.
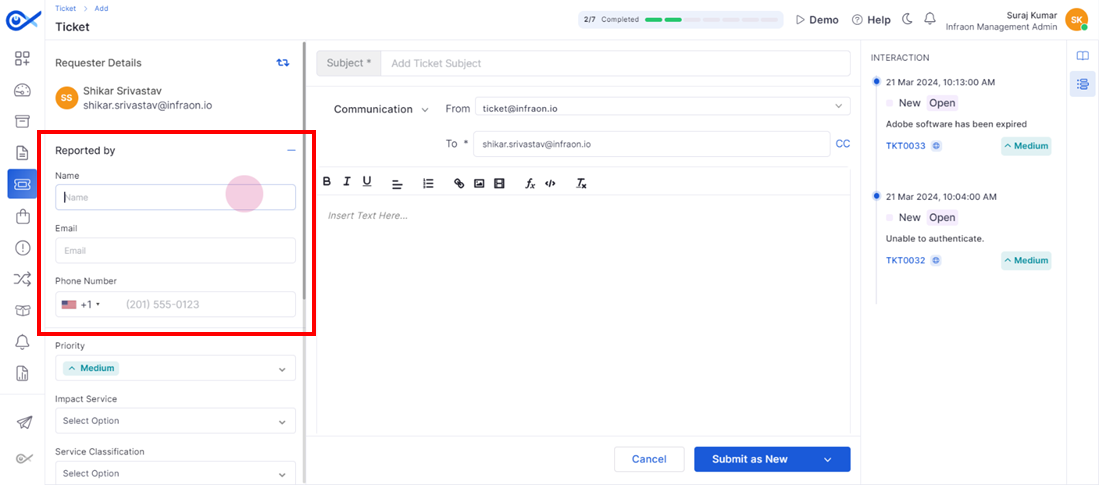
Step 3: Technicians can identify themselves in the 'Reported By' section by entering their Name, Email, and Phone Number. This ensures the requester and support team have a point of contact.
Specifying Service Area
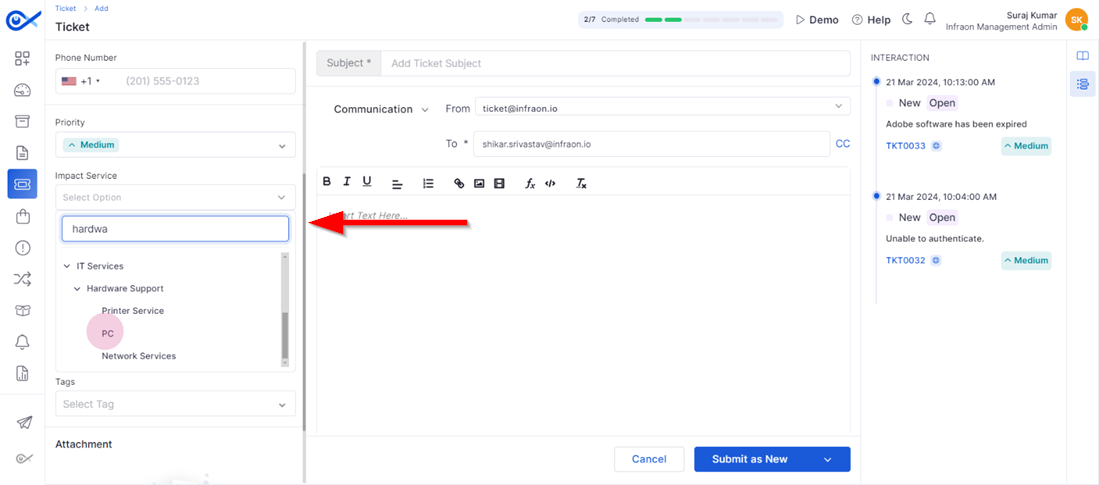
Step 4: Enter the impact service and specify the service area the end user is having trouble with.
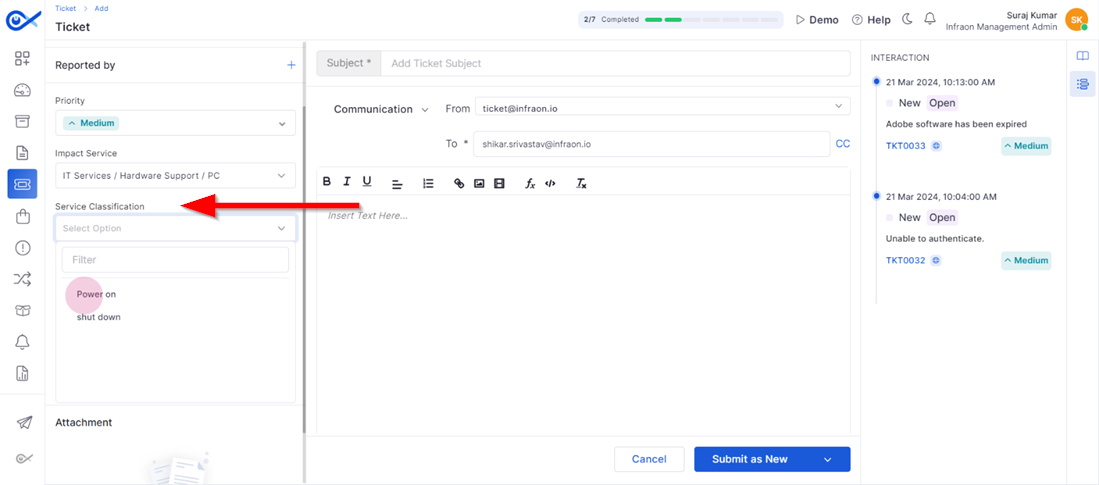
Step 5: Select the service classification based on the issue faced by the requester.
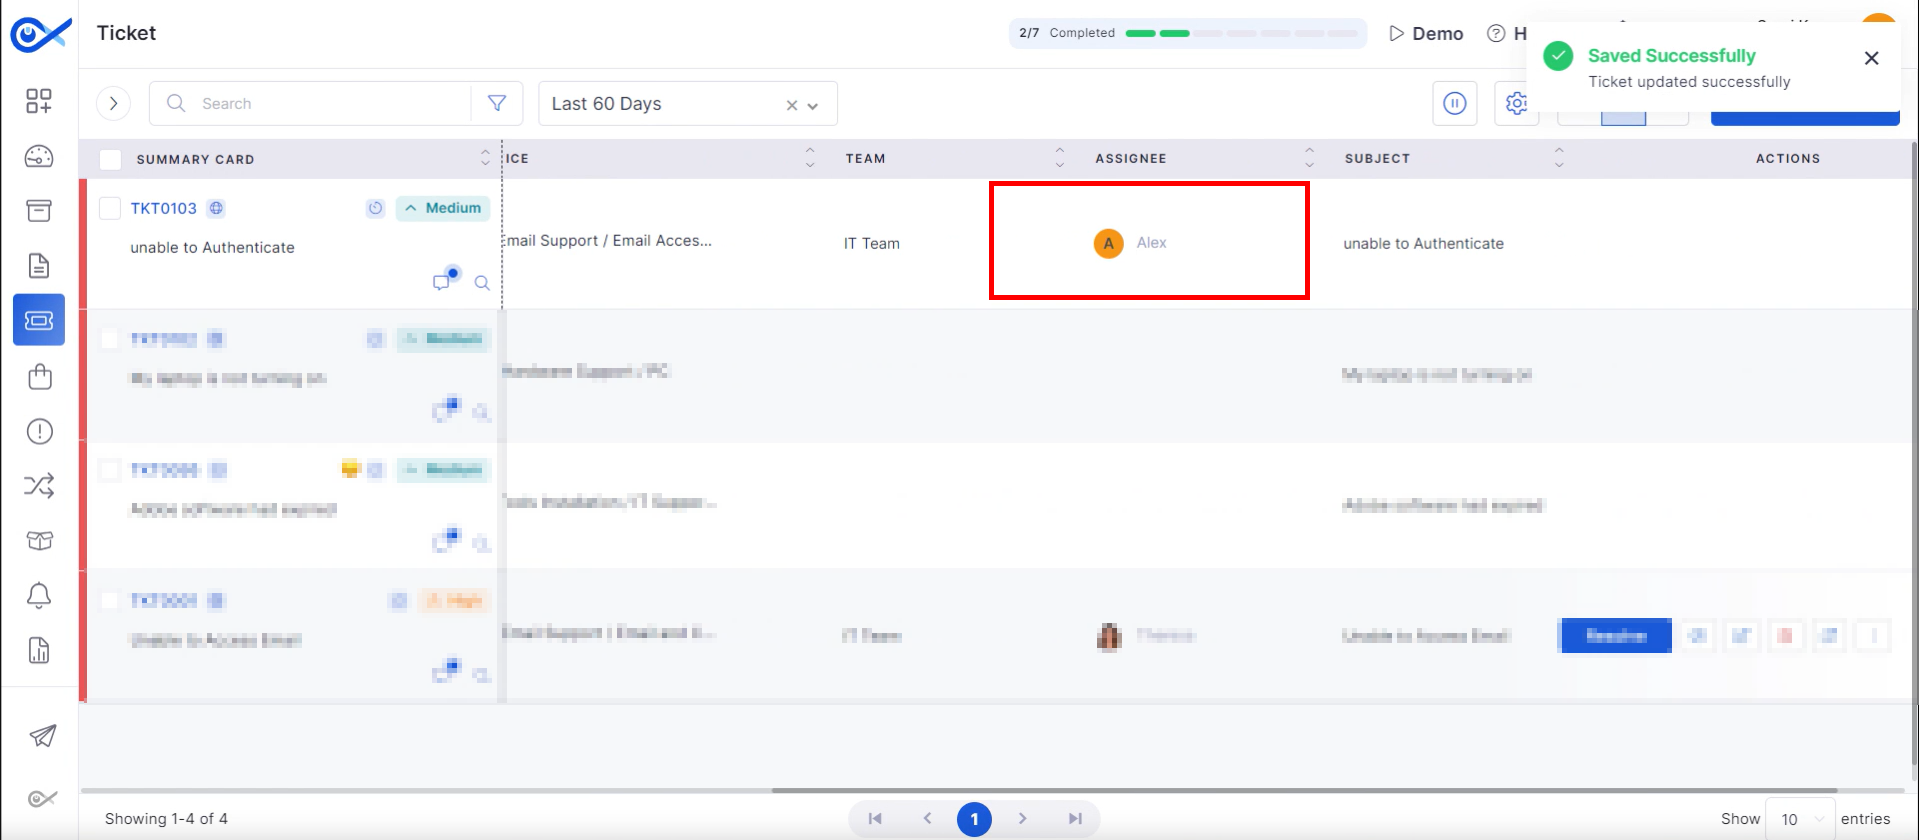
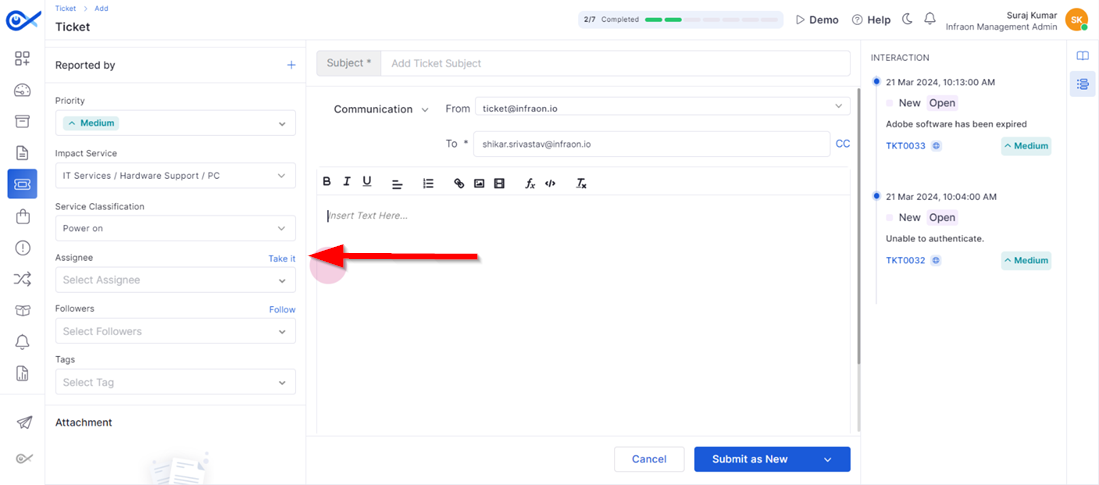
Step 6: Assign the ticket to the service technician working on the issue or to yourself if you're handling the problem. You can also add additional followers and relevant tags to the ticket.
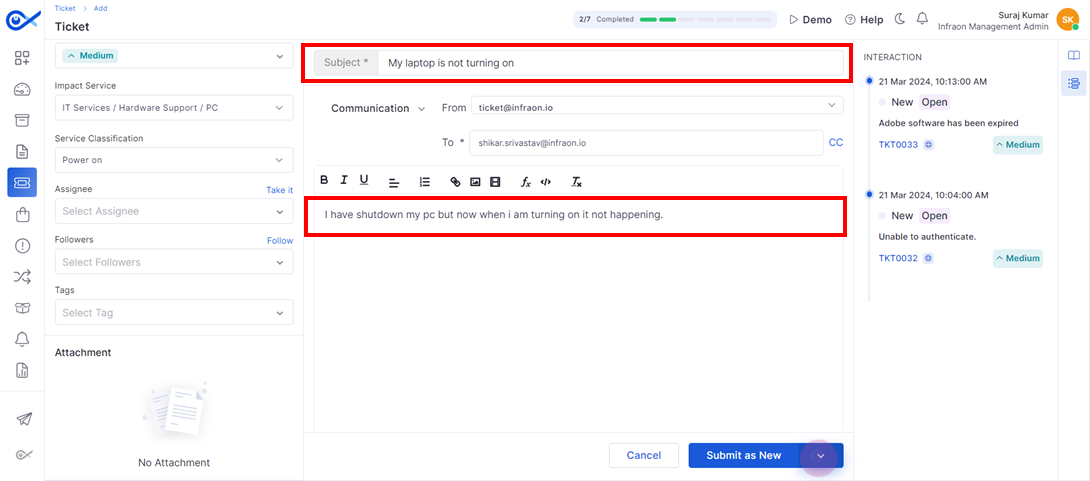
Step 7: Provide a subject for the ticket and a brief description of the problem faced.
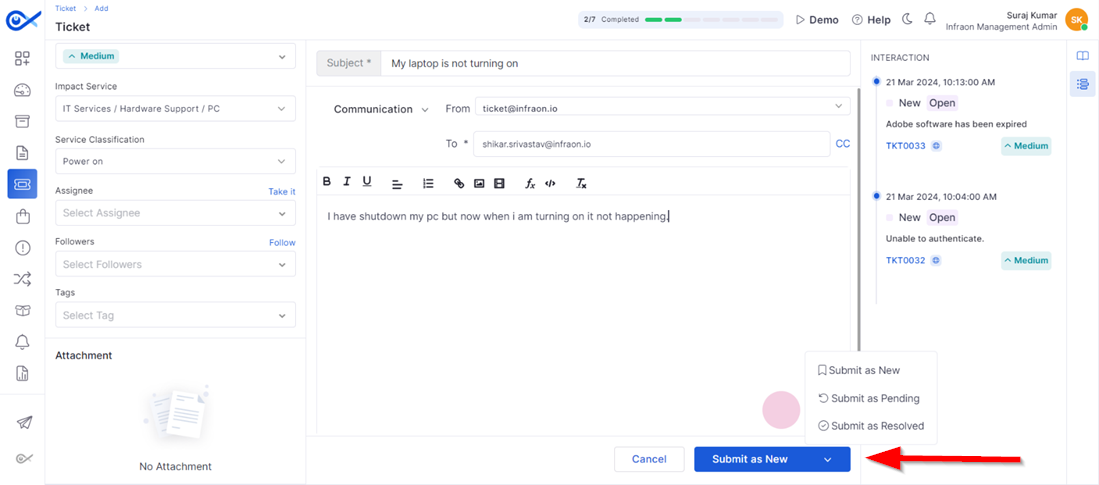
Step 8: Once all the necessary details have been filed, technicians can submit the ticket. If the issue is already resolved, submit the ticket as resolved. If work has started but the issue isn't resolved yet, submit it as pending. For new issues, click on submit as new.
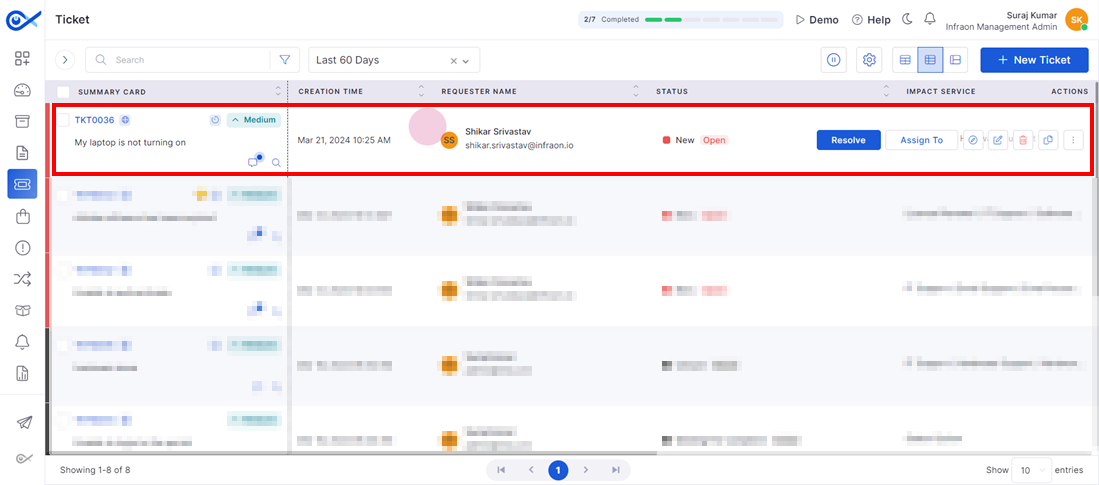
Upon clicking submit as new, the ticket is created in the Infraon Infinity tool on behalf of the end user.
Now, a ticket has been raised for the end user stating the reason, and a corresponding technician will rectify the issue.
This is how a technician creates a ticket for an end user who is unable to access their email or the self-service portal.
Ticket Resolution
This guide outlines a technician or engineer's process for working on a ticket, from creation to resolution. Tickets follow a specific workflow, which are the steps or guidelines to follow when resolving a ticket, request, or problem.
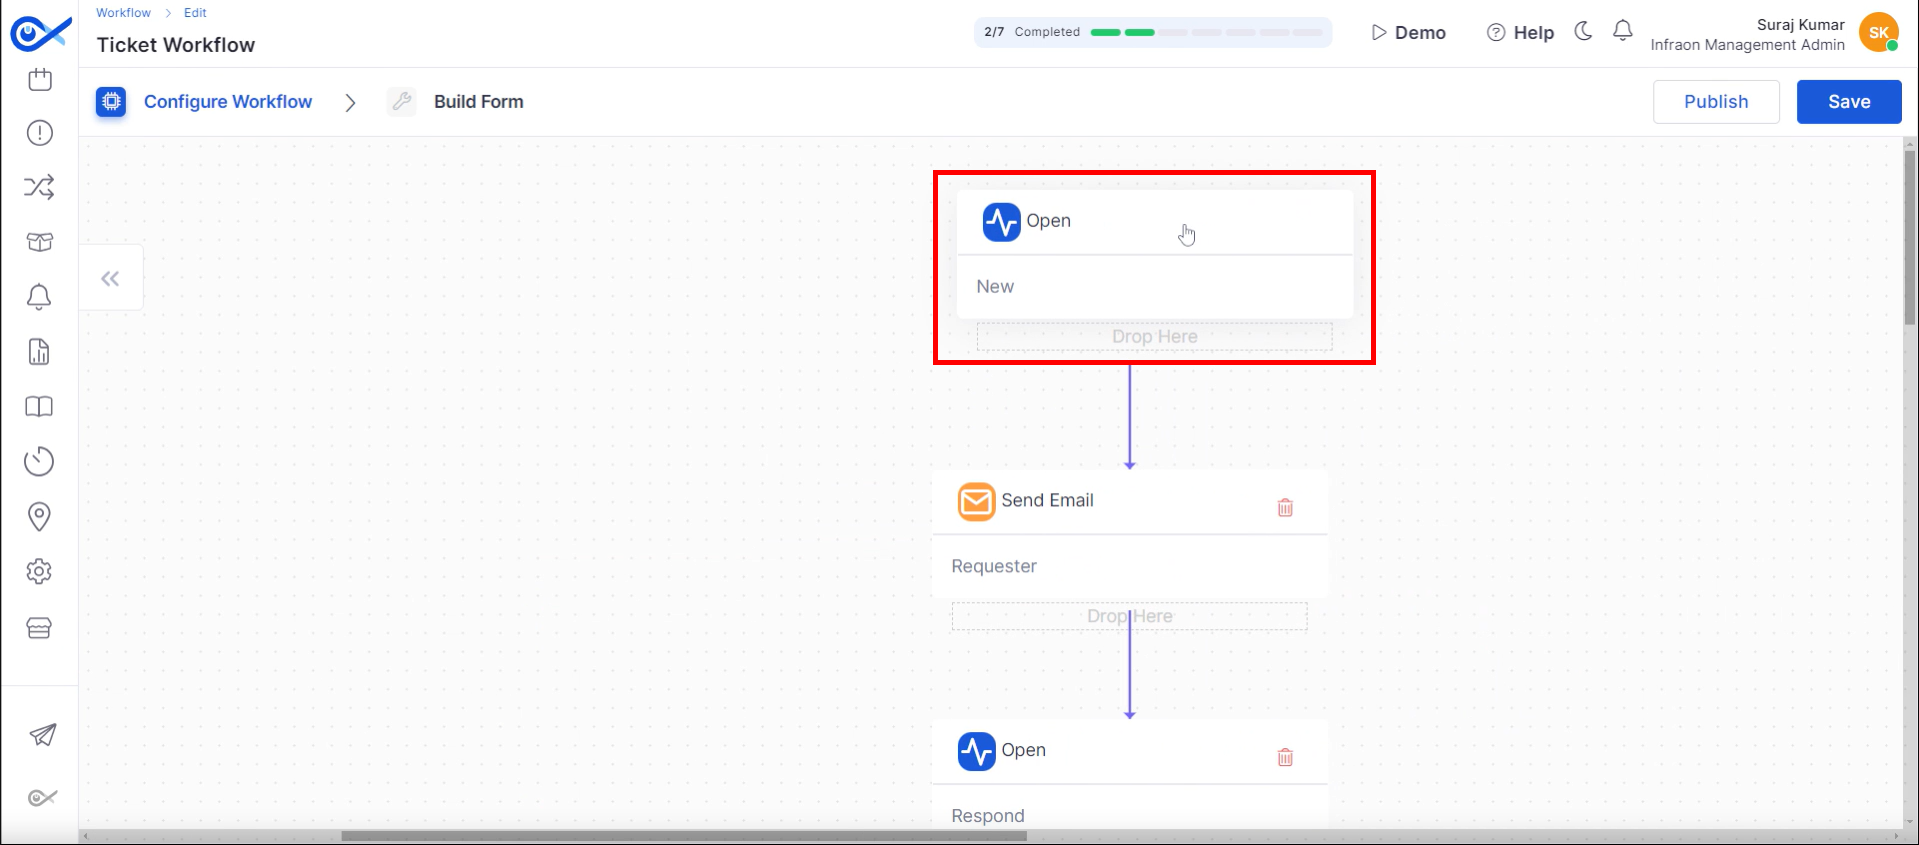
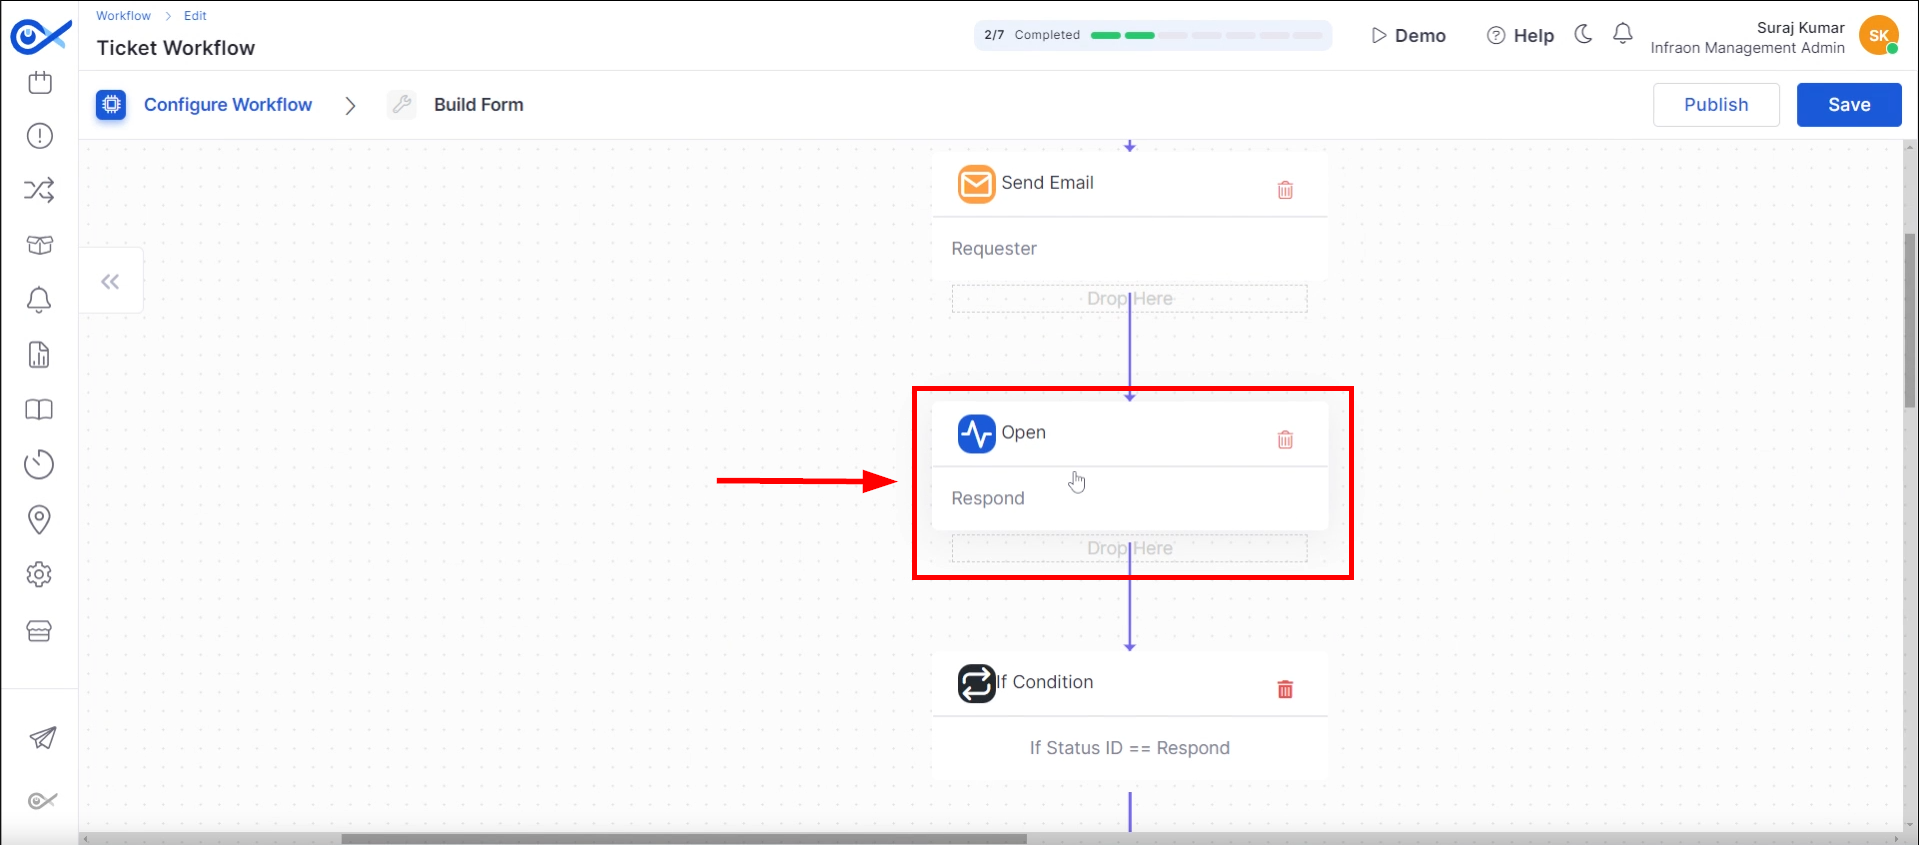
When a new ticket is generated within the system, its lifecycle is initiated in the “Open and New” state.
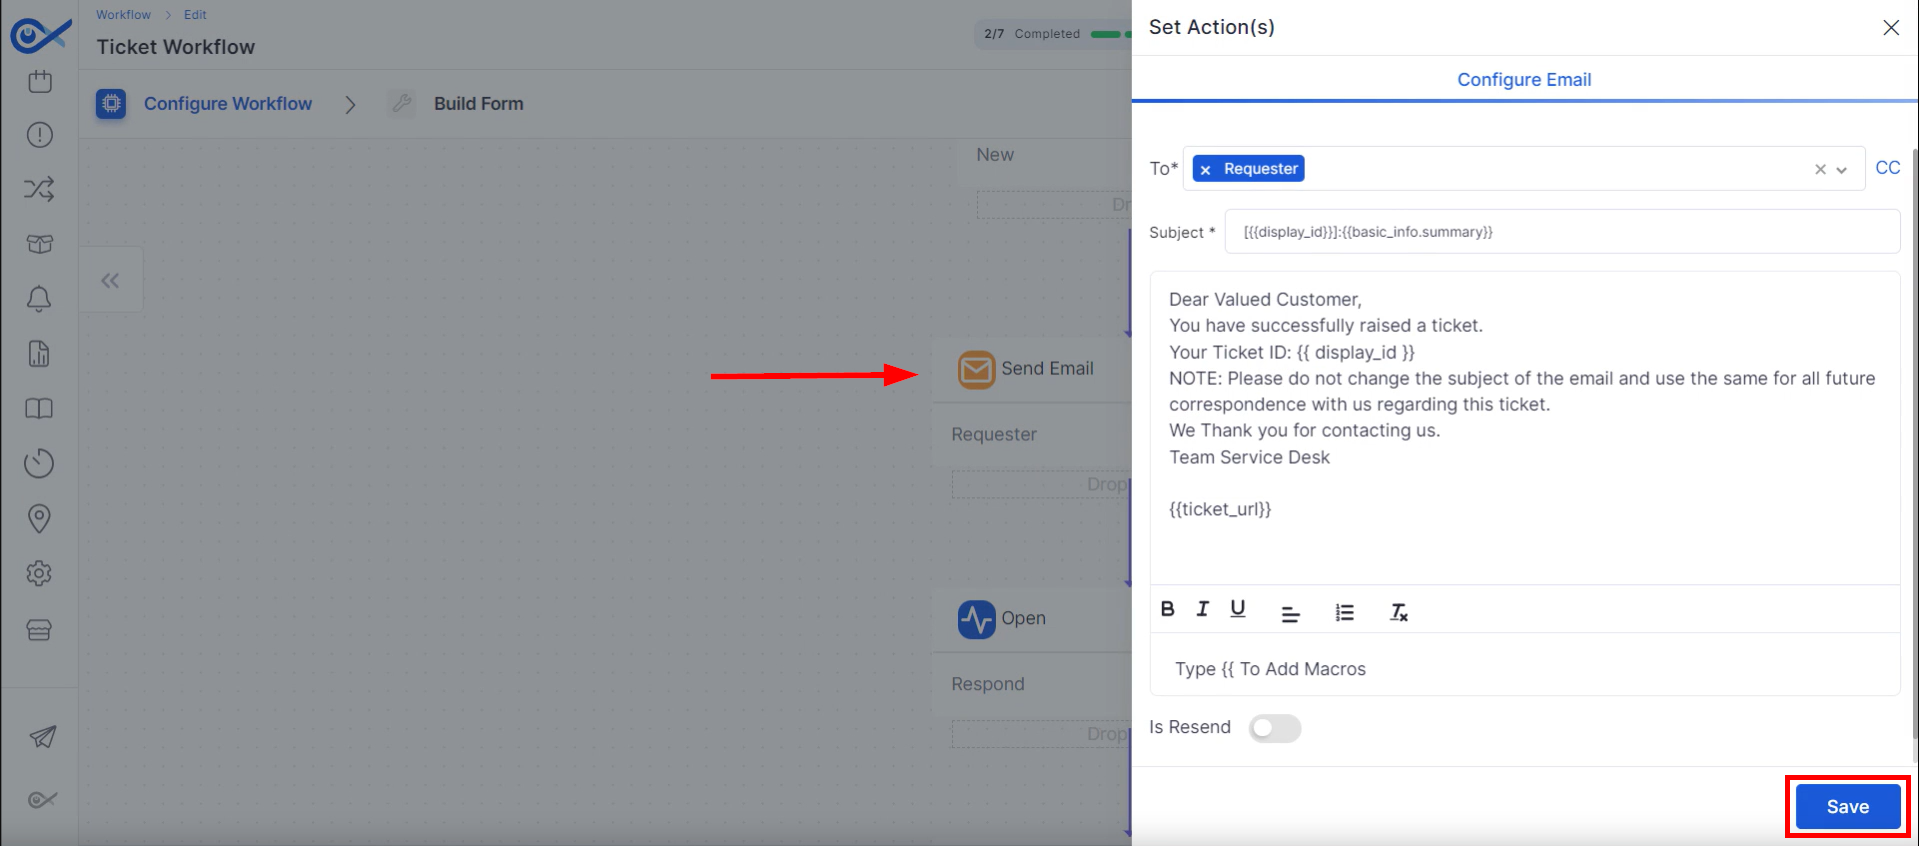
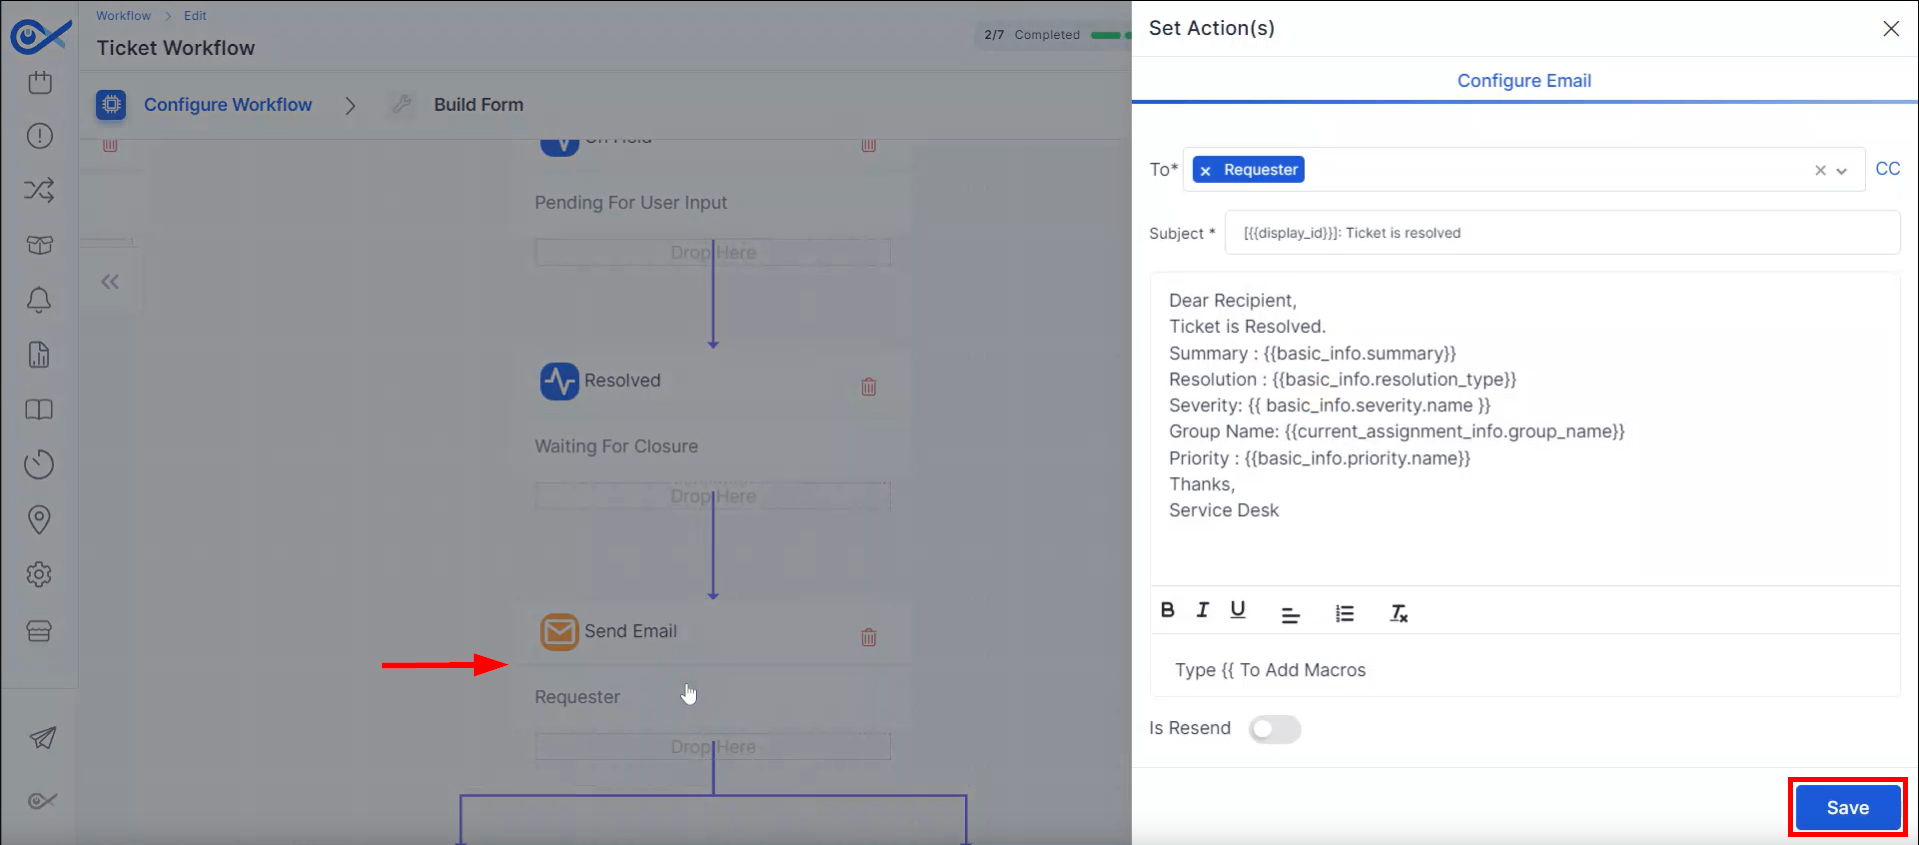
An automated email acknowledging ticket creation is sent to the end user. Email content can be customized using available macros.
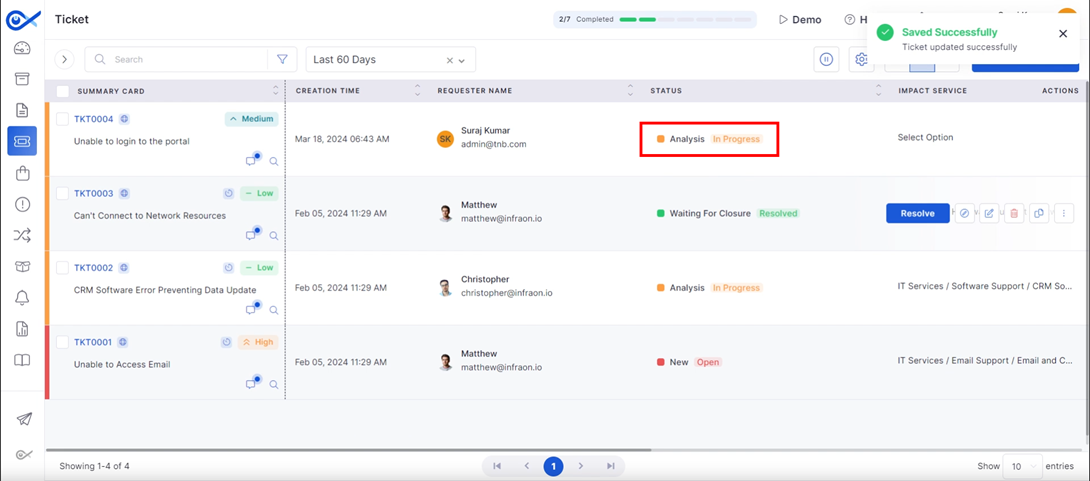
The ticket status is updated to “Open-Responded,” signifying the commencement of technician involvement.
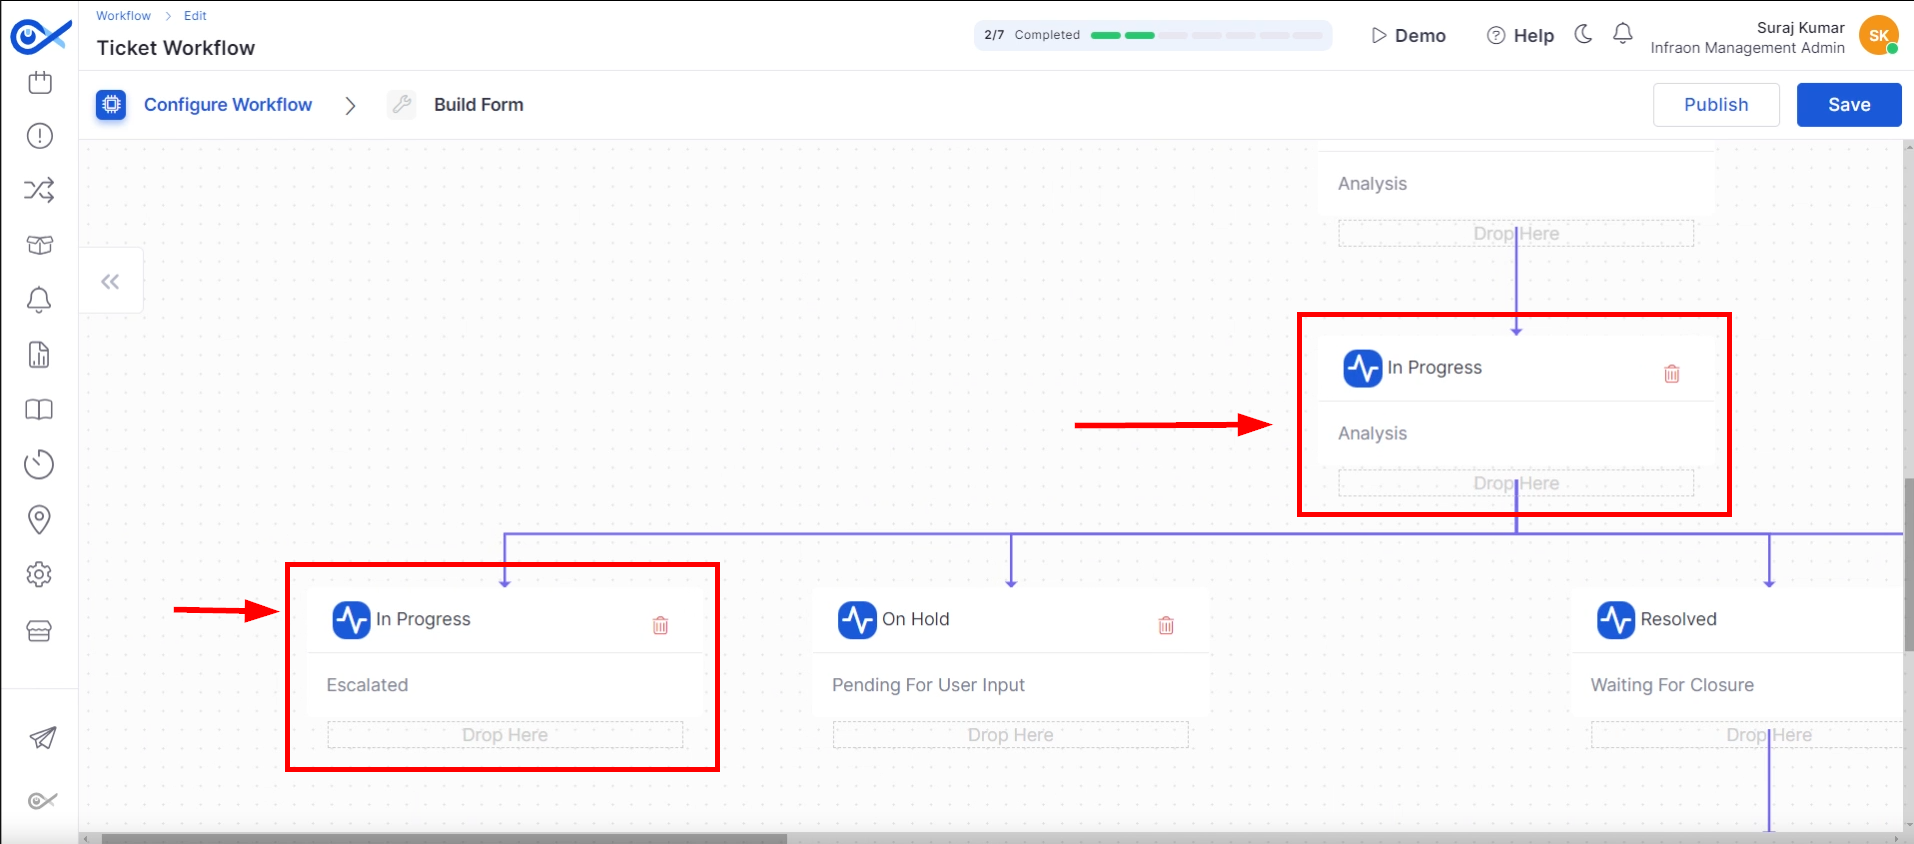
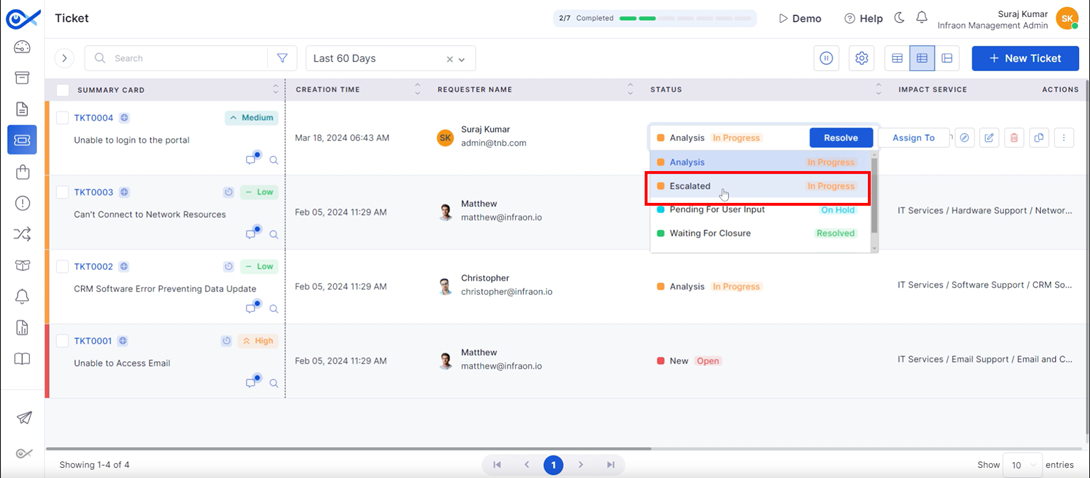
The ticket transitions to the “In-Progress Analysis” state. This phase may include sub-statuses like
Submitting the Ticket
“In-Progress Escalated”
for elevated issues.
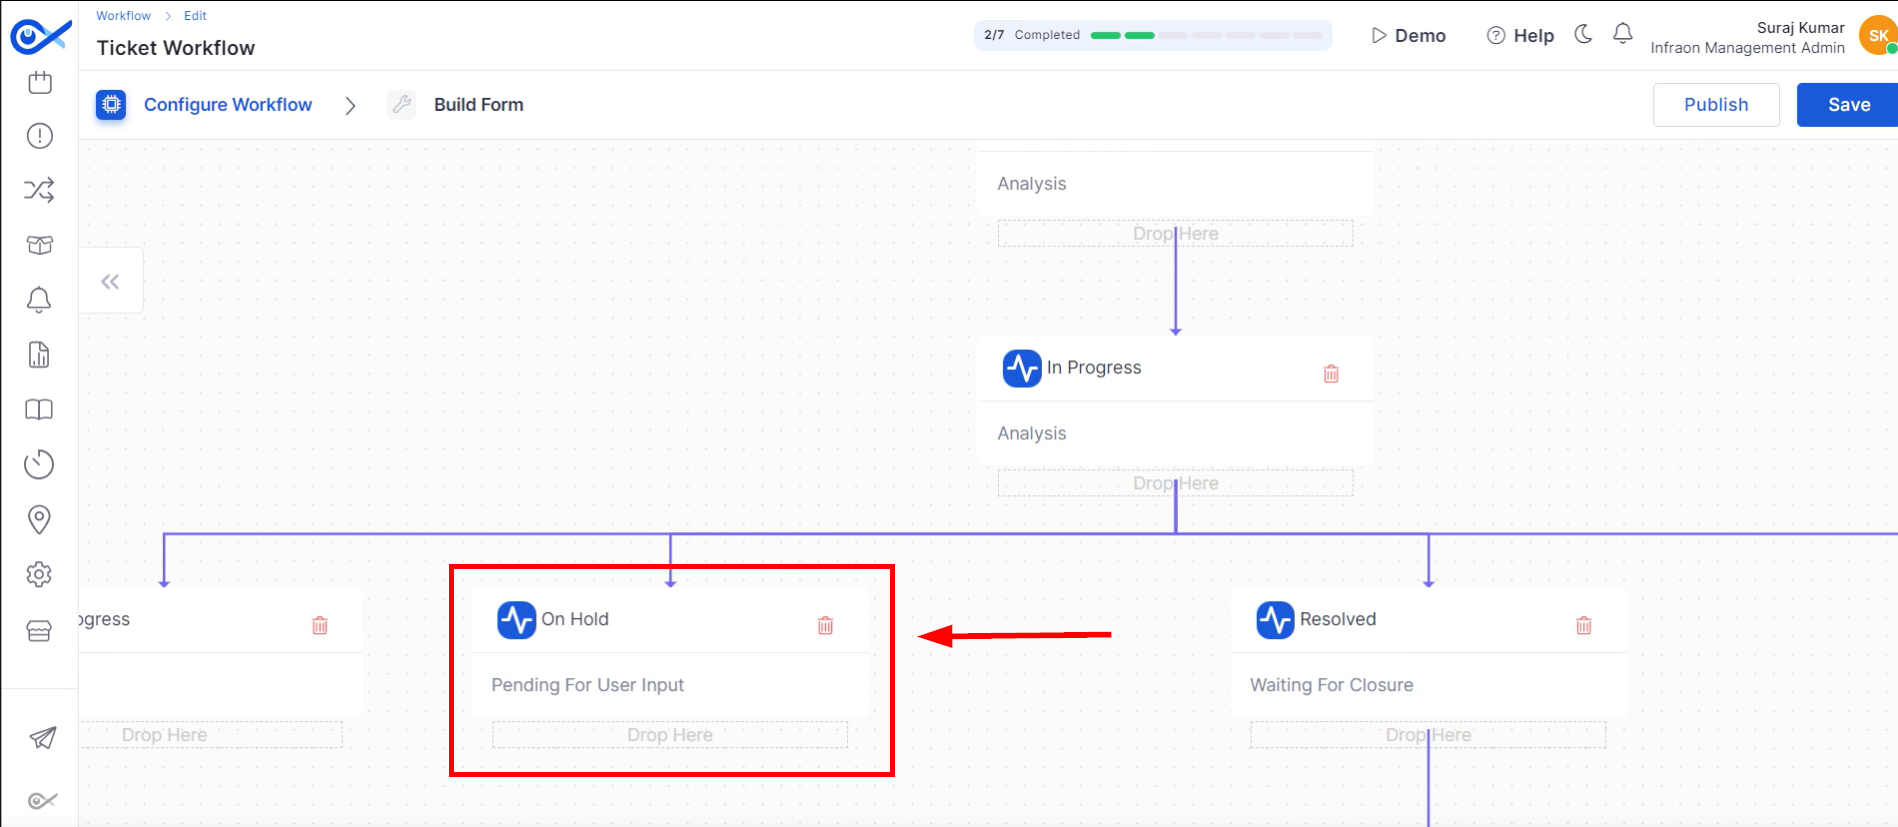
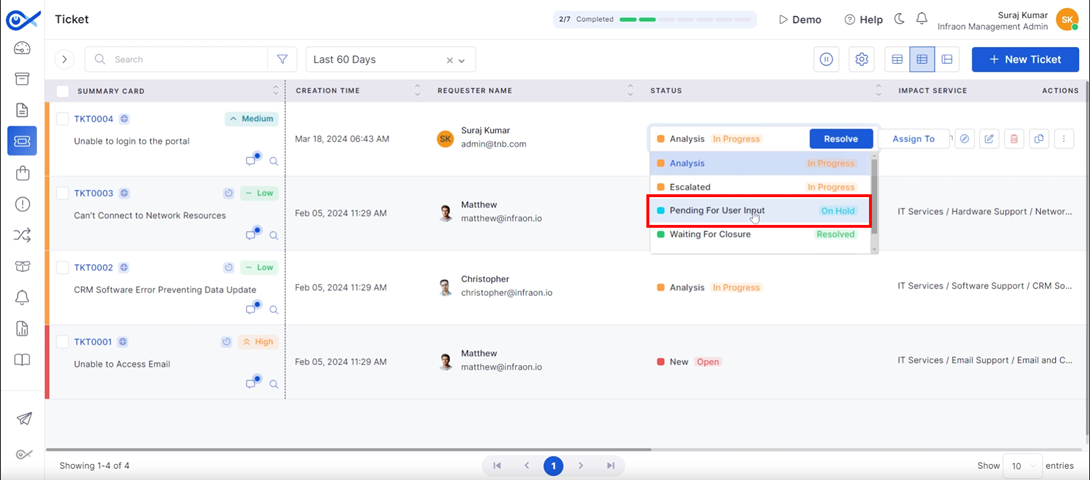
If the end user is required to provide additional information, the ticket can be placed on hold in the “Pending for User Input” state. SLA timers are paused during this phase.
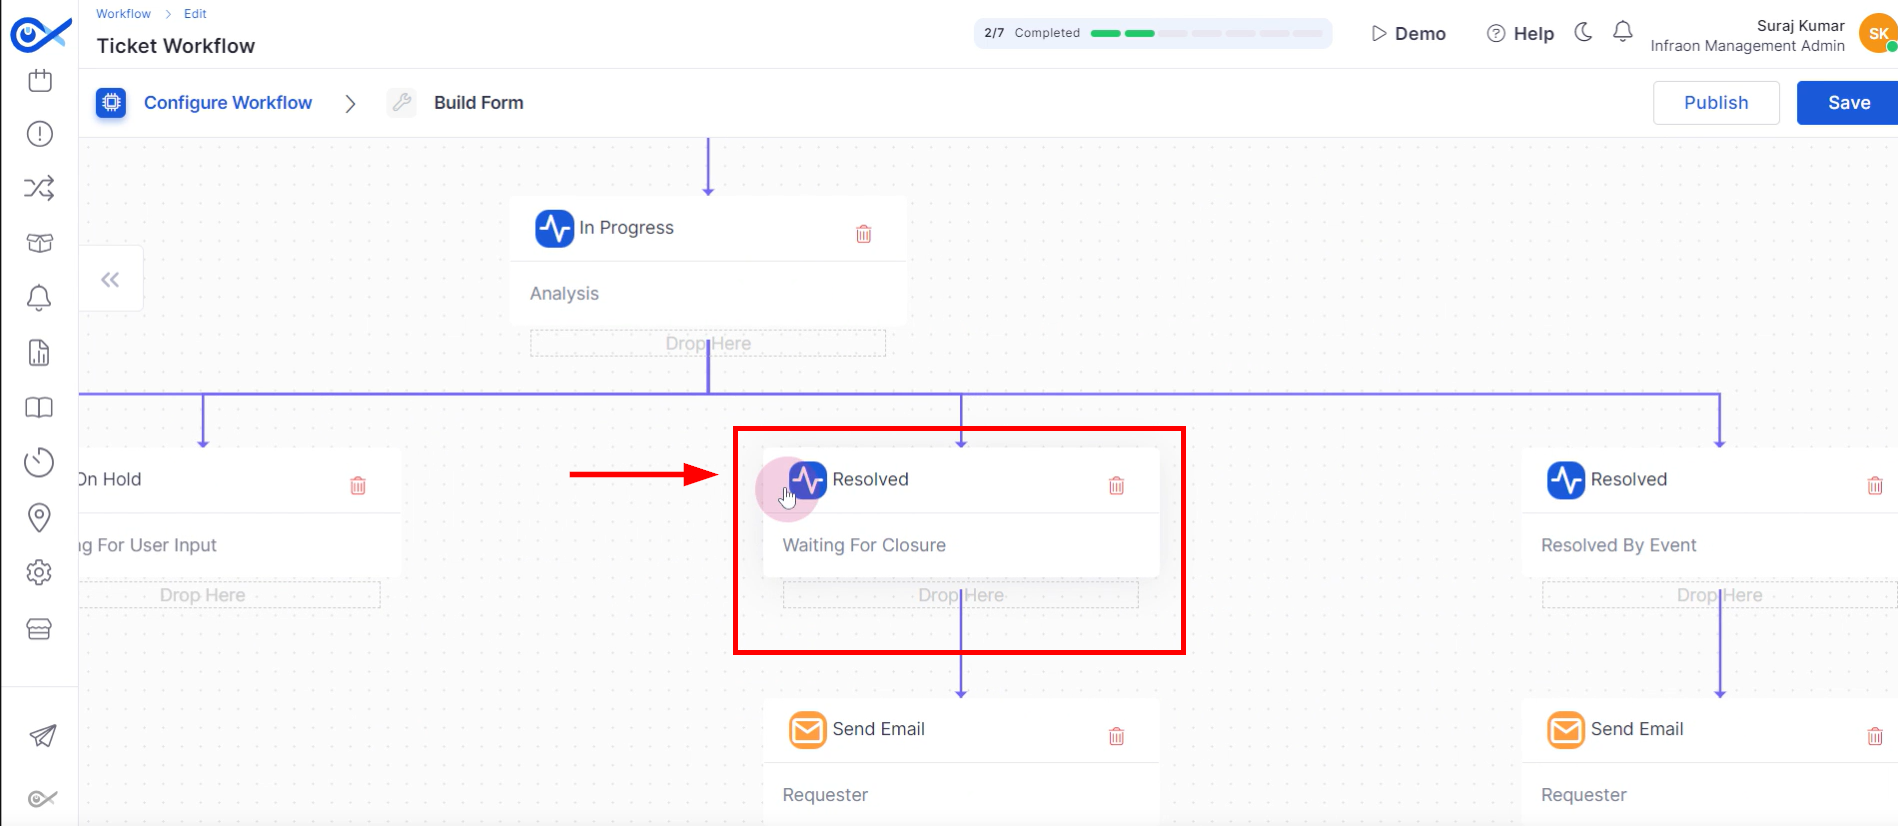
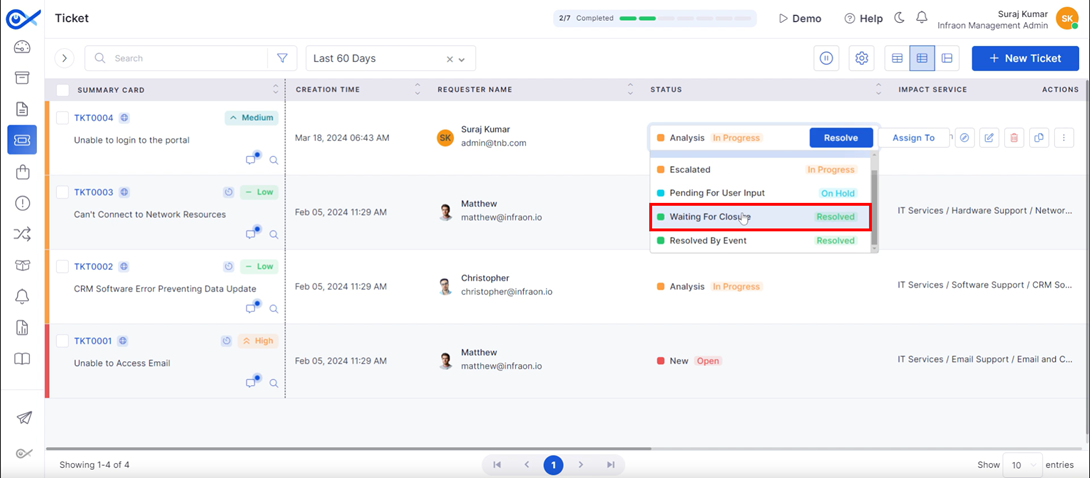
Once a solution is determined, the ticket status is changed to “Resolved and Waiting for Closure.”
An email is sent to relevant parties informing them of the ticket resolution, including a summary and solution details.
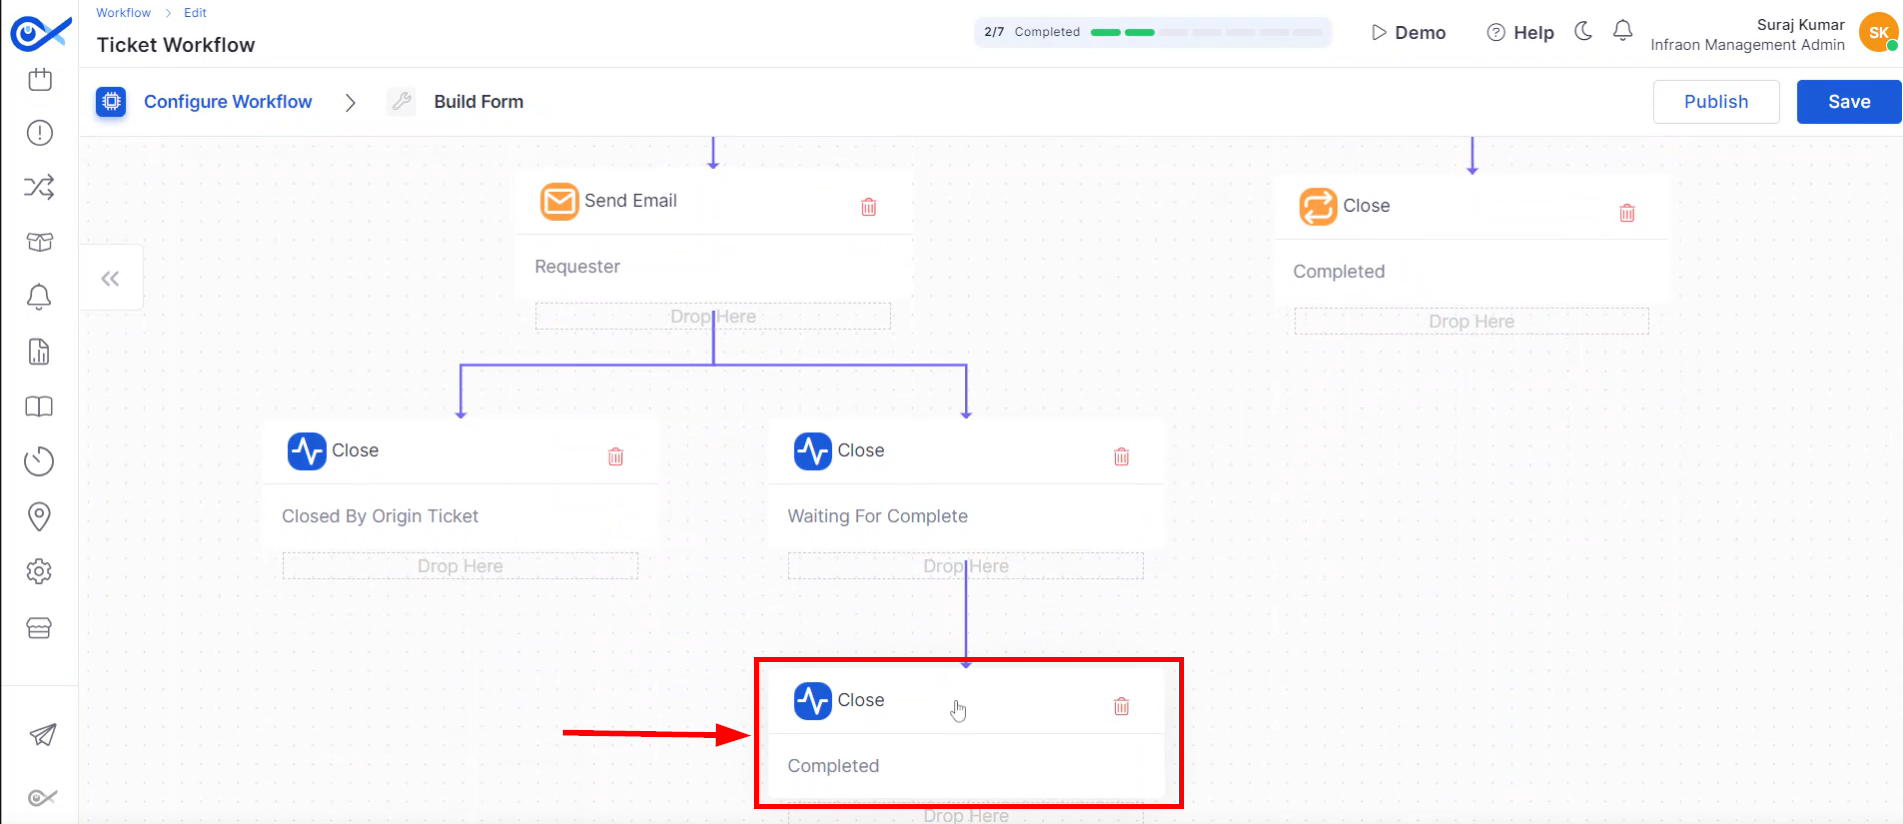
The ticket is officially closed upon confirmation from the end-user.
The ticket will be automatically closed if there is no response from the end user within a specified timeframe.
This outlines the standard ticket workflow. The following sections will detail how this workflow is implemented within the tool and technicians' specific actions when assigned a ticket.
Whenevera new ticket is generated, it is assigned to the technician based on predefined rules or manual allocation.
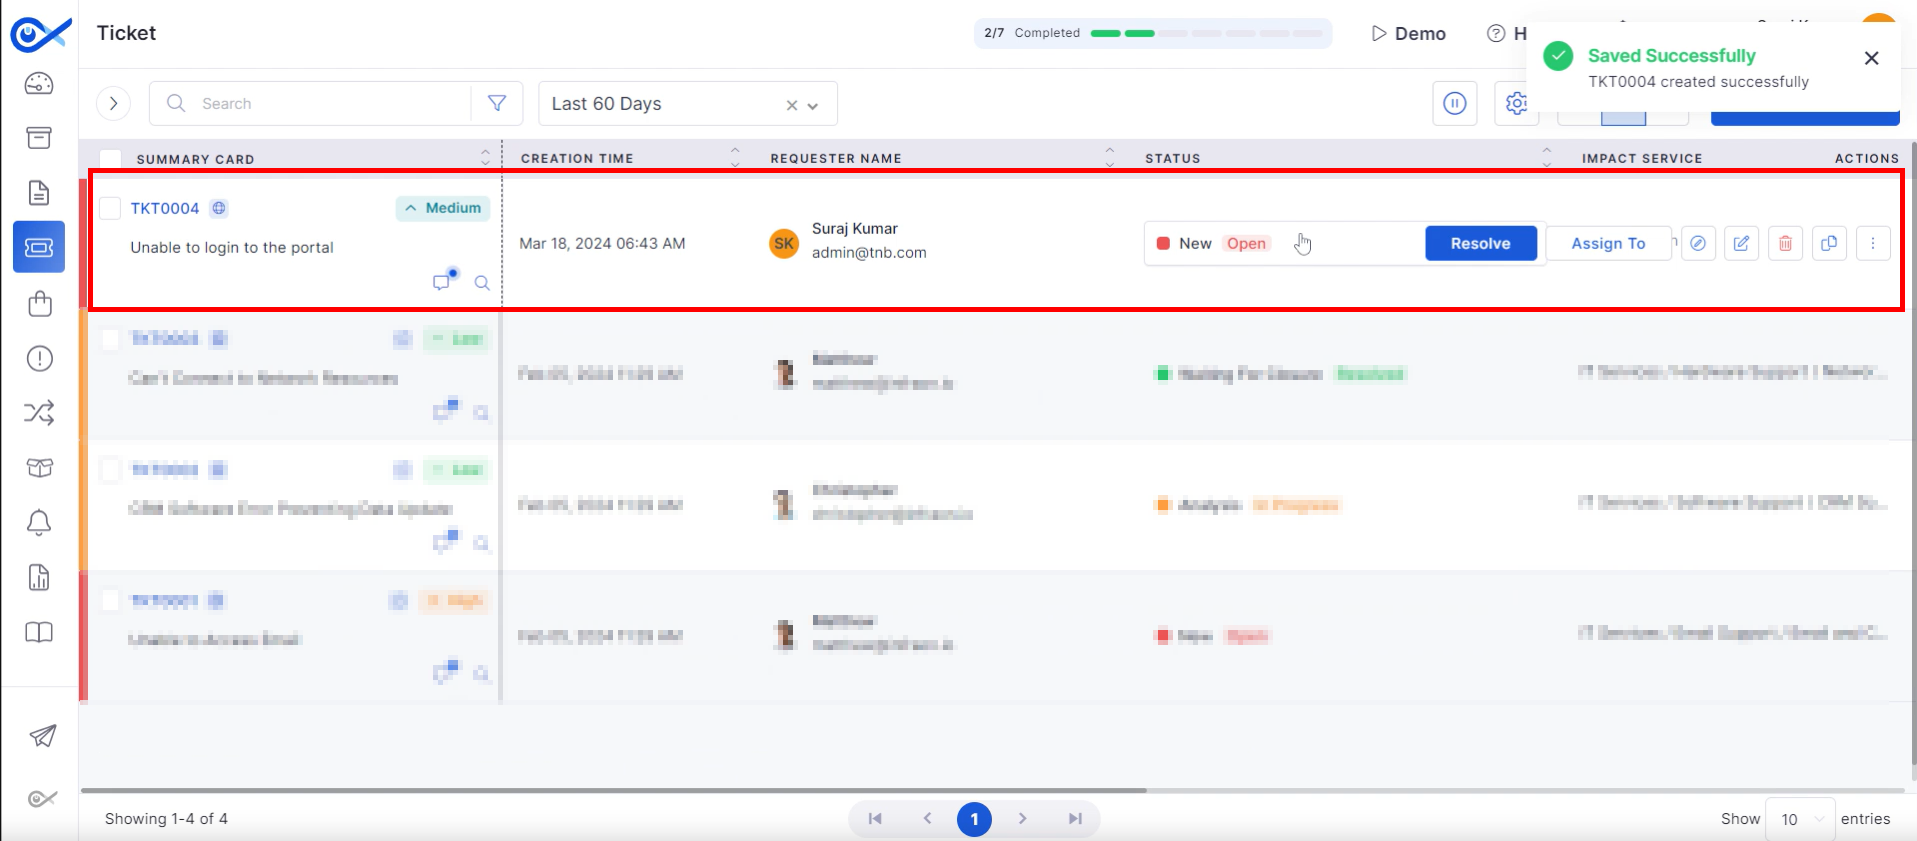
Essential ticket details, including the end-user, are populated. The ticket's initial status is then set to “New and Open.”
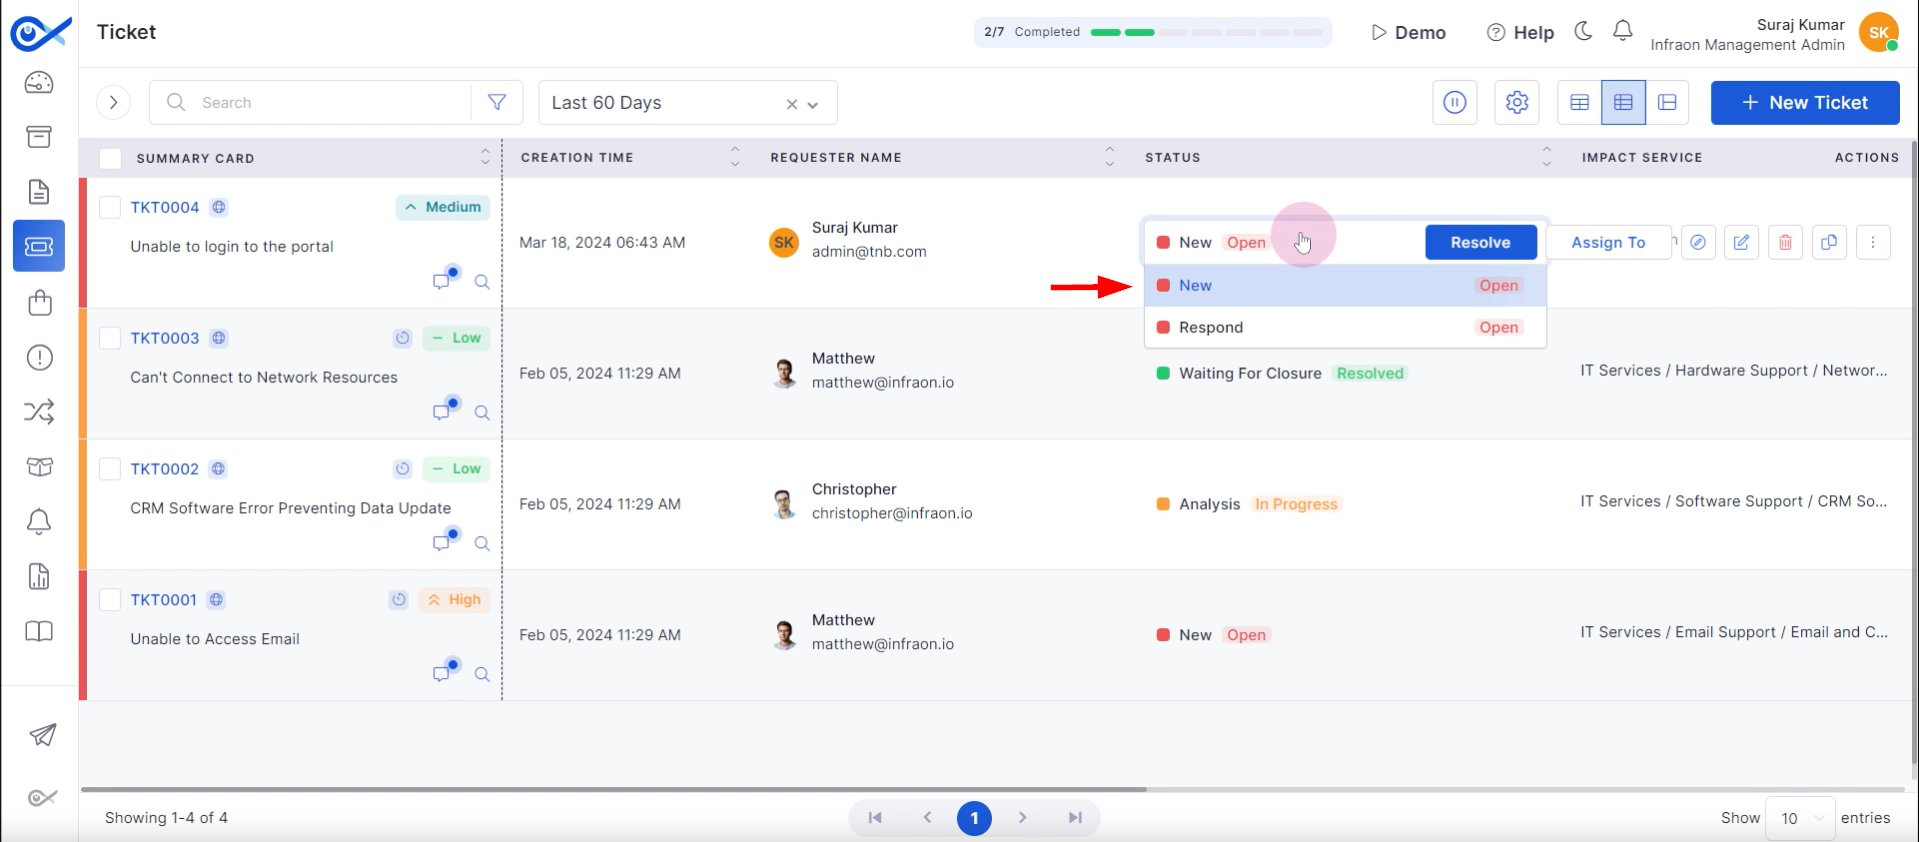
Upon acknowledging the ticket, the technician changes its status to “In-Progress Analysis.”
As the investigation progresses, the ticket status is updated accordingly. If additional information is required from the end user, the status is changed to “Pending for User Input.”
In case of escalation, the status is updated to “Escalated.”
Once a solution is determined, the ticket is marked as “Resolved and Waiting for Closure.”
The end user is then presented with options to close or reopen the ticket.
Upon closure confirmation from the end user or system timeout,
the ticket is finalized with a closing note.
This concludes the overview of a technician's workflow when handling an assigned ticket.
NOTE: This demonstration will outline a default ticket workflow process implemented in Infraon Infinity. A comprehensive understanding can be gained by exploring the “Ticket Workflow” module under “Infraon Configuration -> Infraon Automation -> Workflow -> Ticket.”
Ticket Workflow
Ticket Handling
Trigger Configuration
This guide explains the Trigger configuration module in the Infraon Infinity suit. Triggers are rules or configurations that trigger an alert or an event within Infraon. Infraon allows adding conditions to raise alerts or events when the specified rule is met.
There are two types of trigger configurations within Infraon. They are:
Alerts - Alerts are based on configured thresholds (refer to Threshold module for details)
Correlation - Infraon correlates events based on multiple conditions to trigger an action.
This functionality is crucial for automating ticket creation and sending alert notifications to users via email or SMS in response to system alarms, ensuring that users are promptly informed about any issues.
Navigating Trigger Configuration
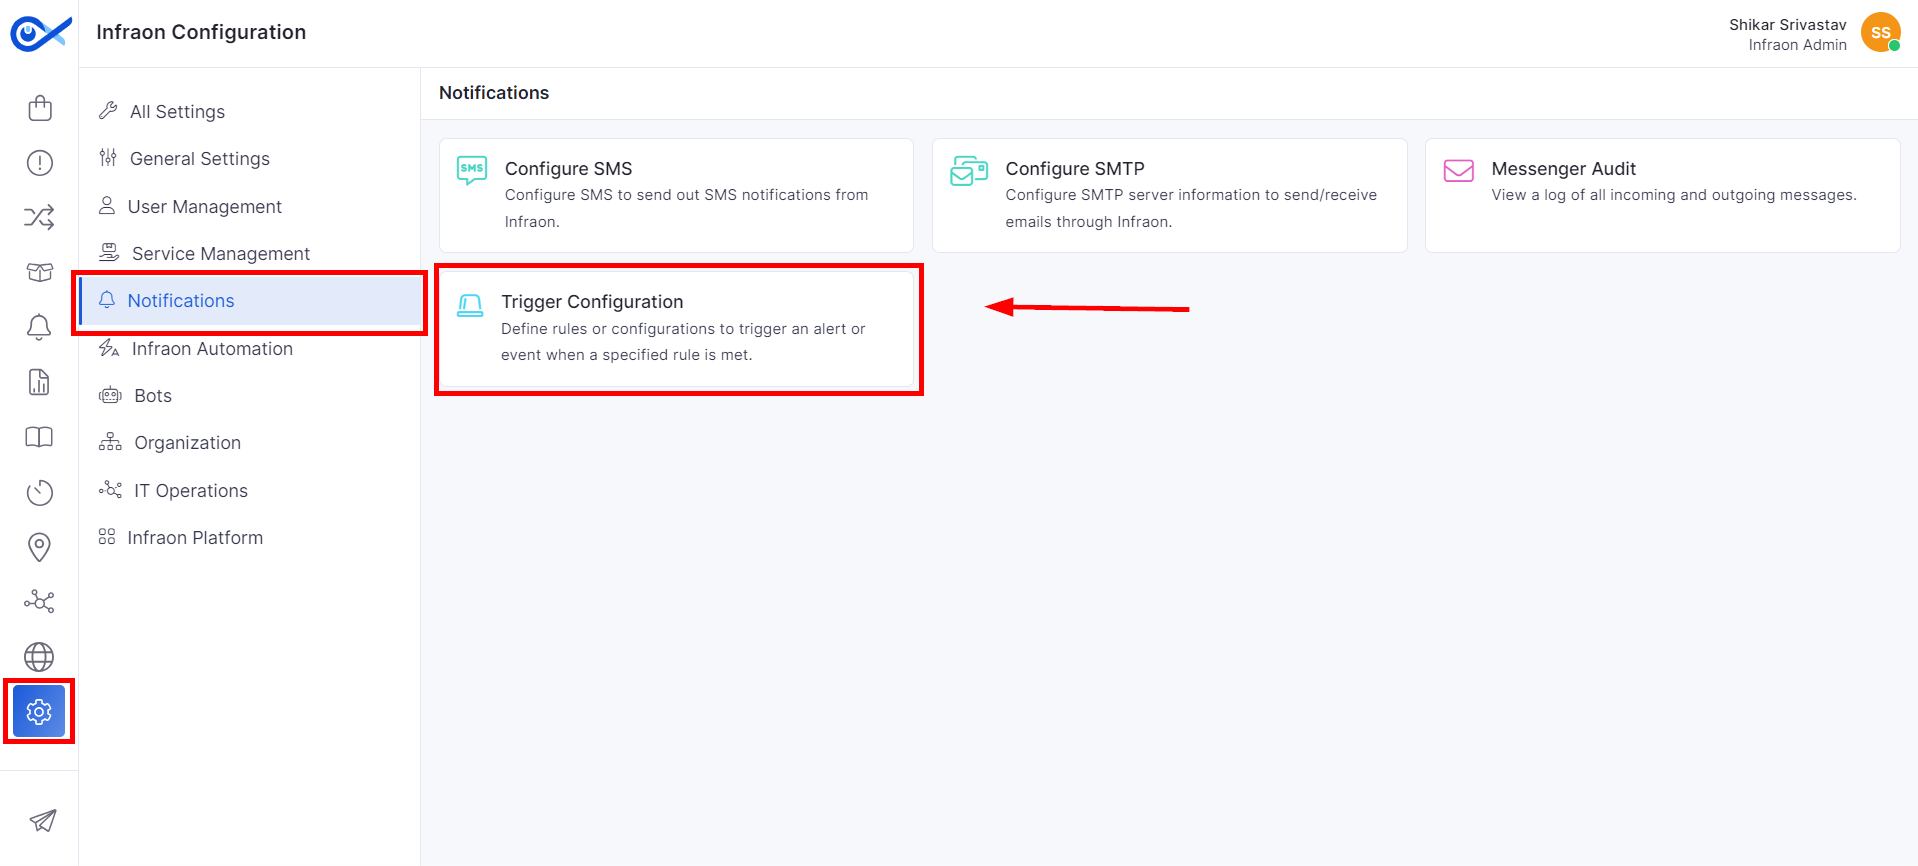
Step 1: To initiate trigger configuration in Infraon, access the Infraon Configuration from the left panel. From the main menu, select the Notifications option and locate Trigger Configuration within the menu.
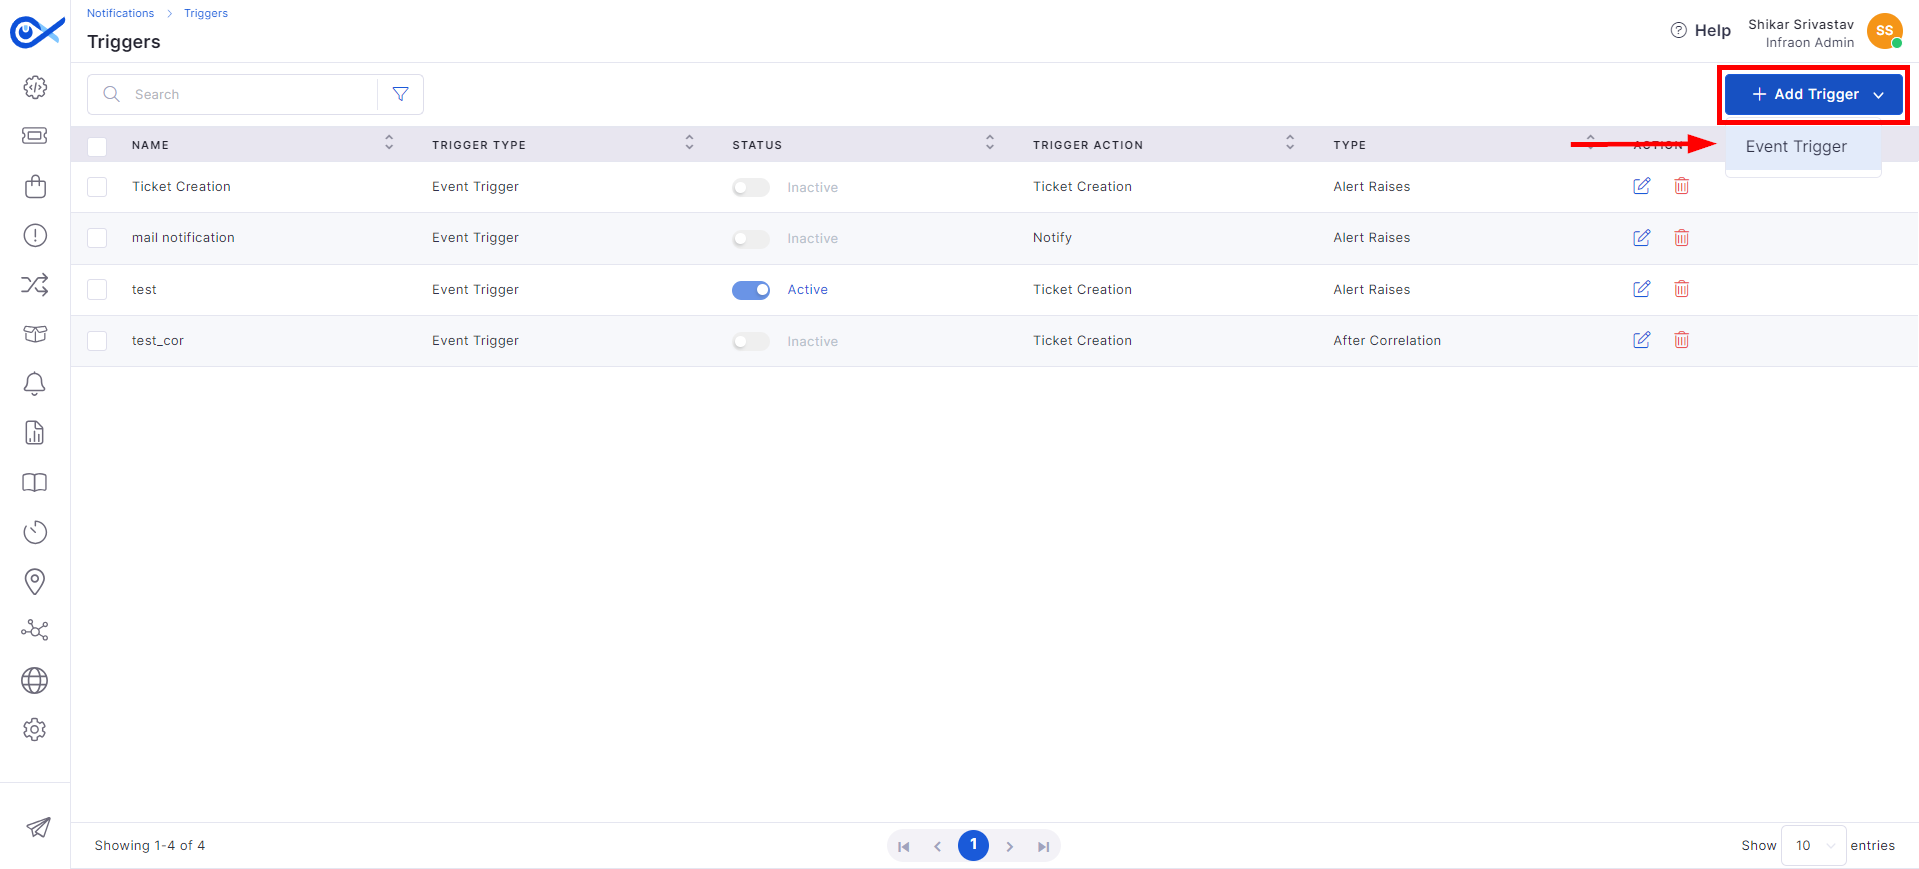
After entering the Trigger Configuration section, a list of previously configured triggers will be displayed.
Step 2: Click on the 'Add Trigger' button at the top-right corner of the page. Choose 'Event Trigger' from the dropdown menu to set up a new event-based trigger.
Follow the steps below to add the required details in the 'Add Trigger Configuration' section.
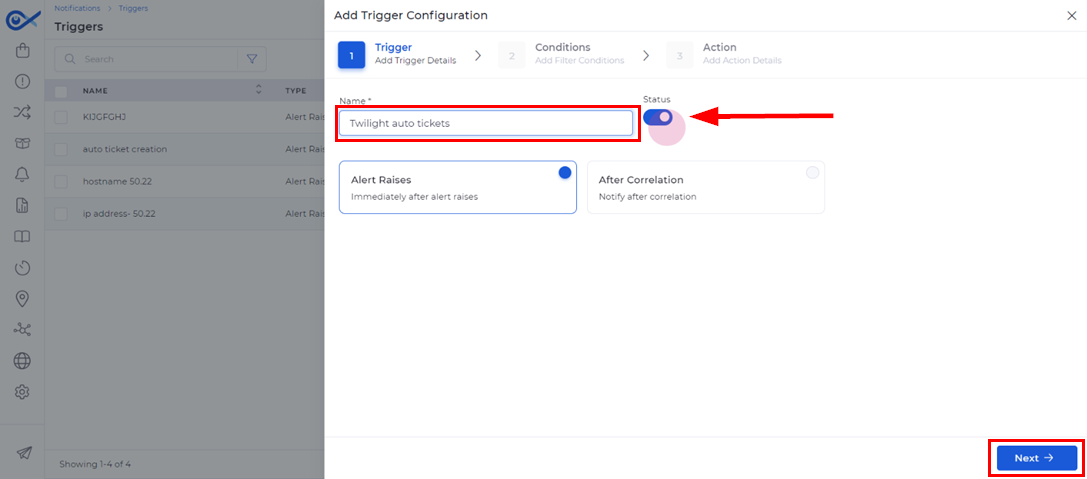
Step 3: Assign a name to your trigger configuration. Next, set the trigger's status, choosing between 'Active' and 'Inactive.'
Step 4: You have two main options:
'Alert Raises’: The trigger activates when event data meets the specified criteria.
'Notify After Correlation': The system waits for a correlation process to complete before activating the trigger.
After making your selection, click Next to proceed.
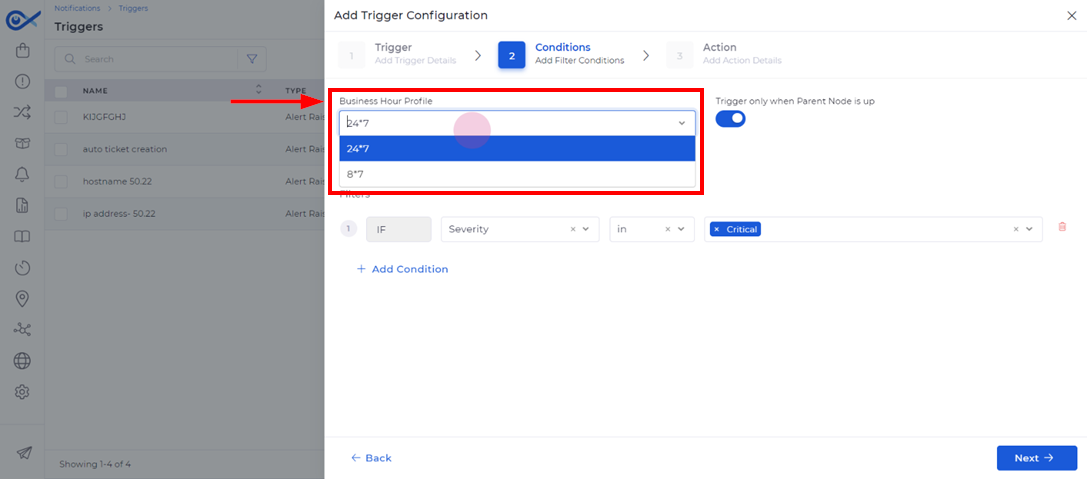
Step 5: Define specific filters to determine which events should activate the trigger.
Additionally, you can apply a Business Hours Profile from the available system options.
For instance, selecting a 24/7 profile ensures that alarms generated during these hours automatically trigger notifications or ticket creation.
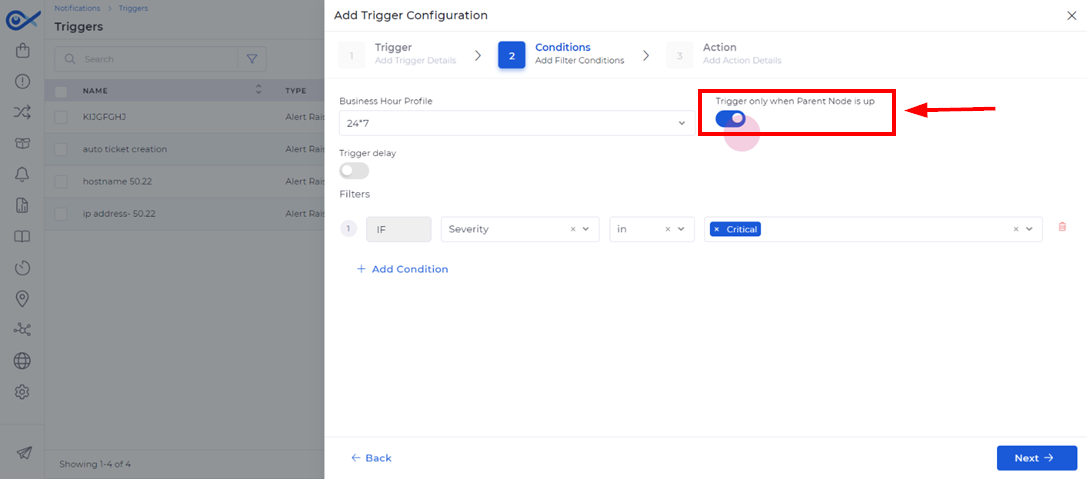
Step 6: Optionally, you can configure notifications to trigger only when the Parent Node is operational using a toggle button.
For example, if the parent node is active but child nodes are down, alarms will still be triggered for the non-operational links. Activating this option means alarms are only generated for the parent node if both parent and child nodes are down.
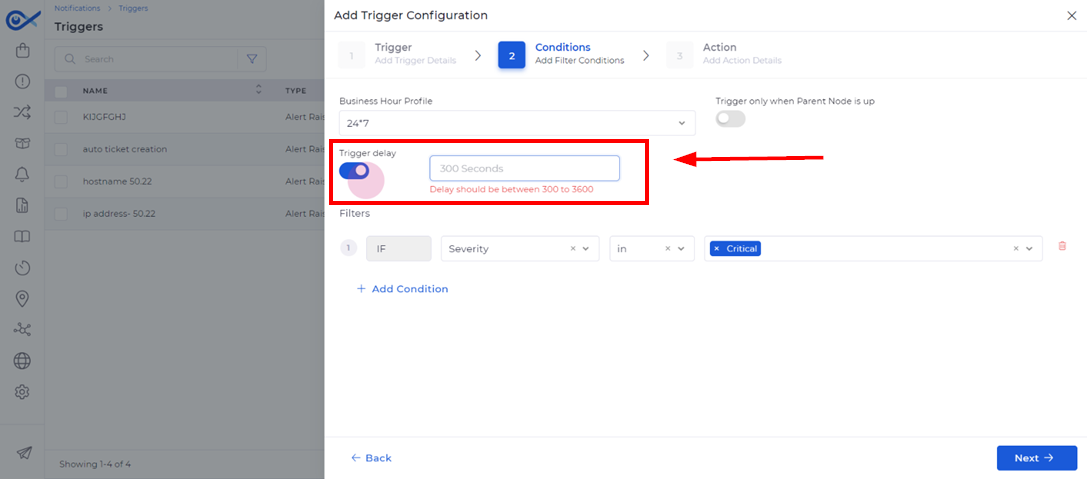
Step 7: Users can delay the trigger action by setting a specific time delay in seconds.
The delay option allows for a range between 300 and 3600 seconds. Toggling the option off when necessary disable the delay.
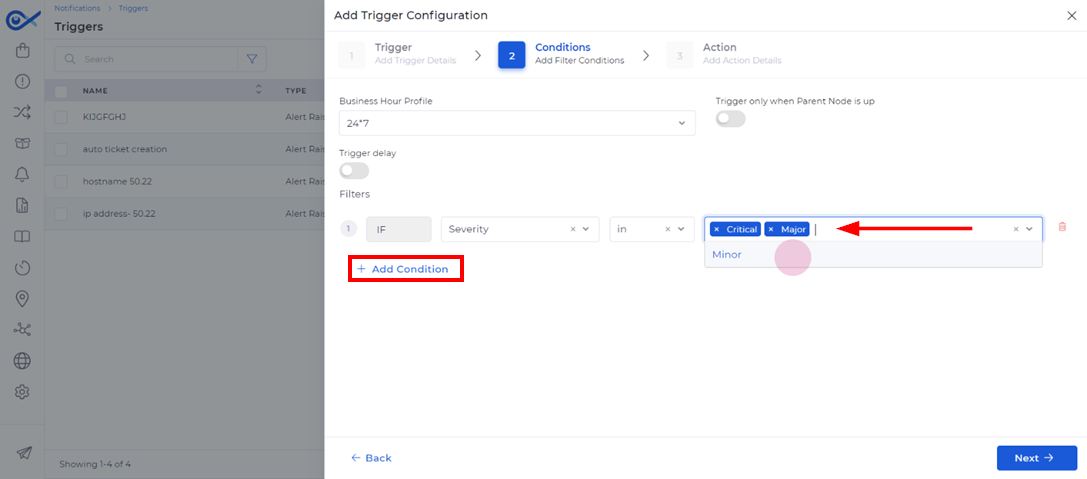
Step 8: To refine the trigger criteria, multiple filter conditions can be added. By default, the severity filter is set to Critical, but you can include additional conditions for Major and Minor severities.
To add more conditions, select 'Add Condition' and choose 'AND' to apply them cumulatively. Filters include Alarm Message, Asset ID, Hostname, IP Address, Device Type, and more, ensuring that the conditions match your requirements.
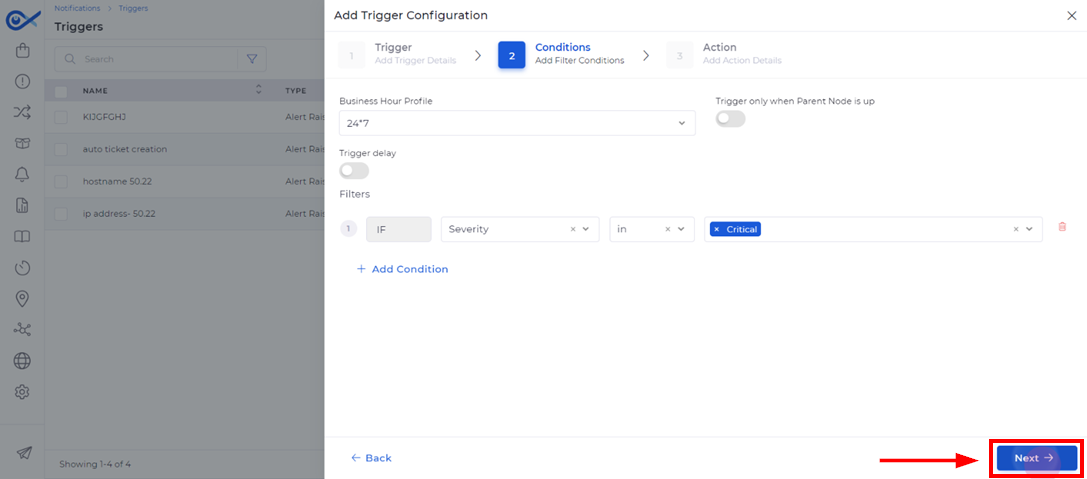
Step 9: Click Next to proceed to the action details after defining your conditions.
The action page has two main options: Notify or Create a Ticket.
The system supports multiple notification protocols, including SMTP (email), SMS gateway integration, and REST API endpoints. The notification delivery mechanism is executed based on the selected protocol configuration.
Let’s see each one in detail:
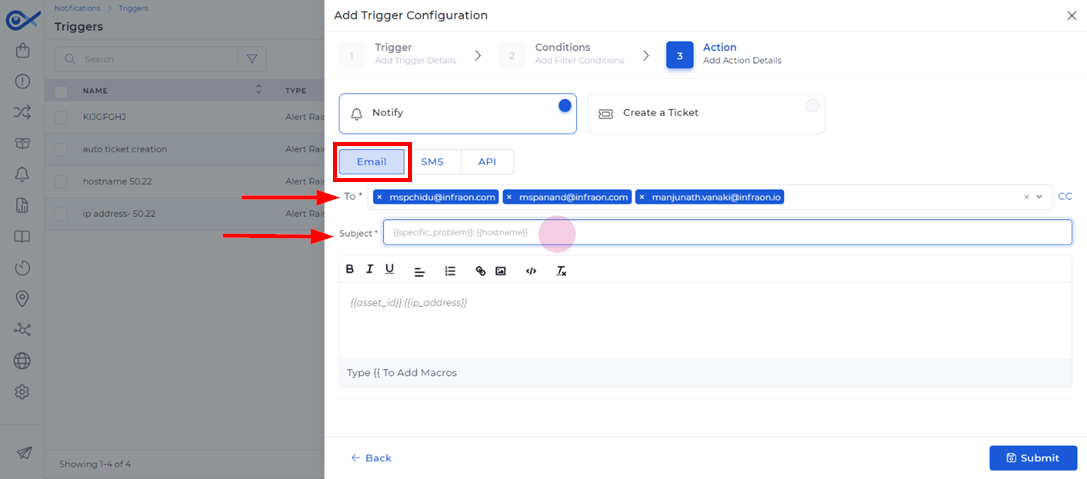
Step 1: Select the recipient email address from a dropdown or enter it manually. Optionally, you can add a CC and define the email subject.
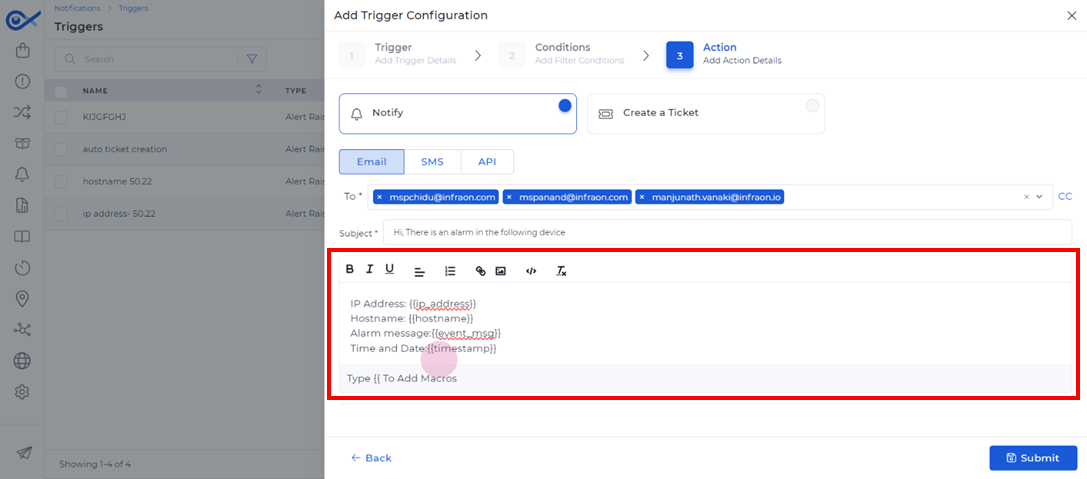
Step 2: The email body supports dynamic content injection through macro implementation using double curly braces ({{). The system provides predefined macro variables, including network parameters (IP_ADDRESS, HOSTNAME) for customized alert messaging.
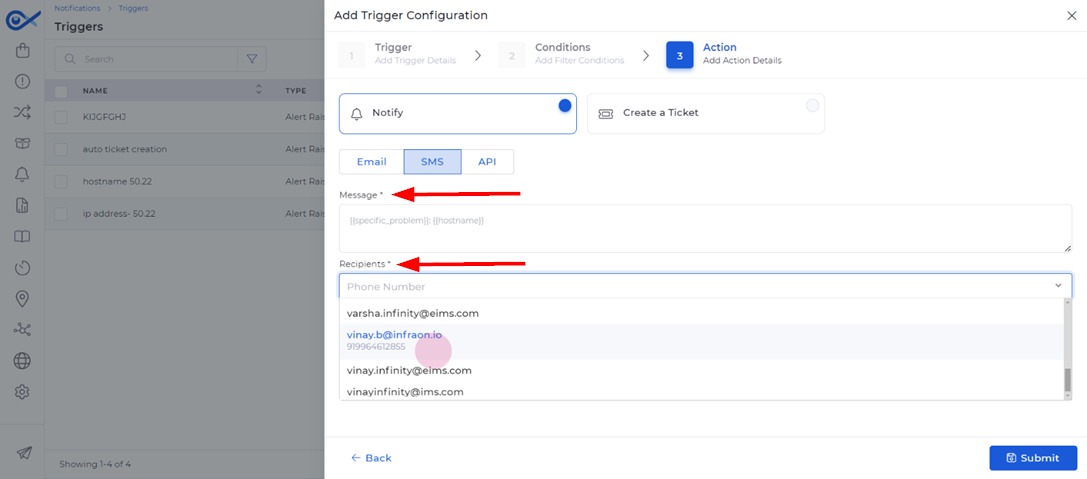
Step 1: Create a custom SMS message describing the trigger action.
Step 2: Specify the recipient's phone number from the dropdown box.
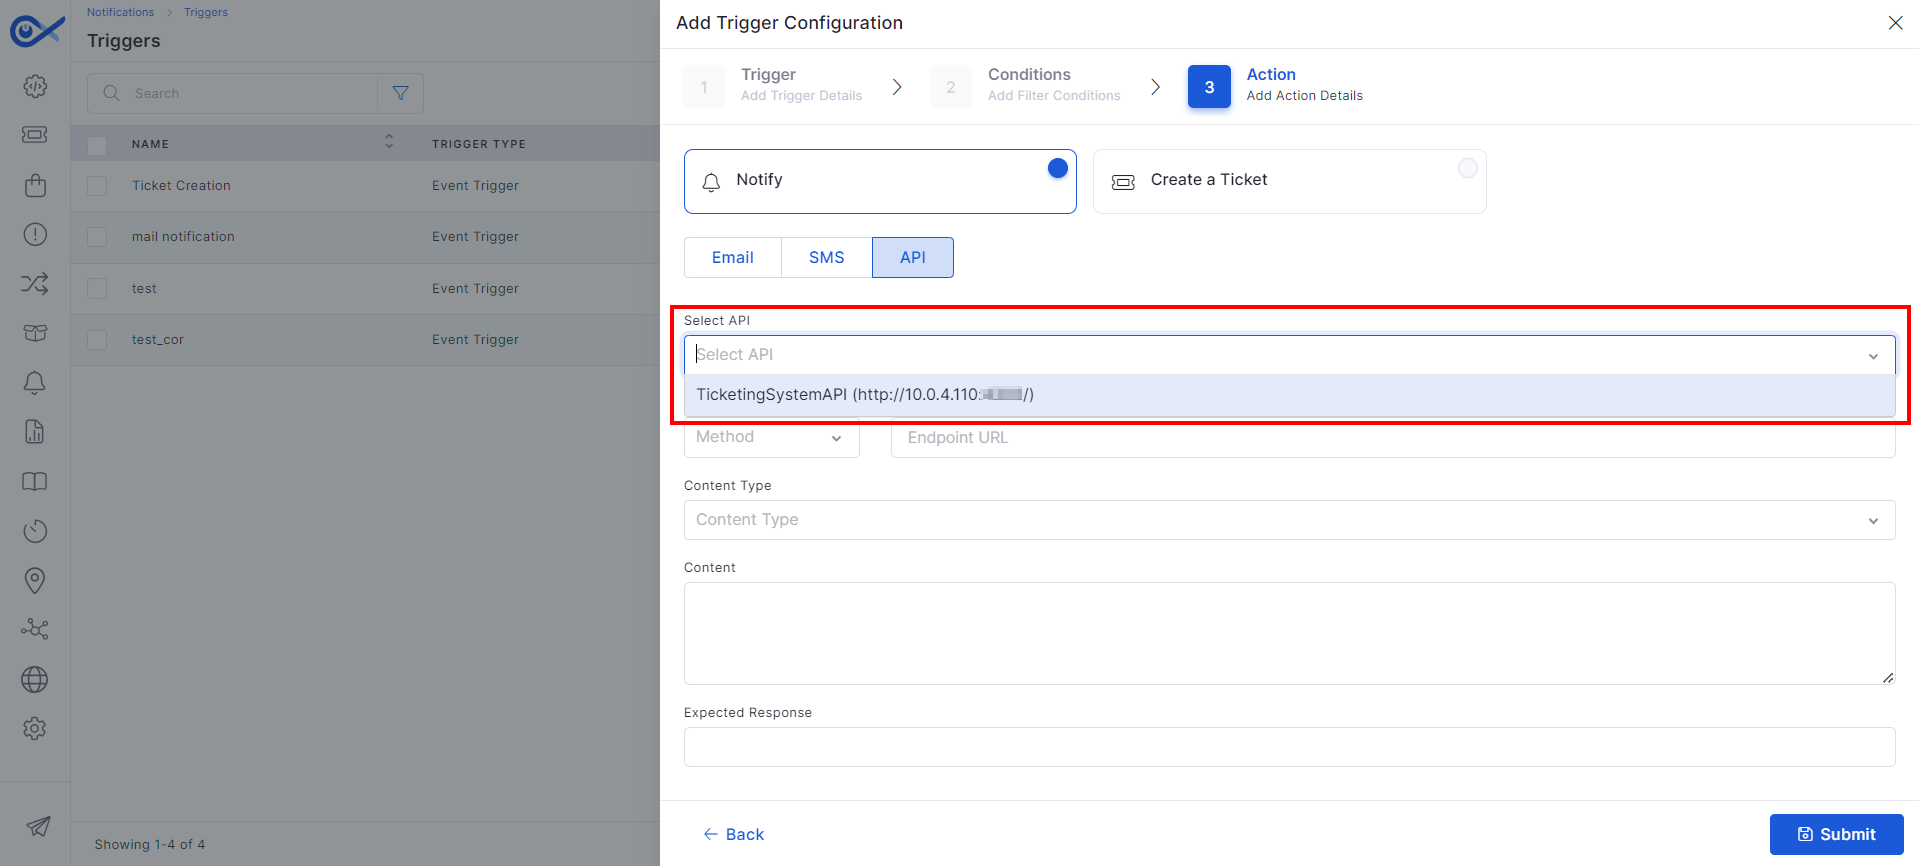
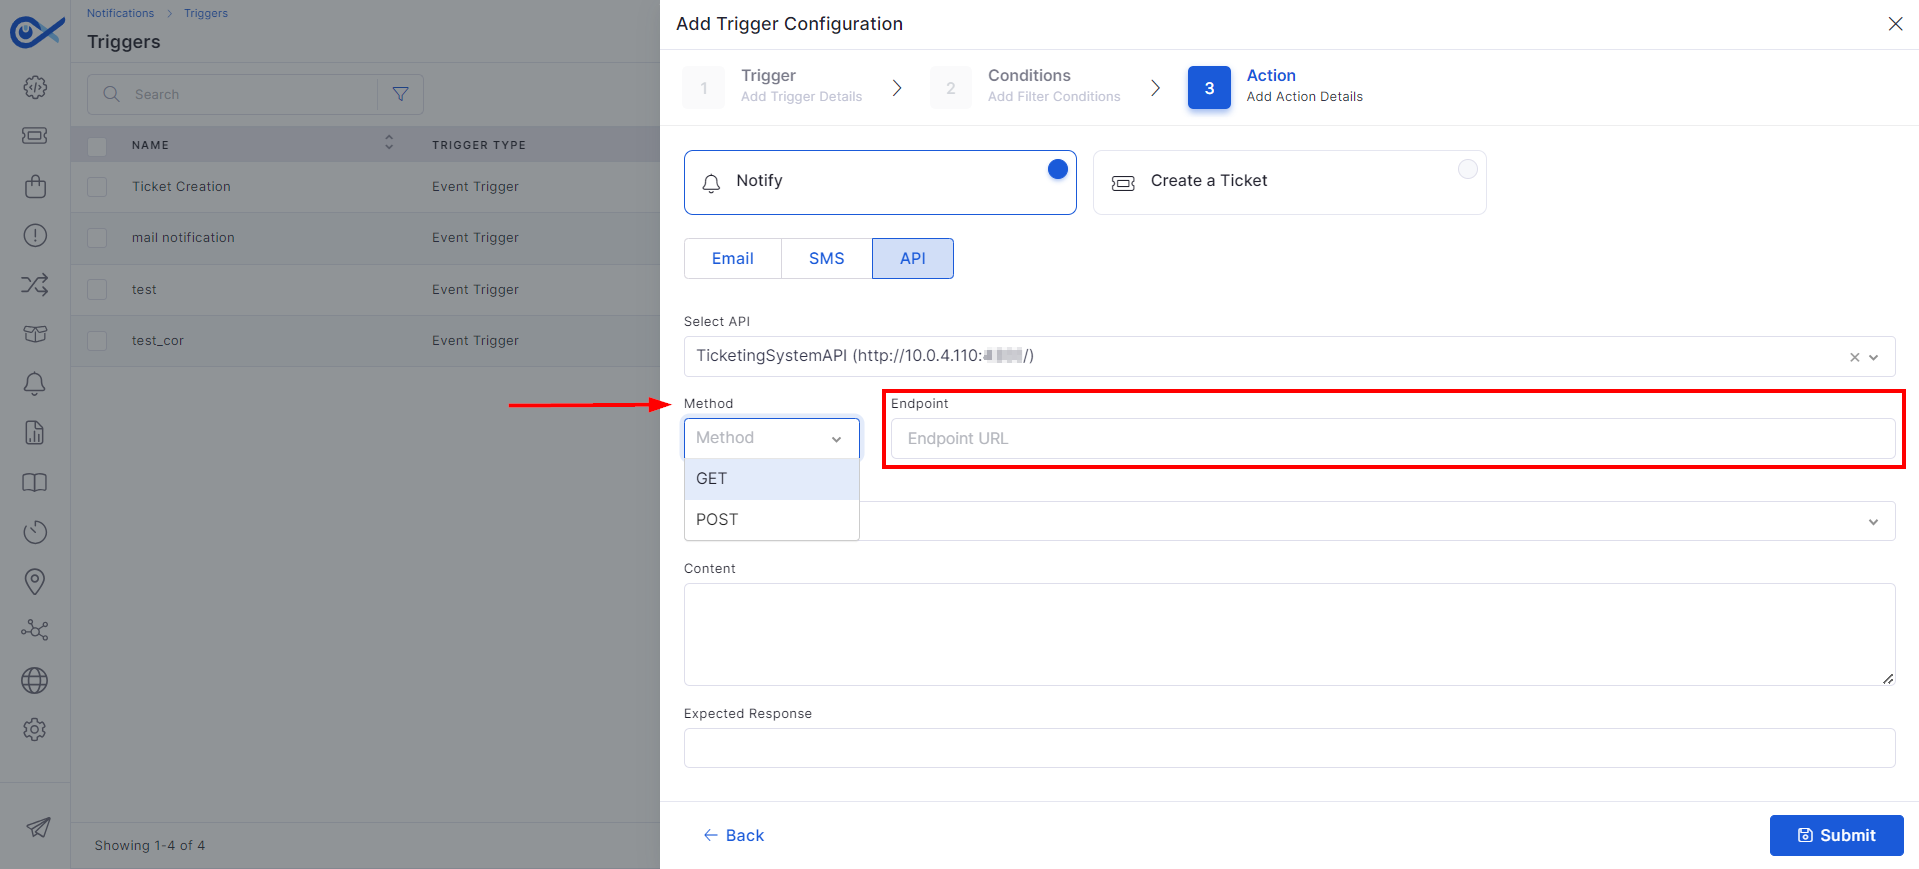
Step 1: Select the appropriate API from the list of registered APIs.
Step 2: Choose the GET or POST method and enter the endpoint respected URL.
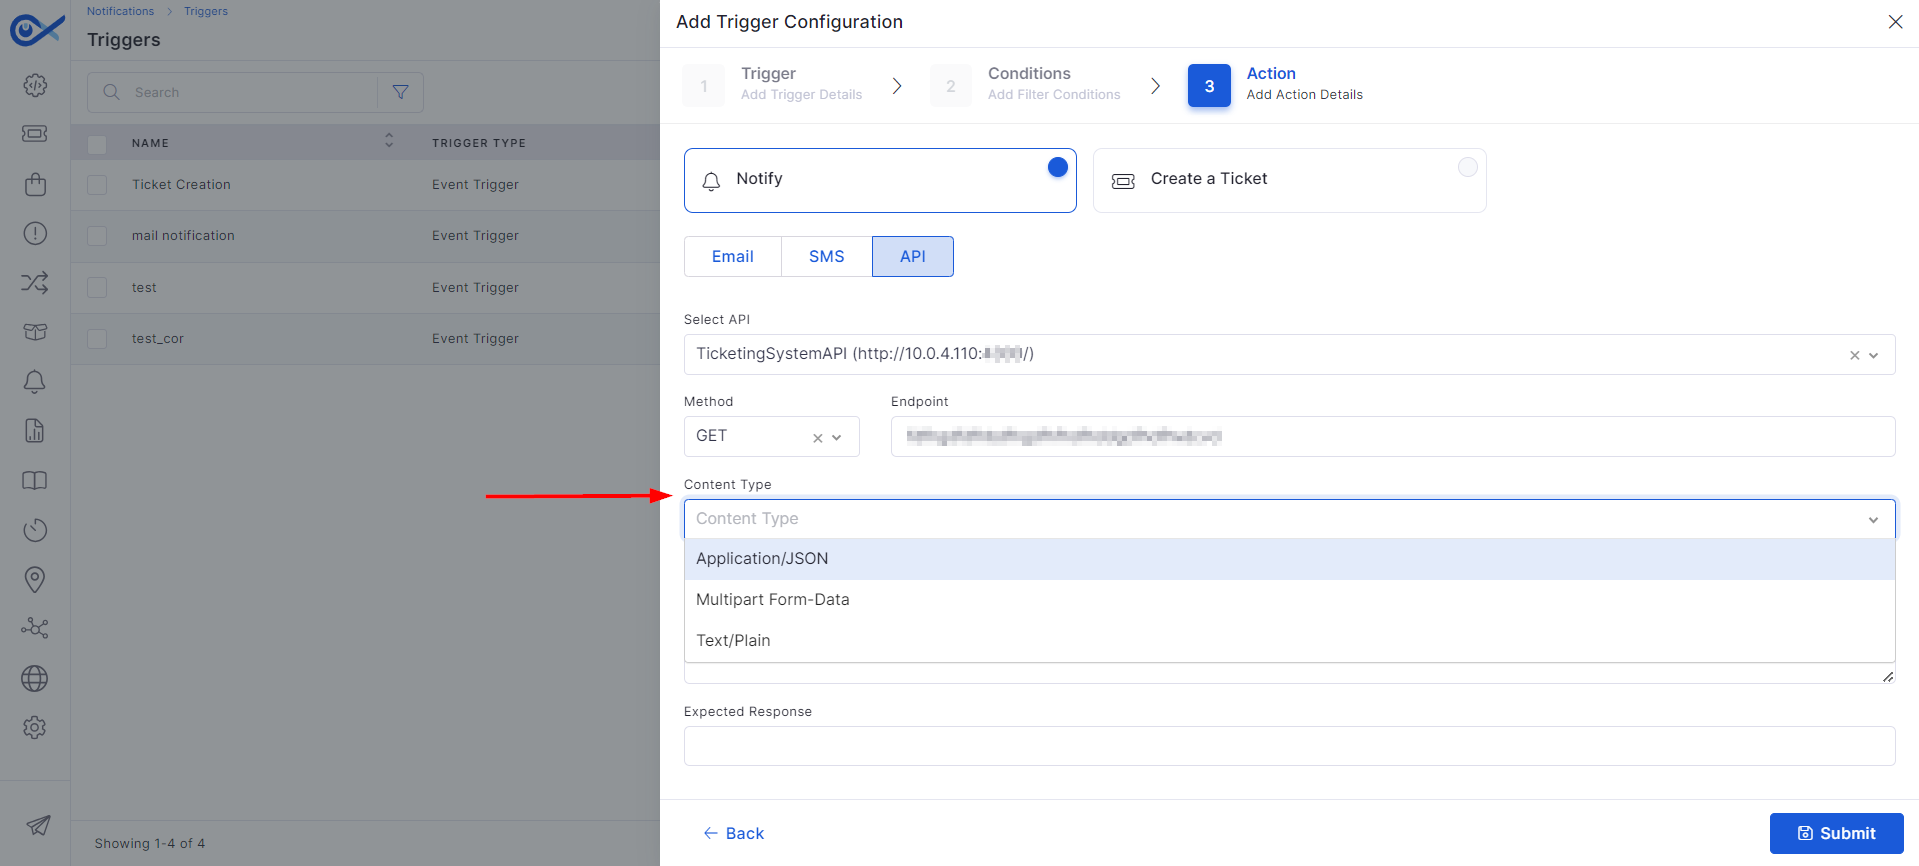
Step 3: Select the content type (e.g., application/JSON) and provide the required data in the corresponding fields.
Once the notification channel configurations are completed for the selected protocol (email, SMS, or API), the system executes a validation sequence and confirms successful trigger deployment.
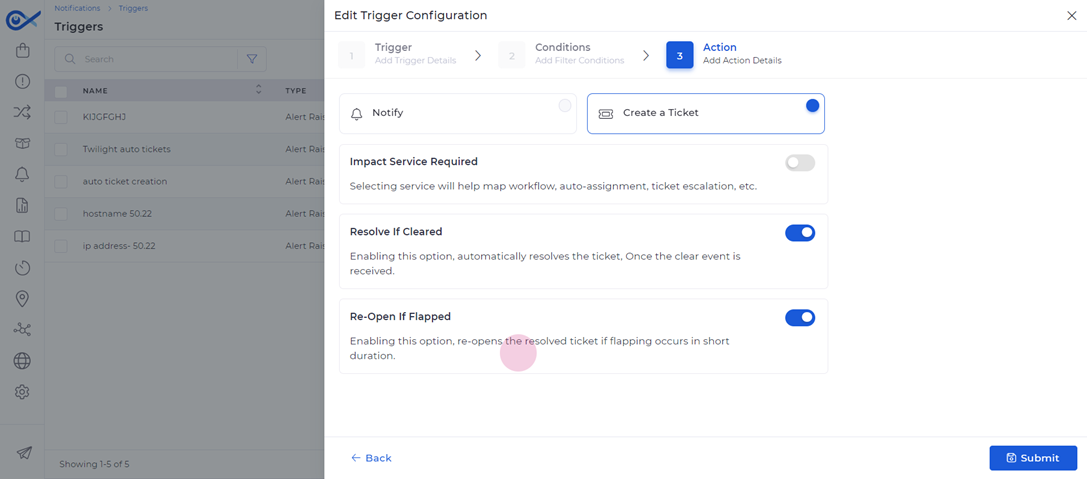
Several toggles are available during ticket creation, such as 'Impact Service,' 'Resolve if Cleared,' and 'Reopen if Necessary.' Let’s break down these options:
Impact Service: If this toggle is enabled, users are prompted to choose a service impacted by the event for ticket creation. The available services will be displayed in a dropdown menu. Once a service is selected, the created ticket will be automatically linked. This optional step allows users to associate a service or leave the feature disabled.
Resolve if Cleared: Enabling this option allows the system to resolve the ticket automatically when the event has been cleared. This feature is optional and should be selected if users wish the ticket to close upon resolution of the alarm.
Reopen on Re-alarm: Activating this toggle ensures the system reopens the ticket if a re-alarm or event recurrence occurs. Initially, the ticket moves from an open to a resolved state, but with this option enabled, the ticket status will change to 'in progress' upon re-alarm.
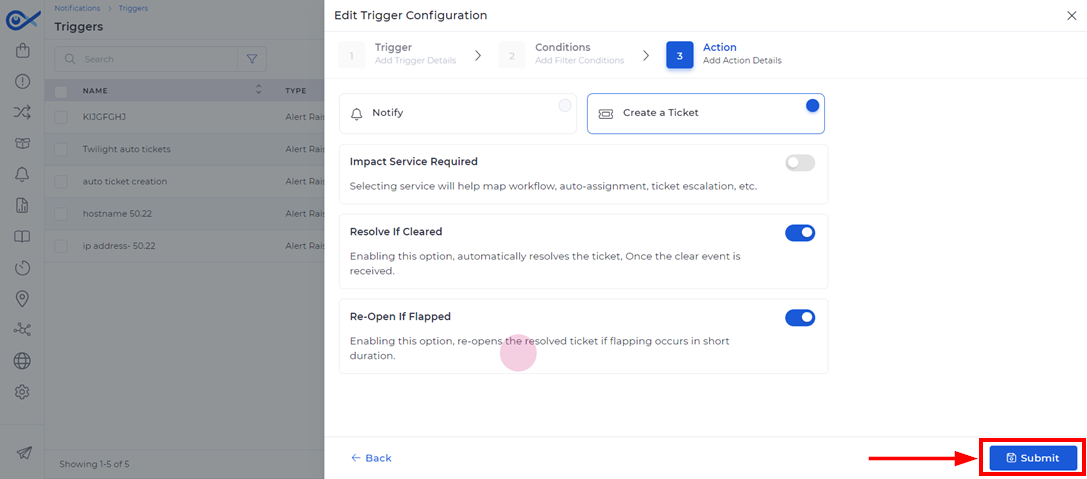
After adjusting the necessary settings, click the Submit button.
A confirmation message will appear, indicating that the trigger has been successfully created and is visible in the trigger list.
You can configure multiple triggers for scenarios requiring multiple actions (e.g., notifying users and creating tickets for the same event).
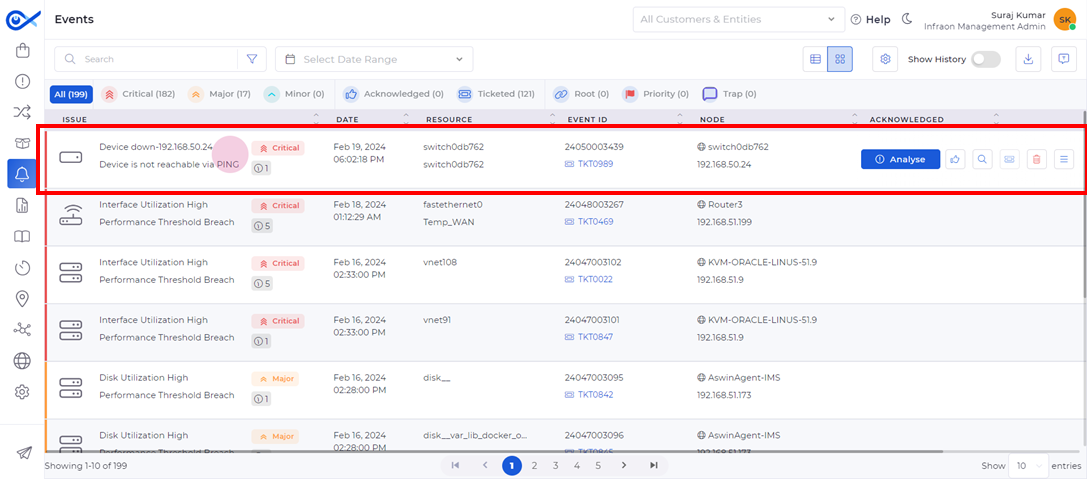
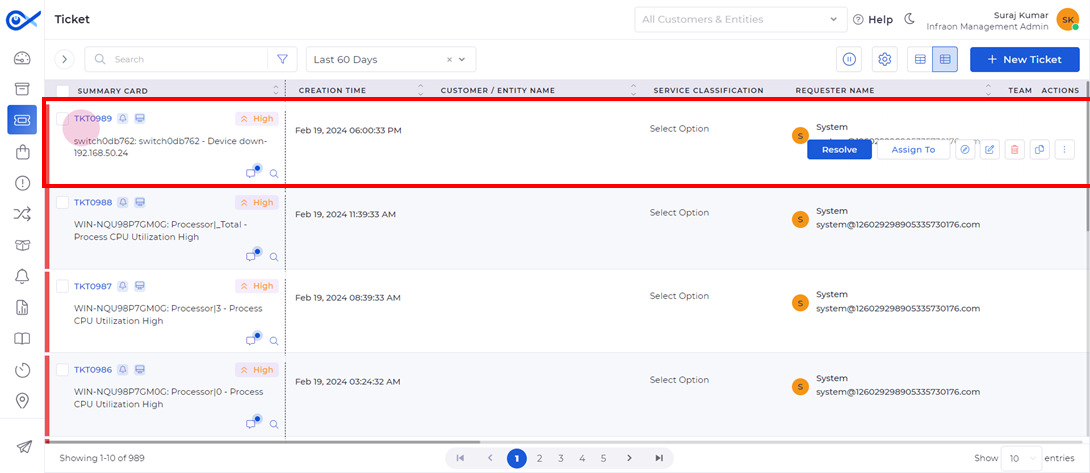
Once configured, triggers will activate based on the predefined thresholds. You can monitor triggered events in the events module, where details like event ID and ticket ID are displayed.
Tickets can be accessed through the ticket module, and corresponding notifications are sent to designated recipients, providing full traceability of the trigger configuration process.
Ticket Assignment (Automatic)
This guide will explore the automatic ticket assignment feature in the Infraon Infinity platform. This feature offers two options: Team Assignment and Business Rule.
Team assignment is a process of automatically allocating technicians to resolve issues. When a ticket is created, the associated impacted service triggers the assignment. Predefined linkages between impacted services and responsible teams direct the ticket to the appropriate team. Subsequently, the ticket is assigned to a specific technician within that team.
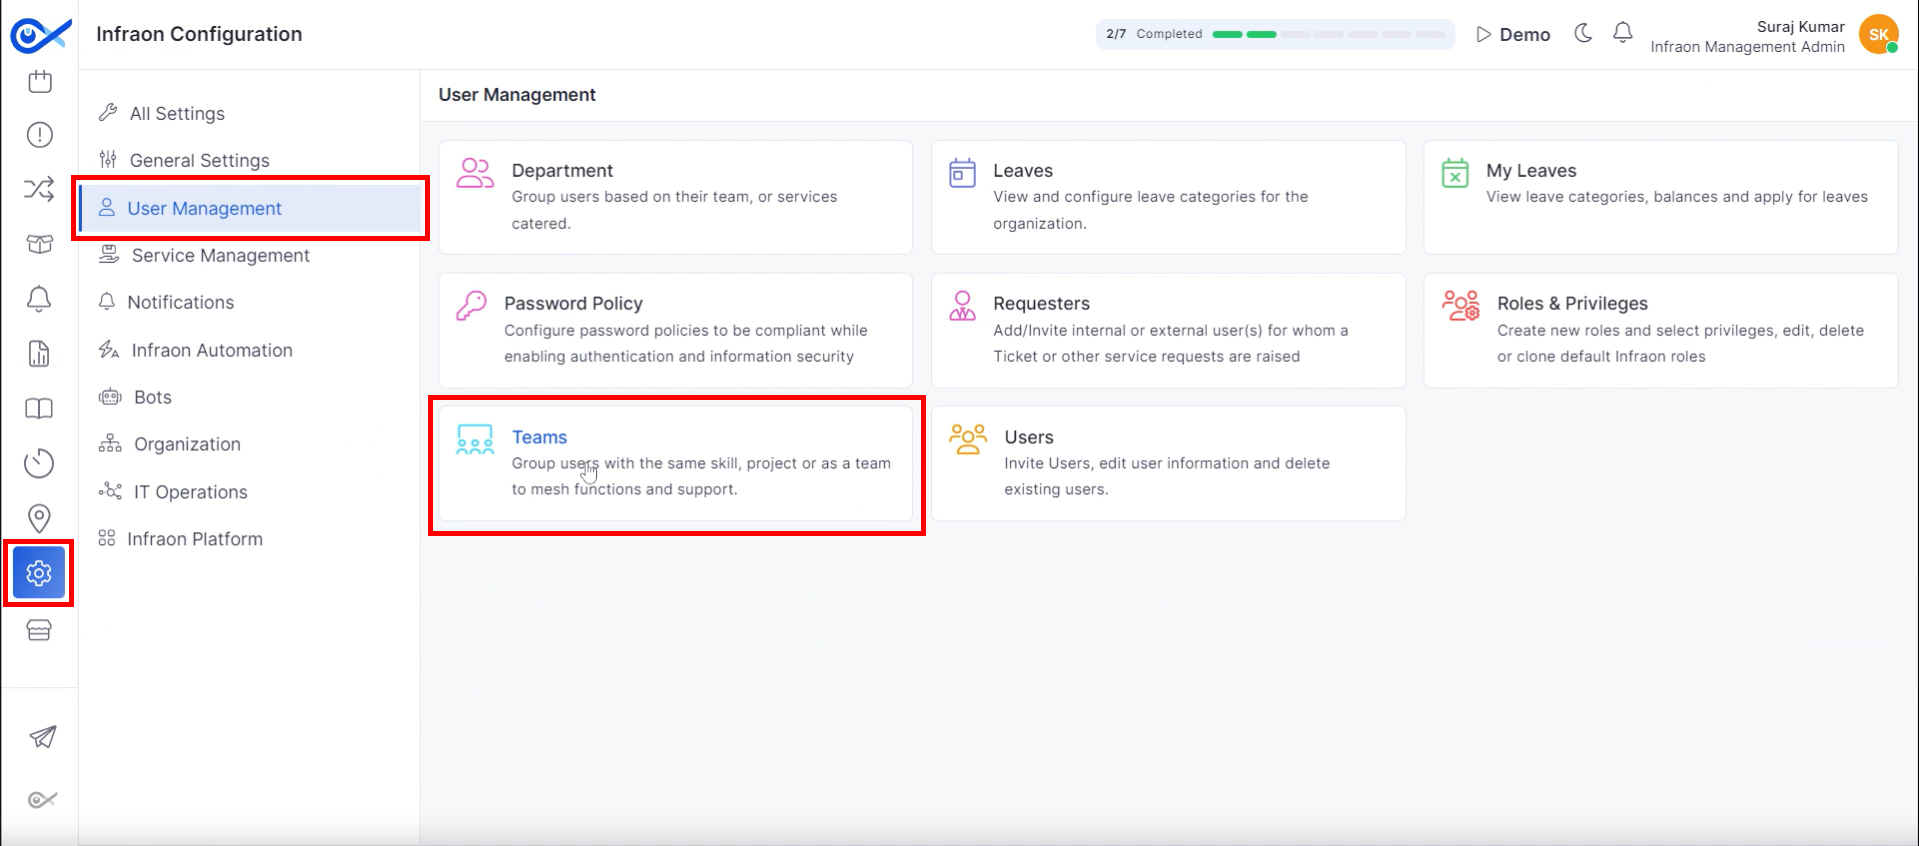
Step 1: Navigate to the “Infraon Configuration” module, then proceed to the “User Management” tab and select the “Teams” module to configure automated ticket assignment.
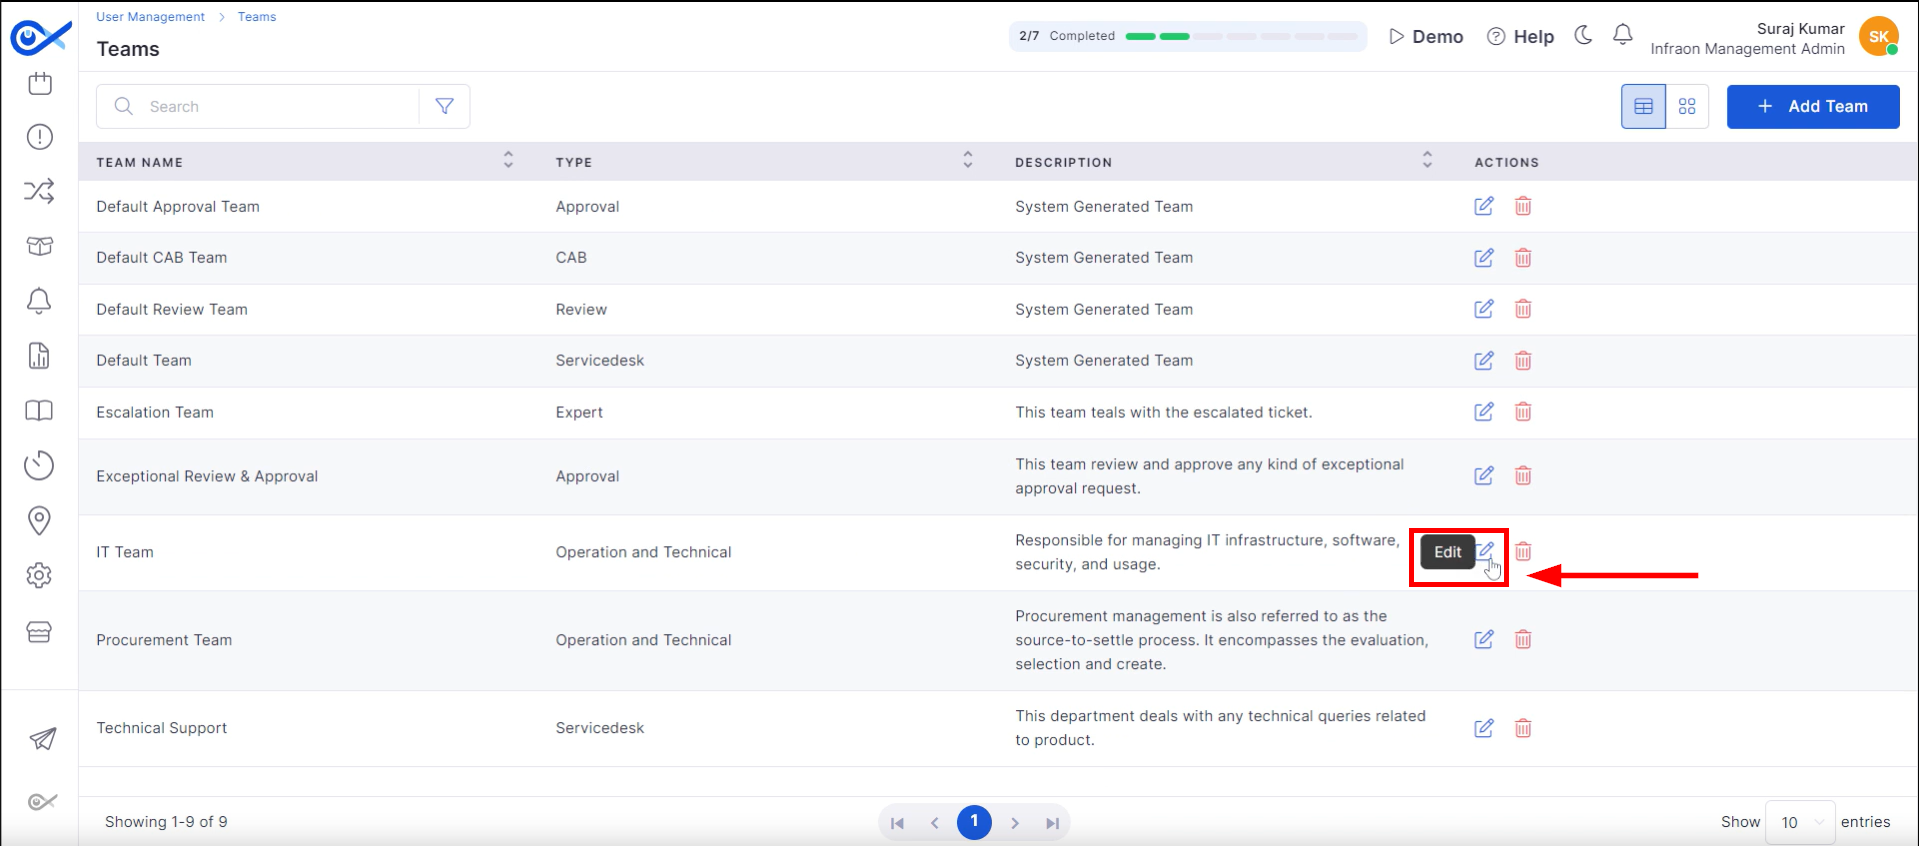
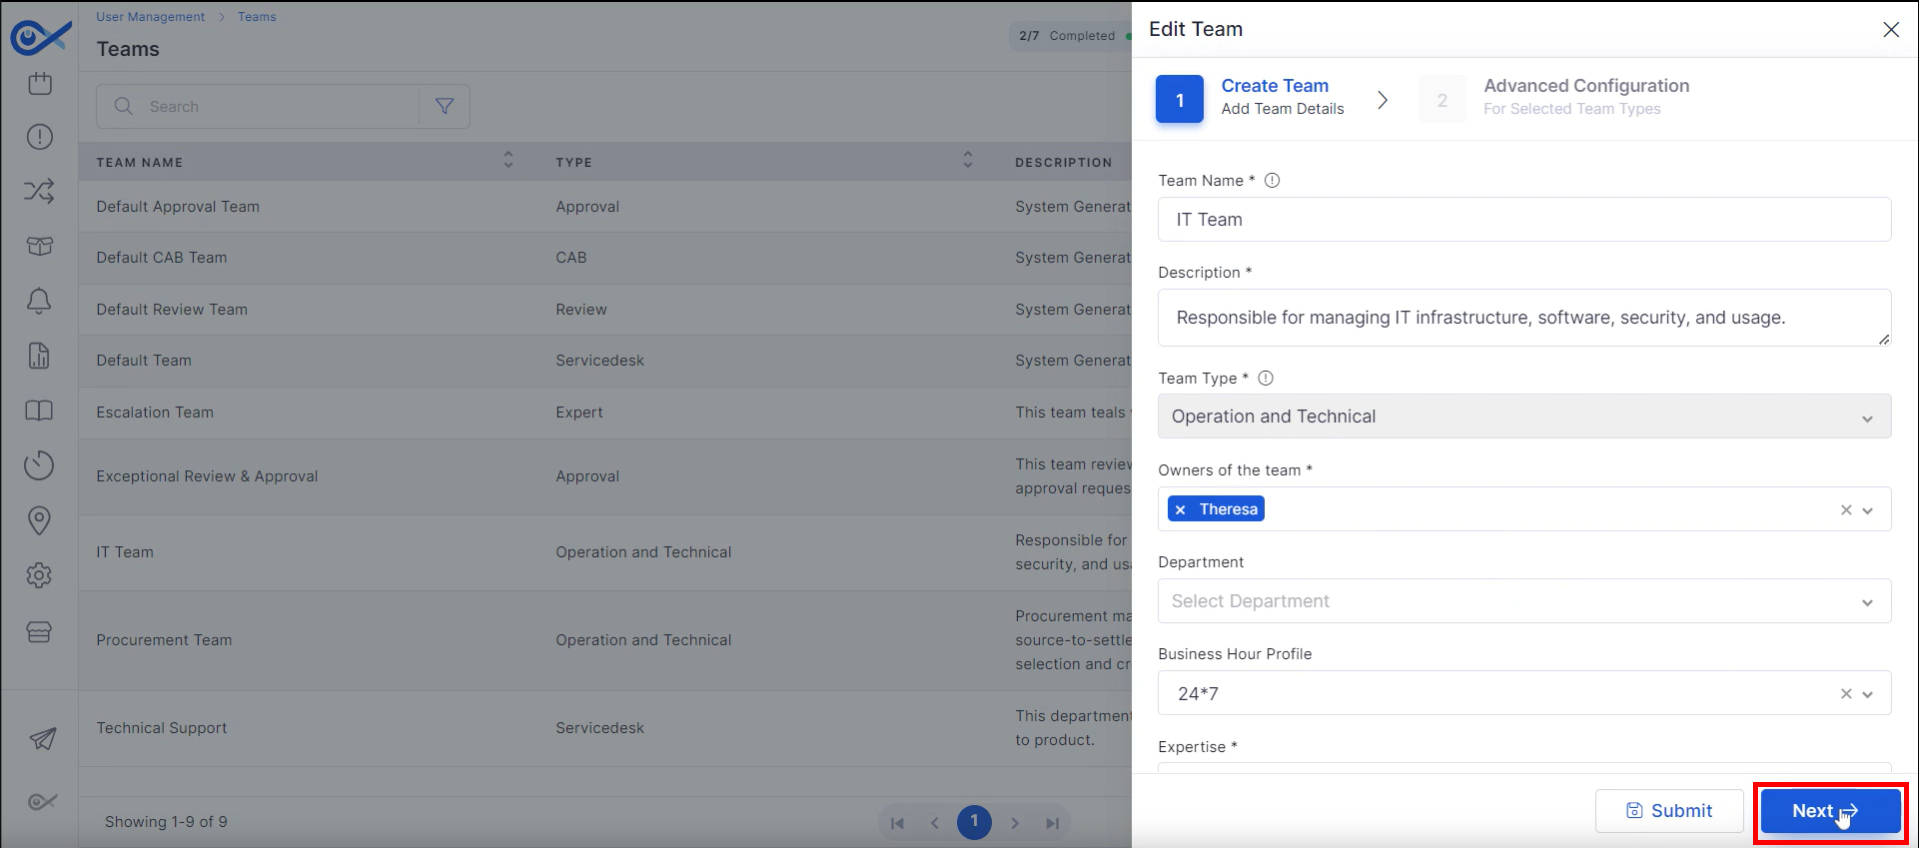
Step 2: To evenly distribute ticket workload among technicians within a specific team, select the desired team and click the “Edit” button to modify team assignments.
Step 3: Access the advanced configuration by clicking
“Next”
in the pop-up window. Within this section, enable automatic ticket assignment.
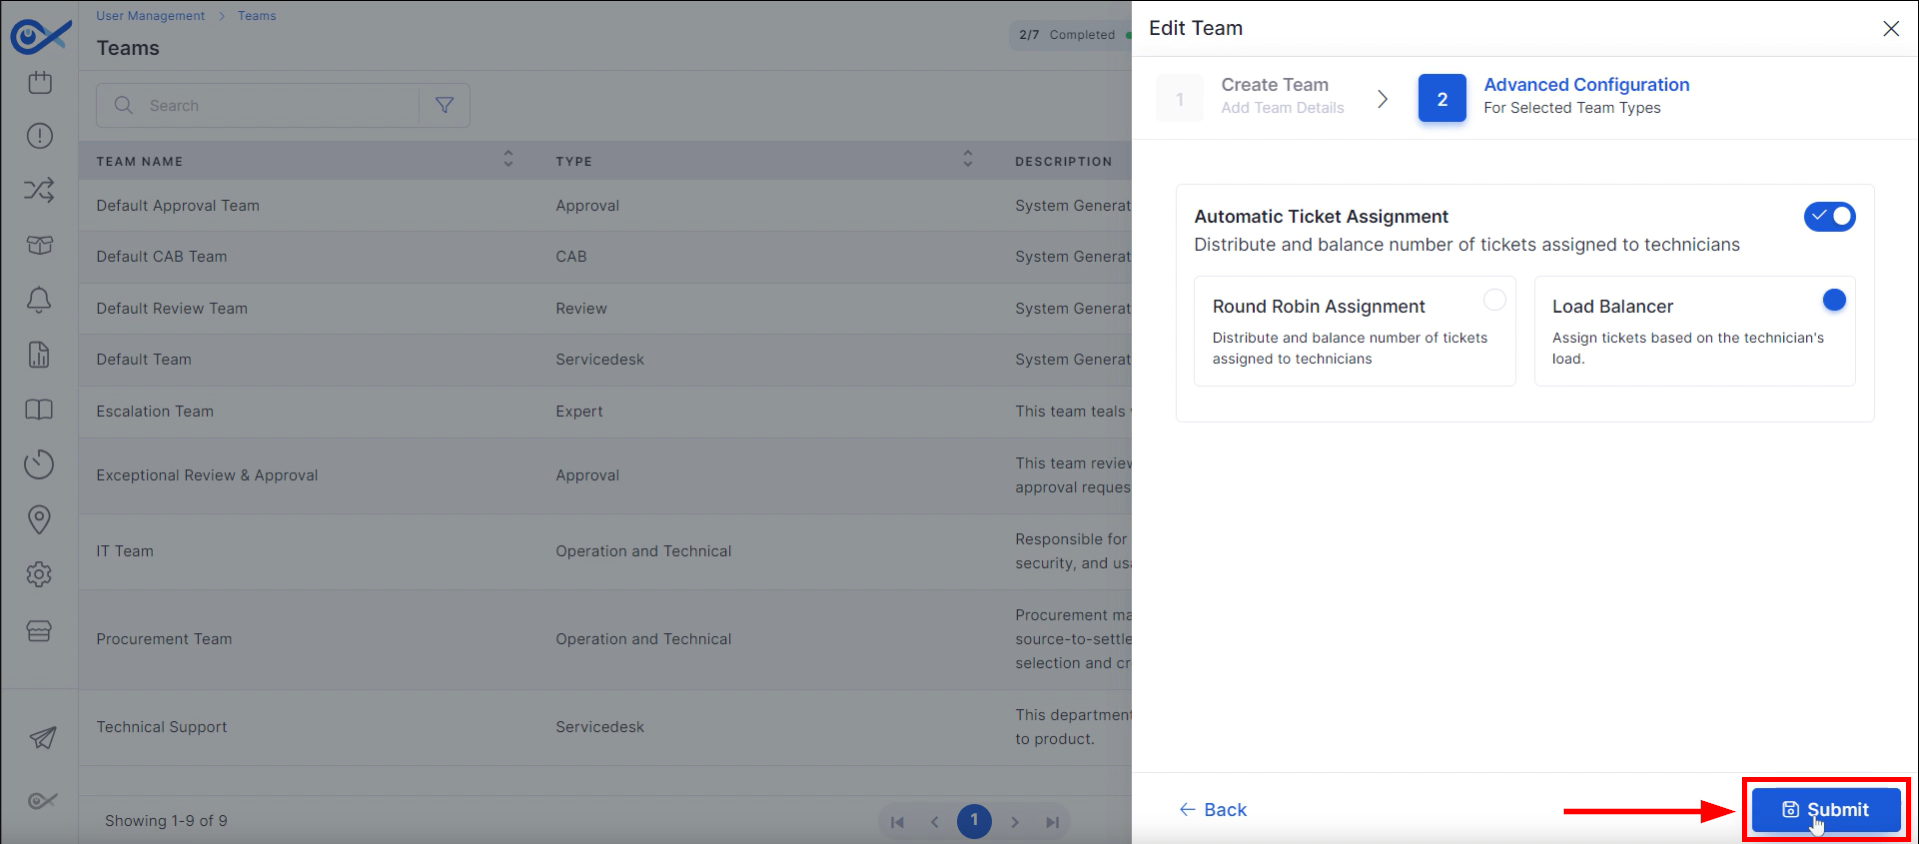
There are two methods: Round Robin Assignment and Load Balancer.
Round Robin ticket assignment evenly distributes incoming tickets among available technicians. For example, if a team consists of Alice, Bob, and Carol, the tickets would be assigned in the following order: Ticket 1 to Alice, Ticket 2 to Bob, Ticket 3 to Carol, Ticket 4 back to Alice, and so forth, continuing this cycle.
The load Balancer method considers the current workload of available agents to ensure a balanced distribution of tickets. For instance, if Alice is handling 6 tickets, Bob 2, and Carol 5, a new ticket would be assigned to Bob, as he currently has the lightest load. The load balancer continuously adjusts to distribute the workload evenly.
Step 4: Make appropriate configuration selections and confirm choices by clicking the “Submit” button.
This marks the end of the explanation of how automatic ticket assignment functions within the Infraon Infinity Teams framework.
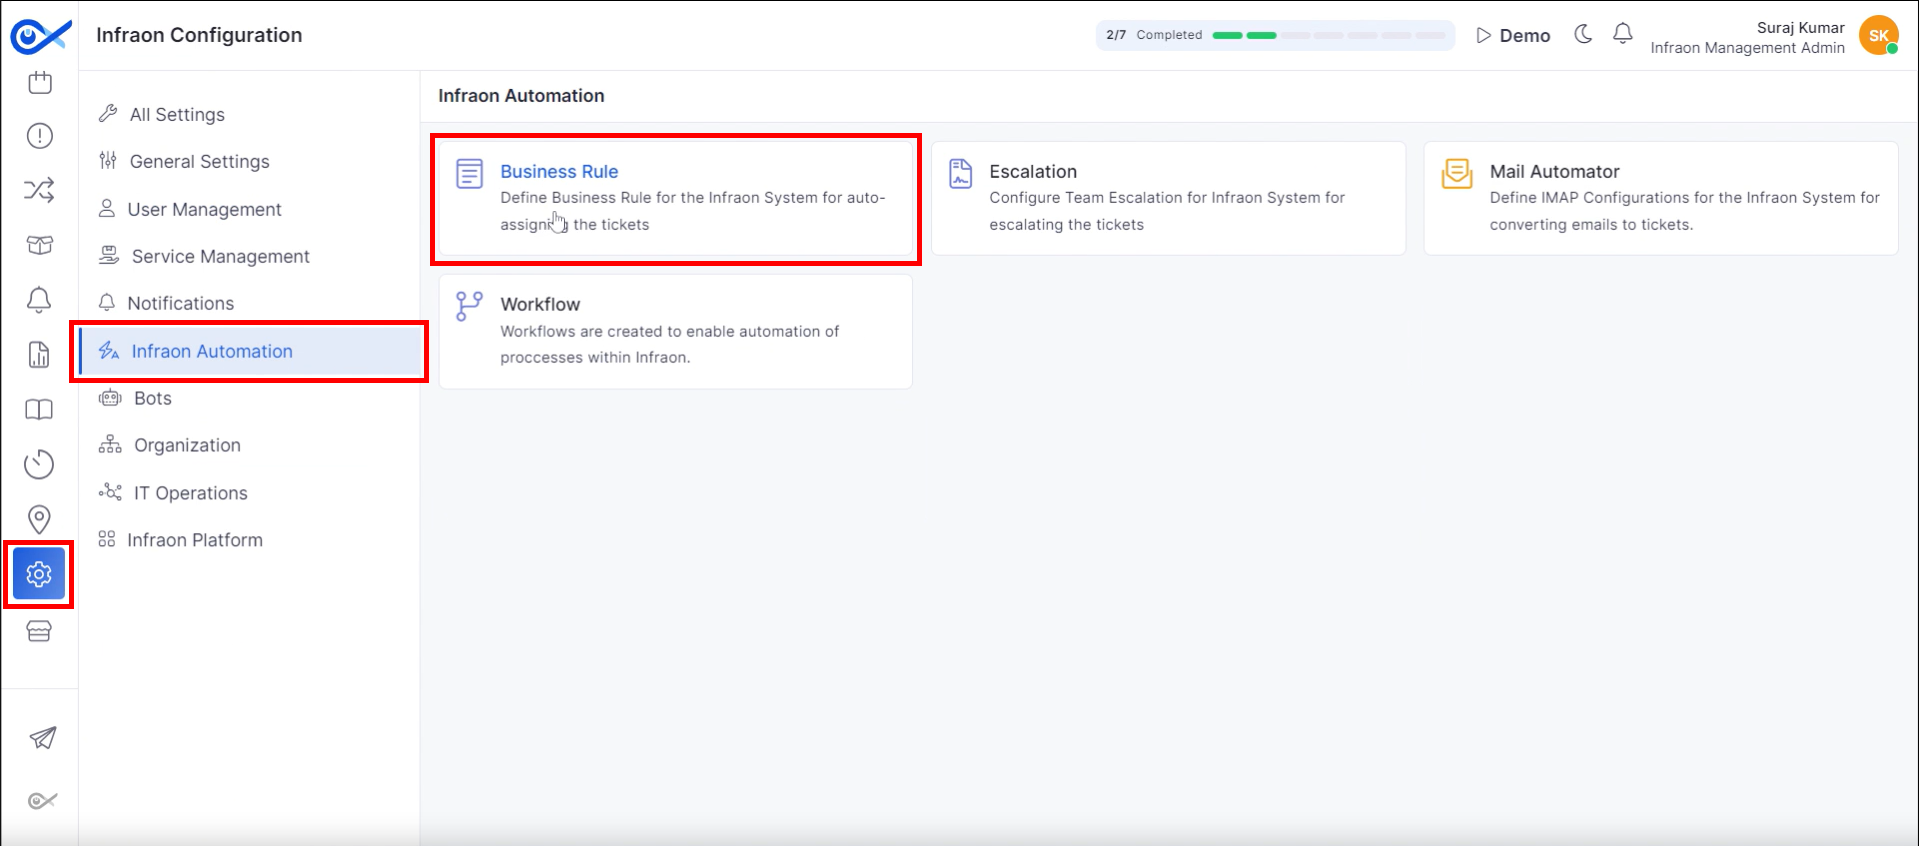
Business Rules automatically assign tickets based on the impacted service and requester tag. For example, if a ticket is created for a specific impacted service, it is automatically assigned to the Level configured for that service.
Step 1: Navigate to the “Infraon Configuration” module, then proceed to the “Infraon Automation” tab and select the “Business Rule” module to configure automated ticket assignment.
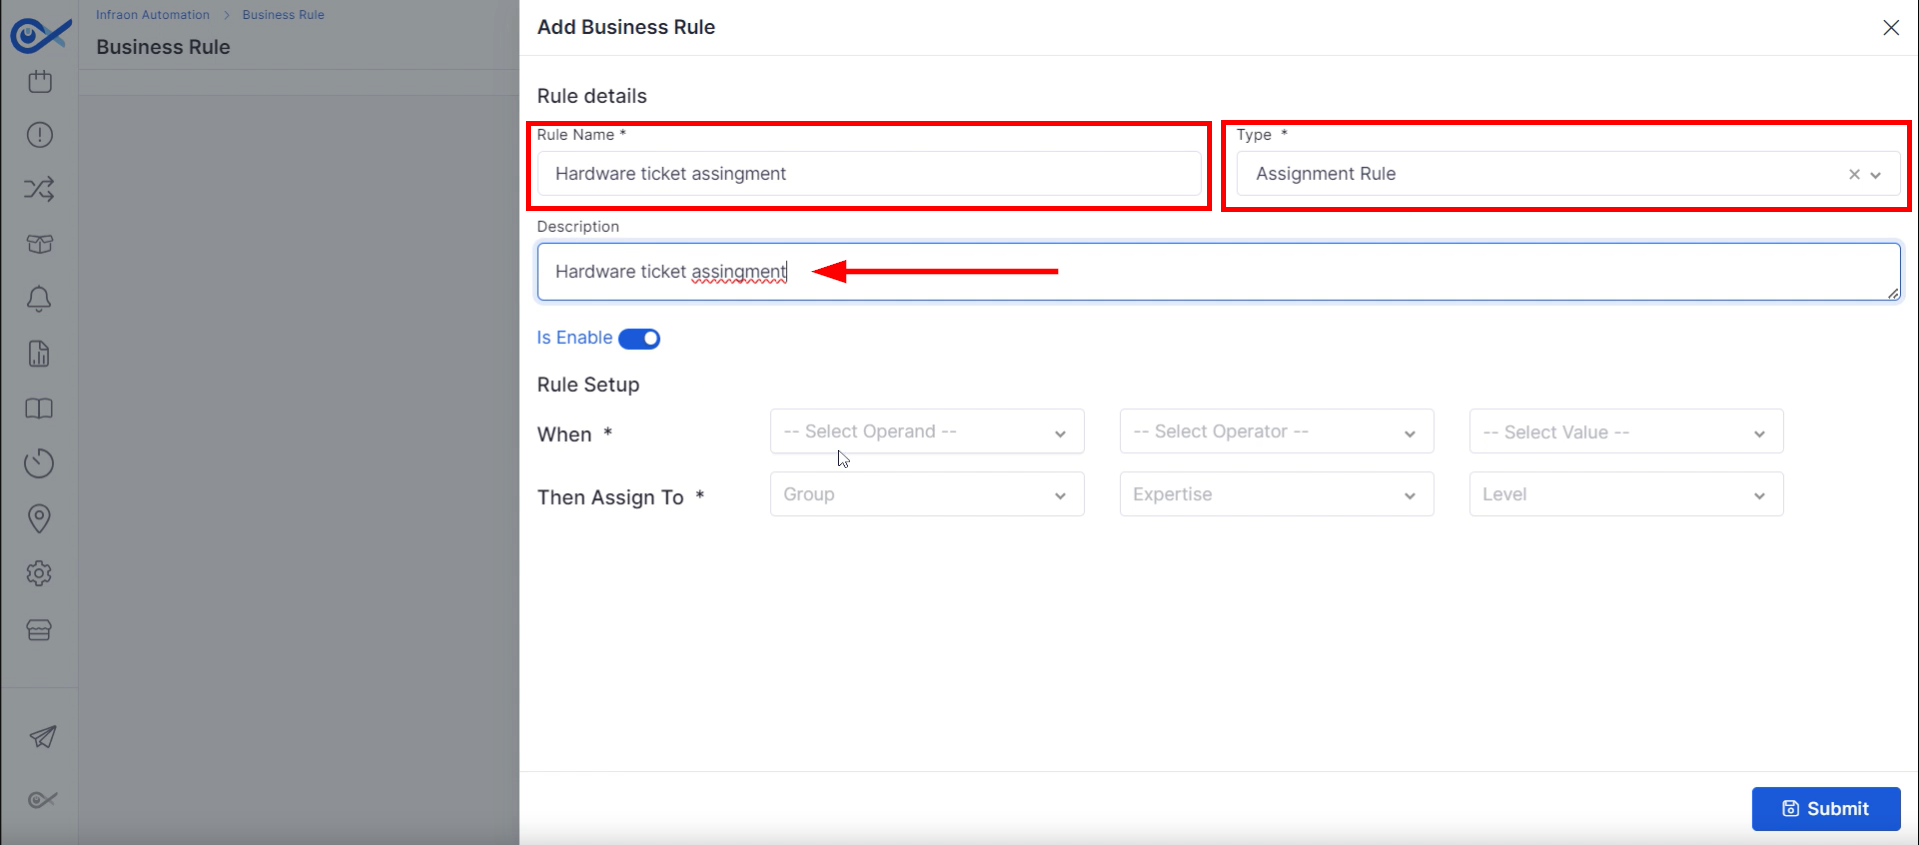
Step 2: Begin the rule creation process by inputting a rule name, determining the rule type, and supplying a brief description.
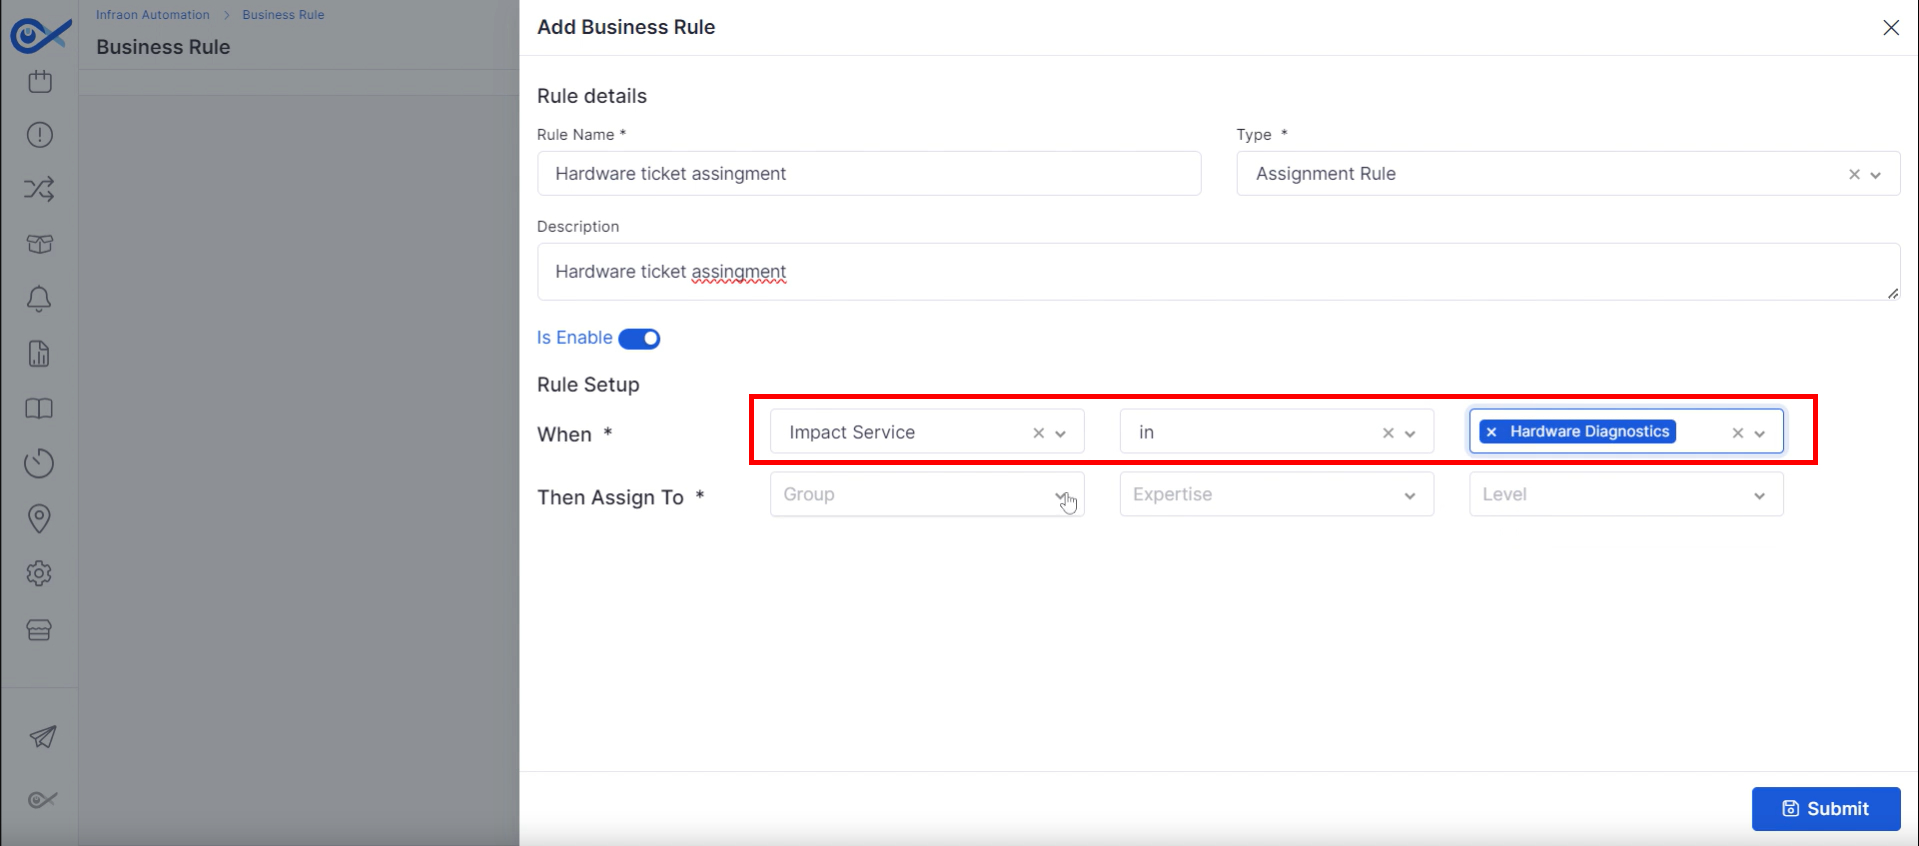
Step 3: In the “When” column, establish rule conditions by selecting an Operand (such as Impact service), applying an Operator (like 'in'), and defining the desired Value.
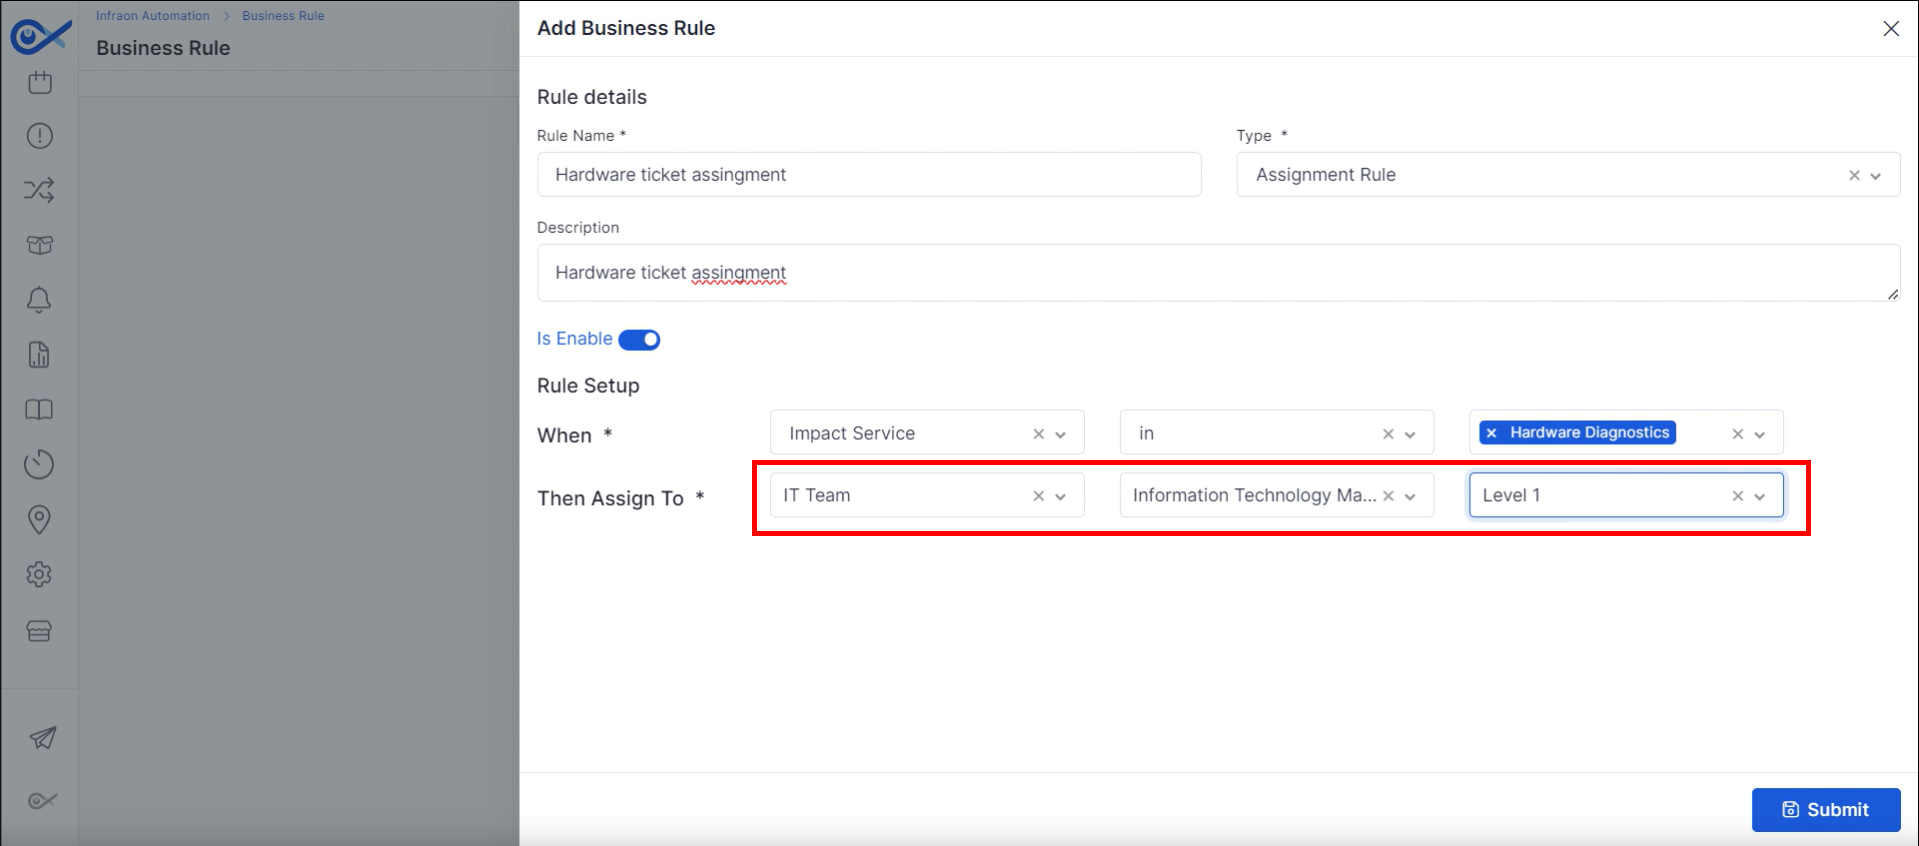
Step 4: In the "Then Assign To" section, define the assignment criteria by inputting the target Group, Expertise requirements, and impact service Level.
Once theconfiguration ismade, click “Submit.”
For example, if the impact service is hardware diagnostics, any ticket created with this service will be automatically assigned to the IT team level one technician.
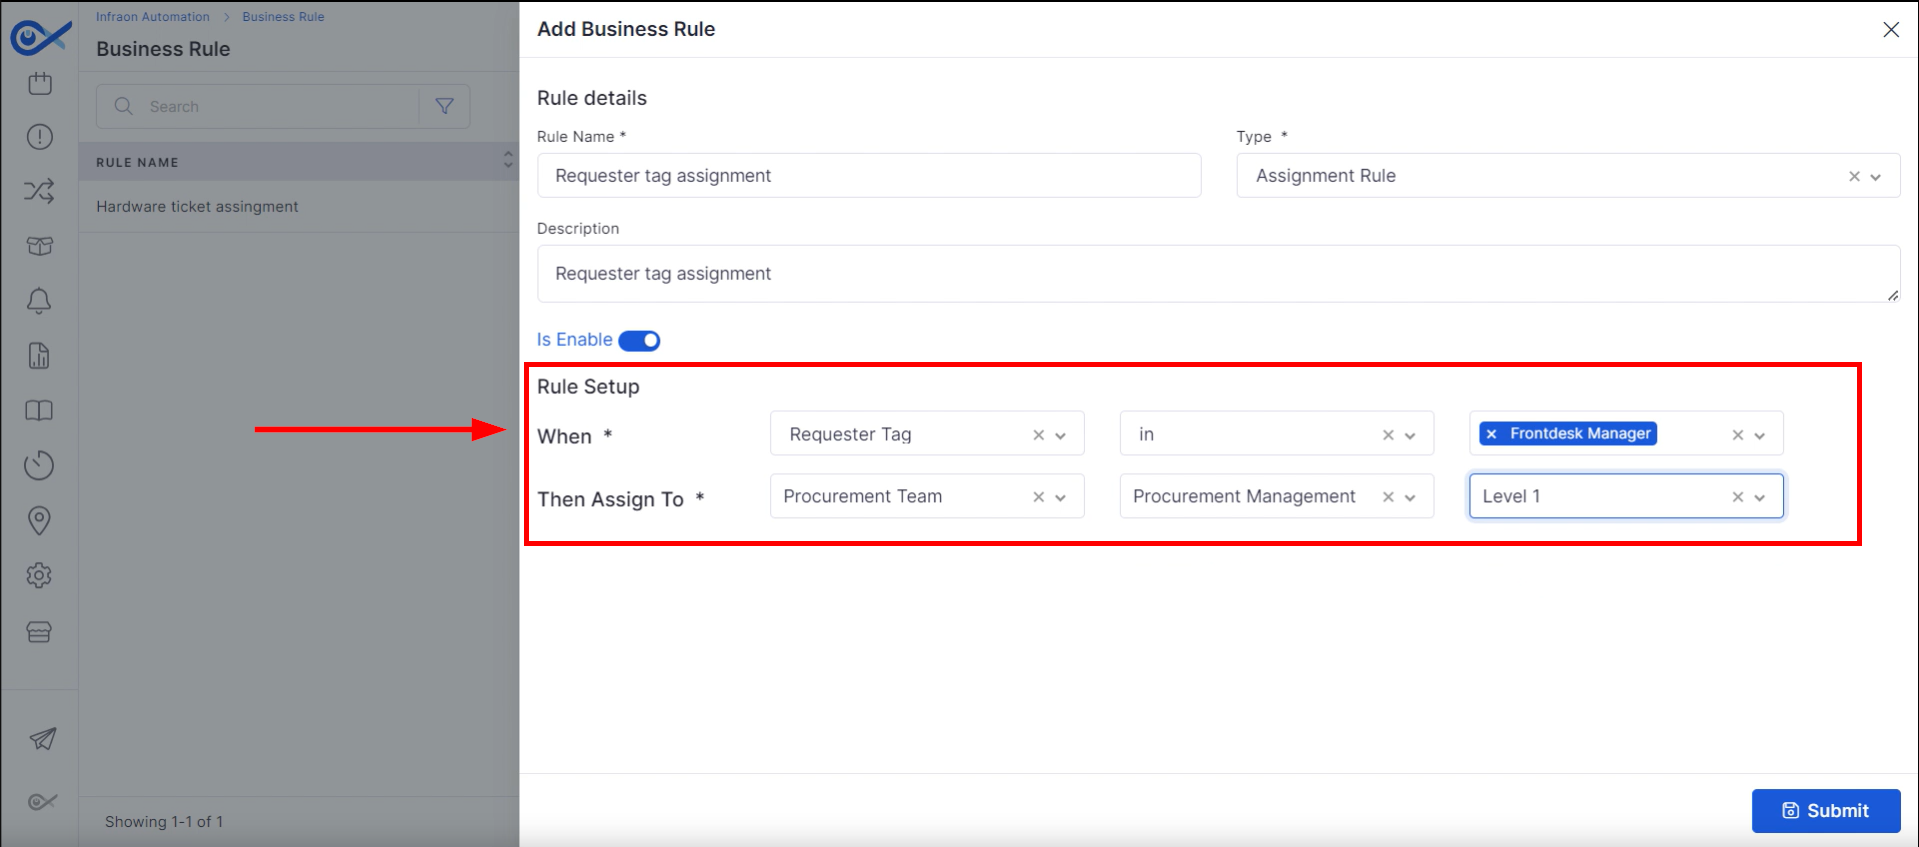
For the second case, if a business rule matches a requester tag, any ticket created by that requester is automatically assigned to the preconfigured level.
Step 1: Define a business rule for the requester tag by entering a rule name, selecting the rule type, and adding a descriptive explanation. Utilize the same procedure as described above.
Step 2: To set up a business rule based on the requested tag, select the operator as the front desk manager and "Assign To" details, respectively.
When an end user creates a ticket, it will be directly assigned to the procurement team to the level one technician in the procurement team.
This is how to use the auto-ticket assignment feature in the Infraon Infinity platform.
Team Assignment
Configuring Trigger Details
Note: Trigger actions will only execute when the status is Active. If the status is set to Inactive, no actions will be triggered.
Adding Conditions
Note: You can assign a business service by configuring specific business hours. (To know more, )
Defining Trigger Actions
Notify
Notify via Email
Notify via SMS
Notify via API
Create a Ticket
Submitting the Configuration
Miscellaneous
Business Rule
click here
Miscellaneous
This guide provides a comprehensive overview of the ticket management page, explaining its features and functionalities. These pages offer various tools for managing and organizing tickets effectively.
Navigating the Top Panel
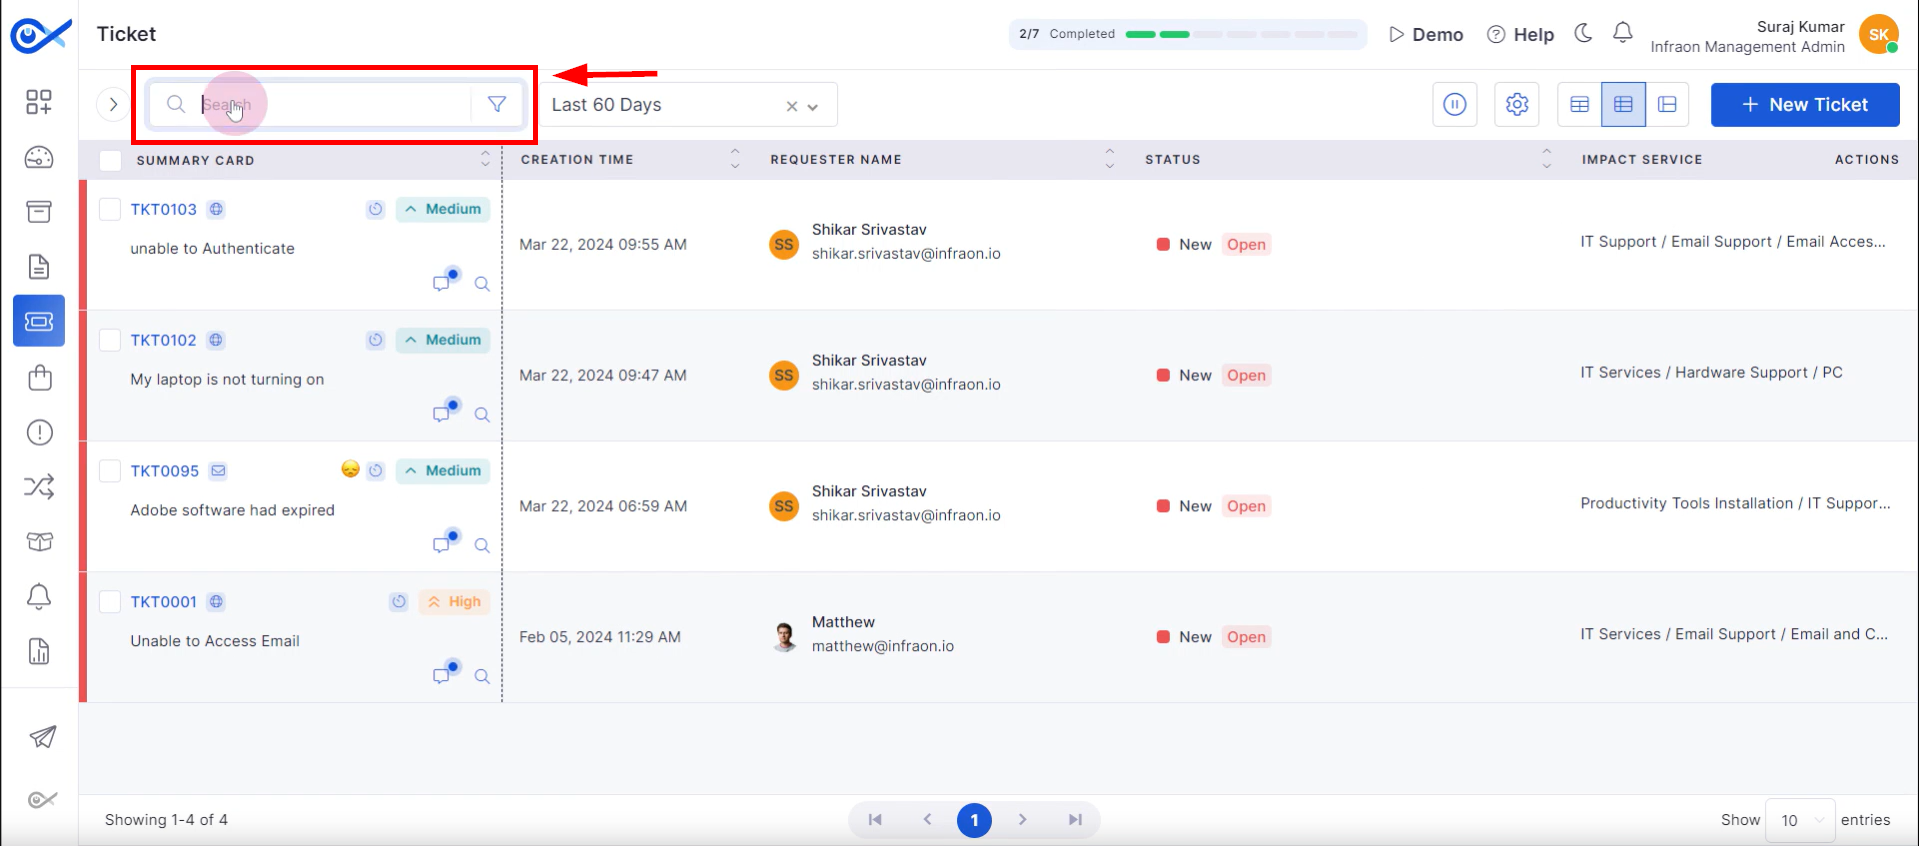
Locating the “Search” option on the top panel will assist technicians in finding a specific ticket based on its ID, requester, and more.
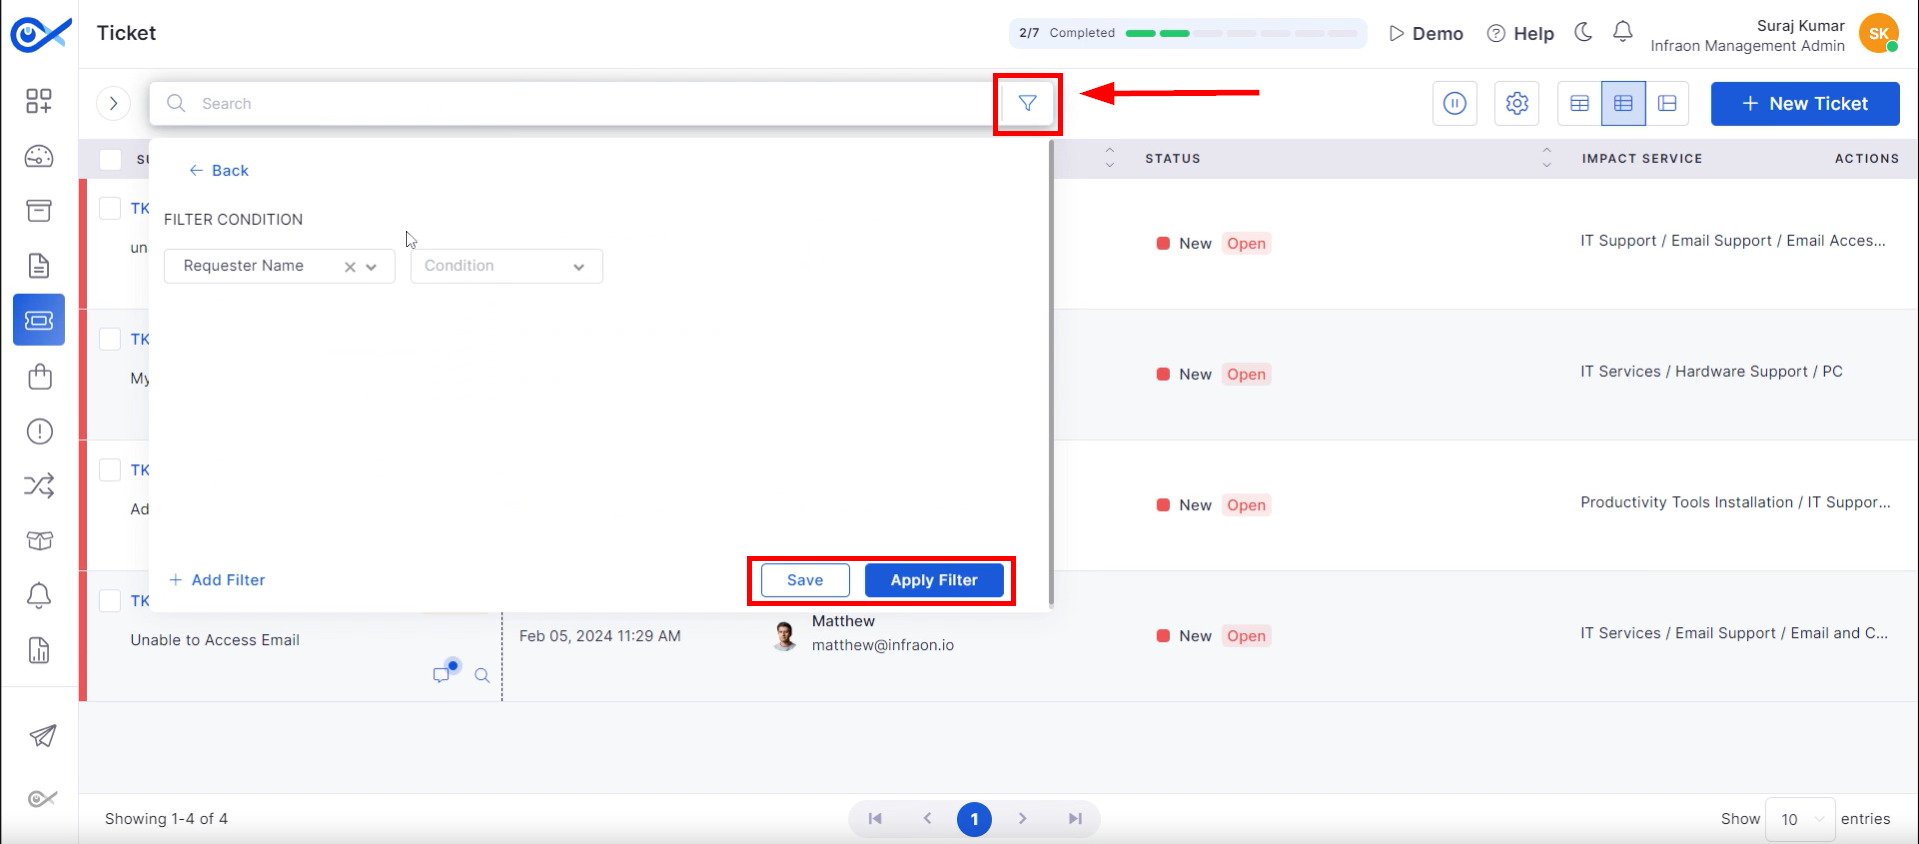
Use the “Filter” option adjacent to the search bar to refine your ticket search. Apply filters based on criteria like ticket ID, requester, technician, issue, ticket type, etc. “Save” your custom filter settings for future use.
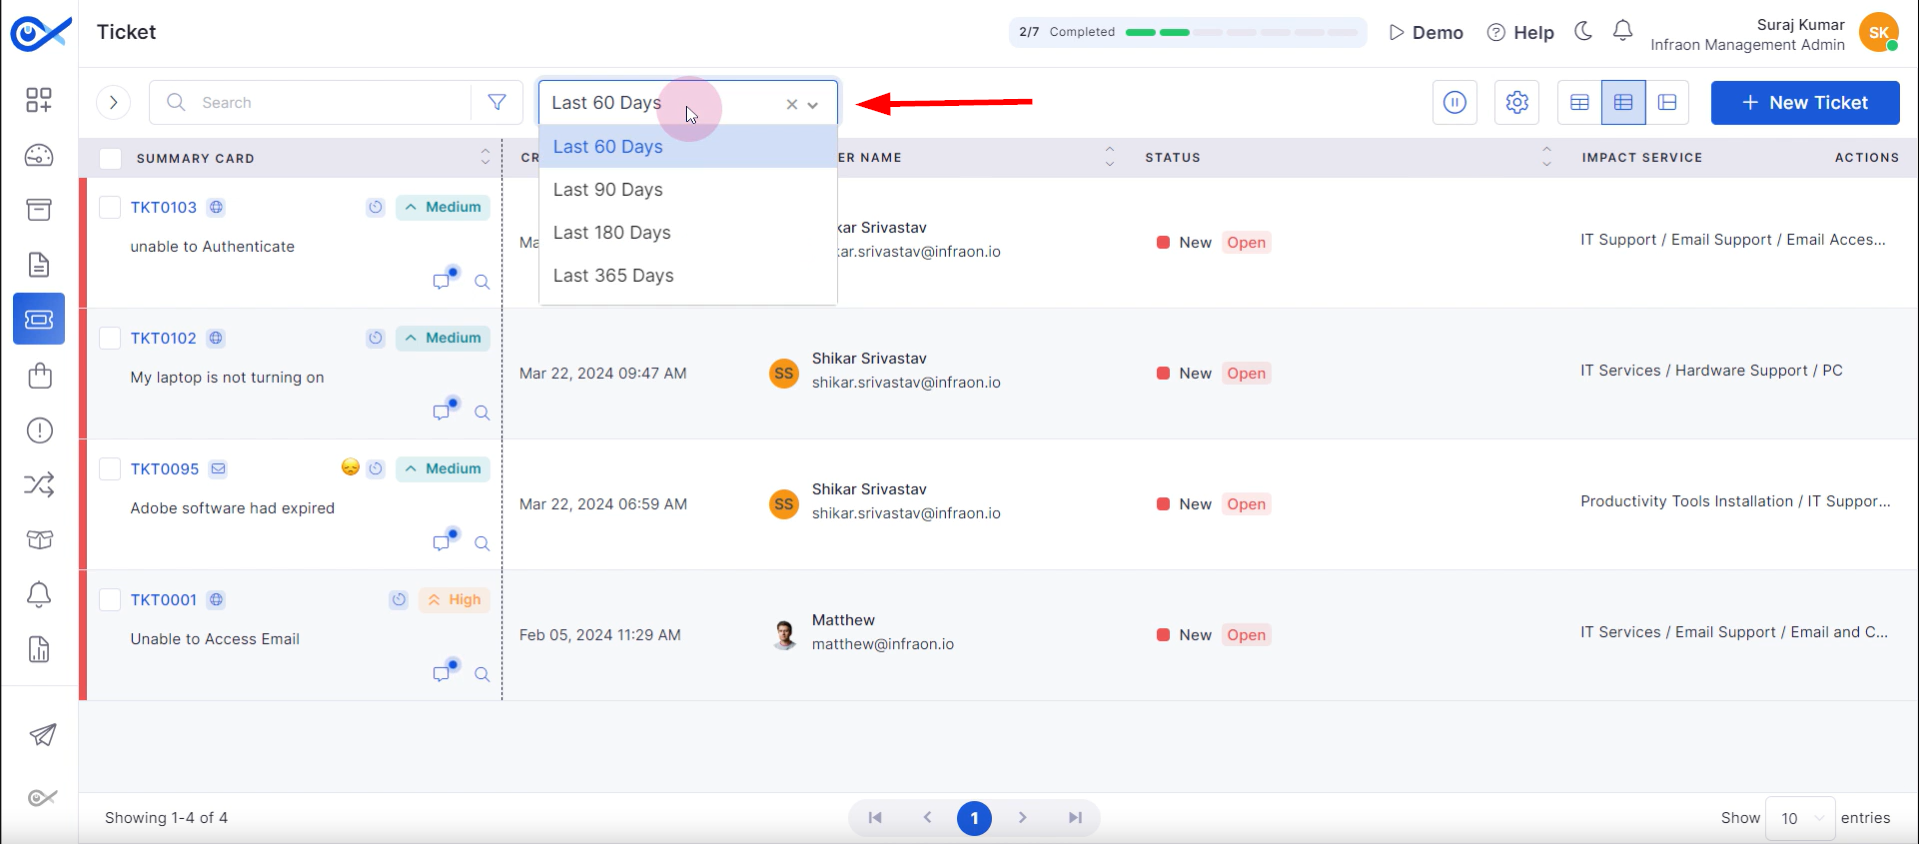
Adjacent to the search and filter options is a “Timeframe Selector,” which enables users to view tickets within specific timeframes, such as the past thirty, sixty, or ninety days or the entire previous year.
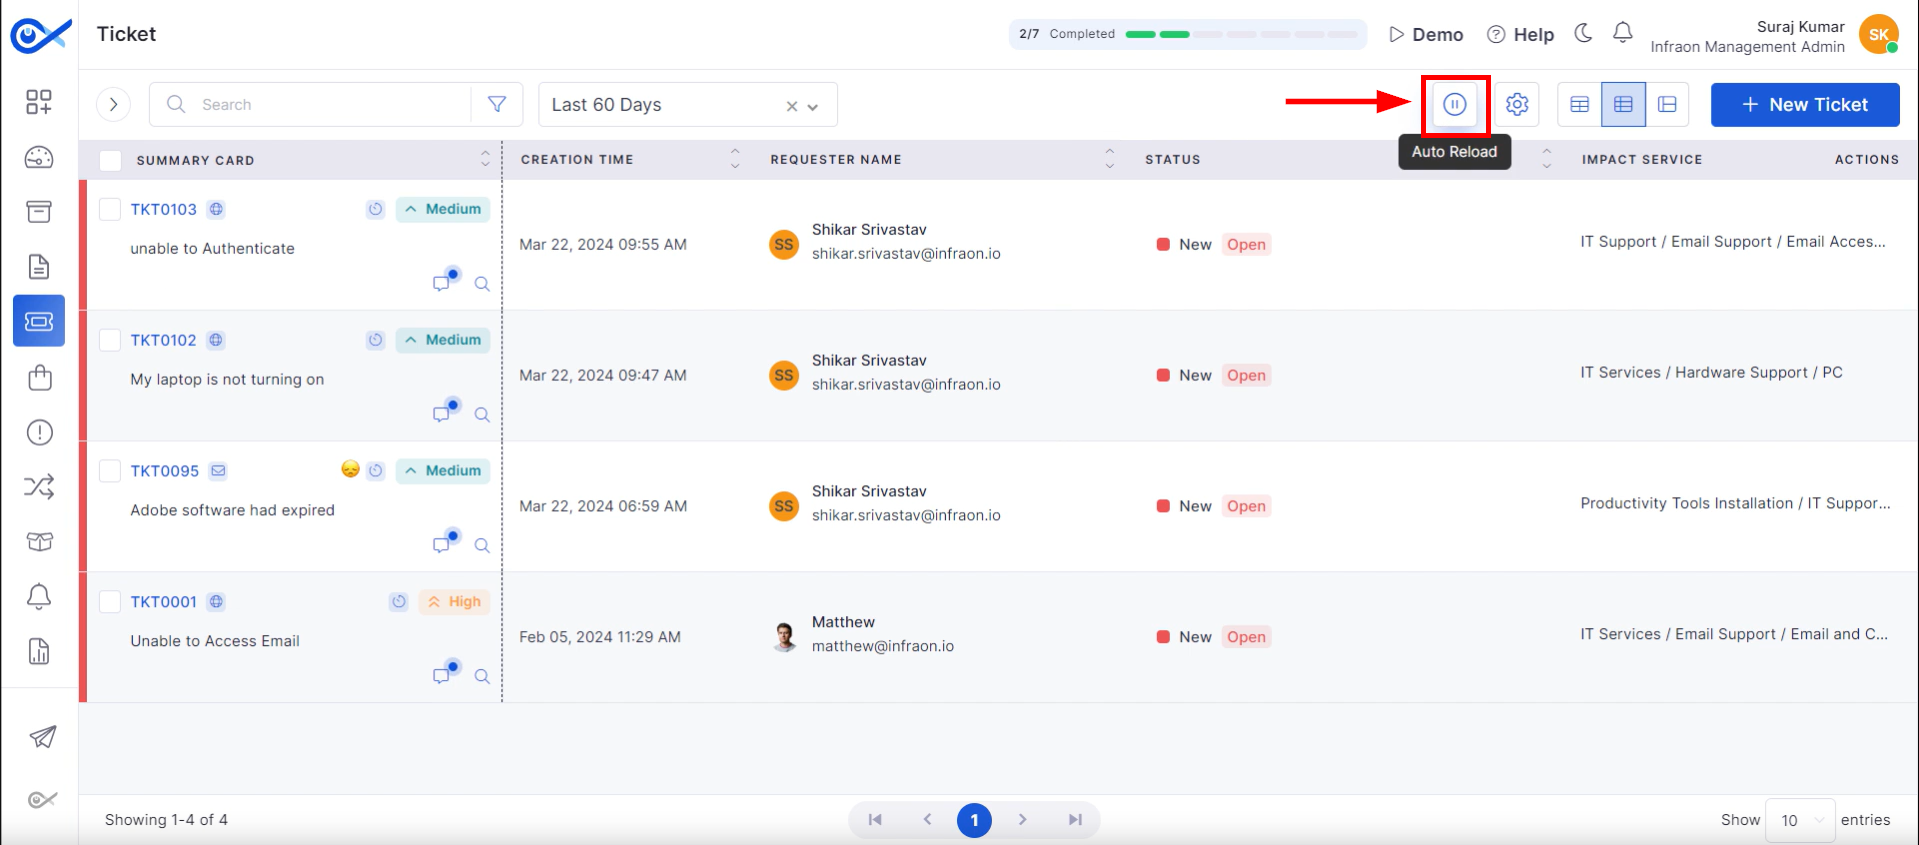
The top panel includes an “Auto-Reload” feature, which refreshes the page every five minutes by default. This allows for real-time updates on ticket statuses. To manually disable this feature, click the auto-reload icon.
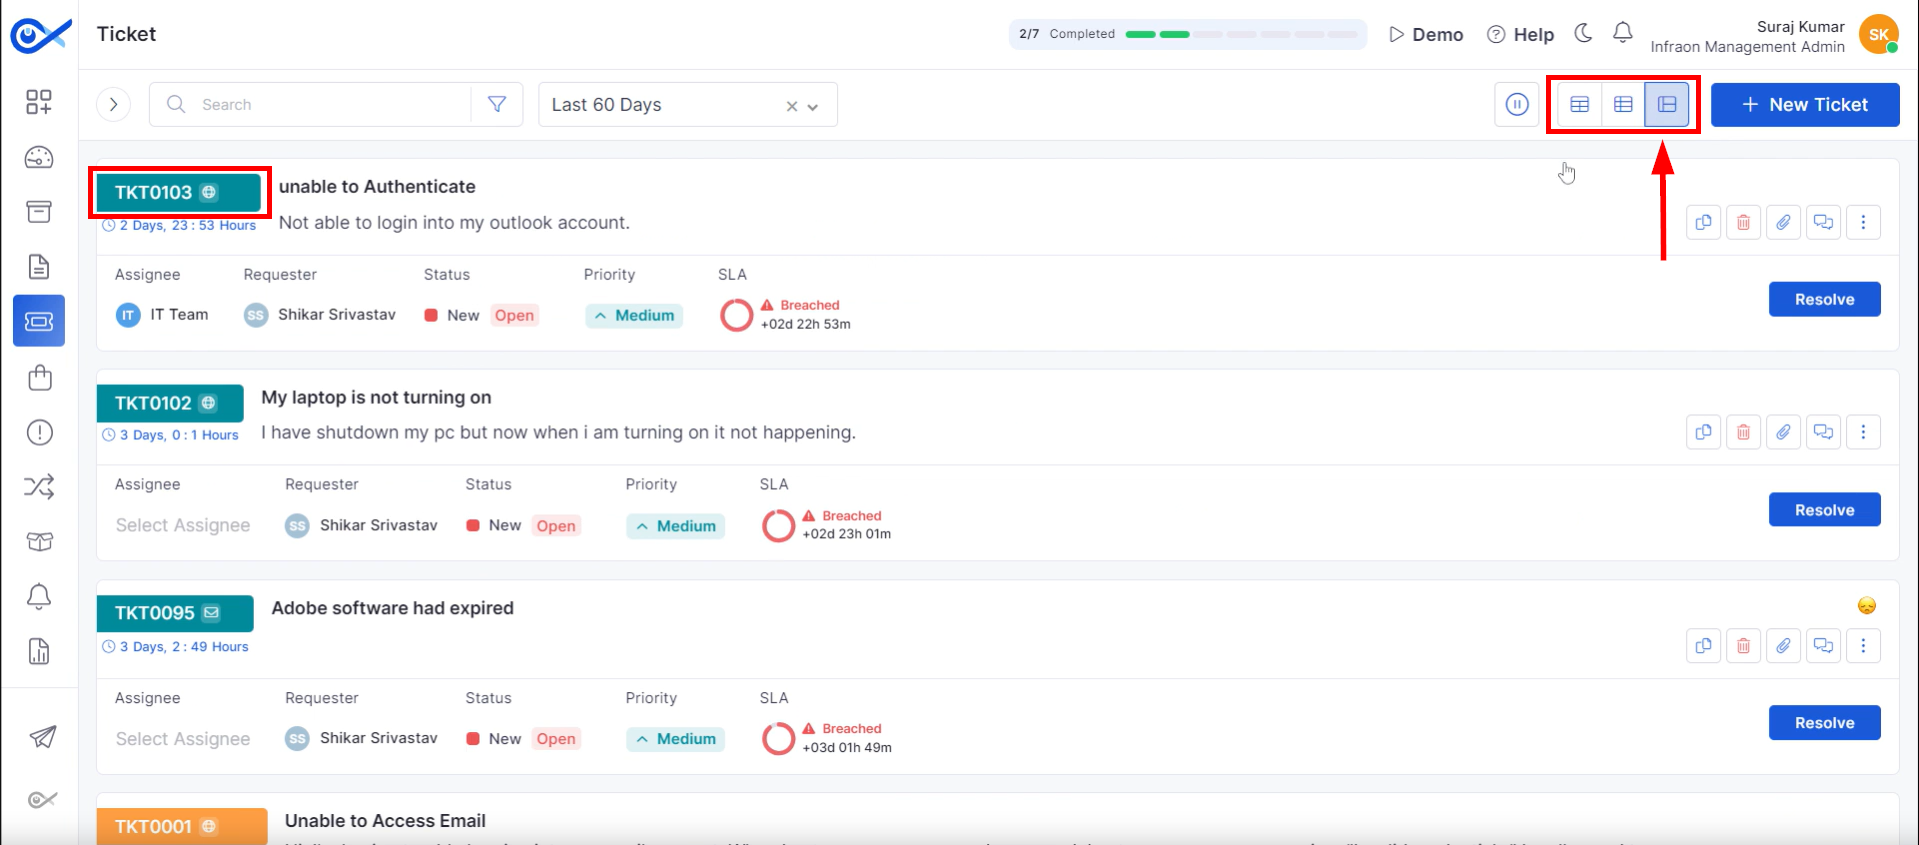
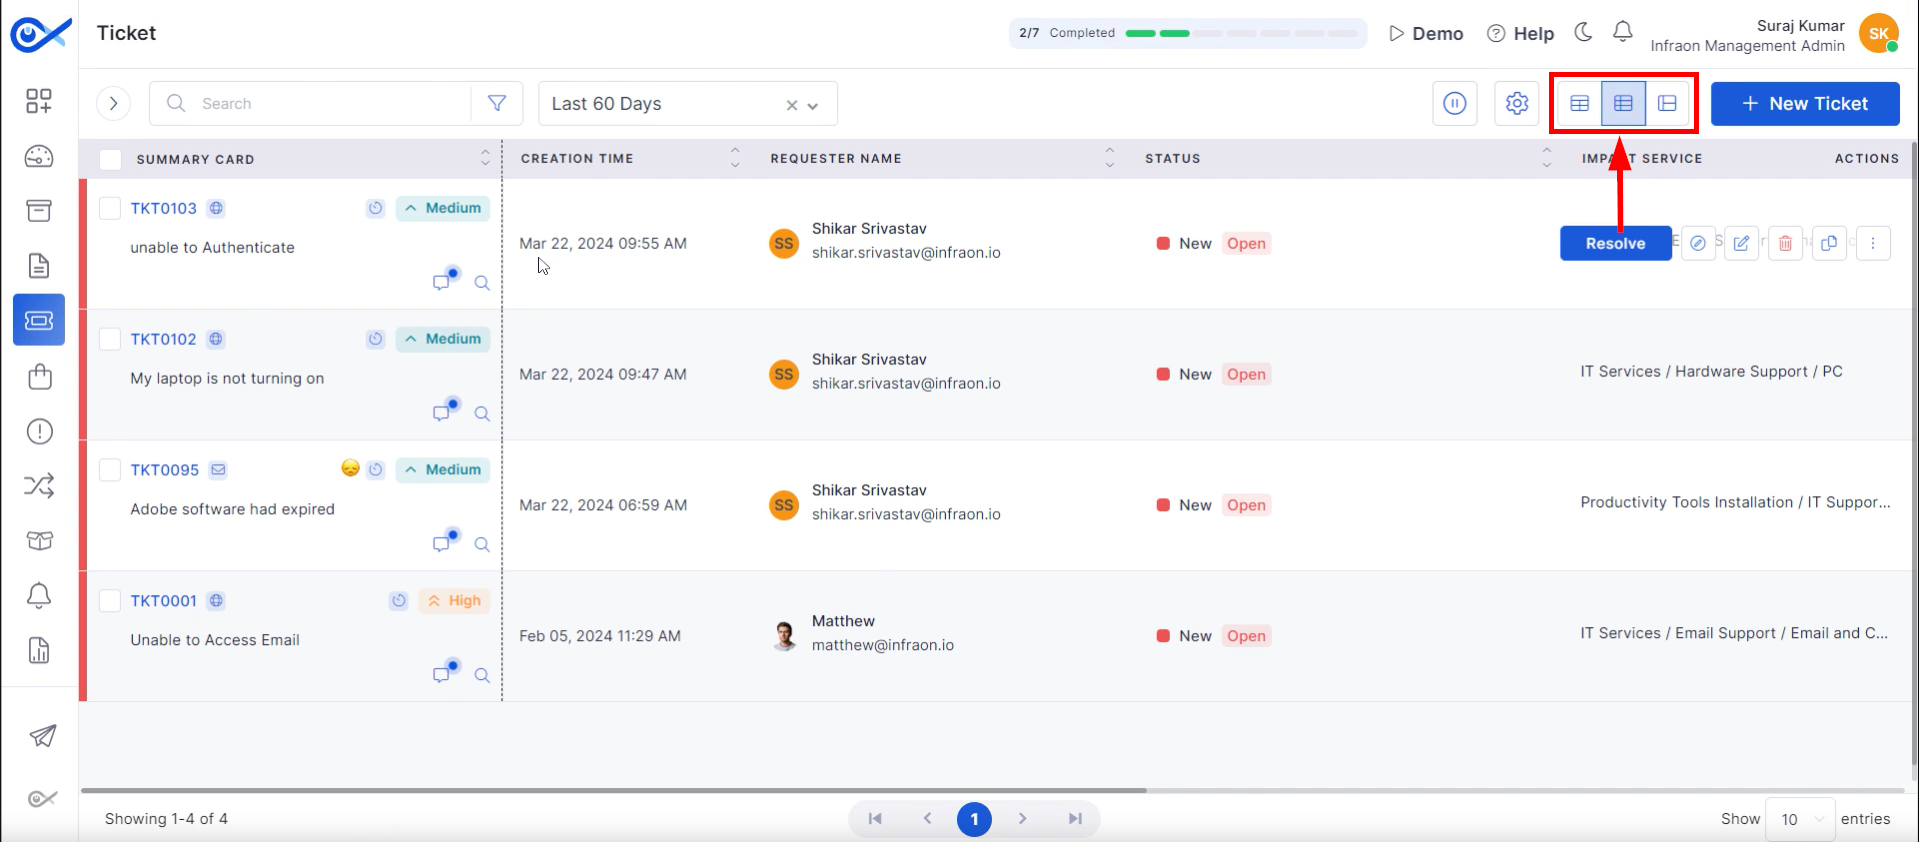
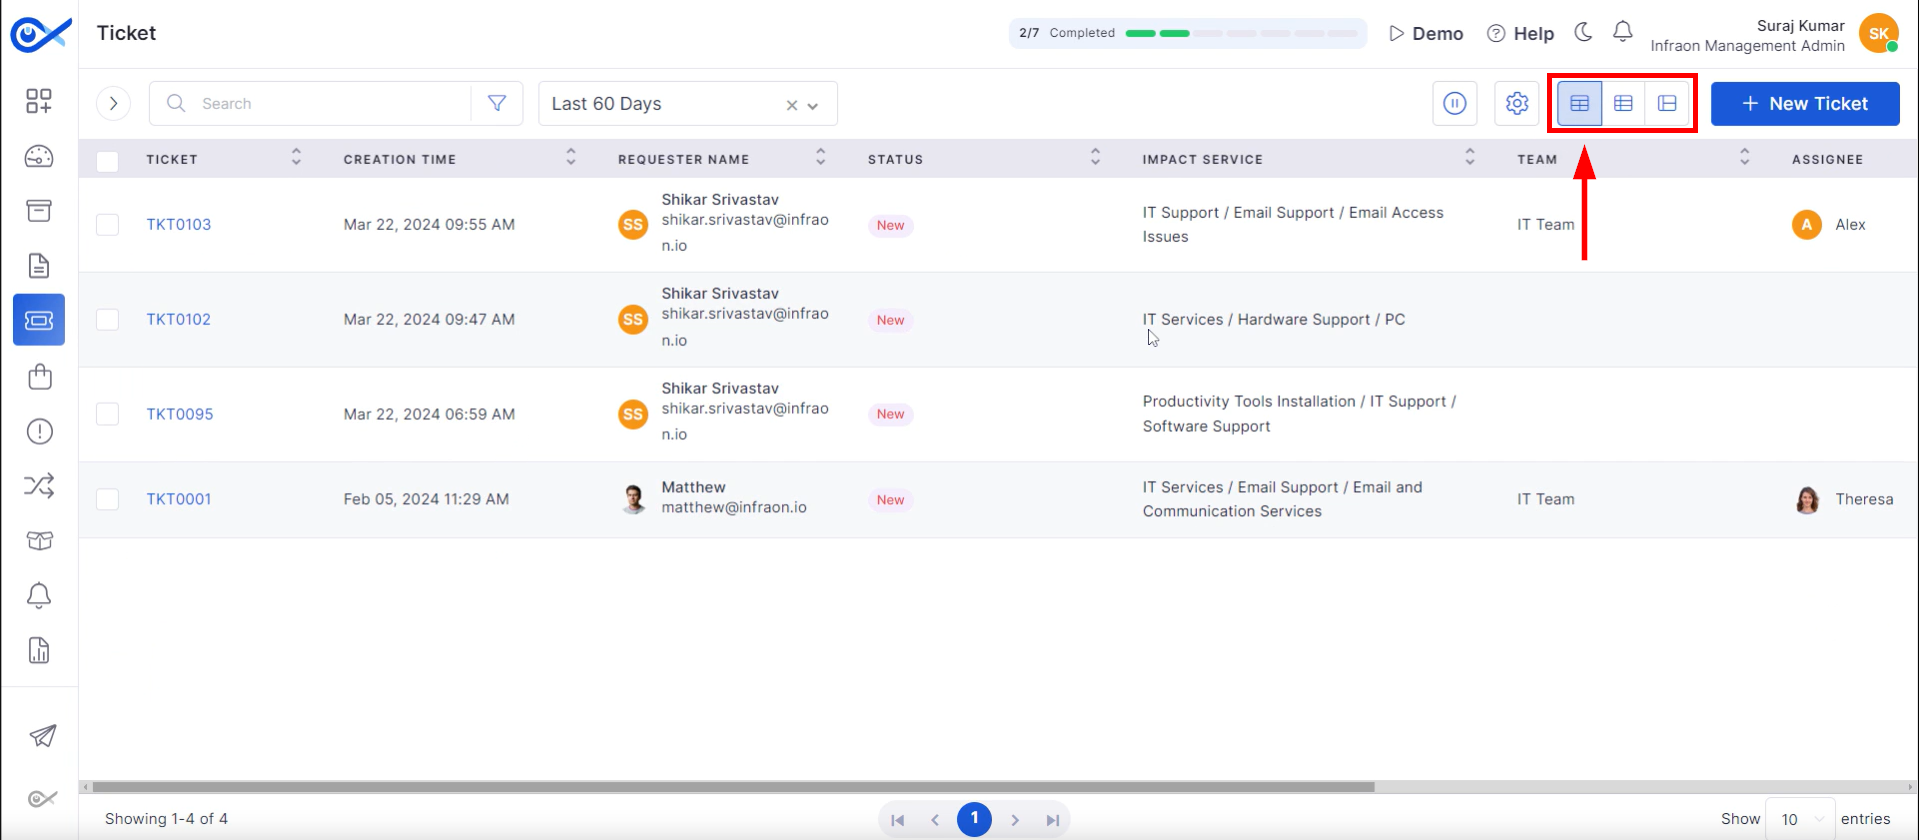
Tickets can be toggled between panel view, smart grid, and grid view.
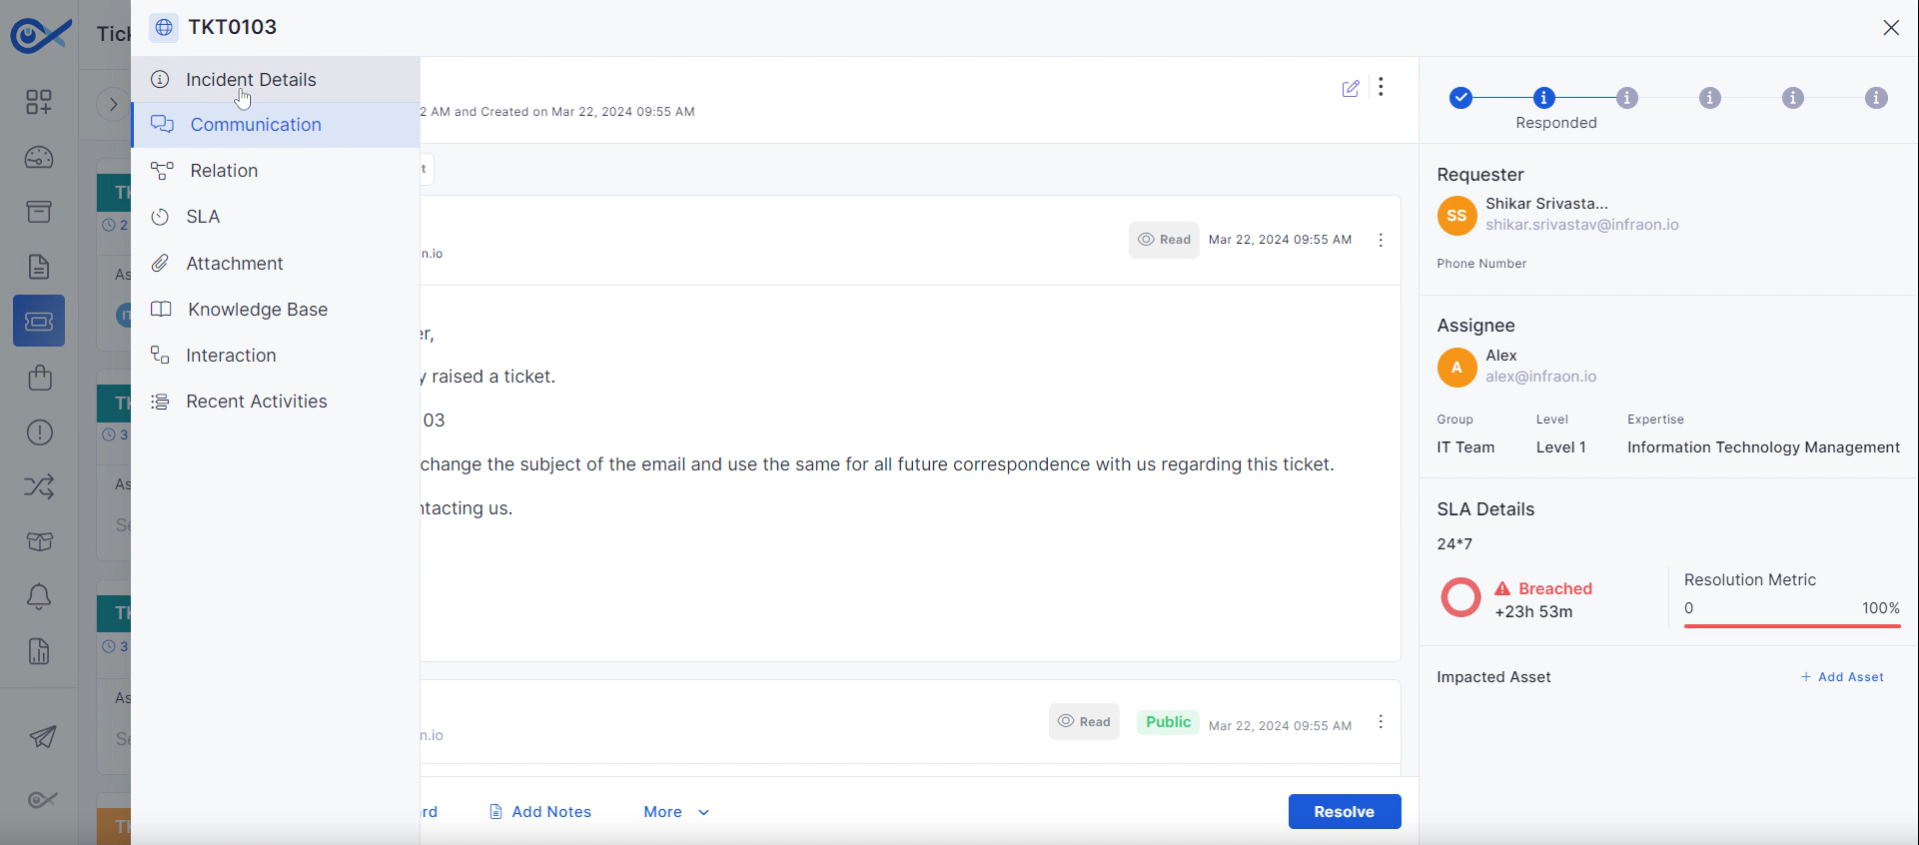
The panel view provides a concise overview of tickets, displaying key details such as assignee, requester, status, priority, and SLA. Selecting the Ticket ID,
It opens its dedicated module, which provides comprehensive information on incident details, communication, relationships, SLAs, attachments, knowledge base, interaction, and recent activities.
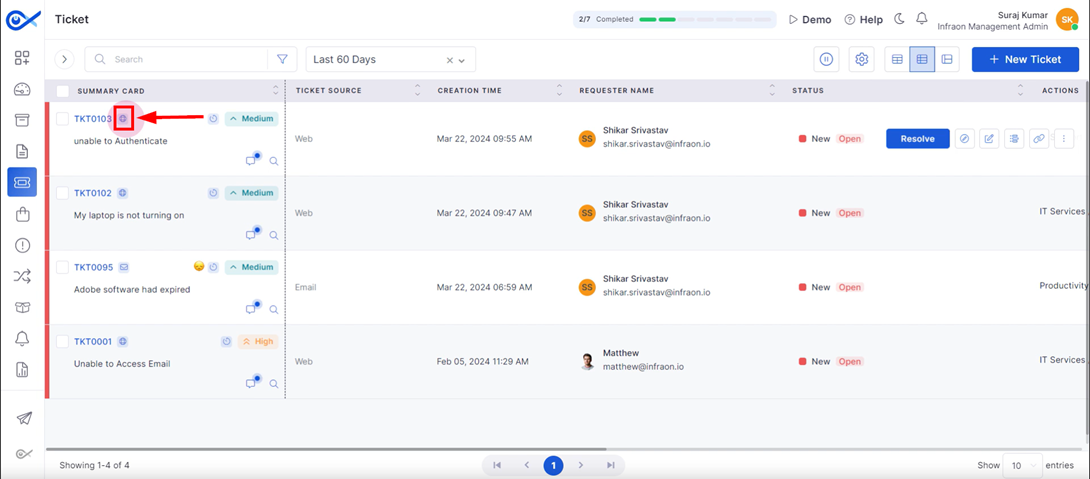
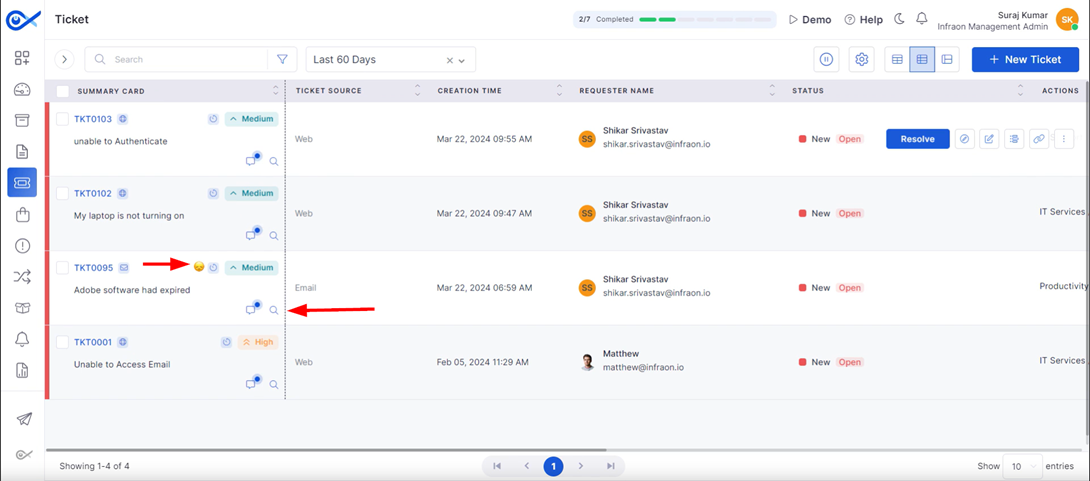
The smart grid provides a concise overview of tickets through summary cards that include creation time, requester, status, affected service, and actionable items.
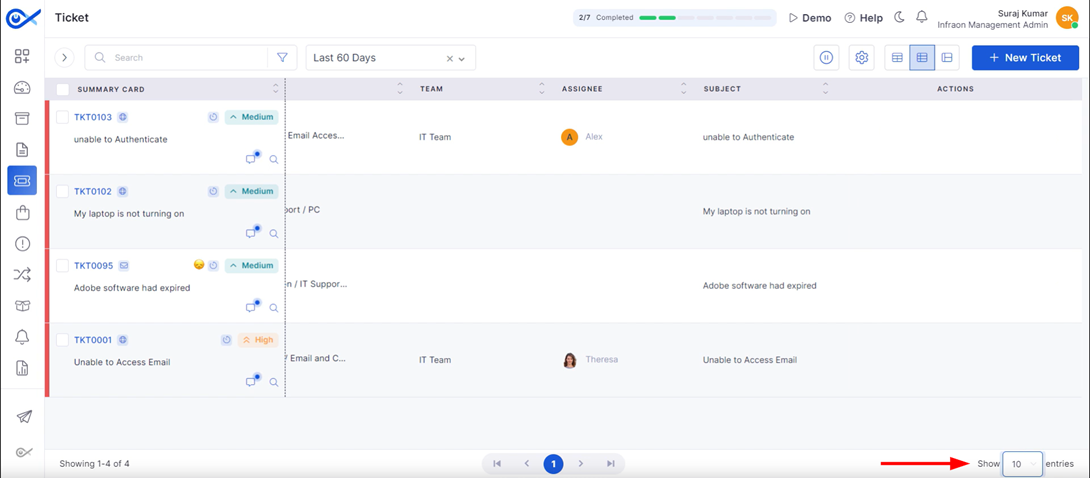
The grid view presents ticket data in a tabular format, displaying key information such as ticket number, creation date, requester, status, and affected service in dedicated columns.
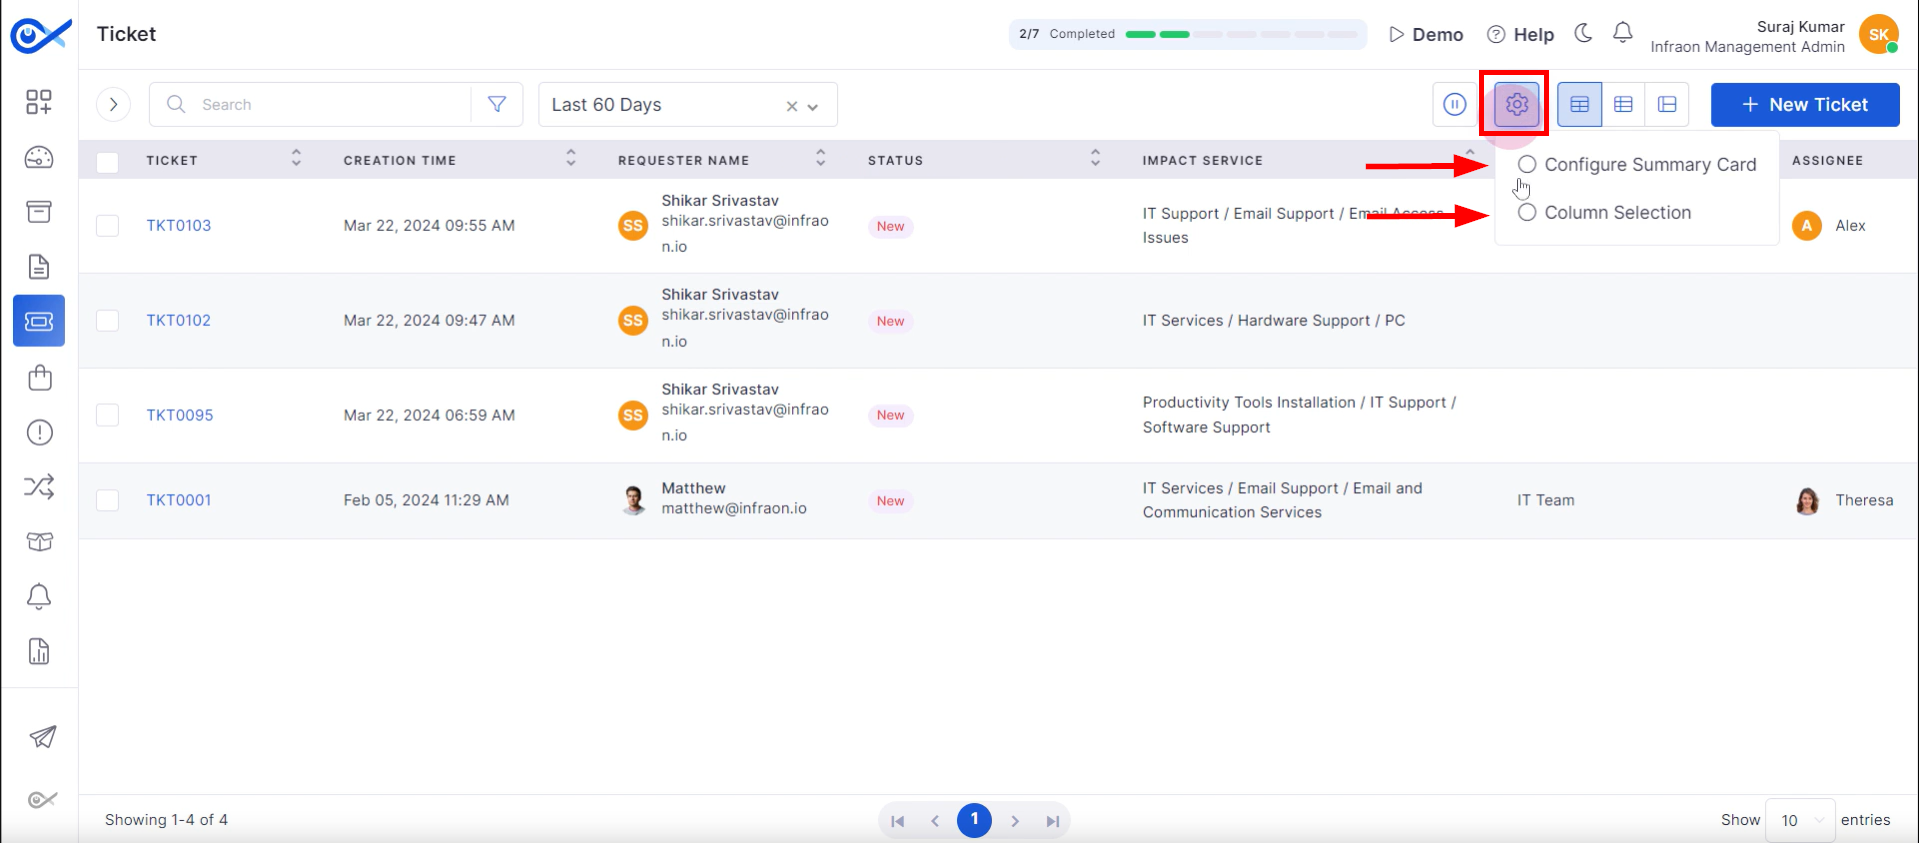
Locate the “Configure” icon on the top panel next to the view options to customize the displayed columns. This will open a menu allowing users to select the “Configure Summary Card” or “Column Selection” format.
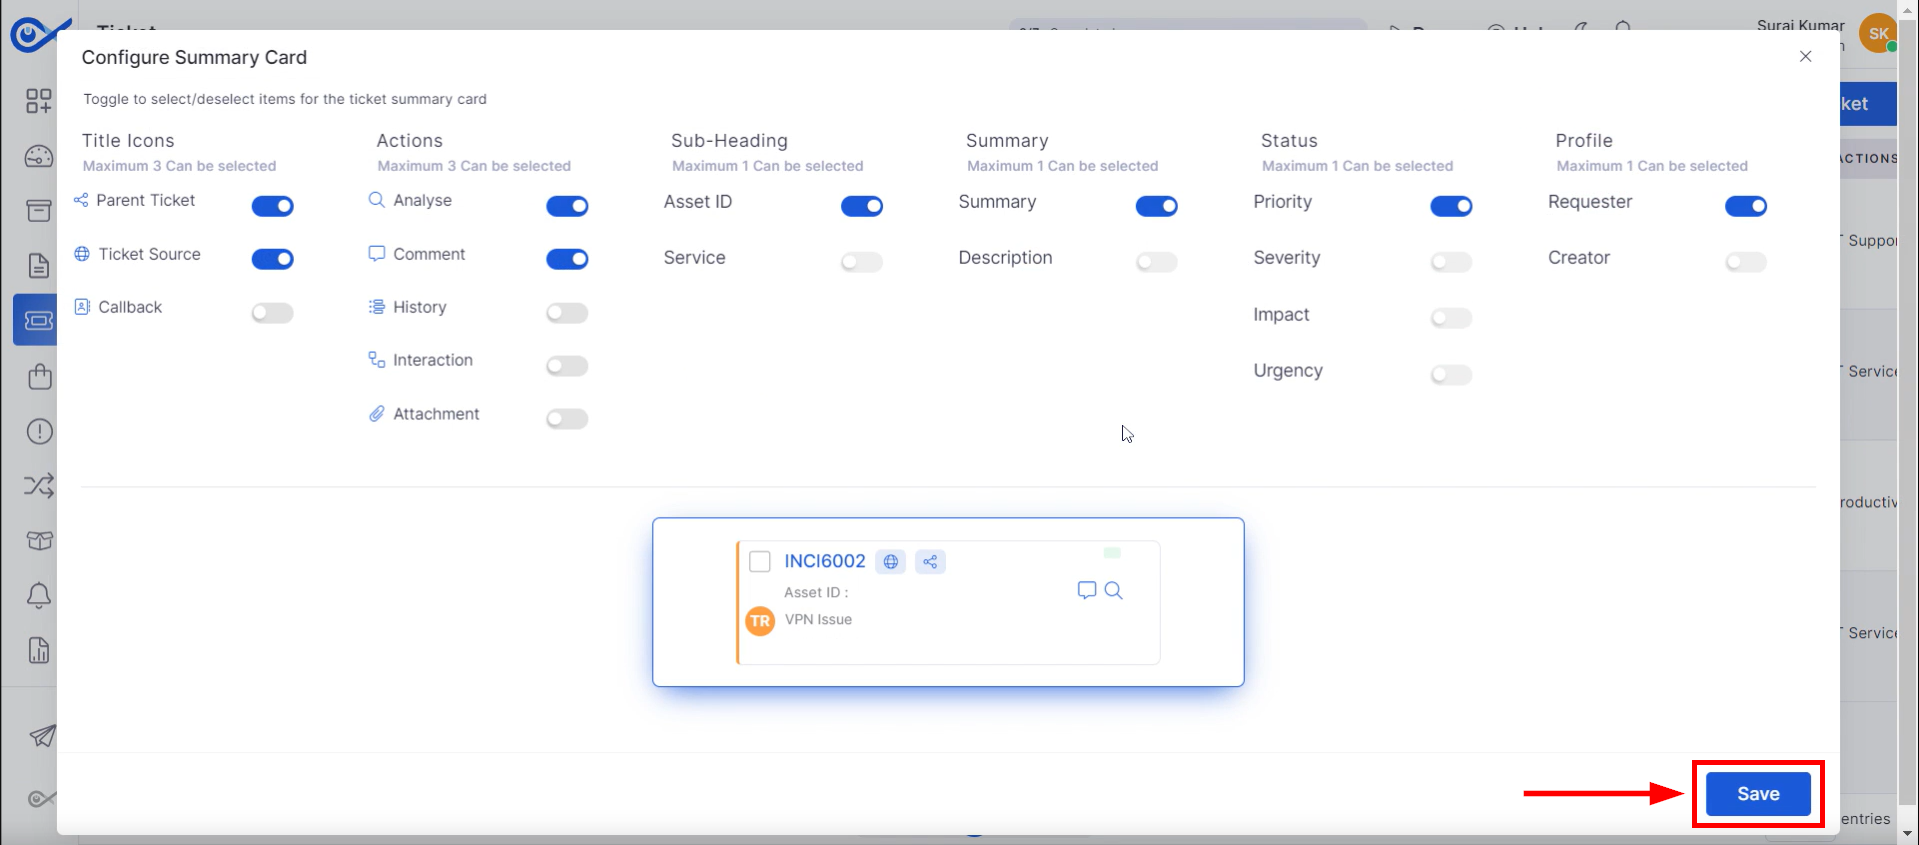
The smart grid offers a “Configure Summary Card” option, enabling users to customize the card's content. This includes adding ticket source and analysis details and toggling the visibility of impact and severity indicators. Alternatively, the impact status can be displayed directly on the main page by selecting the corresponding option and saving the changes.
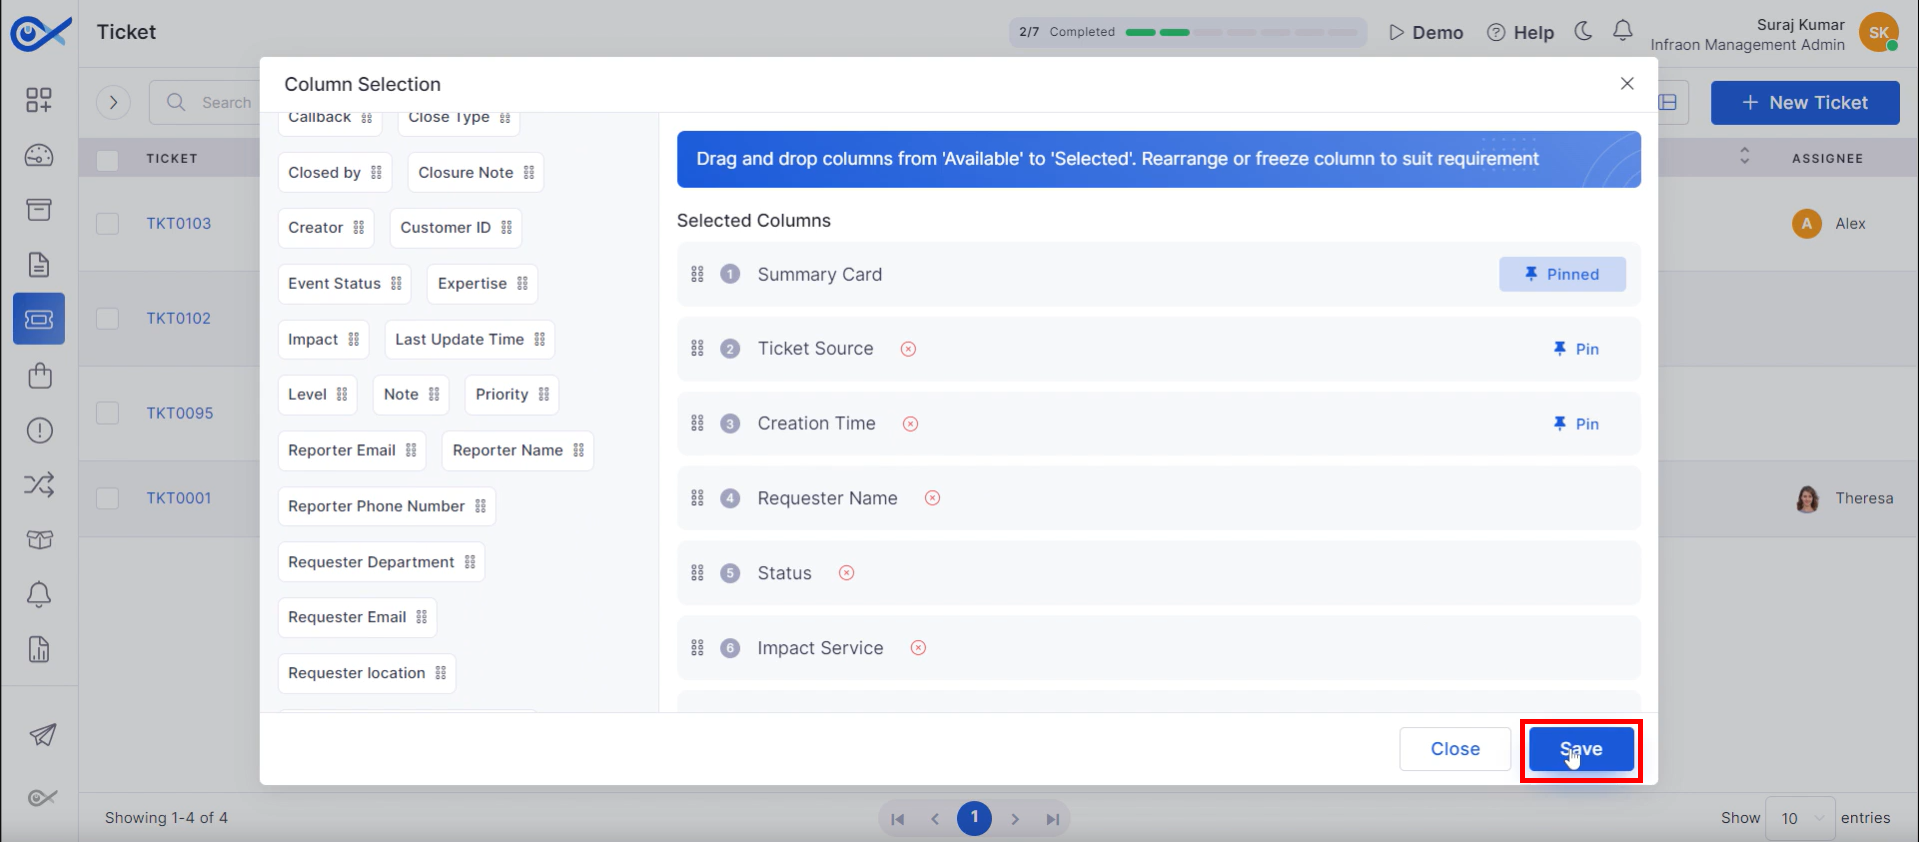
In Column Selection, users can modify the displayed columns by dragging and dropping desired fields from the available options to the active column list. Once satisfied with the selection, save the changes and apply them to the view page.
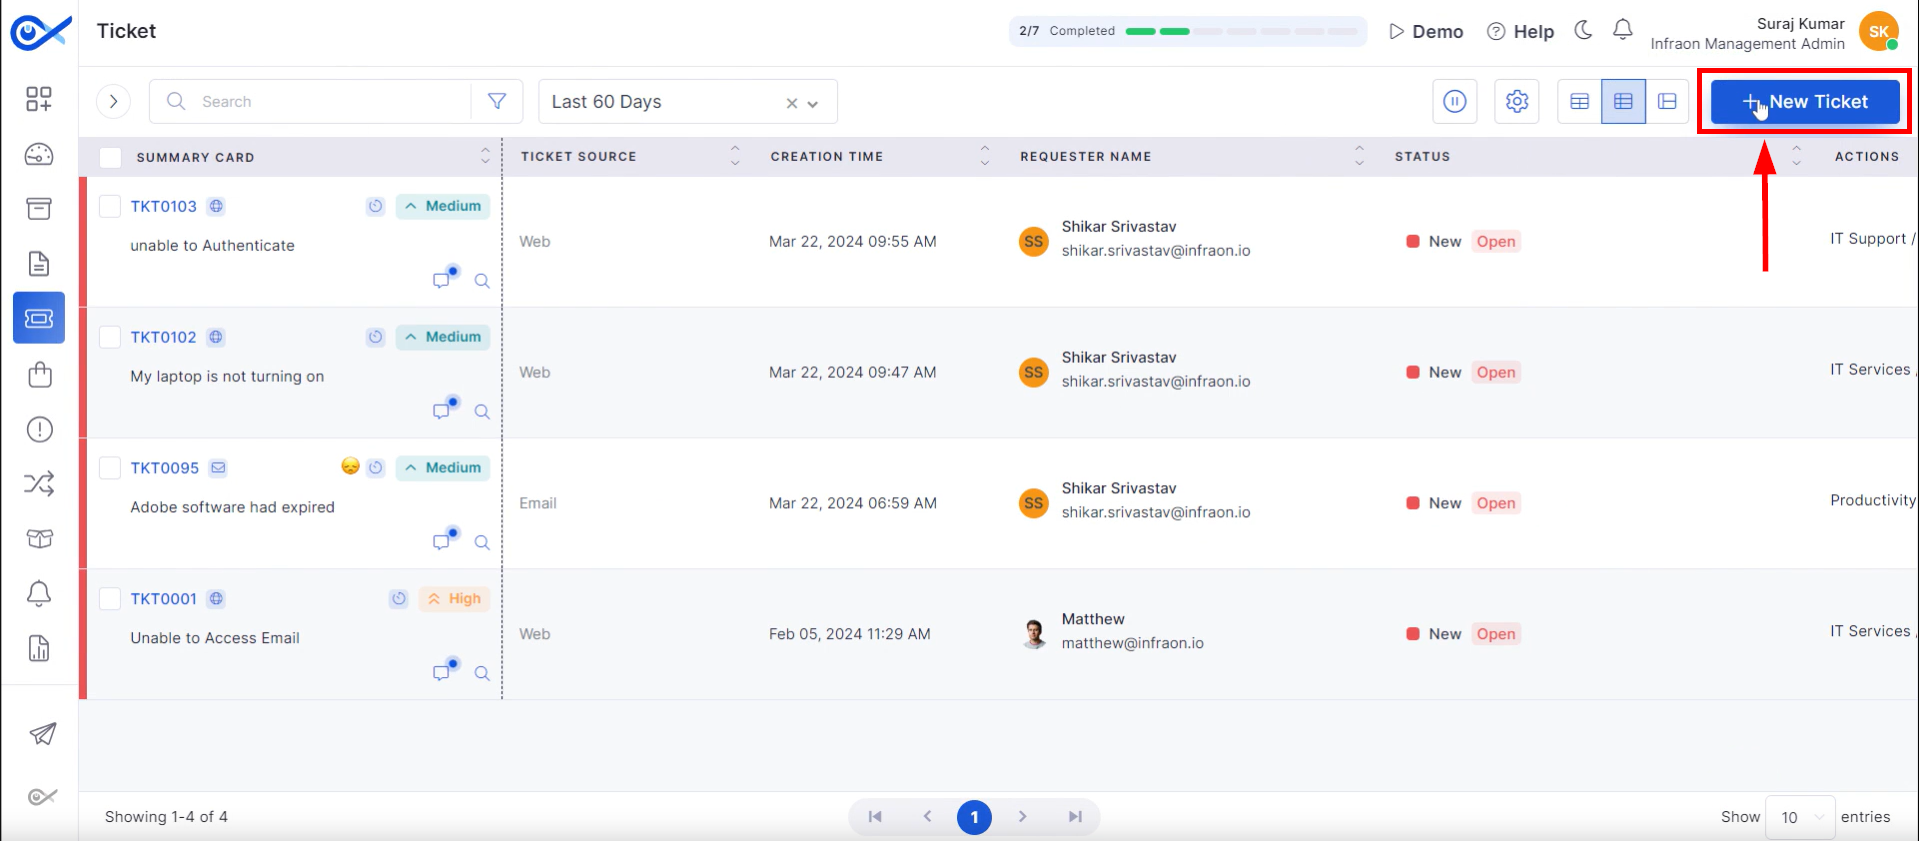
The "New Ticket" button, located in the upper right-hand corner of the page, is the entry point for creating new tickets.
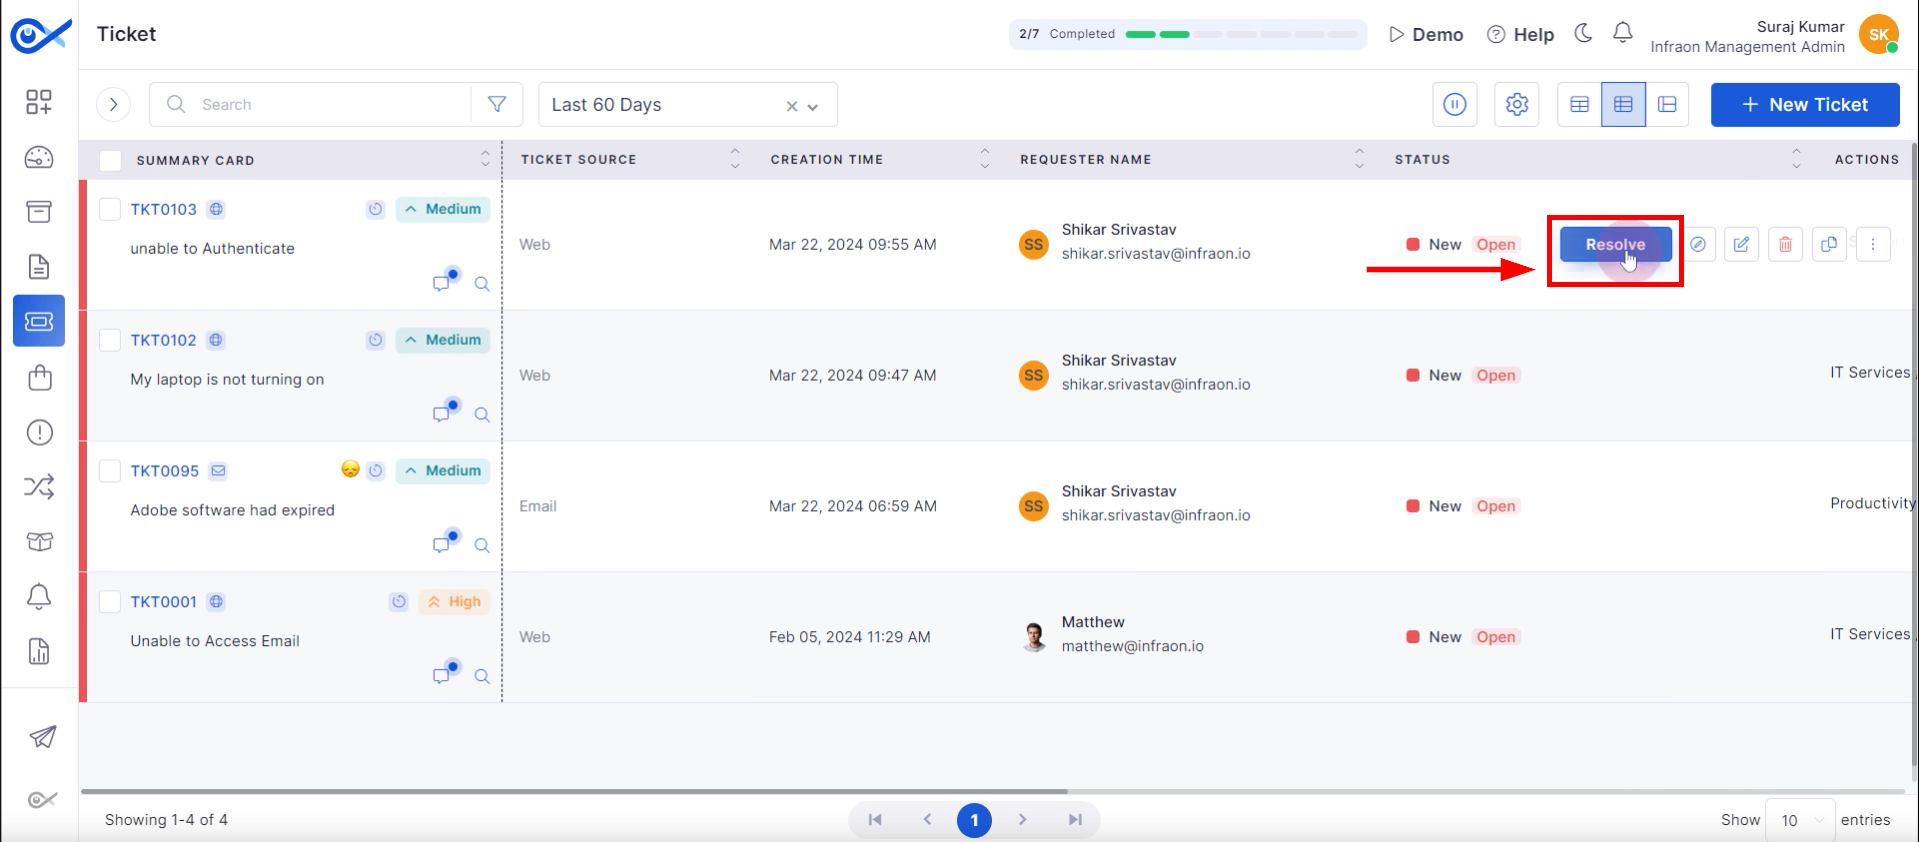
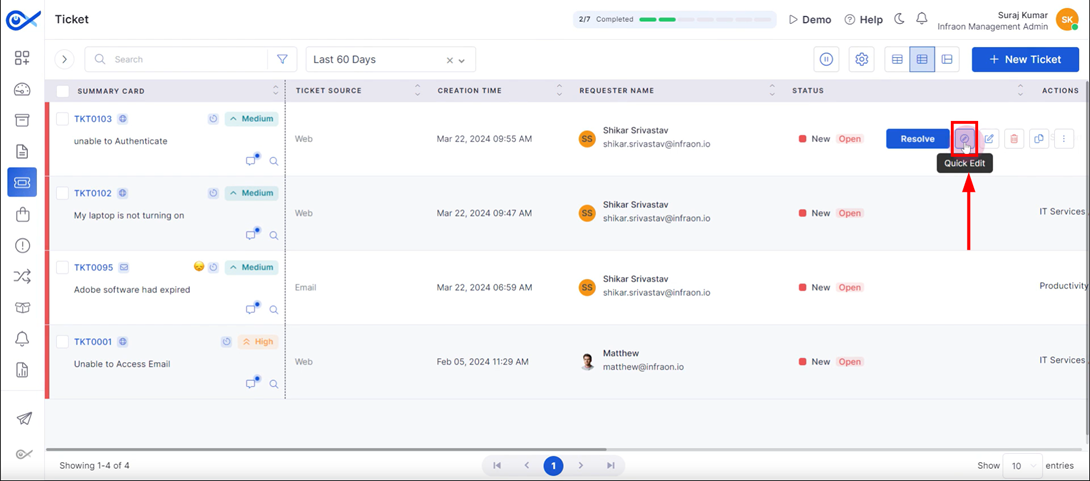
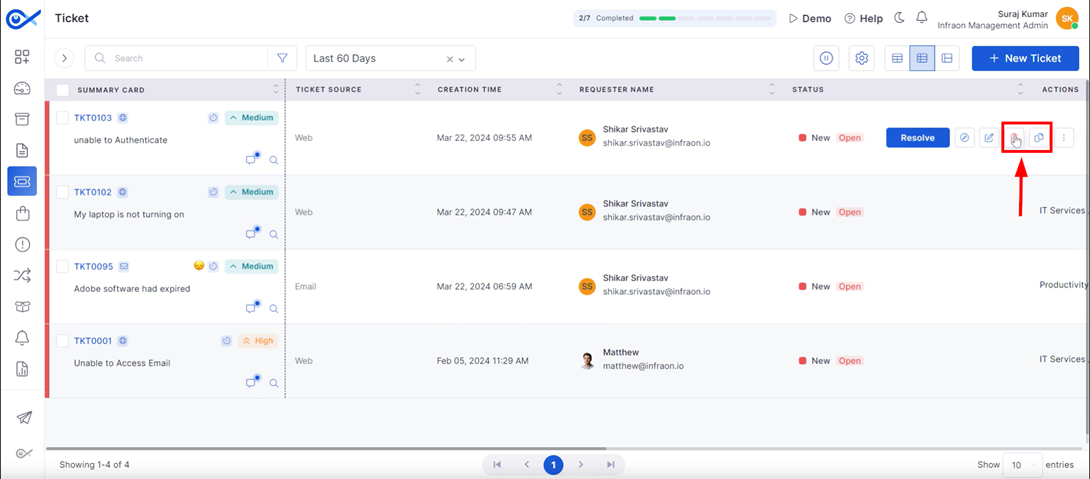
Mouse-over interactions on ticket listings reveal accessible quick-action controls.
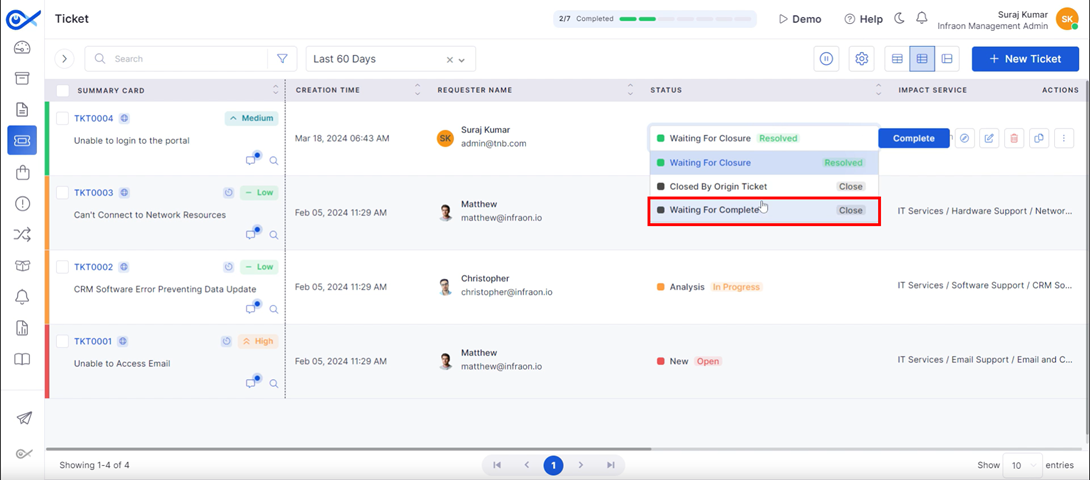
The initial quick action available is "Resolve," which allows for the direct closure of a ticket upon execution.
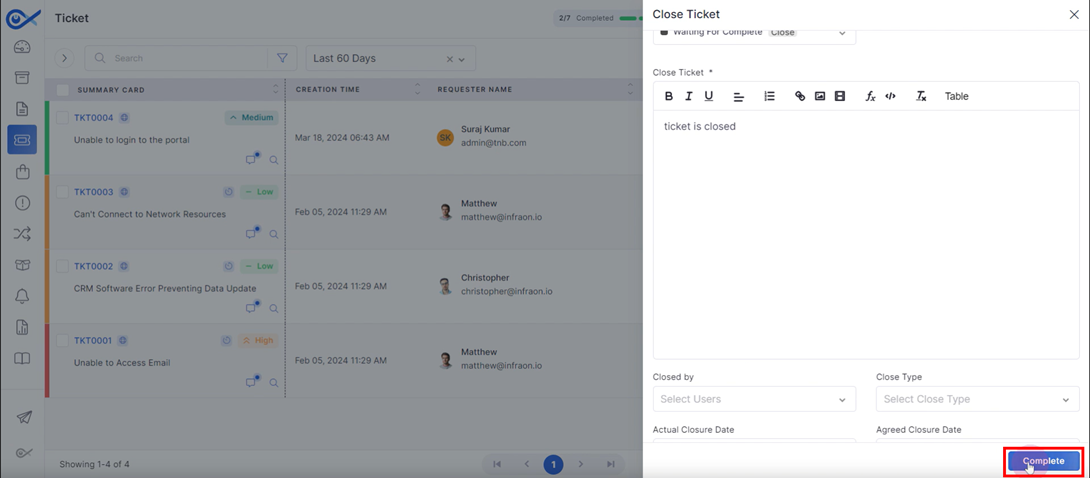
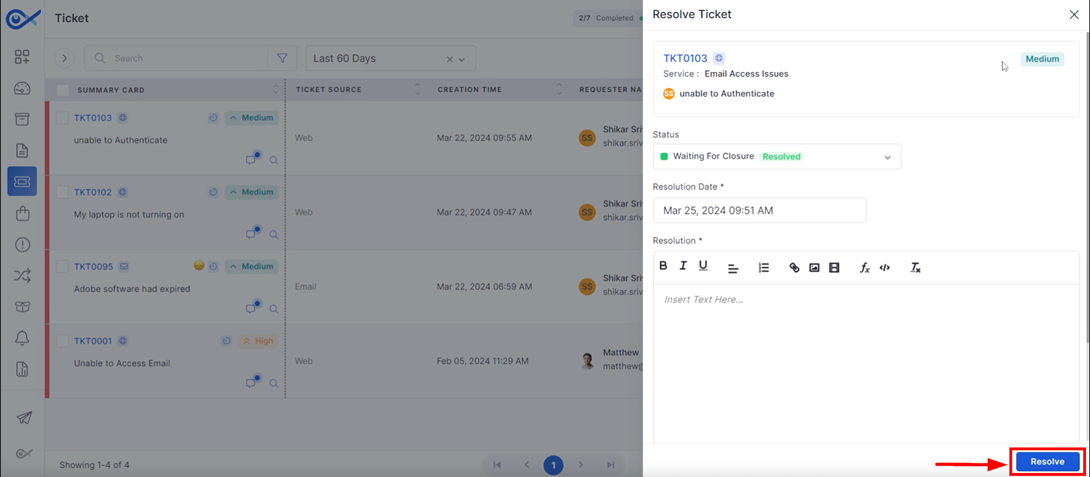
Upon selecting "Resolve," a pop-up window appears prompting for a resolution summary. Click “Submit” to finalizes the ticket closure process.
The "Assign To" quick action allows for immediate ticket reassignment within the management interface.
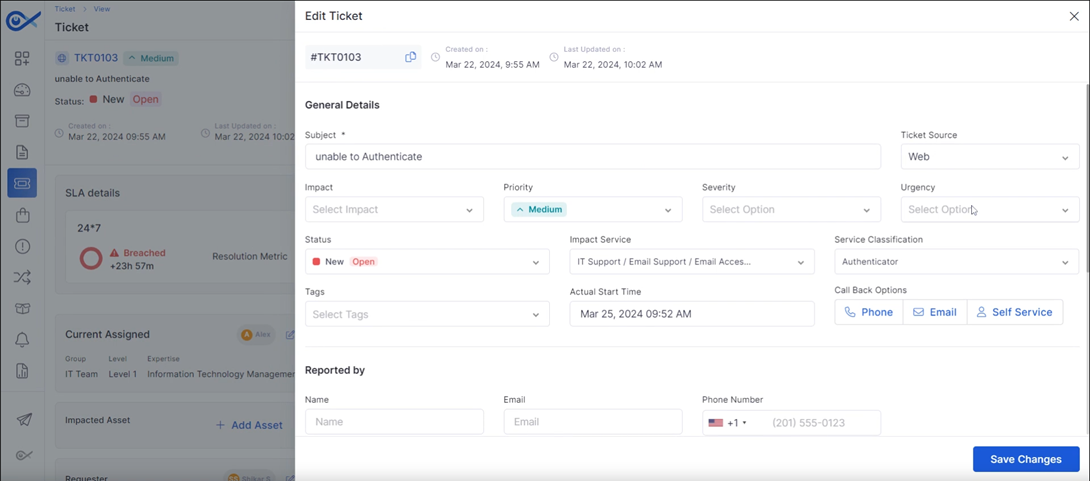
A “Quick Edit” function is accessible for expeditious modification of ticket attributes including priority, urgency, severity, and impact levels. The impacted service and assembly can also be amended via this streamlined process.
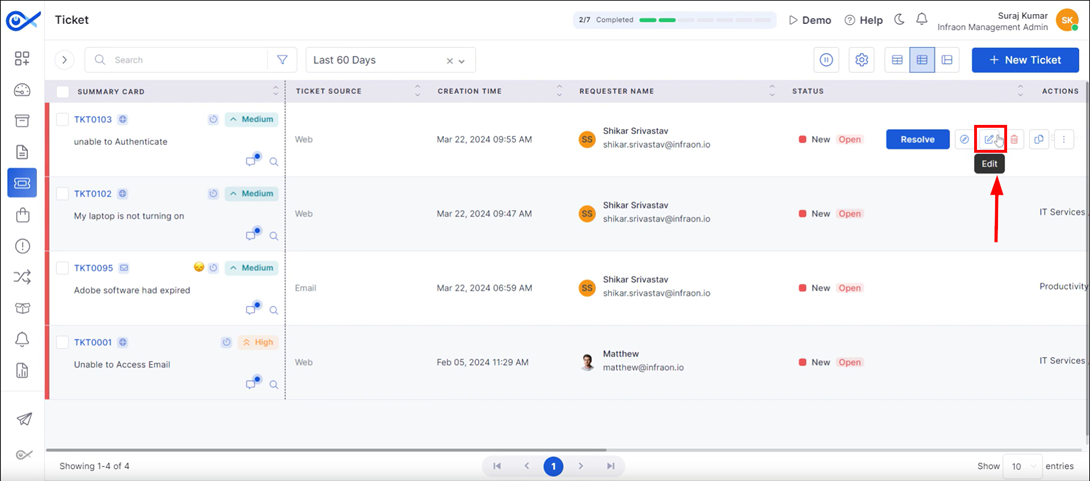
For comprehensive ticket modification, access the detailed “Edit” function.
The “Edit” view provides visibility into ticket source, urgency, severity, and priority. Additionally, users can add followers or reassign the ticket within this interface.
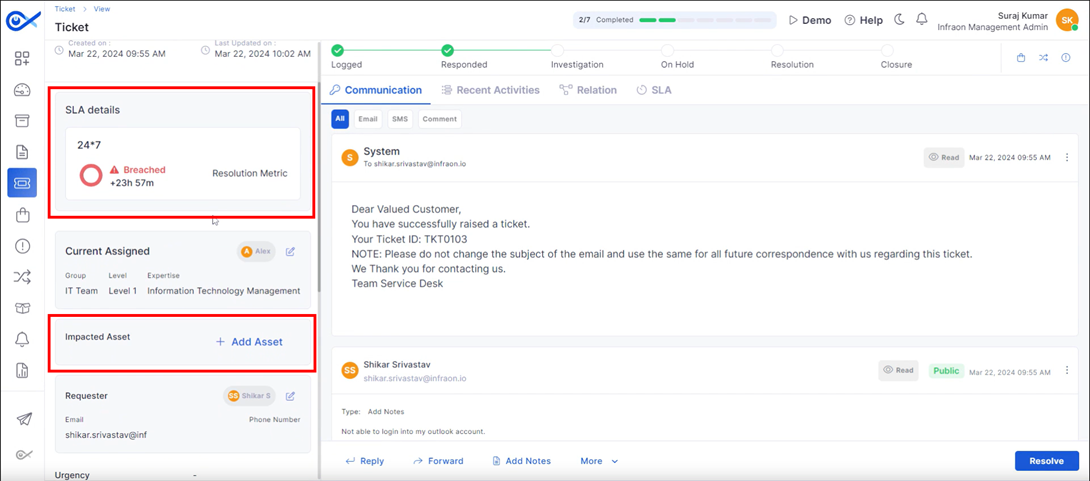
The edit page displays “SLA” metrics and assigned technician details. “Impacted assets” relevant to the ticket can also be linked within this section.
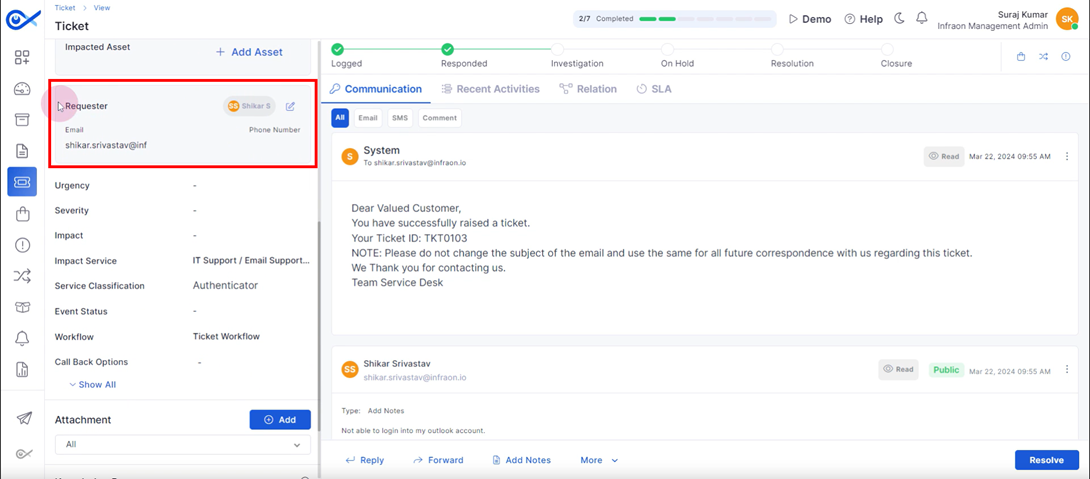
“Requester” information is accessible within the ticket details section, alongside urgency, severity, and impacted service data.
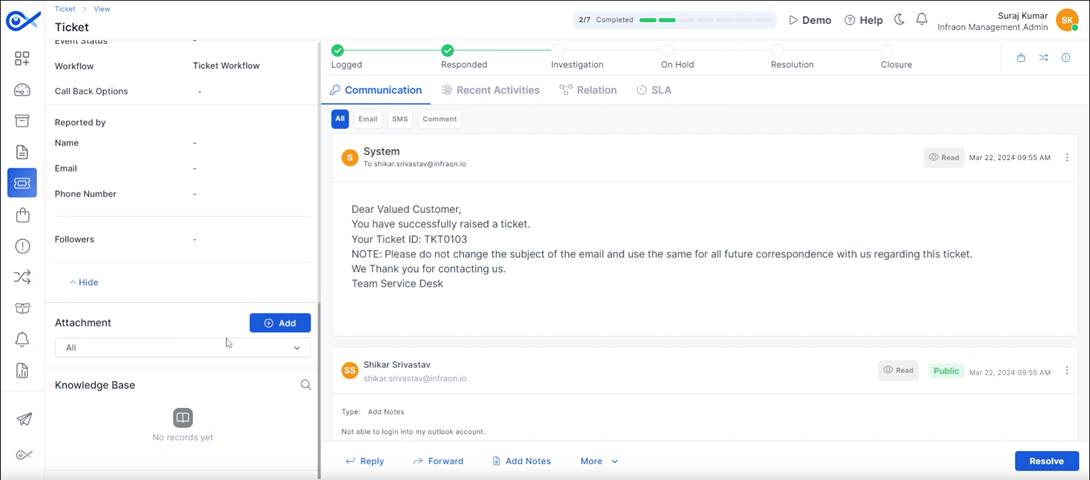
Relevant “Attachments” can be added directly within the ticket. Additionally, the “Communication” section provides a view of associated emails, SMS messages, and comments.
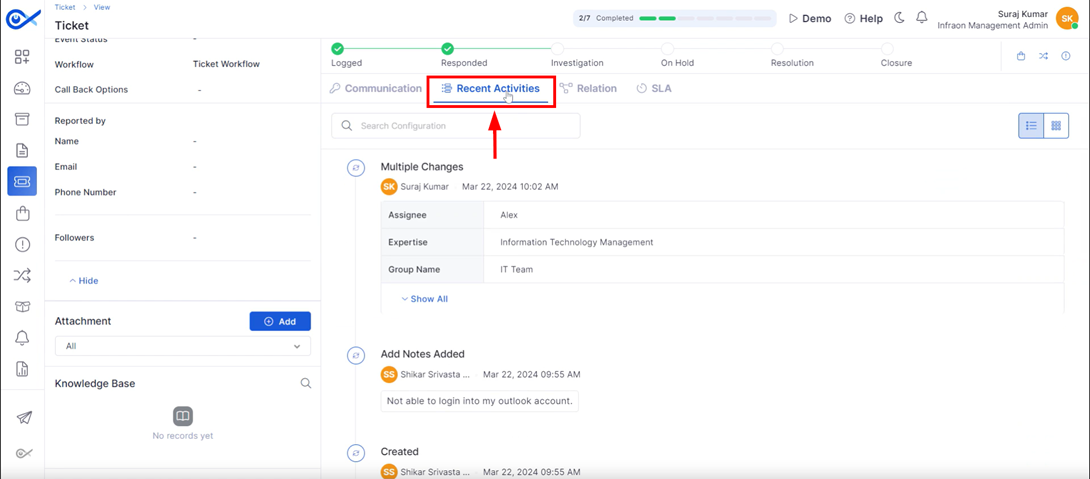
The "Recent Activities" section maintains a chronological record of modifications made to the ticket, providing transparency into the ticket's evolution.
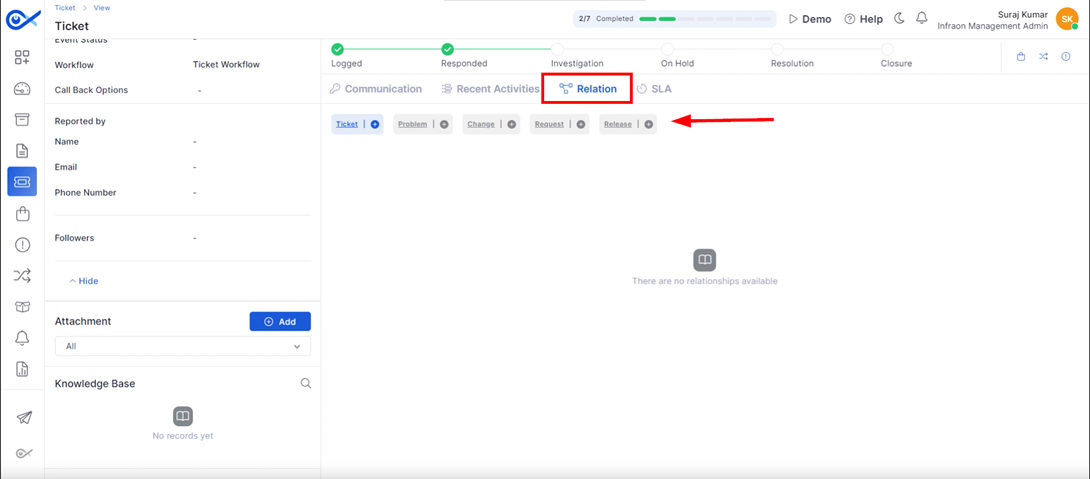
The "Relations" area facilitates the association of related problems or changes to the primary ticket, enabling comprehensive issue management.
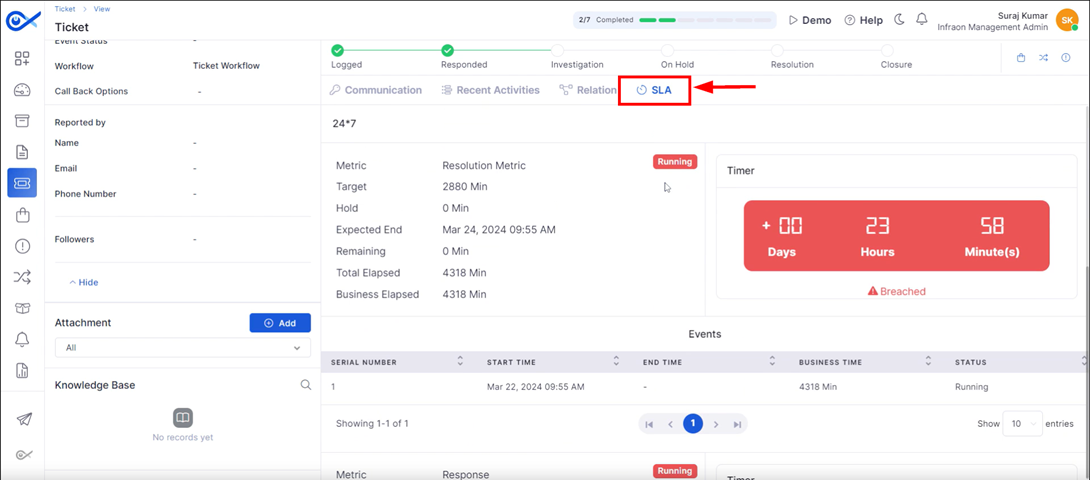
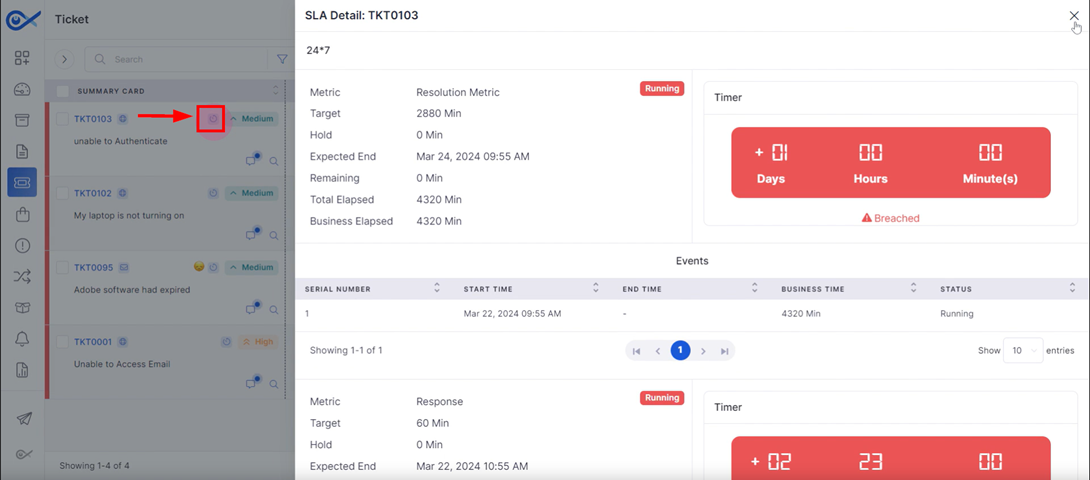
Real-time “Service Level Agreement (SLA)” metrics are readily accessible within the ticket interface, allowing for proactive monitoring of performance against agreed-upon service levels.
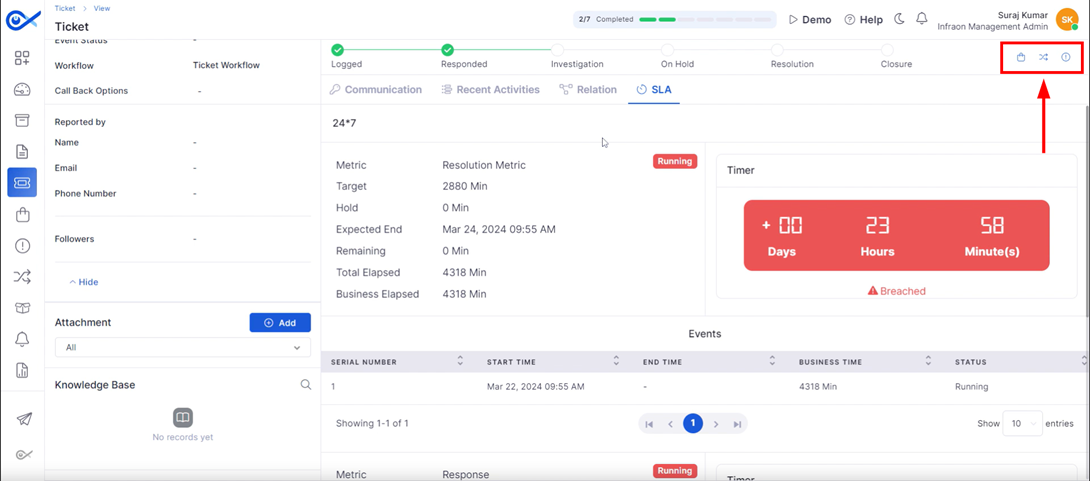
Technicians can Convert “Ticket to Request,” “Add Change,” or “Add Problem” here. Once the ticket is resolved, technicians can also convert it into a “Knowledge Base” article if needed. That concludes the overview of the ticket editing options.
Tickets can be deleted by clicking the designated “Delete” icon. To create a duplicate, utilize the “Copy” function. The copied ticket requires the addition of requester details and other relevant information before finalization.
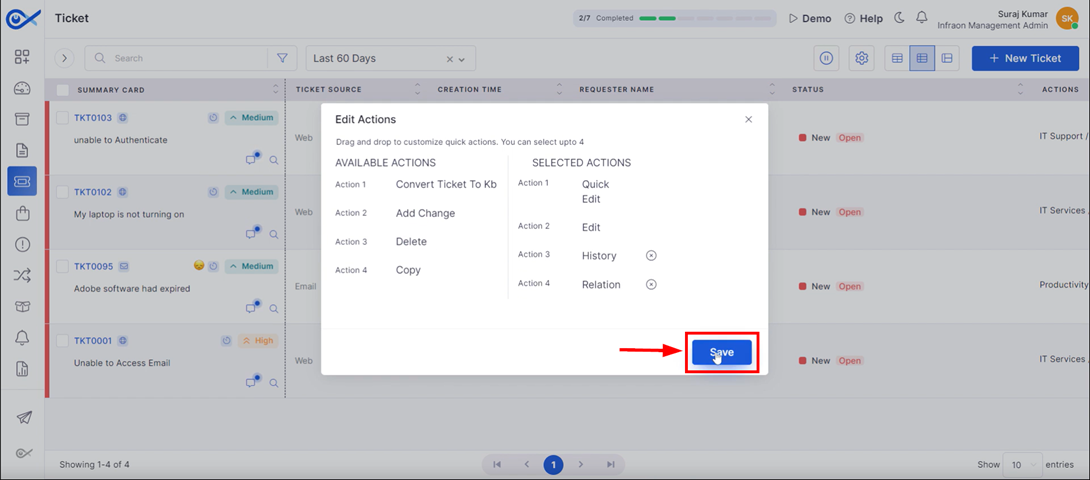
Customize action keys, navigate to the 'Quick Actions' menu and select “Edit Actions.” This allows for configuration, such as enabling a drag-and-drop function to view ticket history and related records.
The ticket summary card incorporates a “Ticket Source” metadata field, indicating the originating channel for the ticket, whether it be a web-based interface, email, or self-service portal.
The summary card includes an “SLA” indicator which, when clicked, expands to display detailed SLA information.
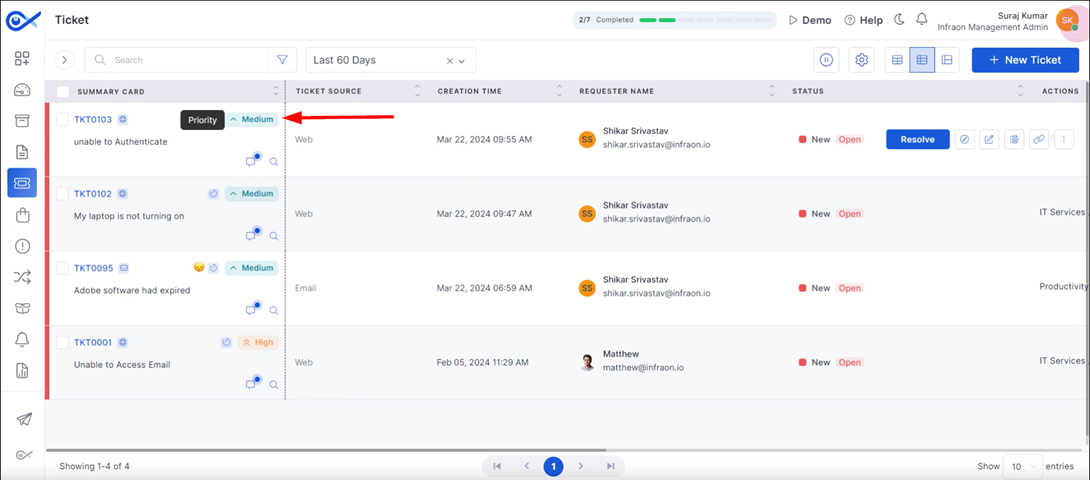
The summary card displays the ticket “Priority” adjacent to the SLA indicator.
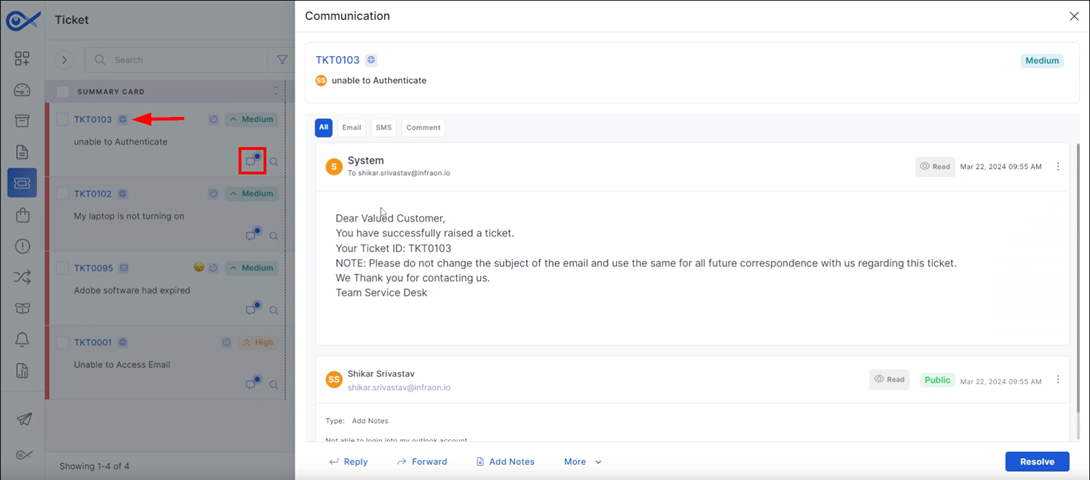
To initiate ticket-related communication, click on the “Ticket ID” to access the dedicated communication tab. This area provides a comprehensive view of all interactions associated with the ticket. Users can directly respond to the end-user, including adding a personalized signature, with new message notifications indicated by a blue pointer icon.
The “Search” icon enables ticket history analysis. Ticket creation initiates an automated emoji assignment process based on subject line content.
The "Show entries" option at the bottom of the page enables users to customize the number of tickets displayed per page, ranging from 10 to 200.
The “Views” pop-up, accessible via the right arrow icon located at the top left corner of the page, provides various ticket overviews for technicians. Technicians can analyze ticket counts by groups based on unsolved, unassigned, new tickets in the group, solved tickets, pending, unsolved, my group solved tickets, my approval, and unread message.
This concludes the complete details of the ticket management page.